How to Install: Crucial CT1000P3SSD8 Crucial SSD NVMe P3 User Guide

Content
Crucial CT1000P3SSD8 SSD NVMe P3
Introducing the high-performance NVMe SSD, the Crucial CT1000P3SSD8 is made to dramatically increase the speed and responsiveness of your computer. It provides enough storage space for your files, programs, and games with a 1TB capacity. It provides read and write speeds that are quicker than those of conventional SATA SSDs by utilizing the NVMe interface. This guarantees rapid boot times, swift file transfers, and seamless multitasking. The drive is a great option for upgrading your laptop or desktop for improved speed and efficiency because it is constructed using cutting-edge NAND technology for dependability and longevity.
Detailed Specifications
The Crucial CT1000P3SSD8 SSD NVMe P3 boasts impressive specifications that set it apart from the competition. Here are some of its key features:
- Up to 4TB of storage capacity
- NVMe PCIe 4.0 interface for lightning-fast transfer speeds
- Advanced LPN (Latency-Reducing Power Management) technology for improved performance
- Dynamic Write Acceleration technology for faster write speeds
- Up to 7000 TBW (Terabytes Written) for exceptional endurance and reliability
- SSD health monitoring and management software included
Description
The Crucial CT1000P3SSD8 SSD NVMe P3 is a high-performance NVMe PCIe 4.0 SSD that delivers lightning-fast transfer speeds and exceptional reliability. Its advanced LPN technology reduces latency and improves performance, while its Dynamic Write Acceleration technology ensures faster write speeds. With up to 4TB of storage capacity, this SSD provides ample space for all your files, applications, and games. Its SSD health monitoring and management software allows you to easily monitor and manage your SSD's performance, ensuring optimal operation at all times.
PREPARE
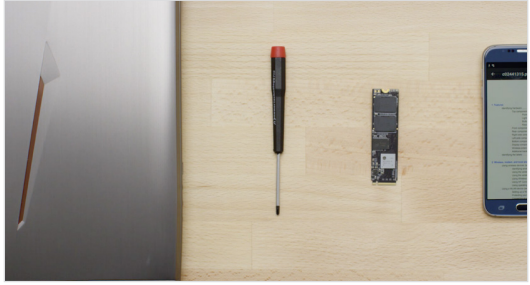
- Gather supplies
You’ll need your computer, a screwdriver, your new Crucial SSD, and your computer’s owner’s manual.
- Back up important files
Before starting the install process, save any important files on your computer to an external storage drive, a USB flash drive, or cloud storage.
- Go slowly and deliberately
The information you need is all here. Your computer will likely look different than the ones shown, but the process is the same. Read each step thoroughly and consult our Helpful Tips for more info.
HELPFUL TIP
NVMe SSD support and drivers are not available for Windows© 7. Your computer or motherboard manufacturer might be able to add support. There is also a hotfix available from Microsoft© that can be applied to natively support NVMe drives for Windows 7.
DID YOU KNOW...?
Clearing your workspace helps prevent the buildup of static electricity that could damage your new drive.
INSTALL
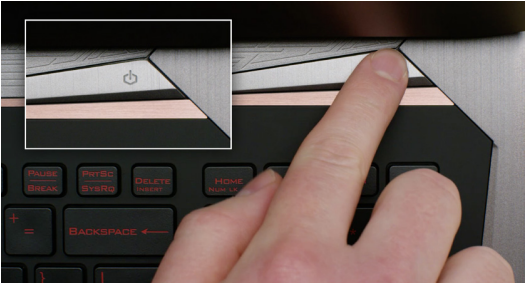
- Shut down your system
Turn off your computer completely.
- Remove the power cable and battery
Now remove the power cable and battery. The battery removal step applies only to laptops when it’s possible to remove the battery. To see how to remove the battery, refer to your owner’s manual.
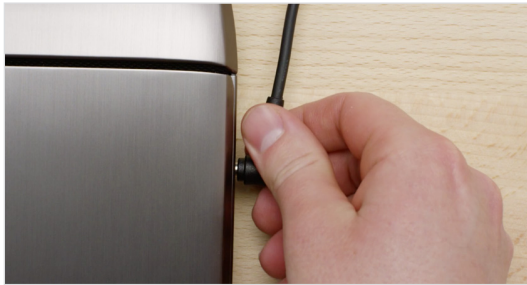
- Discharge residual power
If your laptop has a removable battery, remove it, and hold the power button for five seconds to discharge any electricity left in the system.
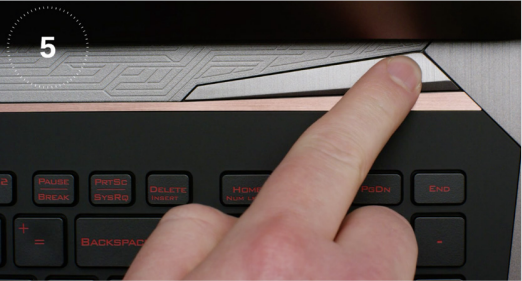
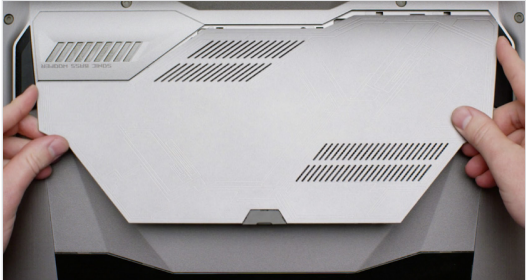
- Open the case
How you do this will vary from system to system, so consult your owner’s manual for exact instructions.

- Ground yourself
Touch an unpainted metal surface to ground yourself. This protects your computer’s components from the static electricity that’s naturally present in your body – grounding is an extra safeguard.
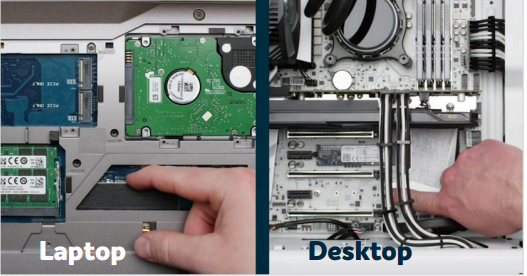
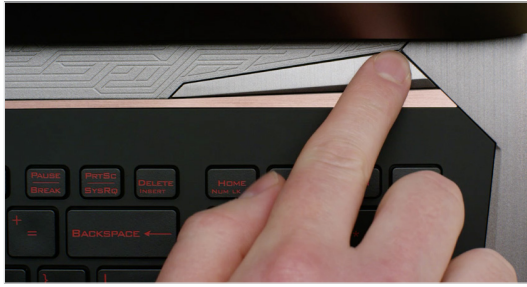
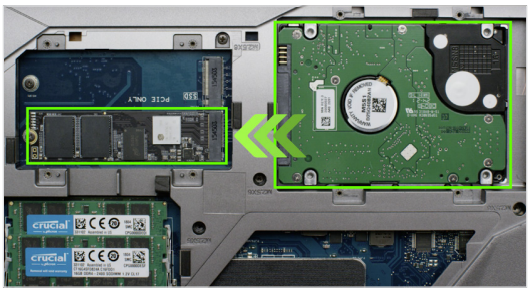
- Locate the M.2 PCIe slot
This slot is usually easy to find in desktops, but in laptops the location will vary – it’s typically under the bottom panel, or under the keyboard. Refer to your owner’s manual for the exact location, as every system looks slightly different.
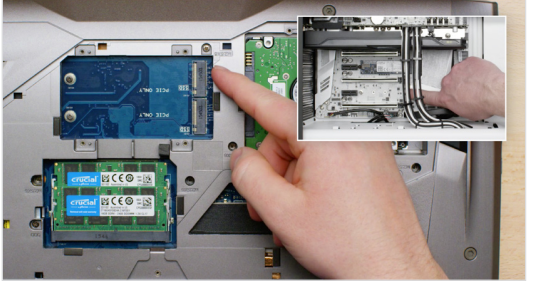
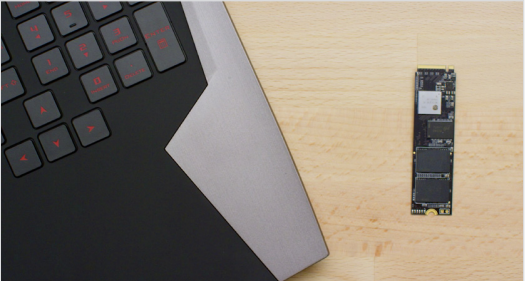
- Insert the SSD
- Depending on your computer, there might be a heat sink or screw that needs to be removed prior to inserting your new NVMe PCIe SSD. To insert your Crucial NVMe PCIe SSD, hold the SSD carefully by the sides. Do not touch the gold connector pins. Align the notches in the SSD with the ridges in the PCIe slot, then insert at a 30-degree angle. Do not force the connection.
To secure the drive, it might be necessary to insert the screw into the provided mount on the motherboard. Do not overtighten the screw.

- Reassemble your system
After the SSD is securely seated in the slot, put your computer back together and reconnect the battery if it was removed.
- Turn on your computer
Turn on your computer. Unless you removed your old storage drive in a previous step, the computer is booting from the old drive. Part 3 will walk you through how to clone your data to use your new drive to boot up.
HELPFUL TIP
With some motherboards, you might see some messages about configuring to increase speeds of NVMe SSDs or about enabling and disabling shared bandwidth of SATA and NVMe ports. This is not a malfunction. You can configure your hardware for optimal performance and avoid malfunctions by obtaining detailed information about your motherboard from the manufacturer.
DID YOU KNOW...?
The longest part of the SSD install process is copying everything from your old drive to your new SSD. Before you start, get a sense of how long this’ll take by referring to our chart on the left.
COPY
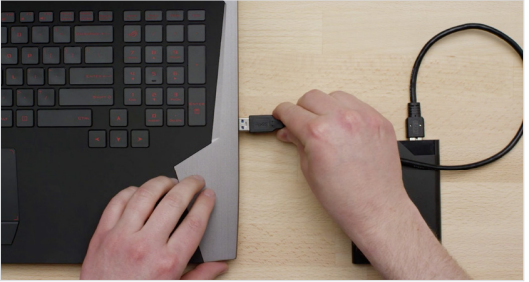
- Download the cloning software
On the computer with the SSD, go to https://www.acronis.com/en-us/promotion/crucialhd-download/ to download the software that will copy your old drive to your new SSD. This software comes free with Crucial SSDs.

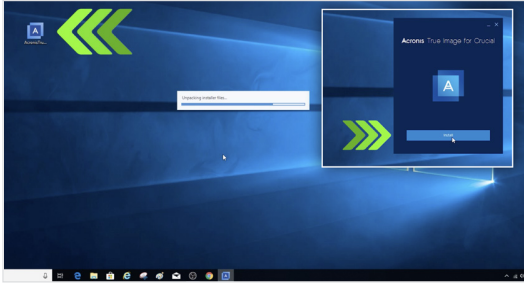
- Install the software you downloaded
Open the file you downloaded and accept all of the prompts. A screen will then pop up. Click Install. After installation is complete, start the application.
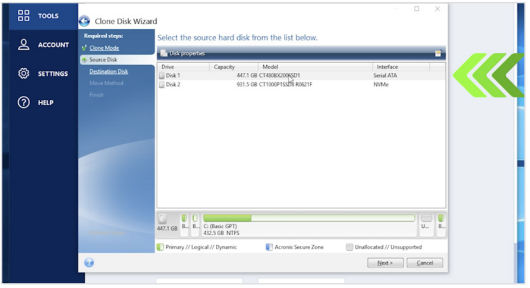
- Prepare to copy (clone) your data
You’ll now see several options in the software. Select the Clone Disk option. You’ll then be asked to select a clone mode. If you’ve never done this before, we recommend the Automatic method, then click the Next button.

HELPFUL TIP
If your old storage drive is 128GB (for example) and you copy its contents to a 275GB SSD, the SSD may show up in your system as a 128GB drive, even though it’s actually the size that you bought. No need to fear – you can still store more on it, but you’ll need to make some adjustments to the drive’s settings. This doesn’t usually happen, but if it does, we want to let you know that it’s OK and that it’s based on your system, not you.
DID YOU KNOW...?
Millions of people have used this software to copy data, from everyday home users with passwords and precious home photos to corporate users who have lots of proprietary information. The security and privacy of your data is important to us, and we don’t compromise that. Copying is a safe, secure process.
- Select source and destination drives
Your “source” drive is your existing drive (disk). Select it by clicking on it, then click Next. Now select your “destination” drive (your new SSD) and click Next. On the following screen, click Proceed to start copying your data.
- Wait for your data to copy
It’ll take a while for everything to copy, but the Acronis software will keep you updated on the progress.

- Change your primary or boot drive
When everything has copied over, you’ll need to tell your operating system to use your new SSD as the primary drive. This can be done by removing the old drive, which will force your system to use the new drive. Check your computer’s owner’s manual or contact the computer manufacturer for instructions on how to change the primary drive.
- Have some fun
See how fast your favorite apps open when you click on them! Your SSD is installed, but you can make it even faster by enabling a special feature.
DOWNLOAD
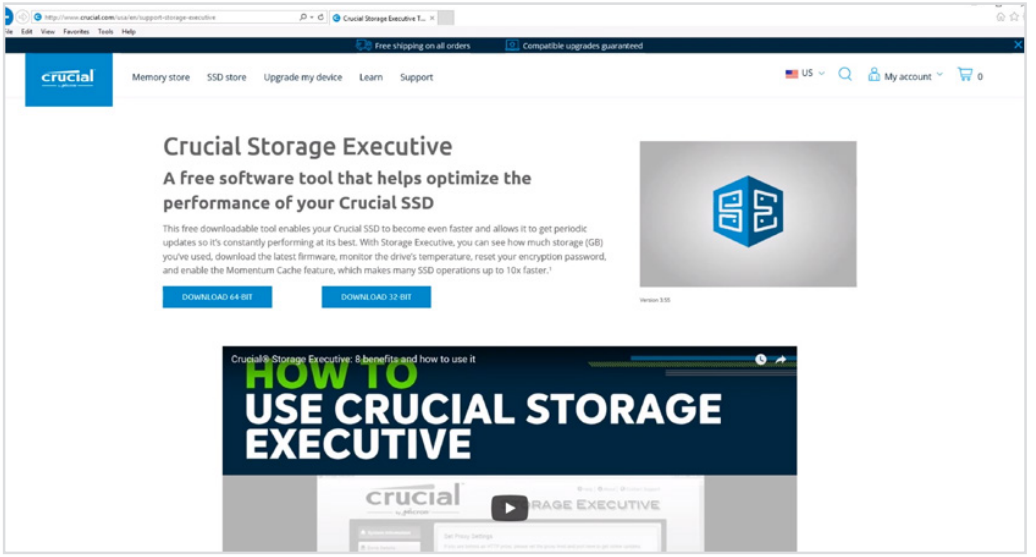
- Enable Storage Executive
- This free software enables your SSD to receive performance updates and to improve the performance of your new SSD by using system resources to increase performance.
- Click on one of the “Download” buttons
Download times will vary based on your internet connection, but average 1-3 minutes.
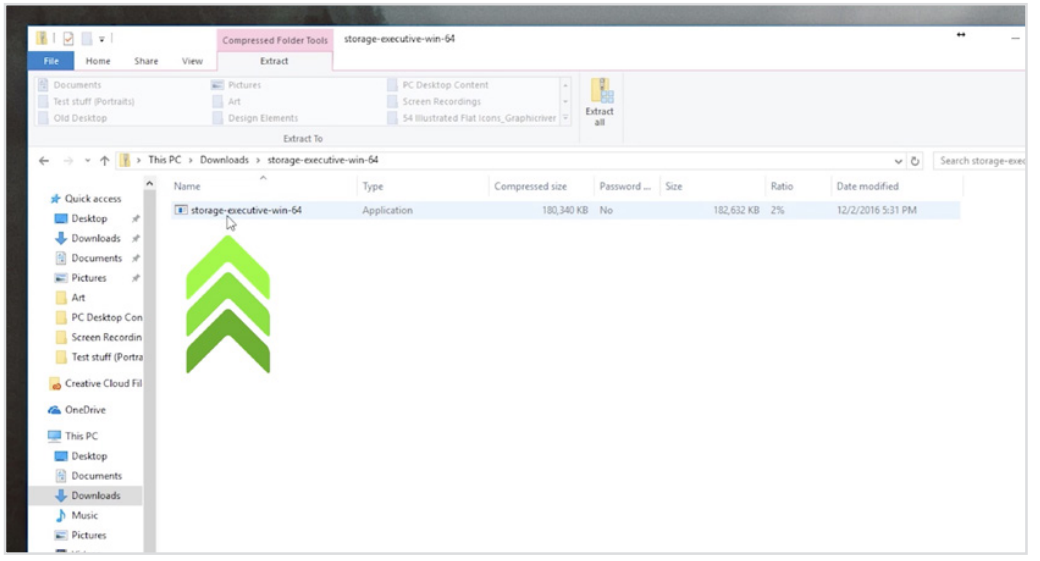
- Install and run Storage Executive
Click on the file you just downloaded. If it doesn’t open right away, double-click on it, then save it to your desktop and open it from there. Follow the onscreen prompts and instructions to install and start using the software.
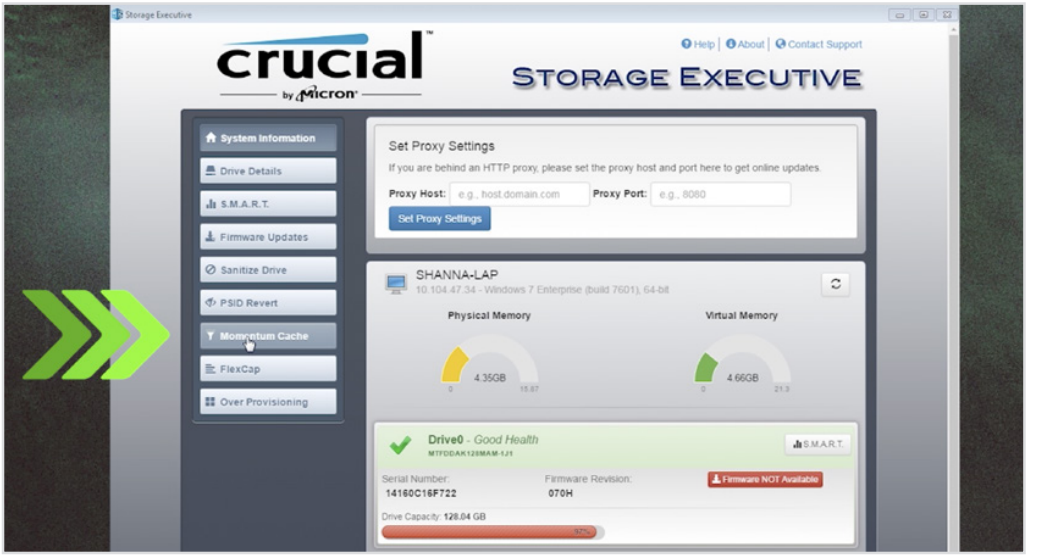
- Enable Momentum Cache and make your SSD even faster
In the left menu, click on Momentum Cache. Enabling this feature forces your computer to restart, which is normal. The feature doesn’t work with RAID arrays.
HELPFUL TIP
Download the 64-bit version of the software if you have a 64-bit operating system (most users). Download the 32-bit version if you have a 32-bit operating system. Not sure which one you have? Follow the steps in our chart below.
Operating System
How to know if you have the 32-bit or 64-bit version?
- Windows 10
- In the Start menu, type This PC into the Windows search bar, but don’t hit enter. Right click on the This PC option that displays, then select Properties and your type of operating system will be displayed onscreen.
- Windows 8
- Move your mouse to the upper right side of the screen and click on the search tool that appears.
- Type Computer into the search field, then right click on it and select Properties. Your type of operating system will be displayed onscreen.
- Windows 7
- In the Start menu, right click on Computer, then select Properties and your type of operating system will be displayed onscreen.
- If you see anything other than 64-bit, download the 32-bit version of the software.
DID YOU KNOW...?
You can use Storage Executive to see how much storage you’ve used, monitor your drive’s temperature, and enable the Momentum Cache feature, which makes many SSD operations up to 10x faster.
Setup Guide
Setting up the Crucial CT1000P3SSD8 SSD NVMe P3 is a breeze. Simply insert the SSD into an available M.2 slot on your motherboard, connect the SATA power cable, and install the SSD health monitoring and management software. Once installed, format the SSD and transfer your files and applications. The SSD is compatible with Windows, Mac, and Linux operating systems, making it a versatile solution for any setup.
Troubleshooting
While the Crucial P3 is a reliable and high-performance SSD, there may be occasional issues that arise. Here are some common problems and solutions:
- If the SSD is not recognized by your system, ensure that it is properly inserted into the M.2 slot and that the SATA power cable is connected.
- If the SSD is running slowly, ensure that it is not overloaded with files and applications. Use the SSD health monitoring and management software to monitor the SSD's performance and adjust settings as needed.
- If the SSD is experiencing high temperatures, ensure that it is properly ventilated and that there is adequate airflow in your system.
Crucial CT1000P3SSD8 SSD NVMe P3 Pros & Cons
Pros
- Lightning-fast transfer speeds
- Excellent reliability and endurance
- Ample storage capacity
- SSD health monitoring and management software included
Cons
- May be more expensive than other SSDs on the market
- Requires an available M.2 slot on your motherboard
Customer Reviews
Customers have praised the Crucial CT1000P3SSD8 SSD NVMe P3 for its exceptional speed, reliability, and capacity. Many have noted the significant improvement in performance compared to their previous SSDs. However, some have expressed concerns about the cost, especially for those with limited budgets.
Faqs
What is the Crucial CT1000P3SSD8 SSD NVMe P3 storage capacity?
What interface is utilized by the Crucial?
What are the Crucial NVMe P3's read and write speeds?
Are desktop and laptop computers compatible with the Crucial?
Is encryption supported by the Crucial NVMe P3?
What is the Crucial CT1000P3SSD8 SSD's form factor?
Can PCIe Gen 4 be used with the Crucial NVMe P3?
What kind of NAND is used in the Crucial CT1000P3SSD8 SSD NVMe P3?
What are the ways in which the Crucial CT1000P3SSD8 SSD enhances system performance?
What warranty does the Crucial CT1000P3SSD8 have?
Leave a Comment