Cuisinart Classic 7-Cup Food Processor DLC-10S Instruction Manual
Content
Cuisinart Classic 7-Cup Food Processor DLC-10S Introduction
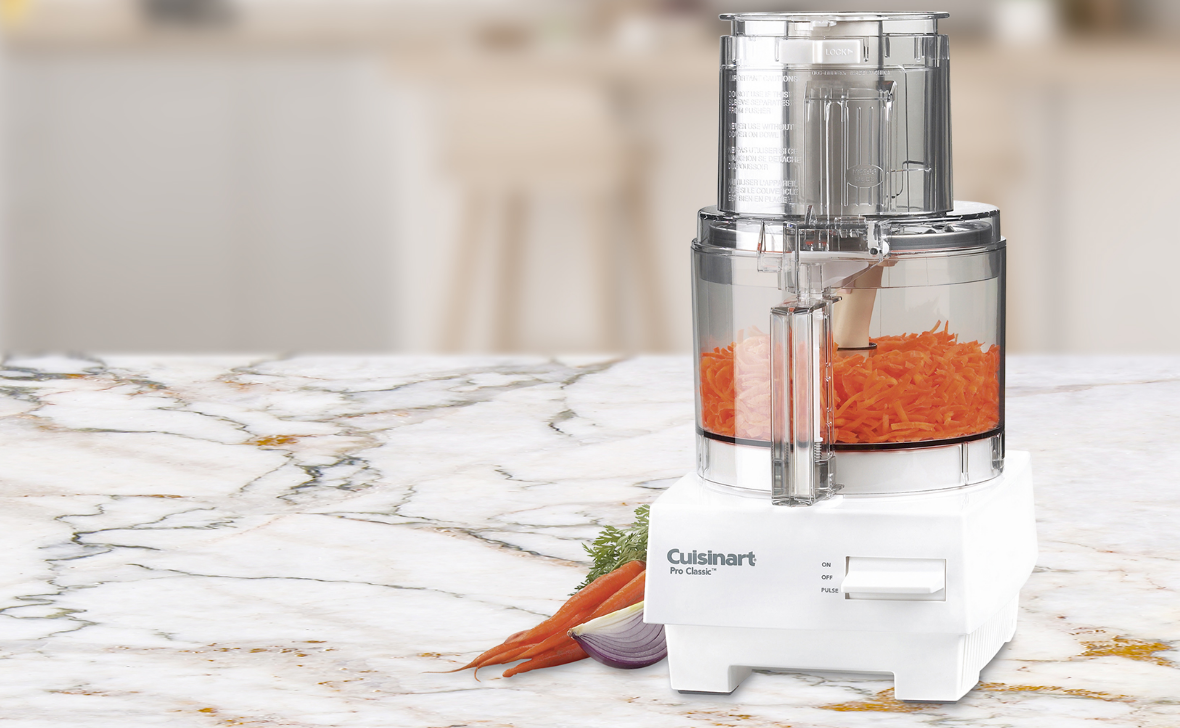
A multipurpose kitchen tool that makes food preparation easier is the DLC-10S. This food processor is ideal for slicing, shredding, chopping, blending, and pureeing a wide range of ingredients because of its strong motor and large capacity. The 7-cup work bowl is perfect for everyday cooking and entertaining because it can handle both little and large batches. The Cuisinart Classic 7-Cup Food Processor promises effective and reliable results every time with its sturdy stainless steel blades and user-friendly design, improving your cooking experience.
Parts Included
Your Cuisinart DLC-10S or DLC-10C will look like this after you follow the easy step-by-step assembly instructions inside.
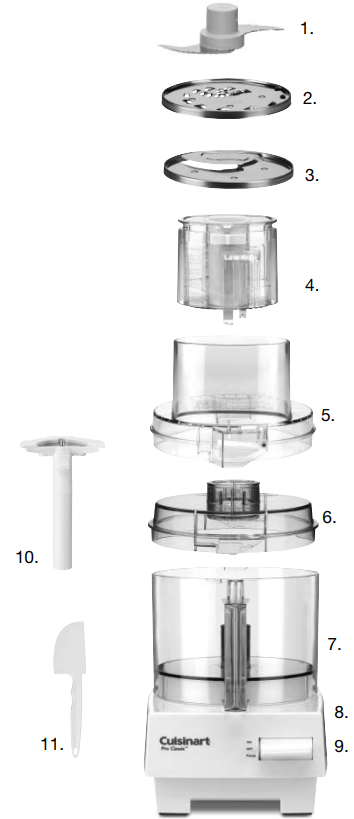
- Chopping/Mixing/Dough Blade
- Shredding Disc
- Slicing Disc
- Feed Tube
- Work Bowl Cover
- Flat Cover
- Work Bowl
- Motor Base
- Control Switch
- Stem Adapter
- Spatula
Detailed Specifications
The Cuisinart Classic 7-Cup Food Processor DLC-10S comes with the following key features:
- 7-cup work bowl
- Extra-large feed tube
- Integrated stainless steel blade system
- Touchpad controls with pulse feature
- BPA-free
- Dishwasher-safe parts
- 1-year limited warranty
Description
To make food preparation simple and quick, Cuisinart created the Classic 7-Cup Food Processor DLC-10S. Its oversized feed tube can hold huge food pieces, negating the necessity for labor-intensive dicing and slicing. A touchpad with a pulse feature and integrated stainless steel blade system guarantee uniform chopping, mixing, or puréeing of all components, enabling precise and personalized results. The food processor's dishwasher-safe components and BPA-free work bowl make cleanup simple, and its one-year limited warranty gives customers piece of mind.
Instructions for Use Cuisinart Classic 7-Cup Food Processor DLC-10S
- Put base on counter, with nameplate facing you. Pick up work bowl, with handle facing you, and place it on base with handle at about 7 o’clock.
- Turn work bowl counterclockwise until it clicks.
- Place metal blade over shaft matching outline on top of the hub to the same shape on shaft. Lower blade will almost touch the bottom of the bowl.
- Put cover on work bowl, with feed tube at about 7 o’clock. Turn cover counterclockwise until it fits into position.
- The pusher assembly slides over the large feed tube. It has a large pusher and a small pusher. Push the small white pusher all the way down until it twists it to lock. Push the large pusher all the way down and push the white Slide Lock right to lock.
- Hold pusher with white Slide Lock toward you. Slide pusher over feed tube on cover and push locking tab down until locking tab clicks. CAUTION: Machine must be unplugged when you practice locking and unlocking the pusher. Repeated locking and unlocking with the machine plugged in is never necessary in normal use and will make the machine inoperable.
- Plug machine in. Move control switch to the ON position to start the motor. Move control switch down to the OFF position to stop the motor. Move control switch to the PULSE position and release it for pulse/chopping. If the machine doesn’t start, make sure it is plugged in and the work bowl, cover, and pusher assembly are locked in position.
- To remove the cover, hold pusher assembly with thumb away from two locking tabs. Turn clockwise, and lift. The work bowl won’t come off until the cover is unlocked.
Instructions for Slicing and Shredding
- Lock bowl in place.
- Place disc, cutting side down, on a flat, stable surface and hold it down firmly with one hand. With the other hand, line up two symbols (o and Δ) on the stem with similar symbols on disc. Turn stem clockwise until it clicks into position.
- Place disc over shaft, matching outline on its top to the same shape on shaft. Without touching the blade edge, push disc down as far as it will go.
- Put cover on bowl, feed tube at 7 o’clock, and turn clockwise until it clicks. Insert food in feed tube.
- Twist small pusher to lock it and push Slide Lock to the left to unlock pusher sleeve. Slide large pusher sleeve over feed tube and push all the way down until tabs click into place.
- Apply even pressure to large pusher while holding the lever down at PULSE position, and push food through.
- To remove the pusher assembly, hold it with thumb on large tab. Press firmly on tab and lift straight up. Cover will stay in place, allowing you to reload the feed tube.
- To remove disc from stem, slide the button up as far as it will go and turn the stem counterclockwise.
Practicing with Food
Try chopping some practice foods before you process food to eat. A zucchini or potato is a good choice. First cut it into 1-inch pieces. Insert the metal blade and put pieces into the work bowl. Put on the cover and the pusher assembly; press the pusher assembly down to lock it into place. Press the lever down to PULSE and release it. Repeat two to three times and see what happens. Each time the blade stops, let the pieces drop to the bottom of the bowl before you pulse again. That puts them in the path of the blade each time the motor starts. Using the pulse/chopping technique, you can get an even chop without danger of over-processing. Check the texture frequently by looking through the cover of the work bowl. If you want a finer chop, keep pressing the lever down to PULSE and releasing it until you achieve that desired texture. Onions and other foods with a high water content will quickly end up as a purée unless examined after each pulse to make sure it is not over-processed. Try chopping other food, like meat for hamburger and sausage. Then make mayonnaise, pastry, or bread, as described in the recipes in this book.
To obtain consistent results:
- Be sure all the pieces you add to the bowl are the same size.
- Be sure the amount of food is no larger than recommended.
Removing Processed Food
- Before you do anything, wait for the blade to stop spinning. When it does, remove the cover first. You can remove the cover and pusher assembly in one operation.
- Hold the pusher assembly with your thumb away from the descending tabs and turn it clockwise. Lift it off, and the cover will come with it. Never try to remove the cover and the work bowl together; this can damage the work bowl.
- Remove the bowl from the base of the machine before removing the blade. This creates a seal to prevent food from leaking. Turn the bowl clockwise to unlock it from the base and lift it straight up to remove it.
- To prevent the blade from falling out of the work bowl onto your hand, be sure your hands are dry.
- Remove the metal blade before tilting the bowl, using a spatula to scrape off any food sticking to it. Or insert your finger through the hole in the bottom of the work bowl, gripping the blade from the bottom, and grip the outside of the work bowl with your thumb. Or hold the blade in place with your finger or a spatula while pouring out processed food.
Chopping and Puréeing with Metal Blade
To chop raw fruits and vegetables: First cut the food into 1-inch pieces. You can get a more even chop when all pieces are about the same size. Put no more than 2 cups of food into the work bowl. Lock the cover and pusher assembly in place. Press the lever down to PULSE and release it, repeating at the rate of 1 second on, 1 second off, until the food is chopped. Check frequently to avoid over-processing. Use the spatula to scrape down any pieces that stick to the sides.
To purée fruit and cooked vegetables: First, cut the food into 1-inch pieces. You get a smoother purée faster when all the pieces are about equal in size. Put no more than 2 cups of food in the work bowl. Lock the cover and pusher assembly in place. Pulse to chop coarsely, then move the lever up to ON and process continuously until the food is puréed. (NOTE: Cooked potatoes are an exception to this procedure. They develop a gluey texture when processed with the metal blade. See the recipe for mashed potatoes at the end of the book.)
- When making soup, you will want to purée vegetables that have cooked in liquid. Don’t add the liquid to the work bowl–just the cooked vegetables; remove them with a slotted spoon. They will purée faster and smoother without liquid. After processing, add just enough liquid to make the purée pourable, return it to the soup liquid, and stir to combine.
- Occasionally, a piece of food may become wedged between the blade and the work bowl. If this happens, remove the cover, lift the blade out carefully and remove the wedged piece. Empty the bowl, reinsert the blade, and lock the cover and the pusher assembly into place, first removing the small pusher. Move the lever up to ON and drop the food piece through the small feed tube while the machine is running. Add the remaining food to the bowl and process the usual way.
Techniques for Chopping and Puréeing with Metal Blade
- To chop hard food like garlic and hard cheese: Remove the small pusher, press the ON lever and drop the food through the small feed tube while the machine is running. Small foods like garlic can be dropped in whole. Large foods like hard cheese should be cut into 1-inch pieces. This method of processing minces garlic, shallots, and onions. Hard cheese and coconut will have the same texture as if they had been hand-grated. IMPORTANT: Never try to process cheese that is too hard to cut with a knife. You may damage the blade or the machine.
- To chop parsley and other fresh herbs: The herbs, the work bowl, and the metal blade must all be thoroughly cleaned and dry. Remove stems from herbs. Add leaves to the bowl and process until they are chopped as fine as you want. The more herbs you chop at a time, the finer chop you can obtain. If completely dry when chopped, parsley and other herbs will keep for at least 10 days, stored in an airtight bag in the refrigerator. They may be frozen for months, stored in an airtight container or bag.
- To chop peel from citrus fruits or to chop sticky fruits like dates or raisins: For citrus, remove the peel with a vegetable peeler, leaving on the white pith, which is bitter tasting. Cut the peel into lengths of 2 inches or less and process with ½ cup granulated sugar until finely chopped. This may take 2 minutes or longer. For sticky fruits like dates, raisins, prunes, and candied fruit, first freeze the fruit for about 10 minutes. Add to it some of the flour called for in the recipe. Use no more than 1 cup of flour for each cup of fruit.
Compact Flat Cover
- Use the compact cover for added convenience when your recipe calls for chopping, mixing, puréeing, and kneading. It is particularly useful when preparing baked goods such as cakes, cookies, pies, and bread.
- To assemble the compact cover: Begin with the work bowl and the metal blade or whisk attachment in place. Place the compact cover on the work bowl so that the Cuisinart logo written on the cover is face up and readable. Then turn the cover counterclockwise to lock it into place.
- To disassemble the compact cover: Place one hand near the Cuisinart logo and the other hand on the opposite end of the cover; turn the cover clockwise. Lift the cover up and off the work bowl.
Setup Guide
To set up the Cuisinart Classic 7-Cup Food Processor DLC-10S, follow these steps:
- Wash and dry all removable parts before using them for the first time.
- Place the food processor base on a flat and stable surface.
- Attach the work bowl to the base by aligning the tabs on the bowl with the slots on the base.
- Insert the stainless steel blade into the bottom of the work bowl.
- Lock the lid in place by turning it clockwise until it clicks.
- Plug in the food processor and select the desired speed or pulse setting.
Chopping and Puréeing with Metal Blade
- To chop meat, poultry, fish, and seafood: The food should be very cold, but not frozen. Cut it into 1-inch pieces to ensure an even chop. Process no more than 2½ cups (1¼ pounds) at a time. Press the lever down to PULSE and release it, repeating 3 or 4 times at a rate of 1 second on, 1 second off. If the food is not chopped fine enough, let the processor run continuously for a few seconds. Check the texture often to avoid over-processing. Use a spatula to scrape food from the sides of the bowl as necessary.
- To purée meat, poultry, fish, and seafood: Prepare the food as described above. Pulse until it is evenly chopped, then process continuously to the desired texture. Scrape the bowl with a spatula as needed. Leave the purée in the work bowl and add eggs, cream, and seasoning as called for by the recipe. Process to combine thoroughly. Remember, you control texture by the length of time you process. By varying the processing time, you can get a range of textures suitable for hamburgers, hash, stuffed peppers, rough pâtés, or smooth mousses.
- To chop nuts: Chop no more than 2 cups at one time. Press the lever down to PULSE and release it, repeating several times. Check frequently to avoid letting powdered nuts clump together in a nut butter. When a recipe calls for flour or sugar, add some to the nuts before you chop them—about ½ cup for each cup of nuts. This allows you to chop the nuts as fine as you want without turning them into a nut butter. You can also chop nuts with a shredding disc. The optional Fine Shredding Disc is particularly good.
- To make peanut butter and other nut butters: Process up to 2 cups of nuts. Let the machine run continuously. After 2 or 3 minutes, the ground nuts will form a ball that will gradually smooth out. Scrape the sides of the bowl and continue processing until drops of oil are visible. Taste for consistency. The longer you process, the softer the butter will be. For chunky style, add a handful of nuts just after the ball of nut butter begins to smooth out. To make cashew butter, add a little bland vegetable oil. Processor nut butters contain no preservatives. Store in the refrigerator to keep them without separating.
- To make flavored butters, spreads, and dips: Cut room-temperature butter into tablespoon-size pieces. Process flavoring ingredients first—anchovies, cheese, herbs, etc.—chopping them fine. Be sure the work bowl is clean and dry. Add small, hard ingredients like garlic and hard cheese through the feed tube while the machine is running. Next, add the butter and process until smooth. Add any liquid ingredients last, while the processor is running, and process just long enough to blend. Process ingredients for spreads and dips in the same way. They should be at room temperature and cut into 1-inch cubes, or added by tablespoonfuls.
- To make mayonnaise: The work bowl and metal blade must be clean and dry. Use one large whole egg, or the yolks from two large eggs. Mayonnaise made from yolks will almost be as thick as butter. You should be able to add 2⁄3 cup of oil for each yolk or 1¼ cups for a whole egg. Process the yolks or egg with salt, mustard, and 2 tablespoons of vegetable oil for at least 30 seconds. Then, while the machine is running, pour ¼ cup of oil into the small pusher. After it dribbles through the pinhole at the bottom, remove the small pusher and slowly add the remaining oil while the machine runs. See the recipe at the back of this book.
- To beat egg whites: Use this method only for recipes that can be done almost entirely by a food processor. The work bowl must be absolutely clean. Add 3 or more egg whites and press the ON lever. Add about 1 teaspoon of lemon juice or vinegar for every egg white. Vinegar makes stiffer whites; its flavor is hardly detectable in cakes, soufflés, and ice creams. Continue processing until the egg whites hold their shape – about 1½ to 2½ minutes. For the lightest, fluffiest egg whites, use the Whisk Attachment, which is an optional attachment for the Pro Classic™ Food Processor.
- To whip cream: Processor whipped cream holds its shape very well. It is good for decoration or as a topping for gingerbread, berries, or other desserts. It will not whip to the light, fluffy consistency obtained by methods that beat in more air. Use the optional Whisk Attachment for the fluffiest whipped cream. Chill the cream well before starting. Process continuously until it begins to thicken. Then add sugar as desired and continue processing, watching carefully until the cream reaches the desired consistency. For consistently reliable results, add 2 tablespoons of non-fat dry milk for every cup of cream, before whipping.
- To make crumbs and crumb crusts: Cut out or break bread, crackers, or cookies into pieces and put them in the work bowl. Process continuously until they reach the desired texture. For seasoned crumbs, chop the parsley or other fresh herbs with the crumbs. For buttered crumbs, process until the dry crumbs are the desired texture, then dribble melted butter through the small feed tube while the machine is running. For crumb crust, process crackers or cookies as described above. Add sugar, spices, and butter, cut into pieces, as specified by your recipe. Process until well combined.
- To make pastry: This describes a general procedure. A recipe giving exact proportions is in the back of this book. Combine unbleached, all-purpose flour, salt, and pieces of very cold or frozen butter in the work bowl. Process to the consistency of cornmeal. While the machine is running, start pouring ice water through the feed tube, a tablespoon at a time. Stop processing as soon as the dough begins to form a ball, to ensure tender, flaky pastry. Use the dough immediately or form it into a round disk about 1 inch thick. Wrap in plastic and refrigerate or freeze for later use.
- To make quick breads and cakes that use baking powder and/or soda: The most important rule for success is not to overmix after the flour is added. The ingredients for these soft doughs should be cold. If the recipe calls for chopped ingredients like lemon peel or nuts, chop them first while the work bowl is clean and dry. Then set them aside until needed. (Always use sugar when chopping lemon peel.) Put dry ingredients like flour, salt, and leavening in the work bowl and process with the metal blade for 5 seconds to mix them. Remove and reserve the dry ingredients. Add the eggs and sugar to the work bowl and process to mix, letting the machine run about 1 minute. Next, add butter at room temperature, cut into 1-inch pieces. Let the machine run continuously for 1 minute, until the butter is thoroughly mixed with the eggs and sugar. Then add flavoring and liquid—vanilla, spices, cocoa, etc., and process until mixed. Add the dry ingredients to the work bowl. Process by pulsing, inspecting after each pulse. Stop pulsing as soon as the dry ingredients have almost disappeared into the batter. Over-processing will cause quick bread and cakes to be tough. (If your recipe calls for ingredients that are coarsely chopped—like raisins or nuts–add them last with the mixed dry ingredients.)
- To make cake mix: Your food processor work bowl is large enough for the preparation of a 15.25 oz. packaged cake mix. Insert the metal blade and add the cake mix to the work bowl. While the machine is running, add the eggs and liquid through the small feed tube and process for 5 seconds. Scrape down the side of the work bowl and process again for 1 minute for maximum volume. Do not remove the metal blade. Insert a finger into the underside of the blade from the bottom of the work bowl to hold the blade in place while emptying the batter. TIP: After emptying cake batter or puréed soup from the work bowl, replace the bowl on the motor base. Insert the metal blade and pulse once. Centrifugal force will spin the batter off the blade onto the side of the work bowl. Remove the blade, and use the spatula to scrape remaining batter from the bowl.
Troubleshooting with Typical Bread Doughs
- Blade doesn’t incorporate ingredients
Always start the processor before adding liquid. Add liquid in a slow, steady stream, only as fast as dry ingredients absorb it. If you hear liquid sloshing, stop adding it, but do not turn off the machine. Instead, wait for the ingredients in the work bowl to have mixed, then add the remaining liquid slowly. Pour liquid onto the dough as it passes under the feed tube; do not pour liquid directly onto the bottom of the work bowl. - Blade rises in the work bowl
Blade may not have been pushed down as far as it will go before processing started. Excessively sticky dough can cause the blade to rise even though it cleans inside the work bowl. If the dough feels very sticky, reinsert the blade and immediately add 2 tablespoons of flour through the feed tube while the machine is running. - Dough doesn’t clean inside of the work bowl
- Amount of dough may exceed the maximum capacity of your food processor. Remove half and process in two batches.
- Dough may be too dry. If it feels crumbly, add water–1 tablespoon at a time–while the machine is running, until the dough becomes moist and cleans inside of the work bowl. Wait 10 seconds between additions of water.
- Dough may be too wet. While the machine is running, add 1 tablespoon of flour. If necessary, add more – 1 tablespoon at a time–until the dough cleans inside the work bowl and forms a ball.
- Nub of dough forms on top of blade and does not become uniformly kneaded: Stop the machine, carefully remove dough, divide it into 3 pieces and redistribute them evenly in the work bowl. Continue processing until the dough is uniformly soft and pliable.
- Dough feels tough after kneading: Divide the dough into 2 or 3 pieces and redistribute evenly in the work bowl. Process 10 seconds or until uniformly soft and pliable.
- Soft dough or liquid leaks onto the base of the food processor
Always start the processor before adding liquid and add liquid only as fast as dry ingredients absorb it. - Motor stops:
- Pusher assembly may have become unlocked. Push down the pusher sleeve to lock it into place and continue processing.
- Cover may have become unlocked. Lock cover and continue processing.
- Power cord may have become unplugged. Plug the machine back in and continue processing.
- Excessive strain may have caused the motor to overheat and stop. Wait for the motor to cool off, 5–10 minutes. A safety protector in the motor prevents it from excessive overheating. If the motor stops, turn the machine off. After 5–10 minutes, divide dough into 2 batches and complete processing. Pinch the dough to make sure that it is not too stiff to knead comfortably by hand. If it is, add liquid—1 teaspoon at a time—until dough is sufficiently moist to clean inside the work bowl.
- Dough doesn’t rise: We recommend that you always test the activity of yeast before using it by stirring it and at least ½ teaspoon sugar into about 1⁄3 cup of warm liquid. Within 10 minutes foam should develop, indicating yeast is active. Do not use dry yeast after the expiration date on the package. Avoid killing yeast cells by dissolving yeast in too warm water or overheating dough by excessive kneading. Dissolve yeast in about 1⁄3 cup warm liquid at 105–120 degrees F. All other liquids should be cold. Do not knead so long that it becomes overheated. The ideal temperature for kneaded dough is 80 degrees. It should never exceed 100 degrees. Let the dough rise in a draft-free environment of about 80–90 degrees F.
- Baked bread is too heavy
Next time, feel the dough to be sure it is uniformly soft, pliable, and slightly sticky before setting it aside to rise. Let the dough fully double in bulk in the bowl or bag, punch it down, then let it double up again after it is shaped.
Troubleshooting with Typical Sweet Doughs
- Motor slows down
- Amount of dough may exceed the maximum capacity of your food processor. Remove half and process in 2 batches.
- Don’t process too long after all the ingredients are incorporated. These rich doughs will give you good results after only 30 seconds of kneading.
- Blade doesn’t incorporate ingredients
- Butter or margarine, if not melted, must be cut into tablespoon-size pieces before added to the work bowl.
- Metal blade rises in the work bowl
- Blade may not have been pushed down as far as it will go before processing started. The machine may be overloaded. Stop it, remove half of the dough and process in 2 batches.
Preparation for Slicing and Shredding
- Round fruits and vegetables: Before processing onions, apples, and other large, round fruits and vegetables, trim them with a knife. Cut the bottom end flat, to make the food lie stable on the disc. Place the food in the feed tube, flat side down. Position it as far right as possible, to prevent it from tilting when being processed. Choose fruits that are firm and not too ripe. Always remove large hard pits and seeds from fruits before processing. Seeds from citrus fruits need not be removed. You may remove the rind before slicing or shredding or leave the rind on.
- Whole peppers are the exception: Remove the stem and cut the stem end flat. Remove the core and scoop out the seeds. Leave the end opposite the stem whole, to keep the structure stiff. This ensures round, even slices.
- Large fruits like pineapple and cantaloupe: Cut them in half and remove the seeds or core. If necessary, cut the halves into smaller pieces to fit in the feed tube. Remember to cut the ends flat.
- Cabbage and iceberg lettuce: Turn the head on its side and slice the top and bottom, leaving a center section about 3 inches deep. Remove the core and cut the center section in wedges to fit the feed tube. Remove the core from the bottom piece and cut it and the top piece into two wedges to fit the feed tube. The optional 2mm or 1mm Slicing Discs are excellent for slicing cabbage for coleslaw.
- If the fruit or vegetable doesn’t fit: Try inserting it from the bottom of the feed tube. The opening there is slightly larger.
- Pack the feed tube for desired results: For small, round slices or short shreds from carrots, zucchini, and other long vegetables, cut them in feed tube heights and pack them tightly upright. For long slices or shreds, cut the food in feed tube widths and pack the pieces horizontally. Food should fit snugly, but not so tight that it prevents the pusher from moving. When slicing or shredding food, always use the pusher. Never put your fingers or a spatula into the feed tube. Never push down hard on the pusher. Use light pressure for soft fruits and vegetables like bananas, mushrooms, strawberries, and tomatoes, and for all cheese. Use medium pressure for most food—apples, celery, citrus fruit, potatoes, and zucchini. Use firm pressure for really hard vegetables like carrots and yams.
Practicing Slicing and Shredding
- Insert a slicing or shredding disc, put the cover on the work bowl and insert the prepared food in the feed tube.
- Prepare the pusher assembly. Lock the small pusher in place and unlock the slide lock on the back of the sleeve, so the pusher can move up and down freely.
- Slide the pusher over the feed tube and push the sleeve down to lock it into place, apply pressure to the pusher while pressing the lever down to PULSE. Release the lever as soon as the food is sliced or shredded.
- You can load the feed tube repeatedly without removing the work bowl cover. Simply grasp the pusher assembly with your thumb on the wide locking tab. Press firmly on the tab and lift up. The pusher assembly will come off easily, leaving the cover and feed tube in place. Your other hand is free to reload the feed tube.
Removing Sliced or Shredded Food
- Before you do anything, wait for the disc to stop spinning. When it does, remove the cover first. Hold the pusher assembly with your thumb away from the locking tabs and turn it clockwise. Lift, and the pusher assembly and cover will come off together.
- Remove the slicing or shredding disc before removing the work bowl. Place two fingers under each side of the disc and lift it straight up.
- Then turn the bowl clockwise to unlock it from the base and lift it straight up to remove it. You can place the disc on top of the inverted work bowl cover, to minimize drips and spills
RECOMMENDED MAXIMUM WORK BOWL CAPACITY
FOOD CAPACITY | |
Sliced orshredded fruit, vegetables or cheese | 5 cups |
Chopped fruit, vegetables or cheese | 2 cups |
Puréed fruit, vegetables or cheese | 3 cups cooked; 1½ cups puréed |
Chopped or puréed meat, fish or seafood | 1¼ pound |
Thin liquid (e.g., dressings, soups, etc.) | 5 cups |
Cake batter | 8-inch cheesecake batter; 1 box (15.25 ounce) cake mix |
Cookie dough | 2½ dozen (based on average chocolate chip cookie recipe) |
White bread/pizza dough | 3 cups (all-purpose or bread flour) |
Nuts for nut butter | 2 cups |
WARRANTY
THREE-YEAR WARRANTY ON THE ENTIRE MACHINE. FIVE–YEAR FULL WARRANTY ON MOTOR
We warrant that your Cuisinart Pro Classic Food Processor will be free of defects in material or workmanship under normal home use for three years from the date of original purchase.
Cuisinart Classic 7-Cup Food Processor DLC-10S Pros & Cons
Pros
- Affordable price point
- Large work bowl
- Extra-large feed tube
- Touchpad controls with pulse feature
- Dishwasher-safe parts
Cons
- Only has a 1-year warranty
- May not be powerful enough for heavy-duty tasks
- Some users may find the food processor noisy
Customer Reviews
The Cuisinart Classic 7-Cup Food Processor DLC-10S has received mostly positive reviews from customers. Many users have praised its versatility, ease of use, and affordable price point. However, some have noted that it may not be powerful enough for heavy-duty tasks, and that the food processor can be noisy.
Faqs
How is the Cuisinart Classic 7-Cup Food Processor DLC-10S put together?
Is it possible to chop nuts in a food processor?
Which foods should I stay away from processing?
If food becomes lodged in the feed tube, what should I do?
How can I make the most of the pulse function?
What is the warranty period for the Cuisinart?
Leave a Comment