Cuisinart Griddler Elite GR-300 Usage Guide | Features
Content
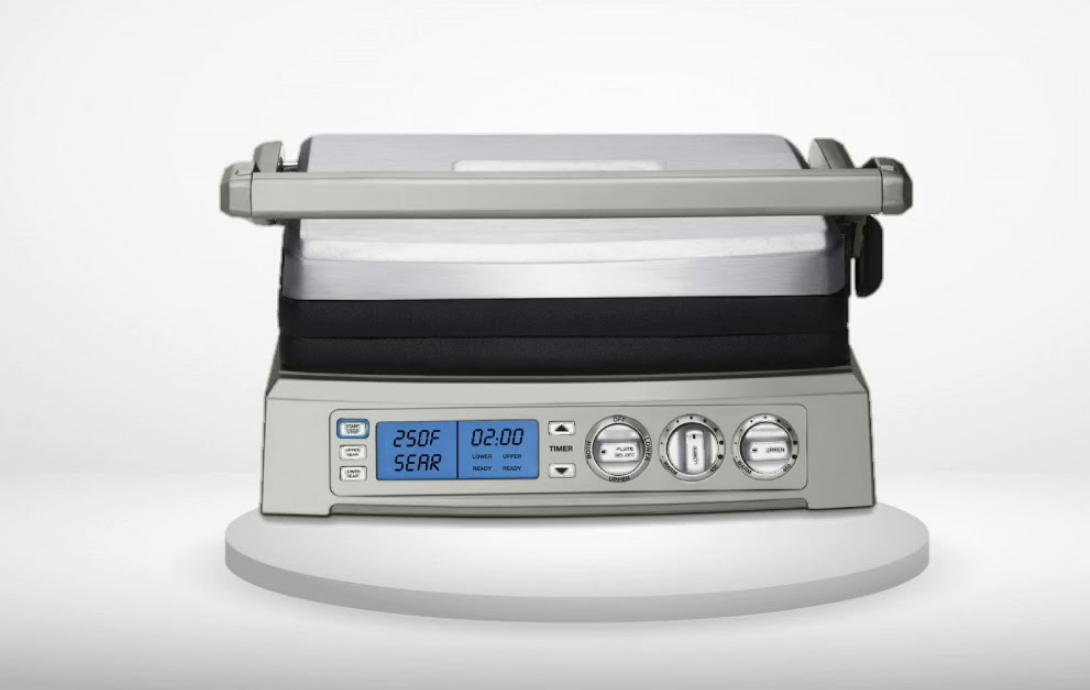
Introduction of the Cuisinart Griddler Elite GR-300
Cuisinart is a versatile and advanced electric griddle that combines the functions of a grill, panini press, and griddle in one compact unit. Launched in 2013, this kitchen appliance has quickly become a favorite among home cooks and professional chefs alike. With its sleek design and robust features, the Griddler Elite is perfect for preparing a wide range of dishes, from breakfast favorites like pancakes and eggs to lunchtime sandwiches and dinner entrees. The estimated price of the Cuisinart Griddler Elite GR-300 ranges from $150 to $200, making it a valuable investment for any kitchen.
Detailed Specifications
The Cuisinart Griddler Elite GR-300 boasts several key features that make it a standout in its class. These include:
- Dual-Zone Temperature Control: Allows for independent temperature settings on each side of the griddle.
- Large Cooking Surface: Offers 240 square inches of cooking space, ideal for cooking multiple items at once.
- Adjustable Hinge: Enables easy conversion between griddle and grill modes.
- Integrated Timer: Helps ensure perfectly cooked meals with a built-in 60-minute timer.
- Non-Stick Plates: Easy to clean and maintain, these plates are also dishwasher safe.
- Compact Design: The unit folds up for easy storage, making it perfect for kitchens with limited space.
FEATURES AND BENEFITS
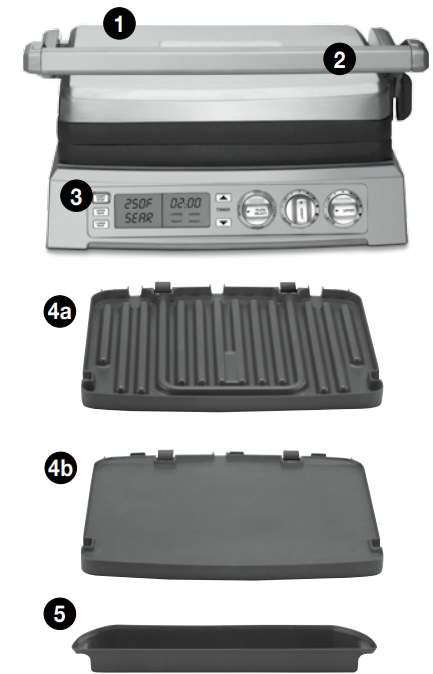
- Base and Cover
Solid construction with stainless steel self-adjusting cover. - Panini-Style Handle
Sturdy cast-metal handle adjusts cover to accommodate thickness of food. - Control Panel
- Removable, Reversible and Embedded Cooking Plates Nonstick and dishwasher safe for easy cleanup.
- Grill Side: Perfect for grilling steak, burgers, chicken and vegetables.
- Griddle Side: Prepare pancakes, eggs, bacon and seared scallops.
- Drip Tray
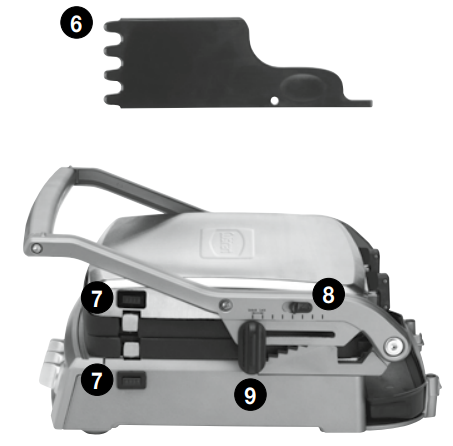
Collects grease and removes from base for easy cleanup (dishwasher safe). - Cleaning/Scraping Tool
Helps clean grill and griddle plates after cooking. - Plate Release Buttons
Push in to release and remove cooking plates. - Hinge Release Lever
Allows the cover to extend back to the Flat position. - Cover Height Adjuster
Features 6 preset height positions for top melting. Locks cover closed to store.
BP A Free (not shown)
All materials that come in contact with food are BPA free.
GETTING TO KNOW YOUR CONTROL PANEL

- Plate Select Dial & Temperature Dials
Use the PLATE SELECT dial to select LOWER and UPPER plates and to turn unit off. Use the UPPER and LOWER temperature dials to select temperature of each plate. - Time Directionals
Use to set cooking time. Press and hold to scroll quickly; press and release to advance more slowly. - Upper and Lower Plate Sear Buttons
Press to sear at 500˚F for up to two minutes. - Start/Stop Button
Starts/stops cooking selection. - Blue Backlit LCD Display
Shows plate temperatures, timer and PREHEAT/READY.
Description
The Cuisinart Griddler Elite GR-300 is designed to be both functional and user-friendly. Its dual-zone temperature control allows for precise cooking, whether you're searing steaks or cooking delicate fish. The large cooking surface makes it ideal for families or entertaining guests. The adjustable hinge and integrated timer ensure that you can cook a variety of dishes with ease. Additionally, the non-stick plates are easy to clean and maintain, reducing the hassle of post-meal cleanup.
BEFORE THE FIRST USE
Remove all packaging materials and any labels or stickers from your grill. Be sure all parts (see Features and Benefits) have been included before discarding any packaging materials. You may want to keep the box and packing materials for use at a later date.
Before using your Cuisinart Griddler Elite for the first time, remove any dust from shipping by wiping the base, cover and controls with a damp cloth. Thoroughly clean cooking plates, drip tray and scraping tool; all are dishwasher safe. Refer to Assembly Instructions for plate removal.
ASSEMBLY INSTRUCTIONS
Place the base on a clean, flat surface where you intend to cook, with the controls directly in front of you.
To insert the cooking plates:
- Choose the side(s) you intend to cook on. The two cooking plates each have two sides:
- Grill side: ribbed surface intended for grilling steaks, hamburgers, chicken, seafood and vegetables. Also can be used for panini and other toasted sandwiches.
Griddle side: smooth surface intended for cooking bacon and eggs, pancakes and French toast. Also can be used for panini and other toasted sandwiches.

- Identify the lower and upper plates. The word LOWER or UPPER is embossed on both sides of each plate.
Locate the connector prongs on the plate(s) and line up with the appropriate connection blocks. Slide the connector prongs into the blocks and push down the front end of the plate(s). They will snap into place.
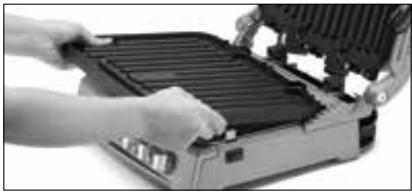
NOTE: If the plate(s) are not inserted properly and completely into the connection blocks, the plate(s) will not heat up. This is a safety feature that prevents the user from operating the grill when it is not assembled correctly.
Slide the drip tray into the base at the rear of the unit from the right side.
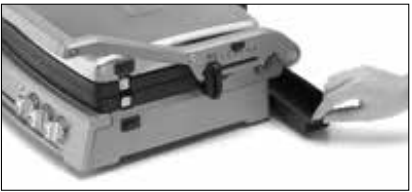
- Plug the cord into a standard electrical outlet. The blue backlight on the LCD screen will illuminate, indicating the unit is energized. The LCD will display the current settings.
NOTE: If the START/STOP button is not pressed within 10 minutes, the unit will enter SLEEP mode. The blue backlight on the LCD screen will turn off and the screen’s display will go blank. - Just follow the instructions below to position the unit, and you’re ready to cook!
GRIDDLER ELITE POSITIONS
- STORAGE Position – Upper plate/cover rests flat on the lower plate/base and cover height adjuster is in Lock position.
- PREHEAT Position – Upper plate/ cover rests flat on the lower plate/base and cover height adjuster is in Unlock position.
- OPEN COOKING Position
- To Cook on Lower Plate Only: Lift the handle so upper plate/cover is vertical. Plate does not “float” in this position.
CLOSED COOKING Position
- To Contact Grill or Panini Press: Start with unit in Open Cooking position. Lower top carefully until plate contacts food. Hinge will automatically release the plate, allowing it to “float” and rest evenly on food.
- To Top Melt: Start with unit in Open Cooking position. Wearing an oven mitt, press down slightly on front of upper plate/cover to release hinge, allowing plate to “float.” Lower it to close to the desired height, then slide the cover height adjuster into a notch to set the position.
NOTE: After Closed Cooking, you can lock the upper plate/cover back into place by simply closing the unit without any food in it.
- FLAT COOKING Position
To Cook on Full Grill, Full Griddle or Half Grill/Half Griddle: Upper plate/cover opens to lie flat, level with the lower plate/base.- To adjust to this position from the Preheat position, open unit and slide the hinge release lever up while pushing the handle back. The upper plate/cover will sit flat, resting on the handle.
- To adjust to this position from Closed Cooking position, first close the unit, resting upper plate/cover flat on lower plate/base. You will hear the upper plate click into place. Open unit and slide the hinge release lever up while pushing the handle back. The upper plate/ cover will sit flat, resting on the handle.
- To adjust to this position from Open Cooking position, grasp handle and pull slightly forward, then slide the hinge release lever up while pushing the handle back. The upper plate/cover will sit flat, resting on the handle.
OPERATING THE GRIDDLER ELITE
Turn the PLATE SELECT dial to the desired plate selection.
You can choose the upper plate, lower plate, or both plates, depending on how and what you want to cook.
We recommend the following plate selections:Cooking Option
Plate Selection
Contact Grill
Both
Panini Press
Both
Full Grill
Both
Full Griddle
Both
Half Grill and Half Griddle
Both
Half Grill or Half Griddle
Lower or Upper
Top Melt
Both
The selected plate(s) and the corresponding temperature(s) will appear on the LCD screen.
Turn the temperature dial for the selected plate(s) to the desired setting – from Warm to 450°F. The temperature readout(s) in the LCD screen will change as you turn the dial.
NOTE: Warm setting will display as 200°F. In the example below, the lower plate temperature has been set to 350˚F.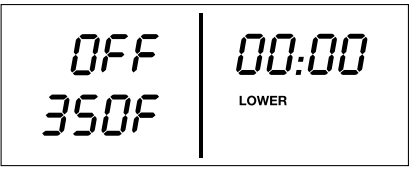
- Once the desired temperature setting(s) have been selected, press the START/STOP button.
NOTE: If the START/STOP button is not pressed within 10 minutes, the unit will enter sleep mode. Turn any knob or press any button to reactivate the unit.- The LED light around the START/STOP button will illuminate and the unit will beep one time.
In the LCD screen, PREHEAT will appear and the selected temperature(s) will flash as the plate(s) heat up. It may take up to 20 minutes to reach operating temperature, depending on the temperature(s) selected.
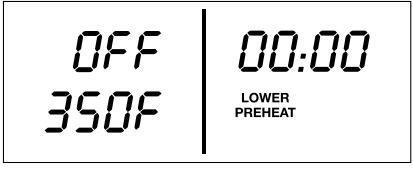
When the plate(s) reach temperature, the selected temperature(s) will stop flashing, READY will display, and the unit will beep 3 times.
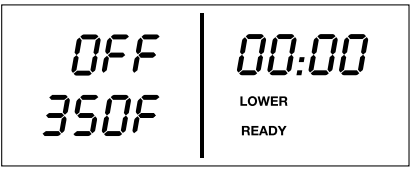
NOTE: If both plates are selected, when the first plate reaches temperature it will show READY and the unit will beep 1 time; you can begin cooking on this plate if you choose. The second plate will continue to preheat until it reaches temperature, at which time it will show READY and the unit will beep 3 times.
In the example below, the upper plate temperature has been set to 250˚F and is ready, and the lower plate temperature has been set to 350˚F and is still preheating.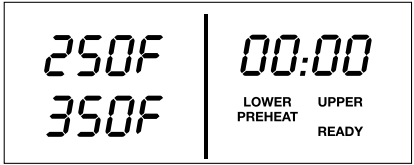
- To change the temperature(s) at any time during operation, simply turn the temperature dial of the selected plate(s) to the new setting.
- If the plate(s) are in PREHEAT mode, they will continue to preheat to new selection.
- If the plate(s) are in READY mode and the temperature(s) are lowered, READY will remain on display as the unit adjusts to the lower temperature(s).
- If the plate(s) are in READY mode and the temperature(s) is raised, PREHEAT will display and the higher selected temperature will flash as the plate(s) heat up. Once the higher temperature(s) is reached, READY will display, the temperature(s) will stop flashing, and the unit will beep 3 times.
- To change the plate selection at any time during operation, simply turn the PLATE SELECT dial to the new selection and adjust the plate(s) temperature (if necessary). PREHEAT will display for new selected plate(s) and the temperature will flash as the plate(s) heat up. Once the new temperature(s) are reached, READY will display, the temperature(s) will stop flashing, and the unit will beep 3 times.
- To stop the unit from heating, simply press the START/STOP button.
NOTE: If the unit is on and heated for more than 2 hours, it will automatically shut off. This is a safety feature of the Griddler Elite.
SEAR Function
You can sear foods at 500°F for up to 2 minutes.
- Follow Standard Cooking, Step 1.
Press UPPER SEAR and/or LOWER SEAR button to initiate SEAR function. SEAR will appear in place of the temperature(s) in the LCD screen.
In the example below, the lower plate has been set to SEAR.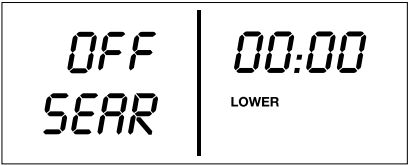
- Press the START/STOP button. The LED light around the START/STOP button will illuminate and the unit will beep one time.
In the LCD screen, PREHEAT will display and SEAR will flash while the plate(s) heat up to 500°.
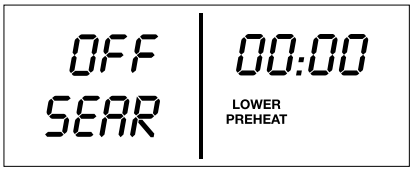
When the plate(s) reach the SEAR temperature, SEAR will stop flashing, READY will display and the unit will beep 3 times.
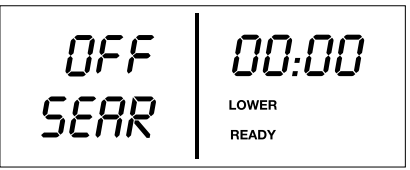
NOTE: If both plates are selected for SEAR, when the first plate reaches temperature it will show READY and the unit will beep 1 time; you can begin cooking on this plate if you choose. The second plate will continue to preheat until it reaches temperature, at which time it will show READY and the unit will beep 3 times. In the example below, both plate temperatures have been set to SEAR and the upper plate is ready while the lower plate is still preheating.
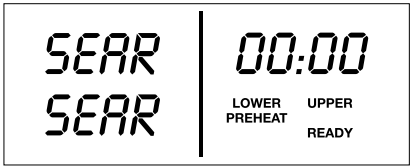
In the example shown below, both plates have been set to SEAR, but only the upper plate has reached SEAR temperature. The lower plate is still preheating.
The 02:00 minute countdown timer will flash ten times to allow enough time to put the food on the plate(s).
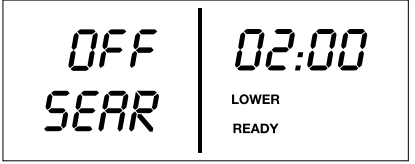
After 10 seconds, the 2-minute countdown will begin. To sear for less than 2 minutes, simply press the arrow down button at any time during 10- second delay or countdown to decrease the time. You cannot sear for more than 2 minutes at a time.
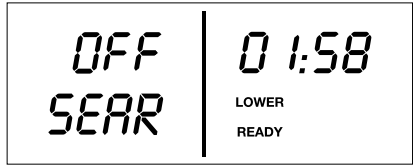
When the countdown is complete, the unit will beep 3 times to indicate the SEAR cycle has finished, and the unit will adjust to the temperature(s) selected on the corresponding temperature knobs.
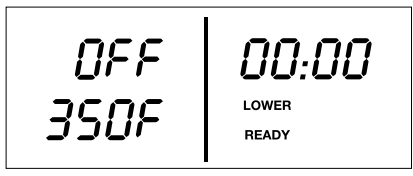
- To cancel SEAR, press the SEAR button(s) again and the unit will adjust to the temperature(s) selected on the corresponding temperature knobs.
OPERATING THE TIMER
The 60-minute timer can be activated at any time the unit is on, except in the middle of a SEAR cycle.
- Press the up or down arrow button to initiate time-set mode. The LCD screen will display a blinking 00:00.
- Press the up and down arrows to add or subtract time. Time can be set in 30-second intervals up to 10 minutes, then 1-minute intervals up to 60 minutes. Press and hold the buttons to scroll through time more quickly. Timer will stop blinking and automatically start to count down when no time-set buttons have been pressed for 3 seconds.
- To add or subtract time during countdown, simply press the up or down arrow buttons.
- When the countdown is complete, the unit will beep 3 times.
- To stop and reset the timer, press and hold both the up and down arrow buttons at the same time for 2 seconds. Timer will default to 00:00.
- To turn the unit off, simply turn PLATE SELECT dial to OFF.
NOTE: If timer is in use and either SEAR button is pressed, the SEAR cycle will override the previously set timer.
Setup Guide
To operate the Cuisinart Griddler Elite GR-300,
- Unpack and wash the nonstick plates first.
- Connect the plates to the base to assemble the unit.
- After plugging it in, let the griddle warm to the temperature you've selected.
- If necessary, adjust the temperature on each side separately with the dual-zone temperature control.
- To grill, set the hinge at the appropriate angle. Flip the cover all the way closed to enter panini press mode. To keep track of how long you're cooking, use the built-in timer.
CLEANING AND CARE
- Once you have finished cooking, turn the PLATE SELECT dial to the OFF position and unplug the power cord from the wall outlet. Allow the unit to cool down for at least 30 minutes.
- Use the cleaning/scraping tool to remove any leftover food from the cooking plate(s).
- Dispose of grease from the drip tray once cooled.
- Press the plate release buttons to remove cooking plates from the housing. Be sure that the plates have cooled completely before handling (at least 30 minutes).
- Wipe down the plates to remove any leftover food. The cooking plates, drip tray and cleaning/scraping tool can be cleaned by hand or on the top shelf of the dishwasher. The housing base, cover and control panel can be wiped clean with a soft, dry cloth. For tough stains, dampen cloth. Never use an abrasive cleaner or harsh pad.
USER MAINTENANCE
- The first time you use the Griddler Elite it may have a slight odor and may smoke a bit. This is common to appliances with nonstick surfaces.
- Always exercise caution when handling the Griddler Elite during cooking. Open and close the unit using the handle only. Do not touch the arms or top cover during or immediately after cooking, as they become hot during use. We recommend you wear oven mitts when handling the Griddler Elite to prevent burns.
- Never use metal utensils, which will scratch the nonstick plates. Instead, use wooden or heat-proof plastic utensils.
- Never leave plastic utensils in contact with the hot grill plates. This includes the cleaning tool that is included.
- In between recipes, use a wooden or heat-proof plastic utensil to scrape excess food buildup through grease channels and into the drip tray. Wipe off any residue with a paper towel before proceeding with next recipe.
- Allow the Griddler Elite to cool down completely (at least 30 minutes) before cleaning.
- Any other servicing should be performed by an authorized service representative.
STORAGE
- Wrap the power cord around the cord storage clips at the back of the base.
- Store clean cooking plates and drip tray in the unit.
- Lock unit closed by sliding the cover height adjuster to the Lock position.
Troubleshooting Chart
Subject | Question | Answer/Solution |
Power |
Why won’t my unit turn on? | Check to make sureyour unit isplugged into a functional outlet. |
Contact Customer Service at 1-800-726-0190. | ||
Why is my unit turning itself off? | If thePLATE SELECT dial isnot turned toON within 10 minutes ofthe unit beingplugged in, the Griddler® Elite will enter SLEEPmode. All lightswill turn off.Turn the PLATESELECT dial toON to “wake up” theunit and operate the unit as normal. | |
It is possible theunit overheated. Wait forthe unit to cool down and try again.If it does not turn back on, contact Customer Service at 1-800-726-0190. | ||
If already cooking and you wantto change the temperature of thecurrent plate selection, you do not needto hit START/STOP buttonagain. Doing so will turn the unit off. Simply change the temperature dial for the currentplate selection and the unitwill adjust automatically. | ||
If yourGriddler® Elite isnot turned off orif you do not change any settings, it will shut off automatically after 2 hours. Thisis a safety feature. | ||
Why won’t theplates get hot? | Confirm you have inserted the plates correctly into the connection blocks. If the platesare not fitted correctly and securely, they will notheat up. Thisis a safety feature. | |
Programming |
Can I change my temperature or plate selection when the unit is already cooking? | Yes. To change temperature of yourcurrent plate selection, simplyturn the plate’s temperature dial and the unit willadjust automatically. To change your plate selection, simply turn the PLATE SELECT dialand set yournew temperature. |
Can I sear when I’m already cooking? | Yes. Simply press theSEAR button(s) andthe plates will preheat to sear temperature. We recommend you takethe food off duringpreheating to SEAR. Oncethe SEAR cycleis complete, the unit will revert back to previously selected temperatures. | |
Can I adjust my SEAR cycle time? | You can only sear for2 minutes max.However if you would like tosear for lessthan 2 minutes, simply pressthe down arrowbutton. | |
Cleaning |
Are the parts and accessories dishwasher safe? | Yes, all removable parts are dishwasher safe.Do not immerse or putthe base of the unitin the dishwasher. Clean it and thecontrol panel witha clean damp cloth. |
Food residue is sticking to the plates. Howdo I clean them without damaging them? | Use the scraper toolprovided to scrapeoff any excess food buildup. Do not use metal utensils to cleanthe plates as they candamage the nonstick coating. |
WARRANTY THREE-YEAR WARRANTY
We warrant that your Cuisinart Griddler Elite will be free of defects in materials and workmanship under normal home use for 3 years from the date of original purchase.
CALIFORNIA RESIDENTS ONLY
California law provides that for In-Warranty Service, California residents have the option of returning a nonconforming product (A) to the store where it was purchased or (B) to another retail store which sells Cuisinart products of the same type.
Cuisinart Griddler Elite GR-300 Pros & Cons
Pros
- Versatile Cooking Options: Can be used as a grill, panini press, or griddle.
- Dual-Zone Temperature Control: Allows for precise temperature settings.
- Large Cooking Surface: Ideal for cooking multiple items at once.
- Ease of Cleaning: Non-stick plates are dishwasher safe.
- Compact Storage: Folds up for easy storage.
Cons
- Space Consumption: Although compact when folded, it still occupies significant space when in use.
- Heat Distribution Issues: Some users report uneven heat distribution.
- Heavy Unit: Weighs around 17 pounds, making it less portable.
- Cleaning Between Plates: Requires careful cleaning between the plates to prevent food buildup.
Customer Reviews
Customers praise the Cuisinart Griddler Elite GR-300 for its versatility and ease of use. Many appreciate the dual-zone temperature control and large cooking surface, which make it easy to cook a variety of dishes simultaneously. However, some users have reported issues with heat distribution and the weight of the unit. Despite these minor drawbacks, the Griddler Elite remains a popular choice for home cooks looking for a reliable multi-functional kitchen appliance.
Common complaints include uneven heating and the need for careful cleaning to maintain performance.
Faqs
What are the primary functions of the Cuisinart Griddler?
How do I clean the non-stick plates of my Griddler?
What is the significance of dual-zone temperature control on the Elite?
Can I fold the Cuisinart Griddler for storage?
How do I adjust the hinge on my Cuisinart Griddler Elite GR-300?
What is the cooking surface area of the Cuisinart?
Is the Cuisinart Griddler Elite heavy?
Can I use my Cuisinart Griddler Elite GR-300 for meal prep?
How do I preheat my Griddler Elite GR-300?
Is there an integrated timer on the Cuisinart Griddler Elite?
Leave a Comment
