Cuisine Yogurt Maker YM80 Instruction Manual | Specs & Features
Content
Introduction Cuisine Yogurt Maker YM80
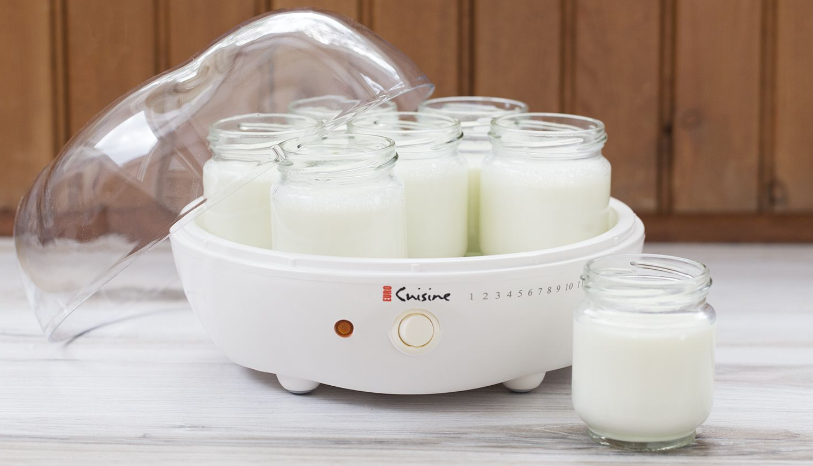
The Cuisine Yogurt Maker YM80 is a versatile and user-friendly appliance designed to make homemade yogurt with ease and convenience. With a sleek and modern design, this yogurt maker is perfect for health-conscious individuals who want to enjoy fresh and delicious yogurt without any preservatives or artificial additives. The estimated price of the product is around $40 to $50, making it an affordable option for those who want to make yogurt at home. The product is set to launch in the market in the coming months, so stay tuned for more updates!
PARTS IDENTIFICATION
(YOGURT MAKER WITH SWITCH FUNCTION) MODEL YM80
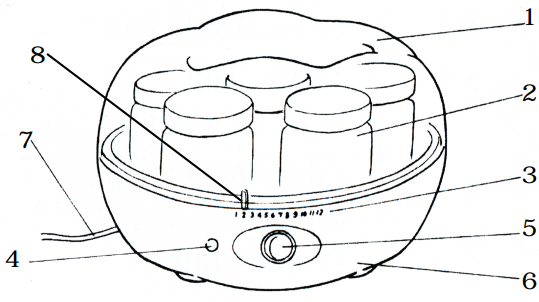
- Upper Cover
- Glass Jar with Screw-Top
- Hour Reminder
- Pilot Lamp
- Switch Button
- Base
- Power Cord
- Hour Reminder Indicator
Detailed Specifications
The Cuisine Yogurt Maker YM80 comes with the following key features:
- 7 x 7 x 7 inches dimensions, making it compact and easy to store
- Makes up to 1 quart of yogurt at a time
- Adjustable temperature control for optimal fermentation
- BPA-free and dishwasher-safe containers
- Clear lid for easy monitoring of the yogurt-making process
- Recipe book and instruction manual included
CHARACTERISTICS MEASUREMENTS
- Dimensions: 53§4” High x 91§2” Diameter
- Jar Capacity
- 6 oz
- 120V - 60Hz -13W
- ACCESSORIES: 7 glass jars
IMPORTANT SAFEGUARDS
Because we are interested in your safety while using this fine Cuisine Yogurt Maker YM80 product, we have included these general safeguards; please take the time to carefully read them. They provide important information regarding safe use and maintenance of the appliance. Nonobservance of these safeguards may compromise the safety of the appliance, result in injury, and/or void the warranty.
- READ THE INSTRUCTIONS
- Keep this booklet safe for future reference.
- To protect against risk of electrical shock, do not put the appliance or cord in water or other liquid. If appliance or cord falls into liquid, unplug the cord from the outlet immediately. Do not reach into the liquid.
- To avoid accidental injury, close supervision is necessary when any appliance is used by or near children.
- Unplug from the outlet when not in use, before taking parts off and before cleaning. To unplug, grasp plug and pull from the electrical outlet. Never pull cord. Allow it to cool before putting on or taking off parts.
- Do not operate any appliance with damaged cord or plug, or after appliance malfunctions, or after the appliance has been dropped or damaged in any way. Return appliance to and authorized service center for examination and repair.
- The use of attachments not recommended or sold by the manufacturer may cause fire, electrical shock, or injury.
- This appliance is designed for household use. Do not use outdoors.
- Do not let cord hang over edge of table or counter.
- Do not place on or near a hot gas or electric burner, or in a heated oven. Do not place any parts in the microwave oven.
- Do not operate this or any other appliance while under the influence of alcohol or other substances that affect your reaction time or perception.
- Do not touch the parts that are not intended for manipulation.
- Never move the appliance when it is working.
- Do not use the appliance while barefoot. Do not touch the appliance with wet or damp hands.
- After each use, clean all parts that have had contact with food by following the cleaning instructions in this booklet.
- Store the appliance and all of its parts out of the reach of children.
- Plug cord into the wall outlet. To disconnect remove plug from wall outlet.
- Do not use appliance for other than intended uses.
- After unpacking the appliance, check that it is undamaged and that no parts are missing. If you are in any doubt, consult your local service dealer.
- Before connecting, check that the supply voltage details marked on the appliance agree with those of the electrical supply. The label with this information may be found on the bottom of the appliance.
- Household electrical installation must be carried out in accordance with manufacturer’s instructions. The manufacturer is not responsible for damage or injuries to persons, animals or objects caused by incorrect installation.
- Do not put on top of a vibrating surface such as the top of a refrigerator or exposed to drafts.
- Do not keep yogurt in the refrigerator for more than 8-10 days.
- Never put the appliance in the refrigerator.
Before using your yogurt maker for the first time, remove all packaging. Wash the jars and lids in warm soapy water. Rinse and dry the jars and lids completely. Now your yogurt maker is ready to use. Note: disconnect from power supply after use. Always ensure that the appliance is completely cool before cleaning and storage. Always disconnect from power supply and clean thoroughly before storage. This appliance must be used for the purpose for which it was designed, namely for making yogurt. Any other use must be considered improper and therefore dangerous. The manufacturer cannot be held responsible for any injuries and damage resulting from improper use.
SAVE THESE INSTRUCTIONS
NOTICE: This appliance has a polarized plug (one blade is wider than other). As a safety feature, this plug will fit in a polarized outlet only one way. If the plug does not fit fully in the outlet, reverse the plug. If it still does not fit, contact a qualified electrician. Do not attempt to defeat this safety feature.
FOR HOUSEHOLD USE ONLY.
Description
The Cuisine Yogurt Maker YM80 is a high-quality appliance that allows you to make fresh and delicious yogurt at home. With its adjustable temperature control, you can customize the fermentation process to your liking, resulting in creamy and tangy yogurt every time. The BPA-free and dishwasher-safe containers make cleanup a breeze, and the clear lid allows you to monitor the progress of your yogurt without opening the lid. The yogurt maker also comes with a recipe book and instruction manual, making it easy for beginners to get started. Whether you're a yogurt aficionado or just looking for a healthier alternative to store-bought yogurt, the Cuisine Yogurt Maker YM80 is an excellent choice.
MAINTENANCE
- Before cleaning, unplug the appliance.
- Clean the base and the cover with a damp cloth and avoid abrasives.
- Do not immerse the cord, plug or appliance in water or other liquids.
- The Glass Jars are dishwasher safe.
BEFORE FIRST TIME USE
- Remove any labels or stickers from appliance.
- Before first use or after periods of prolonged storage, thoroughly wash cover, glass jars and white lids in warm, soapy water then rinse and dry completely. White lids are not dishwasher safe, however the glass jars are.
- Wipe the inside of Yogurt maker with a damp cloth.
- Prepare following utensils: a high sided saucepan, a pitcher, a sieve and a spoon. Ensure all these utensils are thoroughly washed with warm water and soap and they are dry before start making yogurt.
INSTRUCTIONS FOR USE
- Thoroughly wash the jars with hot water and soap before using.
- To make yogurt, pour 7 glass jars (equal to 42oz) of fresh, pasteurized milk (it can be either whole milk, skimmed or semi-skimmed) into a high-sided saucepan.
- Heat the milk until it boils and starts to climb the side of the saucepan.
- Remove the saucepan from heat and allow the milk to cool to lukewarm temperature (95∞F).
- Once the milk has cooled, pour it into a pitcher through a sieve or fine mesh colander.
- Stir in one glass jar (equal to 6oz) full of plain yogurt with some of the strained milk in a separate bowl until the yogurt is dissolved and you have a smooth mixture. (The plain yogurt can either be purchased from a store or from a previous batch of homemade yogurt. If you use the homemade yogurt, please repeat only 1 time. Freeze-dried Yogurt Starter can be used instead of yogurt. Follow the directions on the Yogurt Starter package).
- Mix the room temperature milk very well with the smooth mixture as prepared above.
- Pour the mixture into the seven jars of the yogurt maker.
- Place the Jars – without the white lids – in the yogurt maker.
- Cover the yogurt maker with its clear cover.
Boiling ensures a firmer yogurt familiar to most American tastes.
- For Softer Yogurt Without Boiling: You do not have to boil the pasteurized milk; however you must make sure that the milk is lukewarm (95∞F) before pouring it into the glass jars.
- For Firmer Yogurt Without Boiling: Just add 10 tablespoons of powdered milk to the room temperature pasteurized milk before pouring it into the glass jars.
TO OPERATE
- Plug the yogurt maker into the wall socket.
- Push the switch button on, the pilot lamp will go on.
- Set the hour reminder to the time desired for the yogurt to be ready. It will take about seven hours to make yogurt with whole milk. For skimmed milk will takes about ten hours. The hour reminder will not switch off the yogurt maker. It just reminds you when to push off switch button and remove the plug from the wall socket.
- When the yogurt is ready, turn off the unit and remove the plug from the socket.
- Water may condense on the clear lid of the yogurt maker. When you remove the clear lid, take care not to drip any accumulated water into the finished yogurt.
- Cover the individual jars with the white lids and chill them in the refrigerator for a minimum of three hours before eating.
THE YOGURT MAKER SHOULD REMAIN PERFECTLY STILL DURING THE MATURING PROCESS. DO NOT MOVE THE APPLIANCE OR REMOVE ANY GLASS JARS AS THIS WILL AFFECT THE FIRMNESS OF THE YOGURT.
CHOOSING THE MILK
The following types of milk may be used:
- Pasteurized milk of any fat content (full, 2%, 1% or fat-free)
- Powdered milk
- Long-life UHT sterilized milk
- Soy Milk. Be sure to use UHT soy milk which contains one of the following ingredients: fructose, honey or malt. These ingredients are necessary for fermentation and you will not succeed if none are available in the milk.
Fresh milk must be boiled and, if necessary, filtered prior to use. The taste and texture of yogurt varies according to the milk and yogurt starter selected. For best results do not use:
- Expired milk;
- Expired yogurt; or
- Yogurt with flavoring, fruit, or other ingredients.
Before using yogurt for a starter, skim and discard the upper surface of the yogurt with spoon.
RECIPES
The Euro-Cuisine yogurt maker can be used to make different types of yogurt:
UNFLAVORED YOGURT
The taste and texture of yogurt varies according to the milk and yogurt starter selected. Cuisine Yogurt Maker YM80 may be made with milk of any fat content, even nonfat milk. You should experiment with milk of various fat contents to determine which you prefer.
YOGURT FLAVORED AFTER COOKING
You may choose to make flavored yogurt and add sugar, honey, flavorings, fruit, or other ingredients to taste just prior to eating.
YOGURT FLAVORED WITH PRESERVED FRUIT
Ingredients
- 1/2 cup chopped preserved fruit
- 5 tablespoons of the syrup in which the fruit was preserved
- 5 tablespoons of unflavored yogurt or 1 tablespoon of culture
- 1 quart of milk
Heat the milk until it boils and starts to climb the side of the Saucepan. Remove the saucepan from heat and allow the milk to cool to lukewarm (95˚F). To accelerate the cooling down, place the saucepan in cold water. Beat together the culture and milk until smooth. Add the syrup while beating. Stir in the chopped fruit. Divide the mixture between the seven jars. Place the jars –without the white lids – in the yogurt maker. Cover the yogurt maker with its clear cover. Turn machine on.
YOGURT FLAVORED WITH JAM OR JELLY
Ingredients
- 4 - 5 tablespoons of jam or jelly
- 5 tablespoons of unflavored yogurt or 1 tablespoon of culture
- 1 quart of milk
Heat the milk until it boils and starts to climb the side of the Saucepan. Remove the saucepan from heat and allow the milk to cool to lukewarm (95˚F). To accelerate the cooling down, place the saucepan in cold water. Warm the jam or jelly in a pan over low heat. Add half of the milk and stir until smooth; let cool again to (95˚F). Beat together the culture, jam or jelly, and remaining milk until smooth. Add the Jam or Jelly while beating. Divide the mixture between the seven jars. Place the jars – without the white lids – in the yogurt maker. Cover the yogurt maker with its clear cover. Turn machine on.
YOGURT FLAVORED WITH SYRUP
Ingredients
- 4 - 5 tablespoons of concentrated syrup (e.g. orange, lemon, pomegranate, strawberry, etc.)
- 5 tablespoons of unflavored yogurt or 1 tablespoon of culture
- 1 quart of milk
Heat the milk until it boils and starts to climb the side of the Saucepan. Remove the saucepan from heat and allow the milk to cool to lukewarm (95˚F). To accelerate the cooling down, place the saucepan in cold water. Beat together the culture and milk until smooth. Add the syrup while beating. Divide the mixture between the seven jars. Place the jars – without the white lids – in the yogurt maker. Cover the yogurt maker with its clear cover. Turn machine on.
YOGURT FLAVORED WITH FRESH FRUIT
Ingredients
- 1/2 cup chopped fresh fruit
- 4 - 5 tablespoons of sugar or to taste
- 1 - 3 cup water
- 5 tablespoons of unflavored yogurt or 1 tablespoon of culture
- 1 quart of milk
Heat the milk until it boils and starts to climb the side of the Saucepan. Remove the saucepan from heat and allow the milk to cool to lukewarm (95˚F). To accelerate the cooling down, place the saucepan in cold water. Cook the fruit in the sugar and water over low heat for 10-15 minutes or until thickened. Let cool again to 95˚F. Beat together the culture and milk until smooth. Stir in the chopped fruit. Divide the mixture between the seven jars. Place the jars – without the white lids – in the yogurt maker. Cover the yogurt maker with its clear cover. Turn machine on.
YOGURT FLAVORED WITH COFFEE
Ingredients
- 2 tablespoons of sugar or to taste
- 1 tablespoon of instant coffee
- 5 tablespoons of unflavored yogurt or 1 tablespoon of culture
- 1 quart of milk
Heat the milk until it boils and starts to climb the side of the Saucepan. Remove the saucepan from heat and allow the milk to cool to lukewarm (95˚F). To accelerate the cooling down, place the saucepan in cold water. Dissolve the sugar and coffee with the milk. Beat together the culture and milk until smooth. Divide the mixture between the seven jars. Place the jars – without the white lids – in the yogurt maker. Cover the yogurt maker with its clear cover. Turn machine on.
Troubleshooting
Here are some common problems and solutions when using the Cuisine Yogurt Maker YM80:
- Problem: The yogurt is too thin or runny.
Solution: Make sure you're using the right amount of milk and yogurt culture. Also, try increasing the fermentation time or using a higher temperature setting. - Problem: The yogurt has a weird taste or smell.
Solution: Make sure you're using fresh and high-quality ingredients. Also, make sure the yogurt maker is clean and free from any bacteria or contaminants. - Problem: The yogurt is not setting or firming up.
Solution: Make sure the yogurt maker is at the right temperature and that the fermentation process is not interrupted. Also, try using a different brand of yogurt culture or increasing the fermentation time.
Pros & Cons
- Pros:
- User-friendly and easy to use
- Adjustable temperature control for optimal fermentation
- BPA-free and dishwasher-safe containers
- Compact and easy to store
- Affordable price point
- Cons:
- May take some trial and error to get the right consistency and taste
- Only makes up to 1 quart of yogurt at a time
- May not be as durable as more expensive yogurt makers
Customer Reviews
Customers who have used the Cuisine Yogurt Maker YM80 have praised its ease of use and versatility. Many have noted that the adjustable temperature control is a game-changer, allowing them to make yogurt to their exact specifications. However, some have noted that the yogurt maker may take some trial and error to get the right consistency and taste. Overall, customers have been happy with their purchase and would recommend the yogurt maker to others.
Most Common Complaints
The most common complaints about the Cuisine Yogurt Maker YM80 are related to its durability and capacity. Some customers have noted that the yogurt maker may not be as durable as more expensive models, and that it only makes up to 1 quart of yogurt at a time. However, these complaints are relatively minor and do not detract from the overall quality of the yogurt maker.
Faqs
What is the maximum capacity of the Euro Cuisine Yogurt Maker YM80 in terms of the number of jars it can accommodate simultaneously?
Which kinds of milk are compatible with the YM80 Euro Cuisine Yogurt Maker?
How long does the Euro Cuisine Yogurt Maker YM80 take to produce yogurt?
What is the Euro Cuisine Yogurt Maker YM80's wattage?
How should the jars and Euro Cuisine Yogurt Maker YM80 be cleaned?
What should I do in the event that the Euro Cuisine Yogurt Maker YM80 does not set my yogurt?
What is the procedure used to regulate the thickness of the yogurt that the Euro Cuisine Yogurt Maker YM80 produces?
After producing yogurt in the Euro Cuisine Yogurt Maker YM80, how should I preserve it?
How can I use the Euro Cuisine Yogurt Maker YM80 to guarantee the greatest flavor and texture?
What kind of upkeep and care should I give my Euro Cuisine Yogurt Maker YM80 to maintain it in working order?
Leave a Comment