Power-Xl Pressure Cooker PPC780 Owners Manual | Settings
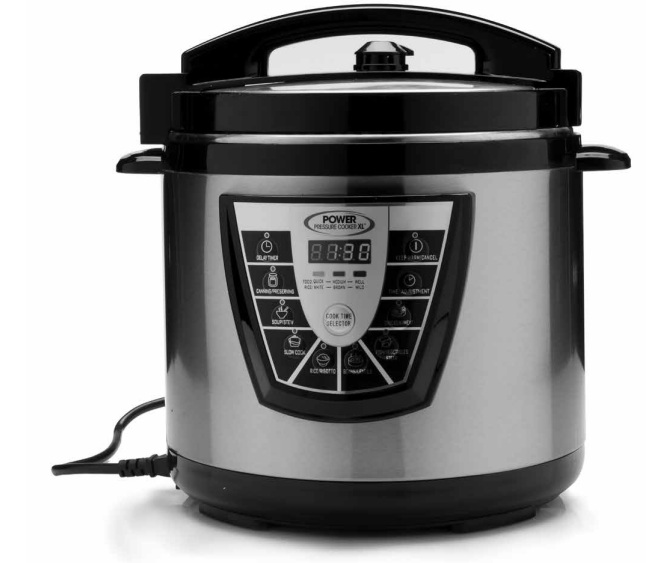
Content
Introduction
The Power-XL Pressure Cooker PPC780 is a multifunctional kitchen appliance that combines the capabilities of a pressure cooker, slow cooker, and steamer, making meal preparation quick and efficient. With a user-friendly digital interface and a large capacity, it allows for versatile cooking options, from soups to desserts. The unit features a non-stick inner pot for easy cleaning and a variety of preset cooking programs to simplify the cooking process. Priced at $69.50, the PPC780 is an excellent choice for busy households looking to save time without sacrificing flavor or nutrition in their meals.
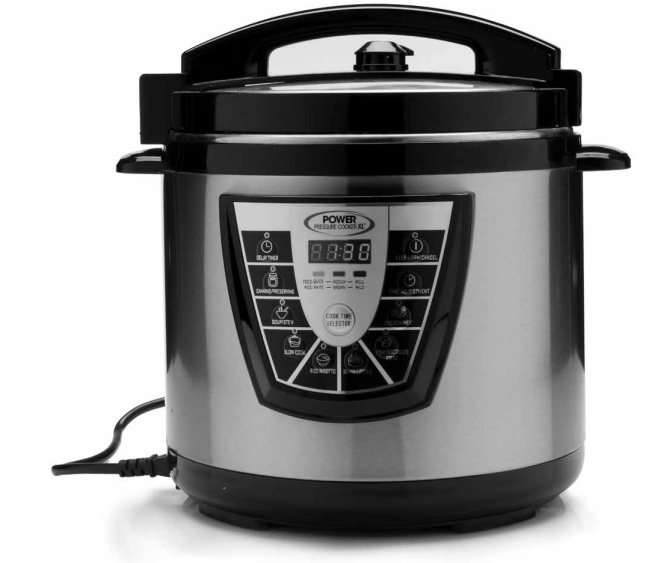
For decades, our culinary design division has created some of the most useful and popular kitchen appliances for worldwide use. The Power Pressure Cooker XL is the latest in our distinguished line. We have tested and perfected the right combination of metals, cooking surfaces and digital technology guaranteed to help you get mealtime raves from the whole family. Once familiar with the “one-touch” pre-set system, you’ll find that many of your favorite family recipes can be cooked perfectly in a fraction of the time. The sealed cooking chamber builds up heat and pressure.
The result ... more flavor stays locked within the food and less energy is wasted in a shorter cooking time. The “sealed” cooking process eliminates messy stovetop spills while “trapping” heat, making for cooler kitchens and easier cleanups. The Power Pressure Cooker XL™ will provide you many years of delicious family meals and memories around the dinner table… but before you begin it is very important that you read this entire manual making certain that you are totally familiar with its operation and precautions.
UNIT SPECIFICATIONS
Model Number | Supply Power | Rated Power | Capacity of InnerPot | Working Pressure | Safety WorkingPressure |
PPC780 | AC 120V 60HZ | 1300W | 8QT | 0-80 kPa | 80-90 kPa |
SPECIAL FEATURES
- The Digital Display on your Power Pressure Cooker XL offers a wide range of choices including Low Temp Cooking, Stewing,Steaming and much more.
- Cooking Time and Pressure Levels may be adjusted to suit any recipe or personal preference. At the completion of the cooking cycle, the unit will automatically shift to the KEEP WARM mode.
- Digital Pressure Cooking utilizes temperatures up to 248O F (120O C) creating a more sterile and healthier environment when compared to traditional cooking methods.
- The Pressure Vent feature allows you to lower pressure quickly and completely. To do so, carefully rotate the Pressure Valve to the Vent position using tongs or another kitchen tool. Never use bare hands.
CAUTION: During this process protect your skin from any contact with escaping steam. - The STEAM mode heats cooking liquid in the Inner Pot to a boil in a matter of minutes, for steaming and cooking an endless variety of foods.
- The KEEP WARM mode holds and keeps cooked food warm for an extended period of time. Foods kept at KEEP WARM mode for periods beyond 4 hours may lose their good flavor and texture.
Built-In Safety Features
- Lid Safety Device: Prevents pressure build-up if lid is not closed properly and prevents lid from opening until all pressure is released.
- Pressure and Temperature Sensor Controls: Maintain even heat and pressure by automatically activating or deactivating the power supply.
- “Back-up” Safety Release Valve: Should the Temperature/Pressure Sensor device malfunction, causing pressure to build beyond maximum setting, the “Back-Up” will automatically “kick in” and release the built up pressure.
- “Clog Resistant” Feature: Prevents food from blocking the steam release port.
- “Spring-Loaded” Safety Pressure Release: Should all safety features listed above fail, this “spring-loaded” device located beneath the heating element will automatically lower the Inner Pot, causing it to separate automatically from the Rubber Gasket. This will enable the steam and pressure to automatically escape around the pot Lid, avoiding a dangerous situation.
- Temperature “Cut-Off” Device: Should the unit malfunction and cause the internal temperature to rise beyond the “Safe” limit, this device will cut-off the power supply and will not automatically reset.
PARTS & ACCESSORIES
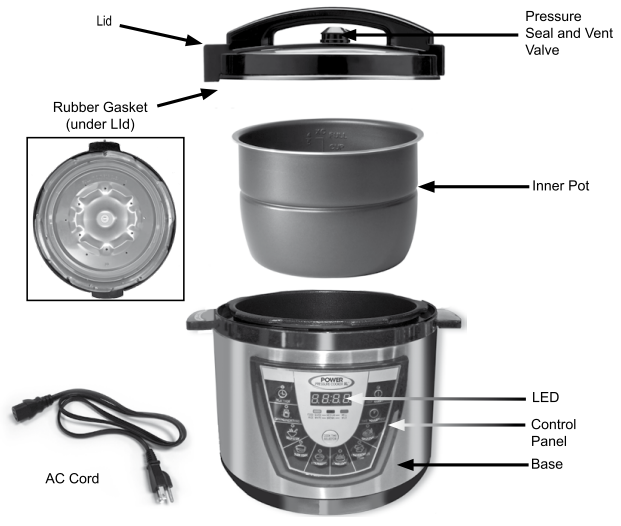
ACCESSORIES

IMPORTANT: Your Power Pressure Cooker XLTM has been shipped with the components shown above. Check everything carefully before use. If any part is missing or damaged do not use this product and contact shipper using the customer service number located on the back cover of the owner’s manual.
Description
The Power-XL Pressure Cooker PPC780 is a high-quality and durable appliance that can help you cook a wide variety of meals quickly and easily. With its 7-quart capacity, you can cook for a crowd or meal prep for the week ahead. The digital display and preset cooking functions make it easy to use, even if you're new to pressure cooking. And with its multiple safety features, you can cook with confidence, knowing that your pressure cooker is safe and reliable. Whether you're making soups, stews, roasts, or even desserts, the Power-XL Pressure Cooker PPC780 can help you create delicious and healthy meals for you and your family.
General Operating Instructions
BEFORE THE FIRST USE
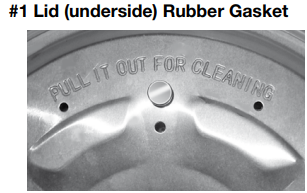
Before using the Power Pressure Cooker XL for the first time, wash the Inner Pot, the Lid and the Rubber Gasket (pictured below # 1) with warm soapy water. Rinse with clean water and dry thoroughly.
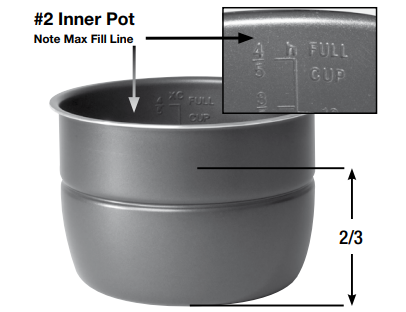
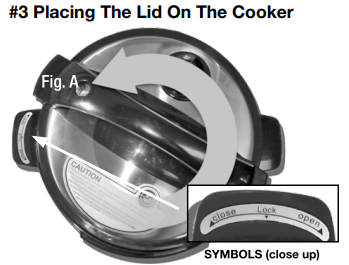
To ensure correct fitting of the Rubber Gasket, fill the Inner Pot (pictured below #2) with water about 2/3 full, place the Lid on the cooker (Pictured below #3), then Rotate the Pressure Valve to the Lock position and run on CANNING mode for 10 minutes. When the cycle is complete, useing tongs or another kitchen tool, carefully rotate the Pressure Valve to the Open position (Pictured below #4) allowing all pressure to escape. Let the appliance cool to room temperature. Pour out the water. Rinse and towel dry the Inner Pot. The Power Pressure Cooker XL is now ready for use.
#1 Lid (underside) Rubber Gasket
For proper cleaning the Rubber Gasket should be removed. Using the Pull Tab located beneath the Lid, remove the Pot Lid Liner that holds the Gasket. After cleaning, re-attach Gasket to Lid Liner and snap back in place.
#2 Inner Pot
#3 Placing The Lid On The Cooker
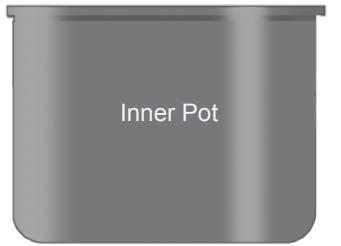
Place Inner Pot into the unit. Never load Inner Pot above the MAX line. Rotate the Inner Pot to make certain that it is seated properly.
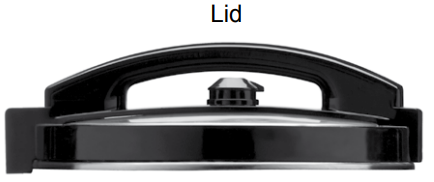
Place Lid on Cooker with Handle and Recessed Valve (Fig. A) pointed to the “10:00 o’clock” position. Rotate Lid counter-clockwise until you feel a click.
HOT LID WARNING: Use black composite handle only when opening lid. The stainless steal parts become very hot and could burn your hands.
#4 Pressure Valve
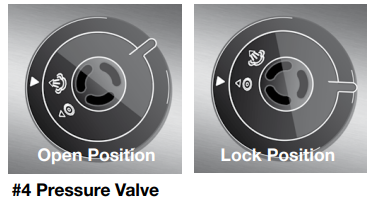
WARNING: Avoid serious injury... Never use your hand to set the Pressure Valve in the Open Position after any cooking process. Use tongs or some other kitchen tool.
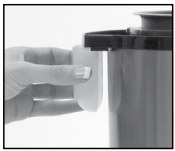
Condensation Collector
The Condensation Collector easily picks up any moisture that may drip off when using your Power Pressure Cooker XL. Simply align and push the collector into the channels on the back of the cooker. Empty and clean after each use.
- Never load Inner Pot above the MAX line. Rotate the Inner Pot to make certain that it is seated properly on the Heating Plate.
- Always be certain the Pressure Valve is free floating and clear of any obstructions.
- Attach the AC Cord to the base of the unit then plug the AC Cord into a dedicated 120V wall outlet.
- Steam and pressure must be released completely from the Cooker before the Lid will open. To do this, carefully follow the instructions on the previous page.
CAUTION: During this process protect your skin by avoiding any contact with escaping steam or the stainless steel portion of the Pot Lid. - Press down gently on Lid and turn clockwise until Lid meets resistance... lift carefully and place aside. Avoid personal injury resulting from hot unit surfaces and dripping liquids.
Note: The “cook times” shown in the recipe booklet do not include the additional time needed to pressurize the unit before cooking begins. Full pressurization could take up to 17 minutes.
Setup Guide
Setting up the Power-XL Pressure Cooker PPC780 is easy.
- First, make sure that the inner pot is securely in place. Then, add your ingredients and select the appropriate cooking function using the digital display.
- Make sure to close the lid and turn the pressure release valve to the "sealing" position.
- Once the pressure cooker has reached the appropriate pressure, it will begin counting down the cooking time. When the cooking time is up, the pressure cooker will switch to the keep warm function automatically.
- To release the pressure, turn the pressure release valve to the "venting" position.
- Once all of the pressure has been released, you can safely open the lid and serve your meal.
Important Safeguards
When using electrical appliances, basic safety precautions should always be followed including the following:
- Read and follow all instructions carefully.
- This appliance is not intended for use by persons with reduced physical, sensory or mental capabilities, or lack of experience and knowledge, unless they are under the supervision of a responsible person or have been given proper instruction in using the appliance. This appliance is not intended for use by children.
- Always be sure the float valve is on correctly before use. Incorrect assembly may prevent the cooker from building pressure or allow steam to come out from the sides of the lid (See page 7 for assembly).
- Do not touch hot surfaces. Use handles or knobs.
- To protect against electric shock do not immerse or rinse cords or plugs in water or other liquid.
- This appliance should never be operated by children and special care should be taken when the unit is in use in their presence.
- Unplug from outlet when not in use and before cleaning. Allow to cool before putting on or taking off parts.
- Do not operate any appliance with a damaged cord or plug or after the appliance malfunctions or has been damaged in any manner. Return appliance to the nearest authorized service facility for examination, repair or adjustment.
- Do not use any attachments or utensils that were not recommended or supplied by the manufacturer. The use of attachments not recommended for use by the manufacturer may cause serious hazardous situations including personal injury.
- Do not use outdoors.
- Do not let cord hang over edge of table or counter, or touch hot surfaces.
- Do not place on or near a hot gas or electric burner, or in a heated oven.
- Extreme caution must be used when moving an appliance containing hot oil or other hot liquids.
- Always attach plug to appliance first, then plug cord into the wall outlet. To disconnect, set any control to ”Off”, then remove plug from wall outlet.
- Do not use appliance for anything other than its intended use.
- This appliance cooks under pressure. Improper use may result in scalding injury. Make certain unit is properly closed before operating. See Instructions For Use.
- Never fill the unit above the MAX LINE in the Inner Pot (Illustration #2, page 4). When using foods that expand during cooking such as rice or dried beans, follow the recipe for “pressure cooking” those products, and as a rule of thumb, do not fill the unit above the “halfway” point. Overfilling may cause clogging, allowing excess pressure to develop. See Instructions For Use.
- Be aware that certain foods, such as applesauce, cranberries, pearl barley, oatmeal or other cereals, split peas, noodles, macaroni, rhubarb, and spaghetti, can foam, froth, sputter, and clog the pressure release device (steam vent). Recipes using these items must be followed carefully to avoid problems.
- Always check the pressure release devices for clogs before use.
- Do not open the Power Pressure Cooker XL until the unit has cooled and all internal pressure has been released. If the unit is difficult to open, this indicates that the cooker is still pressurized –do not force it open. Any pressure in the cooker can be hazardous.
- Do not use this pressure cooker for pressure frying with oil.
- This appliance has been designed for use with a 3 prong, grounded, 120V electrical outlet only. Do not use any other electrical outlet.
- The Power Pressure Cooker XL generates extreme heat and steam in its operation. All necessary precautions must be taken to avoid fire, burns and other personal injury during its operation.
- When in operation the Power Pressure Cooker XL requires sufficient air space on all sides including top and bottom. Never operate the unit near any flammable materials such as dish towels, paper towels, curtains, paper plates, etc.
- Always plug the electrical cord directly into the wall outlet. Never use this unit with an extension cord of any kind.
- Anyone who has not fully read and understood all operating and safety instructions contained in this manual is not qualified to operate or clean this appliance.
- If this unit falls or accidentally becomes immersed in water, unplug it from the wall outlet immediately. Do not reach into the water!
- Do not operate this appliance on an unstable surface.
- If this appliance begins to malfunction during use, immediately unplug the cord. Do not use or attempt to repair a malfunctioning appliance!
- NEVER FORCE OPEN the Power Pressure Cooker XL. If you need to open the Power Pressure Cooker XL, press the ”KEEP WARM/CANCEL” button and using tongs or a kitchen tool carefully rotate the Pressure Valve to the OPEN position (fig. 4, page 4) to fully release the building pressure inside the cooker. Make sure that all the steam has dissipated from the cooker. Carefully turn the handle clockwise to open. Always open the lid away from you to avoid skin contact with any remaining heat or steam.
- CAUTION: TO REDUCE RISK OF ELECTRIC SHOCK, COOK ONLY IN THE REMOVABLE CONTAINER. Do not immerse the housing or base in water. Before use, clean the bottom of the Inner Pot and the surface of the heater plate… insert the Inner Pot, turning it slightly clockwise and counterclockwise until you are sure it is sitting correctly on the heater plate. Failure to do so will prevent proper operation and may cause damage to the unit.
- CAUTION HOT SURFACES. This appliance generates heat and escaping steam during use. Proper precautions must be taken to prevent the risk of personal injury, fires, and damage to property.
- When moving the pressure cooker, use the carry handles and not the lid handle.
SAVE THESE INSTRUCTIONS FOR HOUSEHOLD USE ONLY.
SHORT CORD INSTRUCTIONS
A short power-supply cord is provided to reduce the risk resulting from becoming entangled in or tripping over a longer cord. Do not use an extension cord with this product.
ELECTRIC POWER
If the electrical circuit is overloaded with other appliances, your appliance may not operate properly. It should be operated on a dedicated electrical circuit.
NOTE: This product must be grounded. If it should malfunction or break down, grounding provides a path of least resistance for electric current to reduce the risk of electric shock. This product is equipped with a cord having an equipment grounding conductor and a grounding plug. The plug must be plugged into an appropriate outlet that is properly installed and grounded in accordance with all local codes and ordinances.
CARE AND CLEANING
- CLEANING THE SAFETY DEVICES: In addition to the gasket, the other safety devices on the Power Pressure Cooker XL must also be cleaned after each use.
- THE PRESSURE VALVE: To remove the Pressure Valve, simply pull up and valve will release from its spring lock mechanism. Apply mild detergent and wash it under warm running water. After cleaning, check to see that the interior spring-loaded part moves freely by pressing down on it. Put the Pressure Valve back in place by pushing it down onto the spring-loaded mechanism. This appliance requires little maintenance. It contains no user serviceable parts. Do not try to repair it yourself. Contact customer service for qualified repair information.
- TO CLEAN: After use, unplug unit and allow to cool completely before cleaning. The Power Pressure Cooker XL must be cleaned thoroughly after each use in order to avoid staining caused by a build-up of food or cooking residue.
DO NOT POUR COLD WATER INTO A HOT Power Pressure Cooker XL.
Note: To ensure safe operation of this Power Pressure Cooker XL, strictly follow the cleaning and maintenance instructions after each use, should a tiny bit of food (such as a grain of rice or pea shell) remain in the unit, it could prevent the safety devices from operating during subsequent use.
IMPORTANT: Always remove the Pressure Valve and clean the opening with pin to remove any blockage that might have occurred during the cooking process. This must be done after each use. The removable cooking pot and Lid are immersible for cleaning. Rinse cooking pot and Lid under hot running water. Use only a mild liquid detergent and a soft cloth, sponge or nylon scrubber for cleaning. Do not use abrasive powders, bicarbonate of soda or bleach. Do not use scouring pads.
WIPE BASE AFTER EACH USE WITH A SOFT, DAMP CLOTH OR SPONGE, MAKING SURE ALL FOOD RESIDUE IS REMOVED. DO NOT IMMERSE BASE IN WATER
When cleaning the Lid, the Rubber Gasket (page 4, Illustration #1) must be removed and washed separately with a sponge or soft cloth and warm, soapy water.
- Unplug and let the Power Pressure Cooker XL cool to room temperature before cleaning.
- Wash the removable pot with warm, soapy water and clean with a soft cloth or sponge. Rinse off with clean water and towel dry.
- The Rubber Gasket must always be properly positioned on the underside of the Lid. Check periodically to make sure that it is clean, flexible and not torn. If damaged, do not use this unit.
- Wipe the mirror finished outer Housing with a damp soft cloth or sponge (glass cleaner gives housing a brilliant lustre).
- Never use harsh chemical detergents, scouring pads or powders on any of the parts or components.
- Always check that the Pressure Valve and Float Valve are in good working order and debris free.
General Operating Instructions
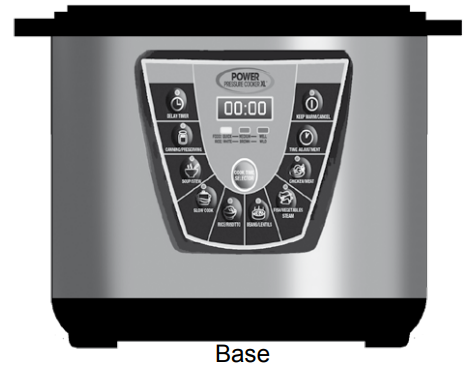
DIGITAL CONTROL PANEL
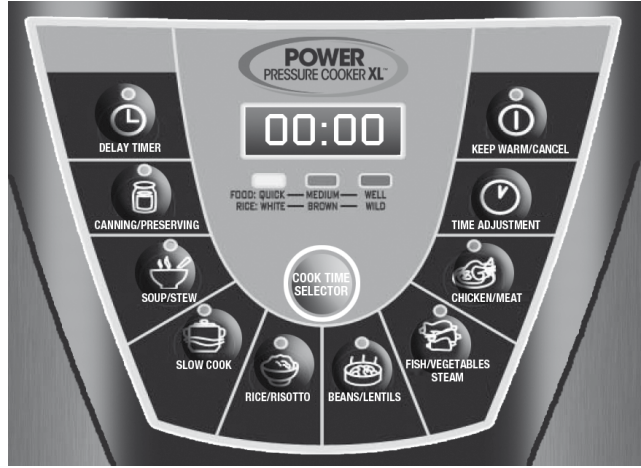
The Power Pressure Cooker XL has seven basic cooking modes that may be used alone or in combination to produce an infinite variety of results.
WHEN THE UNIT IS FIRSTPLUGGED IN, 0000 will appear on the LED Display. When a cooking process is selected, such as CANNING/PRESERVING, the default time will be displayed for 5 seconds in the LED window. Then a rotating effect will appear on the screen to signify it is building pressure. Once pressure is built, the rotating effect will end and the display will begin counting down the time. When the process is completed, the unit will beep and enter KEEP WARM mode until cancelled.
COOK TIME SELECTOR BUTTON: When a specific cooking program is selected, the unit will display the default time in the LED window and the “Food:Quick” indicator below the LED window will light. Should your recipe or personal taste require “Medium” or “Well” results, you may select those options by pushing the Cook Time Selector button. In addition, the Cook Time Selector Button may be used when cooking Rice to select the perfect program for White, Brown or Wild varieties.
NOTE: You may override pre-programmed time by selecting the Time Adjustment button. IMPORTANT: Any function can be stopped immediately by selecting the CANCEL button.
Programme Setting
Program Buttons | Default Time | Quick- Med-Well Select Button | Cook Time Adjust Range | Temperature ° C ° F | Pressure kPa PSI |
Delay Timer | N / A | N / A | 0-24 hrs |
|
|
Canning / Preserving | 10 mins | 10-45-120 mins | 10-120 mins | 116 241 | 82.7 12 |
Soup / Stew | 10 mins | 10-30-60 mins | 10-60 mins | 109 228 | 50 7.2 |
Slow Cook | 2 hrs | 2-6-12 hrs | 2-12 hrs | 79-93 174-199 | <30 <4.3 |
Rice / Risotto | 6 mins | 6-18-25 mins | 6-25 mins | 109 228 | 50 7.2 |
Beans / Lentils | 5 mins | 5-15-30 mins | 5-30 mins | 109 228 | 50 7.2 |
Fish / Veg. / Steam | 2 mins | 2-4-10 mins | 2-10 mins | 109 228 | 50 7.2 |
Meat / Chicken | 15 mins | 15-40-60 mins | 15-60 mins | 109 228 | 50 7.2 |
Time Adjustment | 10 mins | N / A | 10-120 mins |
|
|
Cancel / Keep Warm | N / A | N / A | N / A |
|
|
IMPORTANT INFORMATION
If there is steam coming out the sides and the Pressure Valve on top of the Lid is in the Lock position, then the Lid has not seated. This sometimes happens when the unit is new. If the gasket is in place try pushing down on the Lid. This should seal the Lid and the steam should stop coming out. It is also important to be sure the Float Valve is assembled correctly. Incorrect assembly may cause steam to come out the sides or prevent pressure from building. The Float Valve should be able to move up and down freely only stopping when the silicon gasket meets the Lid. It is however normal for condensation to appear in the condensation collector. See illustration below for assembly.
Hold the head of the Float Valve and insert the fluted end into the hole in the Lid of the unit with a pencil or any other slim tool. Push and hold the head of the Float Valve tightly in place and reverse the Lid to the underside.
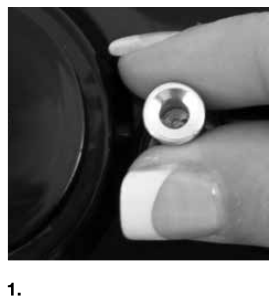
Place the silicon gasket onto the fluted end of the Float Valve so it sits in the groove.
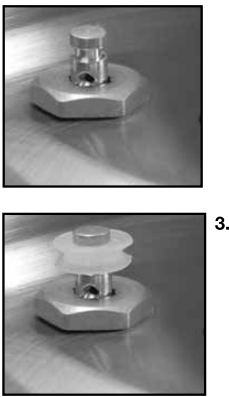
The Float Valve should be able to move up and down freely only stopping when the silicon gasket meets the Lid.
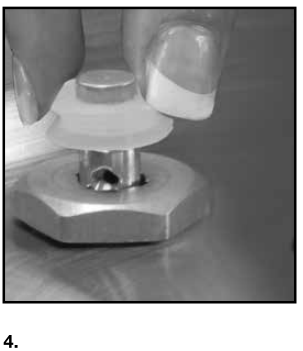
General Operating Instructions
PRESSURE COOKING CHARTS
Meats | Liquid / Cups | Approximate Minutes |
| Beef/Veal, roast or brisket | 3-4 | 35-40 |
| Beef Meatloaf, 2 lbs | 1 | 10-15 |
| Beef, Corned | 4 | 50-60 |
| Pork, roast | 1 | 40-45 |
| Pork, ribs, 2 lbs. | 3 | 20 |
| Leg of Lamb | 2-4 | 35-40 |
| Chicken, whole, 2-3 lbs. | 3-4 | 20 |
Chicken, pieces, 2-3 lbs. | 3-4 | 15-20 |
Cornish Hens, two | 1 | 15 |
Meat/Poultry Soup/Stock | 4-6 | 15-20 |
Seafood / Fish | Liquid / Cups | Approximate Minutes |
Clams | 1 | 2-3 |
Lobster, 1 1/2 - 2 lbs. | 1 | 2-3 |
Shrimp | 1 | 1-2 |
Fish, Soup or Stock | 1-4 | 5-6 |
Vegetables | Liquid / Cups | Approximate Minutes |
Asparagus, thin whole | 1 | 1 -2 |
| Beans, fava | 1 | 4 |
| Beans, green | 1 | 2-3 |
| Beans, lima | 1 | 2 |
| Beets, medium | 1 | 10 |
| Broccoli, pieces | 1 | 2 |
| Brussel sprouts, whole | 1 | 4 |
| Carrots, 1-inch pieces | 1 | 4 |
| Corn, on-the-cob | 1 | 3 |
| Pearl Onions, whole | 1 | 2 |
| Potatoes, 1 1/2”chunks | 1 | 6 |
| Potatoes, whole, medium | 1 | 10-11 |
| Squash, acorn, halved | 1 | 7 |
| Squash, summer, zucchini | 1 | 4 |
NOTE: All pressure cooking modes require the addition of liquid in some form (water, stock, etc.). Unless you are familiar with the pressure cooking process, follow recipes carefully for liquid addition suggestions. Never fill inner pot above MAX line. Always use Pressure Valve to lower pressure quickly.
Pressure Canning Guide
Great Food Anytime...
The canning process will enable you to prepare and preserve all of your family’s favorites including fresh and cooked fruits, vegetables, meats, jams and jellies. Canning is a great way to bring “out of season” foods to the table economically. You can buy in bulk now at low prices and preserve for the future when items are scarce and more costly.
NOTE: It is important that you read this guide carefully following all steps to ensure that the food has been processed to preserve its nutritional value and is safe for consumption by your family. Improper canning can lead to serious health consequences.
Pressure Canning
The Pressure Canning process can be used for all foods and particularly for those containing little acid. These include vegetables, meats and seafood.
When canning there is no room for experimentation. Altering cooking time, ingredients and temperatures can be dangerous and risky. Using the exact time, temperature and method specified in the recipe will protect the food from harmful bacteria, molds and enzymes. Adding too much time to a recipe will destroy nutrients and flavor.
Food enzymes can promote the growth of molds and yeasts, which in turn will cause food to spoil. These agents can be destroyed by achieving a temperature of 212° with steam canning methods however other contaminants may develop such as salmonella, staphylococcus aureus, and clostridium botulinum, the cause of botulism. Killing these harmful bacteria requires a temperature of 240° provided only by the Pressure Canning process.
Food Acidity
The lower the acid content in the food, the greater the potential for spoilage and contamination. Many foods such as fruits are high in acid where as others such as meats, dairy products and sea foods have low acid levels. (see charts below) Proper Pressure Canning minimizes the possibility of spoilage and contamination.
Examples of High Acid Foods Examples of Low AcidFoods | ||||
Apples | Oranges |
| Asparagus | Mushrooms |
Applesauce | Peaches | Beans | Okra | |
Apricots | Pears | Beets | Peas | |
Berries | Pickled Beets | Carrots | Potatoes | |
Cherries | Pineapple | Corn | Seafood | |
Cranberries | Plums | Hominy | Spinach | |
Fruit Juices | Rhubarb | Meat | Winter Squash | |
Raw Packing and Hot Packing
Fresh foods contain air. The shelf life of canned food depends on how much air has been removed during the canning process. The more air removed, the longer the shelf life.
Raw Packing is the process of canning fresh but unheated foods. The process causes foods such as fresh fruit to float in their jars. Raw packed foods tend to lose color over time. Raw packing may be preferable in some recipes.
Hot Packing is the process of canning foods that have been pre-cooked prior to packing them in their jars. This reduces the air in the food.
Regardless of the method used, all liquids added to the foods should always be heated to a boiling point. This will remove excess air, shrink the foods, prevent floating and create a tighter seal.
IMPORTANT INFORMATION
Altitude and Pressure Canning
The temperature at which water will boil can vary depending upon your location in regards to sea level. The Power Pressure Cooker XL will operate properly up to a maximum altitude of 2,000 ft. above sea level. Do not use this unit for pressure canning above an altitude of 2,000 ft.
Processing Time and Pressure
The chart below demonstrates proper processing time and pressure for various foods using your Power Pressure Cooker XL. The CANNING button sets the pressure. A kPa setting of 80 is equal to 11.6 lbs. PSI. At up to 2,000 ft. above sea level, the Power Pressure Cooker XL with a kPa 80 setting will produce sufficient pressure and heat to safely process all foods for canning.
| Food Item | Packing Conditions | Set Pressure to 80 kPa |
|---|---|---|
| Asparagus | Hot & Raw | 30 minutes |
| Beans (green) | Hot & Raw | 20 minutes |
| Beans (lima, pinto, butter or soy) | Hot & Raw | 40 minutes |
| Beets | Hot | 30 minutes |
| Carrots | Hot & Raw | 25 minutes |
| Corn, whole-kernel | Hot & Raw | 55 minutes |
| Greens | Hot | 70 minutes |
| Okra | Hot | 25 minutes |
| Peas, Green or English | Hot & Raw | 40 minutes |
| Potatoes, white | Hot | 35 minutes |
| Meat Strips, Cubes, or Chunks | Hot or Raw | 75 minutes |
| Ground or Chopped Meat | Hot or Raw | 75 minutes |
| Poultry, without bones | Hot or Raw | 75 minutes |
| Poultry, with bones | Hot or Raw | 65 minutes |
For processing times and methods for additional low-acid foods, please refer to the National Center for Home Food Preservation (http://www.uga.edu/nchfp/): or your local county extension agent.
Safe Canning Tips
- Do not use over-ripe fruit. Bad quality degrades with storage.
- Do not add more low-acid ingredients (onions, celery, peppers, garlic) than specified in the recipe. This may result in an unsafe product.
- Don’t over-season with spices. Spices tend to be high in bacteria making canned goods unsafe.
- Do not add butter or fat. Fats do not store well and may increase the rate of spoilage.
- Thickeners – never use flour, starch, pasta, rice or barley. Use only USDA recommended Clear Jel.
- DO add acid (lemon juice, vinegar or citric acid) especially to tomato products when directed in the recipe. If necessary, you can balance the tart taste by adding sugar.
Getting Started Power-XL Pressure Cooker PPC780
Your Power Pressure Cooker XL is designed to accommodate 4 - 16 oz. (1 pint) wide mouth jars per canning session. We suggest you use jars with self-sealing lids.
Jar Cleaning
Always wash empty jars in hot water with detergent by hand or in dishwasher. Rinse thoroughly. Scale or hard-water films on jars are easily removed by soaking jars several hours in a solution containing 1 cup of vinegar (5 percent acidity) per gallon of water.
Lid Preparation
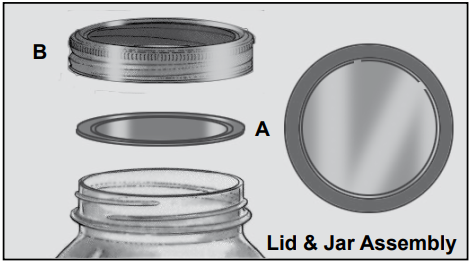
The self-sealing lid (A) consists of a flat metal lid held in place during processing by a metal screw band (B). When jars are processed, the lid gasket softens to form an airtight seal with the jar. To ensure a good seal, carefully follow the manufacturer’s directions in preparing lids for use. Examine all metal lids carefully.
Do not use old, dented, or deformed lids, or lids with gaps or other defects in the sealing gasket.
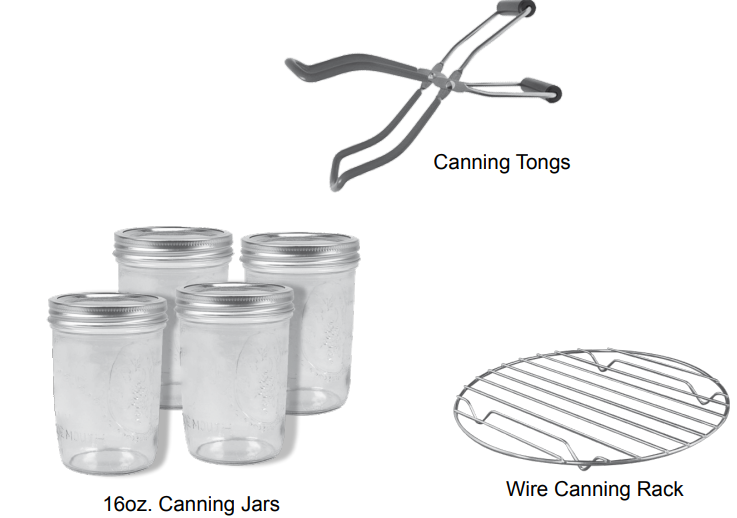
Additional Accessories You May Need
The Power Pressure Cooker XL Pressure Canning Process
To begin, select a recipe that has been pre-tested and approved for pressure canning. Though ingredients vary, generally speaking you will be processing the food as demonstrated in this guide.
- Select a pre-tested pressure can-ning recipe. Choosing only the fresh-est ingredients, prepare the food as instructed. Vegetables and fruits should be at their peak of fresh-picked ripeness.
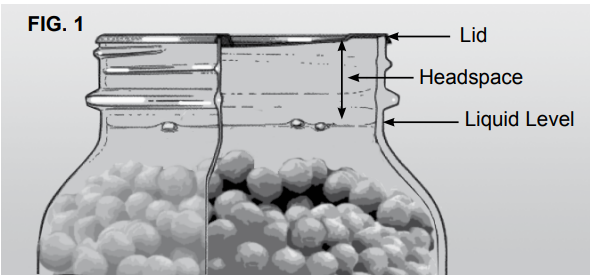
Fill 16 oz. clean canning jars to the level shown in FIG.1. Any liquid should not exceed the level shown in FIG.1, so that there remains a head-space at the top of approximately 1 inch.
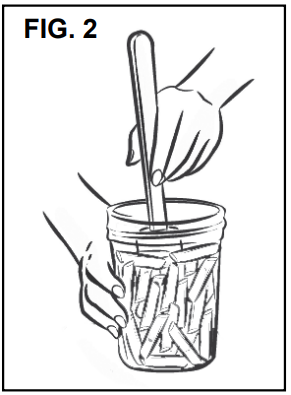
Using a flexible nonporous spatula gently press between the food and the jar to remove any trapped air bubbles as in FIG.2.
Place a clean lid on top of the jar and then add a screw band. Turn clockwise and hand tighten in place as in FIG.3.
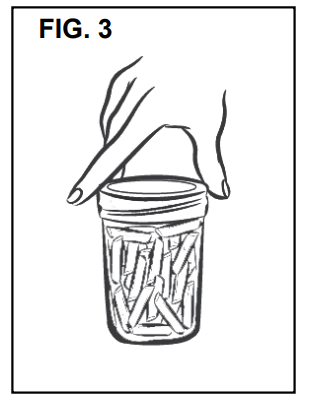
If screw bands are too tight, air cannot vent during processing, and food will discolor during storage. Over tightening also may cause lids to buckle and jars to break, especially with raw-packed, pressure-processed food. Screw bands are not needed on stored jars. They should be removed after jars are cooled.
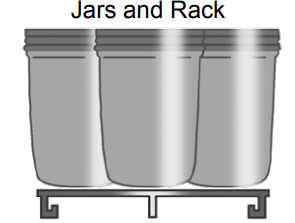
When removed, washed, dried, and stored, screw bands may be used many times. If left on stored jars, they become difficult to remove, often rust, and may not work properly again.Place the Inner Pot in the base unit. Then put the Wire Rack in the bottom of the Inner Pot. Place Filled, sealed Jars on Rack. Unit will hold up to 4-16 oz. jars (maximum).
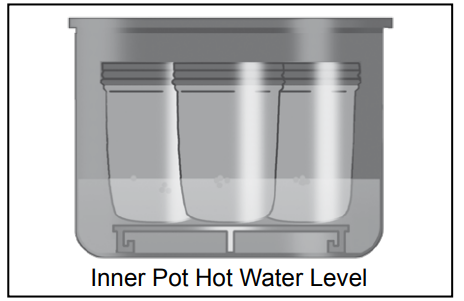
- Pour hot water over the jars and into the Inner Pot until the water level reaches 1/4 of the way up the sides of the jars. For 4-16 oz. jars this would be about 6 cups of water. When processing fewer jars, more water would be needed.
- After reading the Owner’s Manual, put the lid on the base and lock in place. Plug the unit into the wall outlet.
- Select the Canning/Preserving button. The Unit will default to the Canning program automatically setting the pressure at 80 kPa. Now you will need to set the Cook Time as per your recipe.
When the canning process is complete, select the Cancel button. Unplug the unit and Set the Pressure Valve to the Open position. Once all the steam has escaped, Carefully remove the lid.
Using Canning Tongs, remove the hot jars and place them on a heat resistant surface and allow to cool to room temperature.
- When jars are thoroughly cool, remove the Screw Bands. The lids should be tightly sealed to the jars and when pressed in the center they should not have any “give” or springing motion. If they do, you can not safely store this food for future use. It must be reprocessed immediately or refrigerated and used within a few days.
Place the finished jars on shelves in a cool, clean, dry atmosphere. Properly processed food will last for months and seasons. Jars, lids and screw bands are reusable. Check all carefully for damage before reuse.
IMPORTANT: The Power Pressure Cooker XL when used as a pressure canning device does not have an effective operating capacity for more than 2,000 ft. above sea level.
Manufacturer’s Warranty
The manufacturer warrants that your Power Pressure Cooker XL is free of defects in materials and workmanship and will, at its option, repair or replace any defective Power Pressure Cooker XL that is returned to it. All parts and components of the Power Pressure Cooker XL are warranted for 60 days from the original date of purchase. This warranty is valid only in accordance with the conditions set forth below:
Troubleshooting
If you're having trouble with your Power-XL Pressure Cooker PPC780, here are a few common problems and solutions to help you troubleshoot:
- The pressure cooker isn't building pressure: Make sure that the lid is closed and locked, and that the pressure release valve is in the "sealing" position.
- The pressure cooker is beeping and won't start: Make sure that the inner pot is securely in place, and that the lid is closed and locked.
- The food is overcooked or burnt: Make sure to check the cooking time and pressure level for your recipe, and adjust as necessary.
- The pressure release valve is leaking: Make sure that the pressure release valve is turned to the "sealing" position during cooking, and that it is not obstructed.
Pros & Cons
Pros:
- 7-quart capacity
- Digital display with preset cooking functions
- Multiple safety features
- Dishwasher safe
Cons:
- The inner pot could be heavier
- The lid can be difficult to clean
Customer Reviews
Customers love the Power-XL Pressure Cooker PPC780 for its versatility, ease of use, and quick cooking times. They appreciate the digital display and preset cooking functions, and find that the pressure cooker makes it easy to cook a wide variety of meals. Some of the most common complaints include the weight of the inner pot and the difficulty of cleaning the lid.
Faqs
What is the capacity of the Power-XL?
What materials is the PPC780 made of?
Does the Power-XL Pressure have a digital display?
Does the Power-XL PPC780 have multiple safety features?
What is the estimated price of the Power-XL Pressure Cooker PPC780?
When was the Power-XL launched?
What is the weight of the inner pot of the Power-XL?
What is the warranty of the PPC780?
Leave a Comment
