How to Connect: D-Link Wi-Fi Range Extender DAP-1860 User Manual
Content
Introduction
The D-Link DAP-1860 AC2600 Wi-Fi Range Extender extends your Internet connection over a blazing-fast Gigabit Wireless AC connection of up to 2532 Mbps (up to 1732 Mbps via 5 GHz Wireless AC and up to 600 Mbps via 2.4 GHz Wireless N)¹, by using advanced AC beamforming technology to maximize the speed and range of your wireless signal. The DAP-1860 connects with your existing networking equipment to extend the range and enhance the capabilities of your home or office network. This means you can bring Wi-Fi to places where your current signal doesn’t reach, letting you move from room to room, office to office, floor to floor, or yard to yard without losing signal. Enjoy Wi-Fi on your porch, balcony, next to your pool, breakroom, the far end of your office, or in your basement. The DAP-1860 prepares your home to become a Connected Home by allowing you to install more wireless surveillance cameras, baby monitors, sensors, and alarms in the places where you want rather just where your old signal reached. Featuring a 4x4 MIMO antenna configuration, the DAP-1860 offers better data rates, fewer dead-spots, more coverage, and higher reliability. Built with AC SmartBeam technology, the DAP-1860’s intelligent radios will direct wireless signals to exactly where they are needed. Operating exclusively in the 5 GHz band, the DAP-1860’s 802.11ac wireless connections avoid crowded 2.4 GHz band traffic, giving you faster speeds while still maintaining backwards compatibility with older 802.11n/g/b devices. The DAP-1860’s superior design allows you to enjoy full motion, high definition video calls on your mobile device while moving around. Equipped with a Gigabit LAN/Internet port to provide speeds up to 10x faster than standard 10/100 ports, the DAP-1860 creates the best networking experience to date.
The DAP-1860 AC2600 Wi-Fi Range Extender features D-Link’s Smart Signal LED technology which makes finding the optimal location for your extender a cinch. With other range extenders, it is difficult or impossible to gauge how strong or weak the connection between an extender and an uplink network is, but the DAP-1860’s Smart Signal LEDs eliminate the guesswork by giving you instant visual feedback so you can quickly test out multiple locations to find the best place for the DAP-1860. The DAP-1860's Smart Connect Technology makes connecting to wireless networks easy by eliminating the confusion of multiple networks. Ever since the introduction of 5 GHz multi-band wireless technology, users have had to guess whether the 5 GHz or 2.4 GHz band network would provide them with better range and speed. Smart Connect simplifies this by only presenting a single wireless network for the user to connect to. Behind the scenes, the DAP-1860's advanced algorithms determine the best band for your device to connect to, automatically distributing devices to the optimal speed and band, thereby ensuring a faster, more reliable, and hassle-free experience for all of your users and devices.
Package Contents
DAP-1860 AC2600 Wi-Fi Range Extender

Wi-Fi Configuration Card

Quick Installation Guide

If any of the above items are missing, please contact your reseller.
Technical Specifications
Standards
- IEEE 802.11ac
- IEEE 802.11a
- IEEE 802.11n
- IEEE 802.11g
- IEEE 802.11b
Wireless Frequency Range 1
- 2.4 GHz to 2.4835 GHz
- 5.18 GHz to 5.85 GHz USA
- 5.15 GHz to 5.175 GHz European Countries
Device Interfaces
- 802.11ac/n/g/b/a Wireless LAN
- 10/100/1000 Gigabit Ethernet Port
- Reset Button
- WPS Button
- Status/WPS LED
- 3 Segment Wi-Fi Smart Signal LED
Antenna
- Four External Antennas
Security
- Wi-Fi Protected Access (WPA/WPA2)
- Wi-Fi Protected Setup (WPS)
- Wired Equivalent Privacy (WEP) 64/128-bit
Advanced Features
- QRS Mobile setup app for iOS and Android devices
Device Management
- Web UI
Operating Temperature
- 0 to 40 ˚C (32 to 104 ˚F)
Storage Temperature
- Storage: -20 to 65 °C (-4 to 149 °F)
Operating Humidity
- 10% to 90% non-condensing
Storage Humidity
- 5% to 95% non-condensing
- Power Input
- AC 100-240 V
Maximum Power Consumption
- 11.54 W
Certifications
- FCC
- ISED
- CE
- C-Tick
- RoHS
- CB
- LVD
- WPS Setup
- Wi-Fi Certified
Dimensions
- • 158.5 x 69.8 x 51 mm (6.24 x 2.75 x 2.01 inches)
Weight
- • 380 grams
System Requirements
Network Requirements
- A wireless router with an active Internet connection.
- IEEE 802.11ac, 802.11n, 802.11g, 802.11b, or 802.11a wireless clients/devices.
Web-based Configuration Utility Requirements
- A Computer or Mobile Device with the following:
- Windows, Apple Mac OS, or Linux-based operating system.
- Wireless adapter or Wi-Fi functionality.
- An Apple iPhone, iPod touch, iPad, or Android mobile device.
Browser Requirements
- Internet Explorer 10 or later.
- Firefox 20.0 or later.
- Safari 6 or later.
- Google Chrome 28 or later.
Features
Superior Wireless Networking
The DAP-1860 AC2600 Wi-Fi Range Extender lets you easily extend a secure wireless network with a press of a button. Connect the DAP-1860 to a router via Wi-Fi or Ethernet and share your high-speed Internet access in more places throughout your home or small office. The DAP-1860 provides Gigabit wireless speeds of up to a combined 2532 Mbps (1732 Mbps 802.11ac 5 GHz, plus 600 Mbps 802.11n 2.4 GHz)¹. This capability rivals wired connections, allowing users to participate in real-time activities online, such as HD video communication, online gaming, and use mobile devices from anywhere in your home while still offering full 802.11n/g/b backward compatibility.
Simple Setup
All it takes is a press of a button to connect compatible WPS devices to the DAP-1860. Its easy-to-use web interface lets you quickly and easily connect the DAP-1860 to an uplink router, configure the extended wireless network, and manage administrative settings. The setup wizard will even guide you through the setup process, getting your extended wireless network up and running in no time. Alternatively, connect an Ethernet cable to your existing network infrastructure to quickly and easily create a wireless network.
Smart Connect
Creates a ‘single’ wireless network for your devices to connect to. Behind the scenes, the DAP-1860 automatically determines whether to connect a device to the 2.4 or 5 GHz band, thereby providing the best speed and range for each device and optimally distributing devices between networks.
Latest Wireless Network Security and Encryption Standard
The DAP-1860 is fully compatible with the latest 802.11ac standard, but is also backwards compatible with IEEE 802.11n/g/b/a wireless devices, so you can use your existing devices without sacrificing performance.
¹ Maximum wireless signal rate derived from IEEE Standard 802.11b, 802.11g, 802.11a, 802.11n, and 802.11ac specifications. Actual data throughput will vary. Network conditions and environmental factors, including volume of network traffic, building materials and construction, and network overhead, lower actual data throughput rate. Environmental conditions will adversely affect wireless signal range.
What is a Wireless Extender?
The DAP-1860 acts as a repeater to extend the range of an existing wireless network to provide a better signal for parts of your home or office that may have poor or no reception. Your existing wireless signal will be rebroadcast by the DAP-1860, allowing you to reach the farthest corners of your home or office. The extended network can simply use the same network credentials as the existing network, or you can specify a different network name and password, giving you the flexibility to control network access. You may also use the DAP-1860 as a wireless access point by connecting an Ethernet cable.
Extend Your Wireless Network using Wi-Fi

Create a Wireless Network using Ethernet

Hardware Overview
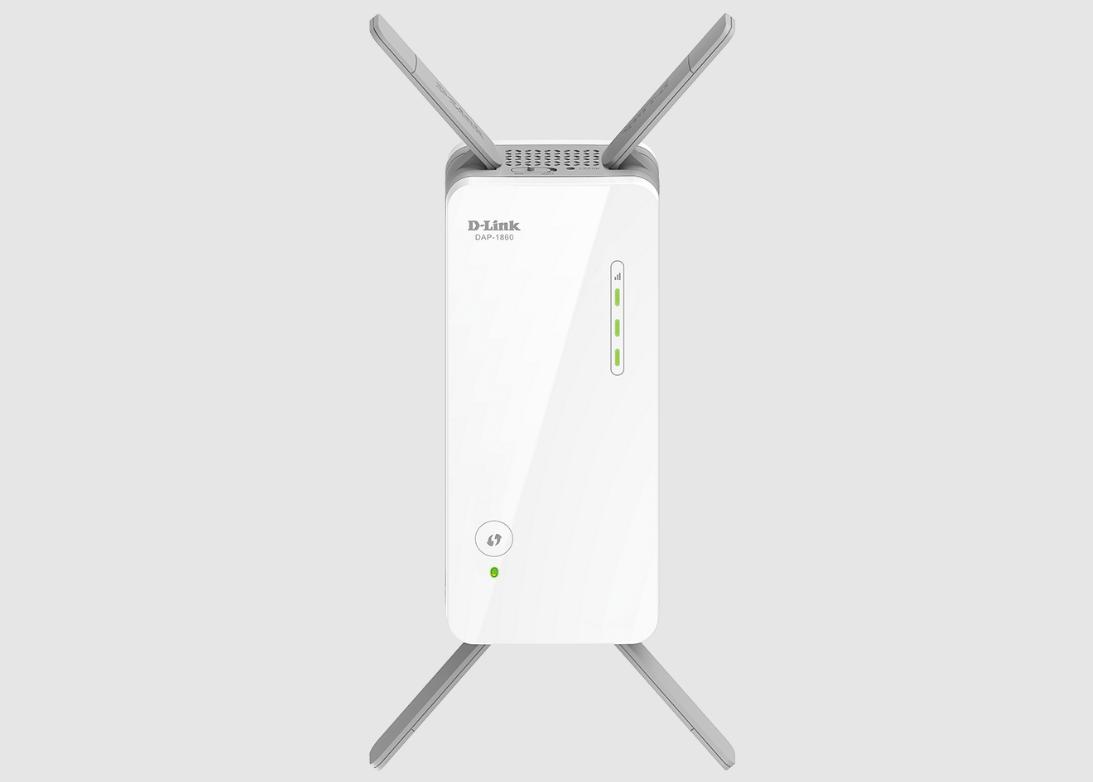
Front and Side

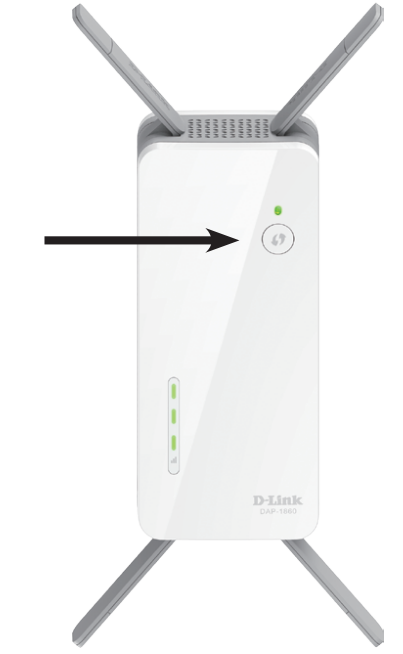
- Status/WPS LED: This LED indicates the current status of the DAP-1860, as detailed on the next page.
- WPS Button: Press to establish a connection with another WPS compatible device. Refer to Using the WPS Button on page 46 for more information.
- Signal Indicator LED: The more lit green bars on the Signal Indicator LED, the better the wireless signal to the host network. A single solid amber LED indicates a weak Wi-Fi signal.
- LAN Port: Connect an Ethernet cable if you are adding wireless to a wired network.
Status/WPS LED Indicator
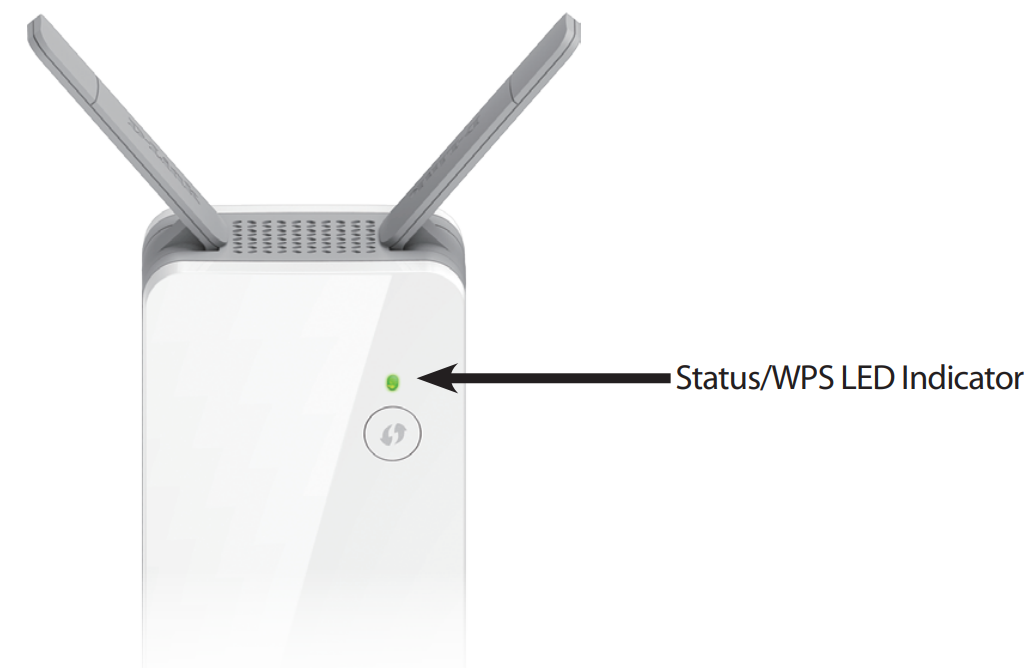
| LED Indicator Color | Status | Description |
|---|---|---|
| Green | Solid | The DAP-1860 is receiving power and connected to a host network. |
| Blinking | WPS mode is active and ready to add a wireless device. | |
| Red | Solid | The DAP-1860 is booting or an error has occurred. |
| Amber | Blinking | The DAP-1860 is not connected to a host network. |
| None | Off | Device is not receiving power. Check the power outlet. |
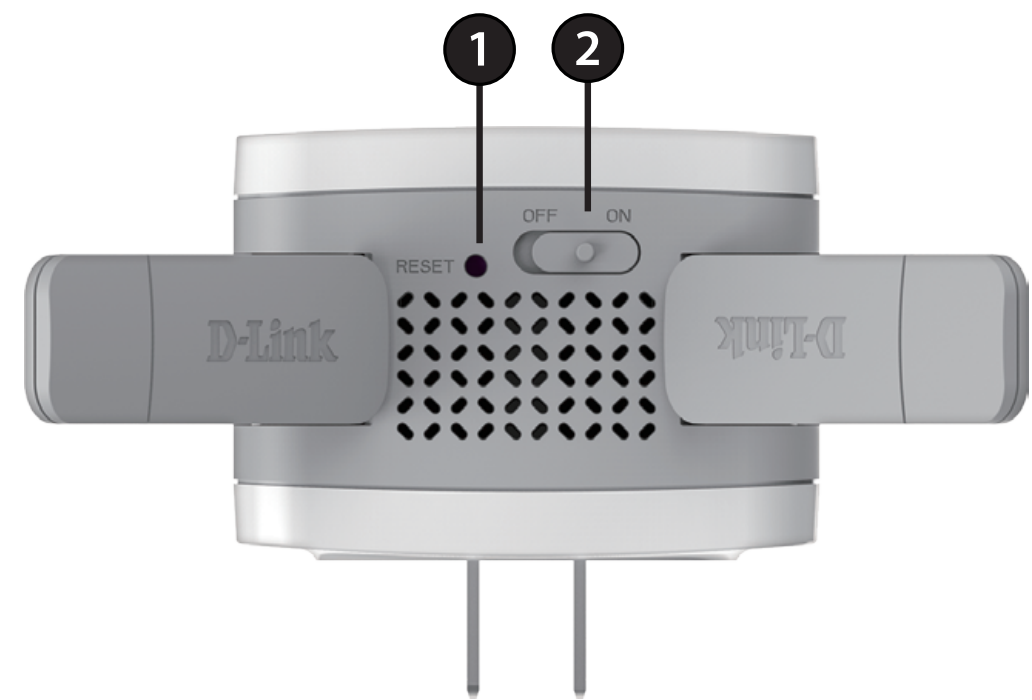
Bottom
- Reset Button: Use an unfolded paperclip to press and hold the reset button on the bottom of DAP-1860 for 10 seconds to restore the factory default settings.
- Power Switch: Use the power switch to power the DAP-1860 when it will not be in use for an extended period of time. The factory default is ON.
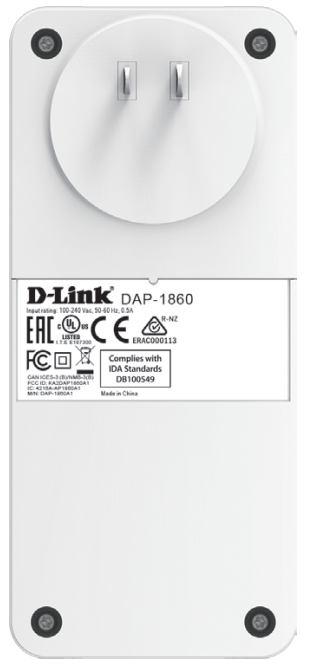
Back
- You may locate the Wi-Fi name (SSID) and password for your DAP-1860. This information is printed on the label on the back of the device. You will need this information to connect your computer or mobile device to the default network (SSID) of your DAP-1860. This information is also provided on the included Wi-Fi configuration card.
Description
Ensuring continuous and dependable coverage throughout your home or workplace is possible with the D-Link Wi-Fi Range Extender AC2600, which offers a smooth extension of your current wireless network. The device's four Gigabit Ethernet ports facilitate wired connections for devices that demand a more stable connection, and its dual-band technology facilitates quicker data transfer rates and decreased interference. The sophisticated QoS and band steering features intelligently allocate devices to the best available band for their particular needs, and the clever Smart Signal Strength LEDs help you position the range extender for best results.
Installation
Wireless Installation Considerations
The DAP-1860 lets you extend your existing wireless network’s coverage as long as it is within range of the uplink network. Keep in mind that the DAP-1860’s extension network’s range may be limited by the number, thickness and location of walls, ceilings, or other objects that the wireless signals must pass through. Typical ranges vary depending on the types of materials and background RF (radio frequency) noise in your home or business. The key to maximizing wireless range is to follow these basic guidelines:
- Keep the number of walls and ceilings between the D-Link extender and other network devices to a minimum - each wall or ceiling can reduce your adapter’s range from 3-90 feet (1-30 meters.) Position your devices so that the number of walls or ceilings is minimized.
- Be aware of the direct line between network devices. A wall that is 1.5 feet thick (0.5 meters), at a 45-degree angle appears to be almost 3 feet (1 meter) thick. At a 2-degree angle it looks over 42 feet (14 meters) thick!Position devices so that the signal will travel straight through a wall or ceiling (instead of at an angle) for better reception.
- Building materials make a difference. A solid metal door or aluminum studs may have a negative effect on range. Try to position extenders, access points, wireless routers, and computers so that the signal passes through drywall or open doorways. Materials and objects such as glass, steel, metal, walls with insulation, water (fish tanks), mirrors, file cabinets, brick, and concrete will degrade your wireless signal.
- Keep your product away (at least 3-6 feet or 1-2 meters) from electrical devices or appliances that generate RF noise.
- If you are using 2.4 GHz cordless phones or X-10 (wireless products such as ceiling fans, lights, and home security systems), your wireless connection may degrade dramatically or drop completely. Make sure your 2.4 GHz phone base is as far away from your wireless devices as possible. The base transmits a signal even if the phone is not in use.
Setup Guide
Setting up the D-Link Wi-Fi Range Extender AC2600 is simple and straightforward:
- Place the range extender into a power outlet close to the router you currently have.
- Link your PC wirelessly or using an Ethernet connection to the range extender.
- To configure the range extender and connect it to your current network, according to the on-screen instructions.
- After connecting, you can move the range extender to the correct spot and unplug it to increase Wi-Fi coverage.
Connecting Wireless Clients to the Extended Network
Using the WPS Button
Once an uplink network has been established, you may use the DAP-1860’s WPS function to add additional wireless clients to your extended network. Many wireless devices such as wireless routers, media players, printers, and cameras will have a WPS button (or a software utility with WPS) that you can press to connect to the DAP-1860. Please refer to the user manual for the wireless device you want to connect to make sure you understand how to enable WPS, then follow the steps below:
- Step 1: Press the WPS button on the DAP-1860 for about 1 second. The LED on the device will start to blink. You can also use the WPS option in the setup wizard section of the web interface.
- Step 2: Within 120 seconds, press the WPS button on your wireless device.
Step 3: Once the LED light stops blinking and turns solid green, you will be connected and your wireless connection will be secured with WPA2.
Connecting to a Wireless Network Windows 10
To connect to a wireless network using Windows 10, you will need to know the wireless network name (SSID) and Wi-Fi password (security key) of the device you are connecting to.
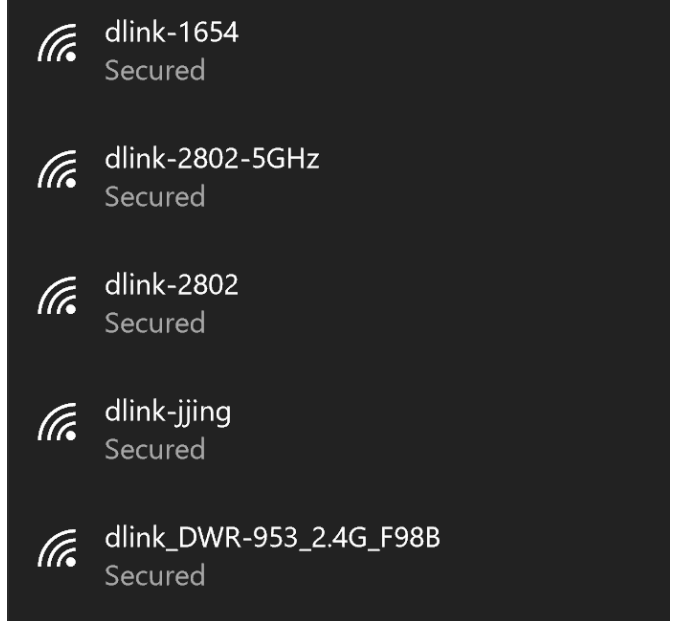
To join an existing network, locate the wireless network icon in the taskbar, next to the time display and click on it.

Clicking on this icon will display a list of wireless networks which are within range of your computer. Select the desired network by clicking on its SSID.
To connect to the network, click Connect.
To automatically connect when your device is in range, click the Connect Automatically check box. Your computer will now automatically connect to this wireless network whenever it is detected.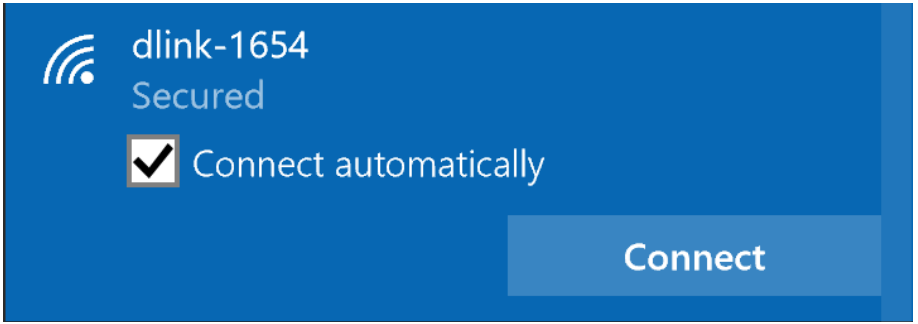
You will then be prompted to enter the Wi-Fi password (network security key) for the wireless network. Enter the password into the box and click Next to connect to the network.
You can also use Wi-Fi Protected Setup (WPS) to connect to the wireless network. Press the WPS button on your device and you will be automatically connected.
It may take 20-30 seconds to connect to the wireless network. If the connection fails, please verify that the security settings are correct. The key or passphrase must be exactly the same as the one on the wireless router.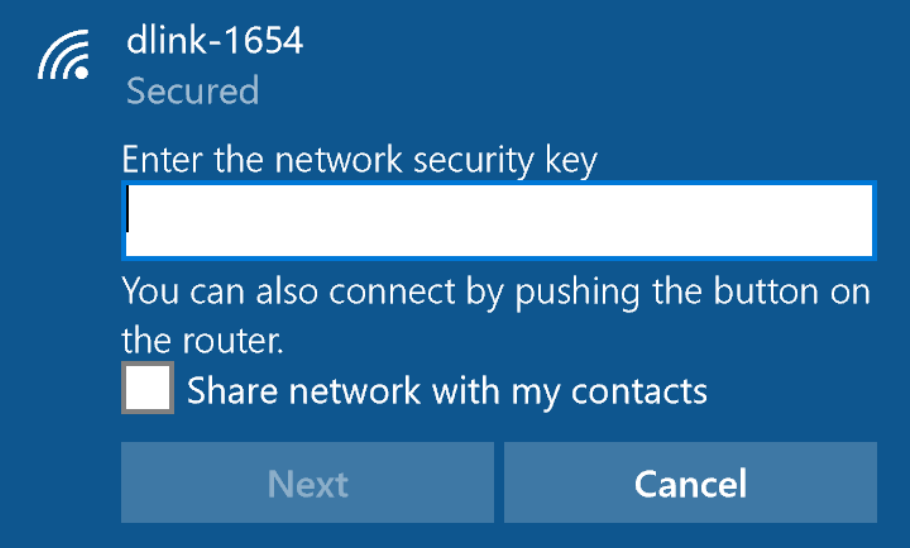
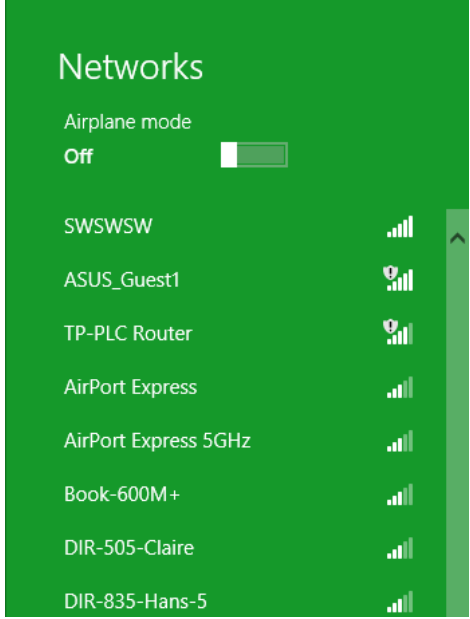
Windows 8
WPA/WPA2
It is recommended to enable wireless security (WPA/WPA2) on your wireless router or extender before configuring your wireless adapter. If you are joining an existing network, you will need to know the security key (Wi-Fi password) being used.
To join an existing network, locate the wireless network icon in the taskbar, next to the time display.
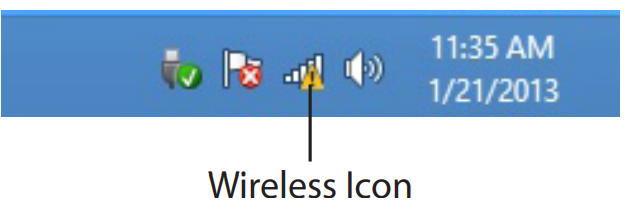
Clicking on this icon will display a list of wireless networks which are within connecting proximity of your computer. Select the desired network by clicking on the network name.
You will then be prompted to enter the network security key (Wi-Fi password) for the wireless network. Enter the password into the box and click Next.
If you wish to use Wi-Fi Protected Setup (WPS) to connect to the router, you can also press the WPS button on your router at this point to enable the WPS function.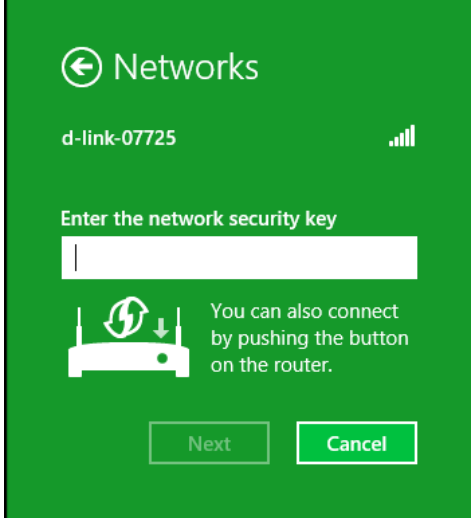
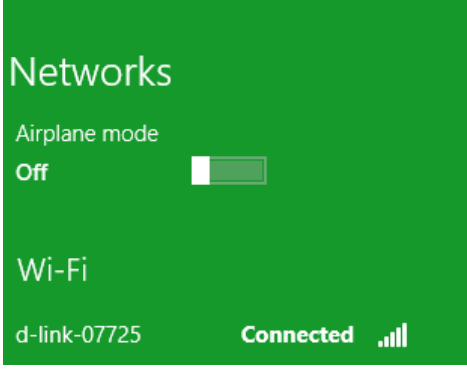
When you have established a successful connection with a wireless network, the word Connected will appear next to the name of the network to which you are connected.
Windows 7
WPA/WPA2
It is recommended to enable wireless security (WPA/WPA2) on your wireless router or extender before configuring your wireless adapter. If you are joining an existing network, you will need to know the security key or passphrase being used.
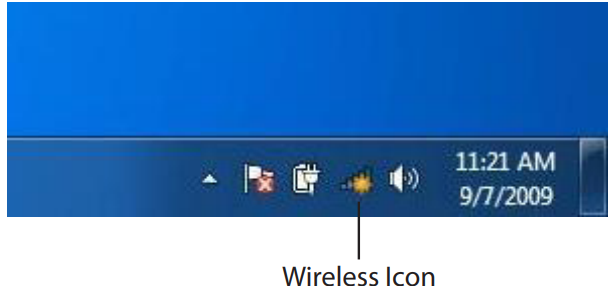
Click on the wireless icon in your system tray (lower-right corner).
The utility will display any available wireless networks in your area.
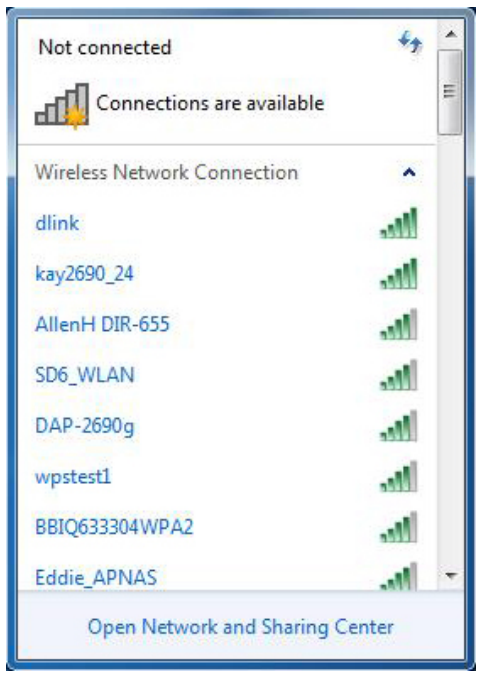
Highlight the wireless network (SSID) you would like to connect to and click the Connect button.
If you get a good signal but cannot access the Internet, check your TCP/IP settings for your wireless adapter. Refer to the Wireless Basics section in this manual for more information.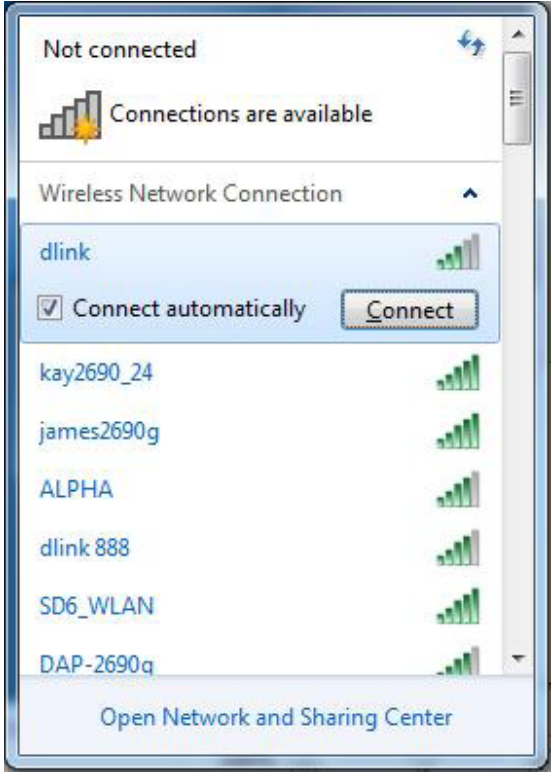
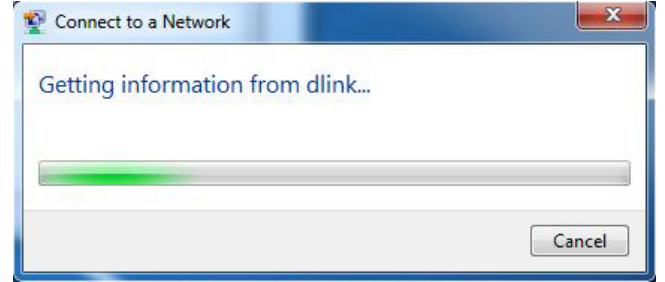
The following window appears while your computer tries to connect to the router.
Enter the same security key or passphrase that is on your router and click Connect.
It may take 20-30 seconds to connect to the wireless network. If the connection fails, please verify that the security settings are correct. The key or passphrase must be exactly the same as on the wireless router.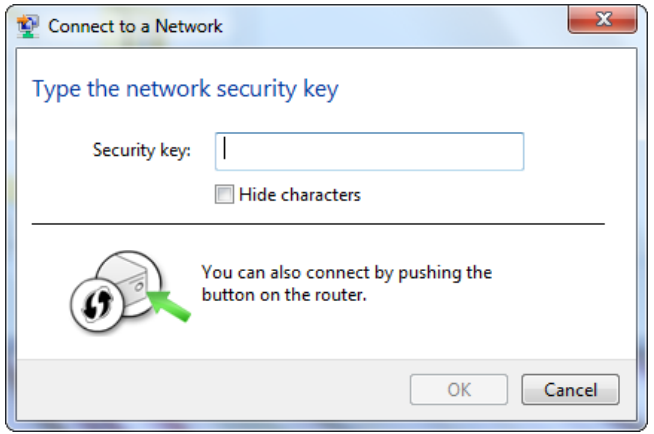
Troubleshooting
This chapter provides solutions to problems that can occur during the installation and operation of the DAP-1860. Read the following descriptions if you are having problems. The examples below are illustrated in Windows® XP. If you have a different operating system, the screenshots on your computer will look similar to the following examples.
Why can’t I access the web-based configuration utility?
When entering the IP address of the AC2600 Wi-Fi Range Extender (dlinkap.local for example), you are not connecting to a website nor do you have to be connected to the Internet. The device has the utility built-in to a ROM chip in the device itself. Your computer must be on the same IP subnet to connect to the web-based utility.
- Make sure you have an updated Java-enabled web browser.
We recommend the following: - Internet Explorer 10 or later
- Firefox 20.0 or later
- Safari 6 or later
- Google Chrome 28.0 or later
- Make sure that you are connected to the same wireless network which is listed on the back of the DAP-1860. If you have an active wired LAN Ethernet connection, try temporarily unplugging the Ethernet cable from the computer you are using, as this may eliminate possible conflicts from having two simultaneous connections on the same computer.
- Disable any Internet security software running on the computer. Software firewalls such as ZoneAlarm, BlackICE, Sygate, Norton Personal Firewall, and Windows XP firewall may block access to the configuration pages. Check the help files included with your firewall software for more information on disabling or configuring it.
Configure your Internet settings: - Go to Start > Settings > Control Panel. Double-click the Internet Options Icon. From the Security tab, click the button to restore the settings to their defaults.
- Click the Connection tab and set the dial-up option to Never Dial a Connection. Click the LAN Settings button. Make sure nothing is checked. Click OK.
- Go to the Advanced tab and click the button to restore these settings to their defaults. Click OK three times.
- Close your web browser (if open) and open it.
- Access the web management interface. Open your web browser and enter the address of your extender (http://dlinkap.local) in the address bar. This should open the login page for your web management. If the DAP-1860 is not connected to an uplink router, you can try accessing the web interface using the default IP address http://192.168.0.50.
- If you still cannot access the configuration, unplug the extender from the power outlet for at least 10 seconds and plug it back in. Wait about 30 seconds and try accessing the configuration. If you have multiple computers, try connecting using a different computer.
What can I do if I forgot my password?
If you forgot your password, you must reset your extender. Unfortunately this process will change all your settings back to the factory defaults.
To reset the extender, locate the reset button (hole) on the underside panel of the unit. With the extender powered on, use a paperclip to hold the button down for 10 seconds. Release the button and the extender will go through its reboot process (indicated by the LED turning red). Wait about 30 seconds to access the extender. The default IP address is
http://dlinkap.local. When logging in, the username is admin and leave the password box empty.
Pros & Cons
Pros:
- Affordable solution for extending your Wi-Fi network
- Dual-band technology for faster speeds and reduced interference
- Four Gigabit Ethernet ports for wired connections
- Smart Signal Strength LEDs for optimal placement
Cons:
- May not provide sufficient coverage for very large areas
- Signal strength may be affected by physical obstructions in the environment
Customer Reviews
Customers have praised the D-Link Wi-Fi Range Extender AC2600 for its ease of use, reliability, and affordability. Common compliments include the simple setup process, strong Wi-Fi signal, and fast data transfer rates. Some customers have reported issues with the range extender's performance in larger homes or offices, but these instances are relatively rare.
Faqs
What is the maximum wireless speed of the D-Link Wi-Fi Range Extender DAP-1860?
How many antennas does the D-Link Wi-Fi Range Extender have?
Does the D-Link Wi-Fi have Gigabit Ethernet ports?
What is the purpose of the WPS button on the D-Link?
Can I use the D-Link Wi-Fi Range Extender DAP-1860 with any router?
How do I reset the D-Link Wi-Fi Range Extender DAP-1860 to its default settings?
What is the range of the D-Link Wi-Fi Range Extender?
Leave a Comment