Dbpower Projector 1080P H89 FHD User Manual | Setup Instructions
Content
Introduction
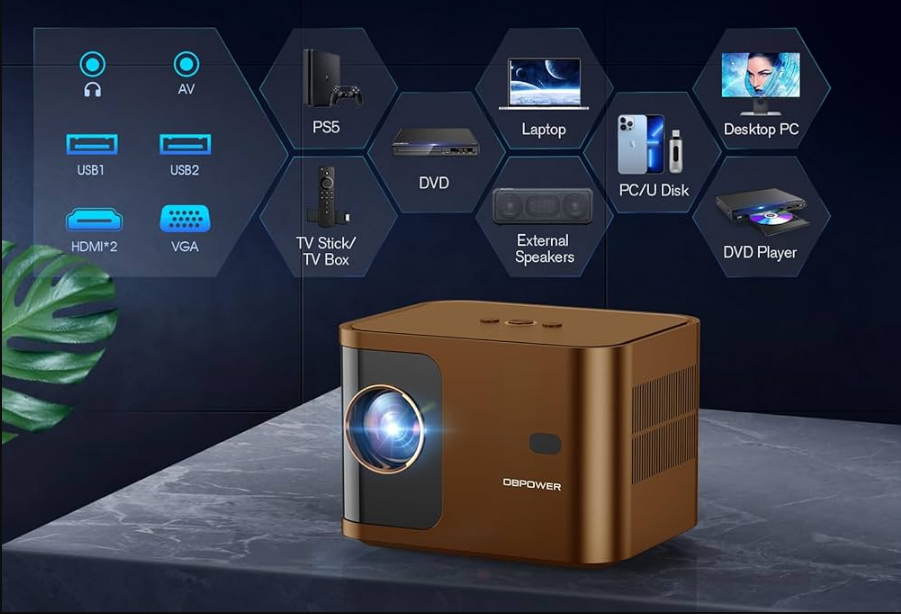
The DBPOWER Projector 1080P H89 FHD is a compact and versatile device ideal for home cinema and outdoor movie nights. It features a native resolution of 1920x1080 pixels, delivering stunning image clarity with 15,000 lumens brightness and a 10,000:1 contrast ratio. The projector includes advanced features like electric focus, ±40° vertical keystone correction, and dual 5G WiFi connectivity, making it user-friendly and efficient. Priced at $47.81, it provides excellent value for high-quality projection needs.
PACKAGE LIST
Projector*l | Remote Control*l | Power Cord*l |
HDMI Cable*l | Cleaning Cloth*l | User Manual*l |
Lens Cover*1 |
| |
PROJECTOR SPECIFICATIONS
Model No. | H89 | Aspect Ratio | 4:3/ 16:9 |
Display Tech | LCD | Light Source | LED |
Color Game | 16.7M Full | Size | 6.3x4.92x5.12inch |
Weight | 2.43 lb | Power Voltage | AC100-240V-50/60Hz |
Output Port | Headphone | Input port | HDMI/ USB |
Projection Method | Front/Rear on Desk | ||
Operation Mode | Remote control | ||
Video Format | AVI/ MP4/ MKV/ FLV/ WMV/ MDV/ RMVB/ MPEGI/ MPEG2/ MPEG-4/ XVID/ JPEG | ||
Audio Format | MC/ MP2/MP3/ PCM/ FLAC/ WMA | ||
Image Format | JPG/JEPG/BMP/PNG | ||
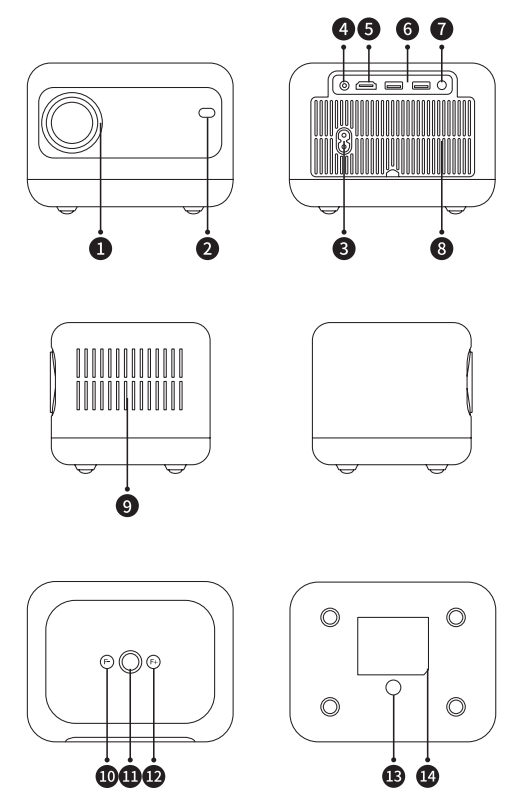
PROJECTOR OVERVIEW
REMOTE CONTROL
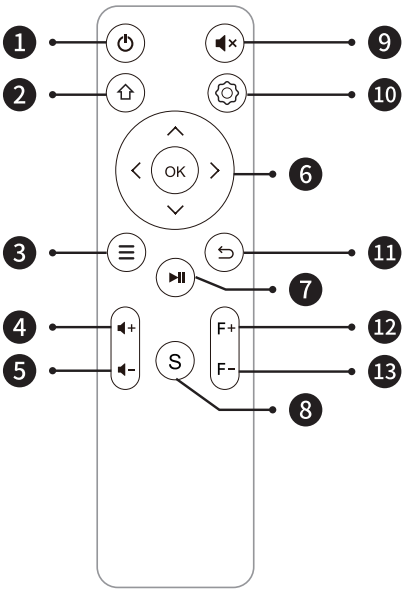
1 |  | Turn on/off the power |
2 |  | Back to the mainmenu |
3 |  | Pull up the menu |
4 | V+ | Volume up |
5 | V- | Volume down |
6 |  | Used to adjust the parameterof the projector in the menu mode |
7 |  | Play andPause |
8 |  | Select theinput signal source |
9 |  | Close the sound |
10 |  | Make system settings |
11 |  | Return to the previous menu |
12 | F+ | Manual focus+ |
13 | F- | Manual focus- |
Note:
- Install 2 pieces of MA batteries into the remote before using it Do not combine new batteries with old ones in remote controller, which can cause operation failure due to insufficient power supply.
- When using the remote controller, please make sure that the signal transmitter of the remote controller aims at infrared signal receiver of the projector.
- If you are not using the remote controller for an extended period, please take out batteries to prevent batteries leakage.
Description
The dbpower Projector 1080P H89 FHD boasts a sleek and compact design, making it easy to move around and set up in different environments. It features a high brightness level of 3500 lumens, ensuring clear images even in well-lit rooms. The projector supports a wide range of input formats, including HDMI, USB, AV, VGA, and an SD card slot, making it versatile for connecting various devices such as laptops, gaming consoles, and smartphones. The built-in dual speakers provide decent audio quality, although external speakers can be connected for an enhanced audio experience.
DBPOWER Projector 1080P H89 FHD INSTALLATION
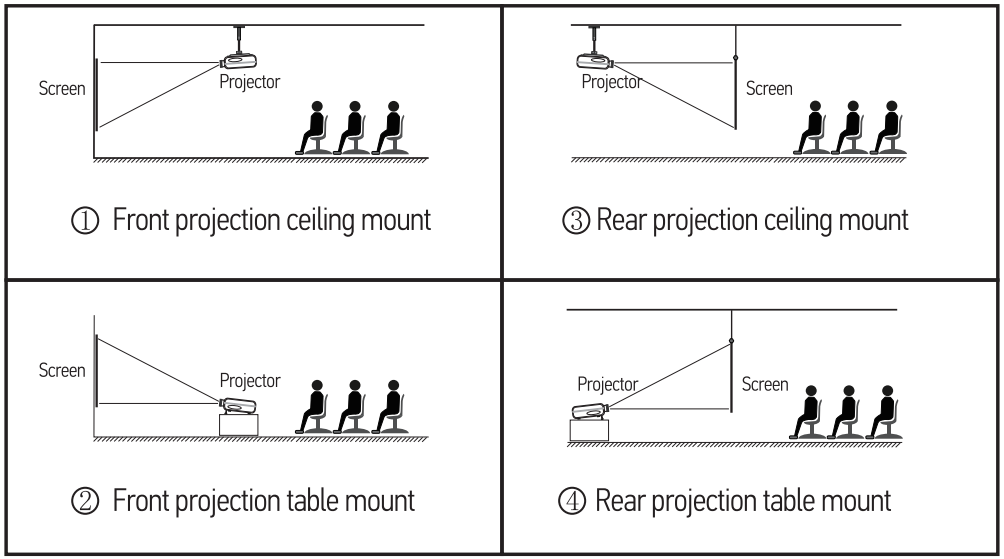
Installation Method
Contact a professional installer to mount this projector to a ceiling. Follow the instructions below for the correct projector positions.
Install on the ceiling
- Contact a professional installer for the projector ceiling mounting;
- Please ensure that the screws used for ceiling mounting are of high quality and the length is enough to prevent the projector from falling;
- Please purchase an universal projector ceiling mount.
STARTING PROJECTOR
- Turn on the projector:
Connect to the power cable, when the red indicator light is on, press the power button on the panel ( Press the power key on the remote control) to start the projector, the indicator turns from the red to blue, the projector is on. - Turn off the projector:
When the projector is working normally, press the power button, the indicator turns from the blue to red, the projector is in shut down.
IMAGE ADJUSTMENT
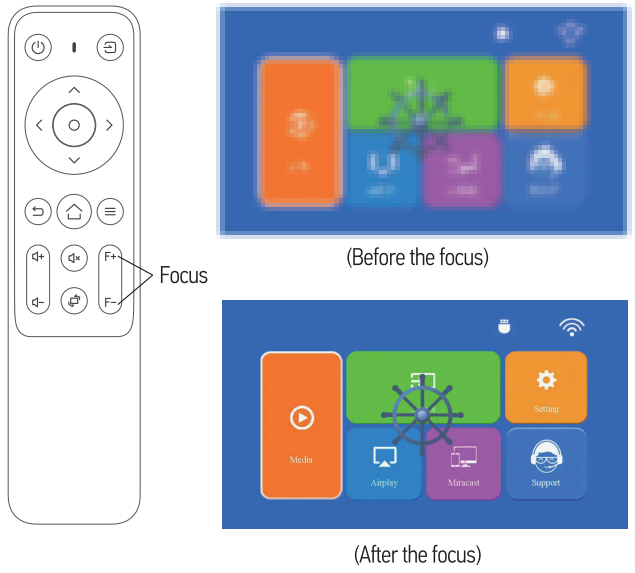
Image focusing
When the newly installed projector is used for the first time, the image will be blurred, and it is necessary to focus the picture;
Automatic Focus
When the picture is blurred, press the focus keys "F+" and" F- "on the remote control to adjust the focal length of the lens. Tap or long press the focus button until the picture is clear. (As shown below)
SETTING UP THE PROJECTOR
Manual Keystone: Vertical Keystone Correction
Select the settings icon in the upper right corner of the main interface, and then press the "OK" key on the remote control to enter the settings interface and select "Keystone Correction"
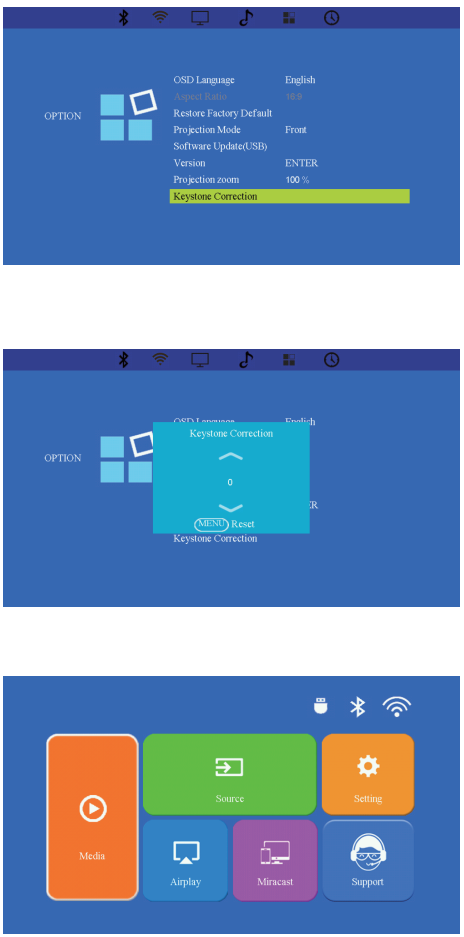
- Step 1 : If the projection image shows as below ( 1 ) , press the button on the remote to increase the vertical parameter -40-0 ) untilto achieve the projection image ( 2 )
Step2 : If the projection image shows as below ( 3 ) , then press the button on the remote and decrease the vertical parameter ( 0-40 ) .until to achieve the projection image ( 4 )

The projector's home page is as follows.
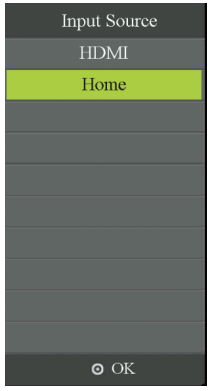
Select The Input Signal Source
Select the desired input signal source (USB/ HDMI) on the home-page.
Note: If you connect the external device ( Such as TV box, Fire TV Stick, DVD Player, USB flash disk, Computer ect.), please must select the corresponding signal source. If you choose wrong, the projector will show no signal.
Multimedia Play
USB Disk Input Mode
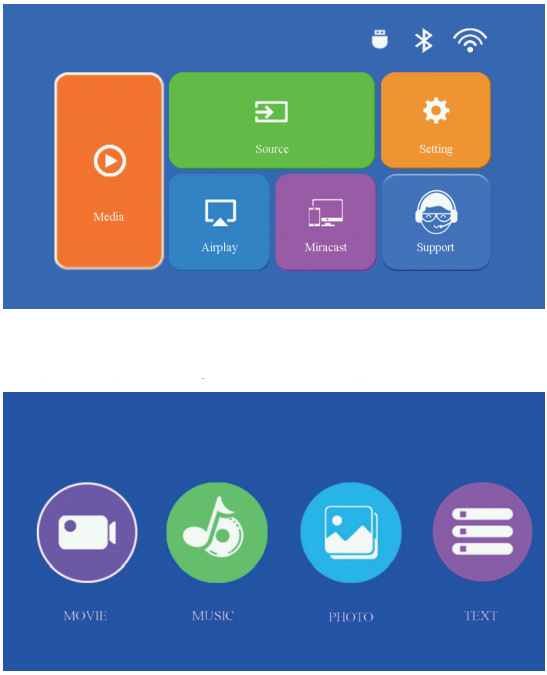
- Step 1: Insert the USB flash disk into the USB port of the projector.
- Step 2: Select "Media" and the press the "OK" key to enter.
- Step 3: Depending on the file type, select the option [MOVIE/MUSIC/ PHOTO/TEXTI
- Step 4: Select the desired file in the USB disk (or enter the sub-folder folder), and then press the [OK] button to play it.
Warm Tips
If the projector cannot recognize the USB disk, please refer to the following methods to solve the problem. Please confirm whether your USB disk meets the following formats.
- FA T32: 8G/16G/32G
- NTFS:64G
If it is not, please format the USB disk. Before you format the USB disk, if you have anything on your USB disk, make sure to backup everything. After these steps, everything will be lost forever.
How to convert USB disk format to FAT32 format?
- Plug-in your us disk into the computer' s USB port.
- Open up File Explorer and right-click on the drive.
- Choose Format
- In the File System dropdown, please choose the FA T32 format
- Click Start and close this window when finished.
If the problem is still not solved, please send your problem to this email: xxxxxx
Play Interface
Click the "OK" button to get the play interface
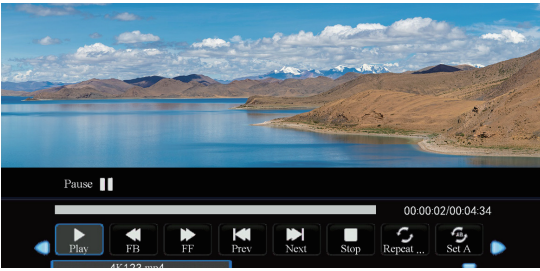
MENU | FUNCTION |
FB | Fast Backward.rewinds the video back quickly while playing it. |
FF | Fast Forward, pushes the video to move forward quickly while playing it. |
Prev. | Switch to the previous video |
Next | Switch to thenext video |
Stop | Stop playing and exit |
Repeat Mode | Repeat One/Repeat All/Repeat Off |
Set A | Set A/B(Set two nodes in the video to loop)/None |
Playlist | Select all playlists in the currentfolder |
Info | Video details |
Slow Forward | Slow Forward1Xto8X |
Step Forward | Step Forward |
Goto Time | Set a time to jump directly |
Zoom+ | Zoom+ 1 X to BX |
Zoom- | Zoom- lXto1/8X |
Aspect Ratio | Auto/4:3/16:9 |
Setup Guide
To set up the dbpower Projector 1080P H89 FHD, follow these steps:
- Unpack the projector and all included accessories (power cord, remote control, etc.).
- Connect the projector to your device using an appropriate cable (HDMI, USB, etc.).
- Position the projector at an optimal distance from your screen or wall. Adjust the focus and keystone correction as needed.
- Turn on the projector and select the correct input source using the remote control.
- Adjust brightness, contrast, and other settings to your preference.
Wifi Setting
Wireless Connection
Warming Tips:
- The fluency of screen mirroring with wireless connection will be affected by the network environment. A bandwidth of 1 DOM bit or more is recommended when using screen mirroring.
- Make sure your mobile device is close to the projector when using wireless connection. A distance within 1 meter is recommended.
- Some mobile devices may not support screen mirroring due to the compatibility
iOS Cast (for iOS Devices)
Go to home page - Select the [Setting] menu -- Select the [WiFi] menu-Select your home WiFi from the list - Connect the projector to your home WiFi.
_dbpower_projector_1080p_h89_fhd.png)
Back to home page - Select [Airplay] menu - Press the OK button to enter the [Airplay] menu.
-dbpower_projector_1080p_h89_fhd.png)
- Select the [Settings] menu on your iOS device--Turn on the [Wi-Fil] function-Connect your iOS device to the same home network as the projector.
- Open the [Control Center] on your iOS device--Select the [Screen Mirroring] function -- Select and connect the iOS Cast receiver named [Airplay-XXXXXXXX]--your iOS device screen will be displayed on the projection screen after 3 seconds.
Miracast (for Android Devices)
Go to home page - Select the I Miracast I - Press the OK button to enter the Miracast setting menu.
_dbpower_projector_1080p_h89_fhd.png)
Select the [Settings) menu on your Android device -- Select the [Screen mirroring) function--Select your Miracast receiver named [Miracast-XXXXXXXXI -- your Android device screen will be displayed on the projection screen after 3 seconds .
-dbpower_projector_1080p_h89_fhd.png)
- On your Android device, tap [Settings] -[WLAN Display ] -Turn [ Wi-Fi] ON, Connect your home WiFi.
Note:- Different brands of Android phones have different operations for select Screen Mirroring Display, please refer to your phone's manual. [ Multi screen Wireless display/WLAN display/Screen mirroring/Wireless projection/Smart view etc.]
- Not all Android phones support this function. Please make sure it is supported before use.
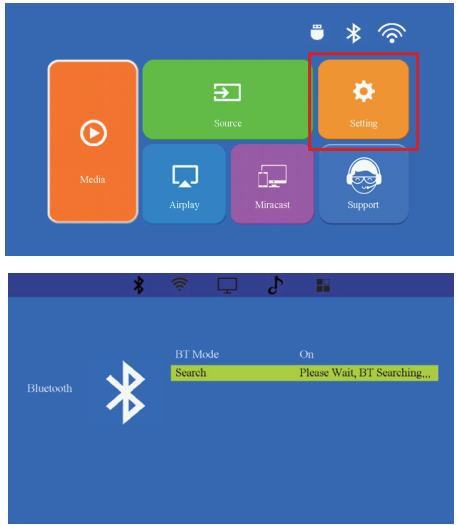
Bluetooth Setting
Go to home page -- Select [Setting] -- Select the [Bluetoothl Enter the Bluetooth settings interface -- Scan the Bluetooth devices nearby automatically-- Choose the Bluetooth device desired -- it will be paired and connected automatically.
Note:
- The projector is compatible with the Bluetooth headsets, Bluetooth speakers and Airpods, but not the Bluetooth keyboards or Bluetooth phones
- If you have any question, please feel free to contact us via [email protected]
Projector Setting
Picture Menu
Go to home page -- Select [Setting] -- Select the [PICTURE] Use the arrow keys on the remote control to switch the menu, press the "OK" to confirm and set
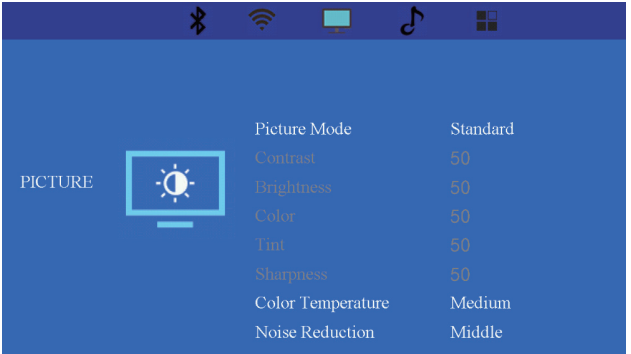
MENU | CONTENT |
Picture Mode | Standard/Dynamic/Mild/User |
Color Temperature | Medium/Cool/Warm/User |
Noise Reduction | Off/Low/Middle/High |
Sound Menu
Go to home page -- Select [Setting]-- Select the [SOUND] Use the arrow keys on the remote control to switch the menu, press the "OK" to confirm and set.
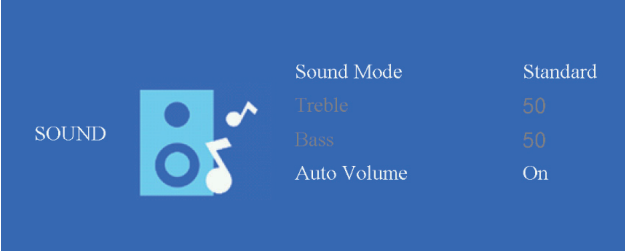
MENU | CONTENT |
Sound Mode | Standard/Movie/Music/Sports/User |
Auto Volume | On/Off |
Option Menu (ZOOM & Keystone correction)
Go to home page -- Select [Setting] -- Select the [OPTION].Use the arrow keys on the remote control to switch the menu, press the "OK" to confirm and set
_dbpower_projector_1080p_h89_fhd.png)
MENU | CONTENT |
OSO Language | English/France/Italian/Japanase etc |
Aspect Ratio | 16:9/4:3 |
Restore Factory Default | Restore Factory Default |
Projection Mode | Front/Rear On Desk/Front On Ceiling/Rear On Ceiling |
Software Update(USB) | Local Update |
Version | Version |
Projection zoom | 75%-100% |
Keystone Correction | Adjust the screen anglevertically |
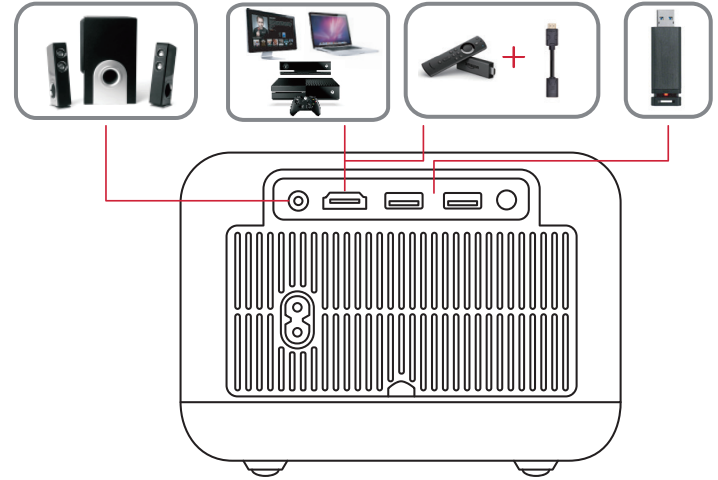
SIGNAL LINES CONNECTION
Projector has 3 interfaces, HDMI port*l / USB port*2/3.5mm headphone output. Please select the correct connecting port to connect your device (PC, DVD Player, Fire lV stick, lV box, Sound bar, USB disk,PS4 etc.)
Connect USB Disk
- Insert the USB disk into the USB input port;
- You can directly enter the start-up screen on the home page, select the option [Movie/Music/Photo/TEXT)
- Select the desired file (or folder to enter the sub folder) in the USB disk, then press the [ OK] button to play it.
Connect the Devices via the HDMI port
Connect your Fire lV stick (or PC, lV box, PS4 etc.) to the HDMI port of the projector;

Enter the home page to select the corresponding HDMI as the signal source.

Connect to the DVD Player
- Turn on your DVD player and the projector;
- Connect to the DVD Player and the projector with the HDMI cable
- Enter the home page to select the corresponding HDMI as the signal source.
Note: When the projector is connected to the DVD player via the HDMI cable, if there is no sound, it may be that the output signal of the HDMI port of the DVD player is not compatible with HDCP, please try to connect your Sound bar/Speaker.
Connect to the Sound bar/Speaker
If your speaker has AUX port, please use your 3.5mm audio cable connect the projector and your speaker as the picture shows.
Connect to the Computer
- Connect to the computer and projector with the HDMI cable (Included)
- Select the HDMI source to project any files on your computer;
- If your laptop, hold down the key "Win+p" board keys to change your display mode.
Computer only: It is the default option - only displays on the main monitor Duplicate: Makes all of the monitors display the same thing duplicating the desktop on each monitor.
Extend: Makes all of your monitors act like one big monitor extending the desktop across all of them.
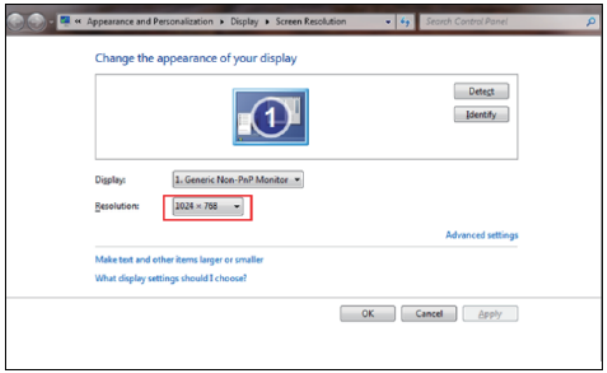
Projector only: Displays only on the secondary monitor like a projector. You can change the screen resolution on the Projector Only Mode
Step: Start> Control Panel> Appearance and Personalization > Adiust Screen Resolution
IMPORTANT SAFEGUARDS
Installation
- Please read the user manual carefully before using the projector.
- To get a better watching, please use this projector while drawing the curtain or in a dark room.
- Please use the projector carefully, dropping or crashing may damage parts or result in blurred images and abnormal displaying.
Power
- Be careful while using the power cord, avoid excessive bending; the damage of power cable may cause electric shock and fire.
- It is better to unplug the power cord after power off.
- Only use the power cord supplied with this product with an electrical socket that is earthed properly.
- Please use the same power voltage as marked on the projector.
Cleaning
- Unplug the power cable firstly.
- Clean the shell regularly with a damp cloth, neutral detergent can be used.
- Please use a glasses cloth or lens paper, not to scratch the lens.
- Please clean projector's vents and speakers regularly by banister brush, or the ventilation will be blocked.
High Temperature and Waterproof Attention
- While projection or just finishing, the exhaust port nearby will be very hot, if touch it, would get scald.
- While projection, please do not look the lens directly, or may hurt eyes.
- Please keep the projector away from the water or any other liquid as it is not waterproof.
- Please do not put the projector in wet or moist conditions to prevent electric shock.
Warm Tips
- Do not disassemble the projector, if not, there will be a risk of electric shock, and the disassembling affect the normal warranty.
- Please do not put any liquid or heavy stuff on the projector.
- To ensure the stability of heat dissipation, please open the height bracket in the bottom of the projector before starting. \
- Change your PC/laptop screen resolution to 1920*1080 for the best clarity.
- This projector can only support Mira-cast WiFi screen mirroring protocol. If you are using phone (Google/MOTO/Sony/Samsung ) that supports other protocols(Like Chrome-cast WiFi screen mirroring), there will be no picture display but only audio works. You may need to use a wired connection or use other phones that are compatible with Mira-cast protocol.
- Due to HDCP copyright, this projector doesn't support Netflix, Amazon Prime and Hulu, but you can use amazon fire stick. This is a very common phenomenon in the market. It's not a problem with the projector.
- Please tum off the Dolby sound to make the sound work property when it can't work due to the copyright protection issue.
Troubleshooting
If you encounter any issues with your dbpower Projector 1080P H89 FHD, here are some common problems and solutions:
- No Image Displayed: Check that all cables are securely connected and that the input source is correctly selected.
- Blurry Image: Adjust the focus or reposition the projector for optimal distance.
- No Sound: Ensure that external speakers are connected properly or check if mute is enabled.
Warning: Avoid direct exposure to sunlight as it may damage the projector's lens.
WARRANTY
Thanks for purchasing DBPOWER PROJECTOR and becoming our valued customer. We are committing to improving your daily life with our products. Your satisfaction is our first priority. DB POWER offers a 3-year warranty 30 days return/exchange policy+ lifetime tech support for this product.
We provide 3-year warranty for projector. If you have any questions, please feel free to contact us via [email protected]
Pros & Cons
Pros
- High-resolution 1080P display for clear visuals.
- Compact design and lightweight for easy portability.
- Multiple connectivity options for various devices.
- Affordable price point compared to other 1080P projectors.
Cons
Customer Reviews
Customers have generally praised the dbpower Projector 1080P H89 FHD for its value for money. Many users appreciate its clear and vibrant picture quality, ease of setup, and compact design. However, some users have noted that the built-in speakers could be improved, and there are occasional minor issues with keystone correction.
Most Common Complaints: Limited speaker quality and lack of wireless connectivity options are among the most common complaints from users.
Faqs
What is the resolution of the dbpower Projector 1080P H89 FHD?
How bright is the dbpower Projector 1080P H89 FHD?
What are the connectivity options available on this projector?
How do I adjust keystone correction on this projector?
What should I do if there is no image displayed?
How do I clean the lens of my dbpower Projector 1080P H89 FHD?
What is the throw distance for this projector?
How to watch Netflix or Hulu on it?
How can I do there is no sound?
Why does the projection screen show no signal?
How to upside down the picture?
How can I do when the image is blurry?
How to reduce the noise of my projector?
How to remove it when there is a black spot on the lens?
Leave a Comment