How to Connect: Dell E-Port Plus User's Guide User Guide | Specifications
Content
Introduction
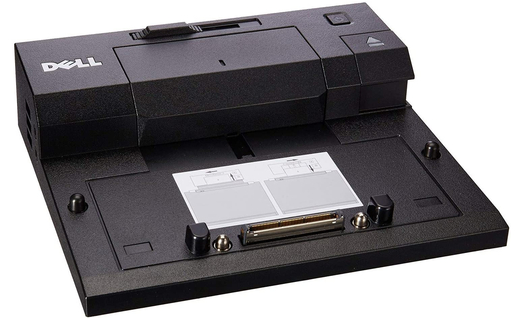
The Dell E-Port Plus is a versatile docking station designed to enhance the connectivity and productivity of Dell's Latitude and Precision laptops, among others. Offering a wide array of ports including USB (2.0 and 3.0), Ethernet, DisplayPort, VGA, DVI, and HDMI, it enables users to effortlessly connect their laptop to multiple peripherals such as monitors, keyboards, and network connections. This accessory is ideal for professionals seeking to seamlessly transition between mobile and desktop computing environments, as it allows for the quick connection to a full desktop setup without the need for individual device connections, supporting a range of laptop models with varying specifications and compatibility features.
Product Parts
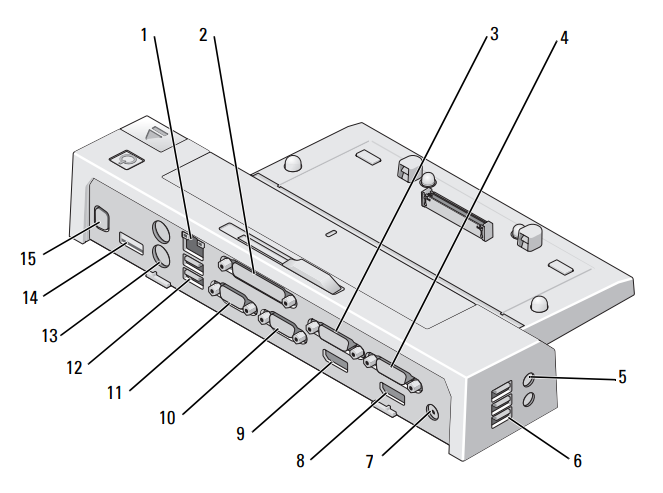
- network connector
- parallel connector
- video 2 DVI connector
- video 1 DVI connector
- audio connectors (2)
- USB connectors (3)
- AC adapter connector
- video 1 DisplayPort connector
- video 2 DisplayPort connector
- VGA connector
- serial connector
- USB connectors (2)
- PS/2 connectors (2)
- USB or eSATA connector
- E-Monitor Stand connector
Overview
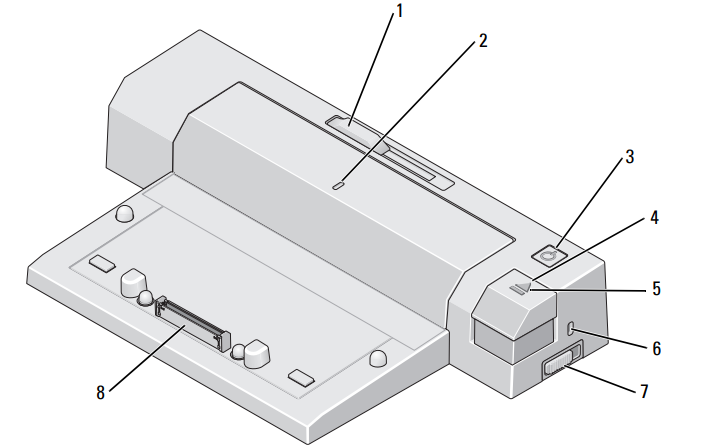
- battery bar adjuster
- alignment mark
- power button
- eject button
- docking light
- security cable slot
- lock/unlock switch
- docking connector
Using the Dell™ E-Port Plus
CAUTION: Before you begin any of the procedures in this section, follow the safety instructions that shipped with your computer.
Setting Up Your E-Port Plus
NOTE: If the cable connector of the external device has thumbscrews, tighten the screws to ensure a proper connection.
- Connect the device’s cable to the appropriate connector on the E-Port Plus.
- Connect any external devices to electrical outlets.
If you attach an external monitor to the E-Port Plus, you may need to press <Fn><F8> one or more times to switch the screen image to the desired location. If the laptop cover is closed, press <Scroll Lck> <F8> on an attached external keyboard to switch the image.
Before You Dock for the First Time
Before you initially connect your laptop to the E-Port Plus, the operating system must complete its setup process. To verify that the operating system has completed the setup process:
- Ensure that the laptop is not connected to the E-Port Plus (docked).
- Turn on the laptop.
- Verify that your laptop operating system has completed the setup process. 4 Verify that your battery is installed before docking your laptop.
Docking Your Laptop
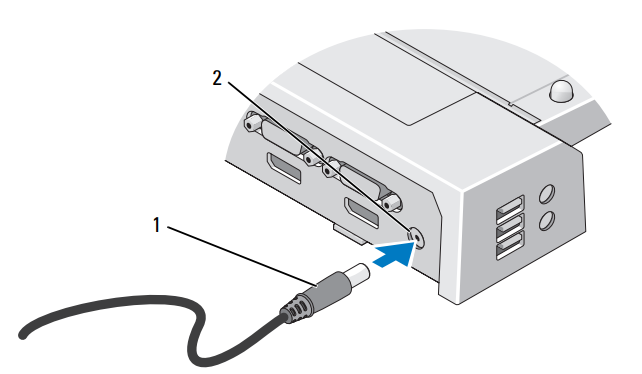
The E-Port Plus can run on its AC power adapter, the laptop’s AC power or the laptop’s battery. You can use the AC adapter to power the E-Port Plus and the laptop, which charges the battery.
NOTICE: Always use the Dell AC adapter that came with the E-Port Plus. If you use any other commercially available AC adapter, you may damage the E-Port Plus or the laptop.
- AC adapter cable
- AC adapter connector
- Complete the steps in "Before You Dock for the First Time" on page 9.
- Place the E-Port Plus with enough flat space in front of it to completely support the laptop when docked to the E-Port Plus.
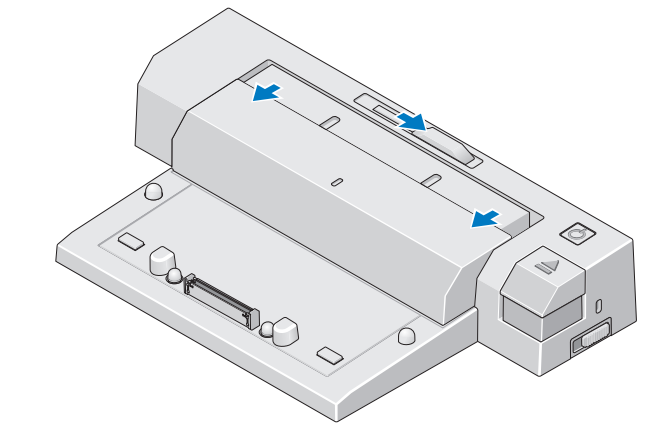
Retract the battery bar if your laptop has a battery that extends beyond the back of the laptop. Slide the battery bar adjuster to the left to retract the battery bar.
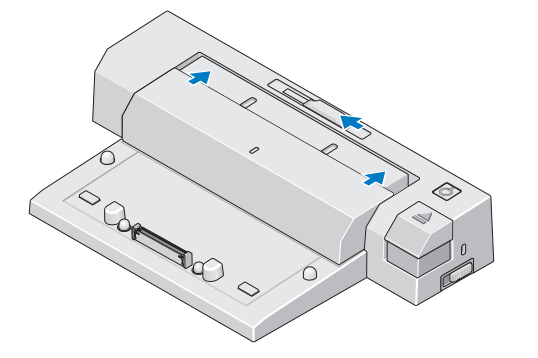
If your laptop does not have a battery extending from the rear of the laptop body, extend the battery bar by sliding the battery bar adjuster to the right.
Push the lock/unlock switch toward the back of the E-Port to unlock it. The E-Port must be unlocked to dock a laptop.
NOTE: You can dock your laptop regardless of whether it is turned on or off.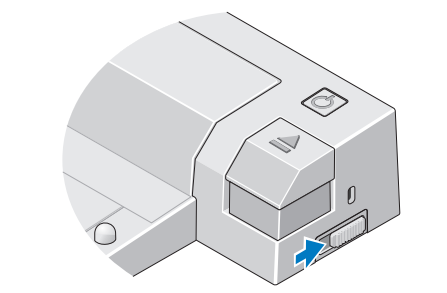
Center the laptop with the E-Port Plus, then push down on the laptop until it clicks into place in the docking connector.
NOTICE: Do not lift the laptop or the E-Port Plus when the laptop is docked. Doing so can damage the connectors on the laptop and on the E-Port Plus.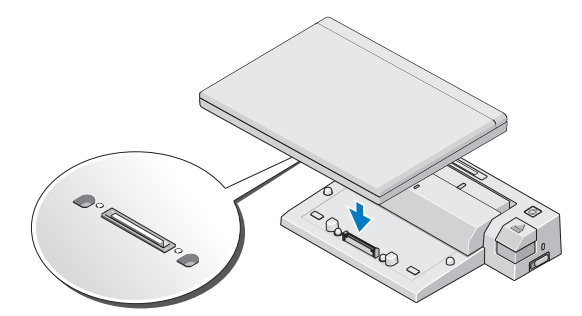
- If the laptop was not already turned on, turn it on by pressing the power button on either the laptop or the E-Port Plus.
- If the laptop does not turn on or awaken successfully, undock and reseat the laptop.
Securing the Dell E-Port Plus
Antitheft devices usually include a segment of metal-stranded cable with an attached locking device and associated key (available at dell.com). For instructions on how to install this kind of antitheft device, see the documentation that came with the device.
- security cable slot
- lock/unlock switch
The E-Port Plus has the following security features:
- LOCK/UNLOCK SWITCH: Move the lock toward the front of the E-Port Plus (locked) to secure a laptop to the E-Port Plus. Move the lock toward the back of the E-Port Plus (unlocked) before pressing the eject button to undock a laptop. The red color in the security cable slot indicates that the E-Port Plus is unlocked.
- SECURITY CABLE SLOT: Attach an antitheft device to the E-Port Plus to secure a laptop to the E-Port Plus.
E-Port Plus Laptop Power and Docking Status
The E-Port Plus power button is used to turn a docked laptop on or off. The power button light indicates the power status of the E-Port Plus or a docked laptop. The docking light on the eject button indicates the AC power and docking status of the E-Port Plus and the laptop. The following table shows all of the possible conditions of docking, power, laptop states and how these conditions are indicated by the E-Port Plus power button and docking lights:
Using the E-Port Plus With Dual Monitors
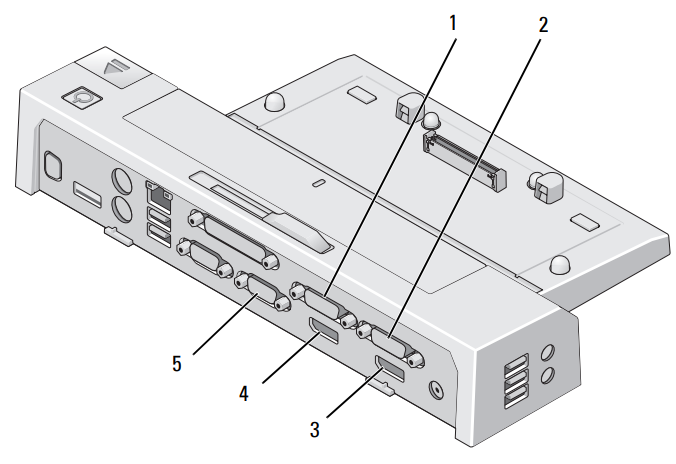
- video 2 DVI connector
- video 1 DVI connector
- video 1 DisplayPort connector
- video 2 DisplayPort connector
- VGA connector
You can use your E-Port Plus for dual monitor display. To enable this feature, connect your monitors using the combinations of connections prescribed below.
NOTE: If you connect two video outputs to two monitors from the same video output group at the same time, (i.e., video 1 DisplayPort and video 1 DVI) only the DisplayPort output will be visible.

Undocking Your Laptop
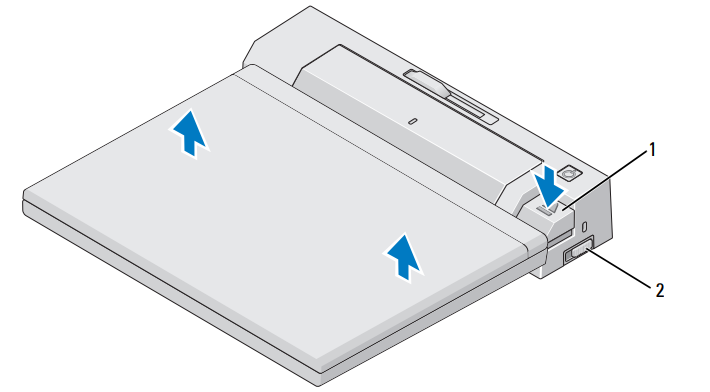
- eject button
- lock/unlock switch
- Push the lock/unlock switch toward the back of the E-Port Plus to unlock it.
- Press the eject button to undock the laptop from the E-Port Plus, then lift the laptop away from the E-Port Plus.
NOTICE: Do not pick up the laptop or the E-Port Plus when the laptop is docked. Doing so can damage the connectors on the laptop and on the E-Port Plus.
Specifications
| Category | Specification |
|---|---|
| Physical Height | 70 mm (2.76 inches) |
| Physical Depth | 180 mm (7.09 inches) |
| Physical Width | 310 mm (12.20 inches) |
| I/O Connectors Serial (DTE) | one 9-pin connector, 16550-compatible, 16-byte buffer |
| Parallel | one 25-pin unidirectional, bidirectional, or ECP connector |
| PS/2 | two 6-pin mini-DIN connectors |
| USB | Six USB connectors: five 4-pin, USB 2.0-compliant connectors, one USB or eSATA connector |
| Audio | headphones/speakers and microphone |
| Network | one RJ-45 port; 10/100/1000 CB Ethernet |
| Dell™ E-Family docking connector | one custom connector (Dell E-Family only) |
| Video 1 | VGA, DVI, DisplayPort (HDMI via dongle) |
| Video 2 | DVI and DisplayPort (HDMI via dongle) |
| USB or eSATA connector | one connector supporting USB or Dell powered E-Family or standard self-powered eSATA devices |
| E-Monitor Stand connector | one custom connector (Dell E-Family only) |
| Specification | Minimum | Typical | Maximum |
|---|---|---|---|
| AC Adapter Power - Input Voltage (100-240 VAC, 50-60 Hz) | 130W* | 1.8A | N/A |
| AC Adapter Power - Input Voltage (100-240 VAC, 50-60 Hz) | 210W* | 3.2A | N/A |
| Temperature (system external) | 0°C | 25°C | 35°C |
| Temperature ramp rate | 0°C/hr | N/A | 10°C/hr |
| Humidity (non-condensing) | 10% | N/A | 80% |
| Humidity ramp rate | 20% / hr | N/A | N/A |
| Altitude | 0 m (0 ft) | N/A | 3048 m (10,000 ft) |
| Non-Operational - Temperature | -40°C | N/A | 65°C |
| Non-Operational - Temperature ramp rate | 0°C/hr | N/A | 20°C/hr |
| Non-Operational - Humidity (non-condensing) | 5% | N/A | 95% |
| Non-Operational - Humidity ramp rate | N/A | N/A | 20% / hr |
| Non-Operational - Altitude | 0 m (0 ft) | N/A | 10,670 m (35,000 ft) |
Description
The Dell E-Port Plus is a docking station designed for Dell laptops, providing additional connectivity and convenience for users. It allows users to connect their laptop to multiple peripherals and external devices, expanding the functionality and versatility of their laptop setup. The E-Port Plus offers a variety of ports, including USB ports, audio ports, video ports, and network ports, allowing users to connect to external monitors, speakers, printers, and other devices. It also features a docking connector that securely connects the laptop to the docking station, ensuring a stable connection and easy docking/undocking process. With its compact and sleek design, the Dell E-Port Plus is a practical solution for users who need to enhance their laptop's capabilities and streamline their workspace. It is compatible with a range of Dell laptop models, providing a seamless integration for Dell users.
Faqs
How do I connect my laptop to the Dell E-Port Plus?
What are the available ports on the Dell E-Port Plus?
Can I connect multiple monitors to the Dell E-Port Plus?
Is the Dell E-Port Plus compatible with all Dell laptops?
Can I charge my laptop using the Dell E-Port Plus?
Does the Dell E-Port Plus support audio output?
Can I use the Dell E-Port Plus with my non-Dell laptop?
What is the maximum resolution supported by the Dell E-Port Plus?
Can I use the Dell E-Port Plus with my laptop's lid closed?
Is the Dell E-Port Plus compatible with USB-C laptops?
Leave a Comment
