How to Adjust: Lippert Solera Power Awning User Manual
Content
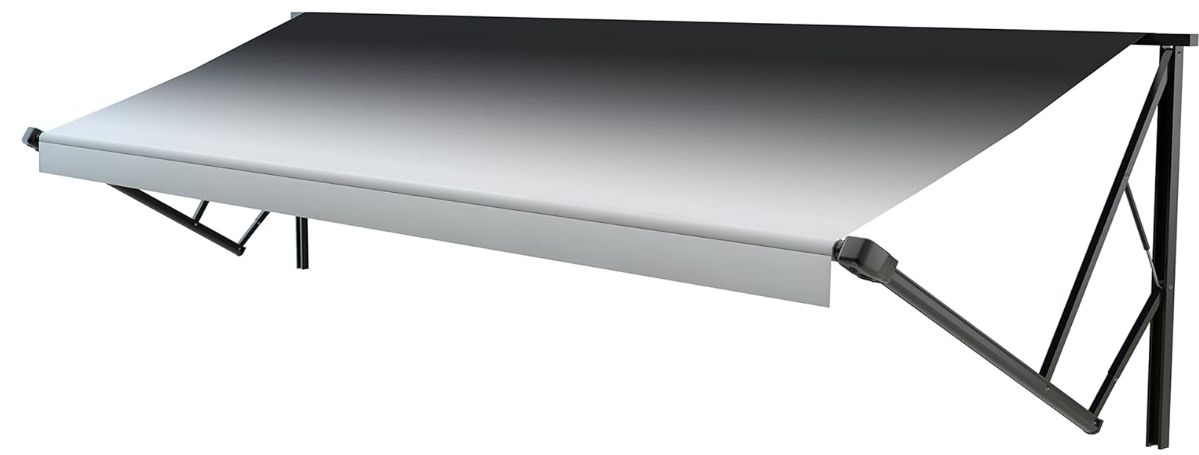
Lippert Solera Power Awning Introduction
The Lippert Solera Power Awning is an innovative solution for enhancing outdoor living spaces, designed to provide shade and protection with ease. Featuring an internal motor for smooth operation, this awning allows users to extend and retract it effortlessly. Its adjustable pitch and rain dump capabilities ensure optimal performance in various weather conditions. Ideal for RV enthusiasts, the Solera Power Awning combines convenience and durability, making it a popular choice. The cost of this awning typically starts around $400.00.
Detailed Specifications
The Lippert Solera Power Awning boasts several key features that set it apart from other awnings on the market:
- Power Operation: The awning can be easily opened and closed with the push of a button, thanks to its powerful motor.
- Durable Fabric: Made from high-quality, waterproof fabric that resists fading and mildew.
- Adjustable Pitch: Allows for customizable angle settings to optimize sun protection.
- LED Lighting: Integrated LED lights provide ambient lighting for nighttime use.
- WeatherGuard Technology: Ensures stability and security in windy conditions.
Operation Extending the Awning
- Verify the battery is fully charged and connected to the electrical system.
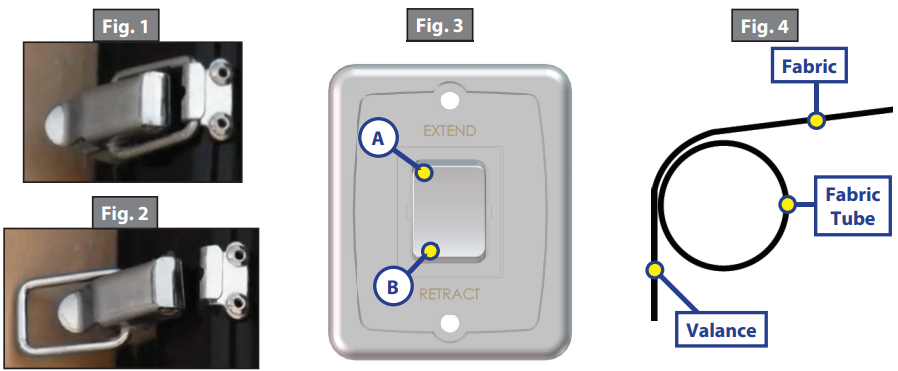
- Locate the locking latch (Fig. 1), if equipped, on the drive side awning arm and unlock the latch (Fig. 2).
NOTE: This latch is optional and may not be installed. - Press and hold EXTEND (Fig. 3A) until the awning is extended completely.
NOTE: Extension is considered complete when the awning valance seam reaches the leading edge of the awning tube (Fig. 4).
Caution: Over-extending the awning will roll the awning back up the wrong way and could damage the system and will void the Limited Warranty.
Caution: Tying the roll bar down once extended will not allow the free floating support arms to work as designed and may cause damage to the awning or RV.
Retracting the Awning
- Verify the battery is fully charged and connected to the electrical system.
- Press and hold RETRACT (Fig. 2B) until the awning is retracted completely.
- Locate the locking latch (Fig. 2), if equipped, on the drive side awning arm and lock the latch to secure the awning in place (Fig. 1).
NOTE: This latch is optional. If not installed, awning is secured and ready for transportation.
Adjusting Pitch
NOTE: Without manually setting pitch to the awning, the awning will pitch itself to purge excessive water pooling in one location and may dump a significant amount of water to either end of the awning without notice.
- Pitch can be set manually by adjusting the articulating arm to tip one side of the awning to allow water runoff.
- Extend awning to desired location.
- Choose the side of the awning for optimum or convenient water runoff. Pull downward on the joint of the articulating arm (Fig. 5) until pitch is set to allow for water runoff. Do not push the articulating arm past straight. This will put tension on the gas strut and can break it. The Belleville washers and bolt allow for the joint (Fig. 6A) to remain in the position set by the operator.

Description
Form and utility were taken into consideration when designing the Solera Power Awning. Its sleek and contemporary style offers enough of shade and blends nicely with any RV or camper. The awning's power operation makes it extremely simple to use, and its sturdy design guarantees long-lasting performance. The integrated LED lights offer a touch of beauty and functionality for evening parties, and the changeable pitch feature lets you modify the awning's inclination to maximum sun protection.
You may feel secure knowing that this awning is equipped with WeatherGuard Technology, which guarantees stability and security in windy situations.
Fabric Care of Lippert Solera Power Awning
If the awning is rolled up while wet, roll it out and let it dry as soon as conditions allow before rolling it up again. This will help prevent the formation of mildew and add greatly to the life of the awning. Mildew does not form on the fabric itself, but on the accumulated dust, dirt and grime. Periodically clean vinyl or woven acrylic fabric using a mixture of ¼ ˜ cup of dish soap mixed with 5 gallons of warm water. Liberally slosh the mixture on the top of the fabric and roll the awning up for 5 minutes. This will apply the mixture to the bottom as well. Roll it out and hose off with fresh water. Repeat if necessary. Allow to dry before rolling up.
Manual Override
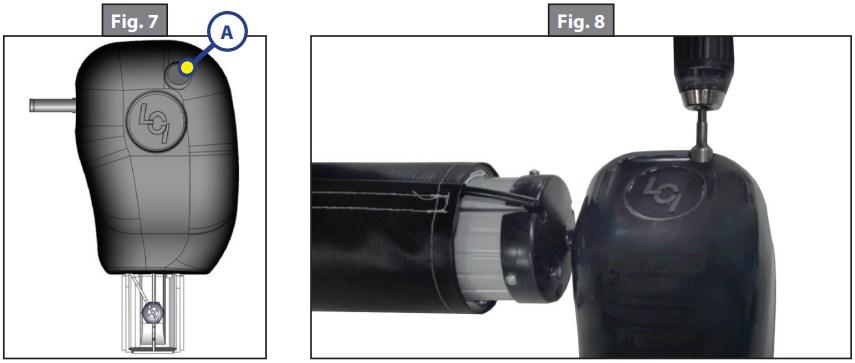
In the event of power loss or motor failure, the awning can be extended and retracted manually. Perform the following procedure to manually retract the awning.
- Remove rubber plug from the power head assembly exposing the manual override nut on the motor (Fig. 7A).
NOTE: The power head is always located on the right side of the awning as it is viewed from outside of the coach. - Using a °⁄˝˙” nut driver and power drill, spin the manual override nut counterclockwise to retract the awning (Fig. 8). A °⁄˝˙” socket and ratchet can be used if a drill is not available, however it will take much longer to retract the awning.
NOTE: Use caution when retracting manually as the use of a step stool or ladder may be required to completely retract the awning. - When awning is completely retracted, remove socket or drive device and replace rubber plug in power head assembly.
NOTE: The motor’s internal drive system prevents the awning from moving (extend or retract) on its own.
If the motor is damaged or disabled, be sure to secure the awning in the retracted position with straps before the override nut is released.
CAUTION: During incidents of high wind, heavy rain or extended time away from the unit, it is advisable to retract the awning completely to prevent damage to the awning and the RV.
Solera Power Awning Assembly Webpage
AWNINGS
Components Webpage
Variant Code Information
The variant code on Lippert products can assist LCI customers in obtaining additional information about the product and its components.

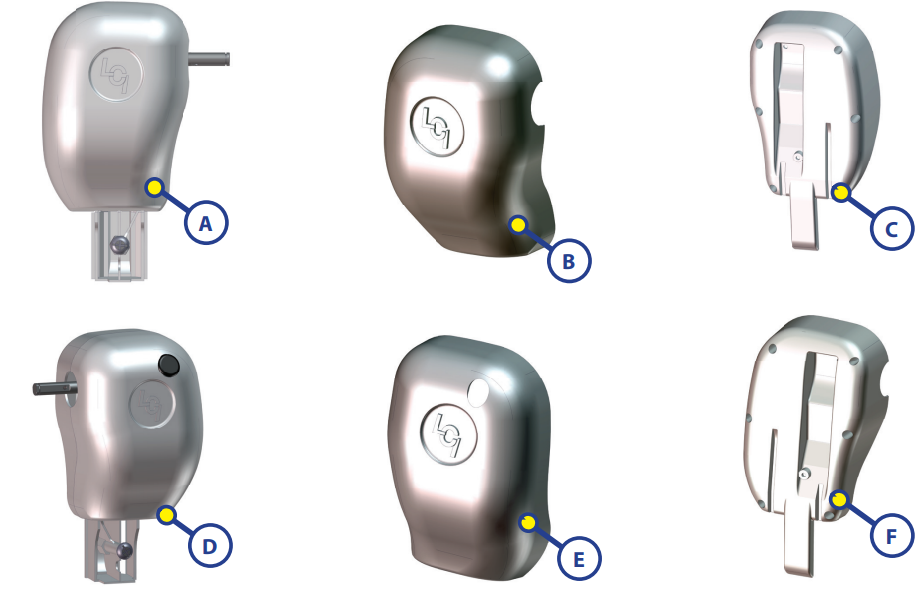
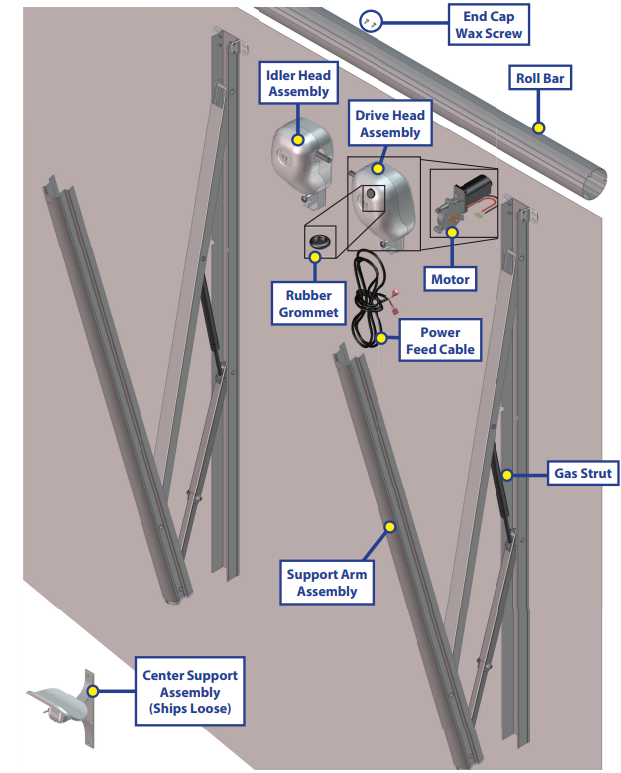
Callout | White Part # | Black Part # | Description |
A | 266147 | 273479 | Idler Head Assembly |
B | 289563 | 289566 | Idler Head Front Cover |
C | 289564 | 289567 | Idler Head Rear Cover |
D | 266146 | 273478 | Drive Head Assembly |
E | 289557 | 289560 | Drive Head Front Cover |
F | 289558 | 289561 | Drive Head Rear Cover |
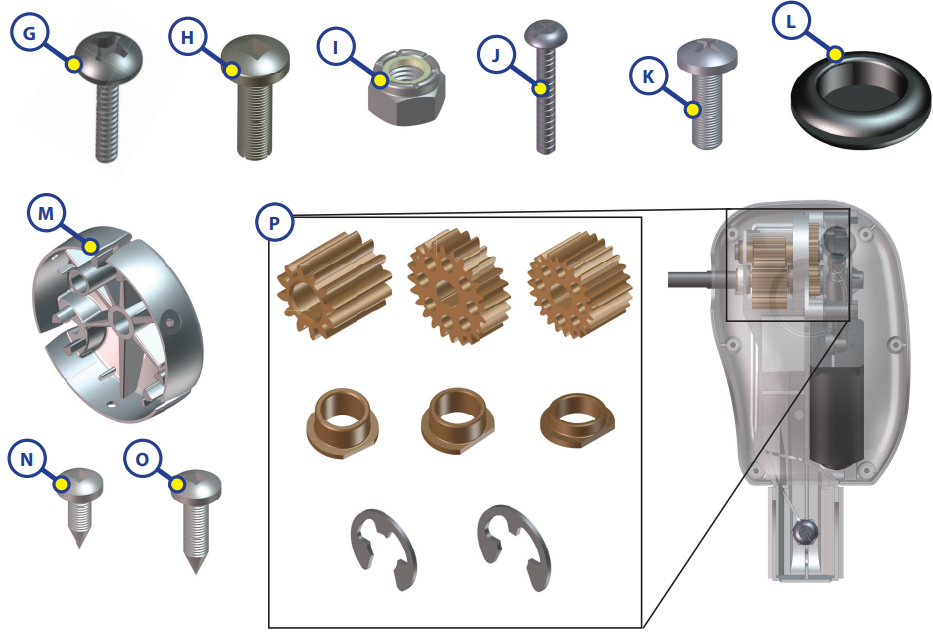
Callout | Part # | Description | |
G | 266156 | #6 X ½ ZN Screw(fastener for headcovers, 6 per cover) | |
H | 299630 | #8 End Cap Wax Screw(head to rollbar) | |
I | 118043 | Nut 5⁄16 -18 Nylock ZN ST (head to arm) | |
J | 266148 | Screw 5⁄16 - 18 X 2 - ¼ (headto arm) | |
K | 266155 | Screw #8-32x ½ PH PNH MACHGZN FTHD (backcover to mount) | |
L | 275071 | Rubber Grommet (around manual override on drive head) | |
M | 2661301 | EndCap for powerheads (White) | |
2661302 | EndCap for powerheads (Black) | ||
N | 299419 | Screw - # 8 - 15 X ½ PNH ZN SQ A ST (Endcap to Rollbar) | |
O | 178231 | #10 x ¾" Hex, Tek Screw(Cord to Rollbar) | |
Drive Head GearKit | Qty. | Part# - Description | |
P |
353964 (Only available as a kit) | 1 | 266133 - .873" 20 PA 16 DP, D SLOT GEAR |
1 | 266134 - .442" 20 PA 16 DP, CLR ZN GEAR | ||
1 | 266136 - .500" 20 PA 16 DP, CLR ZN GEAR | ||
2 | 266142 - Bushing | ||
1 | 266143 - Bushing | ||
1 | 281828 - Bushing | ||
2 | 266137 - E-Clip ½" | ||
2 | 276160 - E-Clip 3⁄s" | ||
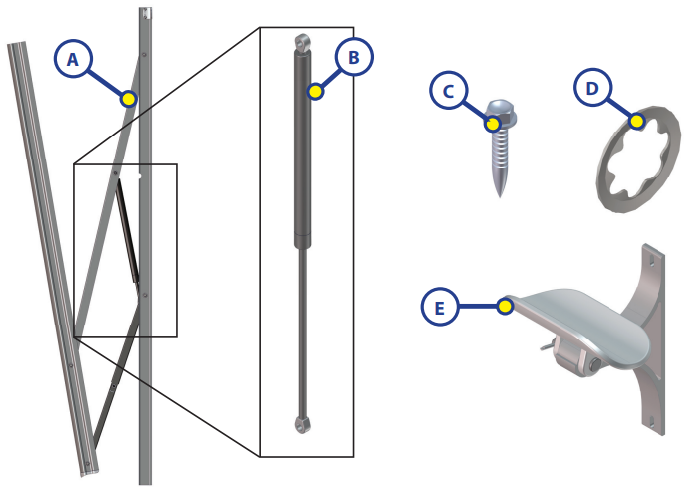
Callout | White Part # | Black Part # | Description |
A | 295742 | 295743 | Support Arm Assembly (Short, 61") (OneArm) |
260294 | 266169 | Support Arm Assembly (Pitched, 66 1⁄s") (One Arm) | |
281152 | 281154 | Support Arm Assembly (Flat, 69") (One Arm) | |
B | 280343 | Gas Strut; 26"; 124 LBS (forShort and FlatArm assemblies) | |
260282 | Gas Strut; 124 - 144 LBS (forPitched Arm assemblies) | ||
C | 286576 | Screw - #14 - 10 x 1 ½ (arms to coach) | |
D | 282484 | Star Washer (forGas Strut) | |
E | 289373 | 289374 | Awning CenterSupport Assembly NOTE: Only required for Solera Awnings greater than 21' in length |
Awning Fabric and Roll Bar Replacement
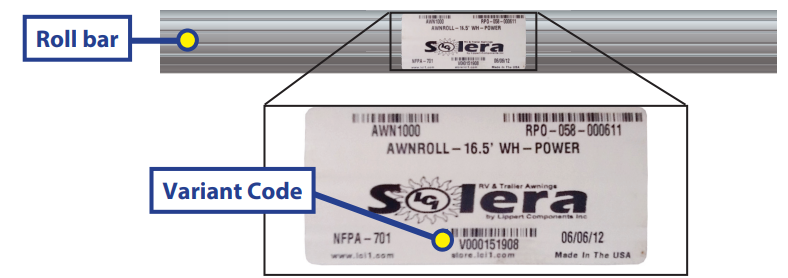
To order replacement awning fabric and roll bar for your awning, locate the awning label on the roll bar. Locate the variant code at the bottom of the label.
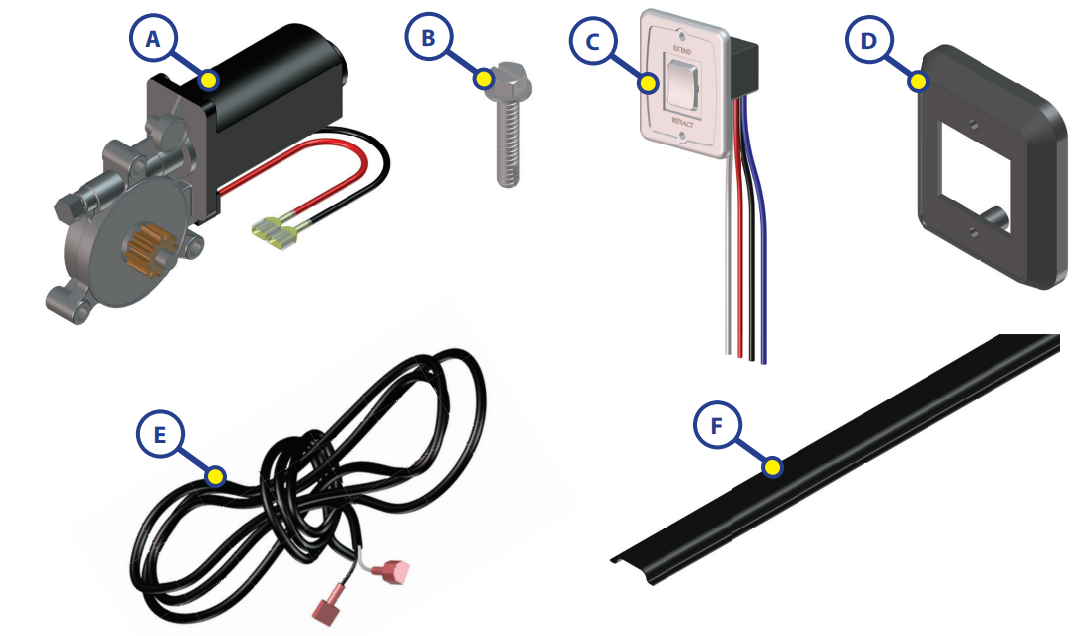
Callout | White Part # | Black Part# | Description |
A | 266149 | Motor | |
B | 266132 | Screw ¼ - 20 x ¼ IHWH 2N SLF ST (motor to mount) | |
C | 285499 | 285500 | Switch Kit (Switch, Plate, and Harness) |
280570 | Wire Harness Only | ||
280565 | 280567 | Switch Plate Only | |
280564 | 280566 | Switch Only | |
D | 285079 | 285077 | Bezel Spacer |
E | 273007 | Power Feed Wires | |
F | 275070157 | 2750701692 | Wire Cover; 9.75"; Narrow |
275070353 | 2750701888 | Wire Cover;22"; Narrow | |
266138481 | 2661382017 | Wire Cover;30"; Narrow | |
266139337 | 2661391872 | Wire Cover;21"; Wide | |
266139429 | 2661391964 | Wire Cover; 26.75"; Wide | |
Setup Guide
Setting up the Lippert Solera Power Awning is relatively straightforward:
- Mount the awning brackets securely to your RV or camper according to the manufacturer’s instructions.
- Attach the awning fabric to the brackets, ensuring proper alignment and tension.
- Connect the power cable to a 12V DC power source.
- Test the awning by pressing the open/close button on the remote control or wall switch.
- Adjust the pitch as needed for optimal sun protection.
Troubleshooting
If you encounter any issues with your Solera Power Awning, here are some common problems and solutions:
- Awnings Won't Open/Close: Check power connections and ensure there are no obstructions blocking the fabric.
- Fabric Not Retracting Properly: Adjust tension settings or clean any debris accumulated on the rollers.
- LED Lights Not Working: Verify power supply to LED lights; replace bulbs if necessary.
- Awnings Not Level: Adjust pitch settings or re-mount brackets for proper alignment.
Lippert Solera Power Awning Pros & Cons
Pros
- Ease of Use: Power operation makes it simple to open and close.
- Durability: High-quality fabric and robust construction ensure long-lasting performance.
- Customizable Pitch: Allows for optimal sun protection in various conditions.
- Ambient Lighting: Integrated LED lights enhance evening use.
Cons
- Higher Cost: More expensive than manual awnings due to power operation and advanced features.
- Power Dependency: Requires a reliable power source for operation.
- Complex Installation: May require professional installation if you're not comfortable with DIY projects.
Customer Reviews
Customers have praised the Lippert Solera Power Awning for its ease of use, durability, and stylish design. However, some have noted that it requires careful installation and can be more expensive than other options on the market.
One common complaint is the need for a reliable power source, which can limit its use in off-grid situations. Despite this, many users find the benefits far outweigh the drawbacks.
Faqs
What is the typical lifespan of the Lippert Solera Power Awning?
Can I install the Lippert Solera Power Awning myself?
How do I clean the fabric of my Lippert Solera Power Awning?
Is the Lippert Solera Power Awning suitable for use in windy conditions?
Can I customize the length of my Lippert Solera Power Awning?
What kind of power source does the Lippert Solera Power Awning require?
How do I adjust the pitch of my Lippert Solera Power Awning?
Is the Lippert Solera Power Awning compatible with all types of RVs?
Can I use my Lippert Solera Power Awning during light rain?
How often should I maintain my Lippert Solera Power Awning?
Leave a Comment
