How to Charge & Operate: Dewalt DCD771 Drill-Driver Instruction Manual
Content
Introduction Of DeWalt DCD771 Drill-Driver
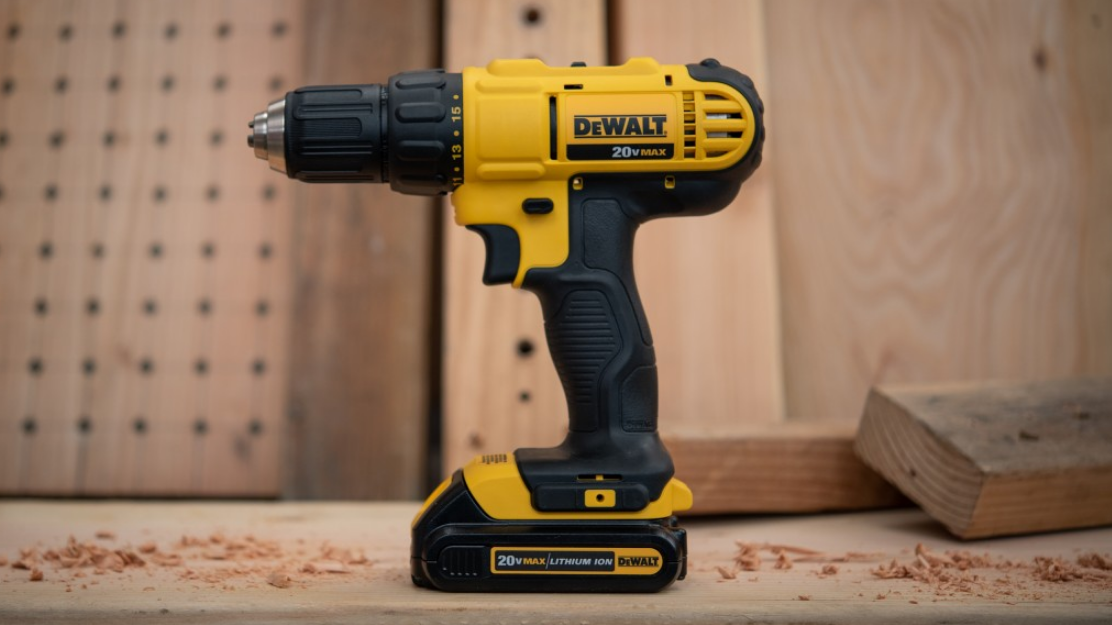
The DeWalt DCD771 Drill-Driver is a powerful and versatile cordless drill that is perfect for a wide range of drilling and driving applications. It is part of DeWalt's 20V MAX system, which means it is compatible with all DeWalt 20V batteries, providing users with the flexibility to use the same battery in multiple tools. The DCD771 Drill-Driver is a great option for professionals and DIYers alike, with a high-performance motor that delivers 300 unit watts out of max power, and a variable speed trigger that allows users to match the speed to the task at hand. It also features a compact and lightweight design, making it easy to use in tight spaces and reducing user fatigue. The estimated price of the DCD771 Drill-Driver is around $100 to $150, and it was launched in 2015.
Detailed Specifications
The DeWalt Drill Driver has the following key features:
- The high-performance motor that delivers 300 unit watts out of max power
- Variable speed trigger with no-load speed range of 0-450/1,500 RPM
- Compact and lightweight design (only 3.6 lbs and 7.56" front to back)
- 1/2" single-sleeve ratcheting clutch that provides 16 settings
- Ergonomic handle with a soft grip for added comfort
- Built-in LED light with a 20-second delay after trigger release
- Belt hook for easy carry and storage
- Compatible with all DeWalt 20V MAX batteries
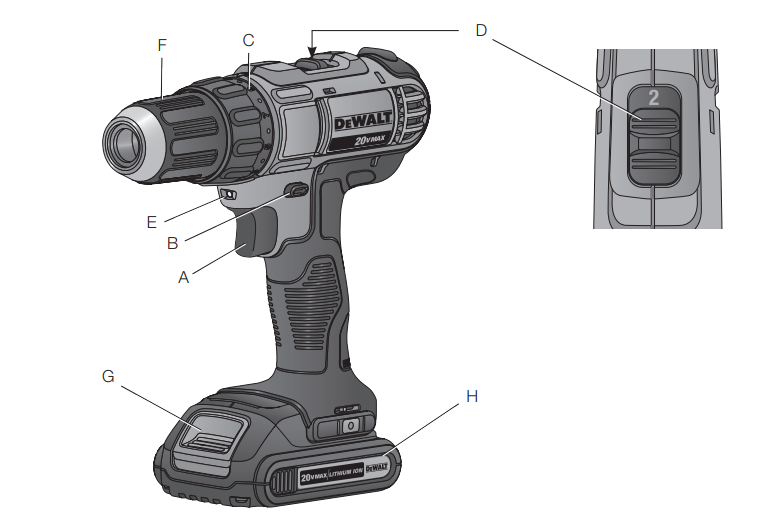
COMPONENTS
WARNING: Never modify the power tool or any part of it. Damage or personal injury could result
- Trigger switch
- Forward/reverse control button
- Torque adjustment collar
- Gear shifter
- Worklight
- Keyless chuck
- Battery release button
- Battery pack
- Variable Speed Trigger Switch
To turn the tool on, squeeze the trigger switch (A). To turn the tool off, release the trigger switch. Your tool is equipped with a brake. The chuck will stop as soon as the trigger switch is fully released.
NOTE: Continuous use in variable speed range is not recommended. It may damage the switch and should be avoided. - Forward/Reverse Control Button
- A forward/reverse control button (B) determines the rotational direction of the tool and also serves as a lock-off button.
- To select forward rotation, release the trigger switch and depress the forward/reverse control button on the right side of the tool.
- To select reverse rotation, depress the forward/reverse control button on the left side of the tool.
- The center position of the control button locks the tool in the off position. When changing the position of the control button, be sure the trigger is released.
NOTE: The first time the tool is run after changing the direction of rotation, you may hear a click on start up. This is normal and does not indicate a problem.
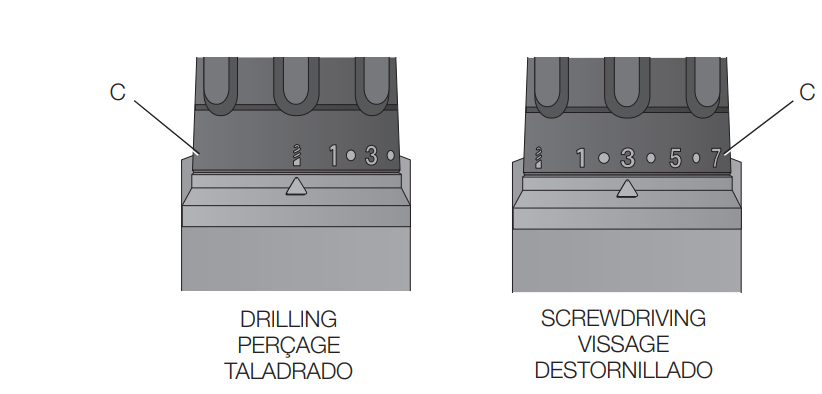
- Torque Adjustment Collar
Your tool has an adjustable torque screwdriver mechanism for driving and removing a wide array of fastener shapes and sizes. Circling the collar (C) are numbers and a drill bit symbol. These numbers are used to set the clutch to deliver a torque range. The higher the number on the collar, the higher the torque and the larger the fastener which can be driven. To select any of the numbers, rotate until the desired number aligns with the arrow. - Dual Range Gearing
The dual range feature of your drill/driver allows you to shift gears for greater versatility.- To select speed 1 (high torque setting), turn the tool off and permit it to stop. Slide the gear shifter (D) forward (towards the chuck).
- To select speed 2 (low torque setting), turn the tool off and permit it to stop. Slide the gear shifter back (away from the chuck).
NOTE: Do not change gears when the tool is running. Always allow the drill to come to a complete stop before changing gears. If you are having trouble changing gears, make sure that the dual range gear shifter is either completely pushed forward or completely pushed back.
- Worklight
CAUTION: Do not stare into the worklight. Serious eye injury could result.
There is a work light (E) located just above the trigger switch (A). The worklight is activated when the trigger switch is depressed, and will automatically turn off 20 seconds after the trigger switch is released. If the trigger switch remains depressed, the worklight will remain on.
NOTE: The worklight is for lighting the immediate work surface and is not intended to be used as a flashlight.
Keyless Single Sleeve Chuck
WARNING: Do not attempt to tighten drill bits (or any other accessory) by gripping the front part of the chuck and turning the tool on. Damage to the chuck and personal injury may result. Always lock off trigger switch and disconnect tool from power source when changing accessories.WARNING: Always ensure the bit is secure before starting the tool. A loose bit may eject from tool causing possible personal injury.
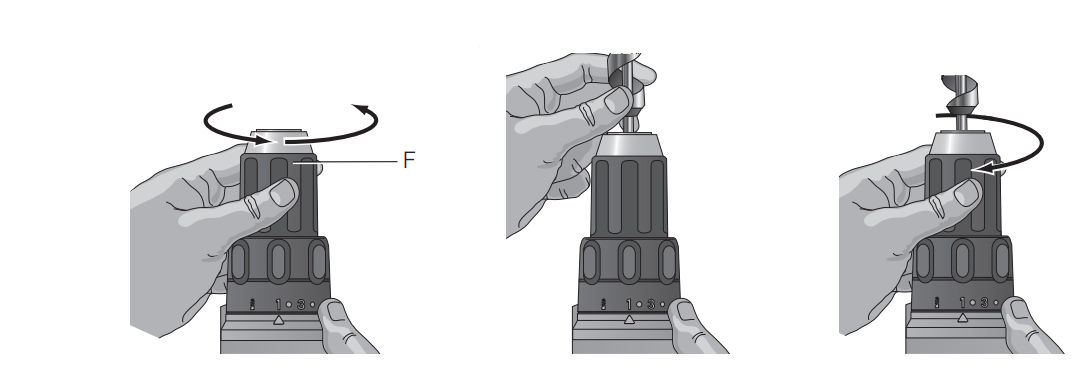
Your tool features a keyless chuck (F) with one rotating sleeve for one-handed operation of the chuck. To insert a drill bit or other accessory, follow these steps.
- Turn tool off and disconnect tool from power source.
- Grasp the black sleeve of the chuck with one hand and use the other hand to secure the tool. Rotate the sleeve counterclockwise far enough to accept the desired accessory.
- Insert the accessory about 3/4" (19 mm) into the chuck and tighten securely by rotating the chuck sleeve clockwise with one hand while holding the tool with the other. Your tool is equipped with an automatic spindle lock mechanism. This allows you to open and close the chuck with one hand.
Be sure to tighten chuck with one hand on the chuck sleeve and one hand holding the tool for maximum tightness. To release the accessory, repeat steps 1 and 2 above.
Setup Guide of DCD771 Drill-Driver
To operate the DeWalt DCD771 Drill-Driver, follow these steps:
- Install the battery: Insert a DeWalt 20V MAX battery into the battery slot on the bottom of the drill.
- Choose a drill bit or driver: Select the appropriate drill bit or driver for the task at hand, and insert it into the chuck.
- Adjust the clutch: Use the clutch settings to match the torque to the material you are drilling or driving.
- Power on the drill: Press the power button to turn on the drill.
- Adjust the speed: Use the variable speed trigger to adjust the speed of the drill to match the task.
- Drill or drive: Hold the drill firmly and apply steady pressure to drill or drive the screws.
Chargers
Your tool uses a DeWALT charger. Be sure to read all safety instructions before using your charger. Consult the chart at the end of this manual for compatibility of chargers and battery packs.
Charging Procedure
- Plug the charger into an appropriate outlet before inserting the battery pack.
- Insert the battery pack (H) into the charger, as shown in Figure 3, making sure the pack is fully seated in charger. The red (charging) light will blink continuously, indicating that the charging process has started.
- The completion of charge will be indicated by the red light remaining ON continuously. The pack is fully charged and may be used at this time or left in the charger.

Indicator Light Operation
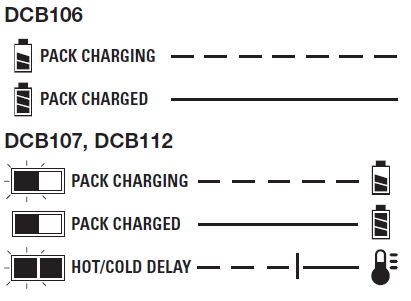
Charge Indicators
HOT/COLD PACK DELAY (DCB107, DCB112)
The DCB107 and DCB112 chargers have a hot/cold delay feature. When the charger detects a battery that is hot, it automatically delays charging until the battery has cooled. When the charger detects a battery that is cold, it automatically delays charging until the battery has warmed.
The red light will continue to blink, but a yellow indicator light will be illuminated during this operation. Once the battery has cooled, the yellow light will turn off and the charger will resume the charging procedure.
LEAVING THE BATTERY PACK IN THE CHARGER
The charger and battery pack can be left connected with the charge indicator showing Pack Charged.
- WEAK BATTERY PACKS: Weak batteries will continue to function but should not be expected to perform as much work.
- FAULTY BATTERY PACKS: This charger will not charge a faulty battery pack.
NOTE: This could also mean a problem with a charger.
Wall Mounting
DCB107, DCB112
These chargers are designed to be wall mountable or to sit upright on a table or work surface. If wall mounting, locate the charger within reach of an electrical outlet. Mount the charger securely using drywall screws at least 1" (25.4 mm) long, screwed into wood to an optimal depth leaving approximately 7/32" (5.5 mm) of the screw exposed.
Important Charging Notes
- Longest life and best performance can be obtained if the battery pack is charged when the air temperature is between 65 °F and 75 °F (18° – 24 °C). DO NOT charge the battery pack in an air temperature below +40 °F (+4.5 °C), or above +105 °F (+40.5 °C). This is important and will prevent serious damage to the battery pack.
- The charger and battery pack may become warm to the touch while charging. This is a normal condition, and does not indicate a problem. To facilitate the cooling of the battery pack after use, avoid placing the charger or battery pack in a warm environment such as in a metal shed or an uninsulated trailer.
- A cold battery pack will charge at about half the rate of a warm battery pack. The battery pack will charge at that slower rate throughout the entire charging cycle and will not return to the maximum charge rate even if the battery pack warms.
- If the battery pack does not charge properly
- Check operation of receptacle by plugging in a lamp or other appliance;
- Check to see if receptacle is connected to a light switch which turns power off when you turn out the lights;
- Move the charger and battery pack to a location where the surrounding air temperature is approximately 65 °F – 75 °F (18° – 24 °C);
- If charging problems persist, take the tool, battery pack and charger to your local service center.
- The battery pack should be recharged when it fails to produce sufficient power on jobs that were easily done previously. DO NOT CONTINUE to use under these conditions. Follow the charging procedure. You may also charge a partially used pack whenever you desire with no adverse effect on the battery pack.
- Foreign materials of a conductive nature such as, but not limited to, grinding dust, metal chips, steel wool, aluminum foil, or any buildup of metallic particles should be kept away from charger cavities. Always unplug the charger from the power supply when there is no battery pack in the cavity. Unplug the charger before attempting to clean.
- Do not freeze or immerse the charger in water or any other liquid.
Storage Recommendations
- The best storage place is one that is cool and dry, away from direct sunlight and excess heat or cold.
- For long storage, it is recommended to store a fully charged battery pack in a cool dry place out of the charger for optimal results.
NOTE: Battery packs should not be stored completely depleted of charge. The battery pack will need to be recharged before use.
OPERATION
WARNING: To reduce the risk of serious personal injury, turn tool off and remove the battery pack before making any adjustments or removing/installing attachments or accessories. An accidental start-up can cause injury.
Installing and Removing the Battery Pack
NOTE: For best results, make sure your battery pack is fully charged.
- To install the battery pack (H) into the tool handle, align the battery pack with the rails inside the tool’s handle and slide it into the handle until the battery pack is firmly seated in the tool and ensure that it does not disengage.
- To remove the battery pack from the tool, press the release button (G) and firmly pull the battery pack out of the tool handle. Insert it into the charger as described in the charger section of this manual.
Drilling
NOTICE: If drilling thin material, use a wood “back-up” block to prevent damage to the material.
- Select the desired speed/torque range using the gear shifter to match the speed and torque to the planned operation. Turn the collar (C) to the drill symbol.
- Use sharp drill bits only.
- Always apply pressure in a straight line with the bit. Use enough pressure to keep drill biting, but do not push hard enough to stall the motor or deflect the bit.
- Hold tool firmly with both hands to control the twisting action of the drill. If model is not equipped with side handle, grip drill with one hand on the handle and one hand on the battery pack.WARNING: Drill may stall if overloaded causing a sudden twist. Always expect the stall. Grip the drill firmly to control the twisting action and avoid injury.
- IF DRILL STALLS, it is usually because it is being overloaded or improperly used. RELEASE TRIGGER IMMEDIATELY, remove drill bit from work, and determine cause of the stalling. DO NOT DEPRESS TRIGGER ON AND OFF IN AN ATTEMPT TO START A STALLED DRILL — THIS CAN DAMAGE THE DRILL.
- To minimize stalling or breaking through the material, reduce pressure on drill and ease the bit through the last fractional part of the hole.
- Keep the motor running when pulling the bit back out of a drilled hole. This will help prevent jamming.
Screwdriving
- Select the desired speed/torque range using the gear shifter to match the speed and torque to the planned operation.
- Turn the torque adjustment collar (C) to the desired position.
NOTE: Use the lowest torque setting required to seat the fastener at the desired depth. The lower the number, the lower the torque output. - Insert the desired fastener accessory into the chuck as you would any drill bit.
- Make some practice runs in scrap or on unseen areas of the workpiece to determine the proper position of the torque adjustment collar.
- Always start with lower torque settings, then advance to higher torque settings to avoid damage to the workpiece or fastener.
MAINTENANCE
WARNING: To reduce the risk of serious personal injury, turn tool off and remove the battery pack before making any adjustments or removing/installing attachments or accessories. An accidental start-up can cause injury.
Cleaning
WARNING: Blow dirt and dust out of all air vents with clean, dry air at least once a week. To minimize the risk of eye injury, always wear ANSI Z87.1-approved eye protection when performing this. WARNING: Never use solvents or other harsh chemicals for cleaning the non-metallic parts of the tool. These chemicals may weaken the plastic materials used in these parts. Use a cloth dampened only with water and mild soap. Never let any liquid get inside the tool; never immerse any part of the tool into a liquid.
CHARGER CLEANING INSTRUCTIONS
WARNING: Shock hazard. Disconnect the charger from the AC outlet before cleaning. Dirt and grease may be removed from the exterior of the charger using a cloth or soft non-metallic brush. Do not use water or any cleaning solutions.
Description of DeWalt DCD771
The DCD771 Drill-Driver is a high-performance cordless drill that is designed to handle a wide range of drilling and driving applications. It has a powerful motor that delivers 300 unit watts out of max power, providing users with the power they need to drill through tough materials. The variable speed trigger allows users to match the speed to the task at hand, and the 1/2" single-sleeve ratcheting clutch provides 16 settings to prevent over-tightening. The compact and lightweight design of the DCD771 Drill-Driver makes it easy to use in tight spaces, and the built-in LED light helps to illuminate the work surface. It also comes with a belt hook for easy carry and storage, and it is compatible with all DeWalt Drill-Driver 20V MAX batteries, providing users with the flexibility to use the same battery in multiple tools.
Troubleshooting
Here are some common problems and solutions that may arise when using the DeWalt DCD771 Drill-Driver
- Problem: The drill won't turn on.
- Solution: Make sure the battery is inserted correctly, and that it is charged. If the battery is charged, try resetting the drill by removing the battery, then reinserting it and turning on the drill.
- Problem: The drill is not drilling smoothly.
- Solution: Make sure the chuck is tightened properly and that the drill bit is securely in place. Also, check that the drill is not overheating, as this can affect its performance. If the drill is overheating, turn it off and let it cool down before continuing to use it.
- Problem: The drill is not driving screws properly.
- Solution: Make sure the clutch settings are adjusted to match the torque of the screws. If the clutch is set too low, the screws may not be driven properly, and if it is set too high, the screws may be stripped. Also, make sure the screws are the correct size and type for the material you are drilling into.
Pros & Cons of DeWalt Drill-Driver
Pros
- High-performance motor
- Variable speed trigger
- Compact and lightweight design
- 1/2" single-sleeve ratcheting clutch
- Built-in LED light
- Belt hook for easy carry and storage
- Compatible with all DeWalt 20V MAX batteries
Cons
- No magnetic bit holder in the chuck
- No case or bag included
- No brake to stop the drill quickly
Customer Reviews of DCD771 Drill-Driver
Customers generally have positive things to say about the DeWalt Drill Driver. They appreciate its high-performance motor, compact and lightweight design, and variable speed trigger. They also like the built-in LED light and the fact that it is compatible with all DeWalt 20V MAX batteries. Some of the most common complaints include the lack of a magnetic bit holder in the chuck, the absence of a case or bag, and the lack of a brake to stop the drill quickly. Overall, however, customers feel that the DeWalt DCD771 Drill-Driver is a great value for the price.
Faqs
Is it possible to drive screws into wood with the DeWalt DCD771 Drill-Driver?
If the DeWalt DCD771 Drill-Driver isn't working, what should I do?
How can I extend the life of the DeWalt DCD771 through maintenance?
Why is the battery on my DeWalt DCD771 Drill-Driver running out so quickly?
How can I change the DeWalt DCD771's torque settings?
Can I drill into concrete with the DeWalt DCD771 Drill-Driver?
How can I determine whether my DeWalt DCD771's chuck needs to be replaced?
Which bit kinds work with the DeWalt DCD771 Drill-Driver?
Why won't my DeWalt DCD771's LED light turn on?
How long is the DeWalt DCD771 Drill-Driver warranty valid?
Leave a Comment