Dji 3-axis Single handled Gimbal Ronin-S User Manual | Operations & Functions
Content
Introduction
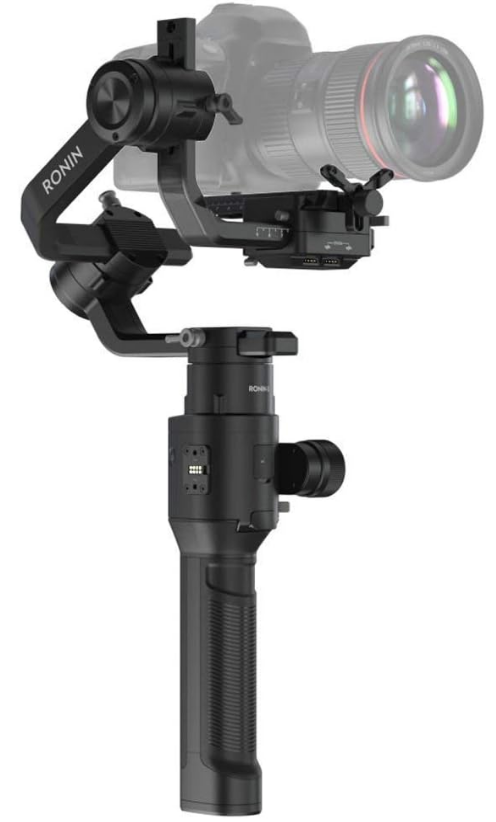
The DJI Ronin-S is a professional 3-axis single handled gimbal that’s specifically designed for DSLR and mirrorless cameras. It is compatible with almost any DSLR or mirrorless camera setup on the market. The Ronin-S also can be mounted to a tripod or a car for shooting, with operating speeds of 75 kph*. There are many modes of operation such as SmoothTrack and Lock mode, and the newly added Sport Mode allows you to capture fast-moving scenes effortlessly.
The Ronin-S comes with an array of buttons that allows you to control the gimbal’s movement, switch control profiles and also working modes easily. Used with the provided camera control cables, the Ronin-S is able to control the shutter, recording and focus. The accessory ports and power ports allow accessories such as an external wireless receiver or Focus motor.
The gimbal and grip are detachable, with a battery system in the grip with a capacity of 2400 mAh, providing a maximum operating time up to 12 hours**. After connecting to the Ronin App, gimbal movement control and the parameter settings are easily achievable with intelligent functions such as Panorama, Timelapse, Motionlapse and Track.
The DJI Ronin-S is priced at $649.00, making it a valuable investment for professional filmmakers.
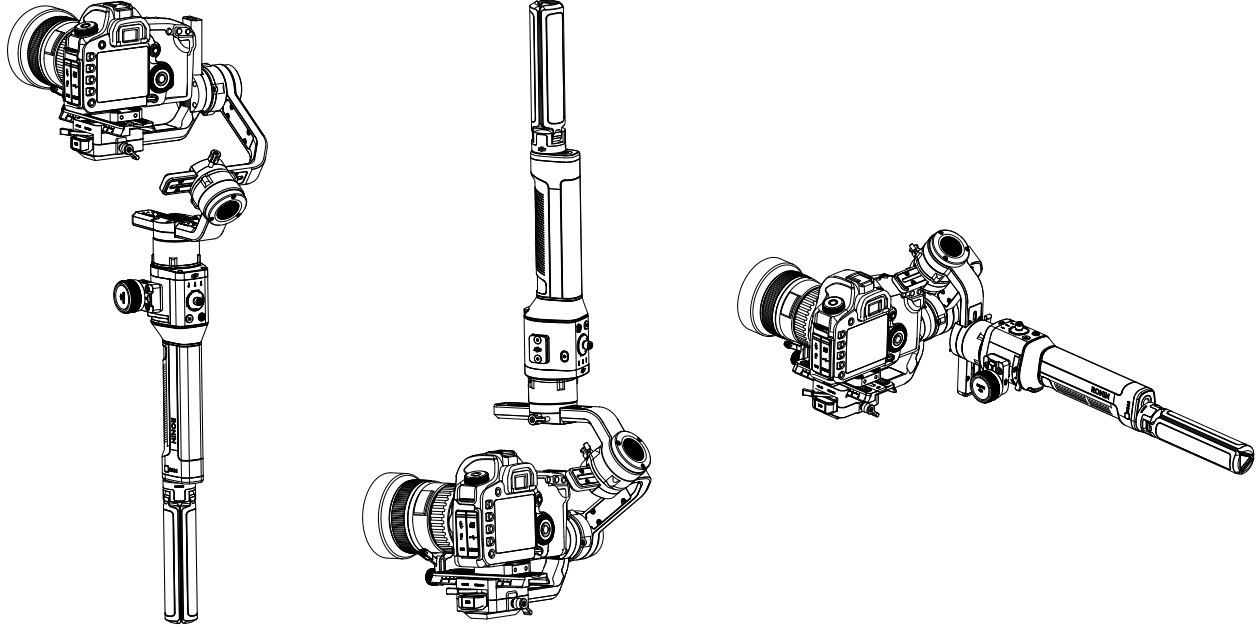
Ronin-S Diagram
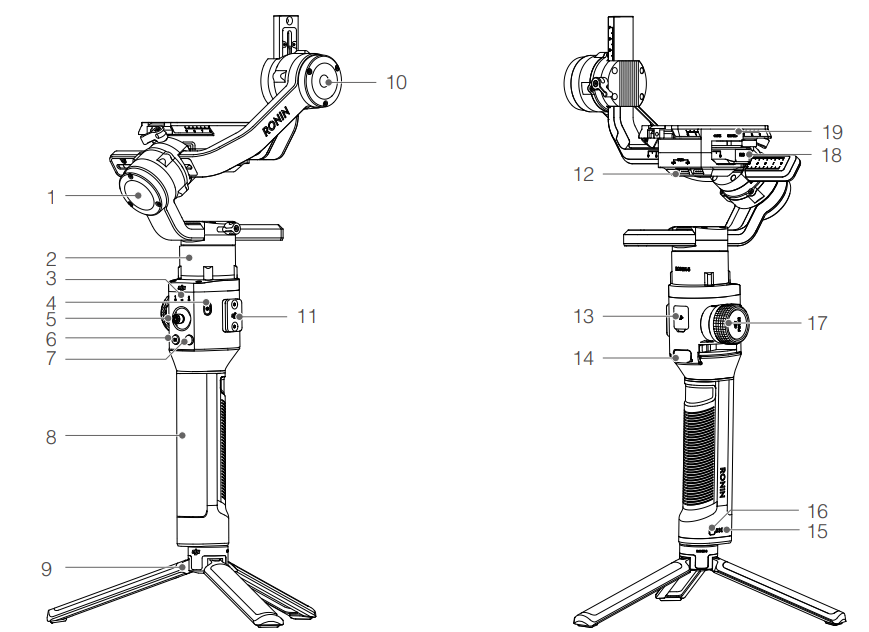
- Roll Motor
- Pan Motor
- Profile LED Indicators
- Power Button
- Joystick
- M Button
- Camera Control Button
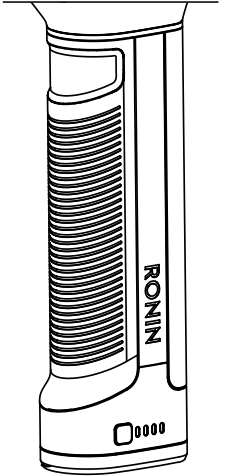
- Grip
- Extended Grip/Tripod
- Tilt Motor
- 8-pin Port/Cover
- 12 V/2 A Accessory Power Port
- USB-C Port
- Trigger
- Battery Level Indicators
- Grip Power Button
- Focus Wheel
- Camera Control Port (RSS Port)
- Camera Mounting Plate
Specifications
General
Built-In Functions
- Operation Modes Upright Mode, Underslung Mode, Flashlight Mode
- Mounting Modes Handheld, Car Mount Mode
- Built-in, independent IMU modules
- Advanced 32-Bit ARM Processor
- DJI Specialized Gimbal Drive Motors with Encoders
- Bluetooth Module
- S-Bus Receiver Supported
- DJI Pro Wireless Receiver Supported
- Extended GPS Supported
- USB-C Port
- 360° continuous rotation through Slip Ring
- Three profile settings, including SmoothTrack and joystick parameters
- Virtual Joystick operation supported
- Timelapse, Track, and Panorama supported
- Roll 360 rotation supported
- Sport mode supported
- Control Sony, Canon, Nikon, and other DSLR and mirrorless cameras through the dedicated DJI camera control cable
- DJI Focus, Command Unit supported
Peripheral
Camera Tray Dimensions
- Maximum depth from the center of gravity on the camera base plate: 98 mm
- Maximum height measured from top of the camera base plate: 150 mm
- Maximum width: 205 mm
Accessory Ports
- Mechanical: 1/4”-20, 3/8”-16 Mounting Hole, M4 Mounting Hole
- Electrical: 12V/2A Power Accessory Port, Camera Control Port, 8-pin Port
Input Power
- Model: RB1-2400mAh-14.4V Type: 18650 LiPo
- Capacity: 2400 mAh
- Energy: 34.56 Wh
User Interface
- Bluetooth 4.0; USB-C
DJI Pro Assistant for Ronin Requirements
- Windows 7 or above; Mac OS X 10.11 or above
Ronin App Requirements
- iOS 9.0 or above; Android 4.4 or above
Mechanical & Electrical Characteristics
- Working Current Static current: ≈0.16 A
- Bluetooth Operating Frequency 2.4 to 2.48 GHz
- Bluetooth Transmitter Power 0 dBm
- Operating Temperature -4° to 113° F (-20℃ to 45℃)
- Weight Approx. 3.3 lb (1.5 kg) (gimbal only)
- Approx. 4.1 lb (1.86 kg) (gimbal and grip included)
- Dimensions Approx. 202×185×486 mm
Working Performance
- Load Weight (Reference Value)
- 7.9 lb (3.6 kg) (handheld)
- Angular Vibration Range
- ±0.02°
- Maximum Controlled Rotation Speed
- Pan axis: 360°/s
- Tilt axis: 360°/s
- Roll axis: 360°/s
Mechanical Endpoint Range
- Pan axis: 360° continuous rotation
- Tilt axis: +185° to -95°
- Roll axis: 360° continuous rotation
Controlled Rotation Range
- Pan axis: 360° continuous rotation
- Tilt axis: +180° to -90° (Upright Mode), +90° to -135° (Underslung and Flashlight Mode)
- Roll axis: ±30°, 360° continuous rotation (Roll 360 Mode)
Description
The DJI Ronin-S is crafted with durability and portability in mind. Its magnesium-aluminum alloy body ensures lightweight yet robust construction. The ergonomic design includes a comfortable grip that reduces fatigue during extended use. The gimbal's size is compact enough to fit into a backpack or case when not in use, making it an excellent choice for location shoots.
The Ronin-S also features a quick-release plate system that allows you to easily switch between different cameras without recalibrating the gimbal. This feature, combined with its intuitive controls, makes it an indispensable tool for any serious filmmaker or videographer.
Getting Started of DJI 3-Axis Single-Handled Gimbal Ronin-S
Mounting the Grip
Attach the gimbal to the grip by sliding it into the dovetail mount. Toggle the lever to the locked position.
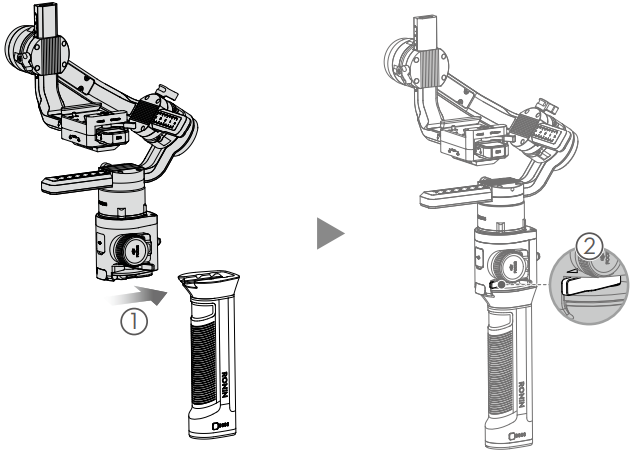
WARNING: The Ronin-S’ power/data ports and connectors are not waterproof. Ensure to protect them from harmful dust and water during use to avoid damage.
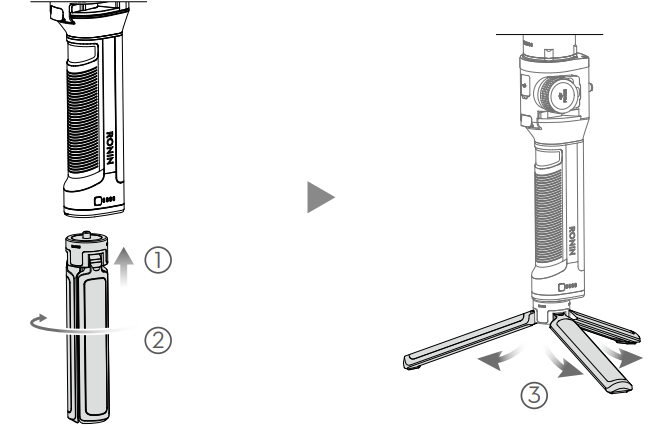
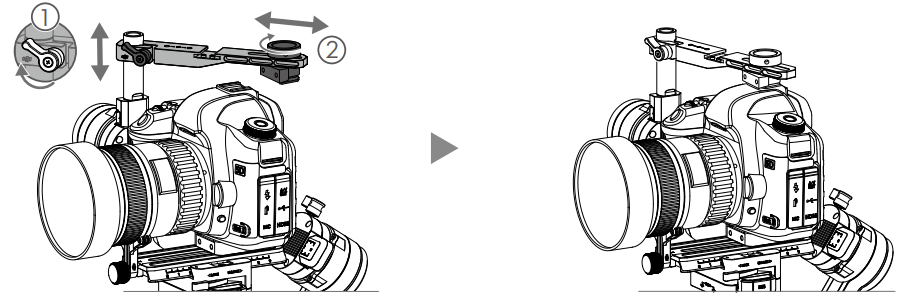
Attaching the Extended Grip
To attach the provided extended grip to the gimbal, toggle the safety lock to the locked position, and expand as shown.
Mounting the Camera
Camera Size Requirements
The maximum depth from the center of gravity on the camera base plate is 98 mm. The maximum height, measured from the top of the camera base plate is 150 mm. The The maximum height, measured from the top of the camera base plate is 150 mm. The maximum width is 205 mm.maximum width is 205 mm.
WARNING
- Make sure the camera is powered off during installation.
- It is recommended to use soft connection cables to avoid obstructing camera It is recommended to use soft connection cables to avoid obstructing camera movement.movement.
Supported Cameras and Lenses
Please refer to Ronin-S product page (www.dji.com/ronin-s) for most updated Ronin-S Please refer to Ronin-S product page (www.dji.com/ronin-s) for most updated Ronin-S Camera Compatibility List. Camera Compatibility List.
Camera Connections
The camera control button accesses different functions depending on the camera model. The camera control button accesses different functions depending on the camera model.
Connect the RSS-IR Control Cable to the RSS port on the gimbal, and then point the infrared light to the camera’s receiver as shown below. You can use the small hook and loop strap to secure the RSS-IR Control Cable to the gimbal. The figure shown below takes the Canon 5D Mark III as an example. Please adjust the infrared light position according to your camera type.
- Connect the Multi-Camera Control Cable (Type-C) to cameras with a USB-C port.
- Connect the Multi-Camera Control Cable (Type-B) to cameras with a Micro USB port.
After completing the camera connection and settings, press halfway to auto focus, as you would for the shutter button on most DSLR cameras; press once to start/ stop recording; press and hold to take a photo. Please refer to the Ronin-S Camera Compatibility List for details.
WARNING
- Be sure the Ronin-S is not powered on when plugging/unplugging the RSS Be sure the Ronin-S is not powered on when plugging/unplugging the RSS cable. Failure to do so may burn out the cable.cable. Failure to do so may burn out the cable.
- When connecting to cameras with the USB cable, be sure to power on the When connecting to cameras with the USB cable, be sure to power on the Ronin-S prior to powering on the camera. Otherwise, camera control may fail.
Mounting a Camera
Before mounting the camera, make sure it is prepared ahead of time. Remove the lens cap and make sure the camera's battery and memory card are already inserted.
Attach the riser plate* to the bottom of the camera using a flathead screwdriver or coin.

- Attach the camera mounting plate and lens support. For the best results during setup, use the lens support whenever possible.
Slide the camera onto the camera mounting base. When a rough back and forth balance is reached, toggle the lever to the locked position after the safety lock is engaged.

It is recommended to mount the camera using the Top Hotshoe Bracket when mounting the gimbal on a car or shooting in environments when traveling at high speeds where wind forces can affect the gimbal stability. The Top Hotshoe Bracket is sold separately. The installation is shown below.
Balancing the Ronin-S for Optimal Performance
To obtain the best performance from the Ronin-S, proper balancing is essential. Accurate balance is critical for shots where the Ronin-S will be subjected to fast motion or acceleration. Proper balance will also offer longer battery runtimes. There are three axes that need to be accurately balanced prior to turning on the Ronin-S and setting up the software.
Before Balancing
- The camera needs to be fully configured, with all accessories and cables connected, prior to installing and balancing the camera on the gimbal. If the camera has a lens cap, be sure to remove it prior to balancing.
- Ensure that the Ronin-S motors are powered off while balancing the camera.
Balancing Procedures
Balancing the Vertical Tilt
- Rotate the tilt axis so that the camera lens is pointing up. Hold the tilt axis motor to ensure the roll axis remains horizontal and check if the camera is top or bottom heavy.
- Loosen Knob 1 on the tilt motor and adjust the camera balance until the camera stays still without tilting up or down.
- Tighten the knob.
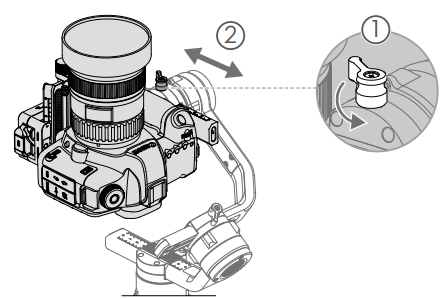
Balancing the Depth for the Tilt Axis
- Rotate the tilt axis so that the camera lens is pointing forward. Hold the tilt motor to check if the camera is front or back heavy.
- Toggle Lever 1 to the unlocked position. Adjust the camera balance until the camera stays still when rotating the tilt axis 45° upwards or downwards.
- Toggle Lever 3 to the locked position.

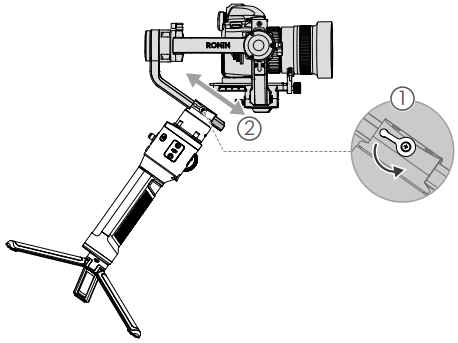
Balancing the Roll Axis
- Release the tilt motor to check the direction in which the motor swings.
- Loosen Knob 1 on the roll axis and adjust the camera balance until the camera stays still.
- If the adjustment on this axis is too stiff, you can try to relieve the weight on the roll motor by lifting up on the camera platform while making the adjustment or tilting the gimbal back until the roll arm is parallel with the ground.
- Tighten the knob.
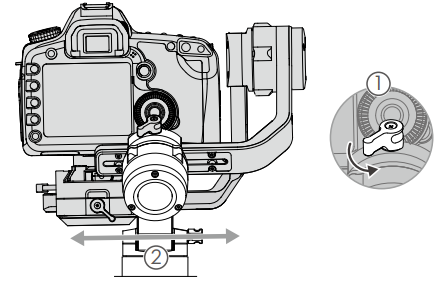
Balancing the Pan-Axis
- Grab the grip and tilt the Ronin-S sideways to check for movement along the pan axis.
- Loosen Knob 1 on the pan motor. Adjust the camera balance until the camera stays still when rotating the pan axis 45° while lifting the grip.
- Tighten the knob.
WARNING
- The knobs on the gimbal can be pulled outwards and repositioned if knob rotation is hindered.
- It is necessary to use optional counterweights if mounting a longer camera system. Visit the official DJI Online Store for more information.
Grip and Built-in Battery
The Grip is for handheld use. The built-in battery within the Grip has a capacity of 2400 mAh and able to power the Ronin-S for up to 12 hours (when the Ronin-S is properly balanced and used under normal conditions).
Charging
Charge the grip using the 24W USB Power Adapter and USB-C cable provided by connecting to the USB-C port on the gimbal.
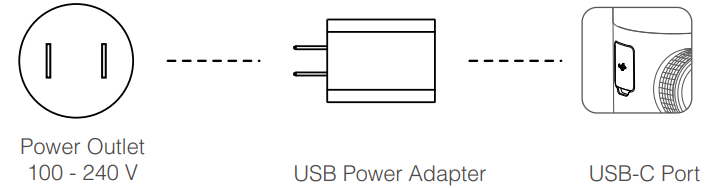
Charging Time: approx. 2 hours 15 minutes.
With the grip attached, you can use a power bank to power the Ronin-S continuously through the USB-C port.
Using the Grip
- Press the grip power button once to turn on the grip, and then press and hold the gimbal power button to turn on the gimbal.
- Press and hold the gimbal power button to turn off the gimbal. Press once, then again and hold to turn off the grip. (The grip automatically powers off if it is not connected to the gimbal or the gimbal is not powered on for 12 hours.)
WARNING: When turning on the Ronin-S, ensure to keep it level and steady.
Safety Guidelines
The following terms are used throughout the product literature to indicate various levels of potential harm when operating this product:
- NOTICE: Procedures, which if not properly followed, create a possibility of physical property damage AND little or no possibility of injury.
- WARNING: Procedures, which if not properly followed, create the probability of property damage, collateral damage, and serious injury OR create a high probability of superficial injury.
Grip Use
- DO NOT allow the grip to come into contact with any kind of liquid. DO NOT leave the grip out in the rain or near a source of moisture. DO NOT drop the grip into water. If the inside of the battery comes into contact with water, chemical decomposition may occur, potentially resulting in the battery catching on fire, and may even lead to an explosion.
- If the grip falls into water by accident, put it in a safe and open area immediately. Maintain a safe distance from the grip until it is completely dry. Never use the grip again, and dispose of the grip properly as described in the Grip Disposal section below.
- Put out any grip fire using water, sand, a fire blanket, or a dry powder fire extinguisher.
- Never use non-DJI batteries. Go to http://www.dji.com to purchase new batteries. DJI takes no responsibility for any damage caused by non-DJI batteries.
- Never use or charge a swollen, leaky, or damaged grip. If the grip is abnormal, contact DJI or a DJI authorized dealer for further assistance.
- Never install or remove the grip from the gimbal when it is turned on.
- The grip should be used in temperatures from -4°F to 113°F (-20°C to 45°C). Use of the grip in environments above 122°F (50°C) can lead to a fire or explosion. Use of the grip below 14°F (-10°C) can lead to permanent damage.
- DO NOT use the grip in strong electrostatic or electromagnetic environments. Otherwise, the battery control board may malfunction.
- Never disassemble or pierce the grip in any way, as the battery may leak, catch fire, or explode.
- DO NOT drop or strike the grip. DO NOT place heavy objects on the grip or charger.
- Electrolytes in the battery are highly corrosive. If any electrolytes make contact with your skin or eyes, immediately wash the affected area with fresh running water for at least 15 minutes, and then see a doctor immediately.
- DO NOT use the grip if it falls.
- DO NOT heat batteries. DO NOT put the grip in a microwave oven or in a pressurized container.
- DO NOT manually short-circuit the grip.
- Clean grip terminals with a clean, dry cloth.
- DO NOT attempt to use the grip when the battery level is lower than 1%, as this may lead to permanent battery damage.
Grip Charging
- Always use a DJI-approved charger. DJI takes no responsibility if the grip is charged using a non-DJI charger.
- Never leave the grip unattended during charging. DO NOT charge the grip near flammable materials or on flammable surfaces such as carpet or wood.
- DO NOT charge the grip immediately after use, as the grip temperature may be too high. It is recommended to charge the grip after it cools down to near room temperature. Charging the grip outside of the temperature range of 41°F to 104°F (5°C to 40°C) may lead to leakage, overheating, or battery damage. The ideal charging temperature is 72°F to 82°F (22°C to 28°C).
- Disconnect the charger when not in use. Examine the charger regularly for damage to the cord, plug, enclosure, or other parts. DO NOT clean the charger with denatured alcohol or other flammable solvents. Never use a damaged charger.
Grip Storage
- Keep the grip out of the reach of children and pets.
- If a low-battery warning appears, charge the grip until the battery level reaches between 30%-50% for long-term storage.
- DO NOT leave the grip near heat sources such as a furnace or heater. DO NOT leave the grip inside of a vehicle on hot days. The ideal storage temperature is 72°F to 82°F (22°C to 28°C).
- Keep the grip dry.
Grip Maintenance
- Never use the grip when the temperature is too high or too low.
- Never store the battery in environments with a temperature higher than 113°F (45°C) or lower than 32°F (0°C).
Travel Notice
- Before carrying the grip on an airline flight, it must first be discharged, and its power level should be lower than 30%. Only discharge the grip in a fireproof location. Store the grip in a ventilated location.
- Keep the grip away from metal objects such as glasses, watches, jewelry, and hairpins.
- Never transport a damaged grip or a grip with a power level higher than 30%.
Grip Disposal
Dispose of the grip in specific recycling boxes only after a complete discharge. DO NOT place the grip in regular trash containers. Strictly follow your local regulations regarding the disposal and recycling of batteries.
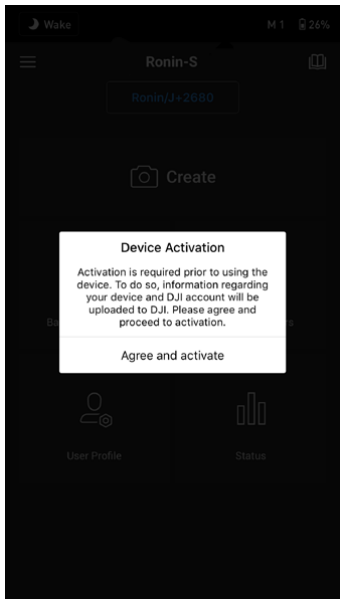
Activating Ronin-S
Make sure the camera is balanced before powering on the Ronin-S. DO NOT turn on Ronin-S without a balanced load, as doing so may damage the gimbal motors.
- Press the power button once to turn on the grip, and then press and hold the gimbal power button to turn on the gimbal.
- Enable Bluetooth on your mobile device and launch the Ronin app. Select Ronin-S and input the default Bluetooth password 12345678 once it's detected.
- Make sure you are connected to the internet and follow the on-screen instructions to activate Ronin-S for the first time.
- After activation, double-tap the gimbal power button to engage the motors before proceeding.
Operation
Ronin App Settings
After balancing and powering on Ronin-S, you can adjust gimbal settings through the Ronin App. The screenshots shown below are based on the iOS version.
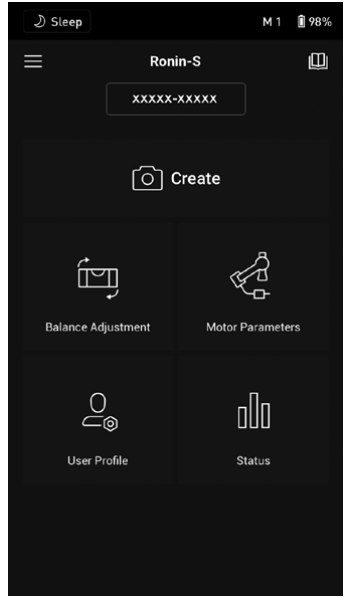
Top Bar
- Sleep/Wake: Tap to enter or exit sleep mode. When Ronin-S is in sleep mode, the motor will be powered off, but the gimbal remains powered on.
- M1: Displays the current user profile.
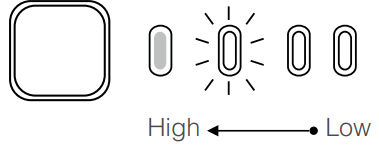
- Battery Level: Displays the battery level of the gimbal.
About
- Settings: View your account and the quick start guide.
- Device List: Displays the device name and password.
- Firmware: Displays the firmware version.
Academy
- Watch the tutorials and read the manual documents.
Create
Virtual Joystick
Use the virtual joystick in the app to control the movement of the gimbal and to shoot.
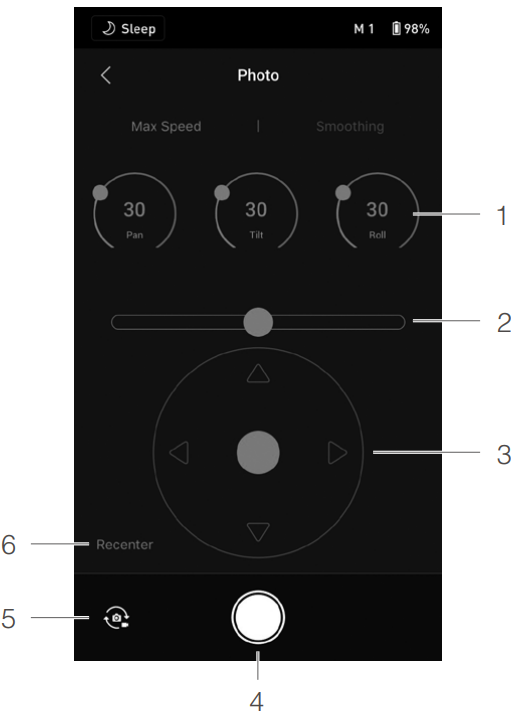
- Control Dial: Control the max speed and smoothing of the gimbal by adjusting the control dial. Max speed allows you to adjust the remote-controlled rotational speed. The smoothing allows you to control the sensitivity of the gimbal. The lower the smoothing value, the more sensitive the movement of the gimbal.
- Roll Stick: Control the roll axis movement of the gimbal using the virtual joystick.
- Pan/Tilt Stick: Control the pan and tilt axis movement of the gimbal using the virtual joystick.
- Shoot/Record Button: Tap to take photos or record video.
- Photo/Video Toggle: Tap to switch between photo and video modes. Make sure the mode is the same as the settings on the camera.
- Recenter: Tap to recenter the gimbal.
ActiveTrack 3.0
ActiveTrack 3.0 has been optimized for tracking human subjects with a head and shoulder model using deep learning algorithms. After mounting the phone holder and a mobile phone on the camera, you can start to use ActiveTrack 3.0 by following the steps below:
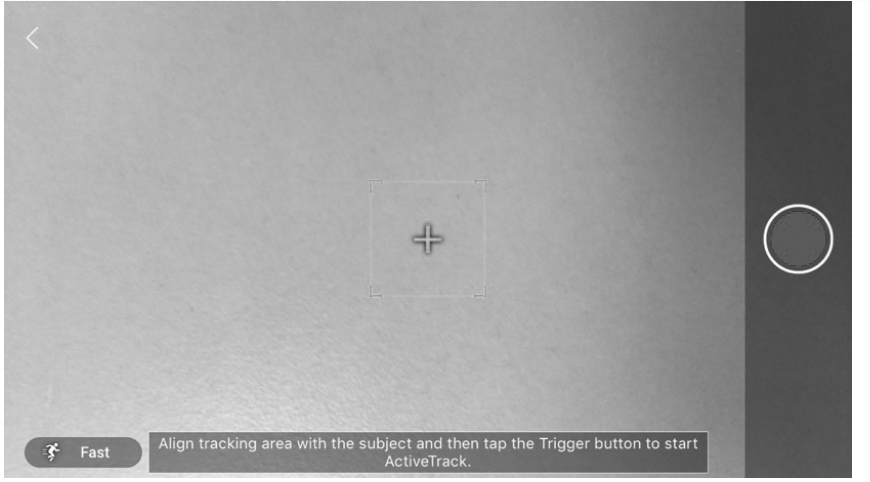
- Select the subject you want to track. There are two ways to select the subject. When the subject is in the selection box, press the trigger once to select the subject. You can also choose the subject on the screen, and the gimbal will select the subject and start tracking.
- After selecting the subject, you can use the joystick to control the gimbal for shooting and to adjust the position of the subject. While tracking, press the trigger twice to center the subject in the middle of the frame.
- Tap the icon in the lower left corner to change the tracking speed. Switch the tracking speed to Fast when following fast-moving people or objects or take a circle shot. Change the tracking speed to Slow when you need to follow slow-moving people or objects.
- Tap the record button to start recording video. Note that only the camera is recording and storing video. The mobile phone does not record or store any videos. Make sure a camera control cable has been connected to the camera and gimbal.
- To stop tracking, press the trigger once or the icon on the upper left corner.
When you need to track with the camera in a lower position, press the power button once to enter sleep mode, and then place Ronin-S in Underslung mode. Press the power button once to exit sleep mode, and then you can use ActiveTrack 3.0.
WARNING: For optimal performance, use ActiveTrack 3.0 in an environment with a plain background without many subjects.
Force Mobile
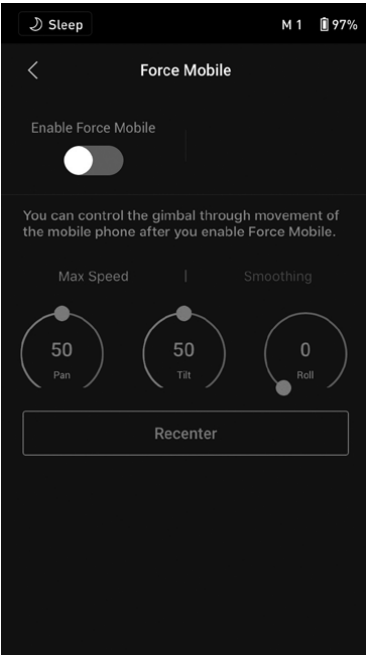
Force Mobile requires the phone holder and a mobile phone mounted. After enabling this feature in the Ronin app, the gimbal movement can be controlled by tilting and rotating your mobile phone.
- When the max speed is set to 50, the angle of rotation for the gimbal and mobile phone is a 1-to-1 ratio. The gimbal will move at an identical angle similar to the mobile phone.
- When the max speed is set to less than 50, the gimbal will rotate slower than the movement of the phone. When the max speed is set higher than 50, the rotation of the gimbal is faster than the mobile phone.
- Control the max speed and smoothing of the gimbal by adjusting the control dial. Max speed allows you to adjust the remote-controlled rotational speed. The smoothing allows you to control the sensitivity of the gimbal and ramping up and down. The lower the smoothing value, the more sensitive the movement of the gimbal.
- Recenter: Tap to recenter the gimbal.
Panorama
Panorama mode allows you to capture a series of interconnecting still images with precise control based on your sensor type and lens focal length. Make sure you have connected the camera and gimbal using the corresponding camera control cable before using Panorama mode.

The interval time between shooting photos should be set to one second more than the shutter time to avoid blurred footage when using a long exposure.
After confirming the camera settings, the panorama range can be set by dragging the white dots on the grid map, pushing the gimbal manually, or using the virtual joystick. The total range covered by the endpoints and the shots required to compose the panorama is displayed above the grid map. The slanted roll motor design allows users to view the path of the panorama through the built-in display of the camera with little obstruction. The tilt axis range in Panorama mode is -45° to +90° to avoid capturing the gimbal in the shot, while the pan axis allows you to capture a full 360° rotation.
Tap the shutter button to start capturing the sequence.
Timelapse
In Timelapse mode, Ronin-S triggers the camera to capture still images with your desired interval time and will automatically stop when completed. The duration for the Timelapse and the frame rate can be set so that Ronin-S can calculate the exact number of images required.
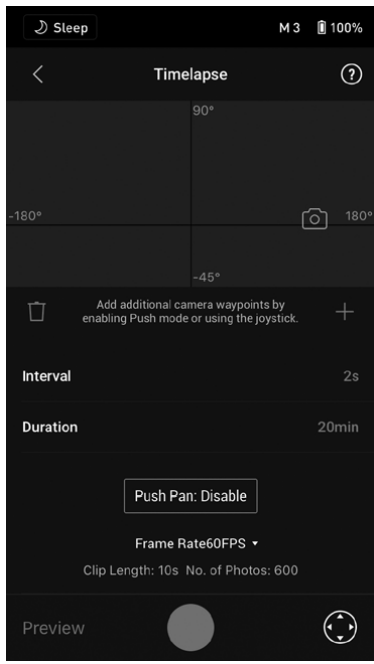
- By enabling Push mode, users can manually adjust the pan and tilt axes before launching the Timelapse. Users can push Ronin-S to alter the camera orientation and adjust the framing.
- Tap the Virtual Joystick icon to use the virtual joystick to adjust the camera orientation.
Motion lapse allows you to set up to five waypoints so that the camera moves during the Timelapse.
- To adjust the position of a waypoint, adjust the camera to the desired position, and tap the + icon to confirm the waypoint. You can also use the virtual joystick to control the pan, tilt, and roll axis as well.
- To add another waypoint, tap the highlighted waypoint to deselect it and tap the + icon above the grid map. Afterward, move the gimbal to the next waypoint.
- To delete a waypoint, select the waypoint and tap the trash icon.
- After setting up the waypoints, you can either tap Preview to make sure the Motionlapse includes everything or tap the shoot button to start shooting. Make sure the camera and gimbal have been connected using a corresponding camera control cable.
Track
Track is designed to capture video with up to 10 waypoints with repeatability. The stay time in between two waypoints can also be set.
- You will need to select the waypoint by manually moving the gimbal or using the virtual joystick.
- The duration parameter beneath the grid map indicates how much time it will take for the gimbal to travel from one waypoint to the next.
- Stay Time determines how long the gimbal will remain steady at the waypoint before moving to the next waypoint.
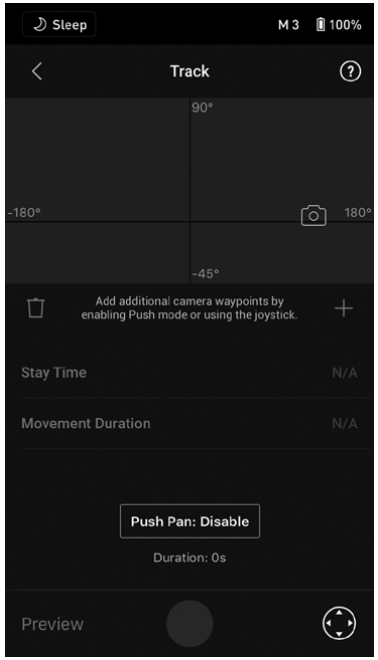
Make sure the camera and gimbal have been connected using a corresponding camera control cable.
WARNING: When pressing the record button on the gimbal, DO NOT use the record button on the camera.
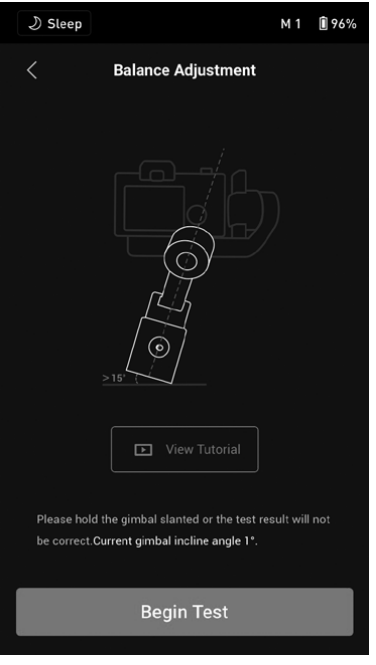
Balance Adjustment
Tap the Begin Test button, and Ronin-S will check the balance status and provide a score for each axis. Make sure the gimbal is not obstructed in any way before performing the balance test and follow the on-screen instructions.
Motor Parameters
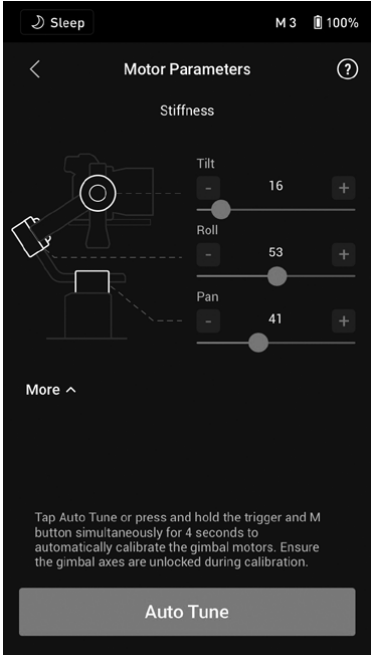
There are Stiffness, Strength, Filter, and Control settings in the motor settings page. Stiffness should always be adjusted in accordance with the total payload mounted onto the gimbal, and the others are advanced settings. It is recommended to leave the settings as default.
- Stiffness: The motor stiffness adjustment allows you to fine-tune the amount of power that is applied by the motors as they react and balance the weight on each axis. Please make sure you leave an extra margin for this setting to ensure stability at all times.
- Auto Tune: Stiffness value is determined by the gimbal system according to the payloads of the gimbal. There are three tuning aggressiveness profiles, so you can adjust the calculated stiffness value with ease. For most cases, we recommend using the ‘Mid’ or ‘High’ profile for the best robustness. For scenarios where you need to move slowly with a more mellow feel, you can use the ‘Low’ profile.
For example, when the payload is 1.8 kg, a ‘High’ Stiffness value provided by Auto Tune may come out to 45, so selecting the ‘Mid’ results in a Stiffness value of 36, and selecting the ‘Low’ results in a Stiffness value of 27.
After selecting the tuning profile, simply tap ‘Auto Tune’. The Ronin-S will automatically work out the optimal result based on the weight of the setup. Alternatively, you can press and hold Ronin-S’ M button and front trigger simultaneously for four seconds to start Auto Tune without using the App.
The Auto Tune process takes approximately 40 seconds. After Auto Tune, you can see detailed motor diagnostics at the bottom of the page. If the gimbal is properly balanced, the Power value of the motors should be in the range of ±5. If Power consumption on a particular axis constantly goes beyond that range, you will need to check your unit’s mechanical balance.
WARNING: Ensure the Ronin-S is placed on a steady platform and working in Upright mode and centered when using Auto Tune. If mounting the Ronin-S on a car, it is recommended to adjust the Stiffness value manually after Auto Tune is complete. Manually tune the Stiffness as high as possible until you feel the gimbal start to vibrate. Then back down the Stiffness values. Ensure the gimbal is balanced and Stiffness values are tuned properly every time you change the camera or lens.
By tapping the Advanced Settings toggle, you will be able to see Strength, Filter, and Control tabs. We recommend leaving these three parameters as default for most cases. Users can still adjust them with proper experience.
- Strength: It is recommended to leave this setting as default. The motor strength adjustment allows you to minimize Ronin-S’ attitude error. This parameter affects how quickly the Ronin-S will react to changes in orientation. If you see any unusual attitude errors, you may minimize it by increasing the corresponding motor’s strength. However, increasing strength too much may also cause the Ronin-S to over-adjust its orientation and induce shake. When the Strength value is set to 10, and the pan axis cannot stop immediately after a fast rotation, try to decrease the value to 6.
- Filter: This setting can ease high-frequency vibrations of the Ronin-S. When the Ronin-S is vibrating at a high frequency, you may experience numbness while touching the gimbal motors of each axis. In such instances, it is recommended to lower the Filter settings.
- Control: It is recommended to leave this setting as default. Control can guide the Ronin-S to better handle low-frequency vibrations. If your Ronin-S vibrates at a visible range, you can suppress it by increasing Control. When the vibration persists at low frequency, then decrease Control. Adjusting Control to optimal settings may take readjustment.
WARNING: It is recommended to use the joystick to test the pan and tilt axis. Control the pan and tilt axis to all angles to see if shaking occurs. It is normal if the pan or tilt axis shakes one time and doesn’t shake after that.
User Profile
Three user profiles can be set and saved.
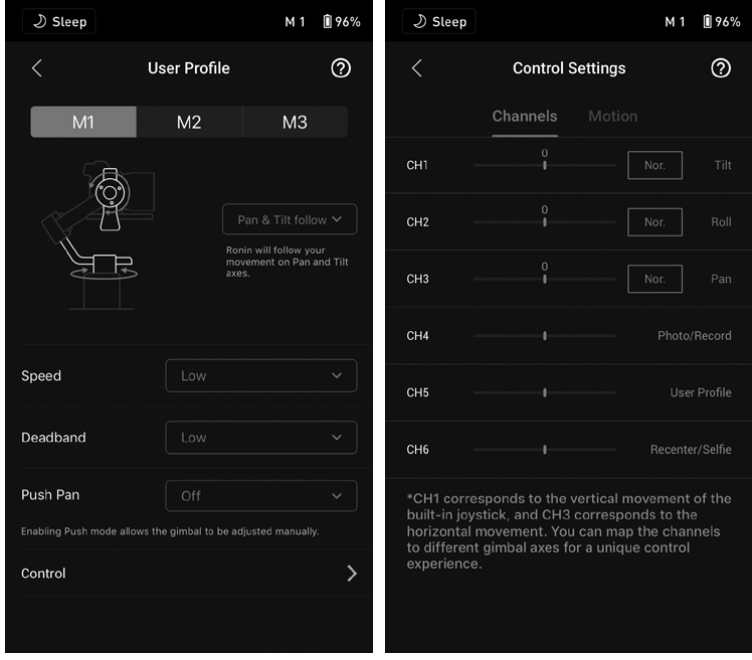
Gimbal Follow Mode
- Pan and Tilt Follow: Pan and tilt axes follow the movement of the grip.
- Pan Follow: Only pan axis follows the movement of the grip.
- FPV: Pan, tilt, and roll axes follow the movement of the grip. Speed must be set to Medium, High, or Customized. FPV mode is not available when the speed is set to Low. When the speed is set to customized, the pan speed value must be set to 50 or higher. Note that Deadband is unavailable in FPV mode.
- Custom: Tap the blue arrows of the figure to manually set which axis will follow the movement of the grip.
- 3D Roll 360: Allows the camera to rotate 360° at any attitude.
- Speed: Determines how fast the camera travels while translating a pan, tilt, or roll movement.
- Deadband: The deadband determines how much movement the gimbal tolerates prior to translating the pan, tilt, and roll movement of the camera.
- Push: After enabling Push, the gimbal axis can be manually pushed to the desired position.
Control Settings
Channels
The channel indicator provides feedback when configuring remote operation. Pan, tilt, and roll channels can be reassigned, and each axis can also be inverted. Normal means the direction of movement is the same as the joystick. Inverted means the direction of movement is the opposite of the joystick. When using the joystick, you can only control CH1 and CH3, which are mapped to tilt and pan axes by default. You can customize channel mapping by tapping on the name of the axis on the right of the screen.
Motion
You can set the joystick control by adjusting deadband, max speed, smoothing, and endpoints for each axis. There are three default profiles for each setting.
- Deadband: When the deadband value increases, more stick movement will be required to translate into the actual movement of the gimbal.
- Max Speed: Allows the remote-controlled rotational speed to be adjusted.
- Smoothing: Allows you to control the sensitivity of the gimbal. The lower the smoothing value, the more sensitive the movement of the gimbal.
- Endpoint: Limits the rotational range of the gimbal by setting the endpoints. The pan axis has a slip-ring, enabling Ronin-S to rotate continuously when the endpoints are set to 180°. On the tilt axis, you can set up the endpoints according to your requirements. Some longer lenses may hit the gimbal frame. Set the endpoint angle to prevent such cases.
Status
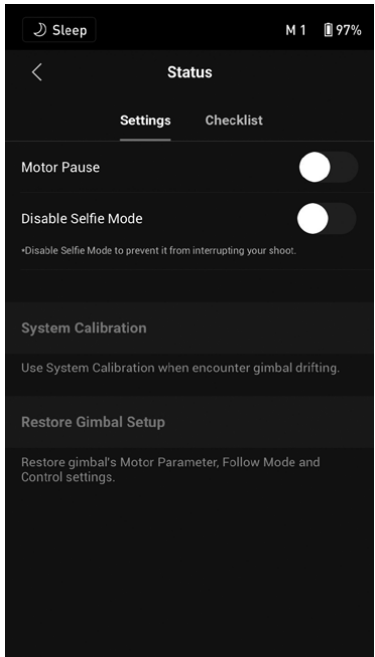
Settings
- Motor Pause: Tap to enable motor pause, and the motor will power off.
- Disable Selfie Mode: Tap to disable Selfie mode to prevent accidentally entering selfie mode and interrupting recording.
- System Calibration: Use only if you notice drift on any of the axes. Tap and then select Calibrate System. Make sure the calibration is complete before picking up Ronin-S.
- Advanced Calibration: Use Advanced Calibration when the roll axis is drifting.
- Restore Gimbal Setup: Tap to restore the motor parameters of the gimbal, Follow mode, and control settings to default.
Checklist
When the gimbal status is abnormal, the status information is displayed here.
Button Functions

Power Button
- Press and hold to power on the gimbal.
- Press once/twice to pause the gimbal’s motors, and press once/twice again to unpause.
M Button
- Press once to switch the user profiles.
- Press and hold to enter Sport mode.
- Press twice to enter/exit Portrait mode.
- Press three times to enter/exit 3D Roll 360.
- Press six times to restore the default Bluetooth password. The profile light glows to indicate the password has been restored successfully.
Trigger
- Press and hold to enter Lock mode.
- Press twice to re-center the gimbal.
- Press three times to turn the gimbal 180° so that the camera faces you.
- Press four times and hold to begin Joystick Calibration.
Joystick calibration is only required if the gimbal drifts (if the gimbal moves by itself without input from the joystick). During calibration, push and pull the joystick several times as far as it will go in all directions. Press four times and hold the trigger again to complete calibration.
The calibration has failed if the LEDs blink red. If they do, try to go through the calibration process again. - Press and hold Ronin-S’ M button and trigger simultaneously for four seconds to start Auto Tune. The default Auto Tune grade is Medium.
Joystick
The joystick is already set to default: push the joystick up or down to control the movement of the tilt axis, and push it left or right to control the movement of the pan axis. Go to the Control page to adjust the parameters for the pan, tilt, and roll axes.
Camera Control Button
- Press halfway to autofocus, as you would for the shutter button on most DSLR cameras.
- Press once to start/stop recording.
- Press and hold to take a photo.
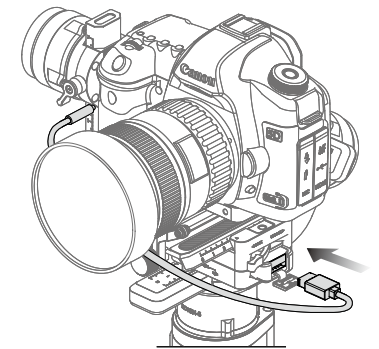
Focus Wheel
The Focus Wheel is used for controlling camera focus. When a compatible camera system connects to the Ronin-S, you can pull focus via the included cable.
- Focus Wheel: Rotate to control camera focus.
- CAN/S-Bus Switch: Switch to the corresponding connected receiver.
- CAN: switch to the CAN position when connected to the DJI Pro Wireless Receiver.
- S-Bus: switch to the S-Bus position when connected to a third-party remote-control system (e.g. Futaba).
- Multifunction Button:
- One-click: a-b-point calibration (when connected to an external focus motor).
- Double click: a double-click will perform a travel calibration when connected to an external focus motor.
- Click and hold: flips the control direction.
- Status Indicator:
- Single red blinking: disconnected.
- Double red blinking: the module requires a firmware update.
- Solid yellow: external focus motor detected without travel calibration.
- Single yellow blinking: external focus motor is being travel calibrated.
- Solid green: connected to a camera with electronically controlled focus supported, or connected to an external focus motor with travel calibration complete.
- Single green blinking: external focus motor’s a-point end is set.
- Double green blinking: external focus motor’s a-b-point ends are set.
- CAN Port (5 V): Used to connect a wireless receiver.
- 8-pin Contact: Used for power supply and transmitting control command data.
Installation
There are two 8-pin ports located on each side of the gimbal. The focus wheel is mounted on one side by default, but can also be mounted to the other side. To mount the focus wheel to the other side, remove the protector from the port first.
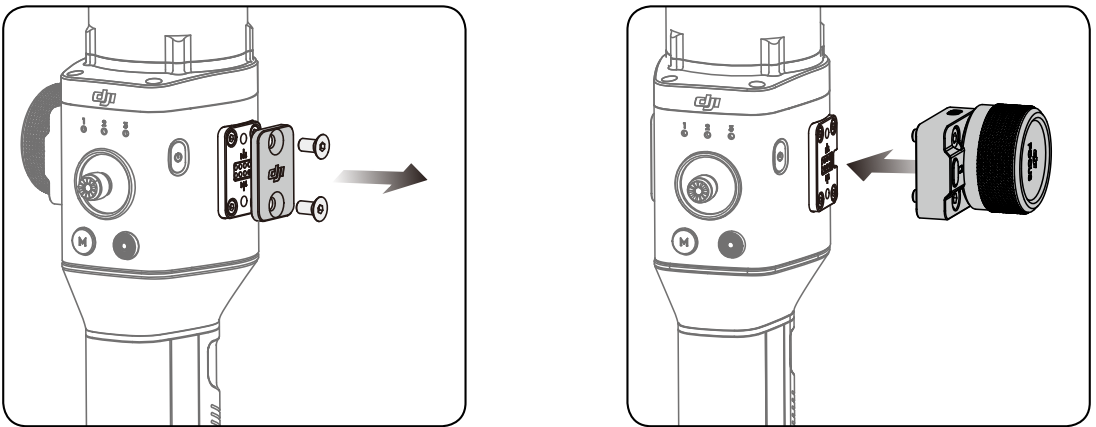
WARNING: Please note that other Ronin-S accessories can be mounted to the 8-pin port. Use the protector when the port is not in use.
Operation Modes
There are three operation modes for the Ronin-S: Upright mode, Underslung mode, and Flashlight mode.
- Roll 360 is available when using the Ronin-S in Flashlight mode. Thanks to the slip-ring on the Pan axis, the Ronin-S is capable of performing a continuous roll rotation.
To set up the Ronin-S for Roll 360, first you need to connect to Ronin-S with the Ronin App. Next, go to the Channels setting page (under Configuration > Control Settings > Channels) and re-map CH3 to the Roll axis (originally mapped as Pan axis) and also set the CH1 as N/A to avoid any input on the Tilt axis. Then hold the Ronin-S in Flashlight mode and double-tap the front trigger to re-center the gimbal orientation. Simply push the joystick left or right to get the gimbal rolling continuously.
Setup Guide
To set up the DJI Ronin-S, start by mounting your camera onto the quick-release plate.
- Ensure that the camera is properly balanced on the gimbal arms to achieve optimal performance.
- Download and install the Ronin Mobile App on your smartphone or tablet to pair the gimbal wirelessly. Follow the in-app instructions to calibrate and configure your settings according to your camera model and preferred shooting style.
- Once set up, familiarize yourself with the controls on the handle, including the joystick, mode button, and focus wheel. Practice using Sport Mode for dynamic movements and Lock Mode for static shots to get a feel for how the gimbal responds.
Updating Firmware
Download the DJI Pro Assistant for Ronin and update the firmware if there is new firmware released for Ronin-S. Follow the steps below to update the firmware:
- Connect the Ronin-S to your computer via the USB-C Cable.
- Click “Upgrade” and wait for the download to finish.
- Click “Upgrade” again and then click “Confirm”.
- Power the Ronin-S off and then on after the update is complete.
WARNING
- Ensure that your computer is connected to the Internet.
- Do not disconnect the USB cable during the update.
- If the firmware update fails, restart the Ronin-S and retry.
Using this Manual
Legend
- Warning
- Important
- Hints and tips
- Reference
Before You Begin
The following documents have been produced to help you safely operate and make full use of your RONINTM-SC.
- Ronin-SC Quick Start Guide
- Ronin-SC User Manual
- Ronin-SC Disclaimer and Safety Guidelines
Read this entire user manual and watch the informational and tutorial videos on the product page of DJI’s official website (http://www.dji.com/ronin-sc). Read the disclaimer and safety guidelines to understand your legal rights and responsibilities. If you have any questions or problems during the installation, maintenance, or use of this product, contact DJI or a DJI-authorized dealer.
Download the Ronin App
Search “Ronin” in the App Store or Google Play and follow the instructions for installation.
Maintenance
The Ronin-S is a precise machine, and its power/data ports are not waterproof. Be sure to protect them from dust and water during use. After use, it is recommended to wipe the Ronin-S down with a soft dry cloth. Never spray any cleaning liquids onto the Ronin-S.
Troubleshooting
- If you encounter issues with your Ronin-S, such as unstable footage or unresponsive controls, check that your camera is properly balanced and secured on the gimbal.
- Ensure that firmware is up-to-date by checking for updates through the Ronin Mobile App.
- Common problems include misaligned sensors; resolve this by recalibrating the gimbal following the app's instructions.
- For battery-related issues, ensure that your batteries are fully charged and seated correctly in their compartments.
- Always refer to DJI's official support resources for detailed troubleshooting guides specific to your issue.
Pros & Cons
Pros
- Exceptional Stabilization: SmoothTrack technology provides professional-grade stabilization in various shooting conditions.
- High Payload Capacity: Supports cameras up to 7.9 lbs (3.6 kg), making it versatile for different camera models.
- Ergonomic Design: Comfortable grip reduces fatigue during extended use.
- Long Battery Life: Up to 12 hours of continuous operation.
- Wireless App Control: Easy configuration and monitoring via the Ronin Mobile App.
Cons
- Learning Curve: Requires practice to master different modes and settings.
- Price Point: While competitive, it may be out of budget for casual users.
- Additional Accessories Required: Some users may find that additional accessories like a focus motor or external monitor are necessary for full functionality.
Customer Reviews
Customers praise the Ronin-S for its exceptional stabilization and ease of use once familiarized with its controls. Many users appreciate its durability and portability, making it a reliable companion for both indoor and outdoor shoots. However, some users have reported a steep learning curve and the necessity of additional accessories for certain features.
Common Complaints
Some common complaints include issues with battery life in cold weather conditions and occasional software glitches requiring firmware updates. However, these issues are generally resolved through updates or proper usage practices.
Faqs
What cameras are compatible with the DJI Ronin-S?
How long does the battery of the DJI Ronin-S last?
Can I use the DJI Ronin-S in cold weather?
Is there a dedicated app for controlling the DJI Ronin-S?
How do I balance my camera on the DJI Ronin-S?
What modes does the DJI Ronin-S offer?
Can I upgrade the firmware of my DJI Ronin-S?
Is there a quick-release plate system available for the DJI Ronin-S?
What accessories are available for enhancing my DJI Ronin-S experience?
Leave a Comment