Dji Aircraft Matrice 200 M210 RTK V2 User Manual | Remote Controller
Content
Introduction DJI Aircraft Matrice 200 M210 RTK V2
Matrice 200 V2 / Matrice 210 V2 / Matrice 210 RTK V2 (M200 V2 / M210 V2 / M210 RTK V2) is a powerful aerial imaging system with class-leading agility and speed, redundant components for maximum reliability, and smart features that make performing complex tasks easy. The aircraft’s visual sensors* enable enhanced hovering precision even when flying indoors or in environments where GNSS is unavailable. Gimbal cameras can be easily exchanged to suit your application's needs. Dual dual-frequency transmission system makes HD video downlink more stable and efficient.
The current price of the DJI Matrice 210 RTK V2 is $11,999.
Specifications
Aircraft
Dimensions
- M200 V2: Unfolded, propellers and landing gears included, 883×886×398 mm
- Folded, propellers and landing gears excluded, 722×247×242 mm
- M210 V2: Unfolded, propellers and landing gears included, 883×886×398 mm
- Folded, propellers and landing gears excluded, 722×282×242 mm
- M210 RTK V2: Unfolded, propellers and landing gears included, 883×886×427 mm
- Folded, propellers and landing gears excluded, 722×282×242 mm
- Diagonal Wheelbase: 643 mm
Weight
- M200 V2: Approx. 4.69 kg (with two TB55 batteries)
- M210 V2: Approx. 4.8 kg (with two TB55 batteries)
- M210 RTK V2: Approx. 4.91 kg (with two TB55 batteries)
Max Takeoff Weight
- 6.14 kg
Max Payload
- M210 V2: 1.34 kg
- M210 RTK V2: 1.23 kg
- M200 V2: 1.45 kg
Operating Frequency
- 2.4000-2.4835 GHz; 5.725-5.850 GHz
EIRP
- 2.4 GHz: ≤ 26 dBm (NCC/FCC); ≤ 20 dBm (CE/MIC); ≤ 20 dBm (SRRC)
- 5.8 GHz: ≤ 26 dBm (NCC/FCC); ≤ 14 dBm (CE); ≤ 26 dBm (SRRC)
Hovering Accuracy (P-mode with GPS)
- Vertical: ±1.64 feet (±0.5 m) or ±0.33 feet (±0.1 m, Downward Vision System enabled)
- Horizontal: ±4.92 feet (±1.5 m) or ±0.98 feet (±0.3 m, Downward Vision System enabled)
Hovering Accuracy (D-RTK, M210 RTK V2)
- Vertical: ±0.33 feet (±0.1 m)
- Horizontal: ±0.33 feet (±0.1 m)
Max Angular Velocity
- Pitch: 300°/s, Yaw: 120°/s
Max Pitch Angle (Dual Downward Gimbal/Single Upward Gimbal)
S-mode: 30°; P-mode: 30° (Forward Vision System enabled: 25°); A-mode: 30°
Max Pitch Angle (Single Downward Gimbal)
- S-mode: 35°; P-mode: 30° (Forward Vision System enabled: 25°); A-mode: 30°
Max Ascent Speed
- 16.4 ft/s (5 m/s)
Max Descent Speed (vertical)
- 9.8 ft/s (3 m/s)
Max Speed (Dual Downward Gimbal/Single Upward Gimbal)
- S-mode/A-mode: 73.8 kph (45.9 mph); P-mode: 61.2 kph (38 mph)
Max Speed (Single Downward Gimbal)
- S-mode/A-mode: 81 kph (50.3 mph); P-mode: 61.2 kph (38 mph)
Max Service Ceiling Above Sea Level
- 9842 feet (3000 m, with 1760S propellers)
Max Wind Resistance
- 39.4 ft/s (12 m/s)
Max Flight Time (with two TB55 batteries)
- M200 V2: 38 min (no payload), 24 min (takeoff weight: 6.14 kg)
- M210 V2: 34 min (no payload), 24 min (takeoff weight: 6.14 kg)
- M210 RTK V2: 33 min (no payload), 24 min (takeoff weight: 6.14 kg)
Motor Model
- DJI 3515
Propeller Model
- 1760S
Supported DJI Gimbals
- Zenmuse X4S/X5S/X7/XT/XT2/Z30/XT S
Supported Gimbal Configurations
- M200 V2: Single Downward Gimbal
- M210 V2 / M210 RTK V2: Single Downward Gimbal (connected to Gimbal Connector I), Dual Downward Gimbals, Single Upward Gimbal
Ingress Protection Rating
- IP43
GNSS
- M200 V2 / M210 V2: GPS+GLONASS
- M210 RTK V2: GPS+GLONASS+BeiDou+Galileo
Operating Temperature
- -4° to 122° F (-20° to 50° C)
Beacons
- Power: Avg. 0.6 W
- Luminous Intensity: Min. Angle: 55 cd; Light Intensity: 157 cd
- Max. Visible Distance: 5000 m (with good air quality and high visibility)
Remote Controller (GL900A)
Operating Frequency
- 2.4000-2.4835 GHz; 5.725-5.850 GHz
Max Transmitting Distance (unobstructed, free of interference)
- NCC/FCC: 5 mi (8 km); CE/MIC: 3.1 mi (5 km); SRRC: 3.1 mi (5 km)
EIRP
- 2.4 GHz: ≤ 26 dBm (NCC/FCC); ≤ 20 dBm (CE/MIC); ≤ 20 dBm (SRRC)
- 5.8 GHz: ≤ 26 dBm (NCC/FCC); ≤ 14 dBm (CE); ≤ 26 dBm (SRRC)
Video Output Ports
- USB, HDMI, SDI
Power Supply
- Extended Intelligent Battery (Model: WB37-4920mAh-7.6V)
Charging
- DJI charger or DJI charging hub
Output Power (max)
- 13 W (Without supplying power to monitor)
USB Power Supply
- 1 A 5.2 V (max)
CrystalSky Monitor (Excluded in M200 V2)
Specifications
- DJI CrystalSky 7.85 inch, Resolution: 2048×1536; Brightness: 2000 cd/m²; Operating System: Android 5.1; Storage: ROM 128 GB
Operating Temperature
- -4° to 122° F (-20° to 50° C)
Optimal Storage Temperature
- 72° to 86° F (22° to 30° C)
Charging Temperature
- 32° to 104° F (0° to 40° C)
Downward Vision System
Velocity Range
- <32.8 ft/s (10 m/s) at the height of 6.56 feet (2 m)
Altitude Range
- <32.8 feet (10 m)
Operating Range
- <32.8 feet (10 m)
Operating Environment
- Surfaces with clear patterns and adequate lighting (>15 lux)
Ultrasonic Sensor Operating Range
- 0.33-16.4 feet (0.1-5 m)
Ultrasonic Sensor Operating Environment
- Non-absorbing material, rigid surfaces (thick indoor carpeting will adversely affect performance)
Forward Vision System
Obstacle Sensing Range
- 2.3-98.4 feet (0.7-30 m)
FOV
- Horizontal: 60°; Vertical: 54°
Operating Environment
- Surfaces with clear patterns and adequate lighting (>15 lux)
Upward Infrared Sensing System
Obstacle Sensing Range
- 0-16.4 feet (0-5 m)
FOV
- ±5°
Operating Environment
- Large, diffuse, and reflective obstacles (reflectivity >10%)
Intelligent Flight Battery (TB55-7660mAh-22.8V)
Capacity
- 7660 mAh
Voltage
- 22.8 V
Battery Type
- LiPo 6S
Energy
- 174.6 Wh
Net Weight (Single One)
- Approx. 885 g
Operating Temperature
- -4° to 122° F (-20° to 50° C)
Optimal Storage Temperature
- 72° to 86° F (22° to 30° C)
Charging Temperature
- 41° to 104° F (5° to 40° C)
Max Charging Power
- 180 W
Charger (IN2C180)
Voltage
- 26.1 V
Rated Power
- 180 W
Charging Hub (IN2CH)
Input Voltage
- 26.1 V
Input Current
- 6.9 A
The Vision and Infrared Sensing Systems
The Vision and Infrared Sensing Systems are affected by surrounding conditions. Read the related section to learn more.
Feature Highlights
- The flight controller provides a safe and reliable flight experience. A flight recorder stores critical data from each flight. Dual IMUs and barometers design provides redundancy. The aircraft can hover and fly in extremely low altitude and indoor environments and provides multi-directional obstacle sensing and vision positioning functions.
- The built-in AirSense makes you aware of nearby aircraft in the surrounding airspace to ensure safety. The safety beacons on both the top and the bottom of the aircraft allow the aircraft to be identified at night or in low-light conditions. The airframe design gives the aircraft an IP43 Ingress Protection, in accordance with the global IEC 60529 standard.
- The low-latency long-range (up to 5 mi (8 km), FCC) HD downlink is powered by DJI OCUSYNCTM 2.0. Support of 2.4 GHz and 5.8 GHz ensures a more reliable connection in environments with more interference. The AES-256 encryption keeps your data transmission secure so you can be sure that your critical information stays safe.
- An advanced power management system along with dual batteries ensures power supply and enhances flight safety. Without a payload, the M210 RTK V2 has a flight time of up to 33 minutes with standard batteries (TB55), the M210 V2 has a flight time of up to 34 minutes, while the M200 V2 has up to 38 minutes of flight time.
- The camera unit is now independent of the image processor so that you have the flexibility to choose the perfect gimbal and camera system (including ZENMUSETM X7/X5S/X4S/XT*/XT2/XT S*, and Z30) for each of your applications. This means that regardless of which camera you choose, you have the same powerful processing backing it. The M200 V2 series can support a single downward gimbal.
M210 V2 and M210 RTK V2 Features
The M210 V2/M210 RTK V2 can support an upward gimbal**, a single downward gimbal (connected to Gimbal Connector I), or dual downward gimbals. It is equipped with many expansion ports to broaden its applications. The M210 RTK V2 has a built-in DJI D-RTKTM 2 air system, which provides more accurate heading data for positioning.
- The TimeSync system continuously aligns the flight controller, camera, GPS module, RTK module for the M210 RTK V2, DJI payloads such as X4S, X5S, or X7, as well as onboard accessories via the Payload SDK or Onboard SDK at the microsecond level. It meets SDK developers’ requirements on time precision.
- The Zenmuse XT Gimbal Adapter is required when mounting the Zenmuse XT gimbal to the aircraft. The Zenmuse XT S is only available in select countries and regions.
- When using an upward gimbal with the M210 V2, an external GPS Kit connected through the expansion port is required.
- When using the M210 RTK V2, more accurate positioning data can be achieved when using a DJI D-RTK 2.
Assemble the Aircraft
This manual uses the M210 RTK V2 and Zenmuse Z30 as an example to demonstrate setup and usage.
Unfolding the D-RTK Antennas (for M210 RTK V2 only)
Unfold the D-RTK antennas and then turn the knob tightly in the direction indicated by the lock icon. For the aircraft to take off, the D-RTK antennas must be fully unfolded and securely locked.
_dji_aircraft_matrice_200_m210_rtk_v2.png)
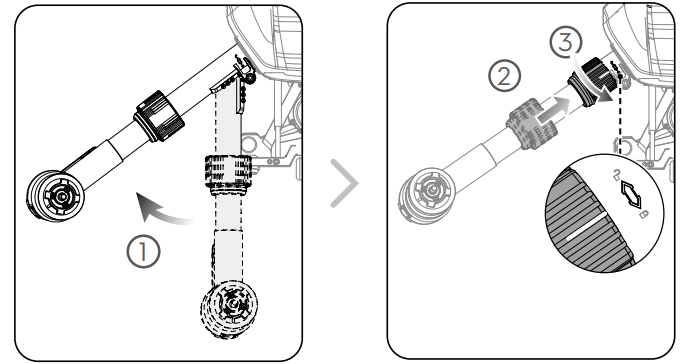
Installing the Landing Gears
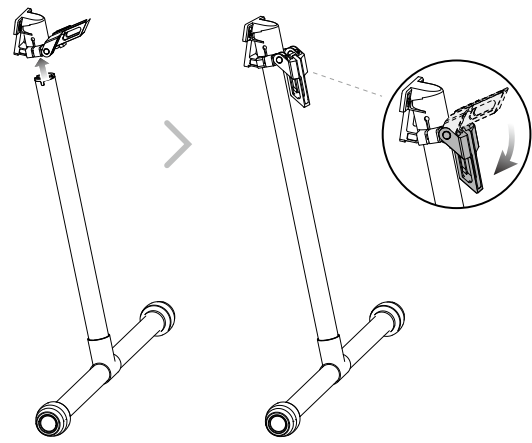
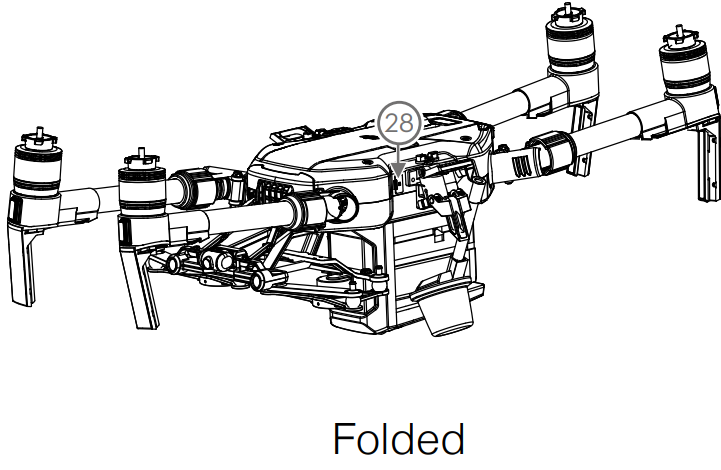
Unfolding the Aircraft
Unfold the frame arm, slide the arm lock to the end of the frame arm, then rotate it about 90° until the silver line lies within the range of the![]() icon.
icon.
Mounting the Propellers
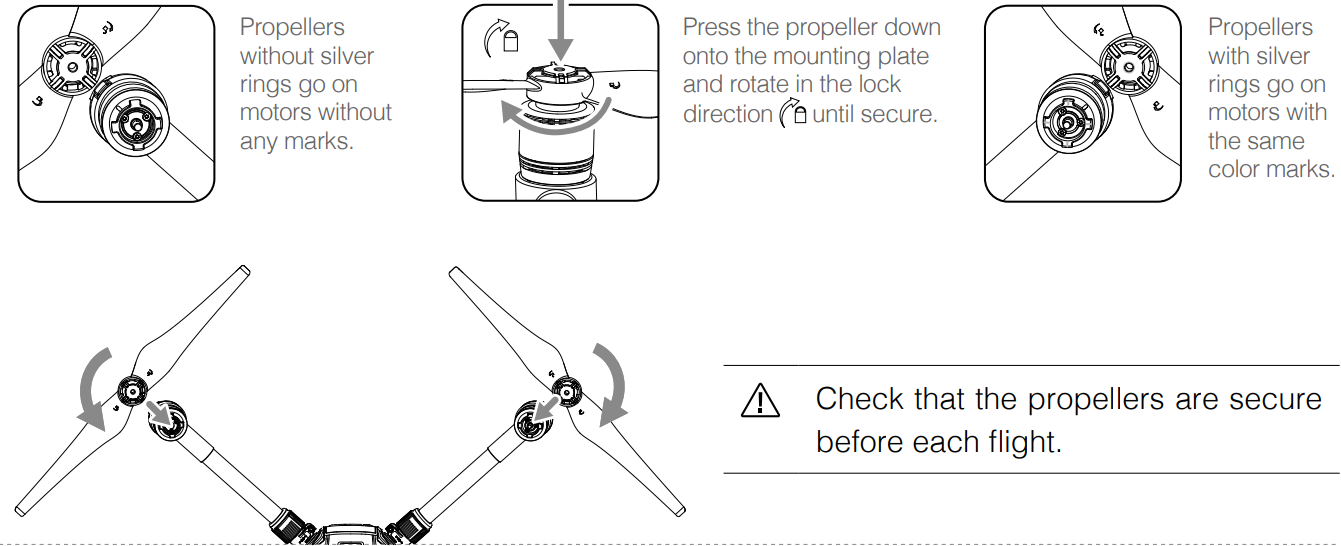
Check that the propellers are secure before each flight.
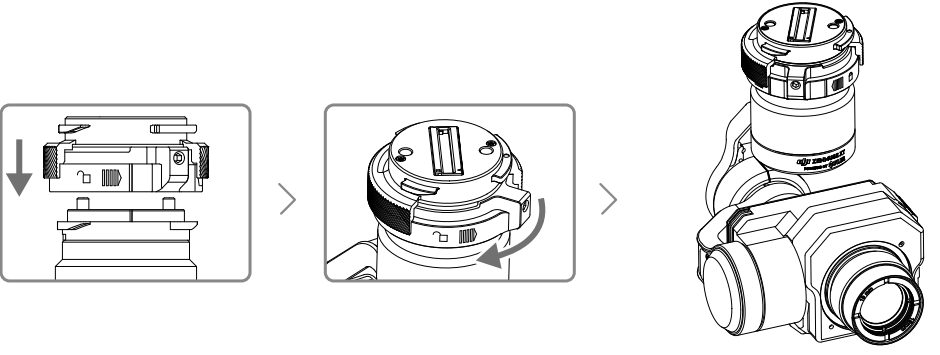
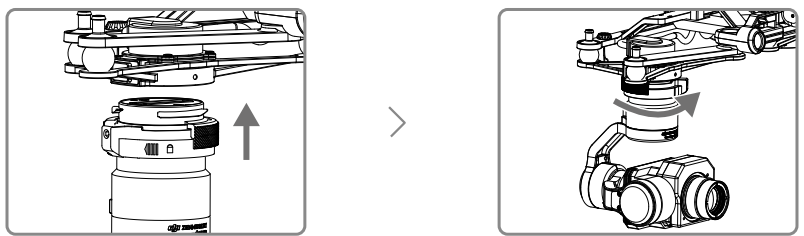
Mounting the Gimbal and Camera

Make sure to press down the gimbal detachment button when rotating the gimbal lock to remove the gimbal and camera. The gimbal lock should be fully rotated when removing the gimbal for the next installation. The M200 V2 comes with a single downward gimbal.
Mounting the Intelligent Flight Batteries

- Insert a pair of batteries.
- Press once to check the battery level.
- Press again and hold until the batteries turn on or off.
Warning
- Only use battery slot B when using one battery to supply power. In this case, the aircraft can only be powered on, but cannot take off.
- If for any reason only one battery is available during flight, land the aircraft immediately and replace the batteries as soon as possible. In this case, the gimbal connectors and the ports at the rear of the aircraft cannot supply power to their connected devices.
- Make sure to use the included TB55 batteries. DO NOT use any other type of batteries.
Removing the Intelligent Flight Battery

Make sure to press the battery removal button when removing the battery.
Description
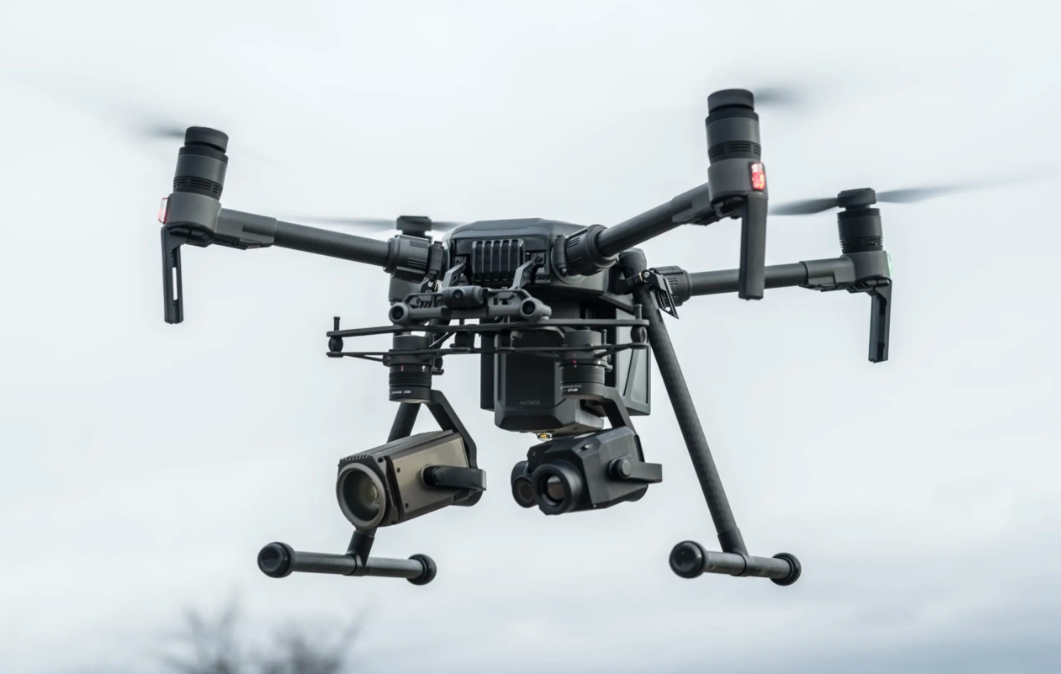
The DJI Matrice 200 M210 RTK V2 is designed with durability and versatility in mind. Its rugged design allows it to operate in challenging weather conditions, ensuring that critical missions are completed without interruption. The drone features a modular design, allowing users to easily swap payloads depending on their specific needs. This flexibility, combined with its advanced navigation system and long-range transmission capabilities, makes the Matrice 200 M210 RTK V2 an invaluable asset for any professional requiring precise aerial data collection.
Aircraft Diagram
The M200 V2 comes with a single downward gimbal connector. The M210 V2 and M210 RTK V2 each come with a dual downward gimbal connector. The illustrations in this manual may vary from the actual product.
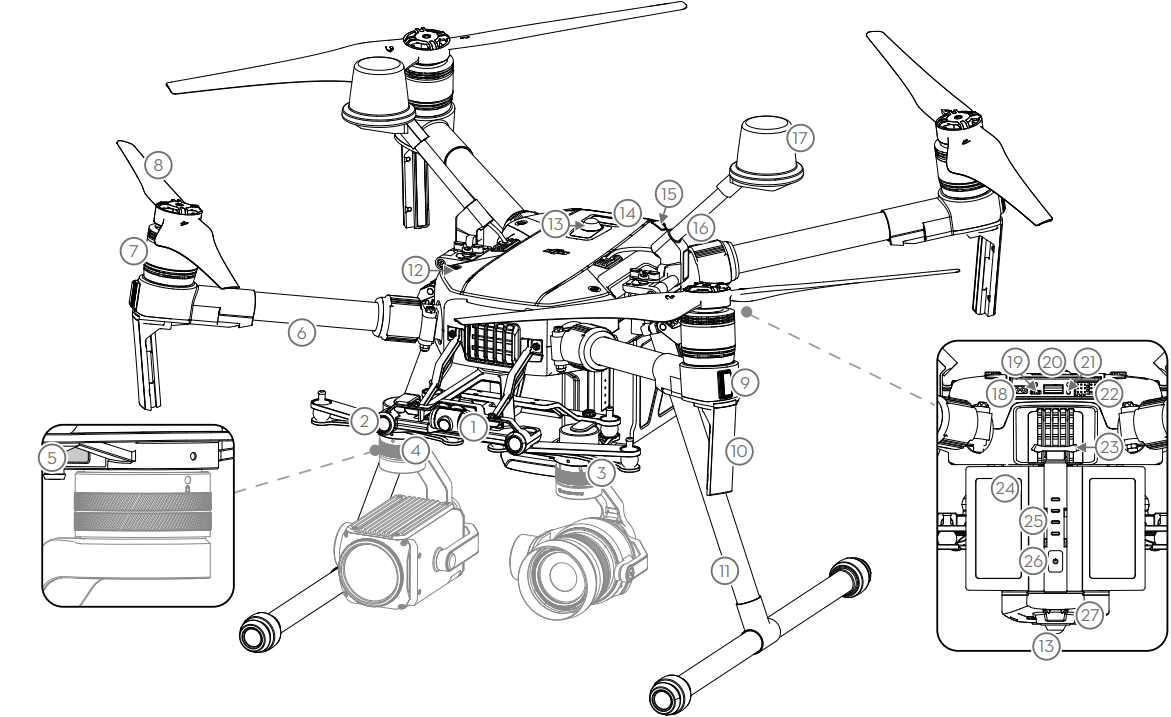
- FPV Camera
- Forward Vision System
- DJI Gimbal Connector v2.0 (DGC2.0) I
- DJI Gimbal Connector v2.0 (DGC2.0) II*
- Gimbal Detachment Button
- Frame Arms
- Motors
- Propellers
- ESC LEDs
- Transmission Antennas
- Landing Gears
- Upward Gimbal Mounting Position*
- Beacons**
- Upward Infrared Sensor
- Aircraft Status Indicators
- D-RTK Mounting Bracket***
- D-RTK Antennas***
- Extended Power Port (XT30)*
- USB Mode Switch
- USB Port
- Linking Button and Indicator
- Expansion Ports*
- Battery Removal Button
- Intelligent Flight Batteries
- Battery Level Indicators
- Power Button
- Downward Vision System
- microSD Card Slot
- Not included with the M200 V2.
- DO NOT look directly at the beacons when they are in use to avoid damage to your eyes.
- Included in the M210 RTK V2 aircraft only.
Remote Controller Diagram
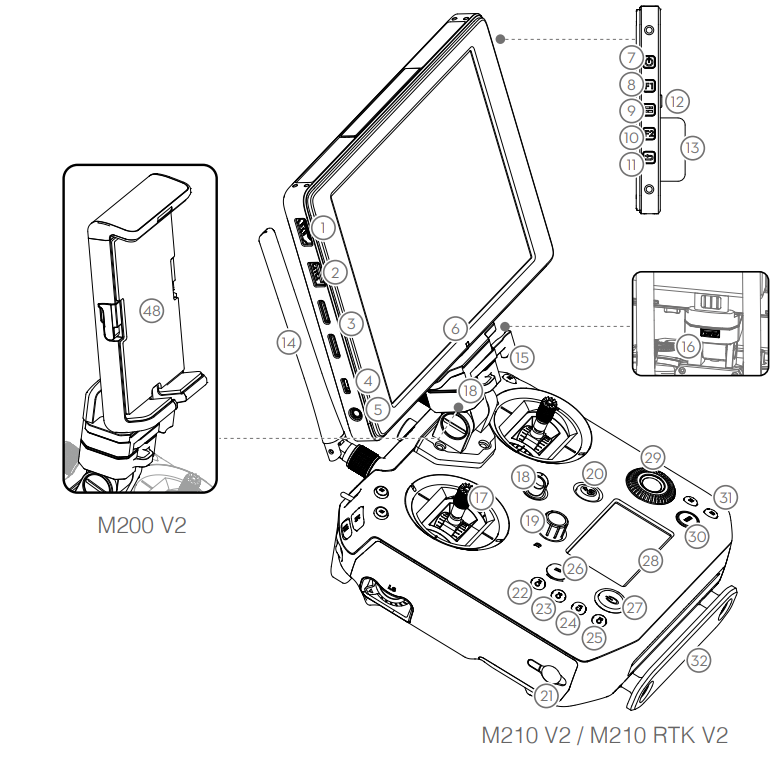
- HDMI Port
Output HDMI video signal. - USB Port
Supports extended device, e.g., U disk. - microSD Card Slot
Provides extra storage space for the display device, maximum card size is 128 GB. - Micro USB Port
Use a Micro USB cable to connect to the remote controller when in use, or to the PC to configure parameters via DJI Assistant 2. - Headphone Jack
- Light-Sensitive Port
Built-in light-sensitive sensor. - Power Button
- Custom Button (F1)
- Setting Button
- Custom Button (F2)
- Back Button
- Battery Release Button
- WB37 Intelligent Battery
- Antennas
Relay aircraft control and video signal. - Monitor Mounting Bracket
Used to mount the DJI CrystalSky monitor*, or mobile device with a holder. - USB Port (Reserved Port)
- Control Sticks
Control the orientation and movement of the aircraft. - Strap Hook
- Focus Adjustment Knob
Rotate to set the focal length. - Return-to-Home (RTH) Button
Press and hold to initiate RTH. - Power Port
Connect to the Charger to charge the battery of the remote controller. - Reserved Buttons
- Shutter Setting Button
When using a Zenmuse X4S, X5S, or X7, press and rotate the Camera Setting Dial to set the shutter speed. - Aperture Setting Button
When using a Zenmuse X4S, X5S, or X7, press and rotate the Camera Setting Dial to set the aperture. - ISO Setting Button
When using a Zenmuse X4S, X5S, or X7, press and rotate the Camera Setting Dial to set the ISO. - Pause Button
Press once and the aircraft will brake and hover. - Power Button
Used to turn the remote controller on and off. - Remote Controller Display
Shows information about the aircraft and camera. - Camera Setting Dial
When using an X4S, X5S, X7, or Z30, turn the dial to adjust the EV. When using an XT2 or XT, turn the dial to select a palette. When using a Zenmuse X4S, X5S, or X7, press the Shutter Setting Button/Aperture Setting Button/ISO Setting Button and rotate the Camera Setting Dial to adjust the Shutter/Aperture/ISO. - Customizable Button Settings Menu
Press to set Customizable Button functions in the DJI Pilot app. - Customizable Buttons (BA-BH)
Customizable through the DJI Pilot app. - Support Rig
- Left Lever
Reserved. - Left Dial (Gimbal Pitch)
Controls gimbal pitch. - Flight Mode Switch
Switch between P-mode, S-mode, and Amara. - Handle Bar
- USB Port (for Mobile Device Connection)
Connection to mobile device for DJI Pilot app if using a third-party mobile device. - HDMI A Port (for Video Output)
Output HDMI signal to an HDMI monitor. - CAN Bus Port (Extension Port)
Reserved port used to connect external devices. - Micro USB Port
Connect to the DJI Assistant 2 for Matrice to update firmware. - SDI Port (for Video Output)**
Output SDI video signal. - Right Lever
Reserved. - Right Dial
Used to control gimbal pan. - Auto Focus Button
Press to focus automatically. - Record Button
Press to start recording video. Press again to stop recording. - Shutter Button
Press to take a photo. Photos can also be captured during video recording. - Customizable Buttons (C1-C4)
Customizable through the DJI Pilot app. - Mobile Device Holder
Note that CrystalSky does not come with the M200 V2.
For better image transmission, a 750 coaxial cable is required for SDI video signal output. Make sure to use a coaxial cable with good electromagnetic shielding performance to avoid signal interference which will degrade the flight distance. Additionally, disable the video output in the Image Transmission Settings in the app when the display device is disconnected.
Gimbal and Camera
Camera
Camera Profile
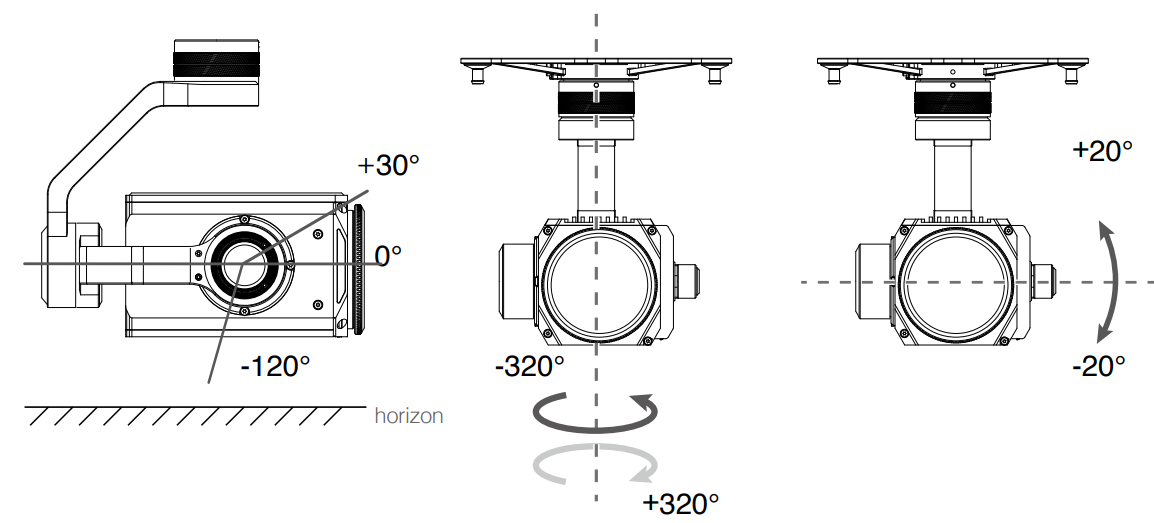
Using the Zenmuse Z30 / X5S as an example, this section will demonstrate the technical specifications of the camera while explaining how to use the gimbal.
Camera microSD Card Slot
When using a Zenmuse X4S, X5S, or X7 to store photos and videos, plug the microSD card into the slot shown below before powering on the aircraft. The aircraft comes with a 64 GB microSD card which was inserted into the slot before delivery and can support card sizes of up to 128 GB. We recommend you use a UHS-I type microSD card with a write speed of at least 20 MB/s because the fast read and write capability of these cards enables you to store high-resolution video data.
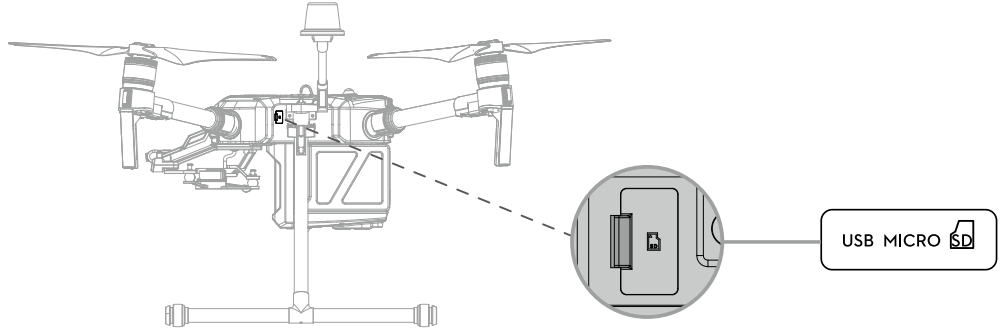
The M210 V2 / M210 RTK V2 currently supports the following microSD:
- Lexar 633X UHS-I microSDXC 64GB (model: LSDMI64GBBAP633A)
- Samsung PRO Endurance UHS-I microSDXC 64GB (model: MB-MJ64G)
Do not remove the microSD card from the aircraft when it is powered on.
- To ensure the stability of the camera system, single video recordings are capped at 30 minutes.
Camera Operation
Remote Controller
Use the Shutter and Record buttons on the remote controller to shoot photos or videos. For more information on how to use these buttons, please refer to Operating the Camera.
DJI Pilot
Use DJI Pilot to shoot photos or videos. For more information, refer to the camera and gimbal User Manual.
WARNING: When using the M200 Series V2 with the X5S or X7, some functions and parameters are unavailable, such as functions requiring an SSD, color settings of D-Cinelike, D-Log, and Film Locks for the X5S, and photo size of 3:2 for the X7.
Gimbal
Gimbal Profile
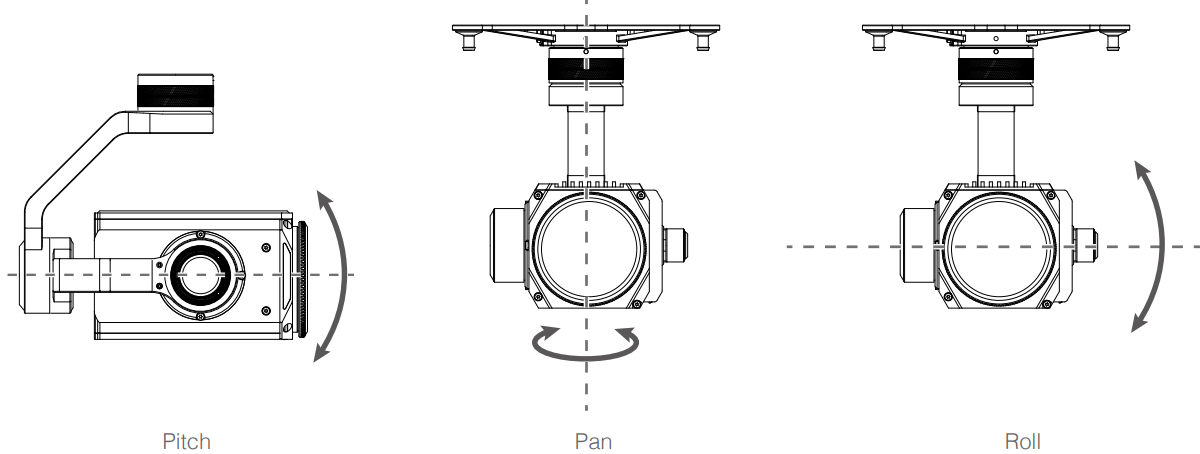
The 3-axis gimbal provides a steady platform for the attached camera, allowing you to capture stabilized images and video. Users can control gimbal angles using the remote controller or the app.
Using the DJI Pilot App to Control Gimbal
Follow the steps below to use the DJI Pilot app to control gimbal orientation:

- Launch DJI Pilot and enter the Camera View.
- Tap and press on the screen until a blue circle is shown.
- Slide to control the gimbal's orientation within the Camera View as shown below.
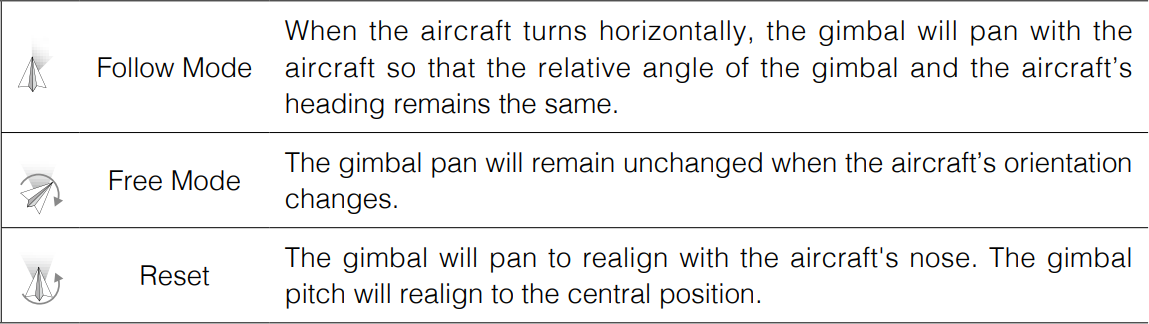
Gimbal Operation Modes
Three gimbal operation modes are available. Switch between the different operation modes in DJI Pilot's Camera View. Note that your mobile device must be connected to the remote controller for changes to take effect. Refer to the table below for details:
- DO NOT block the gimbal. Place the aircraft on a flat, open area before taking off. Do not touch the gimbal after it is powered on.
GPS Kit Indicator Descriptions
- Blinking Blue
- Blinking Green Slowly
Red
- Self-checking, or positioning finished but not used.
- Positioning finished and data from GPS kit used.
DJI Aircraft Matrice 200 M210 RTK V2 Error
Carrying Box Descriptions

- Landing Gear × 2
- Propeller Pair x 4
- Aircraft
- Remote Controller
- CrystalSky Monitor/iPad
- Intelligent Flight Battery
- Wb37 Intelligent Battery
- In2ch Charging Hub
- WCH2 Charging Hub
- Battery Charger
- Gimbal and Camera (X55/230)
- Mobile Device Holder
- Remote Controller Strap/Intelligent Flight Battery
- Power Cable/Intelligent Flight Battery
- Accessory Box/Intelligent Flight Battery
Setup Guide
- Setting up the DJI Matrice 200 M210 RTK V2 involves several steps:
- Assembly: Attach the propellers and landing gear according to the user manual.
- Battery Installation: Insert the TB55 batteries into the slots provided.
- Remote Controller Configuration: Pair the remote controller with the drone using DJI GO or DJI Pilot app.
- RTK Activation: Activate the RTK module if included in your configuration.
- Payload Mounting: Attach your chosen payload (e.g., camera or sensor) following manufacturer guidelines.
- Pre-flight Checks: Conduct thorough checks on all systems before each flight.
Firmware Update
Use the DJI Pilot app or the DJI Assistant 2 for Matrice to update the remote controller, aircraft, and other connected DJI devices. For the Zenmuse X5S, X4S, and X7, the aircraft and gimbal firmware will be updated simultaneously via DJI Assistant 2 for Matrice or the DJI Pilot app. For the Zenmuse Z30, XT, XT S, and XT2, only aircraft firmware can be updated via DJI Assistant 2 for Matrice or the DJI Pilot app. Gimbal firmware must be updated via a microSD card.
Using DJI Pilot
- Ensure that there is a good connection between the aircraft, remote controller, and other DJI devices used with the aircraft such as a D-RTK 2 Mobile Station for Matrice Series, and that all the devices are powered on.
- Go to the app. A prompt will appear if new firmware is available for download. Follow the on-screen instructions to update the firmware. Make sure to connect to the Internet when downloading the firmware.
Using DJI Assistant 2 for Matrice
Connect the remote controller to the software and then run a firmware update for all the connected DJI devices. Users can also connect each device to the software to update its own firmware.
- Power on the device and connect it to the software.
- Click the corresponding device name and then the firmware update tag.
- Select the firmware version required. Make sure to connect to the Internet when downloading the firmware.
- Restart the device after the firmware update is complete.
WARNING
- The battery firmware is included in the aircraft firmware. Be sure to update all the batteries' firmware.
- The firmware update will take around 15 minutes. It is normal that the gimbal will go limp, and the aircraft status indicator blinks abnormally when the aircraft reboots. Wait patiently until the update is complete.
- During an update, the aircraft will sound a quick single beep continuously. The warning sound will then alternate between a longer beep and a quick double beep once the update is complete. Restart the aircraft after the firmware update is complete.
- If the warning sound turns into a long beep, retry the update.
- The battery level should be above 30% for the firmware update process.
- When using DJI Pilot to update, you may disconnect the aircraft and the mobile device once the update is more than 30% completed. No Internet connection is required.
Using the Zenmuse XT Gimbal and Camera
The Zenmuse XT Gimbal Adapter is required when mounting the Zenmuse XT gimbal to the aircraft.
Attach the Zenmuse XT gimbal adapter onto the Zenmuse XT gimbal.
Mount the Zenmuse XT onto the aircraft by securing the gimbal adapter.
Dual Downward Gimbals
The M210 V2/M210 RTK V2 supports dual downward gimbals.
Using the Dual Downward Gimbals
All Zenmuse X5S, X4S, XT, X7, XT2, and Z30 gimbals are supported. You can mount them to the Gimbal Connector I and Gimbal Connector II as shown below:

- Please note that Gimbal Connector II can be mounted with the Zenmuse XT, XT S, and Z30 only.
- Gimbal Connector I and Gimbal Connector II cannot be mounted with two of the same Zenmuse gimbals.
- Gimbal Connector I's camera view will show on the main interface in the DJI Pilot app, while Gimbal Connector II's camera view will show on the assistant interface. You can switch between them.
- When using the Zenmuse Z30 and X7 cameras together, they might obstruct each other's motion at certain angles.
- If using only one camera, be sure to install the gimbal and camera on Gimbal Connector I and not on Gimbal Connector II.
Using the Upward Gimbal and GPS Kit
The M210 V2/M210 RTK V2 supports an upward gimbal. The GPS kit is required to obtain better GPS signals when an upward gimbal is used on the M210 V2 aircraft. Refer to the manuals for the Single Upward Gimbal Connector and GPS Kit on installation and usage.
- The GPS kit has an IP43 ingress protection. However, the aircraft will not retain its IP43 rating if the GPS kit is installed. Users can customize a waterproof rear port cover to ensure ingress protection.
- The M210 V2/M210 RTK V2 supports the simultaneous use of an upward gimbal and a downward gimbal. The upward gimbal should be connected to Gimbal Connector I only.
Troubleshooting
Common issues and solutions for the DJI Matrice 200 M210 RTK V2 include:
- Connection Issues: Ensure proper pairing between drone and remote controller; restart both devices if necessary.
- Flight Stability Problems: Check propellers for damage; calibrate sensors as per user manual.
- RTK Signal Loss: Move away from sources of interference; ensure adequate satellite coverage.
- Battery Drain: Regularly update firmware; avoid extreme temperatures during storage.
Instructions & Warnings: Always follow safety guidelines outlined in the user manual; ensure you have necessary permissions for flight operations.
Pros & Cons
Pros
- Durable Design: Built to withstand harsh weather conditions.
- High Accuracy RTK: Provides precise positioning data.
- Versatile Payload Options: Supports a wide range of cameras and sensors.
- Long-Range Transmission: Reliable communication up to 8 km away.
Cons
- High Cost: Expensive compared to consumer drones.
- Complex Setup Process: Requires technical knowledge for optimal performance.
- Heavyweight & Bulky: Not designed for casual use due to size and weight.
Customer Reviews
Customers have praised the Matrice 200 M210 RTK V2 for its reliability and performance in demanding environments:
"The Matrice 200 has been a game-changer for our inspection services. Its rugged build and accurate RTK positioning have significantly improved our data collection efficiency." - John D., Aerial Inspection Specialist
However, some users have noted challenges related to setup complexity and high cost:
"While the Matrice 200 offers unparalleled performance, it requires extensive setup knowledge which can be daunting for new users." - Sarah K., Drone Operator
Faqs
What is the maximum flight time of the DJI Matrice 200 M210 RTK V2?
Does the Matrice 200 M210 RTK V2 support multiple payload options?
How does the RTK module improve positioning accuracy?
What are some common troubleshooting steps for connection issues?
Is there any particular weather condition that affects drone performance?
What kind of maintenance should I perform regularly?
How far can I transmit data from this drone?
Are there any specific safety guidelines I need to follow?
Can I operate this drone without prior experience?
Leave a Comment