Dji Industrial Helicopter Autopilot System Ace One User Manual
Content
Introduction of DJI Industrial Helicopter Autopilot System Ace One
The DJI Industrial Helicopter Autopilot System Ace One is a cutting-edge solution designed for professional aerial applications, including surveying, agriculture, and search and rescue operations. This advanced autopilot system features high-precision GPS and IMU sensors, enabling stable flight and accurate positioning. With customizable flight modes and an intuitive interface, users can easily manage complex missions. The DJI Ace One is priced at approximately $1,299, making it a valuable investment for industrial drone operators.
Specifications
General Specifications:
- Built-In Functions: Autopilot, Tail Gyro, Engine Governor, Flybarless, Return-to-Home Fail Safe
- Helicopter Types: Electric and internal combustion powered
- Supported Swashplate Types: Normal, Three Servo 120°/140°/90°, Four Servo 90°
- Supported Servo Output: 500Hz(760us)/200Hz(1520us)for Rudder Channel; Others follow on your receiver output.
- Recommended Transmitter: PCM or 2.4GHz with a minimum of 7 channels and Failsafe function available on all channels.
- Recommended Power Supply: DC 7.4~8.4V (Not to exceed MAX operating voltage of servo motor) > 4000 mAh capacity, Discharge current more than 5C
- Power Consumption: MAX 5W (0.9A@5V, [email protected], [email protected], 0.4A@8V )
- Operating Temperature: -5°C to +70°C (You have to keep the IMU warm if you want to use it under low temperature, could be -10°C even lower.)
- Memory: 4GB Flash Memory for flight information recording
Flight Performance (can be affected by mechanical performance):
- Hovering Accuracy: Vertical: ± 0.5m, Horizontal: ± 1m
- Suitable Wind Condition: < 8m/s (17.7mph)
- Forward / Backward Speed: ± 72 Km/h (44.74mph)
- Left / Right Speed: ± 56.7 Km/h (35.77mph)
Packaging & Shapes:
- Total Weight: <= 150g
- Dimensions:
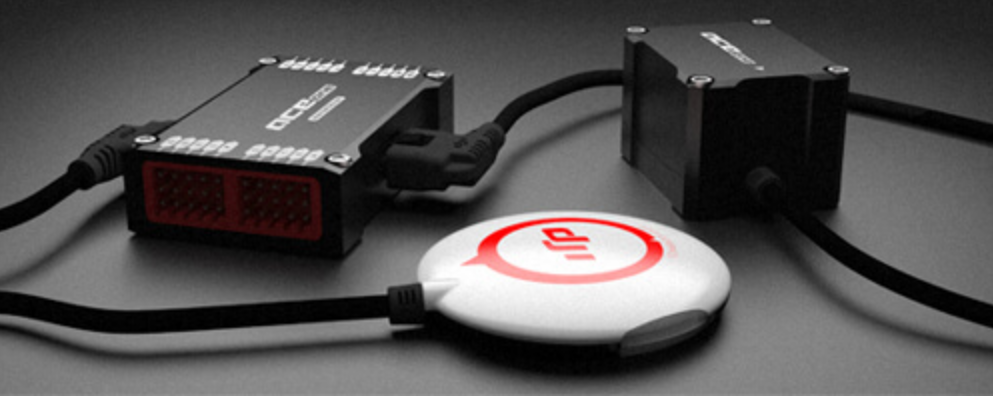
- Main Controller: 61mm x 39.6mm x 15.8mm
- IMU: 40mm x 31mm x 26mm
- GPS & Compass: 50mm (diameter) x 9mm
Mounting and Connection
Before You Begin
Fly the helicopter without Ace One and ensure that the helicopter works properly without any autopilot assistance. To complete this step, you will need a tail gyro instead of the Ace One system. This is a good time to isolate and resolve unwanted vibrations. It is important that you should not skip this step.
Mount the Devices on Your Helicopter
IMU
- Where?
The IMU is best positioned near the helicopter’s center of gravity, where vibration is relatively low. - What orientation?
Orient the IMU such that the arrow marked on the above surface of the IMU faces the sky and points directly forward, backward, left, or right. The sides of the IMU should be precisely parallel to the helicopter body. Do not mount the IMU upside-down. - How?
Use double-sided foam tape for secure installation.- Check the double-sided foam tape or Velcro regularly to ensure that the IMU is securely positioned.
- Do not cover the ventilation holes; keep them unobstructed.
- The IMU module is not water-proof or oil-proof.
GPS & Compass Module (GPS)
_dji_industrial_helicopter_autopilot_system_ace_one.png)
- Where?
Mount it on the tail boom, between the rotor head and the tail rotor. The compass is sensitive to magnetic interference, so position the module at least 20 cm from servos and 30 cm from electric motors or gasoline (petrol) engines. The GPS is sensitive to vibration interference, so position the module at least 10 cm from the tail rotor. The GPS should not be close to the main rotor head because rotor blades can interfere with the GPS satellite signal. The farther from the center of the rotor disk, the better. - What Orientation?
The DJI logo marked on the GPS should face the sky, with the orientation arrow pointing directly forward. The GPS is packaged with a special indication line for mounting for the first time. The LED status indicators should face the tail rotor.- If you are uncertain whether materials near the GPS are magnetic, you can use a compass or magnet to check.
- GPS mounting-support hardware is included in the Ace One package. If you prefer to use your own GPS mount, proceed accordingly.
Main Controller (MC)
Where?
There is no orientation requirement for the MC. Maintain at least a 20-centimeter distance between the MC and the engine or motor. Choose a mounting location where shorter servo extension wires are needed to reduce the risk of electronic interference. Ensure that the USB port is accessible when installing the MC to facilitate software configuration.
After choosing a location to mount the MC, it is recommended not to mount the MC until all wiring and software configurations are completed.
Description
The DJI Industrial Helicopter Autopilot System Ace One is built with durability and performance in mind. The system includes a robust autopilot controller, GPS module, and various sensors to ensure accurate positioning and control. It supports dual GPS and GLONASS for enhanced navigation and can be integrated with different helicopter platforms. The advanced control algorithms provide smooth and stable flight, even in challenging environmental conditions.
The Ace One also features user-friendly software for mission planning and real-time monitoring, making it easier for operators to manage their flights efficiently. The system is designed to be highly customizable, allowing users to tailor it to their specific needs and applications.
LED Indicator Description

Connections
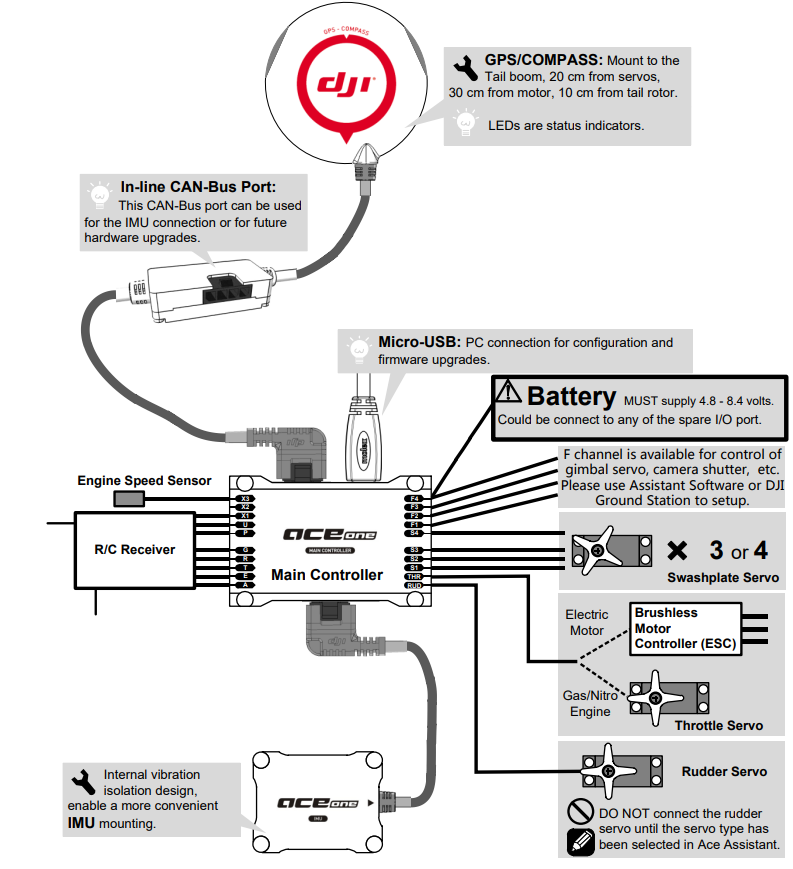
CAN Bus Interface for Ace One Module
The Ace One MC uses CAN-Bus to power and communicate with other Ace One modules. Three connection ports are provided: two on the MC and one in-line connection on the GPS/Compass wire. Ace One identifies the connected devices automatically without configuration.

- The GPS module can be connected to either port of the MC.
- The IMU can be connected to the MC or to the in-line port on the GPS wire. Connect the GPS/Compass and IMU to the MC.
Receiver & Servos
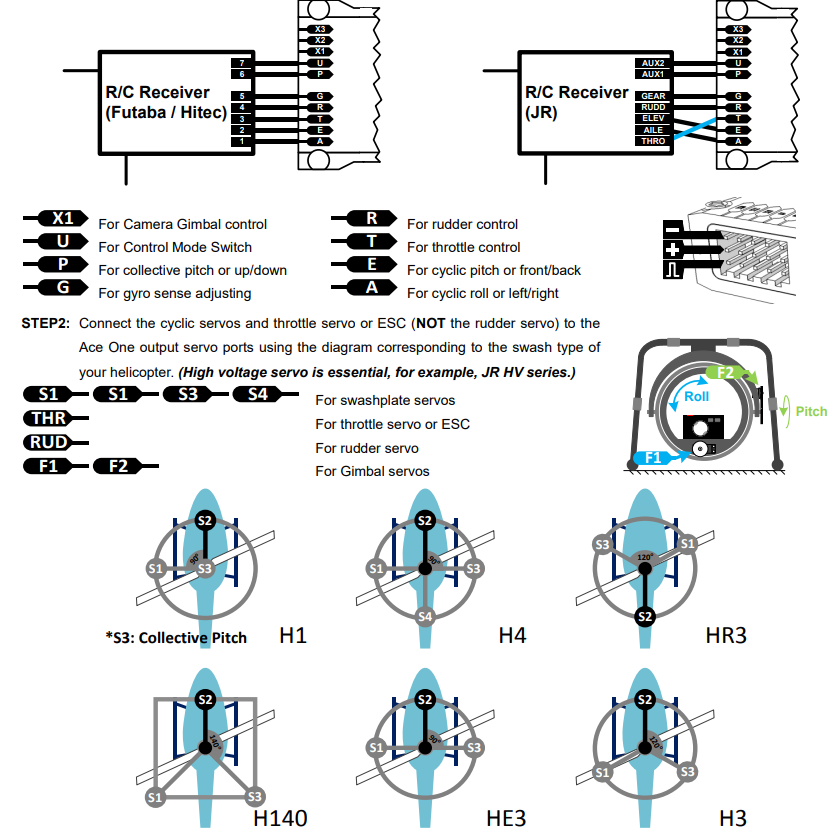
- Set the transmitter to single-servo CCPM (Futaba: H-1; JR/Spectrum: 1sNORM; Hitec: 1-Servo 90°).
- Connect the receiver to the MC input servo ports. (High voltage receiver is essential, over 7.4V).
Battery or BEC
Ace One uses the same power source as the servos and receiver. Power to all electronics connected to the MC can be supplied by either servo input or output ports on the MC. Ace One operates with a power source between 4.8 to 8.4 volts DC. Ensure that the power source will also satisfy the servo requirements. A high-capacity battery of 4000mAh or above is strongly advised, especially for large-scale electric-powered helicopters.
The power consumption of Ace One is 5W maximum (testing condition: 0.9A @ 5V). For some small-scale helicopters, the BEC provided may not be able to supply enough overall power consumption. Please use a high-performance BEC.
Ace Assistant Software Basic Operation

- Tool
- Firmware upgrade: Update your firmware from the DJI server, keeping your Ace One system up-to-date.
- Sign in: Log onto the DJI server.
- Read flight log: Ace One main controller will become a mobile drive under [My Computer], and Ace Assistant will close automatically.
- Disable all knobs
- Reset to factory default
- Language
a) English
b) 中文 - Newsletter: Latest product news.
- About
- Info: Information regarding your Ace One
- Error Code
- Export: Export/save Ace One configurations in files.
- Import: Load previously saved Ace One configurations.
Wizard: Step-by-step guidance for first-time configuration.
Flight & Configuration Procedure Brief
- Write: Write the latest settings of the current page to your Ace One main controller. The parameter value or title will appear in red and bold when modifications are made. Make sure you click the "Write" button to update your Ace One system.
- Read: Read parameters from Ace One main controller.
- Write all: Write the latest settings and changes of all files to your Ace One main controller.
- Graphic guidance
- Text guidance
- Flybarless function ON/OFF indication
- Engine governor working mode indication
- Tail gyro working mode & gyro sense indication
- Autopilot working mode indication
- Red light: Ace One ⇔ PC disconnected.
Green light: Ace One ⇔ PC connected.
Blue light: Ace One ⇔ PC communication. - All configuration pages are available in the "Wizard" section.
Flight
Digital Compass Calibration
Why calibrate the compass?
Ferromagnetic substances placed on the helicopter or around its working environment will affect the reading of the Earth's magnetic field for the digital compass. It also reduces the accuracy of the helicopter's control, or even reads an incorrect heading. Calibration eliminates such influences and ensures the Ace One system performs well in a non-ideal magnetic environment.
When to do it?
- The first time you install Ace One on your helicopter.
- When the helicopter mechanical setup is changed:
- a) If the GPS module is repositioned.
- b) If electronic devices are added/removed/repositioned (MC, servos, batteries, etc.).
- c) When the mechanical structure of the helicopter is changed.
- If the flight direction appears to be shifting (meaning the helicopter doesn’t “fly straight”).
- If the LED indicator often shows abnormal blinking when the helicopter yaws (It is normal for this to happen occasionally).
Calibration Procedure
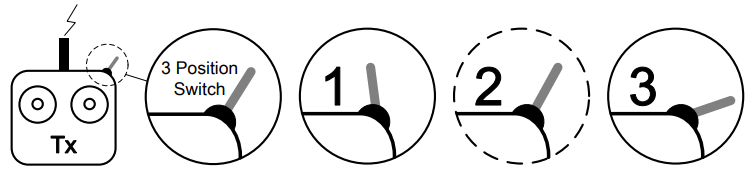
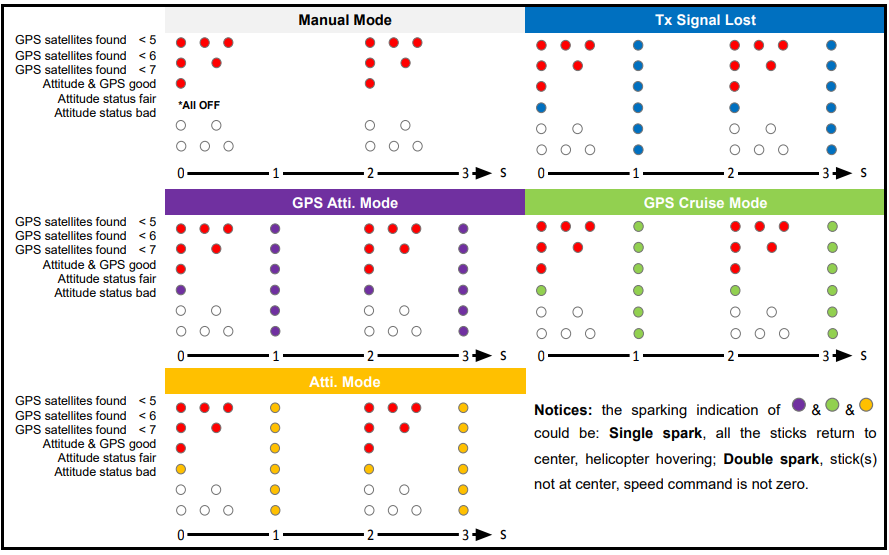
- STEP 1: Enter calibration mode by quickly sliding the control mode switch from Position-1 to Position-3 for 10 times. The LED indicator will be constantly on in blue.
- STEP 2: Calibration in horizontal: Rotate your helicopter along the horizontal surface until the green light is constantly on, then proceed to the next step.
STEP 3: Calibration in vertical: While the green light is constantly on, hold your helicopter vertically and rotate it along its vertical axis. Continue rotating until the green light goes off, indicating the calibration is finished.
- STEP 4: After calibration is finished, the LED indicator will show whether the calibration was successful:
- If the white light turns on for 3 seconds, the calibration succeeds, and calibration mode will auto-exit.
- If the red light keeps blinking quickly, the calibration has failed. Slide the control mode switch one time to cancel the current calibration, then restart from STEP 1 for re-calibration.
Important Notes:
- Don’t calibrate your compass where there is strong magnetic interference, such as magnetite, car parks, and steel reinforcement under the ground.
- DO NOT carry ferromagnetic materials with you during calibration, such as keys or cell phones.
- You don’t need to rotate your helicopter on a precise horizontal or vertical surface, but keep at least a 45° difference between horizontal and vertical calibration.
- Ace One cannot operate within the polar circle.
If you keep having calibration failures, it might suggest strong magnetic interference around the GPS. Avoid flying in this area.
Manual Mode Test Flight
- When the system is powered on, DO NOT move your helicopter or sticks on the transmitter until the system initialization is finished (about 5 seconds).
- Do not switch to Atti. Mode, GPS Atti. Mode, and GPS Cruise Mode during the Manual Mode Test Flight.
Enhanced Fail-Safe
Ace One can detect the fail-safe output from your receiver if you have pre-set the fail-safe output correctly. Once your helicopter loses signal from the transmitter, the Enhanced Fail-Safe function will control the helicopter automatically and save it in most conditions.
- The Enhanced Fail-Safe (Auto Hovering and Auto Go-Home) will not be activated until you’ve correctly pre-set the Transmitter Command Stick Center Position.
- The Enhanced Fail-Safe functions will not work correctly if you have not finished the Auto Mode Test Flight. Please see Autopilot Test Flight on Page 24 for details.
- You must perform the following setting under Manual Mode.
- If GPS signal reception is bad, the Auto Go-Home function will not be disabled, even if it was activated in Ace One Assistant. In this case, the Attitude Hold function will be forced to activate instead.
Procedure
- STEP 1: Please configure your autopilot to the best condition. Make sure the helicopter can fly well under GPS Cruise Mode and GPS Atti. Mode.
- STEP 2: Switch your Ace One into Manual Mode.
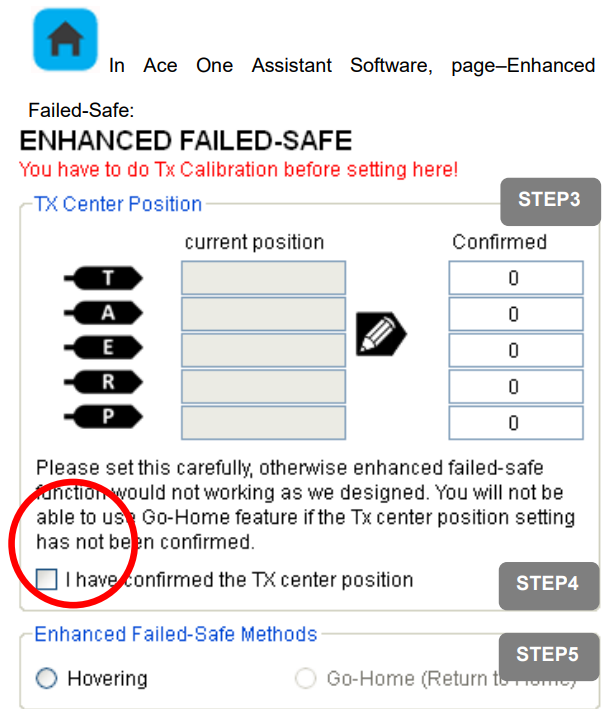
STEP 3: Record your command stick positions, which should be the same as the moment you switched from Manual Mode (if you changed throttle curve before switching, use that curve for this setting). Configure your transmitter to allow your helicopter to hover with the transmitter command stick roughly in their center position (not exact). You can read the [current stick position], which is shown as numbers ranging from -1000 to +1000 in real time. Click the button
 to save them into the [Confirmed] group as the Tx center position.
Note
You will be noticed by a symbol instead of a button, which means you throttle working range has not been correctly set or your throttle position is holding on throttle-cut (STOP) position. Please check your throttle-cut switch and throttle working range setting in Ace One Assistant page–Engine. See page16 for details.
- STEP 4: Check the confirm box to ensure the Tx center position is correct. Otherwise, the Enhanced Fail-Safe will be disabled.
STEP 5: Select a protection method—Auto Hovering or Go-Home. The following schematic is an introduction for Go-Home.
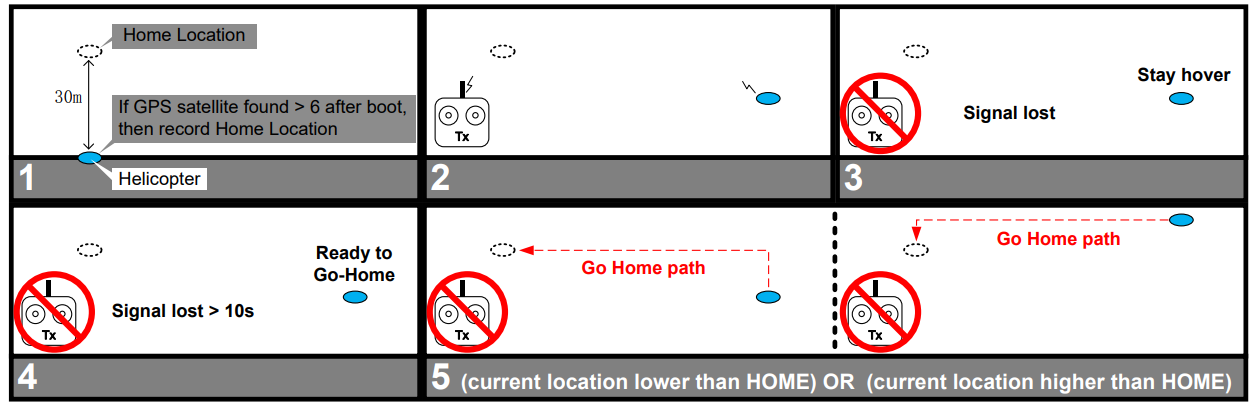
Fail-Safe functions are designed for GPS Atti. Mode and GPS Cruise Mode. Once the helicopter comes back within the available transmitter signal range, switch to Manual Mode, and you can regain control of the Ace One system.
Autopilot Test Flight
When the system is powered on, you must not move your helicopter or transmitter sticks until the system initialization is finished (about 5 seconds). Please read this section before switching to Atti. Mode, GPS Atti. Mode, or GPS Cruise Mode.
- Make sure the GPS signal is good, without any red LED blinking.
- Please avoid using the Ace One system in areas where the GPS signal is likely blocked, such as:
- Urban areas with crowded buildings.
- Tunnels.
- Under bridges.
- Ensure that the helicopter's attitude is in good condition, without any white LED blinking.
- Other system failures and errors will also be displayed by the LED indicator on the GPS/Compass module. See the Appendix for details.
Optional Chargeable Function
Semi-Auto Take-off
Please set up the B7 Engine Governor and all center positions correctly before using this function. In STEP 12, the system can perform the Semi-Auto take-off feature rather than manual take-off. Please follow these operation procedures strictly:
- Set the throttle stick to the lowest position.
- Switch to GPS Cruise, GPS Atti., or Atti. Mode and wait until the main rotor speed stabilizes.
- Gently push the throttle (collective pitch) stick to take off the helicopter. The autopilot system will be in charge of cyclic pitch/roll stabilization.
Semi-Auto Landing
In GPS Cruise, GPS Atti., or Atti. Mode, with throttle (collective pitch) stick operation only, descend the helicopter and hold the throttle stick at the lowest position until the engine or electric motor shuts off automatically. This throttle idle or shut-down in Auto mode when collective is in the lowest stick position only applies if you have this option.
Note
- With this option, the MC will perform in GPS Cruise, GPS Atti., or Atti. Mode for both takeoff and landing. Please be aware that this “Always on” auto mode should not be used in MC without this option.
- Use this function only when the GPS signal is sufficient and in an open area.
- STEP1: Check all connections and wirings, and make sure they are in good condition;
- STEP2: Make sure your batteries are fully charged for your transmitter, Ace One and all the devices on your helicopter;
- STEP3: Turn on the transmitter first;
- STEP4: Power on the Ace One and all the rest of electric device on helicopter, except brushless motor controller;
- STEP5: Check the LED indicator on GPS/Compass module, if red LED sparks quickly, the system start-up has failed. You will need to place you helicopter horizontally and power on again. See Appendix for details about LED indicator
- STEP6: You may find red LED blinking, indicating that Ace One is getting GPS satellite signal, please wait until red LED is off, meaning Ace One have found more than 7 GPS satellites, and that it can work in its best condition. See Appendix for details about LED indicator;
- STEP7: Slide the control mode switch on your transmitter to make sure it is working properly. Check it with LED indicator to specify the current working mode for Ace One. See Appendix for details about LED indicator;
- STEP8: Switch the system to GPS Cruise Mode, if the swashplate is not horizontal, please go back to 3rd step, and power cycle the system;
- STEP9: Switch the system to Manual Mode, move all the sticks on your transmitter to check whether the helicopter is correctly responding to your commands;
- STEP10: If everything checked, and without any problems, switch the system to Manual Mode;
- STEP11: Start the engine or power on the brushless motor controller;
- STEP12: Take-off and fly your helicopter in Manual Mode;
- STEP13: Hover your helicopter, and switch to GPS Cruise Mode
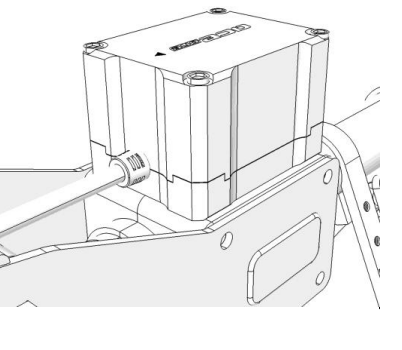
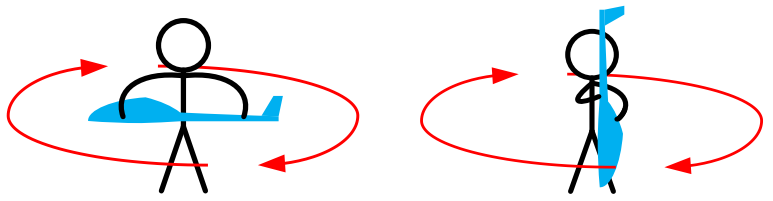
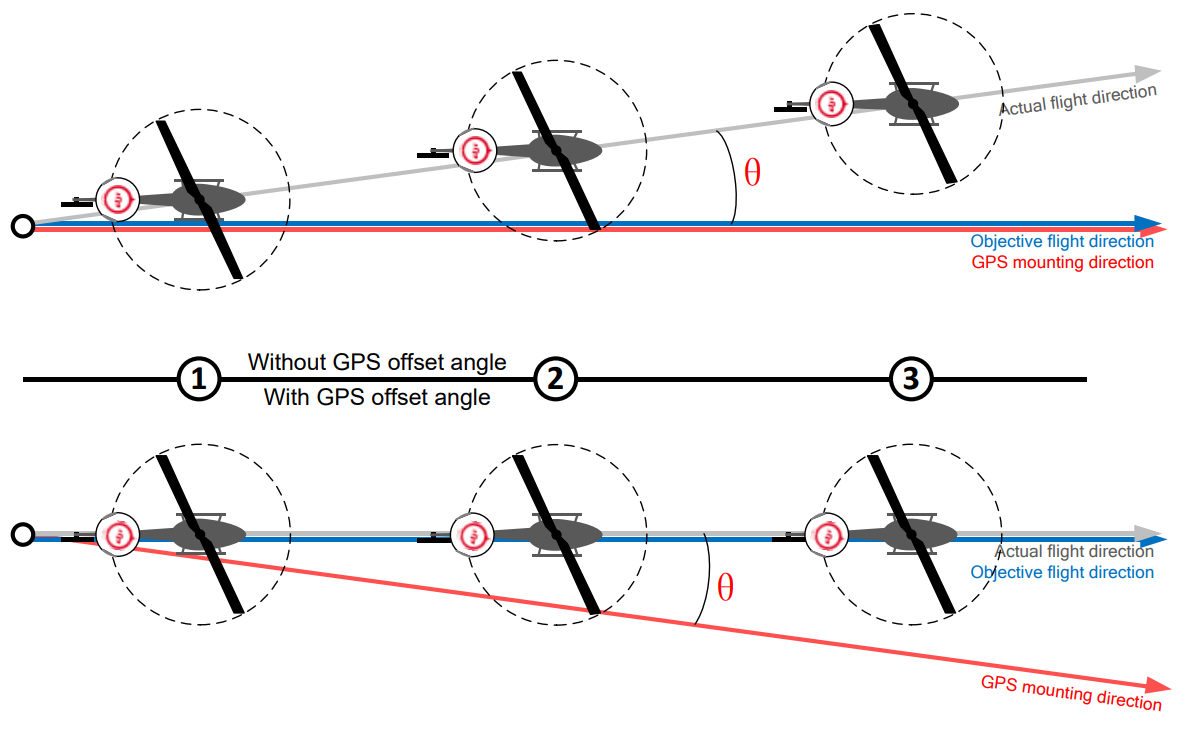
TIP: Should you find the helicopter does not track straight in forward flight, you might try re-mounting GPS in an offsetting angle as showed in right figure. Θ in the figure is the offsetting angle.
Setup Guide
Setting up the DJI Industrial Helicopter Autopilot System Ace One involves several steps:
- Assembly: Carefully assemble the autopilot controller and GPS module according to the provided instructions.
- Configuration: Use the dedicated software to configure the system settings, including calibration of sensors and setting up communication protocols.
- Pairing: Pair the autopilot system with your helicopter's control surfaces and propulsion system.
- Testing: Conduct thorough ground and flight tests to ensure all components are functioning correctly.
It is recommended to follow the detailed manual provided by DJI for a seamless setup process.
Maintains
Flight Log Reading
Notice: You may be asked to provide your Ace One Flight Log for customer support.
- Click [TOOL] → [Read Flight-Log].
- Click [OK].
- Ace One Assistant Software will close automatically, and Ace One MC will work as a storage drive named [ACEONE LOG], which you can find in the [My Computer] directory.
- Open it to find your flight log files. Copy or delete as you would with normal PC operations.
- Power cycle Ace One to exit Flight Log reading mode.
TIP: You have 4GB of memory space for Ace One flight log recording. If the memory is full, Ace One will stop recording flight logs and format all the information after power cycling the MC.
Firmware Upgrade
Please strictly follow the procedure for firmware upgrades; otherwise, Ace One might not work properly:
- Ensure your computer is connected to the Internet.
- Close all other applications during the firmware upgrade, including antivirus software and firewalls.
- Ensure the power supply is securely connected to Ace One. Do not unplug the power supply until the firmware upgrade is finished.
- Connect Ace One MC to the PC with a micro-USB cable. Do not break the connection until the firmware upgrade is finished.
- Open Ace One Assistant Software and wait for the connection.
- Select [TOOL] → [Firmware Upgrade].
- The DJI server will check your current firmware version and prepare the latest firmware for Ace One Assistant.
- If a newer firmware version is available, you can click the upgrade button.
- Wait until Ace One Assistant reads “Finished.”
- Power cycle Ace One after at least 5 seconds.
- Your Ace One is up to date.
Additional Notes
- After a firmware upgrade, re-configure Ace One via Ace One Assistant.
- If the network or DJI server is busy, try again later following the same procedure.
- If the firmware upgrade fails, Ace One will automatically enter a <waiting for firmware upgrade> status. Try again following the same procedure.
Product Info
You can check the Ace One product version via [ABOUT] → [Info].
- Software version.
- Firmware version.
- IMU version.
- Hardware ID.
The [S/N] is a 32-digit authorization code for Ace One function activations. We pre-filled the authorization code for your Ace One after manufacture. You may be asked to input a new [S/N] in the future if you purchase new function upgrades. Input the [S/N], then click the [Write] button.
Important: If you input an invalid S/N more than 30 times, your Ace One will be locked, and you must contact customer support.
Troubleshooting
Common issues and solutions with the DJI Industrial Helicopter Autopilot System Ace One include:
- Loss of Signal: Ensure that all connections are secure and that there are no obstructions between the GPS module and satellites.
- Vibration Issues: Check for any loose components or improper mounting of the autopilot controller.
- Software Errors: Update the software to the latest version and restart the system.
Always refer to the user manual or contact DJI support for detailed troubleshooting guides and instructions.
DJI Industrial Helicopter Autopilot System Ace One Pros & Cons
Pros
- Advanced Performance: Provides precise control and stability.
- Robust Design: Built for durability and reliability in harsh environments.
- Customizability: Highly adaptable to various helicopter platforms and applications.
- User-Friendly Software: Easy mission planning and real-time monitoring.
Cons
- High Cost: Expected to be around $5,000, which may be prohibitive for some users.
- Complex Setup: Requires careful assembly and configuration, which can be time-consuming.
- Dependence on Software Updates: Requires periodic software updates to maintain optimal performance.
Customer Reviews
Early adopters of the DJI Industrial Helicopter Autopilot System Ace One have praised its performance and stability. Many users have noted the ease of use despite the complex setup process. However, some have mentioned the high cost as a significant drawback.
Common complaints include occasional software glitches and the need for frequent firmware updates. Despite these minor issues, overall feedback has been positive, highlighting the system's robustness and reliability in various industrial applications.
Faqs
What is the expected launch date of the DJI Industrial Helicopter Autopilot System Ace One?
What are the key features of the DJI Industrial Helicopter Autopilot System Ace One?
Is the DJI Industrial Helicopter Autopilot System Ace One compatible with different helicopter platforms?
How do I set up the DJI Industrial Helicopter Autopilot System Ace One?
What are common issues with the DJI Industrial Helicopter Autopilot System Ace One and their solutions?
What are the pros of using the DJI Industrial Helicopter Autopilot System Ace One?
What are the cons of using the DJI Industrial Helicopter Autopilot System Ace One?
What do customer reviews say about the DJI Industrial Helicopter Autopilot System Ace One?
How do I troubleshoot common problems with the DJI Industrial Helicopter Autopilot System Ace One?
Leave a Comment