Specifications: Dji Phantom 3 Professional Quadcopter Drone User Manual

Content
Introduction
The DJI Phantom 3 Professional Quadcopter Drone is a potent and sophisticated drone that is intended for both amateur and professional aerial photographers. We will learn more about it in this article. This drone's 4K UHD camera allows it to take beautiful, high-definition aerial pictures and videos. Its sophisticated flight technology makes it simple to use for users of all skill levels by providing accurate control, stable flight, and a variety of flight modes. The Phantom 3 Professional is a great option for producing amazing aerial photos because of its strong GPS navigation, extended flight range, and live HD video streaming capabilities. This drone gives you the skills you need to advance your aerial photography, regardless of your experience level as a videographer.
Aircraft Diagram
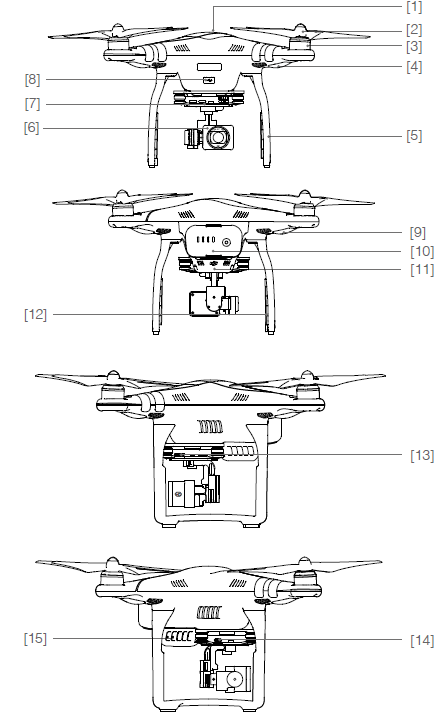
- GPS
- Propeller
- Motor
- Front LED Indicator
- Landing gear
- Gimbal and Camera
- Camera Status Indicator
- Aircraft Micro USB Port
- Aircraft Status Indicator
- Intelligent Flight Battery
- Vision Positioning Sensors
- Antennas
- Camera Micro SD Card Slot
- Camera Micro USB Port
- Link Button
Remote Controller Diagram
- Antennas
Relays aircraft control and video signal. - Mobile Device Holder Securely mounts your mobile device to the remote controller.
- Control Stick
Controls the orientation and movement of the aircraft. - Return Home (RTH) Button
Press and hold the button to initiate Return to Home (RTH). - Battery Level LEDs
Displays the battery level of the remote controller. - Status LED
Displays the remote controller's system status. - Power Button
Used to turn the remote controller on and off. RTH LED
The circular LED around the RTH button displays RTH status.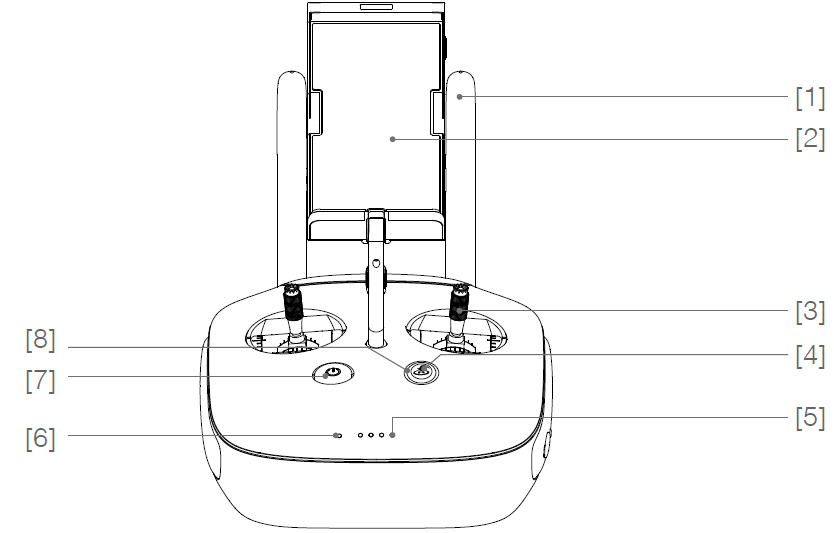
- Camera Settings Dial
Turn the dial to adjust camera settings.(Only functions when the remote controller is connected to a mobile device running the DJI GO app. ) - B
Playback the captured images or videos.
(Only functions when the remote controller is connected to a mobile device running the DJI GO app.) - Shutter Button
Press to take a photo. If burst mode is selected, the set number of photos will be taken with one press. - Flight Mode Switch
Switch between P-mode, A-mode, and F-mode. - Video Recording Button
Press to start recording video. Press again to stop recording. - Gimbal Dial
Use this dial to control the tilt of the gimbal. - Micro USB Port
Reserved port. USB Port
Connect to mobile device or to a USB port for firmware upgrade.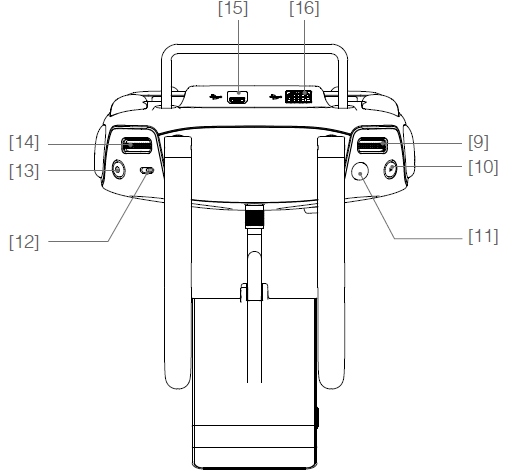
- C1 Button
Customizable through the DJI GO app. - C2 Button
Customizable through the DJI GO app. Power Port
Connect to the DJI Phantom 3 Charger to charge the battery of the remote controller.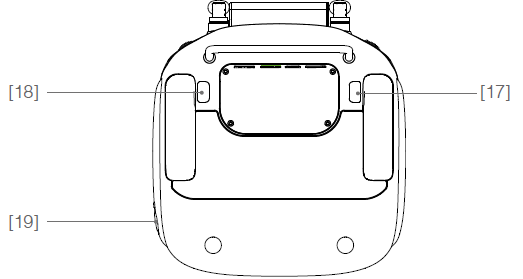
Specifications
Aircraft
Weight (Battery & Propellers Included) |
1280 g |
Max. Ascent Speed | 5 m/s |
Max. Descent Speed | 3 m/s |
Max. Speed | 16 m/s (ATTI mode,no wind) |
Max Service Ceiling Above Sea Level |
6000 m (Software altitude limit: 120m above takeoff point) |
Max. FlightTime | Approximately 23 minutes |
Operating Temperature | 0°C to 40°C |
GPS Mode | GPS/GLONASS |
Gimbal
Controllable Range | Pitch: - 90° to + 30° |
Vision Positioning
Velocity Range | < 8 m/s (2 m aboveground) |
Altitude Range | 30 cm-300cm |
Operating Range | 30 cm-300 cm |
Operating Environment | Brightly lit (lux > 15) patterned surfaces |
Camera
Sensor | Sony EXMOR1/2.3” Effective pixels:12.4 M (total pixels: 12.76 M) |
Lens | FOV 94° 20mm(35mm format equivalent ) f/2.8 |
ISO Range | 100-3200 (video) 100-1600(photo) |
Electronic Shutter Speed | 8s -1/8000s |
Image Max. Size | 4000 × 3000 |
Still Photography Modes | Single shot Burst shooting: 3/5/7 frames Auto Exposure Bracketing (AEB):3/5 Bracketed frames at 0.7EV Bias Time-lapse |
Supported SD Card Types | Micro SD Max. capacity: 64 GB. Class 10 or UHS-1 ratingrequired |
Video Recording Modes | UHD: 4096× 2160p 24/25,3840 × 2160p24/25/30 FHD: 1920 × 1080p 24/25/30/48/50/60 HD: 1280 × 720p 24/25/30/48/50/60 |
Max. Bitrate Of Video Storage | 60 Mbps |
Supported File Formats | FAT32/exFAT Photo: JPEG, DNG Video: MP4/MOV (MPEG-4 AVC/H.264) |
Operating Temperature Range | 0°C to 40°C |
Remote Controller
Operating Frequency | 2.400 GHz-2.483 GHz |
Transmitting Distance | Up to 5.0 km or 3.1 miles (unobstructed, free of interferences and FCC compliant) when it is FCC compliant Up to 3.5 km or 2.1 miles (unobstructed, free of interferences) when it is CE compliant |
Video Output Port | USB |
Operating Temperature Range | 0°C- 40°C |
Battery | 6000 mAh LiPo 2S |
Mobile Device Holder | Tablets and smartphones |
Transmitter Power (EIRP) | FCC: 20 dbm;CE:16 dbm |
Working Voltage | 1.2 A @7.4 V |
Charger
Operating Frequency | 2.400 GHz-2.483 GHz |
Transmitting Distance | Up to 5.0 km or 3.1 miles (unobstructed, free of interferences and FCC compliant) when it is FCC compliant Up to 3.5 km or 2.1 miles (unobstructed, free of interferences) when it is CE compliant |
Video Output Port | USB |
Operating Temperature Range | 0°C- 40°C |
Battery | 6000 mAh LiPo 2S |
Mobile Device Holder | Tablets and smartphones |
Transmitter Power (EIRP) | FCC: 20 dbm;CE:16 dbm |
Working Voltage | 1.2 A @7.4 V |
Intelligent Flight Battery ( PH3-4480 mAh-15.2 V )
Capacity | 4480 mAh |
Voltage | 15.2 V |
Battery Type | LiPo 4S |
Energy | 68 Wh |
Net Weight | 365 g |
Operating Temperature | -10°C- 40°C |
Max. Charging Power | 100 W |
Product Profile
Introduction
The Phantom 3 Professional represents the next generation of DJI quadcopters. It is capable of capturing 4K video and transmitting an HD video signal out of the box. The built-in camera has an integrated gimbal to maximize stability while minimizing both weight and size. Even when no GPS signal is available, the Vision Positioning System allows the aircraft to hover accurately in place.
Feature Highlights
- Camera and Gimbal: With the Phantom 3 Professional, you’re shooting 4K video at up to 30 frames per second and capturing 12 megapixel photos that look crisper and cleaner than ever. An enhanced sensor gives you greater clarity, lower noise, and better pictures than any previous flying camera.
- HD Video Downlink: The low-latency long range HD downlink is powered by an enhanced version of DJI Lightbridge.
- DJI Intelligent Flight Battery: The 4480 mAh DJI Intelligent Flight Battery features upgraded battery cells and an advanced power management system.
- Flight Controller: The next-generation flight controller has been updated to provide a safer, more reliable flight experience. A newly implemented flight recorder stores critical data from each flight and the Vision Positioning System enhances hovering precision when flying indoors or in environments where GPS is unavailable.
Preparing the Aircraft
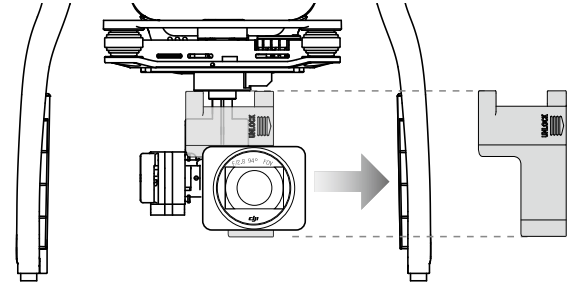
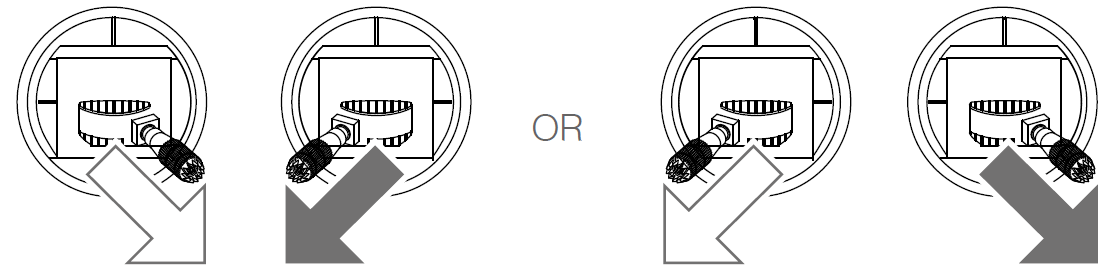
Removing Gimbal Clamp
Remove the gimbal clamp by sliding it to the right (when facing the nose of the aircraft), as shown below.
Attaching the Propellers:
Mount the propellers with black dots on to motors with black axes and spin counter-clockwise to secure. Mount the propellers with sliver dots on to motors with sliver axes and spin clockwise to secure. Be sure all propellers are securely in place.
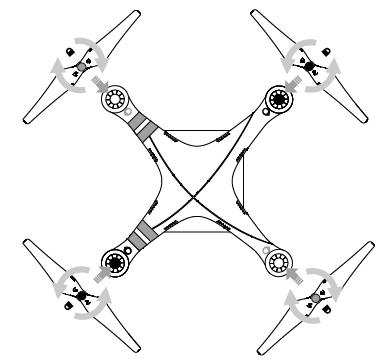
WARNING: Place all propellers onto the correct motors and tighten by hand to lock them in position.
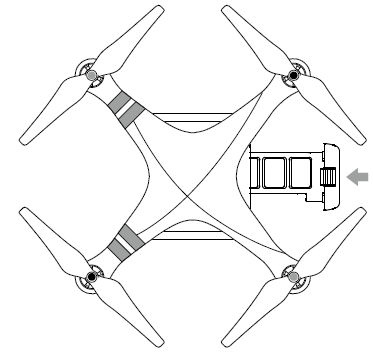
Battery Installation
Slide battery into the battery compartment according to the arrow’s direction shown below. Make sure that you hear a click sound indicates the battery is firmly installed. Failure to do so may affect the flight safety of your aircraft.
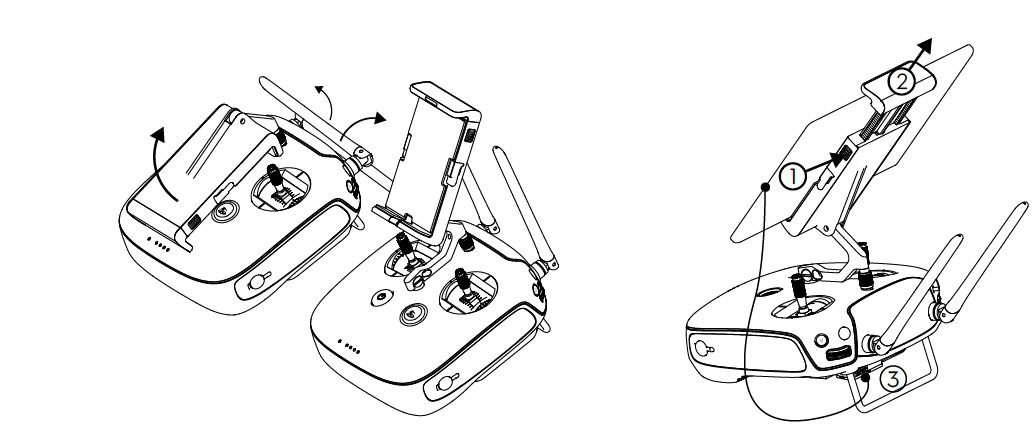
Preparing the Remote Controller
The mobile device holder is designed for securing tablet or mobile device. Tilt the mobile device holder to the desired position, then adjust the antennas so they are facing outward.
- Press the button on the top right side of the mobile device holder to release the clamp, then adjust the clamp to fit the size of your mobile device.
- Secure your mobile device in the clamp by pressing down, and connect your mobile device to the remote controller using a USB cable.
- Plug one end of the cable into the mobile device, and the other end into the USB port on the back of the remote controller.
Description
The DJI Phantom 3 Professional Quadcopter Drone is a high-performance and easy-to-use drone designed for professional use. It features a 4K UHD camera with a 3-axis gimbal for smooth and stable footage. The drone has a long-range remote control with a range of up to 5 km (FCC) or 3.5 km (CE). It also has a GPS and GLONASS positioning system for precise hovering and flight. The drone has a flight time of up to 23 minutes and a top speed of 57.6 km/h. The Phantom 3 Professional is equipped with DJI's Lightbridge technology for real-time video transmission and flight data. The drone also has a Vision Positioning system for stable and precise hovering indoors.
DJI Phantom 3 Professional Quadcopter Drone Flight
Once pre-flight preparation is complete, it is recommended that you use the flight simulator in the DJI GO app to hone your flight skills and practice flying safely. Ensure that all flights are carried out in an open area.
Flight Environment Requirements
- Do not use the aircraft in severe weather conditions. These include wind speeds exceeding 10 m/s , snow, rain and fog.
- Only fly in open areas. Tall structures and large metal structures may affect the accuracy of the on-board compass and GPS system.
- Avoid obstacles, crowds, high voltage power lines, trees, and bodies of water.
- Minimize interference by avoiding areas with high levels of electromagnetism, including base stations and radio transmission towers.
- Aircraft and battery performance is subject to environmental factors such as air density and temperature. Be very careful when flying at altitudes greater than 19, 685 feet (6000 meters) above sea level, as the performance of the battery and aircraft may be affected.
- The Phantom 3 Professional cannot operate within the polar areas.
Flight Limits and No-Fly Zones
All unmanned aerial vehicle (UAV) operators should abide by all regulations set forth by government and regulatory agencies including the ICAO and the FAA. For safety reasons, flights are limited by default, which helps users operate this product safely and legally. Flight limitations include height limits, distance limits, and No-Fly Zones. When operating in P-mode, height limits, distance limits, and No-Fly Zones function concurrently to manage flight safety. In A-mode, only height limits are in effect, which by default prevent the aircraft altitude from exceeding 1640 feet (500 m) .
Maximum flight altitude & Radius Limits
Maximum flight altitude and radius limits may be changed in the DJI GO app. Be aware that the maximum flight altitude cannot exceed 1640 feet (500 meters). In accordance with these settings, your Phantom 3 Professional will fly in a restricted cylinder, as shown below:

GPS SignalStrong | |||
Flight Limits | DJI GO app | Aircraft Status Indicator | |
Maximum Flight Altitude | Aircraft's altitude cannot exceed the specified value. | Warning: Height limit reached. |
None. |
Max Radius |
Flight distance must be within the max radius. |
Warning: Distance limit reached. | Rapid red flashing max radius limit. |
GPS SignalWeak | |||
Flight Limits | DJI GO app | Aircraft Status Indicator | |
Maximum Flight Altitude | Height is restricted to 26 feet (8 meters)when the GPS signal is weak and Vision Positioning is activated. Height is restricted to 164 feet (50meters) when the GPS signal is weak and Vision Positioning is inactivated. |
Warning: Height limit reached. |
None. |
WARNING
- If you fly out of the limit, you can still control the Phantom 3, but cannot fly it any farther. If the Phantom 3 flies out of the max radius in Ready to Fly (non-GPS) mode, it will fly back within range automatically.
- If the Phantom 3 flies out of the max radius in Ready to Fly (non-GPS) mode, it will fly back within range automatically.
No-Fly Zones
All No-Fly Zones are listed on the DJI official website at http://flysafe.dji.com/no-fly. No-Fly Zones are divided into Airports and Restricted Areas. Airports include major airports and flying fields where manned aircraft operate at low altitudes. Restricted Areas include border lines between countries or sensitive institute. The details of the No-Fly Zones are explained as follows:
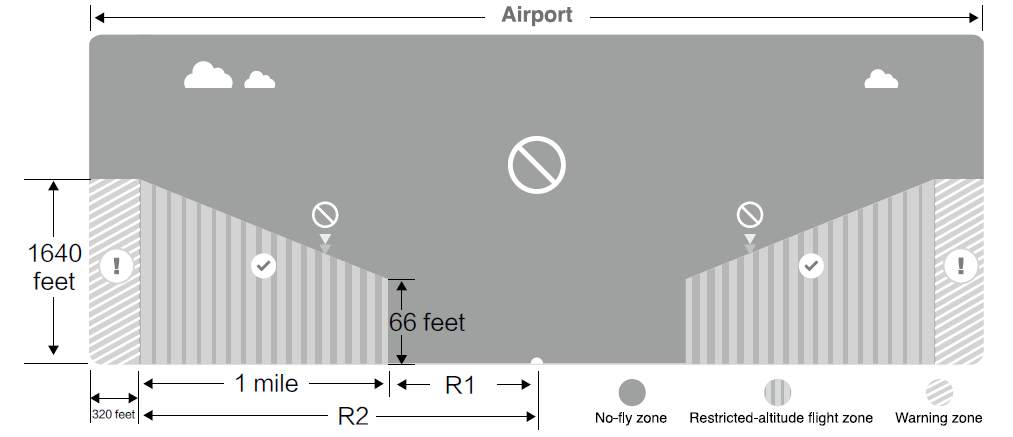
Airport
- Airport No-Fly Zone are comprised of Take-off Restricted zones and Restricted Altitude Zones. Each zone features circles of various sizes.
- R1 miles (value of the R1 depends on the size and shape of the airport) around the airport is a Take-off restricted zone, inside of which take off is prevented.
- From R1 mile to R1 + 1 mile around the airport the flight altitude is limited to a 15 degree inclination. Starting at 65 feet (20 meters) from the edge of airport and radiating outward. The flight altitude is limited to 1640 feet (500 meters) at R1+1 mile
- When the aircraft enters within 320 feet (100 meters) of No-Fly Zones, a warning message will appear on the DJI GO app.
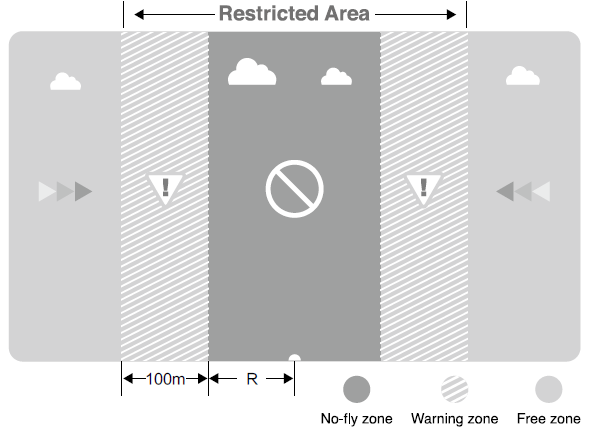
Restricted Area
- Restricted Areas does not have flight altitude restrictions.
- R miles around the designated restriction area is a Take-off Restricted area. Aircraft cannot take off within this zone. The value of R varies based on the definition of the restricted areas.
- A “warning zone” has been set around the Restricted Area. When the aircraft approaches within 0.062 miles (100 m) of this zone, a warning message will appear on the DJI GO app.
GPS Signal Strong | |||
Zone |
Restriction |
DJI GO app Prompt | Aircraft Status Indicator |
No-fly Zone 
|
Motors willnot start. | Warning: You are in a No-fly zone. Take off prohibited. |
Red flashing |
If the aircraft enters the restricted area in A-mode, but isswitched to P-mode, the aircraftwill automatically descend, land, and stop its motors. | Warning: You are in a no-fly zone. Automatic landing has begun. | ||
Restricted- altitude flight zone 
| If the aircraft enters the restricted area in A-mode, but is switched to P-mode, it willdescend to an appropriate altitude and hover 15 feet below the altitude limit. | R1: Warning: You are in a restricted zone. Descending to safe altitude. R2: Warning: You are ina restricted zone. Maximum flight altitude is restricted to between 20m and 500m. Fly cautiously. | |
Warning zone  | Noflight restriction applies,but there will be a warning . | Warning: You are approaching a restricted zone, Fly cautiously. | |
Free zone  |
No restrictions. |
None. |
None. |
NOTE: Semi-automatic descent: All stick commands are available except the throttle stick command during the descent and landing process. Motors will stop automatically after landing.
WARNING: When flying in a safety zone, the aircraft's status indicator will blink red rapidly and continue for 3 seconds, then switch to indicate current flying status and continue for 5 seconds at which point it will switch back to blinking red. For safety reasons, please do not fly close to airports, highways, railway stations, railway lines, city centers, or other sensitive areas. Fly the aircraft only within your line of sight.
Preflight Checklist
- Remote controller, Intelligent Flight Battery, and mobile device are fully charged.
- Propellers are mounted correctly and firmly.
- Micro SD card has been inserted, if necessary.
- Gimbal is functioning normally.
- Motors can start and are functioning normally.
- The DJI GO app is successfully connected to the aircraft.
Calibrating the Compass
Only calibrate the compass when the DJI GO app or the status indicator prompt you to do so. Observe the following rules when calibrating your compass:
TIPS
- DO NOT calibrate your compass where there is a chance of strong magnetic interference, such as magnetite, parking structures, and steel reinforcements underground.
- DO NOT carry ferromagnetic materials with you during calibration such as cellular phones. The DJI GO app will prompt you to resolve the compass issue if the compass is affected by strong interference after calibration is complete. Follow the prompted instructions to resolve the compass issue.
Calibration Procedures
Choose an open area to carry out the following procedures.
- Ensure that the compass is calibrated. If you did not calibrate the compass as part of your pre-flight preparations, or if you have moved to a new location since the last calibration, tap the Aircraft Status Bar in the app and select “Calibrate”, then follow the on-screen instructions.
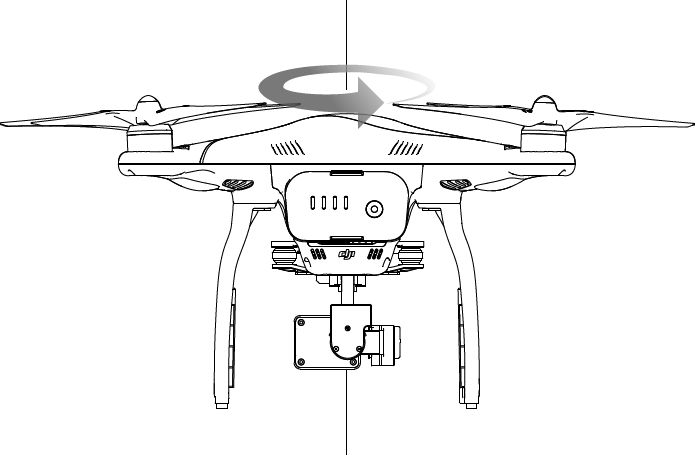
Hold the aircraft horizontally and rotate 360 degrees. The Aircraft Status Indicators will display a solid green light.
Hold the aircraft vertically, with nose pointing downward, and rotate it 360 degrees around the center axis. Recalibrate the compass if the Aircraft Status Indicator glows solid red.
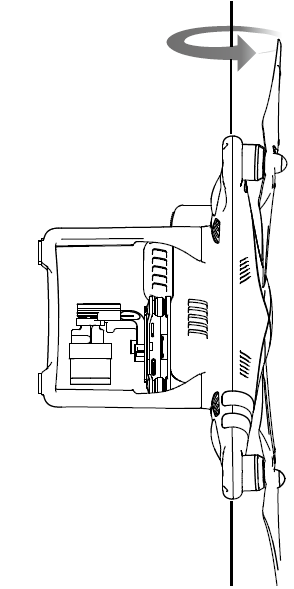
WARNING: If the Aircraft Status Indicator blinks red and yellow after the calibration procedure, move your aircraft to a different location and try again.
TIPS: Launch the DJI GO app and follow the on-screen instructions to calibrate the compass. DO NOT calibrate the compass near metal objects such as a metal bridge, cars, scaffolding.
When to Recalibrate
- When compass data is abnormal and the Aircraft Status Indicator is blinking green and yellow.
- When flying in a new location or in a location that is different from the most recent flight.
- When the mechanical or physical structure of the Phantom 3 Professional has been changed.
- When severe drifting occurs in flight, i.e. Phantom 3 Professional does not fly in straight line.
Auto Takeoff and Auto Landing
Auto Takeoff
Use auto takeoff only if the Aircraft Status Indicators are blinking green. Follow the steps below to use the auto takeoff feature:
- Launch the DJI GO app, and enter the “Camera” page.
- Ensure the aircraft is in P- mode.
- Complete all steps on the pre-flight checklist.
- Tap“
 ”, and confirm that conditions are safe for flight. Slide the icon to confirm and takeoff.
 - The aircraft takes off and hovers at (1.2 meters) above ground.
WARNING: The aircraft Status Indicator blinks rapidly when it is using the Vision Position System for stabilization. The aircraft will automatically hover below 3 meters. It is recommended to wait until there is sufficient GPS lock before using the Auto Take-off feature.
Auto-Landing
Use auto-landing only if the Aircraft Status Indicators are blinking green. Follow the steps below to use the auto-landing feature:
- Ensure the aircraft is in P- mode.
- Check the landing area condition before tapping “
 ”, to begin landing. Then follow the on-screen instructions.
Starting/Stopping the Motors
Starting the Motors
A Combination Stick Command (CSC) is used to start the motors. Push both sticks to the bottom inner or outer corners to start the motors. Once the motors have started spinning, release both sticks simultaneously.
Stopping the Motors
There are two methods to stop the motors.
- Method 1: When Phantom 3 Professional has landed, push the throttle down , then conduct the same CSC that was used to start the motors, as described above . Motors will stop immediately. Release both sticks once motors stop.
- Method 2: When the aircraft has landed, push and hold the throttle down. The motors will stop after three seconds.

WARNING: Do not perform a CSC when the aircraft is in midair, otherwise the motors will suddently stop.
Flight Test
Takeoff/Landing Procedures
- Place the aircraft in an open, flat area with the battery level indicators facing towards you.
- Turn on the remote controller and your mobile device, then turn on the Intelligent Flight Battery.
- Launch the DJI GO app and enter the Camera page.
- Wait until the Aircraft Indicators blink green. This means the Home Point is recorded and it is now safe to fly. If they flash yellow, the Home Point has not been recorded.
- Push the throttle up slowly to take off or use Auto Takeoff.
- Shoot photos and videos using the DJI GO app.
- To land, hover over a level surface and gently pull down on the throttle to descend.
- After landing, execute the CSC command or hold the throttle at its lowest position until the motors stop.
- Turn off the Intelligent Flight Battery first, then the Remote Controller.
WARNING: When the Aircraft Status Indicators blink yellow rapidly during flight, the aircraft has entered Failsafe mode. A low battery level warning is indicated by the Aircraft Status Indicators blinking red slowly or rapidly during flight. Watch our video tutorials for more flight information.
Video Suggestions and Tips
- Go through the full pre-flight checklist before each flight.
- Select the desired gimbal operation mode in the DJI GO app.
- Only shoot video when flying in P-mode
- Always fly in good weather and avoid flying in rain or heavy wind.
- Choose the camera settings that suit your needs. Settings include photo format and exposure compensation.
- Perform flight tests to establish flight routes and preview scenes.
- Push the control sticks gently to keep the aircraft’s movement smooth and stable.
Troubleshooting
Common Problems and Solutions
- Drone not taking off: Make sure the propellers are securely attached and that the battery is fully charged.
- Camera not working: Check the camera connection and make sure the camera is turned on.
- Remote control not connecting: Make sure the remote control is turned on and that it is within range of the drone.
- Flight stability issues: Make sure the drone is in a clear and open area, and that it is not obstructed by tall buildings or other objects.
Pros & Cons
Pros
- 4K UHD camera with 3-axis gimbal for smooth and stable footage
- Long-range remote control with real-time video transmission
- Precise GPS and GLONASS positioning system
- Vision Positioning system for stable indoor hovering
- Up to 23 minutes flight time
Cons
- Price is on the higher end
- Cannot withstand strong winds
- Assembly required
- No collision avoidance sensors
Customer Reviews
Customers love the DJI Phantom 3 Professional Quadcopter Drone for its 4K UHD camera and long-range remote control. The drone is easy to use and has a stable flight. However, some customers have reported that the drone has a short battery life and that it is not suitable for use in windy conditions. Some customers have also reported that the assembly process is difficult.
Most Common Complaints
The most common complaints about the DJI Phantom 3 Professional Quadcopter Drone are the short battery life and the difficulty in assembling the drone. Some customers have also reported that the drone is not suitable for use in windy conditions and that the remote control is not user-friendly.
Faqs
What is the maximum range of the remote control?
How long does the battery last?
Does the drone have a 4K camera?
Can the drone be used indoors?
What is the weight of the drone?
How long does it take to charge the battery?
What is the top speed of the drone?
Leave a Comment