How to Operate: Dji v1.0 RC Remote Controller User Manual
Content
Introducing the DJI V1.0 RC Remote Controller
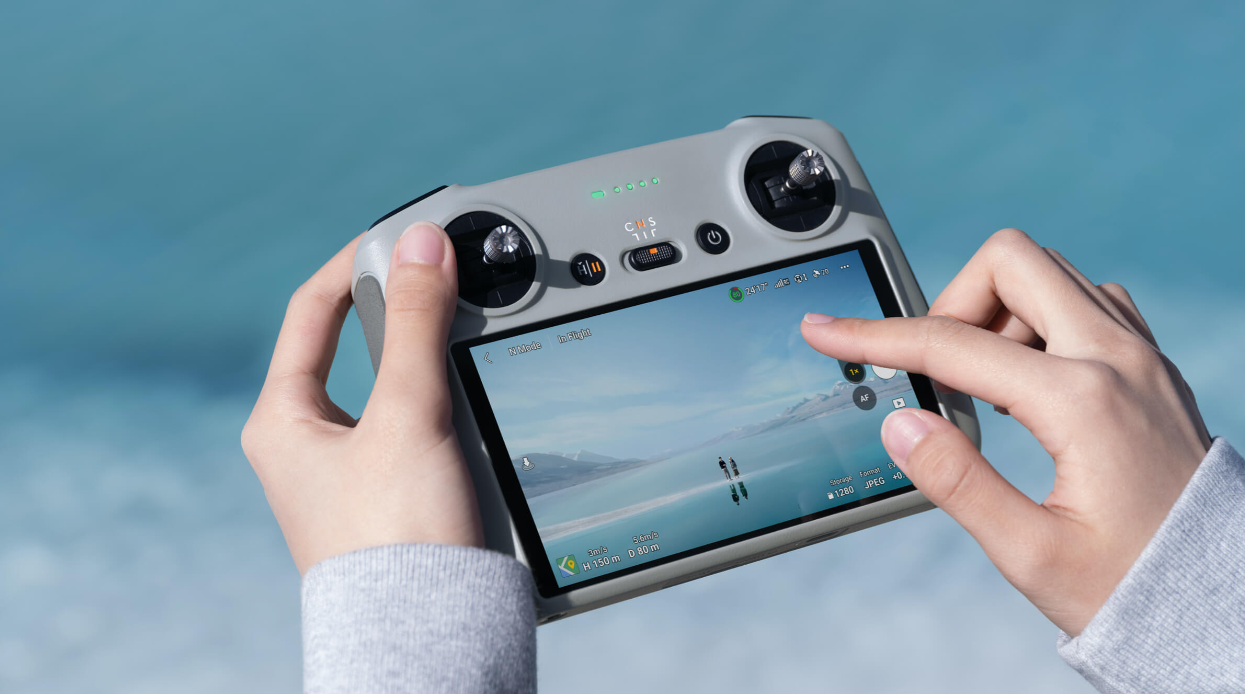
The DJI RC Remote Controller is the perfect companion for your DJI drone, designed to provide an intuitive and immersive flying experience. This remote controller is compatible with various DJI drone models and offers an estimated price range of $200-$300, making it a valuable investment for drone enthusiasts. Although an official launching date has not been announced, we anticipate its release in the near future.
- Touch Screen: The built-in 5.5-in bright 700 cd/m2 screen boasts a resolution of 1920×1080 pixels.
- Multiple Connection Options: The Android operating system comes with a variety of functions, such as Bluetooth and GNSS. Users can connect to the internet via Wi-Fi.
- Extended Storage Capability: The remote controller supports a microSD card to cache photos and videos, enabling users to preview the photos and videos on the remote controller. [4]
- Reliable in More Environments: The remote controller can operate normally within a wide temperature range from -10° to 40° C (14° to 104° F).
- When used with different aircraft hardware configurations, the remote controller will automatically select the corresponding firmware version to update and support the following transmission technologies enabled by the hardware performance of the linked aircraft models:
- DJI Mini 3 Pro: O3
- DJI Mavic 3: O3+
- The maximum transmission distance (FCC) was tested in a wide-open area with no electromagnetic interference at an altitude of approximately 400 ft (120m).
- The maximum transmission distance (FCC) is 15 km when linked with DJI Mavic 3.
- The maximum transmission distance (FCC) is 12 km when linked with DJI Mini 3 Pro.
- The maximum operating time was tested in a lab environment and is for reference only.
- It is recommended to insert a microSD card.
Detailed Specifications of DJI V1.0 RC
The DJI RC Remote Controller boasts several key features, including
- Compatibility with various DJI drone models
- Built-in OcuSync 2.0 transmission system
- High-resolution touchscreen display
- Customizable buttons and controls
- Up to 8 km (5 mi) transmission range
- Integrated GPS and compass
- Anti-interference technology
- Rechargeable battery with up to 6 hours of operation
- Lightweight and ergonomic design
Product Description of DJI V1.0 RC Remote Controller
The V1.0 RC Remote Controller is a powerful and user-friendly remote control unit, offers seamless integration with your DJI V1.0 RC Remote Controller drone. Its OcuSync 2.0 transmission system ensures stable and reliable connectivity, while the high-resolution touchscreen display provides real-time flight data, camera settings, and video transmission. Designed with customizable buttons and controls, the DJI V1.0 RC Remote Controller allows you to tailor your flying experience to your preferences and needs. Its built-in GPS and compass provide accurate location data, while anti-interference technology minimizes signal loss and disruptions.
Overview of DJI V1.0 RC
- Control Sticks
Use the control sticks to control the movement of the aircraft. The control sticks are removable and easy to store. Set the flight control mode in DJI Fly. - Status LED
Indicates the status of the remote controller. - Battery Level LEDs
Displays the current battery level of the remote controller. - Flight Pause/Return to Home (RTH) Button
Press once to make the aircraft brake and hover in place (only when GNSS or Vision Systems are available). Press and hold to initiate RTH. Press again to cancel RTH. - Flight Mode Switch
Switch between Cine, Normal, and Sport mode. Power Button
Press once to check the current battery level. Press, and then press and hold to power the remote controller on or off. When the remote controller is powered on, press once to turn the touchscreen on or off.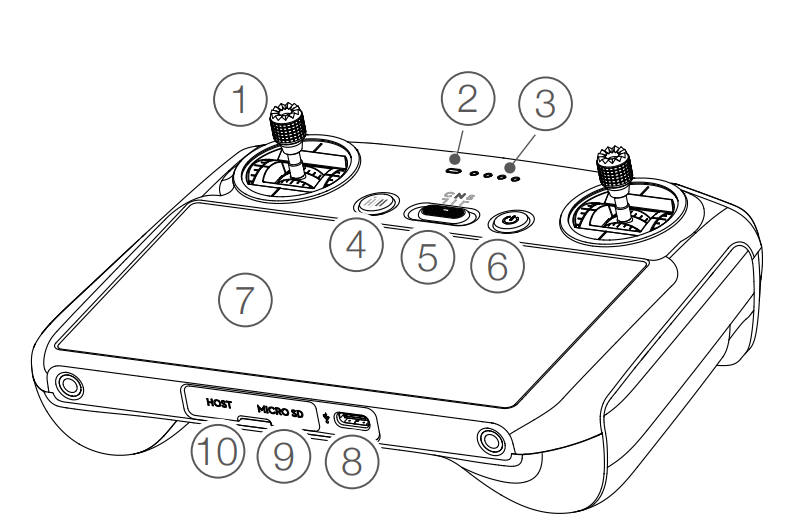
- Touchscreen
Touch the screen to operate the remote controller. Note that the touchscreen is not waterproof. Operate with caution. - USB-C Port
For charging and connecting the remote controller to your computer. - microSD Card Slot
For inserting a microSD card. - Host Port (USB-C)
For connecting the DJI Cellular Module which needs to be purchased separately.
To be supported later through firmware updates. - Gimbal Dial
Controls the tilt of the camera. - Record Button
Press once to start or stop recording. - Camera Control Dial
For zoom control. - Focus/Shutter Button
Press halfway down on the button to auto-focus and press all the way down to take a photo. Speaker
Outputs sound.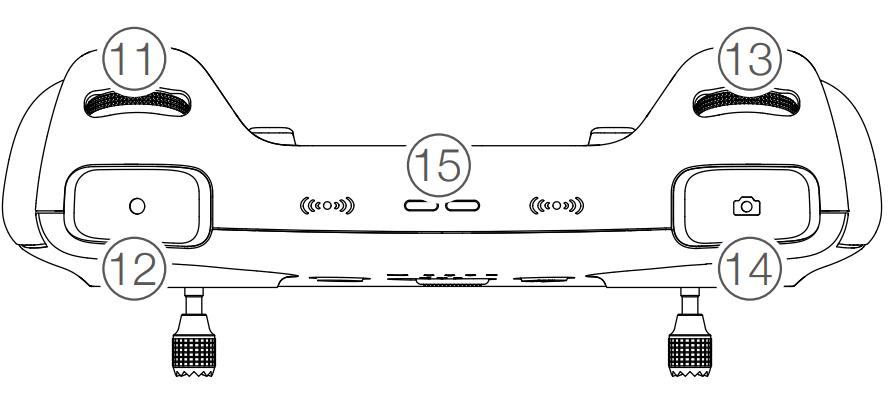
- Control Sticks Storage Slot
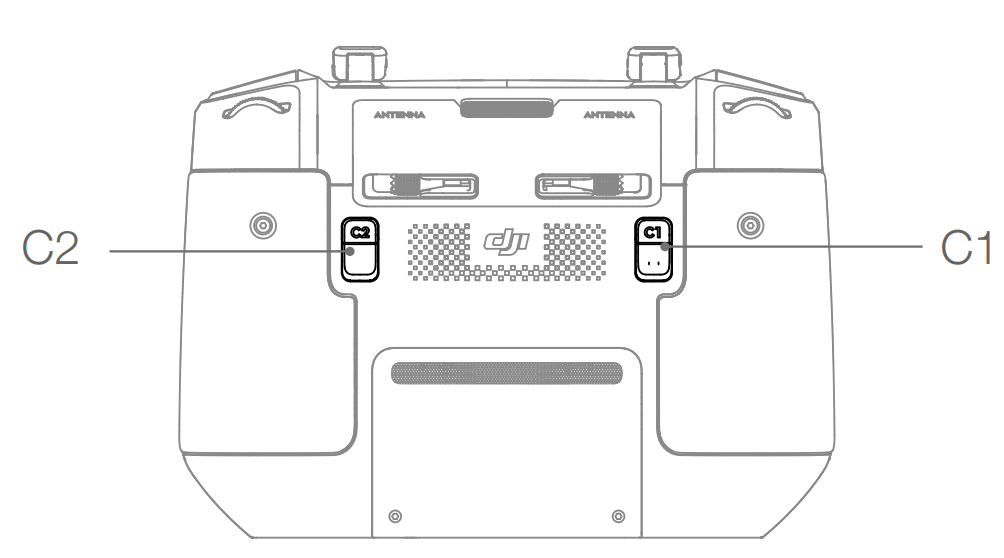
For storing the control sticks. - Customizable C2 Button
Switch between recentering the gimbal and pointing the gimbal downward. The function can be set in DJI Fly. Customizable C1 Button
Switch between recentering the gimbal and pointing the gimbal downward. The function can be set in DJI Fly.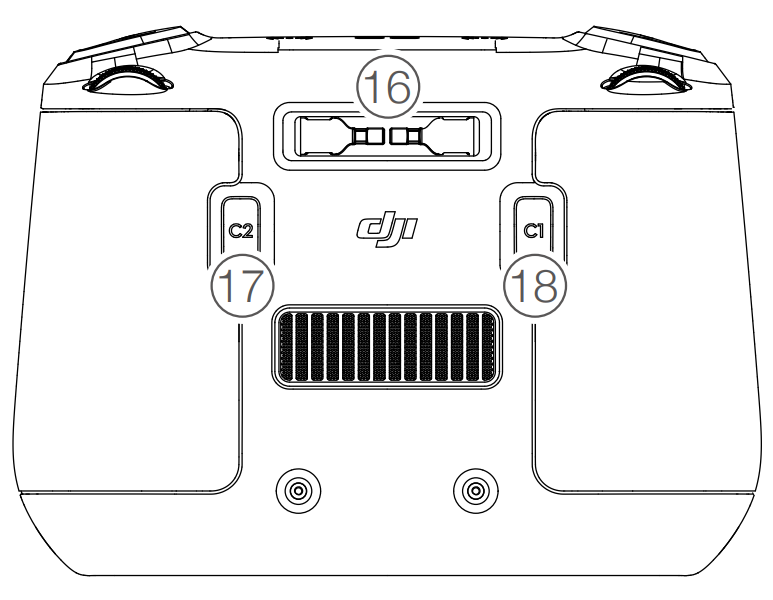
Setup Guide of DJI V1.0 RC
To operate the DJI V1.0 RC , follow these steps
- Charge the remote controller's battery fully before initial use.
- Power on the remote controller and your DJI drone.
- Press and hold the 'Link' button on the remote controller and the 'Power' button on the drone simultaneously to initiate pairing.
- Once the pairing is successful, the LED indicators on both devices will become solid.
- Customize the buttons and controls on the remote controller according to your preference.
Preparing the Remote Controller
Charging the Battery
The built-in battery is placed in hibernation mode before delivery. It must be charged before using for the first time. Use a USB-C cable to connect a USB charger to the USB-C port of the remote controller. The battery can be fully charged in about 1 hour and 30 minutes with a maximum charging power of 15 W (5V/3A).
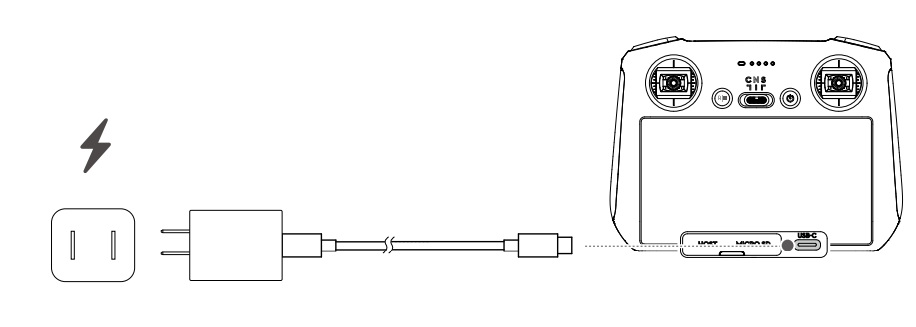
- It is recommended to use a USB Power Delivery charger.
- Recharge the battery at least every three months to prevent over-discharging. The battery depletes when stored for an extended period.
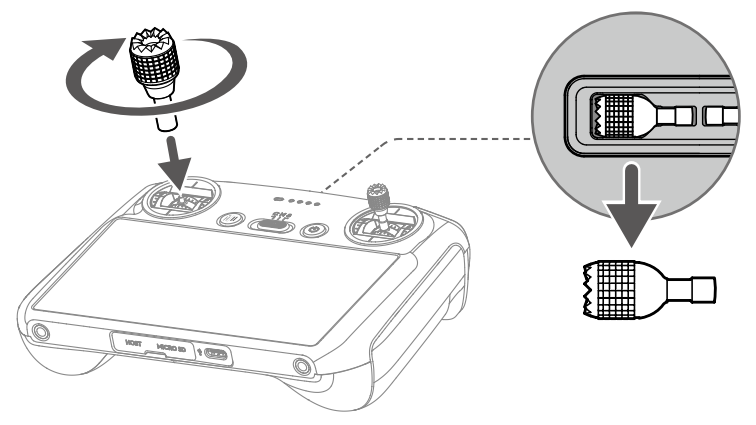
Mounting
Remove the control sticks from the storage slots on the remote controller and screw them into place. Make sure the control sticks are firmly mounted.
Activating the Remote Controller
 The remote controller needs to be activated before using for the first time. Make sure the remote controller can connect to the internet during activation. Follow the steps below to activate the remote controller.
- Power on the remote controller. Select the language and tap “Next”. Carefully read the terms of use and privacy policy and tap “Agree”. After confirming, set the country/region.
- Connect the remote controller to the internet via Wi-Fi. After connecting, tap “Next” to continue and select the time zone, date, and time.
- Log in with your DJI account. If you do not have an account, create a DJI account and log in.
- Tap “Activate” on the activation page.
- After activating, select if you would like to join the improvement project. The project helps to improve the user experience by sending diagnostic and usage data automatically every day. No personal data will be collected by DJI.
Check the internet connection if the activation fails. If the internet connection is normal, please try to activate the remote controller again. Contact DJI Support if the issue persists.
Remote Controller Operations
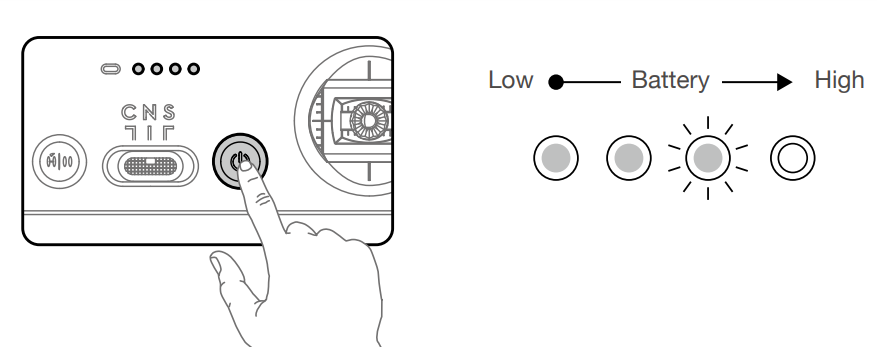
Checking the Battery Level
Press the power button once to check the current battery level.
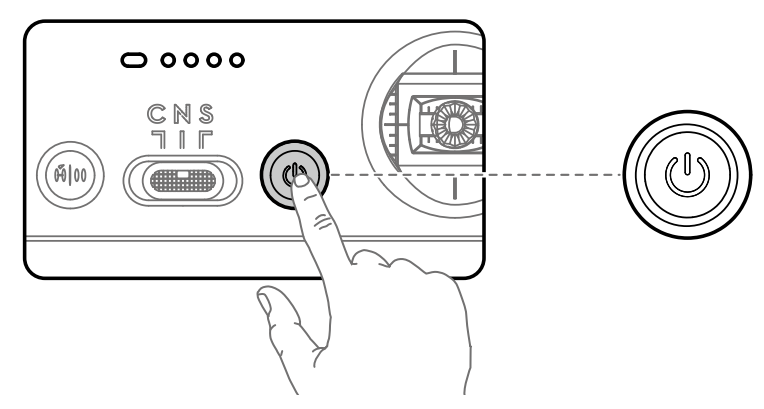
Powering On/Off
Press and then press again and hold to power the remote controller on or off.
Linking the Remote Controller
The remote controller is already linked to the aircraft when purchased together as a combo. Otherwise, follow the steps below to link the remote controller and the aircraft after activation.
- Power on the aircraft and the remote controller.
- Launch DJI Fly.
- In camera view
 , tap and select Control and then Pair to Aircraft (Link).
 - Press and hold the power button on the aircraft for more than four seconds. The aircraft will beep once when it is ready to link. After the linking is successful, the aircraft will beep twice and the battery level LEDs of the remote controller will appear on and solid.
- Make sure the remote controller is within 0.5 m of the aircraft during the linking.
- The remote controller will automatically unlink from an aircraft if a new remote controller is linked to the same aircraft.
- Turn off Bluetooth and Wi-Fi of the remote controller for optimal video transmission.
- Fully charge the remote controller before each flight. The remote controller sounds an alert when the battery level is low.
- If the remote controller is powered on and not in use for five minutes, an alert will sound. After six minutes, the remote controller automatically powers off. Move the control sticks or press any button to cancel the alert.
- Fully charge the battery at least once every three months to maintain the battery’s health.
Controlling the Aircraft
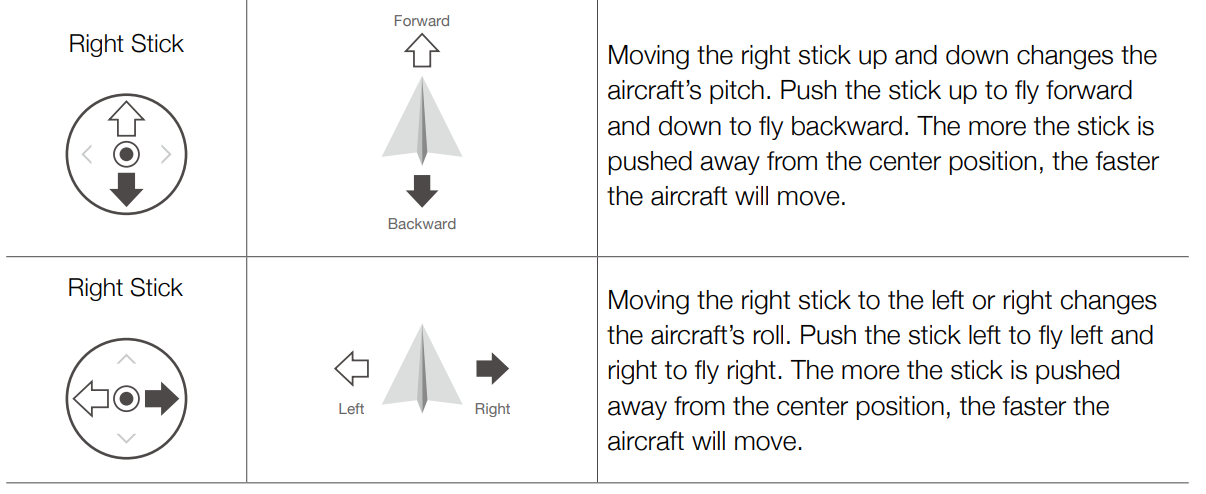
The control sticks control the aircraft’s orientation (pan), forward/backward movement (pitch), altitude (throttle), and left/right movement (roll). The control stick mode determines the function of each control stick movement. Three preprogrammed modes (Mode 1, Mode 2, and Mode 3) are available and custom modes can be configured in DJI Fly.
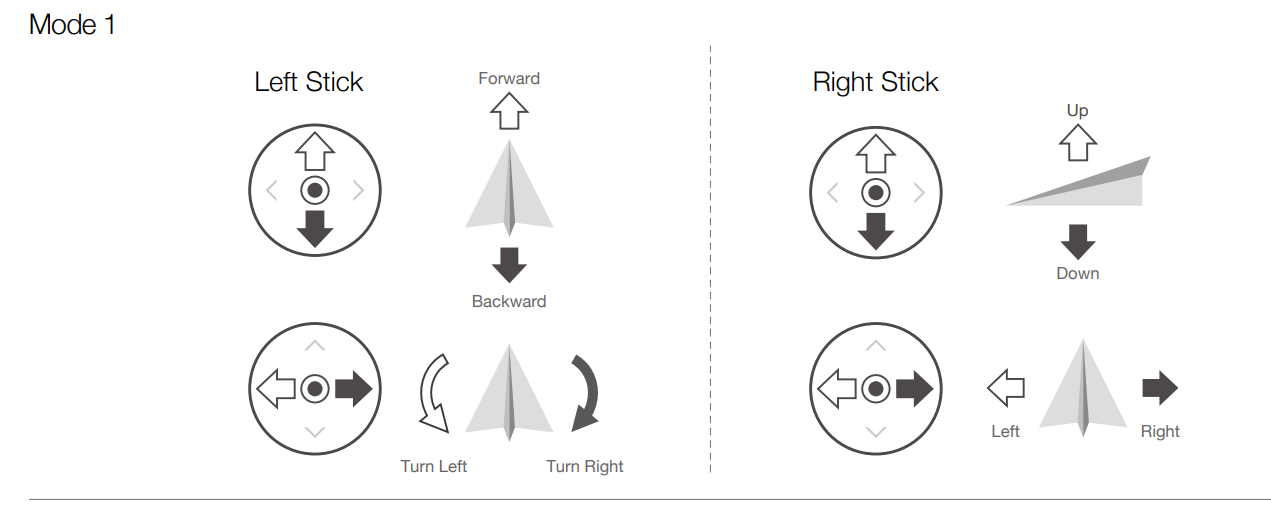
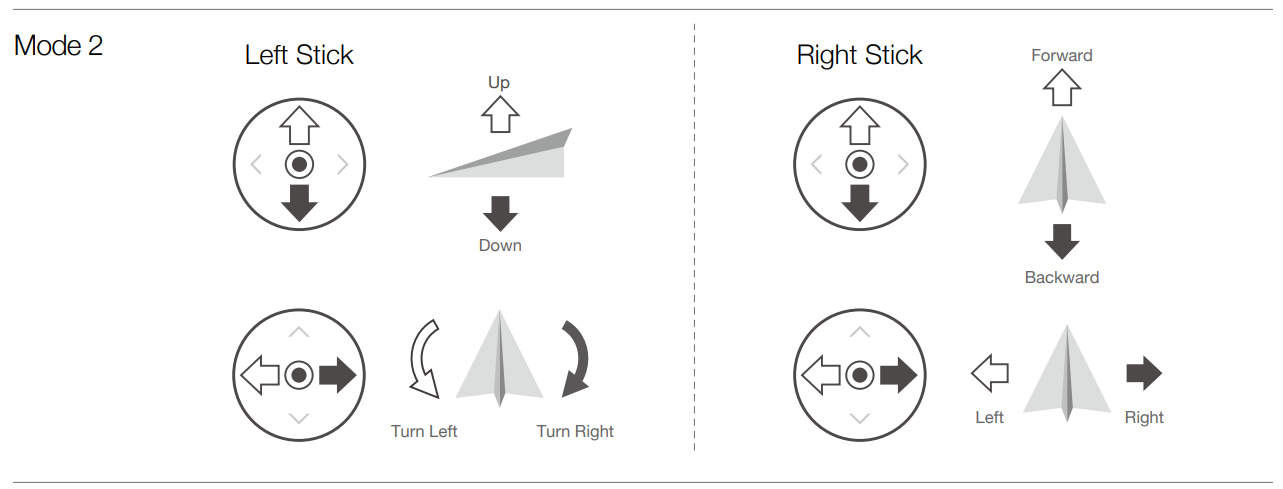
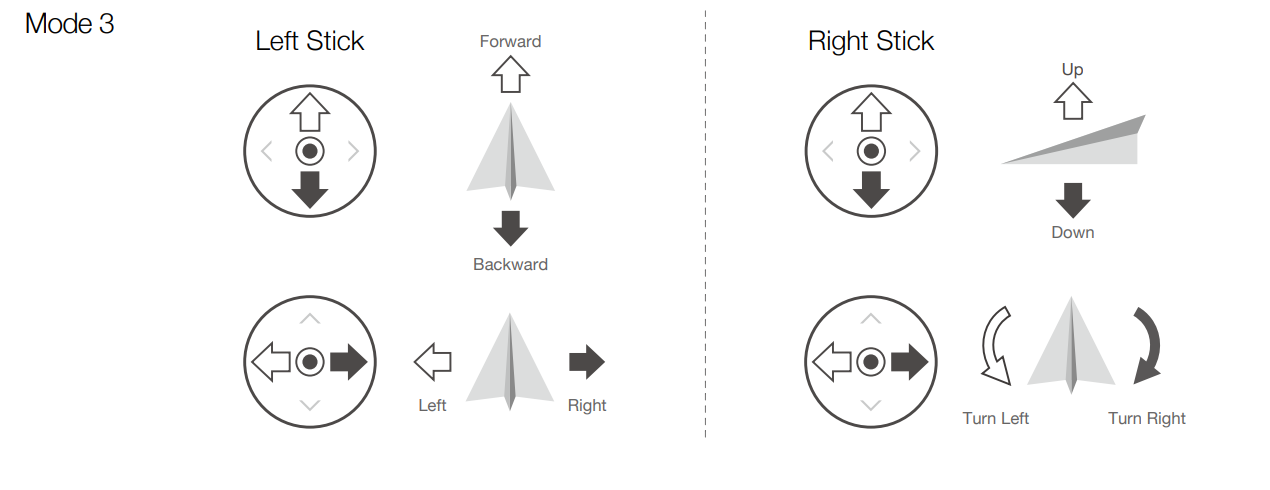
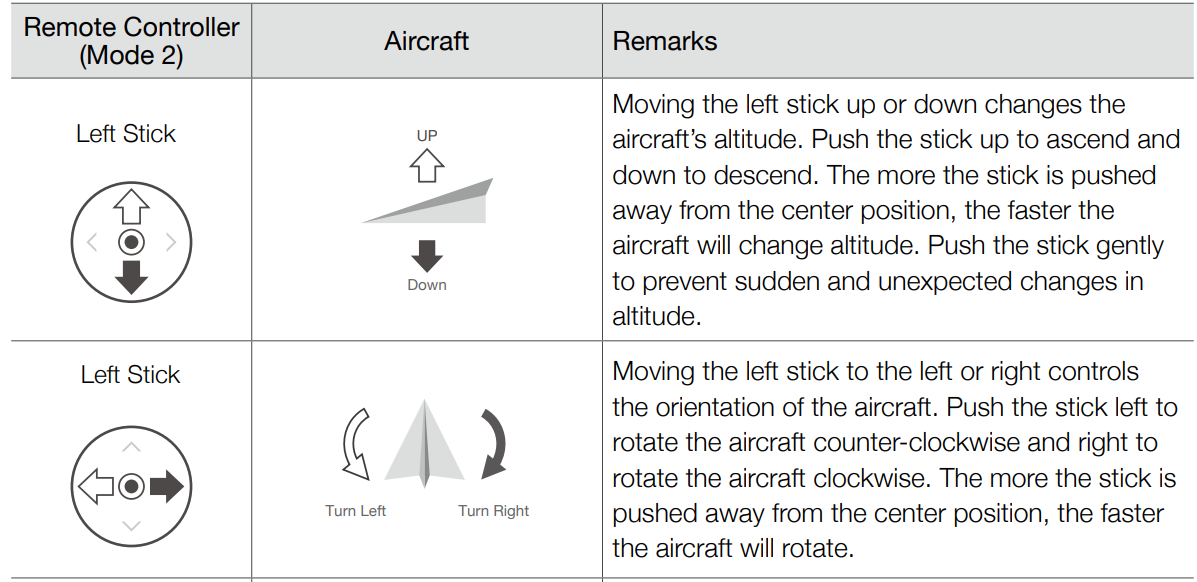
The default control mode of the remote controller is Mode 2. In this manual, Mode 2 is used as an example to illustrate how to use the control sticks.
- Stick Neutral/Center Point: Control sticks are in the center.
- Moving the control stick: The control stick is pushed away from the center position.
The figure below explains how to use each control stick. Mode 2 has been used as an example.
- Keep the remote controller away from magnetic materials to avoid it being affected by magnetic interference.
- To avoid damage, it is recommended that the control sticks are removed and stored in the storage slot on the remote controller during transportation or storage.
Flight Mode Switch
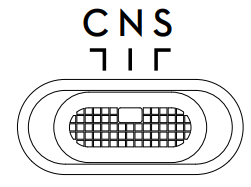
Toggle the switch to select the desired flight mode.
| Position | Flight Mode |
|---|---|
| C | Cine Mode |
| N | Normal Mode |
| S | Sport Mode |
- Normal Mode: The aircraft utilizes GNSS and the Vision Systems and Infrared Sensing System to locate and stabilize itself. When the GNSS signal is strong, the aircraft uses GNSS to locate and stabilize itself. When the GNSS is weak but the lighting and other environment conditions are sufficient, the aircraft uses the vision systems to locate and stabilize itself.
- Sport Mode: In Sport Mode, the aircraft uses GNSS for positioning and the aircraft responses are optimized for agility and speed making it more responsive to control stick movements. Note that obstacle sensing is disabled in Sport Mode.
- Cine Mode: Cine mode is based on Normal mode and the flight speed is limited, making the aircraft more stable during shooting.
Refer to the flight modes section in the aircraft’s user manual for more information about flight mode features for different aircraft types.
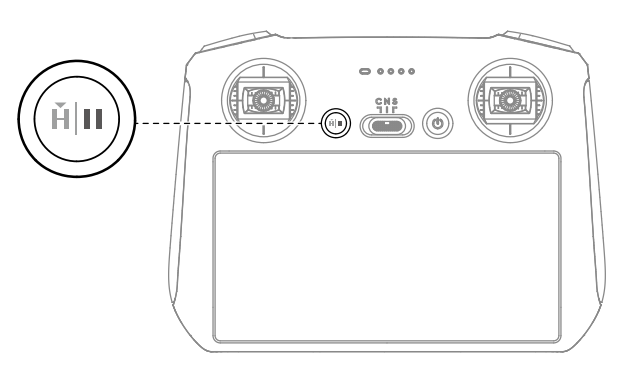
Flight Pause/RTH Button
Press once to make the aircraft brake and hover in place. Press and hold the button until the remote controller beeps to start RTH, the aircraft will return to the last recorded Home Point. Press this button again to cancel RTH and to regain control of the aircraft.
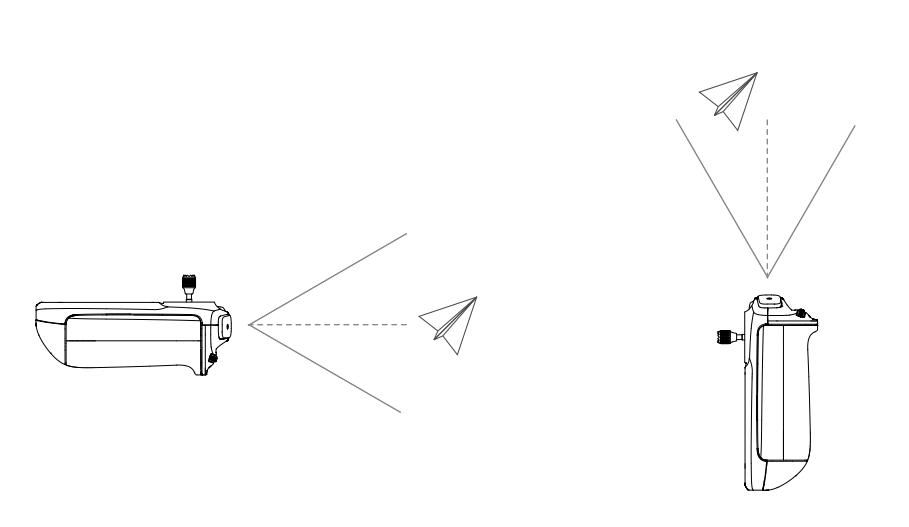
Optimal Transmission Zone
The signal between the aircraft and the remote controller is most reliable when the remote controller is positioned towards the aircraft as depicted below.
- DO NOT use other wireless devices operating at the same frequency as the remote controller. Otherwise, the remote controller will experience interference.
- A prompt will be displayed in DJI Fly if the transmission signal is weak during flight. Adjust the remote controller orientation to make sure that the aircraft is in the optimal transmission range.
Controlling the Gimbal and Camera
The remote controller can be used to control the gimbal and camera. The photos and videos are stored in the aircraft and can be previewed on the remote controller. The QuickTransfer function allows the mobile device to connect to the aircraft directly via Wi-Fi. Users can download photos and videos to the mobile device without using the remote controller.
- Focus/Shutter Button: Press halfway down to auto-focus and press all the way down to take a photo. Record Button: Press once to start or stop recording.
- Camera Control Dial: Adjust the zoom.
- Gimbal Dial: Control the tilt of the gimbal.
Customizable Buttons
The customizable buttons include C1 and C2. Go to System Settings in DJI Fly and select Control to set the functions of the customizable C1 and C2 buttons.
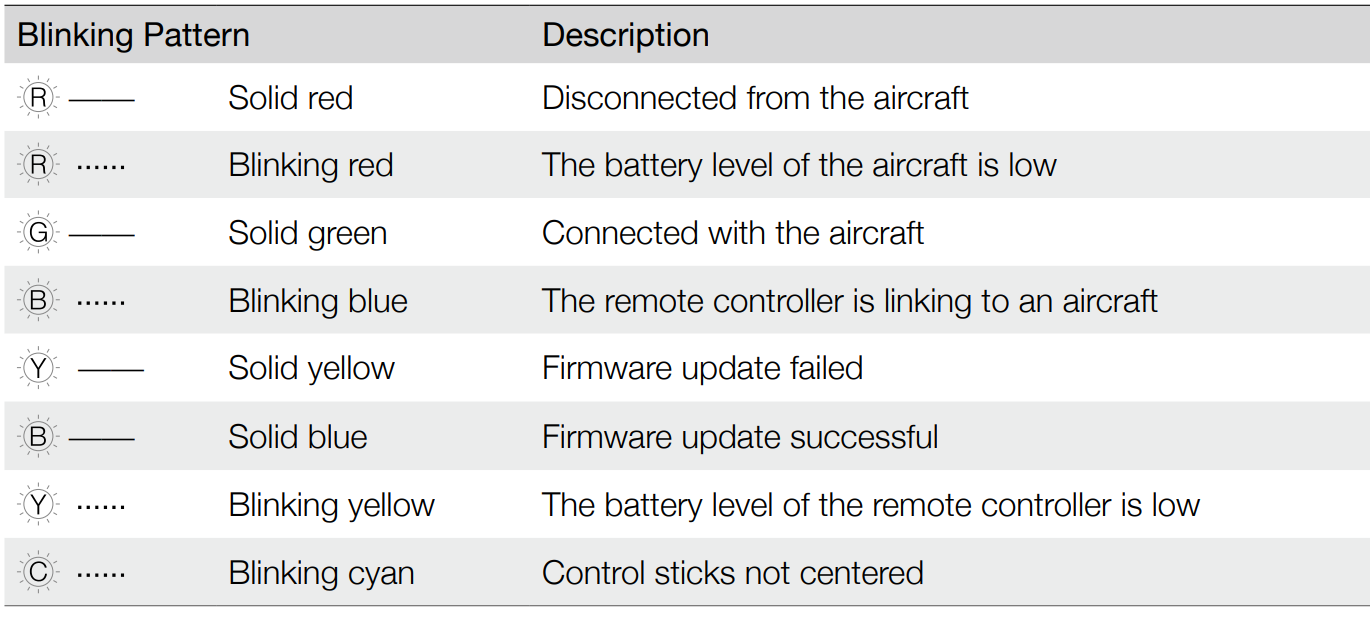
Status LED and Battery Level LEDs Description
Status LED
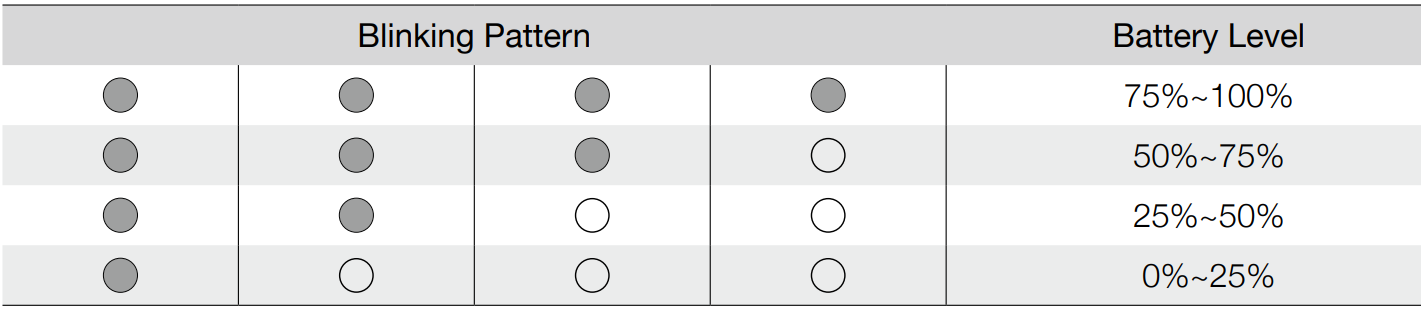
Battery Levels LEDs
Remote Controller Alert
The remote controller beeps when there is an error or warning. Pay attention when prompts appear on the touchscreen or in DJI Fly. Slide down from the top and select Mute to disable all alerts, or slide the volume bar to 0 to disable some alerts.
The remote controller sounds an alert during RTH. The RTH alert cannot be cancelled. The remote controller sounds an alert when the battery level of the remote controller is low (6% to 10%). A low battery level alert can be canceled by pressing the power button. The critical low battery level alert, which is triggered when the battery level is less than 5%, cannot be cancelled.
Touchscreen
Home
The remote controller is pre-installed with the DJI Fly app. Power on the remote controller to enter the home screen of DJI Fly.
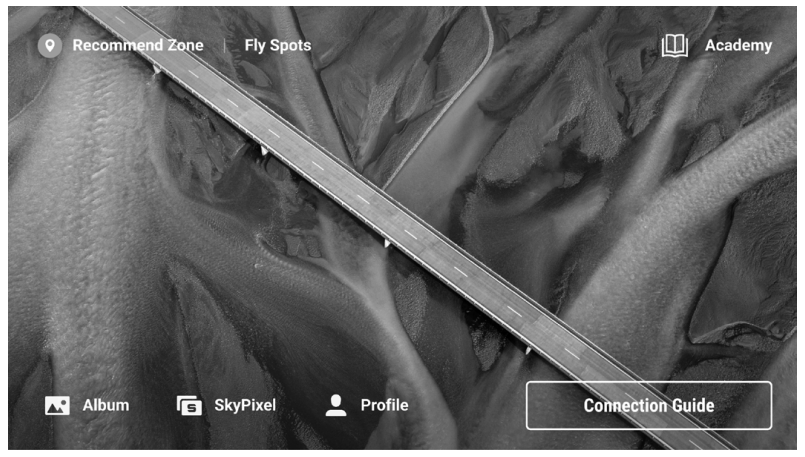
- Fly Spots
View or share suitable flight and shooting locations nearby, learn more about GEO Zones, and preview aerial photos of different locations taken by other users. - Academy
Tap the icon in the top right corner to enter Academy and view product tutorials, flight tips, flight safety notices, and manual documents. - Album
View photos and videos from the aircraft and DJI Fly. - SkyPixel
Enter SkyPixel to view videos and photos shared by users. - Profile
View account information, flight records; visit the DJI forum, online store; access the Find My Drone feature, and other settings such as firmware updates, camera view, cached data, account privacy, and language.
Since the DJI RC is compatible with multiple aircraft models and the interface of DJI Fly may vary depending on the aircraft model, refer to the DJI Fly app section in the user manual of the relevant aircraft for more information.
Operations
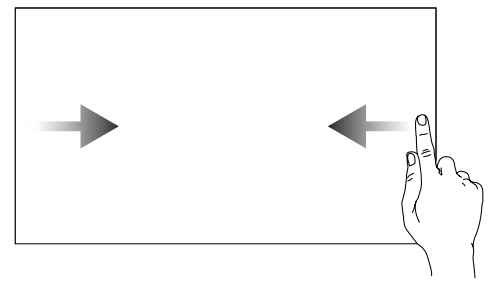
Slide from the left or right to the center of the screen to return to the previous screen.
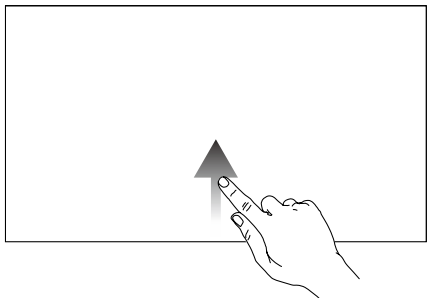
Slide up from the bottom of the screen to return to DJI Fly.
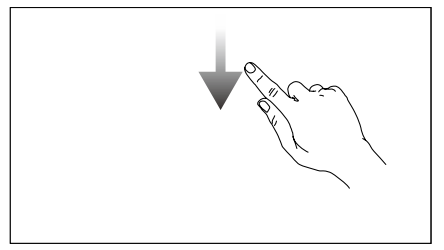
Slide down from the top of the screen to open the status bar when in DJI Fly. The status bar displays the time, Wi-Fi signal, battery level of the remote controller, etc.
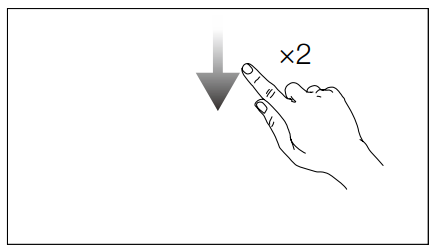
Slide down twice from the top of the screen to open Quick Settings when in DJI Fly.
Quick Settings
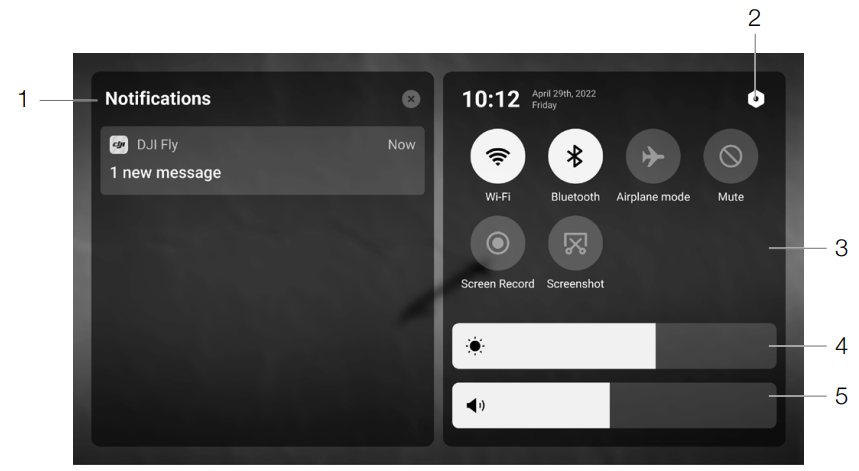
- Notifications
Tap to check system notifications. - System Settings
Tap to access system settings and configure the Bluetooth, volume, network, etc. You can also view the Guide to learn more about the controls and status LEDs. - Shortcuts
 : Tap to enable or disable Wi-Fi. Hold to enter settings and then connect to or add a Wi-Fi network.
  : Tap to enable or disable Bluetooth. Hold to enter settings and connect with nearby Bluetooth devices.
  : Tap to enable Airplane mode. Wi-Fi and Bluetooth will be disabled.
  : Tap to turn off system notifications and disable all alerts.
  : Tap to start recording the screen*. The function will be available only after a microSD card is inserted into the microSD slot on the remote controller.
 : Tap to take a screenshot. The function will be available only after a microSD card is inserted into the microSD slot on the remote controller.
- Adjusting Brightness
Slide the bar to adjust the screen brightness. - Adjusting Volume
Slide the bar to adjust the volume.
* When the remote controller is linked with DJI Mavic 3, the frame rate of the transmission image will drop to 30fps during the recording.
Calibrating the Compass
The compass may need to be calibrated after the remote controller is used in areas with electromagnetic interference. Follow the steps below to calibrate your remote controller.
- Power on the remote controller, and enter Quick Settings.
- Tap enter
 system settings, scroll down and tap Compass.
 - Follow the on-screen instructions to calibrate the compass.
- A prompt will be displayed when the calibration is successful.
Pros & Cons of DJI V1.0 RC Remote Controller
Pros
- Compatible with various DJI drone models
- Built-in OcuSync 2.0 transmission system
- Customizable buttons and controls
- Long transmission range
- Integrated GPS and compass
Cons
- Potentially expensive for some users
- Not compatible with non-DJI drones
- The touchscreen display may be hard to see in direct sunlight
Faqs
How can I connect my drone to my DJI V1.0 RC Remote Controller?
Is it possible to use the DJI V1.0 RC Remote Controller with any DJI drone?
What is the DJI V1.0 RC Remote Controller's effective range?
How can I upgrade my DJI V1.0 RC Remote Controller's firmware?
Can I personalize the DJI V1.0 RC Remote Controller's controls?
How much time does the DJI V1.0 RC Remote Controller's battery last?
Are third-party apps supported by the DJI V1.0 RC Remote Controller?
What gadgets are compatible with the DJI V1.0 RC Remote Controller?
How should my DJI V1.0 RC Remote Controller be maintained and cared for?
What kind of warranty does the DJI V1.0 RC Remote Controller come with?
Leave a Comment