Durablow SH3001-RH Gas Fireplace Remote Control Usage Guide
Content

Introduction
The Durablow SH3001-RH Gas Stove Remote Control is a user-friendly and adaptable accessory that will enhance the functionality and convenience of your gas stove. This remote control's programmable thermostat allows you to effortlessly adjust the temperature as well as height of the flame, thereby establishing the ideal ambiance and warmth, with the simple press of a button. This model, SH3001-RH, is designed with an illuminated LCD screen that is easily visible in low light conditions. Additionally, its compact, ergonomic design is comfortable to hold. The Durablow SH3001-RH is a dependable and efficient method of operating a contemporary fireplace, whether you are seeking to maintain a comfortable environment or precisely regulate the temperature.
Detailed Specifications
The Durablow SH3001-RH Gas Fireplace Remote Control has the following key features:
- Operates on a frequency of 20.8 - 21.2 MHz
- Range of up to 30 feet
- LED display with adjustable brightness
- Battery operated (requires 2 AA batteries, not included)
- Dimensions: 5.5 x 2.2 x 1.2 inches
- Weight: 4.8 ounces
- Compatible with most gas fireplaces
Description
With the sturdy and high-quality Durablow SH3001-RH Gas Fireplace Remote Control, it's easier than ever to use a gas fireplace. It's easy to change the flame height, turn on and off the fireplace, and set the temperature with the remote control's clear buttons. The LED screen shows the temperature and flame setting, and the brightness can be changed so that it's always easy to see. The tiny remote control runs on batteries, so it's easy to store and doesn't need an outlet.
WARNING, REMINDER & LEGAL DISCLAIMER (½)
- Read all sections and original manufacturer manual for safety installation before any actions. If you can NOT read or understand these installation instructions, do NOT attempt to install or operate. ONLY qualified electrician / gas technician with the knowledge of gas appliances and gas valves that are permitted to install this device.
- Any modifications of Durablow remote control system, or parts, or components are PROHIBITED. They will void the warranty, and may cause a fire hazard result in human casualties and property damages.
- Do NOT connect any gas valve or electronic module directly to 110-120VAC power.
- Read gas appliance manufacturer's instructions and wiring schematics completely for proper placement of all wires. All electronic modules are to be wired to manufacturer's specifications. All wiring diagrams in these instructions are for illustration purpose ONLY. Follow instructions from manufacturers of gas valve and electronic module for correct wiring & installation procedures.
- Improper installation of electric components can cause damage to electronic module, gas valve and device.
- Decide where to install the device before proceeding. This device is designed to be near a power outlet and installAed outside the fireplace / stove / fire-pit for better signal transmission.
IMPORTANT: Keep away from high-heat of exceeding 130F . Additional protection is required for no exposure to the hearth). - Unplugging the control device from power source is strongly recommended if house/location is unattended for a long time.
- Legal disclaimer: Due to different using circumstance, user should take specific advice from qualified technician or professional people before undertaking any action following information included in these instructions above. All users who ignore this disclaimer, misuse, abuse, or install the system improperly are at their own risk.
- The APP's user interface, guideline, & functions may differ from this manual due to the application updates, smart phones, countries, languages, operating systems...etc.
DOWNLOAD & INSTALL SMART LIFE APP
Scan this QR code, or search "SMART LIFE" in APP Store (iOS), or Google Play (Android) to download and install.
REGISTER NEW ACCOUNT
Mobile phone number / Email address
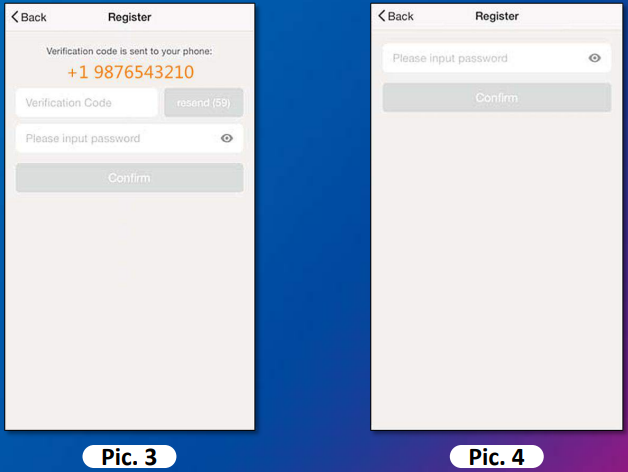
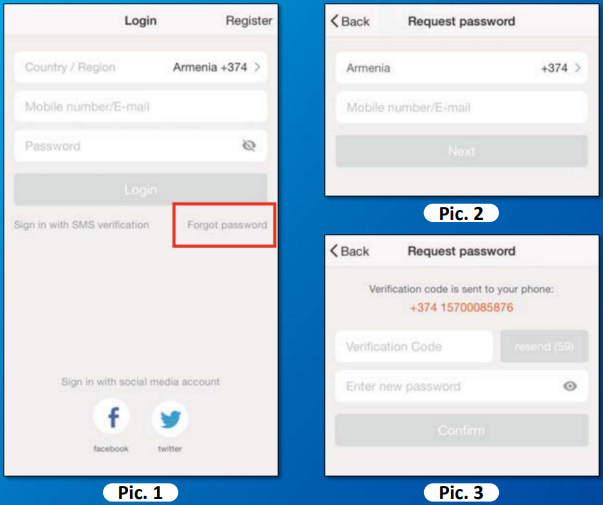
- Tap “Register”. (Pic 1)
Select your country code and enter mobile phone number / E-mail and tap “Next”. (Pic 2) 3-1.
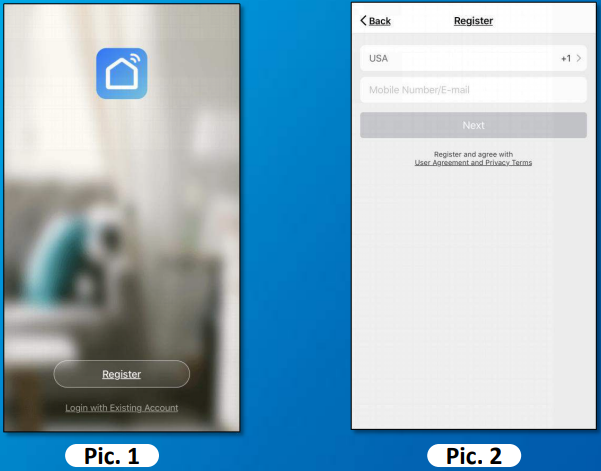
- For mobile phone number account, enter the verification code (Pic 3) given in the text message.
Enter desired password, tap “Confirm” to finish the registration. 3-2. For E-mail account, enter desired password (pic 4), tap “Confirm” to finish the registration.
LOGIN SMART LIFE APP
Login methods
- Login with mobile number + SMS verification code (text message). (Pic. 1+2)
Login with account number (mobile number/E-mail) + password. (Pic. 1)
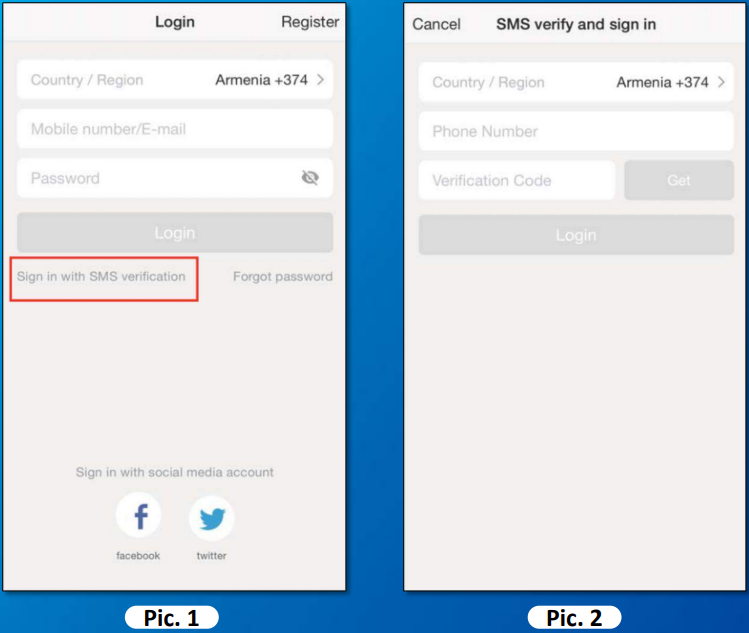
- Login with social media account. (If you have installed Facebook or Twitter APP, tap the corresponding icon below, and sign in the APP after social network authentication.
FORGOT PASSWORD / RESET
If forgot password, follow steps below and reset:
- Tap “Forgot password”. (Pic. 1)
- Select your country, enter your account the cellphone number / E-mail, and tap “Next”. (Pic. 2)
- Enter the verification code given in the message / E-mail, and enter a new password, tap “Confirm” to finish. (Pic. 3)
Login with new password.
ADD DEVICE & Wi-Fi SETTING
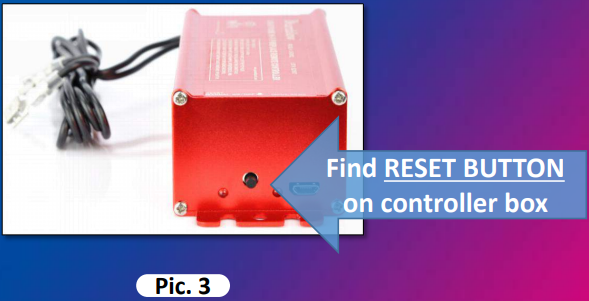
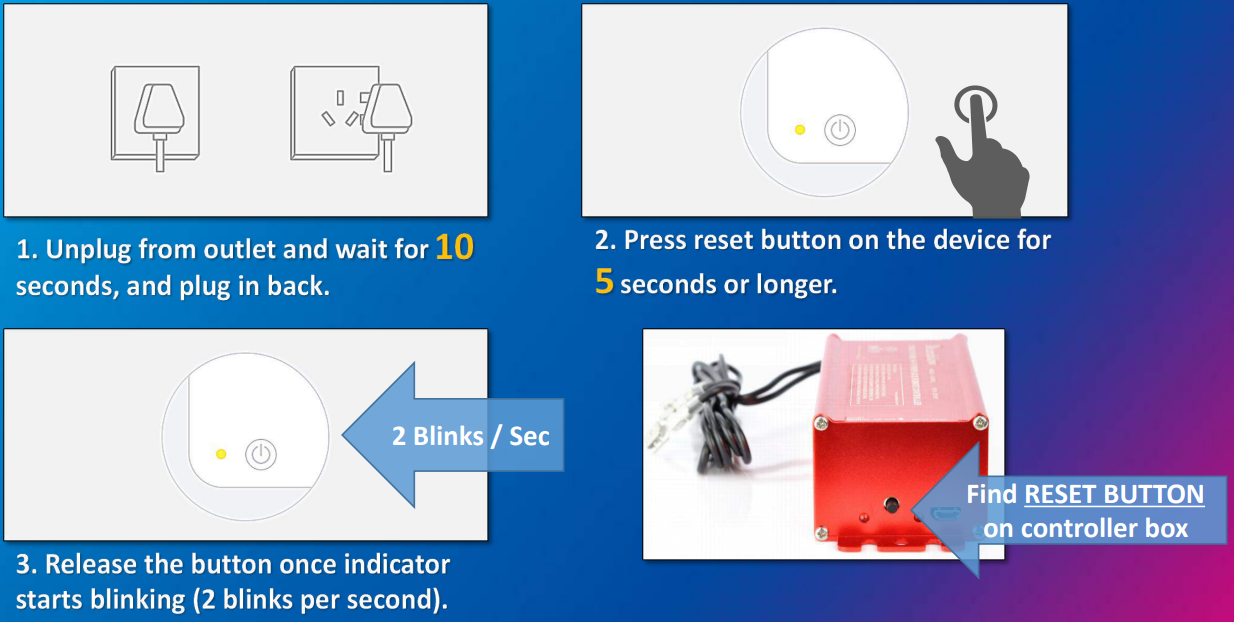
ADD DEVICE & RESET BUTTON (Pic. 3)
- Power ON your device.
Login your Smart Life App, and tap the “+” or “Add Device” Icon (Pic. 1) to add device in Smart Life App, select the right device (Pic. 2). For SH3001, “Switch (Wi-Fi)” is preferred.
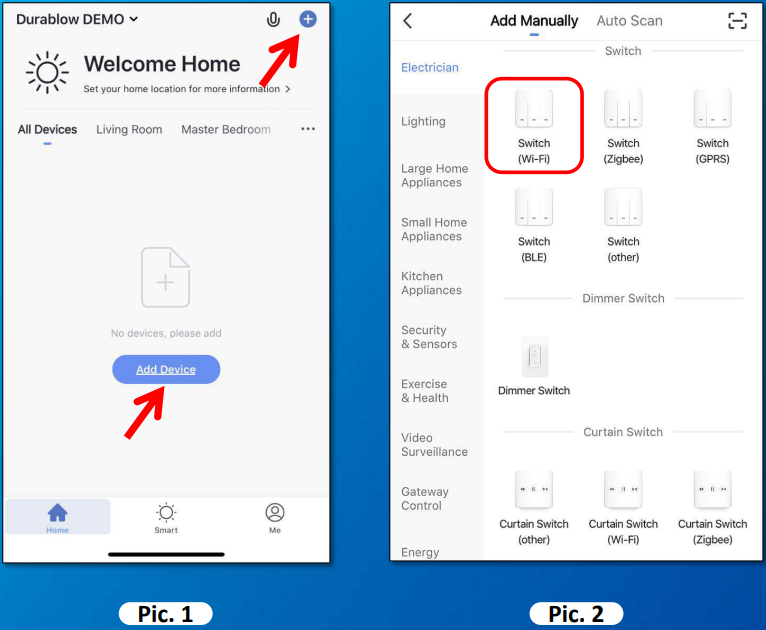
Make sure your phone has been connected with the strongest WiFi signal nearby.
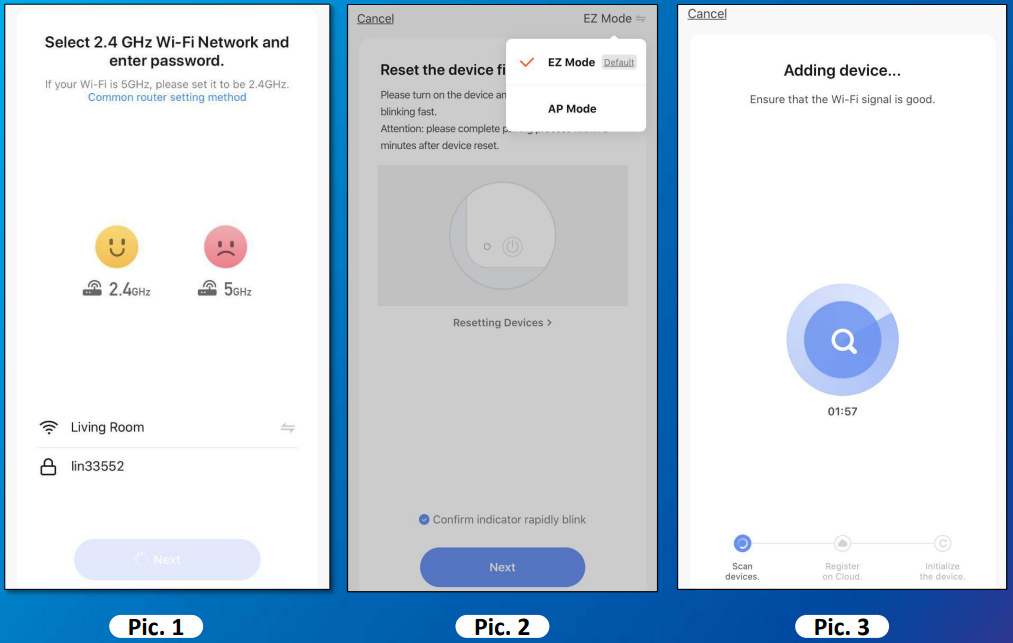
ADD DEVICE (EZ mode)
There are two modes:
- EZ mode (default mode).
- AP mode.
- Enter the WiFi SSID and password. (Pic. 1) * 5G WiFi is NOT supported.
- Tap the Double-Arrow icon to choose “EZ Mode”, please make sure the device’s indicator light rapidly flashes. (Pic. 2)
- It takes 10-30 seconds to complete the pairing. (Pic. 3)
Rename devices, and done.
HOW TO MAKE INDICATOR RAPIDLY BLINK?
For EZ mode
ADD DEVICE (AP mode)
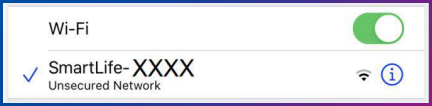
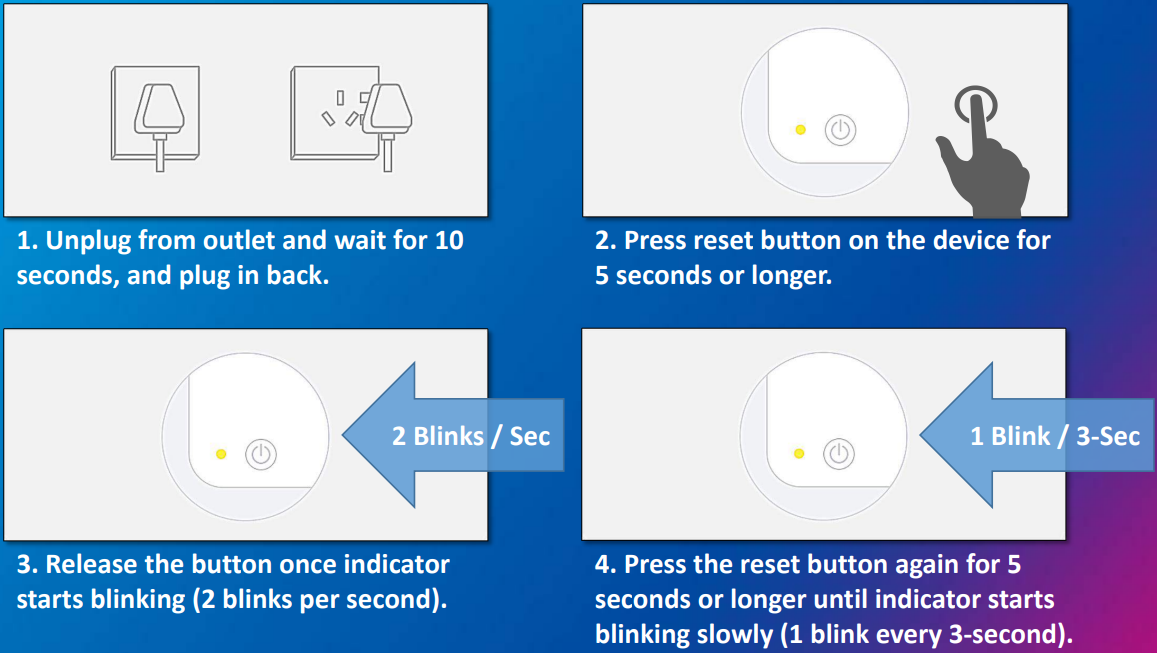
- Tap the Double-Arrow icon to choose “AP Mode”, the device’s indicator light slowly flashes. (Pic. 1)
Connect phone to device's WiFi hotspot (Pic. 2). Such as below
It takes 10-30 seconds to complete the pairing. (Pic. 3)
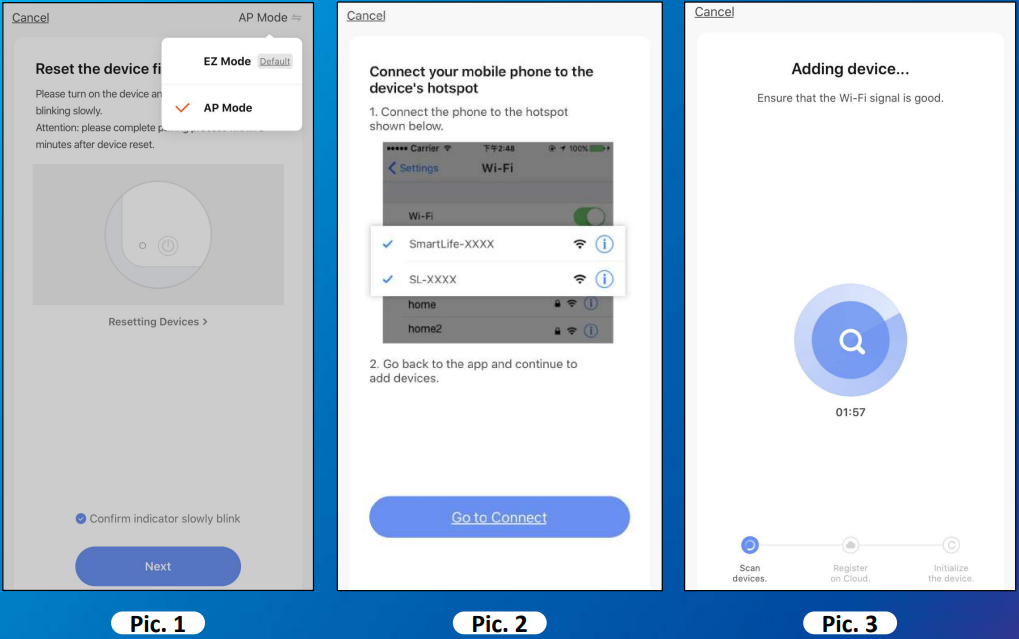
- Rename devices. Done.
HOW TO MAKE INDICATOR SLOWLY BLINK?
For AP mode
TROUBLESHOOTING AND CHECK LIST
Device connection failure in different circumstances?
- Confirm device is powered on.
Confirm the device is under config mode.

Confirm that device, smart phone and router are as close to each other.

Make sure the network function of router and smart phone are unblocked.

- Confirm the entered router password is correct.
Confirm adding device is under 2.4G Wi-Fi channel. Enable the broadcast and not allow to hide Wi-Fi.

If router’s connected devices reach the amount limit, please turn off some devices’ Wi-Fi function (offline) and configure again.
If router enables MAC address filter, please try removing the device from MAC filter list and make sure router is allowing device to be connected to Internet.
WIRING & FUNCTIONS
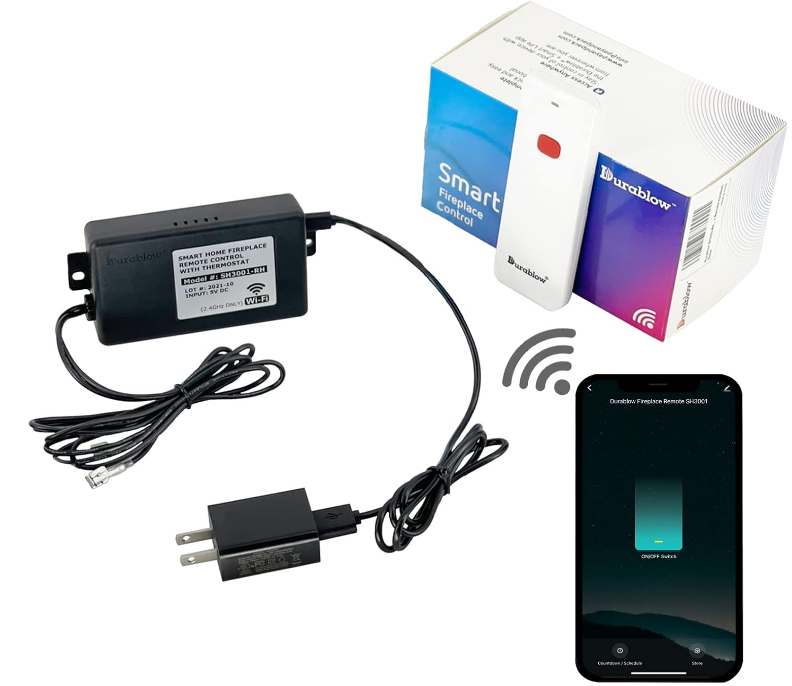
- Remote Controller Box with Two Connected Wires
- Wi-Fi Antenna
- Power Supply USB Plug (100-240VAC)
- Power Cord (Type: USB to Micro USB)
- Remote Transmitter Handset (only in Model #: SH3001-RH)
Installation Instruction / Manual
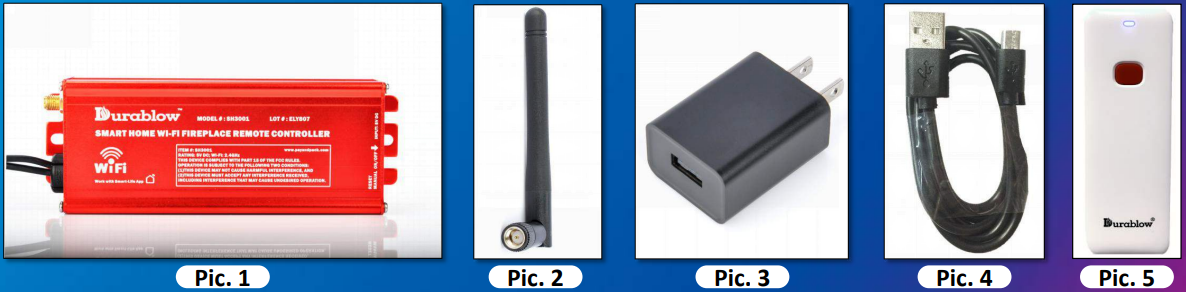
(For any missing parts or damages, please contact vour sellers, or [email protected] with order ID)
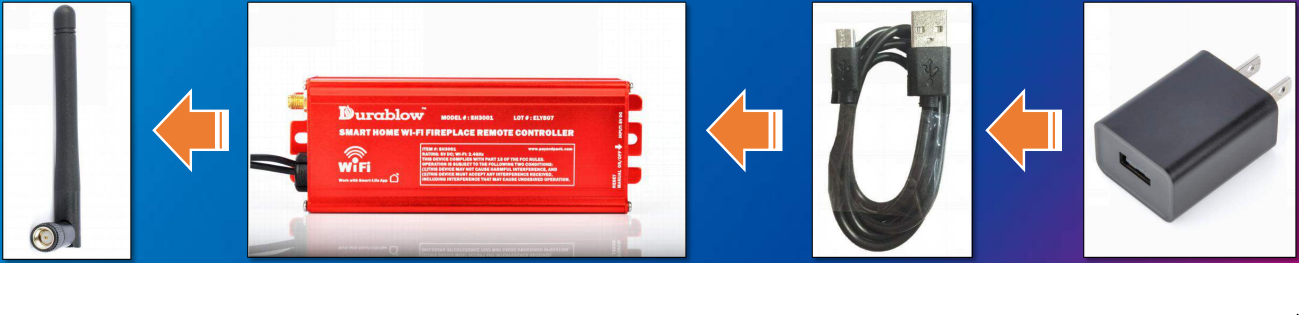
POWER (AC → DC) & Wi-Fi ANTENNA
- Connect power supply USB plug (AC/DC adapter) with power cord and controller box (DC 5V).
- INPUT: AC 100-240V, 50/60Hz, 0.4 A
- OUTPUT: DC 5V, 1.0A
- FCC/EMC approved; cUL standard listed.
Install / screw-in the WiFi Antenna onto the controller box.
WIRING METHOD
FOR *MILLIVOLT VALVE
Connect the two wires of the Wi-Fi controller box to the Millivolt gas valve at the TH, TH/TP terminals on the terminal block. (*Either wires can be connected to either TH, TH/ TP terminals)

ATTENTION: This Durablow device will NOT turn ON the Millivolt valve and fireplace main fire, if the pilot fire or ODS pilot is OFF, or the thermopile is defective, because of no micro voltage (250-750mv) generated.
REPLACING WALL SWITCH OR THERMOSTAT
Add a smart home remote control to your fireplace by replacing your wall switch or any types of fireplace ON/OFF, thermostat switches.
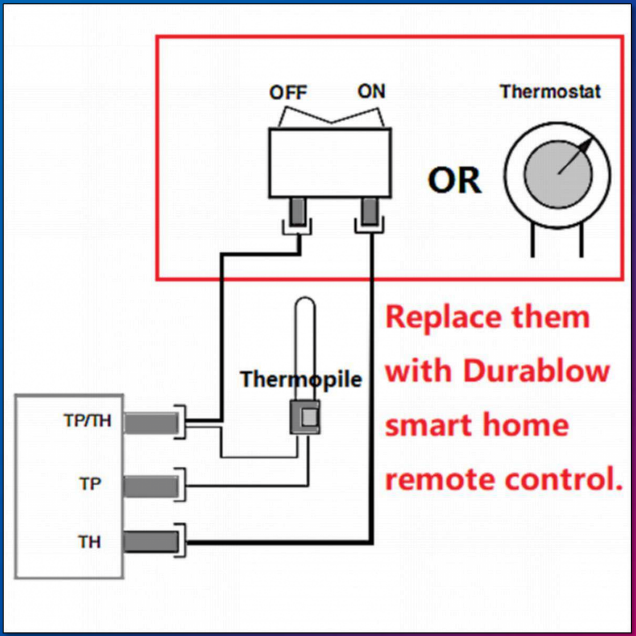
ATTENTION: Hard-wiring might be needed. ONLY qualified electrician / gas technician with the knowledge of gas appliances and gas valves that are permitted to modify the circuit and install.
YouTube Videos for reference
Please read your fireplace manual or consult with original maker.
ADD A SMART HOME REMOTE CONTROL
Add a smart home remote control to your fireplace by connecting it with the wall switch (or any types of fireplace ON/OFF, thermostat switches).
REMOTE CONTROL
WITH SMART LIFE APP
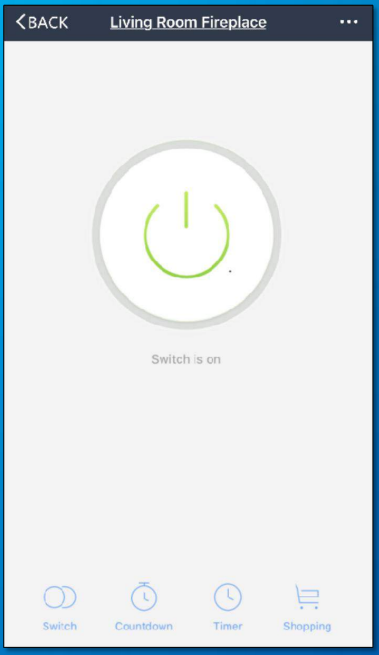
Functions: (see buttons on bottom)
- Switch ON / OFF the device manually.
- Set Countdown, counting down to turn ON / OFF the device automatically.
- Customize Timer sets to turn ON / OFF fireplace with programmable schedule automatically.
Go Shopping or get support on www.PayandPack.com webstore.
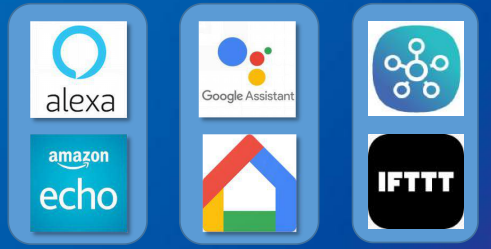
SUPPORTED THIRD-PARTY CONTROL / APP
This device works with Third-Party Control listed below:
- Amazon Alexa: Echo, Echo Dot, Echo Show, Echo Spot...etc.
- Google Assistant: Google Home & Mini.
- IFTTT (App): Design your own Applets.
Samsung SmartThings Hub Gateway
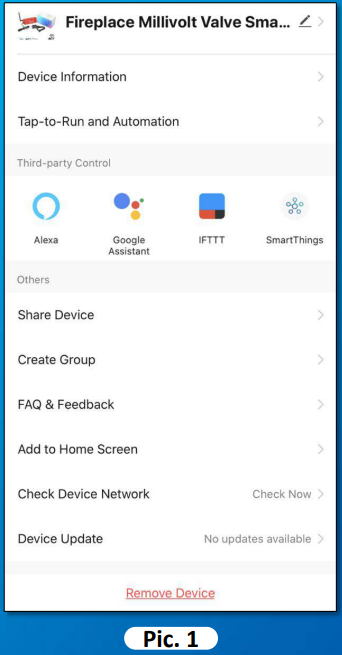
To view and link third-party control / APP, tap the icon accordingly.
Setup Guide
Setting up the Durablow Gas Fireplace Remote Control SH3001-RH is simple. Put two AA batteries (not supplied) in the battery compartment and press "PROG" to program the remote to your fireplace. It should work with your gas fireplace since the remote control works with most. Once programmed, aim the remote at your fireplace and push the buttons to regulate flame height, temperature, and on/off. The remote control should be tested at various distances for optimal range.
Indicator LIghts
- ON/OFF indicator
Light ON = Switch is ON
Light OFF= Switch is OFF
Tips: (Press the RESET button quickly at the side of controller box to operate manual ON/OFF) Setting indicator
Light ON = WiFi connected
Light OFF = Offline or no power
Light rapidly blink = EZ mode (defult mode)
Light slowly blink = AP mode
PAIRING TRANSMITTER HANDSET WITH CONTROLLER BOX
(only for Model #: SH3001-RH)
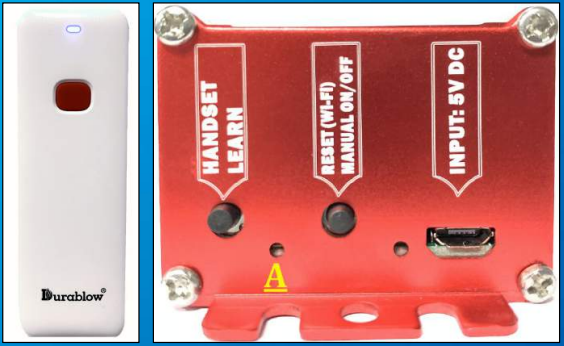
- Unplug the power cord from controller box for 5 seconds, and plug- in again before pairing / learning process.
- Press the RED button on TRANSMITTER HANDSET for 5-7 seconds, the blue LED light on the top will slow blink for 5 times and then stop.
- Press the HANDSET LEARN button on CONTROLLER BOX for 5-7 seconds, the LED light (A) will slow blink for 5 times and then stop.
- Press the RED button on TRANSMITTER HANDSET for 1 second, the blue LED light on the top will quick blink.
- Press the HANDSET LEARN on RECEIVER BOX for 1 second, the LED light (A) will quick blink. While LEDs are Quick-Blinking, the TRANSMITTER & CONTROLLER BOX are in pairing status. Once pairing is completed, the quick blinking will stop, and you can switch ON/OFF the main power of the controller box from transmitter handset.
- If pairing failed, please make sure the batteries in transmitter are new or fully charged, and repeat steps 1-5 again. Any questions, please email to [email protected] or visit www.payandpack.com > "Contact us".
WARRANTY
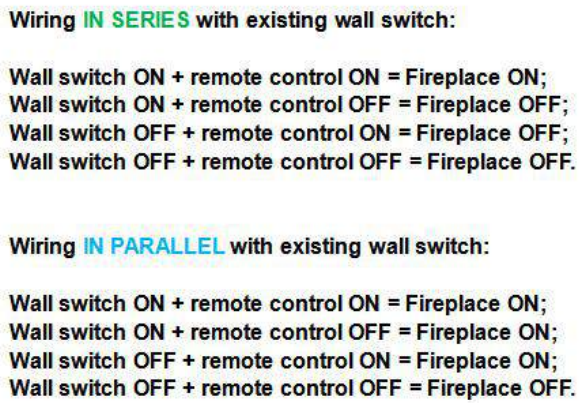
Types of wiring this device to my fireplace?
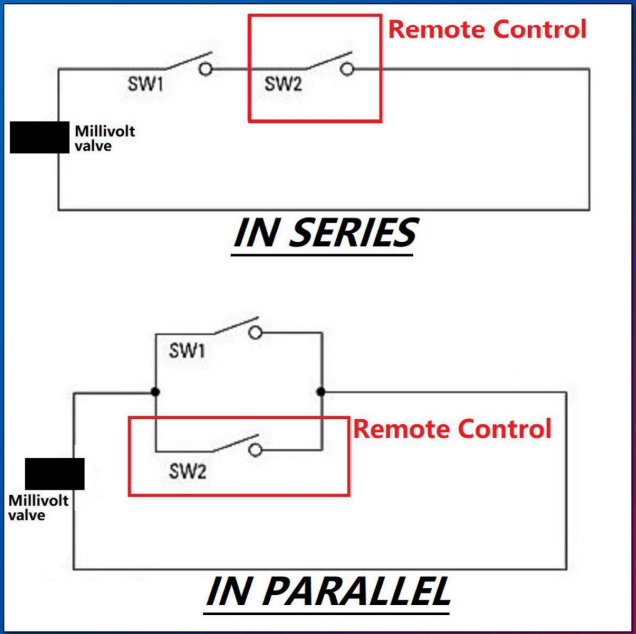
Connect to Millivolt Valve: Adding an optional remote receiver by connecting the TH/ TP, TH on Millivolt valve. These terminals are originally designed for a room thermostat. Replace On/Off wall / manual switch or thermostat. Connect to Electrical Outlet Box: Adding an optional remote receiver at the 24VAC power (output) of electrical outlet box. Switches In-Series or In-parallel: Adding remote receiver into an existing wall / manual On/Off switch or room thermostat with remote receiver.
WARRANTY
- Durablow warrants this product for a 2-YEAR LIMITED WARRANTY of the original purchaser / owner of this product. This warranty is not transferable to another person. It is for the original purchaser of the product. Durablow warrants any parts failed because of defective workmanship in production or materials from the original date of purchase. Durablow will repair or replace the defective parts at Durablow's decision.
- Replacement parts will be available at NO charges and free-shipping to users for the FIRST 2 years of this warranty. If Durablow does not have the parts for a certain model, then a replacement product will be provided.
- The Owner must provide a bill of sale, order ID or payment record which should be kept to verify purchase date and establish warranty period.
- This warranty does not cover claims. Damage to the product caused by accident, misuse, abuse, or installation error, no matter implemented by a contractor, third party Service Company, or owner, is not covered by this warranty. Any modifications of this product will void this warranty.
- Photos and simple questions may be required for further product investigation & improvement. Durablow & PayandPack will reserve the right to physically inspect the product for defects, by authorized representatives.
Troubleshooting
If you are having trouble with the Durablow SH3001-RH Gas Fireplace Remote Control, here are some common problems and solutions:
- Remote control is not responding: Check that the batteries are inserted correctly and that they have enough power. Also, make sure that the remote control is programmed to your fireplace and that there are no obstructions between the remote control and the fireplace.
- LED display is not working: Check that the batteries are inserted correctly and that they have enough power. Also, make sure that the brightness is not set to the lowest level, as this may make the display difficult to see.
- Remote control is not programming to the fireplace: Make sure that the fireplace is in programming mode and that the remote control is within range. If the remote control still will not program, try resetting both the fireplace and the remote control before attempting to program again.
Durablow SH3001-RH Gas Fireplace Remote Control Pros & Cons
Pros
- Easy to use with a simple and intuitive interface
- Compatible with most gas fireplaces
- Long range and adjustable LED display
- Compact and easy to store
Cons
- Batteries are not included
- May not work with some older gas fireplaces
Customer Reviews
Customers have praised the Durablow SH3001-RH Gas Fireplace Remote Control for its ease of use and long range. Many have also commented on the compact size and adjustable LED display, which make it a great addition to any home. However, some customers have noted that the remote control may not work with some older gas fireplaces, and that the batteries are not included. Despite this, most customers have given the remote control high marks for its performance and overall value.
Faqs
What is the SH3001-RH gas fireplace remote?
What is the process for pairing the SH3001-RH remote with my gas fireplace?
Is it possible to operate multiple fireplaces with the SH3001-RH remote control?
What sort of batteries does the Durablow SH3001-RH Gas Fireplace Remote Control require?
Can not turn on fireplace?
What AA, AAA battery brand to use?
Is it possible to modify the flame height using the SH3001-RH remote?
Is the Durablow SH3001-RH Gas Fireplace Remote Control compatible with all gas fireplaces?
What is the process for cleaning the Durablow SH3001-RH Gas Fireplace Remote Control?
What is the Durablow SH3001-RH Gas Fireplace Remote Control control's operating range?
Leave a Comment