
Set Up: Samsung Tab E nook T560NU User Manual
Content
Samsung Tab E Nook T560NU
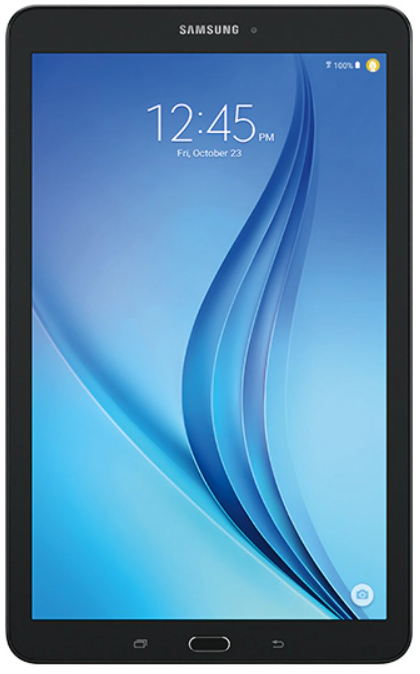
Introduction
The Samsung Tab E Nook T560NU is a versatile tablet that combines the functionality of a tablet with the convenience of an e-reader. With its large display and powerful hardware, it is perfect for both work and entertainment.
Specifications
- Display: 9.6-inch TFT display
- Resolution: 1280 x 800 pixels
- Processor: 1.3 GHz quad-core processor
- RAM: 1.5 GB
- Storage: 16 GB (expandable up to 128 GB with microSD card)
- Operating System: Android
- Battery: 5,000 mAh
- Camera: 5 MP rear camera, 2 MP front camera
- Connectivity: Wi-Fi, Bluetooth
Instructions
- Power on the tablet by pressing and holding the power button.
- Follow the on-screen instructions to set up your tablet.
- Connect to a Wi-Fi network to access the internet.
- Install your favorite apps from the Google Play Store.
- Customize your tablet's settings according to your preferences.
- Enjoy using your Samsung Tab E Nook T560NU!
Front View
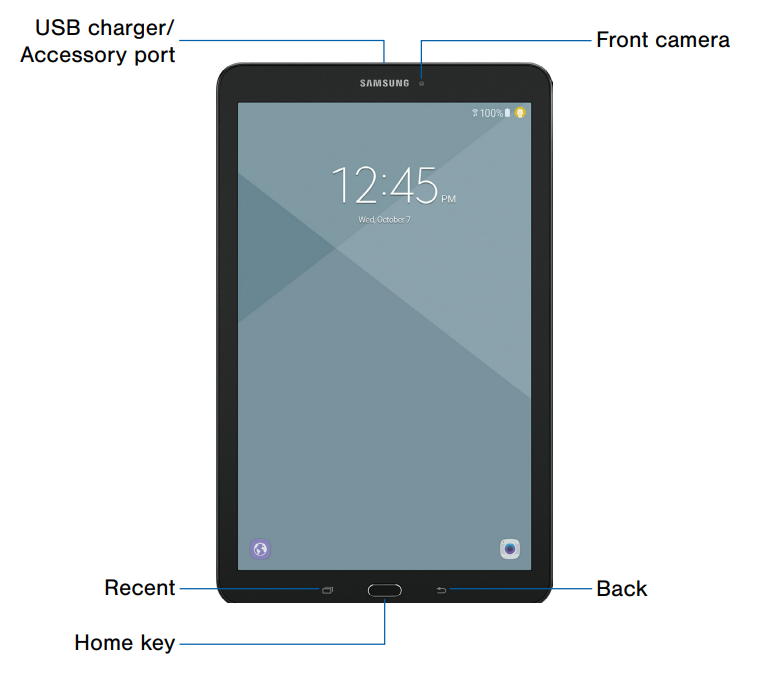
- Front camera: Take self-portraits and record videos of yourself.
- Back: Return to the previous screen, or close a dialog box, menu, or keyboard.
- Home key: Return to the Home screen.
- Recent: Tap to display recent apps, or touch and hold for Multi window™.
- USB charger/Accessory port: Connect the USB charger (included) and other optional accessories (not included).
Back View
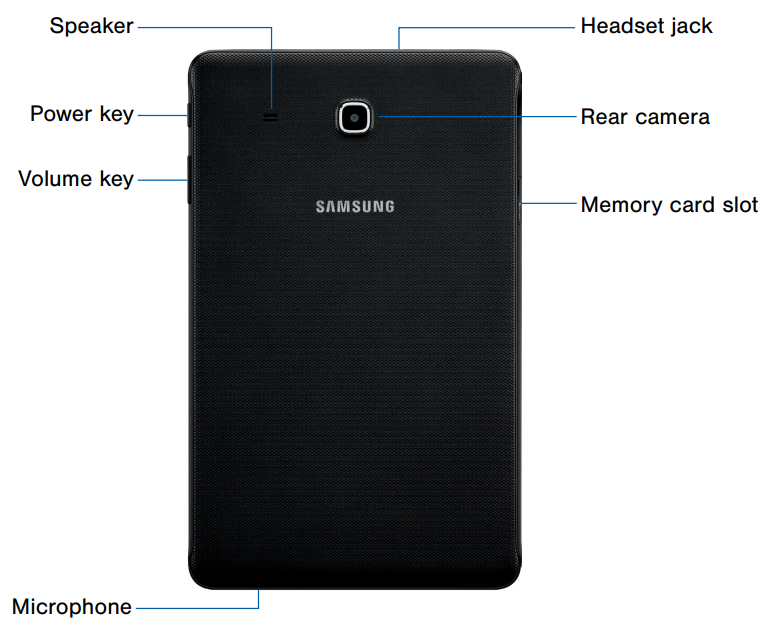
- Headset jack: Connect an optional headset (not included).
- Rear camera: Take pictures and record videos.
- Memory card slot: Install an optional memory card (not included) for storage of files.
- Microphone: Record audio and detect voice commands.
- Volume key: Adjust the volume of your device’s sounds and audio playback.
- Power key: Press and hold to turn the device on or off, or restart it. Press to lock or wake up the screen.
- Speaker: Play music and other sounds.
Assemble Your Device
This section helps you to assemble your device.
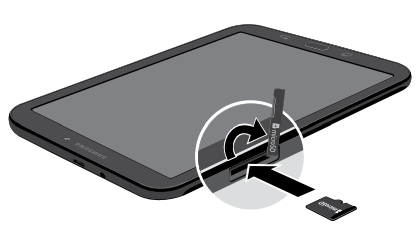
Install an Optional Memory Card
- You can install an optional microSD or microSDHC memory card (not included) to expand the memory space on your device.
- Note: A memory card can be installed at any time; it is not necessary to install it before using the device.
- For more information on installing a memory card, see Memory Card (SD Card).
- Open the memory card slot cover and turn it to expose the slot.
- With the gold contacts facing down, carefully slide the memory card into the slot, pushing gently until it clicks into place.
- Close the memory card slot cover.
Charge the Battery
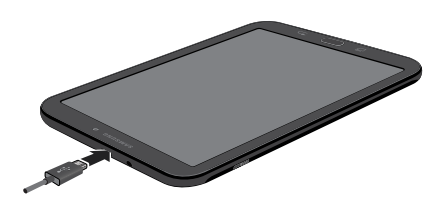
Your device is powered by a rechargeable, standard Li-Ion battery. A USB charger (charging head and USB cable) is included with the device for charging the battery from any standard outlet.
The battery comes partially charged. You can use the device while charging.
- Note: It is recommended that you fully charge the battery before using your device for the first time.
- Caution: Use only charging devices and batteries approved by Samsung. Samsung accessories are designed for your device to maximize battery life. Using other accessories may invalidate your warranty and may cause damage.
- Insert the USB cable into the USB charger/Accessory port.
- Connect the USB cable to the charging head, and then plug the charging head into a standard outlet.
- Unplug the charging head from the outlet and remove the USB cable from the device when charging is complete.
When to Charge the Battery
When the battery is low and only a few minutes of operation remain, the device sounds a warning tone at regular intervals. In this condition, your device conserves its remaining battery power by dimming the screen. When the battery level becomes too low, the device automatically turns off.
For a quick check of your battery level:
- View the battery charge indicator located in the top right corner of your device’s display. A solid color indicates a full charge.
- You can also choose to display a percentage value. Viewing a percentage value can provide a better idea of the remaining charge on the battery. For more information, see Battery.
Set Up Your Device
Turn Your Device On or Off
The instructions below explain how to turn your device on or off.
Turn the Device On
To turn the device on:
- Press and hold the Power key until the device turns on.
Turn the Device Off
To turn the device off:
- Press and hold the Power key until the device options screen is displayed.
- Tap Power off, and confirm if prompted.
Restart a Non-Responsive Device
If your device stops responding to taps or finger gestures and you are unable to turn it off, you can restart your device.
Press and hold the Power key and the Volume down key at the same time for more than seven seconds.
Initial Set Up
- The first time you turn your device on, a Welcome screen is displayed. It guides you through the basics of setting up your device.
- Follow the prompts to choose a default language, connect to a Wi-Fi® network, set up accounts, choose location services, learn about your device’s features, and more.
Note: Voice Assistant provides voice prompts and descriptions of items on the screen to improve accessibility. During setup, you can enable or disable Voice Assistant by pressing the Home key quickly three times.
Set Up Your NOOK Account
During the setup, you will be asked to sign in to your NOOK account.
- If you already have a Barnes & Noble or NOOK account, tap Sign In and enter your login information.
- If you do not already have a Barnes & Noble or NOOK account, tap Create Account.
- Enter your information, and tap Submit.
Your NOOK opens a dialog box with links to legal notices, including the NOOK Device Terms of Service, the NOOK Store® Terms of Service, and the NOOK Privacy Policy. To read any of these notices, tap its link. - Read the legal notices, and if you accept them, tap Accept.
Note: If you do not accept the legal terms, you cannot use your NOOK.
Note: Next,, you will set up a credit card for your account. You have the option of skipping this step, but you will not be able to make any purchases in the NOOK Shop until a credit card has been added to your account. - Add credit card information for your account, and tap Next.
- Enter the billing address for the credit card, and tap Submit.
- Your NOOK enters this information and creates your account.
Secure Your Device
Use your device’s screen lock features to secure your device.
Lock the Device
By default, the device locks automatically when the screen times out.
To lock the device:
Press the Power key.
Unlock the Device
The default Screen lock on your device is Swipe.
Note: To choose a more secure screen lock, see Set a Screen Lock.
To unlock the device:
Press the Power key or Home key, and then drag your finger across the screen.
Battery
View how battery power is used for device activities.
- From a Home screen, tap Apps > Settings.
- Tap Battery for options:
- Power saving mode: Save battery power by limiting your device’s performance and restricting location services and most background data.
- Ultra power saving mode: Save battery power by using a minimal Home screen layout and limiting the number of usable apps.
- Percentage on status bar: Display the battery charge percentage next to the battery icon on the Status bar.
- Past and predicted usage: View estimated usage time remaining based on your usage over the last 7 days.
- Recent battery usage: Tap an item to view details of its battery usage.
- Tap More for the following options:
- Refresh: Update the listing.
- Optimize battery usage: Choose apps to optimize their individual battery usage.
Storage
View the device memory
and usage. Mount, unmount, or format an optional memory card (not included).
Device Memory
View and manage the memory used by the device.
- From a Home screen, tap Apps > Settings.
- Tap Storage.
- Tap Internal storage, if an optional SD card is installed. Device storage used out of the total space available is displayed.
- The amounts of memory used are further divided into:
- Total space: The total space in your device’s memory.
- Available space: The amount of storage space currently available.
- System memory: The minimum amount of storage space required to run the system.
- Used space: The amount of storage space currently being used.
- Other: The space used by app data, downloaded files, and Android system files.
- Cached data: The amount of data currently cached.
- Tap Explore to launch My Files to view content stored on your device.To increase available memory:
- From a Home screen, tap Apps > Settings.
- Tap Storage.
- Tap Internal storage, if an optional SD card is installed.
- Tap Cached data to clear cached data for all apps.
- Tap Delete to confirm.
- Memory Card (SD Card)
Once an optional memory card (not included) has been installed in your device, the card memory is displayed in the Storage settings.
Note: The Portable storage option only appears when an optional memory card is installed.
Install a Memory Card
You can use a microSD or microSDHC card (not included) to add more memory space to your device.
For more information, see Install an Optional Memory Card.
Mount a Memory Card
When you install an optional memory card, it is automatically mounted (connected to the device) and prepared for use. However, should you unmount the card without removing it from the device, you must mount it before it can be accessed.- From a Home screen, tap Apps > Settings.
- Tap Storage.
- Under Portable storage, tap your SD card, and then tap Mount.
- Remove a Memory Card
Warning: To prevent damage to information stored on the memory card, unmount the card before removing it from the device.- From a Home screen, tap Apps > Settings.
- Tap Storage.
- Under Portable storage, tap your SD card, and then tap Unmount.
- Open the memory card slot cover and turn it to expose the slot.
- Gently press inward on the memory card so that it pops out from the slot, and carefully pull the card out.
- Close the memory card slot cover.
- Format a Memory Card
- Warning: When formatting an SD card, you should back up your music and photo files that are stored on the card because formatting the SD card deletes all of the stored data.
- From a Home screen, tap Apps > Settings.
- Tap Storage.
- Under Portable storage, tap your SD card, and then tap Format and follow the prompts.
Faqs
Can I make phone calls with the Samsung Tab E Nook T560NU?
Does the tablet come with a stylus?
Can I expand the storage of the tablet?
What is the battery life of the tablet?
Does the tablet support multi-window functionality?
Can I connect a keyboard to the tablet?
Does the tablet have a front-facing camera?
Is the tablet compatible with Google Play Store?
Can I use the tablet to read e-books?
Does the tablet support external USB devices?
More samsung manuals
- Usage Guide: Samsung S20 FE 5G G781U User Manual
- Samsung SSD Data Migration v3.1 Setup Guide
- Settings & Configuration: Samsung S10e and S10+ Mobile User Manual
- How to Install: Samsung Galaxy Tab A T580 User Manual | Set Up Accounts
- Samsung Tab S2 T810 User Manual | Settings & Configurations
- How to Pair: Samsung SM-R322 Gear VR User Manual | Functions
Leave a Comment