
Samsung Tab S2 T810 User Manual | Settings & Configurations
Content
Samsung Tab S2 T810
Introduction
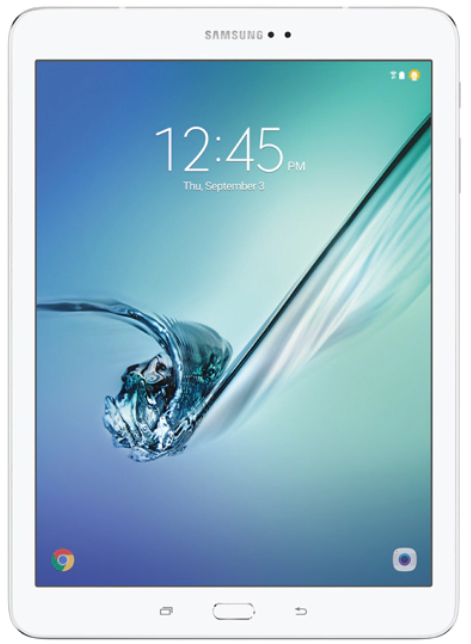
The Samsung Tab S2 T810 is a powerful and versatile tablet that offers a range of features and capabilities.
Specifications
- Display: 9.7-inch Super AMOLED touchscreen
- Resolution: 2048 x 1536 pixels
- Processor: Octa-core (Quad-core 1.9 GHz & Quad-core 1.3 GHz)
- Memory: 3GB RAM
- Storage: 32GB (expandable up to 128GB with microSD card)
- Operating System: Android 7.0 (Nougat)
- Camera: 8MP rear camera, 2.1MP front camera
- Battery: 5870mAh
- Connectivity: Wi-Fi 802.11 a/b/g/n/ac, Bluetooth 4.1
- Dimensions: 237.3 x 169 x 5.6 mm
- Weight: 389g
Instructions
- Power on the tablet by pressing and holding the power button.
- Follow the on-screen instructions to set up your tablet.
- Connect to a Wi-Fi network to access the internet.
- Install your favorite apps from the Google Play Store.
- Customize your tablet's settings according to your preferences.
- Use the touchscreen to navigate and interact with the tablet.
- Charge the tablet using the included charger and cable.
- Back up your data regularly to prevent loss.
- Refer to the user manual for more detailed instructions.
Front View
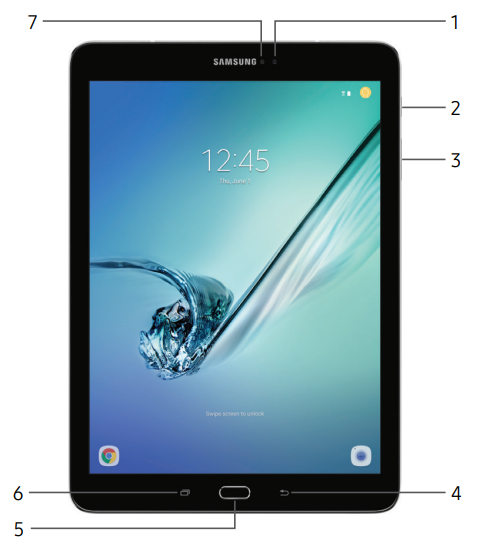
- Front camera: Take self-portraits and record videos of yourself.
- Power key: Press and hold to turn the device on or off, or to restart it. Press to lock or wake up the screen.
- Volume key: Adjust the volume of your device’s sounds and audio playback.
- Back: Return to the previous screen or close a dialog box, menu, or keyboard.
- Home key/Finger scanner: Return to the Home screen. Activate the Fingerprint security feature.
- Recent apps: Tap to display recent apps, or touch and hold for Multi window™.
- Proximity sensor: Detect the presence of objects near the device.
Back View
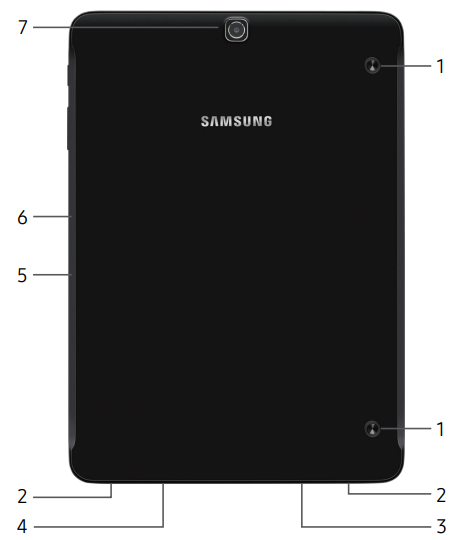
- Simple clicker: Securely attach optional covers (not included) to these retractable attachment points.
- Speaker: Play music and other sounds.
- Headset jack: Connect an optional headset (not included).
- USB charger/Accessory port: Connect the USB charger (included) and other optional accessories (not included).
- Memory card tray: Install an optional memory card (not included) for storage of files. For more information, see “Install an Optional Memory Card” on page 4.
- Microphone: Record audio and detect voice commands.
- Rear camera: Take pictures and record videos.
Charge the Battery
Your device is powered by a rechargeable, standard Li-Ion battery. A USB charger (charging head and USB cable) is included with the device for charging the battery from any standard outlet.
The battery comes partially charged. You can use the device while charging.
Insert the USB cable into the USB charger/ Accessory port.
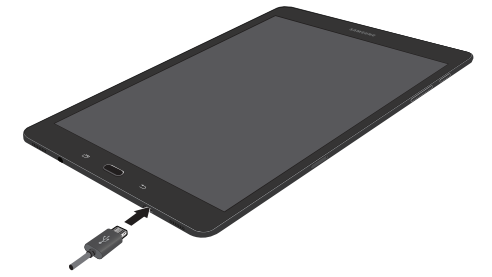
Caution: Use only charging devices and batteries approved by Samsung. Samsung accessories are designed for your device to maximize battery life. Using other accessories may void your warranty and may cause damage.
- Connect the USB cable to the charging head, and then plug the charging head into a standard outlet.
- Unplug the charging head from the outlet and remove the USB cable from the device when charging is complete.
When to Charge the Battery
- When the battery is low and only a few minutes of operation remain, the device sounds a warning tone at regular intervals.
- In this condition, your device conserves its remaining battery power by dimming the screen.
- When the battery level becomes too low, the device automatically turns off.
For a quick check of your battery level:
- View the battery charge indicator located in the top right corner of your device’s display. A solid color indicates a full charge.
You can also choose to display a percentage value. Viewing a percentage value can provide a better idea of the remaining charge on the battery. For more information, see “Battery” on page 104.
Set Up Your Device
Turn Your Device On or Off
The instructions below explain how to turn your device on or off.
Turn the Device On
To turn the device on:
- Press and hold the Power key until the device turns on.
Turn the Device Off
To turn the device off:
- Press and hold the Power key.
- Tap Power off, and confirm if prompted.
Restart the Device
If your device stops responding to taps or finger gestures and you are unable to turn it off, you can restart your device.
- Press and hold the Power key and the Volume down key at the same time for more than seven seconds.
Initial Set Up
The first time you turn your device on, a Welcome screen is displayed. It guides you through the basics of setting up your device.
Follow the prompts to choose a default language, connect to a Wi-Fi® network, set up accounts, choose location services, learn about your device’s features, and more.
Note: Voice Assistant provides voice prompts and descriptions of items on the screen to improve accessibility. During setup, you can enable or disable Voice Assistant by pressing the Home key quickly three times.
Secure Your Device
Use your device’s screen lock features to secure your device.
Lock the Device
By default, the device locks automatically when the screen times out.
To lock the device:
- Press the Power key.
Unlock the Device
The default Screen lock on your device is Swipe.
Note: To choose a more secure screen lock, see “Set a Screen Lock” on page 110.
To unlock the device:
- Press the Power key or Home key, and then drag your finger across the screen.
Know Your Device
Learn some of the key features of your mobile device, including the screens and icons, as well as how to navigate the device and enter text using the keyboard.
Home Screen
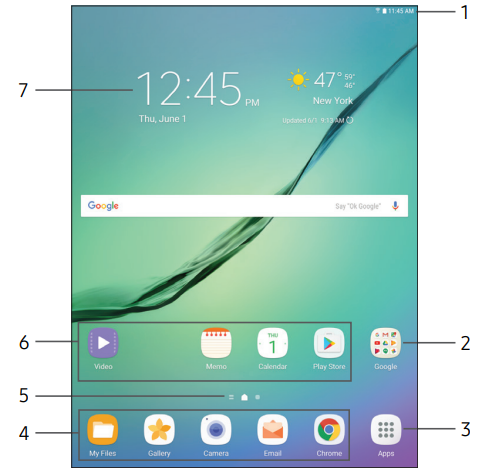
- Status bar: Displays device status icons (right) and notification icons (left). For more information, see “Status Bar” on page 16.
- App folder: Groups multiple apps into a folder.
- Apps list: Allows quick access to all of your applications.
- Primary app shortcuts: Displays these shortcuts on all Home screens.
- Home screen indicator: Indicates which Home screen is currently visible.
- App shortcuts: Launch your favorite applications.
- Widget: Runs as a simple application extension (not a shortcut) on a Home screen.
Status Bar
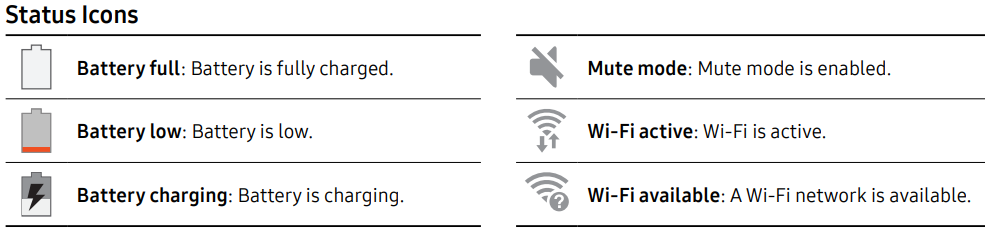
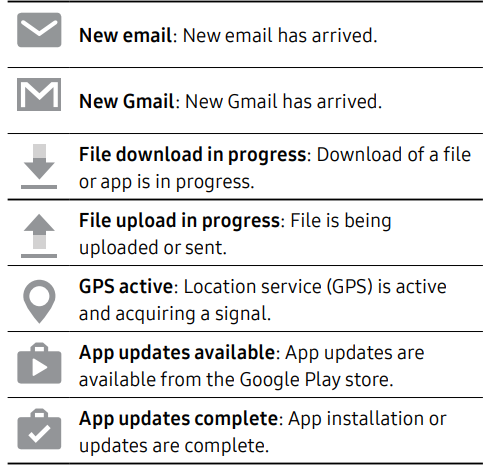
The Status bar at the top of the Home screen provides device information (such as network status, battery charge, and time) on the right side and notification alerts on the left.
Status Icons
Notification Icons
Navigation
Learn the basics for how to navigate through your device.
Touchscreen Navigation
Please note that a touch screen responds best to a light touch from the pad of your finger or a capacitive stylus. Using excessive force or a metallic object on the touch screen may damage the tempered glass surface and void the warranty.
Tap
Lightly tap items to select or launch them.
- Tap the keyboard to enter characters or text.
- Tap an item to select it.
- Tap an app shortcut to launch the application.
Touch and Hold
Touch and hold items on the screen to activate them.
- Touch and hold a widget on a Home screen to move it.
- Touch and hold a field to display a pop-up menu of options.
Swipe
Lightly drag your finger vertically or horizontally across the screen.
- Swipe the screen to unlock the device.
- Swipe the screen to scroll through the Home screens or menu options.
Drag
Touch and hold an item, and then move it to a new location.
- Drag an app shortcut to add it to a Home screen.
- Drag a widget to place it in a new location on a Home screen.
Pinch and Spread
Pinch the screen using your thumb and forefinger or spread it by moving your fingers apart.
- Pinch the screen to zoom out while viewing a picture or a web page.
- Spread your fingers on the screen to zoom in while viewing a picture or a web page.
Notification Panel
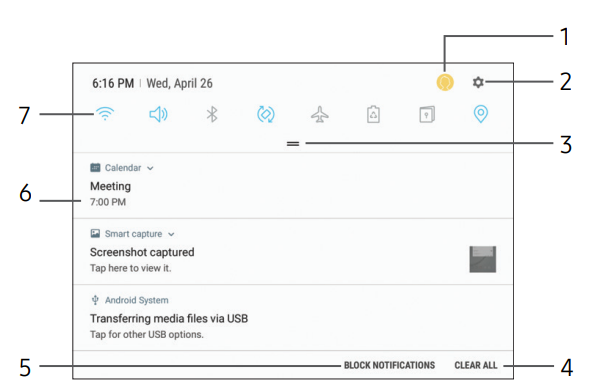
- Manage users: Display the Users screen.
- Settings: Display the Settings screen.
- View all: See all available Quick settings, adjust screen brightness, and more.
- Clear all: Clear all notifications.
- Block notifications: Enable or disable notifications from each app. For more information, see “Notifications” on page 94.
- Notification card: View details about a notification.
- Quick settings: Quickly enable or disable a feature.
Troubleshooting
Basic Restart
- Hold Power + Volume Down for about 10 seconds until it restarts.
- If it doesn’t respond, try Power + Volume Up instead.
Charging Problems
- Plug into a wall charger, not a PC USB port.
- Let it charge for at least 30 minutes, even if the screen stays black.
- Try another USB cable and charger.
- Check the charging port for dust or lint.
Boot Issues (stuck on Samsung logo)
- Boot into Recovery Mode:
- Hold Power + Home + Volume Up until you see the Samsung logo.
- Use the volume keys to select “Wipe cache partition” → press Power to confirm.
- When done, select “Reboot system now.”
- If it still fails, you may need to factory reset or reinstall firmware via Odin.
Factory Reset (last resort)
This will erase all data.
- Boot into Recovery Mode again.
- Select Wipe data/factory reset → Confirm.
- Reboot.
Firmware Reinstall (if the system is corrupted)
- On a PC, install Samsung Smart Switch or Odin.
- Download the official firmware for SM-T810 (e.g., from SamMobile.com or Frija tool).
- Flash the firmware through Odin in Download Mode (Power + Home + Volume Down).
Faqs
Is the Samsung Tab S2 T810 compatible with a stylus?
Does the tablet support 4G LTE connectivity?
Can I expand the storage of the tablet?
What is the battery life of the tablet?
Does the tablet have a fingerprint scanner?
Can I make phone calls with the tablet?
Does the tablet support multi-window functionality?
Is the tablet compatible with a keyboard attachment?
What version of Android does the tablet run?
Does the tablet have a headphone jack?
More samsung manuals
- How to Pair: Samsung SM-R322 Gear VR User Manual | Functions
- Settings & Configuration: Samsung S10e and S10+ Mobile User Manual
- Initial Set-up: Samsung 6 Series Smart LED User Manual
- Usage Guide: Samsung S20 FE 5G G781U User Manual
- Samsung S20 FE G781U User Manual | Features & Settings
- Set Up: Samsung Tab E nook T560NU User Manual
Leave a Comment