
Setup: Ecozy Sphere Ice Maker IM-BM401A User Manual
Content
ecozy Sphere Ice Maker IM-BM401A: Comprehensive Product Manual and Review
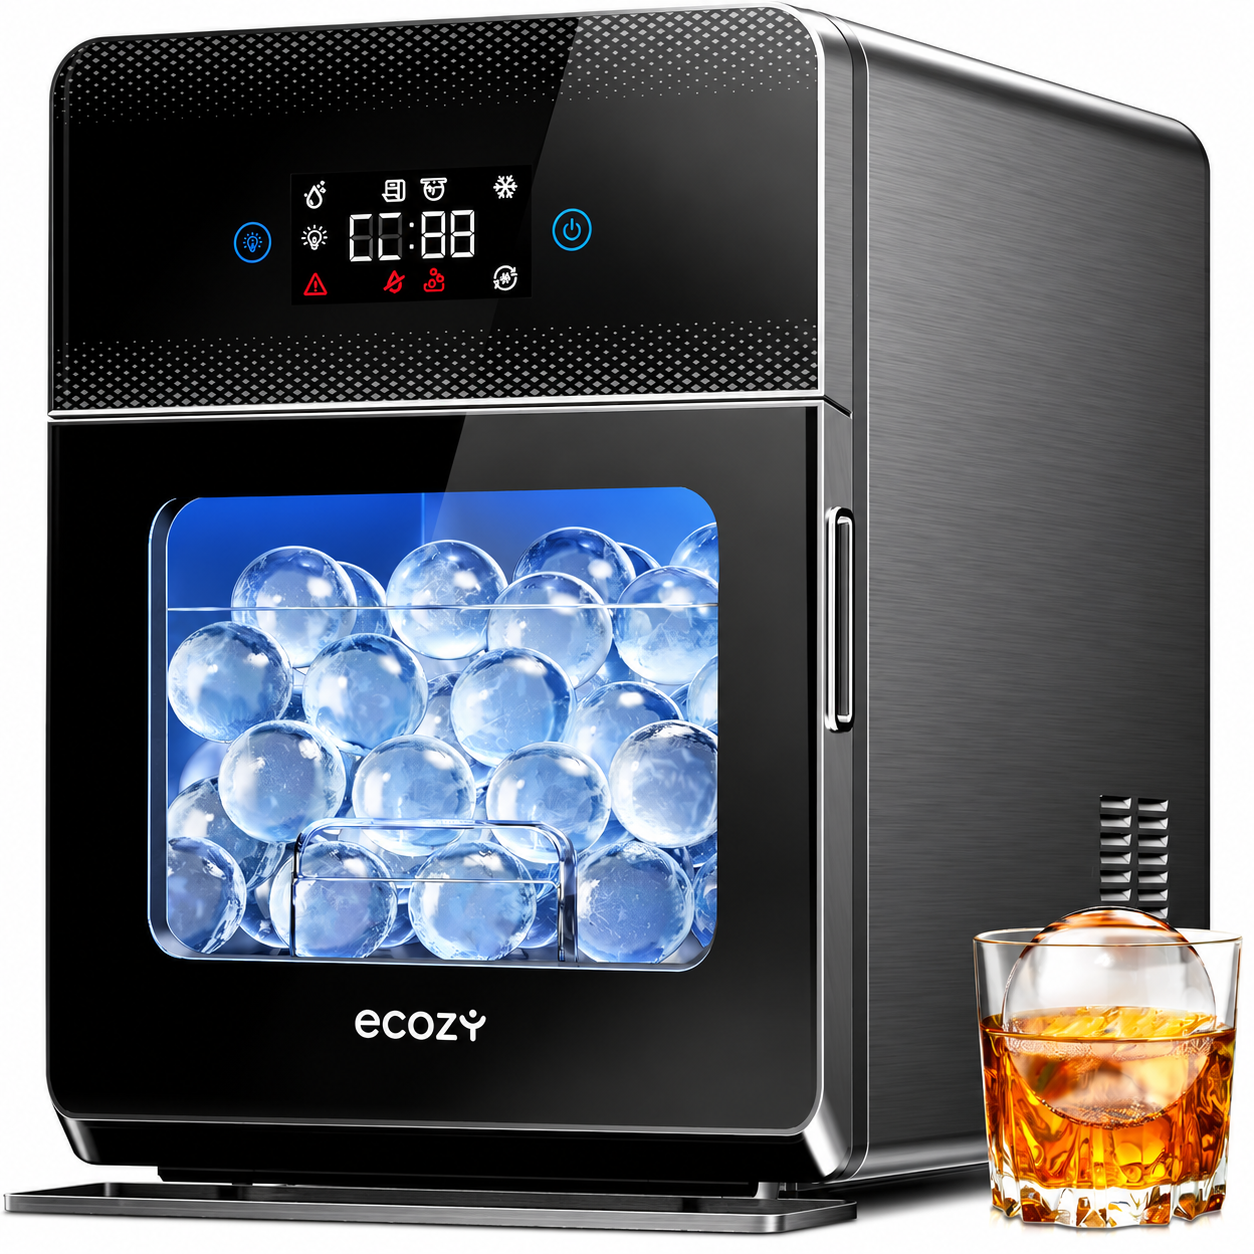
Introduction to ecozy Sphere Ice Maker IM-BM401A
The ecozy Sphere Ice Maker IM-BM401A revolutionizes home bartending with its CrystalFlux technology, producing ultra-transparent 2-inch sphere ice balls that minimize air bubbles for pristine clarity and slow melting. Ideal for whiskey enthusiasts, cocktail lovers, and party hosts, this countertop ice maker delivers up to 144 crystal-clear ice spheres per day—enough to chill around 144 drinks—while producing four balls in just 36-40 minutes. Key benefits include GlacioLock technology, which slows ice melting by 15% when the bin is full, enhanced insulation to keep ice frozen longer, and LED lighting for a stylish display.
Perfect for home bars, entertaining, or daily use, the ecozy Sphere Ice Maker IM-BM401A supports flexible water supply options via an included 6.56ft hose with a 1/4" connector, ensuring easy setup. Its compact design fits countertops effortlessly, powered by about 200W with R290 refrigerant for efficient operation. Target users include those seeking premium clear ice ball maker alternatives to traditional freezers, where murky ice forms due to poor directional freezing. Compared to bullet ice makers, this sphere model elevates drinks with slower dilution, preserving flavors longer.
Available now from ecozy.com and retailers like Best Buy, prices range from $399.99 (sale) to $599.99, offering excellent value over $799.99 list prices. Whether for countertop sphere ice maker needs or clear ice spheres for cocktails, it's a game-changer for beverage perfection.
Package Contents
- Ice Maker
- 1.5m Water Drain Hose (Transparent)
- Water Drain Hose Connector
- Quick Guide
- Spare Ice Mold Drain Plug
- Ice Basket (Preinstalled)
- 2m Water Supply Hose (White)
- Water Tray
- Water Inlet/Drain Port Plug
- Ice Tongs
- Water Supply Hose Connector
- User Manual
- TDS Meter
Product Description
Ice Maker
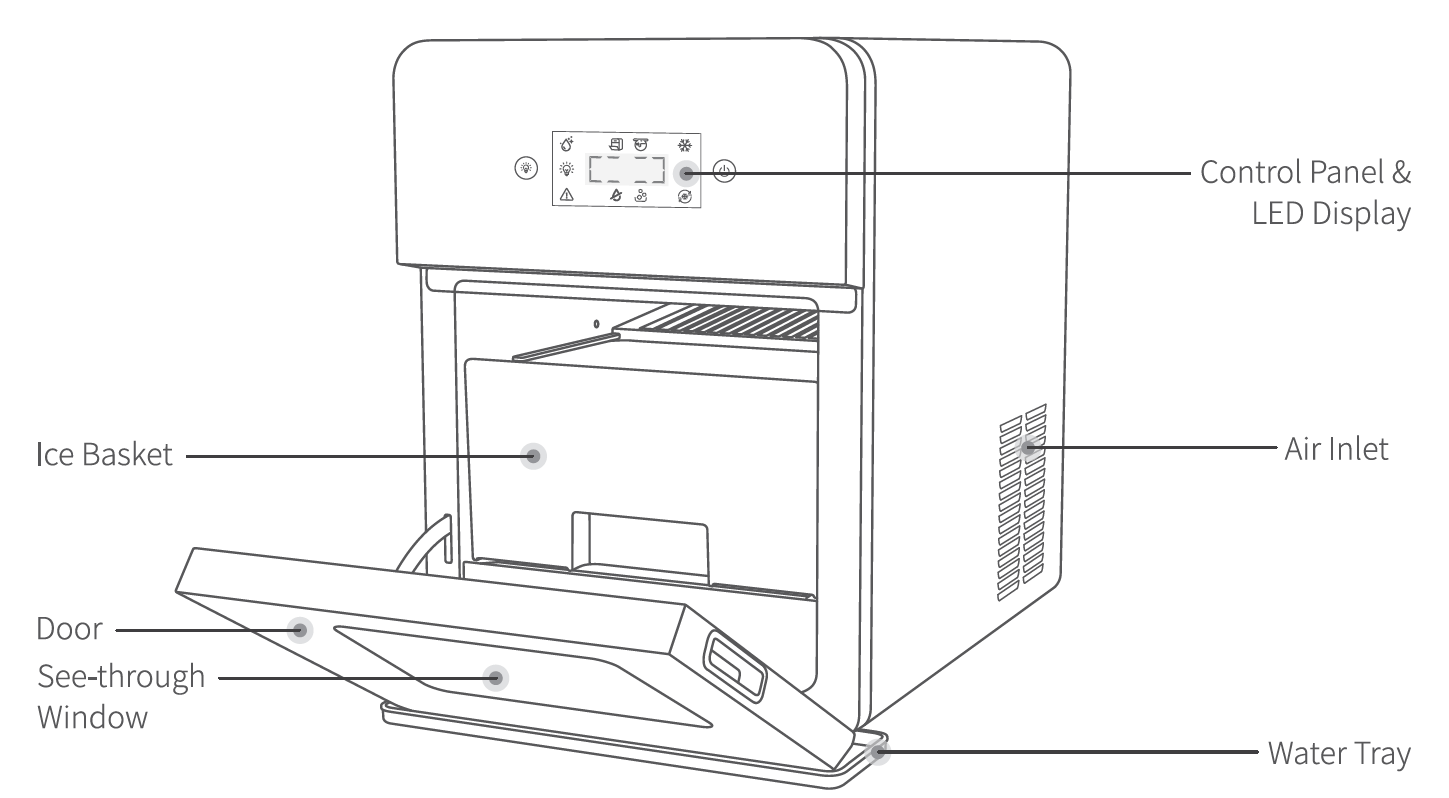
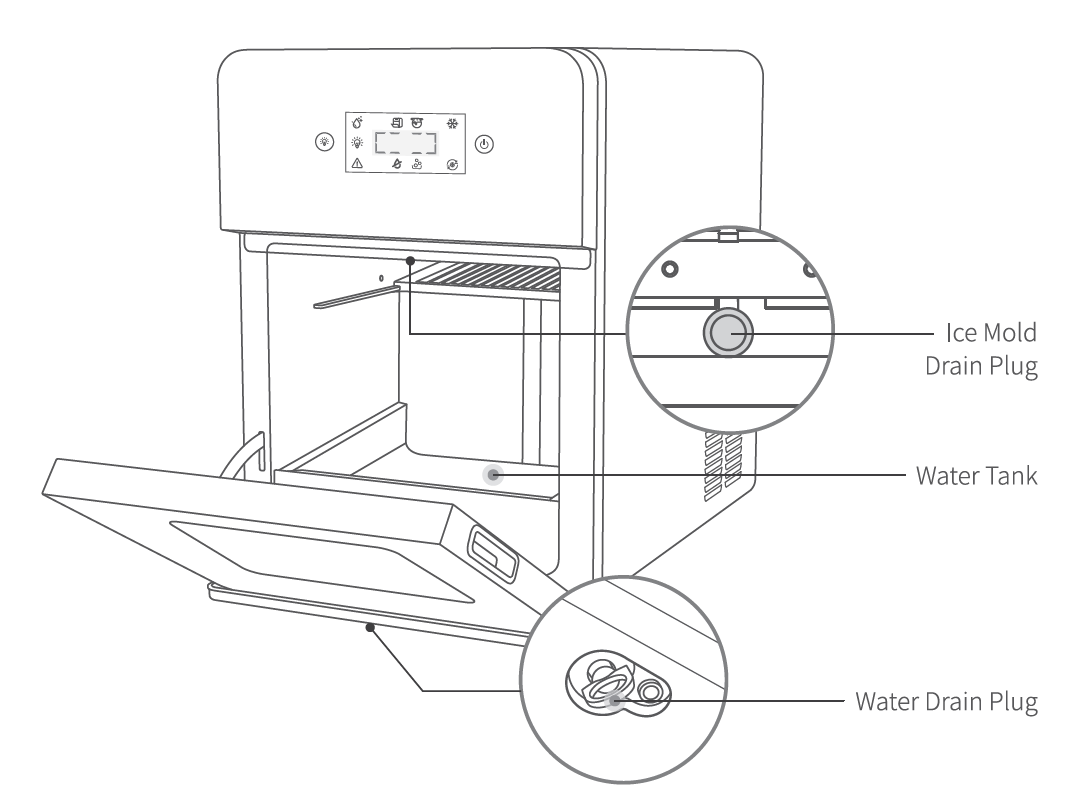
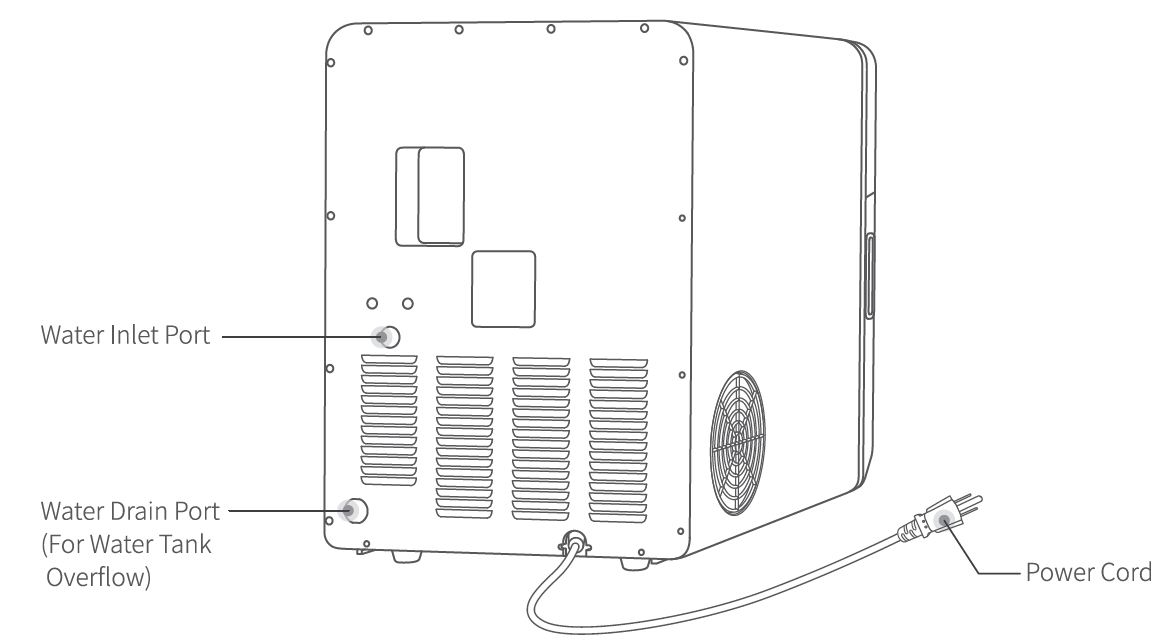
Control Panel & LED Display
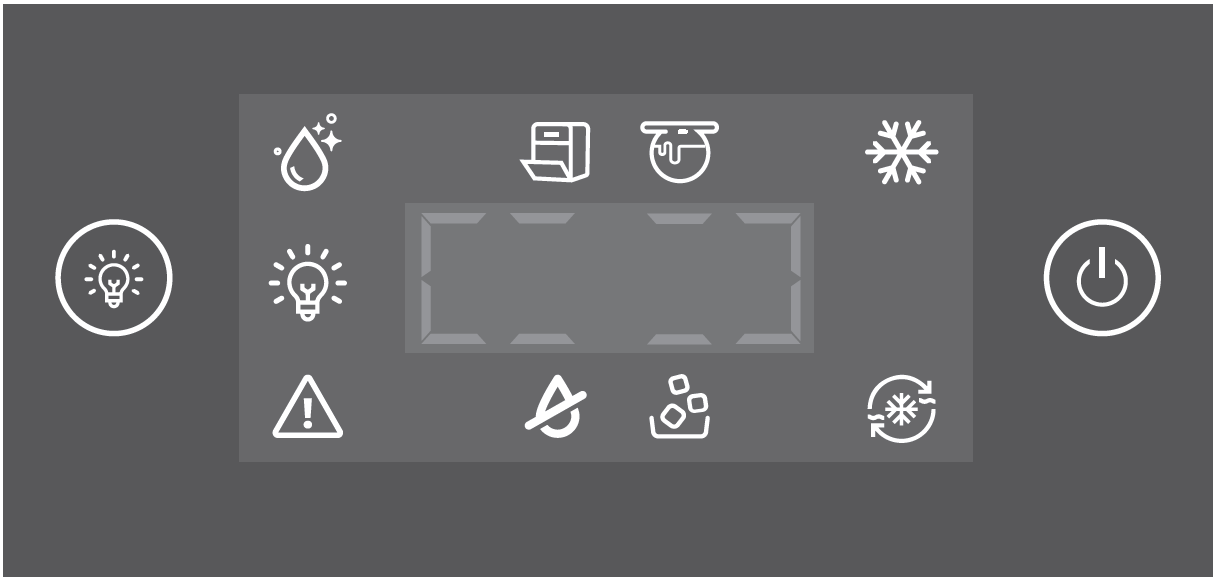
Start/Stop Button
Press once to start or stop ice-making. Press and hold for 5 seconds to reset the machine.
- Light/Cleaning/Mute Button
- Press once to turn the light on or off.
- In standby mode, press and hold for 3 seconds to start self-cleaning.
- Press and hold for 3 seconds again to stop cleaning.
- During ice-making, press and hold for 5 seconds to mute or unmute the sound.
Cleaning Indicator
Lights up when the machine is performing self-cleaning.
Door Open Indicator
Flashes when the door is open.
Ice Harvesting Indicator
Lights up during ice harvesting or defrosting.
Ice Making Indicator
Lights up when the machine is making ice.
Cooling Indicator
Lights up when the ice maker enters cooling mode to keep the ice balls cold.
Ice Full Indicator
Lights up when the ice storage is full.
Add Water Indicator
Lights up when there is insufficient water in the water tank.
- Error Warning
- Ice harvesting error.
- Infrared sensor error.
Light Status Indicator
Lights up when the light is turned on.
Before First Use
- Unpack the ice maker, then remove all the packaging materials.
- Clean the interior of the ice maker, ice basket, and ice tongs with warm water and a soft cloth 3–5 times to remove possible odors or residue caused by manufacturing or transportation.
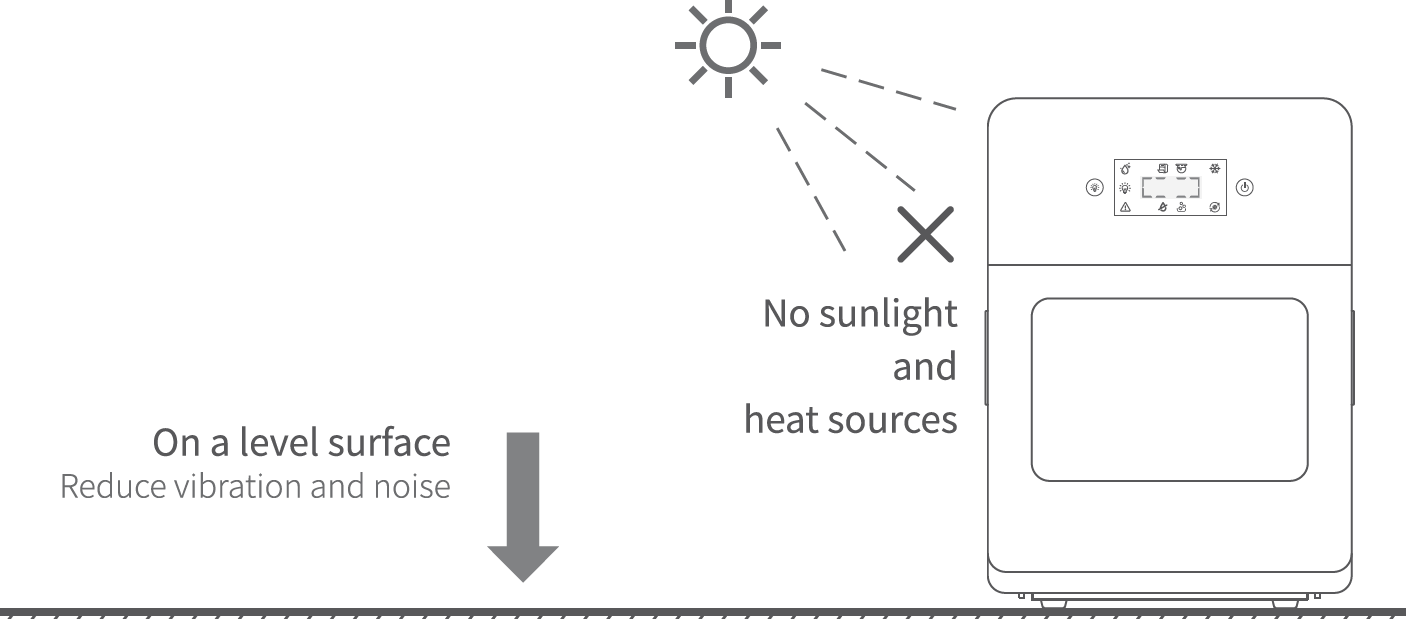
- Place the ice maker on a flat, level surface in a location protected from direct sunlight and other sources of heat, such as a stove, furnace, or radiator.
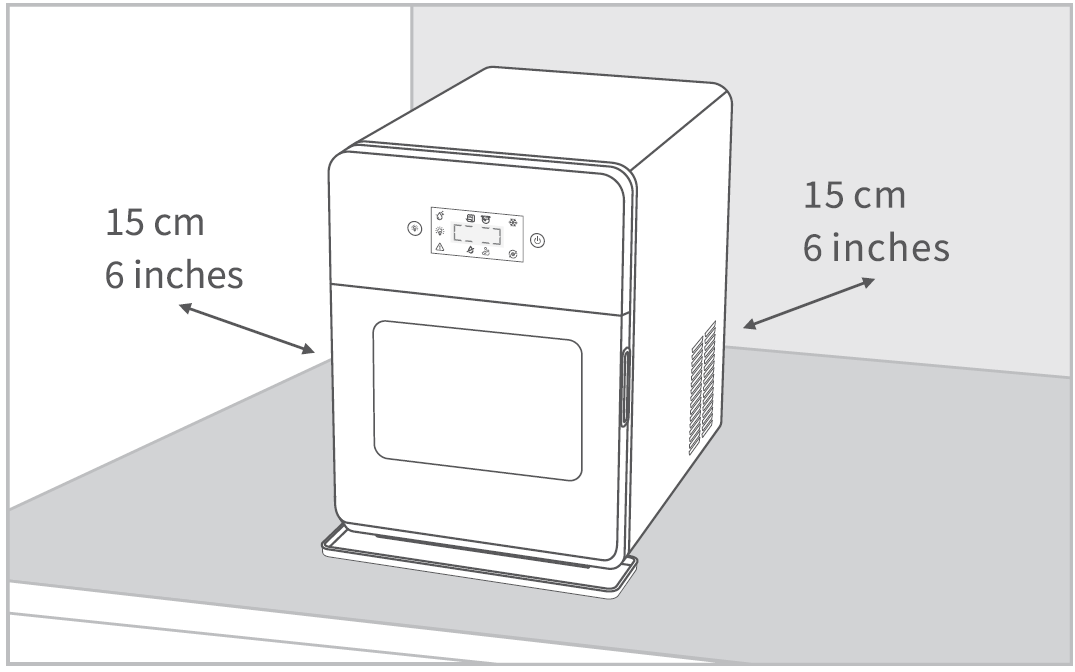
- Make sure to leave at least 6 inches (15 cm) of clearance on all sides of the ice maker for proper air circulation. Then attach the drip tray to the ice maker.
- For a steady water supply and drainage when the water tank is full, it is recommended to connect the water supply and drain hoses. Refer to the Water Hose Connection section for details.
- Before plugging in, let the ice maker stand upright for 2 hours with the door open to allow the refrigerant to settle.
- Plug the ice maker into a well-grounded outlet.
Water Hose Connection
Connect the Water Supply Hose to the Ice Maker If not using the water supply hose, remove the clip from the back water inlet port, seal it with the plug from the accessory bag, and reattach the clip. Then skip the following water supply connection step.
Connect the Water Drain Hose
- Remove the clip from the back water drain port. Then firmly insert the water drain hose connector into the port until you hear a click, confirming secure attachment. Reattach the clip.
- Insert one end of the water drain hose into the connector and connect the other end to the water drain pipeline.
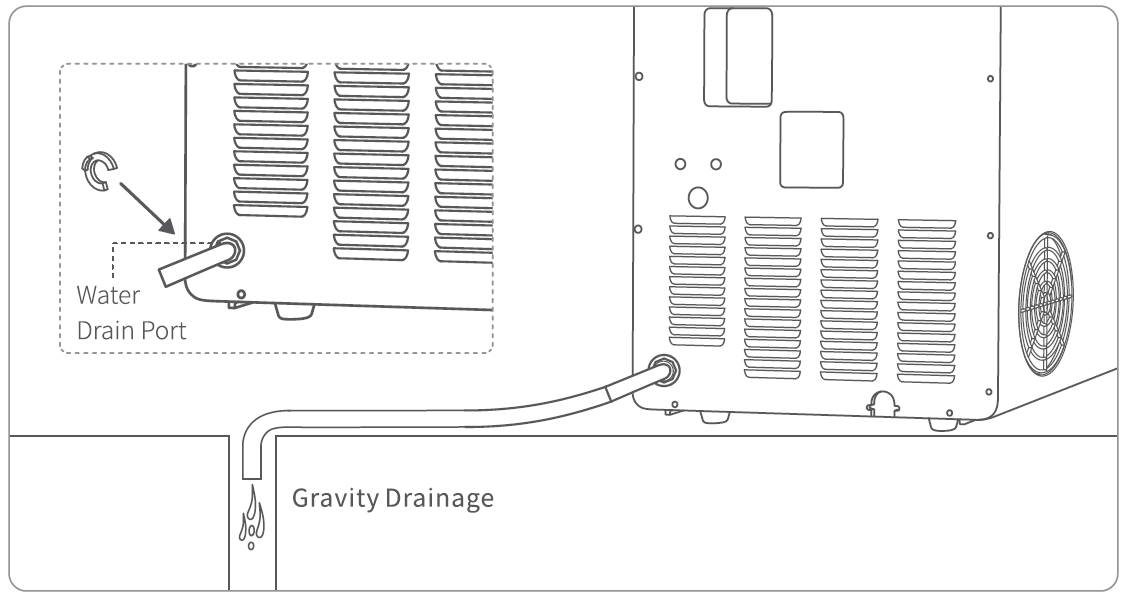
Connect the Water Supply Hose to the Water Supply System
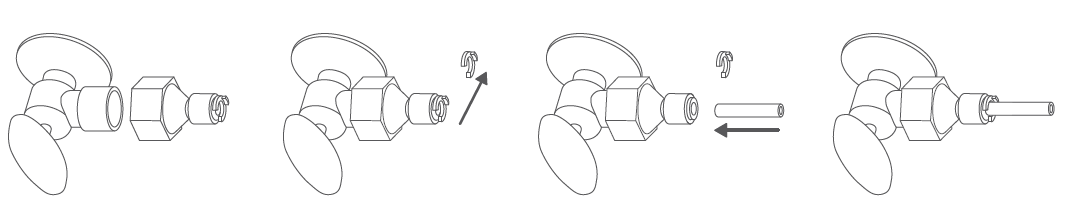
- Install the provided water supply hose connector onto the water faucet of the main water supply system and remove the clip from the connector.
- Insert the other end of the water supply hose fully into the connector port, then reattach the clip.
Use Your Ice Maker
- Add Water
Option 1:
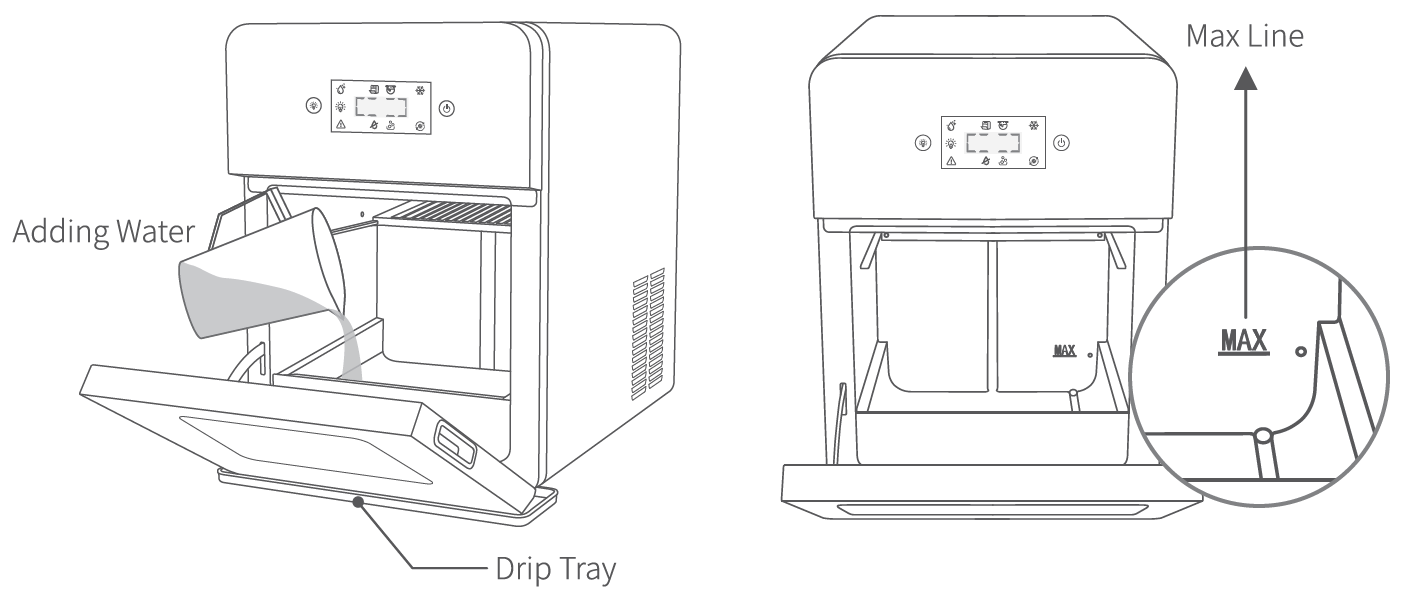
Open the door, remove the ice basket, then fill the water tank with clean drinking water. Make sure that the water level is below the max line. After adding water, place the ice basket back and close the door.
Option 2:
Connect the ice maker's water inlet port to the water supply system as instructed above. Water will automatically be added to the water tank.
Self-Cleaning Mode
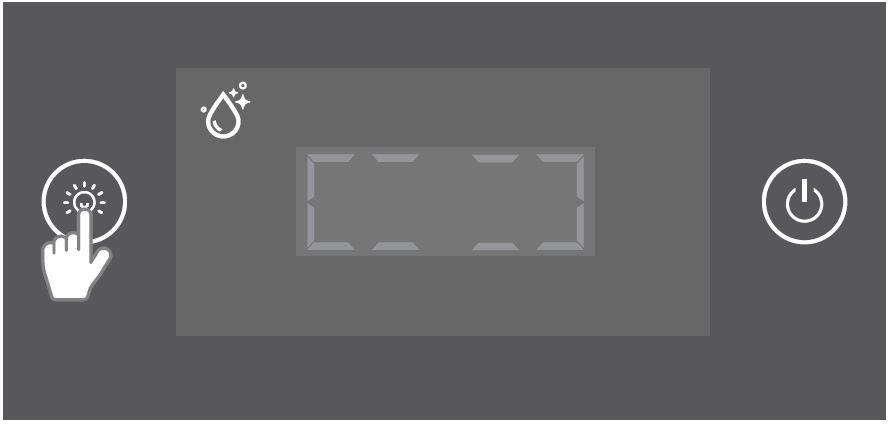
It is recommended to run the self-cleaning process before first use or after the ice maker has been unused for over 48 hours. After plugging in the ice maker, it enters standby mode. Fill the water tank with lukewarm water, then press and hold the light/cleaning/mute button for 3 seconds to start self-cleaning. The self-cleaning process consists of 3 cycles and takes about 3 minutes to complete. During cleaning, the cleaning indicator will light up.
Start/Stop Making Ice
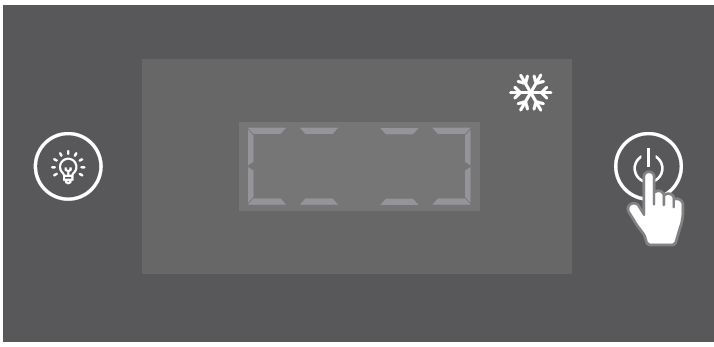
After plugging in the ice maker and adding enough clean drinking water, press the start/stop button. The ice maker will start making ice, and the ice-making indicator will stay lit. To stop making ice, simply press the button again.
Ice Full
The ice full indicator will light up when the sensor detects that the ice basket is full. When the basket is full, the ice maker enters insulation mode to keep the ice balls cool, and the cooling indicator lights up on the display. Remove the ice, and the ice maker will resume working.
Water Drain
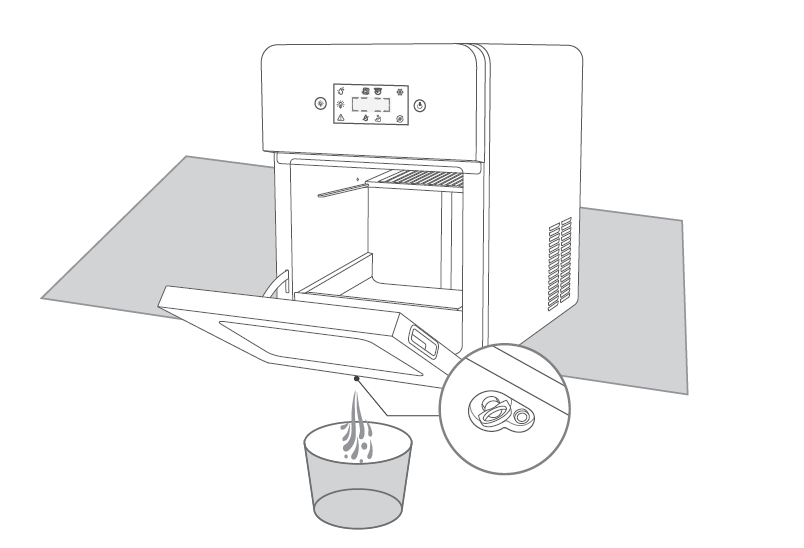
After the ice maker finishes ice-making or self-cleaning, move the ice maker to the edge of the counter and remove the water drain plug at the bottom of the machine to drain the water.
Light
Press the light/cleaning/mute button once to turn on the light, allowing you to monitor the ice-making process. Press it again to turn the light off.
Mute/Unmute
During ice-making, press and hold the light/cleaning/mute button for 5 seconds to mute or unmute the sound.
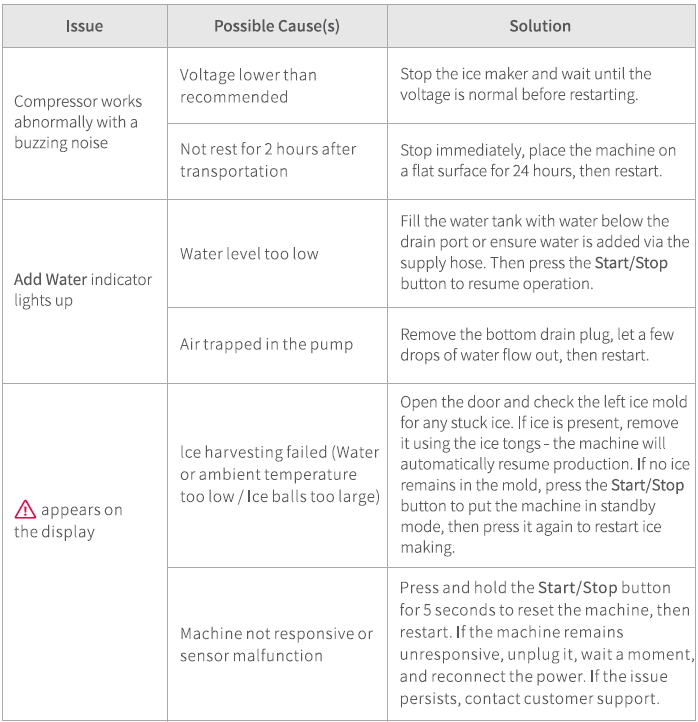
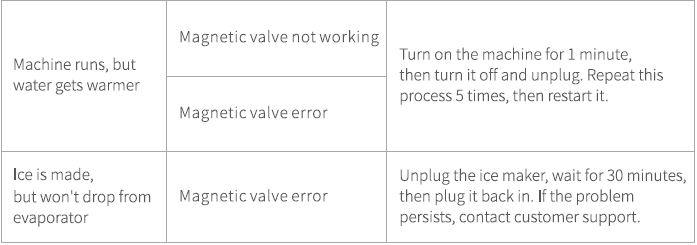
Troubleshooting
Pros and Cons of Ecozy Sphere Ice Maker IM-BM401A
Pros
- Exceptional Clarity and Speed: CrystalFlux produces ultra-clear 2" spheres in 36-40 minutes (four per cycle), far superior to home freezer methods that take hours and yield cloudy ice.
- High Capacity with Smart Features: 22lbs daily production (144 balls), 5.5lbs insulated storage, GlacioLock for 15% slower melt, and LED lights enhance usability and style.
- User-Friendly Design: Includes TDS meter for water quality (under 200 TDS optimal), ice scoop tool, quick-start guide, and flexible hose for easy hookup.
- Great Value: At $399-$599, it outperforms cheaper makers by maintaining ice quality longer, ideal for frequent entertainers versus pricier under-counter models.
Cons
- Water Quality Sensitivity: Requires low TDS water (<200) for best clarity; higher levels may cause imperfections, needing filtration.
- Limited Cooling Depth: Internal temp doesn't freeze extremely low, so full bins may still melt over time without transfer to freezer.
- Higher Initial Cost: More expensive than basic bullet ice makers, though justified for sphere ice fans versus alternatives like manual molds.
Overall, the ecozy Sphere Ice Maker IM-BM401A excels in quality and convenience, providing superior value for the best sphere ice maker for whiskey seekers compared to generic countertop options.
Customer Reviews and Feedback on ecozy Sphere Ice Maker IM-BM401A
Users rave about the ecozy Sphere Ice Maker IM-BM401A, with Best Buy ratings at 5.0 stars from initial reviews praising its "perfect chill" spheres and fast production. YouTube testers highlight the "very clear ice" and 144-ball capacity, noting one ball suffices per drink, with insulated storage keeping ice solid longer than budget models.
Common praises include effortless 40-minute cycles, included tools like the effective scoop, and impressive clarity unattainable at home. Testimonials: "Definitely a lot of ice... stays frozen longer" and “four balls in 40 minutes—impressive!” Frequent recommendations for home bars and parties.
Minor complaints involve water TDS needs and gradual melting in warm rooms, addressed by using filtered water and freezer transfer. No major issues reported; 40+ reviews on ecozy.com echo high satisfaction. Ideal buy for clear ice ball maker review seekers.
Faqs
How do I set up the ecozy Sphere Ice Maker IM-BM401A for the first time?
Why is my ecozy Sphere Ice Maker IM-BM401A producing cloudy ice balls?
How does CrystalFlux technology work in the ecozy Sphere Ice Maker IM-BM401A?
What water sources are compatible with ecozy Sphere Ice Maker IM-BM401A?
How can I optimize ice production speed on ecozy Sphere Ice Maker IM-BM401A?
How often should I clean and maintain the ecozy Sphere Ice Maker IM-BM401A?
What if the ecozy Sphere Ice Maker IM-BM401A won't start or produce ice?
How does GlacioLock technology benefit storage in ecozy Sphere Ice Maker IM-BM401A?
Tags
More ecozy manuals
- Setup: Ecozy Sphere Ice Maker IM-BM401C User Manual
- Setup: Ecozy Brezzano Elite Espresso & Americano & Cold Brew Machine CM-PM020A User Manual
- Setup: Ecozy Ice Maker IM-ND481B User Manual
- Setup: Ecozy Brezzano DuoSet Coffee Maker CM9102TE-UL User Manual
- Setup: Ecozy ICE MAKER IM-SS440A User Manual
- Setup: Ecozy Ice Maker IM-NB661A User Manual
Leave a Comment