Ego Brushless Power Mower LM2020SP Manual
Content
Introduction
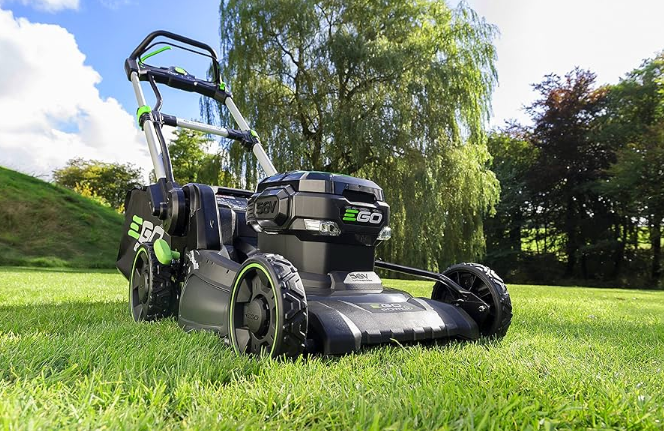
The EGO Brushless Power Mower LM2020SP is a state-of-the-art lawn mower designed to provide homeowners with a convenient and efficient way to maintain their lawns. This mower is powered by a high-performance brushless motor that delivers quiet and reliable operation, making it an excellent choice for residential use. Should you experience any problem you cannot easily remedy. This manual contains important information on the safe assembly, operation, and maintenance of your mower.
Detailed Specifications
The EGO Brushless Power Mower LM2020SP is packed with features that make it stand out from the competition. Here are some of its key specifications:
- Deck size: 20 inches
- Battery voltage: 56 volts
- Battery capacity: 5.0 Ah
- Cutting height range: 1.2 to 3.5 inches
- Wheel size: 10 inches (front), 12 inches (rear)
- Weight: 75 pounds
- Warranty: 5 years
READ ALL INSTRUCTIONS CAREFULLY BEFORE USING THE EGO BRUSHLESS POWER MOWER LM2020SP
WARNING: Some dust created by power cutting contains chemicals known to the state of California to cause cancer, birth defects, or other reproductive harm. Some examples of these chemicals are:
- Lead from lead-based paints
- Crystalline silica from bricks and cement and other masonry products
- Arsenic and chromium from chemically-treated lumber
Your risk from these exposures varies, depending on how often you do this type of work. To reduce your exposure to these chemicals: work in a well-ventilated area, and work with approved safety equipment, such as those dust masks that are specially designed to filter out microscopic particles.
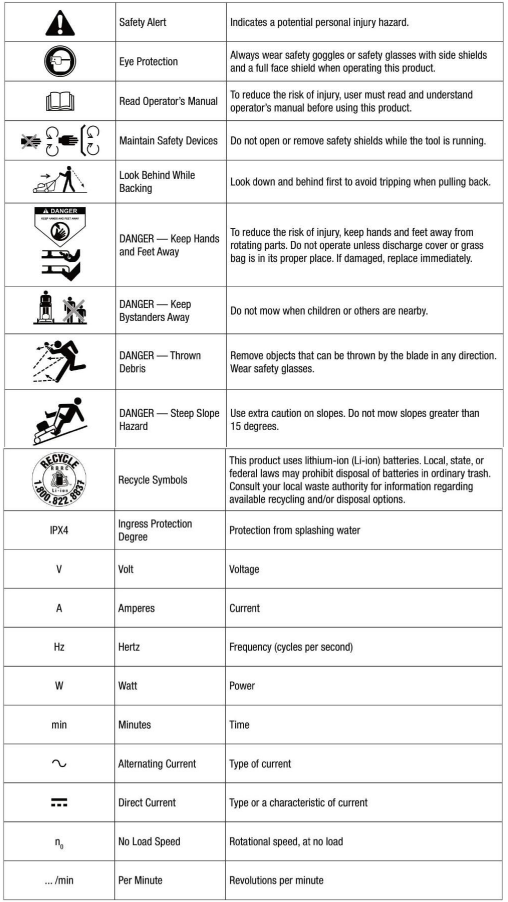
SAFETY SYMBOLS
The purpose of safety symbols is to attract your attention to possible dangers. The safety symbols and the explanations with them deserve your careful attention and understanding. The symbol warnings do not, by themselves, eliminate any danger. The instructions and warnings they give are no substitutes for proper accident prevention measures.
WARNING: Be sure to read and understand all safety instructions in this Operator's Manual, including all safety alert symbols such as "DANGER," "WARNING," and "CAUTION" before using this tool. Failure to follow all instructions listed below may result in electric shock, fire, and/or serious personal injury.
SYMBOL MEANING
SAFETY ALERT SYMBOL: Indicates DANGER, WARNING, or CAUTION. May be used in conjunction with other symbols or pictographs.
WARNING: The operation of any power tools can result in foreign objects being thrown into your eyes, which can result in severe eye damage. Before beginning power tool operation, always wear safety goggles or safety glasses with side shields and a full face shield when needed. We recommend a Wide Vision Safety Mask for use over eyeglasses or standard safety glasses with side shields. Always use eye protection which is marked to comply with ANSI 287.1.
SAFETY INSTRUCTIONS
This page depicts and describes safety symbols that may appear on this product. Read, understand, and follow all instructions on the machine before attempting to assemble and operate.
SAFETY RULES FOR CORDLESS LAWN MOWER
DANGER: This machine was built to be operated according to the rules for safe operation included in this manual. As with any type of power equipment, carelessness or error on the part of the operator can result in serious injury. This machine is capable of amputating hands and feet and throwing objects. Failure to observe all safety instructions could result in serious injury or death.
WARNING: When using electric lawn mowers, basic safety precautions should always be followed to reduce the risk of fire, electric shock, and personal injury. These basic precautions include the following:
CHILDREN
Tragic accidents can occur if the operator is not alert to the presence of children. Children are often attracted to the mower and mowing activity. They do not understand the dangers. Never assume that children will remain where you last saw them.
- Keep children out of the mowing area and under the watchful care of a responsible adult other than the operator.
- Be alert and turn the mower off if a child enters the area.
- Use extreme care when approaching blind corners, doorways, shrubs, trees, or other objects that may obscure your vision of a child who may run into the mower.
- Never allow children under 14 years old to operate a power mower. Children 14 years old and over should read and understand the operation instructions and safety rules in this manual and should be trained and supervised by a parent. Only responsible individuals who are familiar with these rules of safe operation should be allowed to use this machine.
General Operation
- Read this operator's manual carefully in its entirety before attempting to assemble this machine. Read, understand, and follow all instructions on the machine and in the manuals before operation. Be completely familiar with the controls and proper use of this machine before operating it. Keep this manual in a safe place for future and regular reference and for ordering replacement parts.
- Use the right appliance - Do not use the lawn mower for any job except that for which it is intended. Your lawn mower has been designed to perform only one job: to mow grass.
- Don't overreach - Keep proper footing and balance at all times.
- Objects struck by the lawn mower blade can cause severe injuries to persons. The lawn should always be carefully examined and cleared of all objects prior to each mowing.
- Keep the area of operation clear of all persons, particularly small children, and pets.
- Before and while moving backwards with the mower, look behind and down for small children and other people.
- Keep clear of the discharge opening at all times.
- This machine is a precise piece of power equipment, not a plaything. Therefore, exercise extreme caution at all times. Your unit has been designed to perform one job: to mow grass. Do not use it for any other purpose.
- Don't force the lawn mower - it will do the job better and more safely at the rate for which it was designed.
- Thoroughly inspect the area where the equipment is to be used. Remove all stones, sticks, wire, toys and other foreign objects that could be tripped over or picked up and thrown by the blade. Thrown objects can cause serious personal injury.
- Plan your mowing pattern to avoid discharge of material toward roads, sidewalks, bystanders and the like. Also, avoid discharging material against walls or obstructions, which may cause discharged material to ricochet back toward the operator.
- To help avoid blade contact or an injury from thrown objects, stay in the operator zone behind the handles and keep children, bystanders, helpers, and pets at least 100 feet (30m) from the mower while it is in operation. Stop the machine if anyone enters the area.
- Always wear safety glasses or safety goggles during operation and while performing an adjustment or repair to protect your eyes. Thrown objects that ricochet can cause serious injury to the eyes. Always use a face or dust mask if the operation is dusty.
- Dress properly - Do not wear loose clothing or jewelry. They can be caught in moving parts. Use of rubber gloves and footwear is recommended when working outdoors. Wear sturdy, rough-soled work shoes and close-fitting slacks and shirts. Shirts and pants that cover the arms and legs and steel-toed shoes are recommended. Never operate this machine in bare feet, sandals, slippery or lightweight (e.g., canvas) shoes.
- Do not put hands or feet near rotating parts or under the cutting deck. Contact with the blade can amputate hands and feet.
- A missing or damaged discharge cover can cause blade contact or injuries from thrown objects.
- Many injuries occur as a result of the mower being pulled over the foot during a fall caused by slipping or tripping. Do not hold onto the mower if you are falling; immediately release the handle.
- Never pull the mower back toward you while you are walking. If you must back the mower away from a wall or obstruction, first look down and behind you to avoid tripping, and then follow these steps:
- Step back from the mower to fully extend your arms.
- Be sure you are well balanced with sure footing.
- Pull the mower back slowly, no more than halfway toward you.
- Repeat these steps as needed.
- Do not operate the mower while under the influence of alcohol or drugs.
- Stay alert - watch what you are doing. Use common sense. Do not operate the lawn mower when you are tired.
- The motor/blade control handle is a safety device. Never attempt to bypass its operation. Doing so makes the safety device inoperative and may result in personal injury through contact with the rotating blade. The motor/blade control handle must operate easily in both directions and automatically return to the disengaged position when released.
- Avoid dangerous environments - Don't use lawn mowers in damp or wet locations to avoid slipping and falling during operation.
- Always be sure of your footing. A slip and fall can cause serious personal injury. If you feel you are losing your footing, release the motor/blade control handle immediately and the blade will stop rotating within three seconds.
- Mow only in daylight or good artificial light. Walk, never run while operating.
- Stop the blade when crossing gravel drives, walks, or roads.
- If the equipment should start to vibrate abnormally, immediately stop the motor, remove the battery and check for the cause. Vibration is generally a warning of trouble.
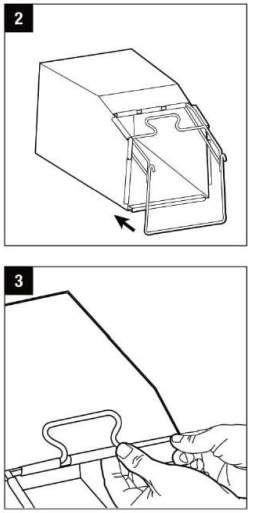
- Before cleaning the machine, unclogging the chute or removing or replacing the grass bag, mulching insert, or side discharge chute, turn the motor off and wait until the blade comes to a complete stop, then remove the battery pack. The cutting blade continues to rotate for a few seconds after the motor is shut off. Never place any part of the body in the blade area until you are sure the blade has stopped rotating.
- Never operate the mower without the proper trailing shield, discharge cover, grass bag, mulching insert, side discharge chute, motor/blade control handle, or other safety protective devices in place and working. Never operate the mower with damaged safety devices. Failure to do so can result in personal injury.
- If situations occur that are not covered in this manual, use care and good judgment. Contact EGO Customer Service for assistance.
- Use only with the battery packs and chargers listed below:
BATTERY PACK CHARGER
BA1120,BA1400,BA2240: CH2100
BA2800,BA4200: CH5500
OPERATION ON A SLOPE
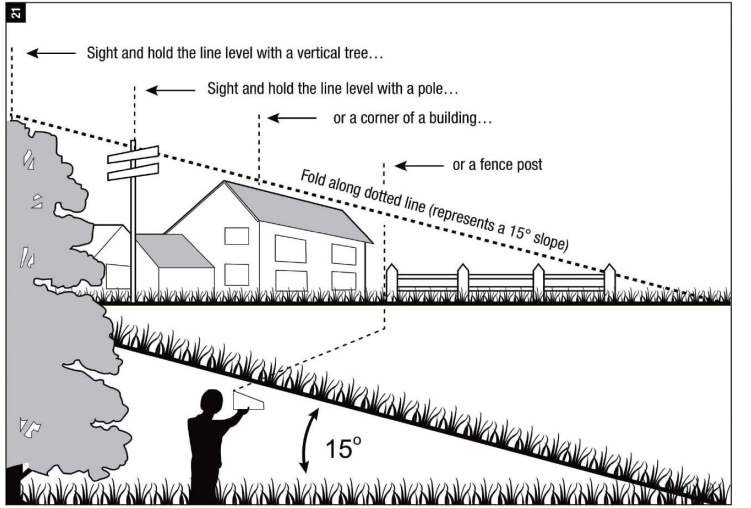
Slopes are a major factor related to slip-and-fall accidents, which can result in severe injury. Operation on slopes requires extra caution. If you feel uneasy on a slope, do not mow it. For your safety, use the slope gauge on page 22 to measure slopes before operating this unit on a sloped or hilly area. If the slope is greater than 15 degrees, do not mow it.
Do
- Mow across the face of slopes; never mow up and down. Exercise extreme caution when changing direction on slopes.
- Watch for holes, ruts, rocks, hidden objects, or bumps which can cause you to slip or trip. Tall grass can hide obstacles.
Do not
- Do not mow near drop-offs, ditches, or embankments; you could lose your footing or balance.
- Do not mow slopes greater than 15 degrees, as shown on the slope gauge.
- Do not mow on wet grass. Unstable footing could cause slipping.
SERVICE
WARNING: Grass bag components, the discharge cover, side discharge chute, mulching insert, and trailing shield are subject to wear and damage, which could expose moving parts or allow objects to be thrown and could increase the risk of injury. For safety protection, frequently check all components and replace damaged components immediately with identical replacement parts, listed in this manual.
- If the mower's built-in overload protection switch frequently trips, contact EGO Customer Service or your closest EGO service center.
- Do not wash the mower with a hose; avoid getting water in the motor and electrical connections.
- Remove the battery and store the idle lawn mower in a covered area when not in use. Allow the motor to cool before storing it in any enclosure. The lawn mower should be stored in a dry, high, or locked-up enclosure, out of reach of children.
- When servicing, use only identical replacement parts listed in this manual. Use of parts that do not meet the original equipment specifications may lead to improper performance and compromised safety.
- Remove or disconnect the battery pack before servicing, cleaning, or removing material from the lawn mower.
- Follow instructions for lubricating and changing accessories.
- Keep handles dry, clean, and free from oil and grease.
- To reduce a fire hazard, keep the motor cover free of grass, leaves, and debris build-up.
- Check the blade and motor mounting bolts at frequent intervals for proper tightness. Also, visually inspect the blade for damage (e.g., bending, cracking, and wear.). Replace the blade only with the identical replacement blade, as listed in this manual.
- Maintain your mower with care - keep the mower blade sharp and clean for the best and safest performance. Mower blades are sharp and can cut. Wrap the blade or wear gloves and use extra caution when servicing it.
- Keep all nuts, bolts, and screws tight to be sure the equipment is in safe working condition.
- Never remove or tamper with safety devices. Regularly check their proper operation. Never do anything to interfere with the intended function of a safety device or to reduce the protection provided by a safety device.
- Always stop the motor before making adjustments to a wheel or a cutting-height adjustment.
- After striking a foreign object, stop the motor, remove the battery pack, allow the blade to stop rotating, and thoroughly inspect the mower for any damage. Repair the damage before operating the mower.
- Maintain or replace safety and instruction labels, as necessary.
SPECIFICATIONS
Model Number Self Propel System | LM2020 No | LM2020SP Yes |
Voltage | 56 V::-: | 56 V::-: |
No-Load Speed Approximate Cutting Height Settings | 3000 rpm | 3000 rpm |
1 | 1-3/16" (30 mm) | 1-3/16" (30mm) |
2 | 1-9/16" (40 mm) | 1-9/16" (40mm) |
3 | 2-1/8" (55mm) | 2-1/8" (55 mm) |
4 | 2-3/4" (70 mm) | 2-3/4" (70mm) |
5 | 3-3/8' (85 mm) | 3-3/8' (85 mm) |
6 | 4" (100 mm) | 4" (100mm) |
Deck Size | 20" | 20" |
Grass Bag Volume | 1.7 Bushel (60 L) | 1.7 Bushel (60 L) |
Mower Weight (Without battery pack; with mulching insert) | 55.18 lb. (25.08 Kg) | 60.68 lb. (27.58 Kg) |
APPROXIMATE RUNNING TIME
Battery | With BA2800 56V Battery 5.0Ah | With BA4200 56V Battery 7.5Ah |
LM2020 | 55 min | 85 min |
LM2020SP | 45 min | 70 min |
NOTICE: The actual running time will vary with grass conditions: species, density, moisture, etc.
ACCESSORIES
- PART NAME
Blade - MODEL NUMBER
AB2000
WARNING: The following part is subjected to be worn out from normal use. Use only identical replacement parts listed below. Use of parts that do not meet the original equipment specifications may lead to improper performance and compromised safety.
PACKING LIST
| PART NAME | QUANTITY |
Lawn mower | 1 |
Grass bag frame | 1 |
Mulching insert (pre-installed in mower) | 1 |
Side discharge chute | 1 |
Operator's manual | 1 |
1 |
The packing list for the EGO Brushless Power Mower LM2020SP includes all necessary components for assembly and operation.
DESCRIPTION
The safe use of this product requires an understanding of the information on the tool and in this operator's manual, as well as knowledge of the project you are attempting. Before using this product, familiarize yourself with all operating features and safety rules.
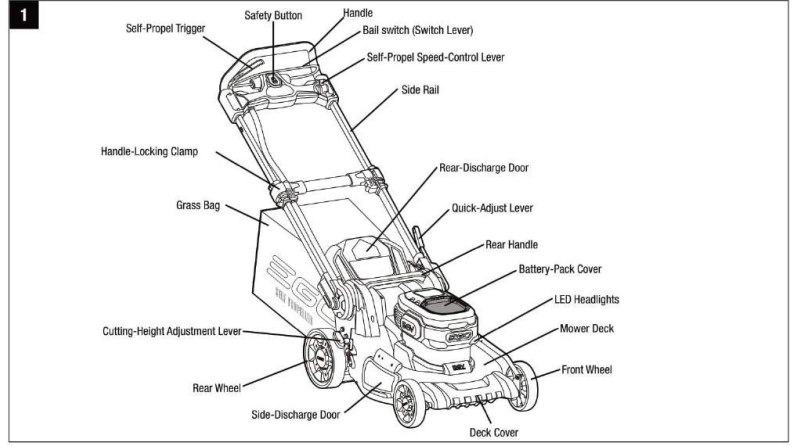
- SAFETY BUTTON The safety button must be pressed down before the motor can be started.
- BAIL SWITCH The bail switch is located on the upper handle of the mower. The switch engages and disengages the motor/blade.
- SELF-PROPEL TRIGGER (model LM2020SP only) Turns the self-propel function ON and OFF.
- SELF-PROPEL SPEED CONTROL LEVER (model LM2020SP only) Increases or decreases the self-propel speed by moving the control lever.
- A WARNING: The bail switch and the safety button are safety devices. Never attempt to bypass their operations.
- ELECTRIC BRAKE Quickly stops blade rotation when the bail switch is released.
- HANDLE-LOCKING CLAMP Locks/unlocks the side rails in the extended or the recessed position.
- SIDE RAILS Can be extended and locked for operation or recessed for storage.
- QUICK-ADJUST LEVER Locks/unlocks the handle position when adjusting the angle of the mower handle:
- Locked Storage Position
- Grass Bag Attachment/Removal Position
- Upper Operating Position
- Middle Operating Position
- Lower Operating Position
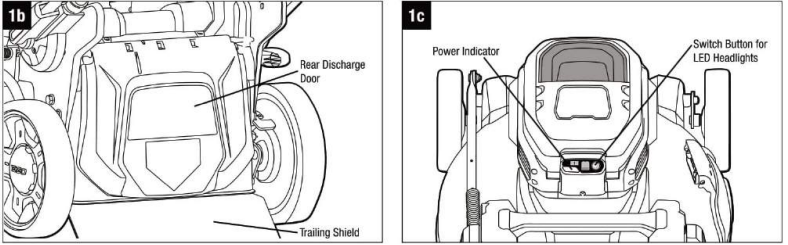
TRAILING SHIELD & REAR DISCHARGE DOOR
The trailing shield is designed to minimize stones or other objects being thrown backward by the mower blade. The shield and the rear discharge door minimize the possibility of accidental foot contact with the blade. DO NOT operate the mower without the trailing shield and rear discharge door in place.
LED HEADLIGHTS
The LED headlights are located in the front of the mower. This feature provides extra light for increased visibility.
SPRING-LOADED CUTTING-HEIGHT ADJUSTMENT LEVER One-handed cutting-height adjustment.
ASSEMBLY of EGO Brushless Power Mower LM2020SP
WARNING: To prevent accidental starting that could cause serious personal injury, always remove the battery pack from the tool when assembling parts.
WARNING: Do not attempt to modify this tool or create accessories not recommended for use with this mower. Any such alteration or modification is misuse and could result in a hazardous condition leading to serious injury.
UNPACKING
- First remove all the accessories from the carton, then grasp both the front part of the deck cover and the rear handle at the same time to carefully lift the mower up and out of the carton. Make sure that all items listed in the parts list are included.
- Inspect the product carefully to make sure that no breakage or damage occurred during shipping.
- Do not discard the packing material until you have carefully inspected and satisfactorily operated the mower.
- If any parts are damaged or missing, please return the mower to the place of purchase.
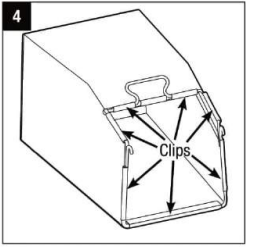
ASSEMBLING THE GRASS BAG
- Check the grass bag before assembling, to make sure that there is no damage.
- Slide the grass bag onto the frame, as shown in Fig. 2.
- Assemble the top clips to the frame, as shown in Fig. 3, then assemble the two side clips. Assemble the bottom clip last.
The completely assembled grass bag is shown in Fig. 4.
ADJUSTING THE FOLDABLE HANDLE
WARNING: Do not attempt to start the mower until the handle has been locked at one of the three preset operating positions.
- LOCKED STORAGE POSITION: Your mower is shipped with the handle in the compact, locked position (Fig. 5).
GRASS BAG ATTACHMENT/REMOVAL POSITION: Press and hold the quick-adjust lever with one hand to release the handle from the locked storage position. Begin to lift the handle from its folded position with your other hand, and then release the lever (Fig. 5). Gently pivot the handle upward until you hear and feel the lock pin engage in the first position (Fig. 6). This position allows easy access to install and remove the grass bag.
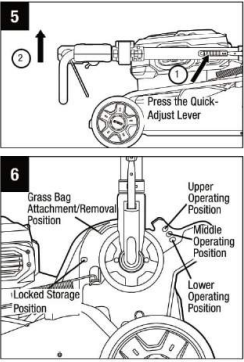
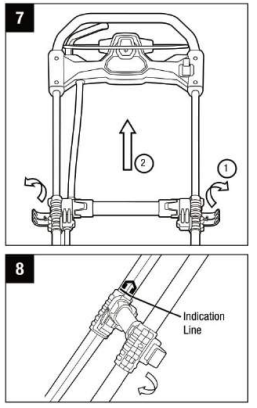
- UPPER OPERATING POSITION: Lift the handle with one hand. Gently pivot the handle backward until you hear and feel the lock pin engage in the Upper Operating Position. Fully extend the side rails and securely close the two handle-locking clamps (Fig. 7 & 8). Taller users may prefer this position.
- MIDDLE OPERATING POSITION: Press and hold the quick-adjust lever with one hand to release the handle from the upper operating position. Begin to lower the handle with your other hand, and then release the lever. Gently pivot the handle downward until you hear and feel the lock pin engage in the Middle Operating Position. Fully extend the side rails and securely close the two handle-locking clamps (Fig. 7 & 8).
LOWER OPERATING POSITION: Press and hold the quick-adjust lever with one hand to release the handle from the middle operating position. Begin to lower the handle with your other hand, and then release the lever. Gently pivot the handle downward until you hear and feel the lock pin engage in the Lower Operating Position. Fully extend the side rails and securely close the two handle-locking clamps (Fig. 7 & 8).
Note: The motor cannot be started unless:
- The side rails are fully extended.
- Both green handle-locking clamps are securely closed.
- The handle is locked into one of the three operating positions.
ATTACHING/REMOVING THE GRASS BAG
WARNING: Do not at any time make any adjustment to the lawn mower without first stopping the motor, removing the battery pack, and waiting for the blade to stop rotating.
NOTICE: Remove the mulching insert before attaching the grass bag to the mower.
- Remove the battery.
- Adjust the handle to the Grass Bag Attachment/Removal Position (please see ADJUSTING THE FOLDABLE HANDLE).
- Lift the rear-discharge door.
Hook the grass bag assembly on the pivot rod (Fig. 9). Release the discharge door so that it rests on the grass bag.
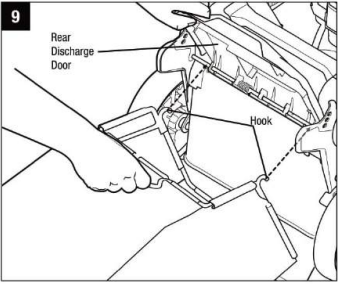
- To remove the grass bag, lift the rear-discharge door on the mower. Lift the grass bag up, off of the pivot rod.
- Release the discharge door.
WARNING: When using the grass bag, never operate the mower unless the hooks on the grass bag are firmly seated on the pivot rod and the rear-discharge door rests firmly against the top of the grass bag.
WARNING: Under normal usage, bag material is subject to wear. To reduce the risk of injury, frequently inspect the bag assembly and replace it if there are any signs of wear or deterioration. Use only grass bags manufactured for this mower.
ATTACHING/REMOVING THE MULCHING INSERT
A WARNING: Do not at any time make any adjustment to the lawn mower without first stopping the motor, removing the battery pack, and waiting for the blade to stop rotating.
- Remove the battery.
- Lift the rear-discharge door.
Grasp the handle of the mulching insert and fully insert it into the mower, so that it is securely seated (Fig. 10).
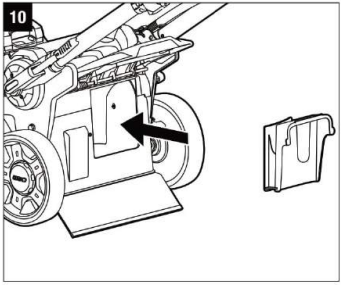
- To remove the mulching insert, lift the rear-discharge door, grasp the handle of the mulching insert, and pull it out.
- Release the discharge door and make sure it rests firmly against the mulching insert.
NOTICE: The mulching insert must be removed in order to install and use the grass bag and must be re-installed when the grass bag is removed.
ATTACHING/REMOVING THE SIDE DISCHARGE CHUTE
WARNING: Do not at any time make any adjustment to the lawn mower without first stopping the motor, removing the battery pack, and waiting for the blade to stop rotating.
To Attach
- Remove the battery.
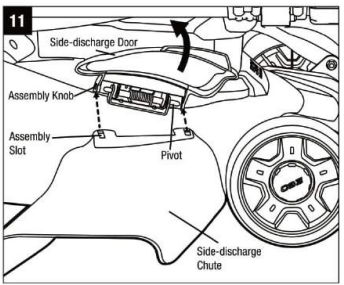
- Lift the side-discharge door.
- Align the slot in the side-discharge chute with the knob on the side-discharge door.
- Gently release the side-discharge door and allow it to rotate around the pivot until it rests firmly on the side-discharge chute.
NOTICE: The mulching insert must be installed when the side discharge chute is attached.
To Remove
- Grasp the side-discharge chute with one hand and use your other hand to lift the side-discharge door.
- Remove the chute and close the side-discharge door until it rests securely against the mower deck.
Description
The EGO Brushless Power Mower LM2020SP is designed for easy and convenient use. Its 20-inch deck provides a wide cutting path, reducing the time it takes to mow your lawn. The mower's brushless motor is powerful and efficient, delivering quiet and reliable operation, even on tough grass. The LM2020SP also features a convenient battery system, making it easy to swap out batteries when they run out of power. With a cutting height range of 1.2 to 3.5 inches, the LM2020SP can handle a variety of grass types and heights, making it an excellent choice for homeowners with different lawn care needs.
OPERATION
WARNING: Do not allow familiarity with this product to make you careless. Remember that a careless fraction of a second is sufficient to inflict serious injury.
WARNING: Always wear eye protection marked to comply with ANSI Z87.1. Failure to do so could result in objects being thrown into your eyes and other possible serious injuries.
WARNING: Do not use any attachments or accessories not recommended by the manufacturer of this product. The use of attachments or accessories not recommended can result in serious personal injury.
ADJUSTING THE CUTTING-HEIGHT
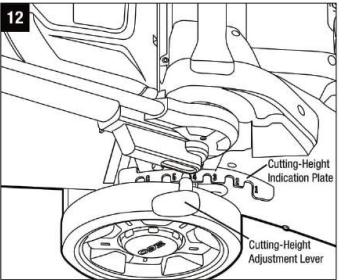
WARNING: Do not at any time make any adjustment to the lawn mower without first stopping the motor, removing the battery pack, and waiting for the blade to stop rotating.
WARNING: Keep your feet away from the deck when adjusting its height. The mower can be set to 6 cutting heights between 1-3/16'' (30mm) and 4" (100mm). Choose the proper cutting height according to the type and condition of the grass.
- Use one hand to hold the right handle tube for stability, and use the other hand to move the cutting-height adjustment lever outwards from the slots in the cutting-height indication plate.
- Move the cutting-height adjustment lever toward the back of the mower for a higher cutting height; move it toward the front of the mower for a lower cutting height.
- Once arriving at the desired cutting-height position, engage the cutting-height adjustment lever back into the slot.
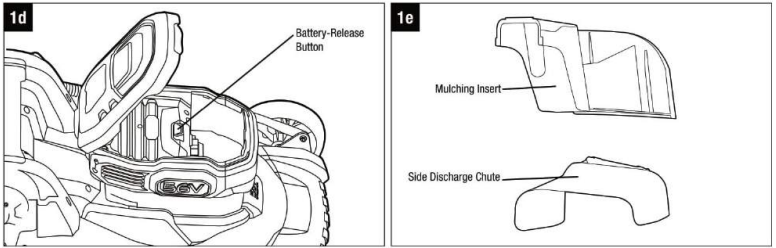
TO ATTACH/DETACH THE BATTERY PACK
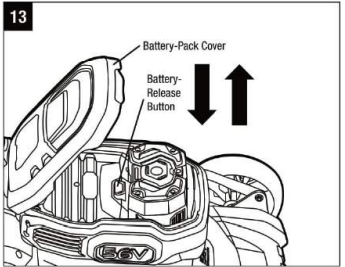
CHARGE BEFORE FIRST USE
WARNING: If any parts are broken or missing, do not attempt to attach the battery pack to the mower or operate the mower until the broken or missing parts are replaced. Failure to do so could result in serious injury.
- The battery cover is hinged. Raise the battery cover by lifting the front of the cover.
- Align the grooves in the battery pack with the raised ribs in the battery compartment, and then insert the battery pack into the compartment.
- Push the battery pack until you hear a "click". The battery-release button will spring up when the battery pack is securely attached.
- To detach the battery pack, depress the battery-release button to release the battery pack, and then lift it out of the compartment.
- Close the battery cover.
NOTICE: Make sure that the latch on the mower snaps into place and that the battery pack is secured to the mower before starting operation.
STARTING/STOPPING THE MOWER
WARNING: The operation of any lawn mower can result in foreign objects being thrown into your or others' eyes, which can damage eyes severely. Always wear safety glasses while operating the mower or while performing any adjustments or repairs on the mower.
WARNING: Ensure that other people and pets remain at least 100' (30m) away from the mower when it is in use.
WARNING: The blade will continue to rotate for a few seconds after the mower is turned off. Allow the motor/blade to stop rotating before starting it again. Do not rapidly turn the mower off and on.
CAUTION: Do not attempt to override the operation of the safety button and bail switch.
NOTICE: The motor cannot be started unless:
- The side rails are fully extended.
- Both green handle-locking clamps are securely closed.
- The handle is locked into one of the three operating positions.
To start the mower
- Attach the battery pack to the mower and close the battery cover.
NOTICE: Make sure that the latch on the mower snaps into place and that the battery pack is secured to the mower before operation. Depress the safety button (Fig. 14 & 15).
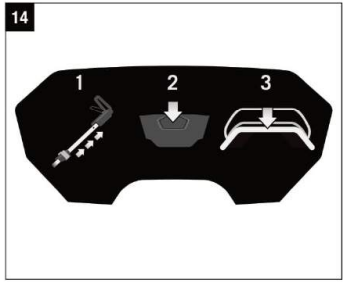

- With the safety button depressed, pull the bail switch upward to meet the handle and release the safety button.
- The mower will start.
To stop the mower
Fully release the bail switch (Fig. 16).
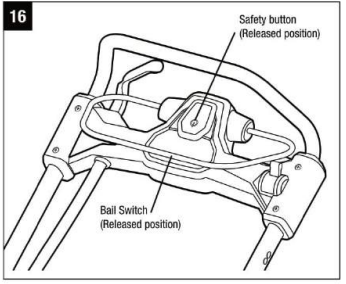
- The electric brake in the Automatic Braking Mechanism will stop the blade rotation within 3 seconds of the bail switch release.
VARIABLE-SPEED SELF-PROPEL SYSTEM
(only for LM2020SP)
The LM2020SP mower is equipped with variable-speed self-propel capability. This system is independent of the blade On-Off switch; it is not dependent on blade rotation. For example, when you have completed cutting your lawn, you can use the self-propel to propel the mower back to your storage location without blade rotation. Or you may choose to operate the mower as a non-self-propelled mower to maximize battery running time.
To operate the self-propel system without blade rotation
- Pull the self-propel trigger to the handle.
To turn the self-propel off, release the self-propel trigger (Fig. 17).
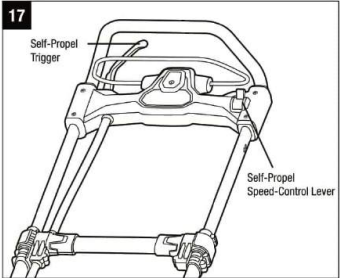
The system has variable speed. To increase the speed, move the self-propel-speed-control lever forwards. To decrease the speed, move the self-propel-speed-control lever backwards.
To operate with the blade rotating for cutting
- Depress the safety button.
- With the safety button depressed, pull the bail switch upward to the handle and release the safety button.
- Hold the bail switch against the handle with your left hand. Pull the self-propel trigger to the handle with your right hand.
- With your right hand, hold both the bail switch and the self-propel trigger against the handle and use your left hand to adjust the self-propel-speed-control lever to choose the desired speed.
NOTICE: When you turn off the self-propel, for example, at the end of a row, it may become temporarily locked if you pull backwards on the mower. Simply push ahead slightly and then move the mower as required.
NOTICE: During cutting, at times it may be easier to mow around an object with the self-propel turned off.
WARNING: To reduce the risk of injury, never attempt to override the operation of the switch or self-propel system. Use the self-propel for its intended purpose only.
LED HEADLIGHTS
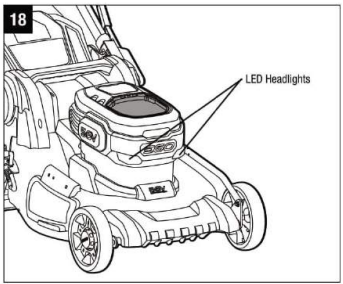
The LED headlights are located on the front of the battery compartment.
To turn on the lights, press the switch button (Fig. 19). The headlights provide bright light in front of the mower.
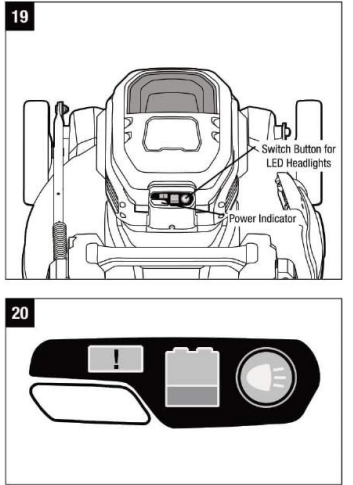
- To turn off the headlights, press the switch button again.
POWER INDICATOR ON THE MOWER
The mower is equipped with a power indicator to indicate the charge level of the battery pack and the working status of the mower. The power indicator will illuminate when the blade is rotating or when the LED headlights are turned on.
- The green light indicates that the battery pack is over 15% of its charge capacity.
- The red light indicates the battery pack's charge is low.
The blinking red light indicates that the battery pack is nearly depleted and needs to be charged immediately.
Power Indicator
Meaning
Action
Shining green
Mower is working properly; battery has at least 15% of its charge.
n/a.
Shining red
Low battery.
Stop the mower and charge the battery pack.
Flashing red
The battery is nearly depleted.
Stop the mower and charge the battery pack.
Shining orange
The mower stops due to
overheating of the battery or mower overheated.
Remove the battery from the mower, move them to the shade and cool them at least 15 minutes.
Flashing orange
The mower stops due to overload.
Remove the battery pack, check and clean if grass has collected beneath the deck.
Slow down yourpace when cutting.
MOWER OVERLOAD PROTECTION
To prevent overload conditions, do not try to remove too much grass at one time. Slow down your cutting pace or raise the cut height. Your mower has built-in overload circuit protection. When the mower is overloaded, the motor will stop and the power indicator on the mower will flash orange. Remove the battery pack from the mower. Check to see if grass has collected beneath the deck and clear it if necessary, then install the battery and restart the mower.
BATTERY HIGH TEMPERATURE PROTECTION
The battery pack will generate heat during operation. The heat dissipates more slowly in hot weather. If the battery temperature exceeds 158° F (70°C) during operation, the protection circuit will immediately turn off the mower to protect the battery pack from heat damage. The power indicator on the mower will shine orange and the LED on the battery will flash orange. Release the bail handle, wait until the battery pack cools down to approximately 152°F (67°C), then restart the mower.
MOWING TIPS
NOTICE: A sharp blade will greatly enhance the performance of the mower, especially when cutting tall grass. Make sure to check the sharpness of the blade before mowing.
- Verify that the lawn is free of stones, sticks, wires, and other objects which could damage the lawn mower or motor. Such objects could be accidentally thrown by the mower in any direction and could cause serious personal injury to the operator and to others. WARNING: If you strike a foreign object, stop the motor and remove the battery. Thoroughly inspect the mower for any damage, and repair the damage before restarting and operating the mower. Excessive vibration of the mower during operation is an indication of damage. The unit should be promptly inspected and repaired.
- For best results, do not mow in circles. Travel back and forth across the lawn.
- When cutting thick grass, reduce your walking speed in order to allow for a more effective cut and a proper discharge of the clippings.
- To maintain a healthy lawn, cut off only one-third or less of the total length of the grass. The average lawn should be approximately 1-1/2 to 2 inches long during cool months, and between 2 to 3-1/4 inches long during hot months.
SLOPE GAUGE
WARNING: Do not mow a slope that has an angle of greater than 15° (a rise of approximately 2-1/2' (0.75m) every 10' (3m)). Mow across the face of a slope and never up and down. Use Fig. 21 as a guide in order to identify slopes that cannot be mowed safely.
MULCHING TIPS
WARNING: Inspect the area where the mower is to be used and remove all stones, sticks, wire, and other debris that might be thrown by the rotating blade.
- Release the switch to turn off the mower blade rotation when crossing any graveled areas; stones can be thrown by a rotating blade.
- Set the mower to the highest cutting height when mowing on uneven ground or in tall growth.
- For effective mulching, do not cut wet grass; it tends to stick to the underside of the deck, preventing the proper mulching of grass clippings. The best time to mow grass is in the late afternoon, when the grass is dry and the newly cut area will not be exposed to direct sunlight.
For the best mulching performance, set the cutting height to remove approximately one-third of the grass blade length, ideally no more than 1-1/2'' at one time. If the grass is overgrown, it may be necessary to increase the cut height to make it easier to mow and to prevent overloading the motor. Slow your cutting pace in tall or thick grass conditions. For mulching extremely thick or tall grass, it is advisable to first cut at a high cut-height setting, and then re-cut to the final cut height. Otherwise, make narrower cuts and mow slowly. ALWAYS MAKE SURE THAT THE BLADE IS SHARP.
Setup Guide
Setting up the EGO Brushless Power Mower LM2020SP is a straightforward process. Here are the steps to follow:
- Charge the battery: Plug the battery charger into a power outlet and connect it to the battery. Charge the battery fully before using the mower for the first time.
- Install the battery: Slide the battery into the battery compartment until it clicks into place.
- Adjust the cutting height: Use the height adjustment lever to set the cutting height to your desired level.
- Attach the grass bag: Slide the grass bag onto the back of the mower and secure it in place.
- Start the mower: Press the power button to turn on the mower and squeeze the handle to engage the blades.
MAINTENANCE
WARNING: To avoid serious personal injury, always remove the battery pack from the mower before cleaning or performing any maintenance.
WARNING: When servicing, use only identical replacement parts. Use of any other parts may create a hazard or cause product damage. To ensure safety and reliability, all repairs should be performed by a qualified service technician.
CLEANING THE MOWER
WARNING: Always remove the battery pack when servicing or transporting the mower. The underside of the mower deck should be cleaned after each use, as grass clippings, leaves, dirt, and other debris will accumulate. This accumulation is undesirable, as it will promote rust and corrosion. Remove any build-up of grass and leaves on or around the drive shaft (LM2020SP only) and motor fan (do not use water). Wipe the mower clean with a damp cloth.
REMOVING THE BLADE
WARNING: Always protect your hands by wearing heavy gloves or wrapping the cutting edges with rags or other materials when performing any maintenance on the mower blade. Always remove the battery pack when servicing or transporting the mower.
NOTICE: The following tools are required for replacing the blade:
- 9/16" (14mm) wrench
- Torque wrench
- Manual screwdriver or metal rod with a diameter of 5/16" (8mm)
- Manual screwdriver or metal rod with a diameter of 1/4" (6.35mm) or less.
- Stop the motor; remove the battery pack from the mower.
- Turn the mower on its side.
While wearing protective gloves, place a metal rod (e.g., a 3.5" length screw bit) with diameter less than 5/16" (8mm) into the fixing hole to act as a stabilizer.
NOTICE: If the bolt rotates with the motor shaft when loosening the bolt, turn the fan by hand to align the through holes in the fan with the holes in the blade, and place another metal rod (e.g., a 3.5" length screw bit) with diameter less than 1/4" (6.35mm) into the aligned holes to act as another stabilizer (Fig. 22).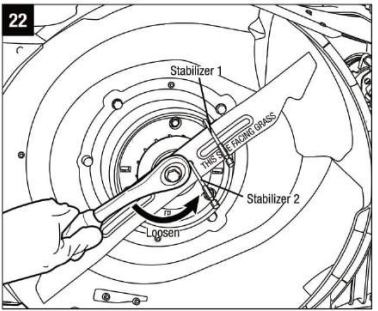
- Use a 9/16" (14mm) wrench to turn the blade bolt counterclockwise to loosen it.
- Continue using the 9/16" (14mm) wrench to turn the blade bolt counterclockwise to loosen it completely.
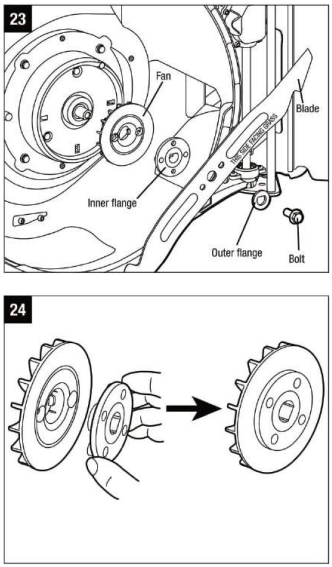
- While wearing protective gloves, remove the bolt, outer flange, and the blade (Fig. 23).
INSTALLING THE BLADE
WARNING: Always protect your hands by wearing heavy gloves or wrapping the cutting edges with rags or other materials when performing any maintenance on the mower blade. Always remove the battery pack when servicing or transporting the mower.
NOTICE: To re-install or replace the blade, be sure to replace the parts in the exact order in which they were removed (Fig. 23).
Mount the inner flange to the fan (Fig. 24).
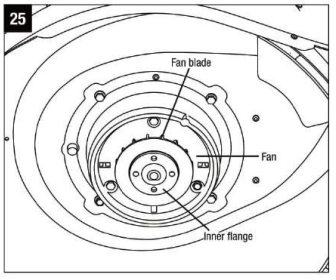
Mount the fan and the inner flange onto the motor shaft with the fan blade towards the deck (Fig. 25).
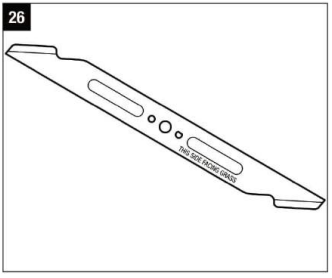
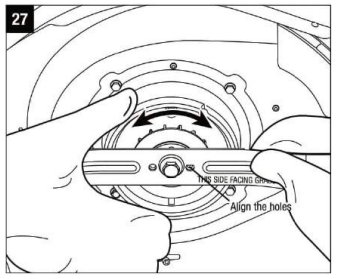
While wearing protective gloves, position the blade on the inner flange with the surface stating "THIS SIDE FACING GRASS" facing toward the outside (Fig. 26).
- Align the outer flange with the shaft and assemble it in place.
- Mount the bolt into the shaft and turn it clockwise by hand to pre-tighten it.
While still wearing protective gloves, hold the blade with one hand and turn the fan with the other hand to align the holes in the blade with the through holes in the inner flange (Fig. 27).
Place a metal rod (e.g., a 3.5" length screw bit) with diameter less than 1/4" (6.35mm) into the aligned holes to act as a stabilizer. Place another metal rod (e.g., a 3.5" length screw bit) with diameter less than 5/16" (8mm) into the fixing hole to act as another stabilizer (Fig. 28).

- Use a 9/16" (14mm) torque wrench (not included) to tighten the bolt clockwise. The recommended torque for the blade bolt is 36-43 ft-lb (49-59Nm).
SHARPENING THE BLADE
WARNING: Always protect your hands by wearing heavy gloves or wrapping the cutting edges with rags or other materials when performing any maintenance on the mower blade. Always remove the battery pack when servicing or transporting the mower.
WARNING: Use proper eye protection while removing, sharpening, and installing the blade.
WARNING: A worn, cracked, or damaged blade can break and pieces of the damaged blade can become dangerous projectiles. Thrown objects can cause serious injury. Inspect the blade regularly and do not operate the mower with a worn or damaged blade.
NOTICE: Keep the blade sharp for best mower performance. A dull blade does not cut grass cleanly or mulch properly. A dull blade can be sharpened, but a blade that is excessively worn, bent, cracked, or otherwise damaged must be replaced. A worn or damaged blade can break, causing blade pieces to be thrown from the mower.
If the blades are found to be bent, take the lawn mower to an authorized EGO service center for inspection.
Sharpening Frequency
Sharpening the blade twice during a mowing season is usually sufficient under normal circumstances. Sand causes the blade to dull quickly; if your lawn has sandy soil, more frequent sharpening may be required.
When Sharpening The Blade
- Make sure that the blade remains balanced.
- Sharpen the blade at the original cutting angle.
- Sharpen the cutting edges on both ends of the blade, removing an equal amount of material from each end.
To Sharpen Blade In A Vise
- Remove the blade from the mower (please see REMOVING THE BLADE).
Secure the blade in a vise (Fig. 29).
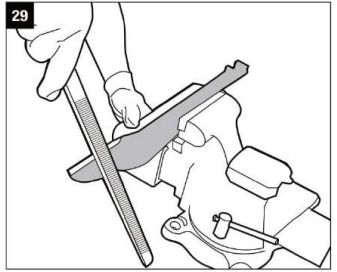
- Wear proper eye protection and gloves and be careful not to cut yourself.
- Carefully file the cutting edges of the blade with a fine-tooth file or sharpening stone, maintaining the original cutting edge angle.
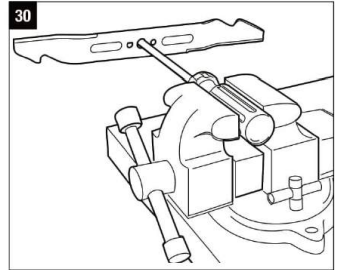
To check the blade balance: clamp a nail or a screwdriver with a round shank in the horizontal position. Position the blade so that the nail or round shank of the screwdriver supports the blade through its center hole. Balance the blade horizontally. If either end of the blade rotates downward, remove some metal from the heavy or lower end until the blade is balanced. It is balanced when neither end drops (Fig. 30).
- Replace the blade on the mower and tighten it securely (please see INSTALLING THE BLADE).
WARNING: An unbalanced blade will cause excessive vibration when rotating at high speeds. It may cause damage to the mower and could break, causing personal injury.
LUBRICATION
Lubricate with light oil as directed below at least once each season.
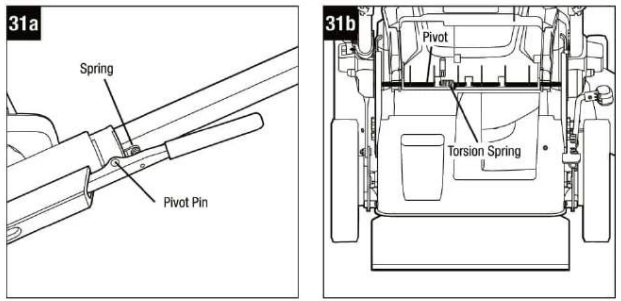
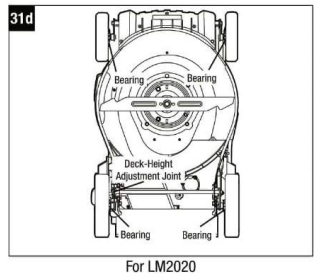
Periodically lubricate the spring and pivot pin in the quick-adjust lever, the torsion spring and pivot of the rear-discharge door with light oil to prevent rust (Fig. 31a & 31b).
- Place the mower into the locked storage position:
- Move the cutting-height adjustment lever toward the front and engage it in the lowest setting (setting 1).
- Open the handle-locking clamps and fully recess the side rails to the compact position.
- Press and hold the quick-adjust lever with your right hand to release the handle.
- Gently pivot the handle toward the front of the mower; release the quick-adjust lever and continue to pivot the handle until you hear and feel the lock pin engage in the locked storage position.
Place the folded mower upright on the ground (Fig. 31c & 31d).
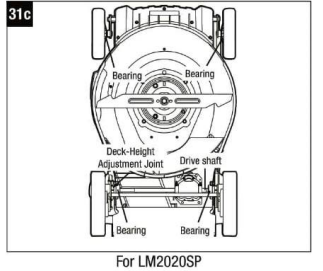
- Lubricate the deck-height adjustment joint.
- For LM2020SP, lubricate the bearings on the drive shaft near the rear wheels and the bearings in the front wheels (Fig. 31c).
- For LM2020, lubricate the bearings in both the rear and front wheels (Fig. 31d).
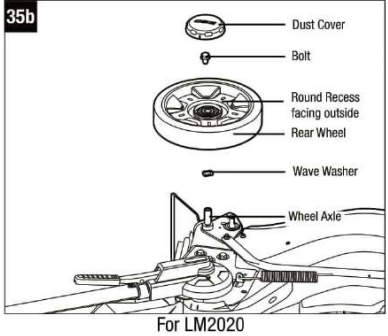
REPLACING THE WHEELS
(Fig. 32a, 32b & 32c)
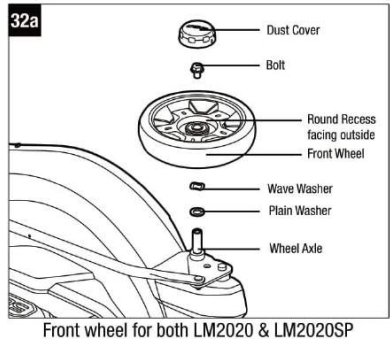
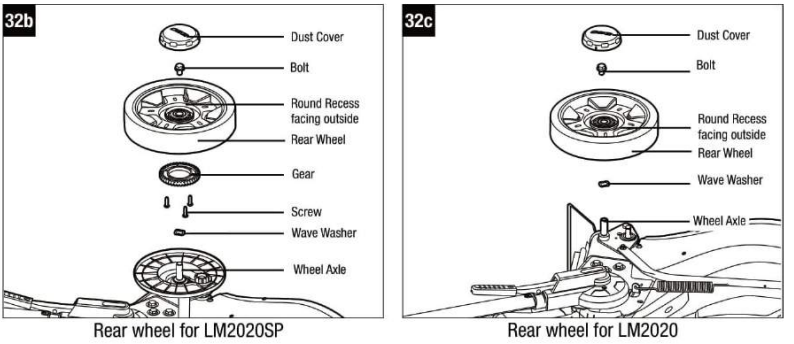
WARNING: Always remove the battery pack when servicing or transporting the mower.
- Turn the mower on its side with the upper surface against a wall.
- Use a flat blade screwdriver to pry the dust cover away from the wheel.
- Use an adjustable or 1/2 inch (13mm) wrench to turn the bolt counterclockwise to loosen it.
- Remove the bolt, the worn wheel, and the washer(s) from the wheel axle.
NOTICE: When replacing the rear wheel for the self-propelled mower (LM2020SP), remove the drive gear from the worn wheel and assemble it to the new wheel with the 3 screws.
- Mount the washers and the new wheel on the wheel axle. Note that the round recess must face outward.
- Lock the wheel with the bolt by tightening the bolt clockwise.
- Mount the dust cover onto the wheel and press it in place.
REPLACING THE TRAILING SHIELD
WARNING: Always remove the battery pack when servicing or transporting the mower.
WARNING: Never operate the mower unless the trailing shield is in place and working. Never operate the mower with damaged safety devices. Failure to do so can result in personal injury. The trailing shield is subject to wear and damage, which could expose moving parts or allow objects to be thrown. For safety protection, frequently check the trailing shield and replace it immediately with only the identical replacement part, listed in this manual.
- Remove the battery.
- Turn the mower on its side with the upper surface against a wall.
- Remove the rear wheel on the top side, following the section "REPLACING THE WHEELS" in this manual.
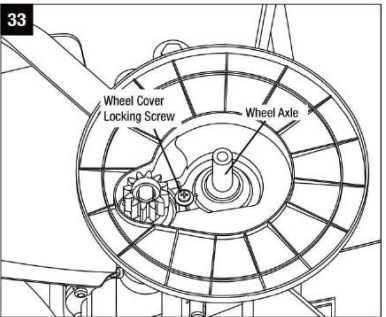
For self-propelled mower LM2020SP, loosen the wheel cover locking screw and remove the screw, spring washer, and flat washer in that order, then remove the wheel cover from the wheel shaft (Fig. 33).
- Repeat steps 1 to 3 above to remove the other rear wheel and wheel cover (LM2020SP only).
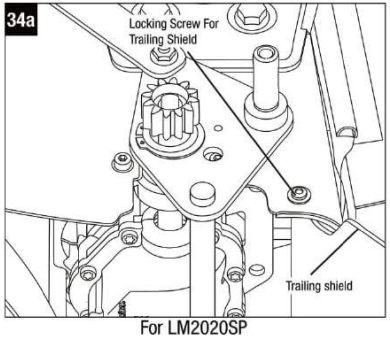
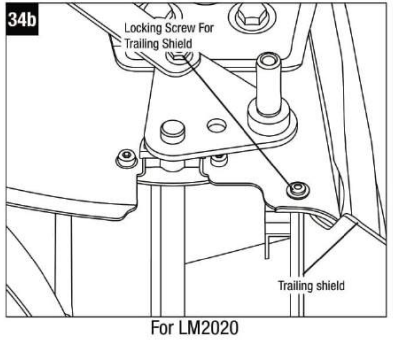
Loosen the locking screw for the trailing shield on both sides; remove the worn trailing shield and the flat washer. Save the washer for reassembly (Fig. 34a & 34b).
- Replace with a new trailing shield and attach it with the two locking screws and flat washers.
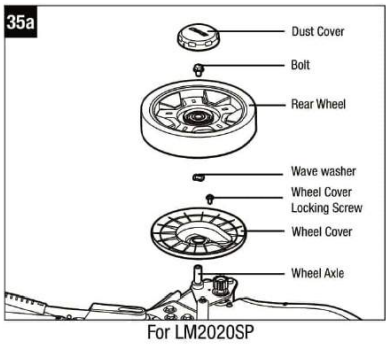
Re-install the rear wheel covers (LM2020SP) and rear wheels; be sure to replace the parts in the exact order in which they were removed (Fig. 35a & Fig. 35b).
STORING THE MOWER
The following steps should be taken in order to prepare the lawn mower for storage.
- Remove the battery pack from the mower and store it at room temperature in a dry location.
- Clean the mower as described earlier in the maintenance section.
- Inspect the blade and replace it or sharpen it if required.
- Lubricate the mower.
- Store the mower in a dry, clean location. Do not store it next to corrosive materials, such as fertilizer or rock salt.
- Store the mower in a covered, enclosed space that is cool and dry and out of the reach of children.
- Do not cover the lawn mower with a solid plastic sheet. Plastic coverings trap moisture around the mower, which causes rust and corrosion.
The handle assembly can be folded away completely for storage:
- Remove the grass bag.
- Move the cutting-height adjustment lever toward the front and engage it in the lowest setting (setting 1).
- Open the handle-locking clamps and fully recess the side rails to the compact position.
- Press and hold the quick-adjust lever with one hand to release the handle. Gently pivot the handle toward the front of the mower; release the quick-adjust lever and continue to pivot the handle until you hear and feel the lock pin engage in the locked storage position.
Store the mower upright or flat (Fig. 36a & 36b).
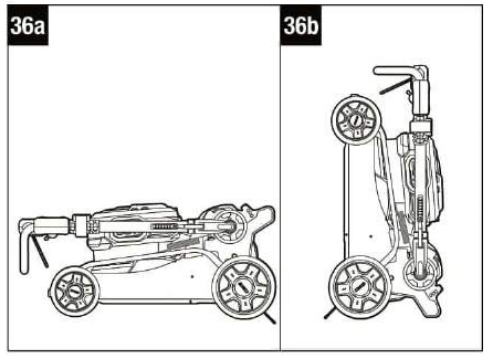
WARNING: If the mower tips over from the upright position, mower damage or personal injury may result. Always keep the mower stable and out of the reach of children when it is in the upright position. If possible, lay it flat for storage.
EGO Brushless Power Mower LM2020SP TROUBLESHOOTING
WARNING: Always remove the battery pack when servicing or transporting the mower. Always protect your hands by wearing heavy gloves or wrapping the cutting edges with rags or other materials when performing any maintenance on the mower blade.
Problem | Cause | Solution |
The mower fails to start. |
|
|
The mower cuts unevenly. |
|
|
The mower stops while mowing. |
|
|
Problem | Cause | Solution |
The mower fails to start. |
|
|
The mower cuts unevenly. |
|
|
The mower stops while mowing. |
|
|
WARRANTY
EGO WARRANTY POLICY
5-year limited warranty on EGO outdoor power equipment and 3-year limited warranty on EGO Power+ System battery packs and chargers. Please contact EGO Customer Service Toll-Free at 1-855-EGO-5656 any time you have questions or warranty claims.
LIMITED SERVICE WARRANTY
FOR FIVE YEARS from the date of original retail purchase, this EGO product is warranted against defects in material or workmanship. Defective products will receive free repair.
Pros & Cons
Pros
- Powerful and efficient brushless motor
- Wide cutting path
- Convenient battery system
- Adjustable cutting height
- Quiet operation
Cons
- May be too heavy for some users
- Higher price point compared to traditional gas-powered mowers
Customer Reviews about EGO Brushless Power Mower LM2020SP
Customers who have used the EGO Brushless Power Mower LM2020SP have praised its powerful motor, efficient battery system, and convenient operation. However, some have noted that the mower is heavy and may be difficult to maneuver for some users. The higher price point compared to traditional gas-powered mowers has also been a point of contention for some customers.
Faqs
What type of battery does the EGO Brushless Power Mower LM2020SP use?
How long does the EGO Brushless Power Mower LM2020SP last on a single charge?
Is the battery included with the EGO Brushless Power Mower LM2020SP?
How do I replace the blades on the EGO Brushless Power Mower LM2020SP?
How do I clean the EGO Brushless Power Mower LM2020SP?
What is the cutting width of the EGO Brushless Power Mower LM2020SP?
How do I store the EGO Brushless Power Mower LM2020SP during the winter?
Does the EGO Brushless Power Mower LM2020SP have a mulching capability?
How many cutting height positions does the EGO Brushless Power Mower LM2020SP offer?
Does the EGO Brushless Power Mower LM2020SP come with a warranty?
Leave a Comment