Makita Cordless Combination Hammer GRH07 Instruction Manual
Content
Introduction
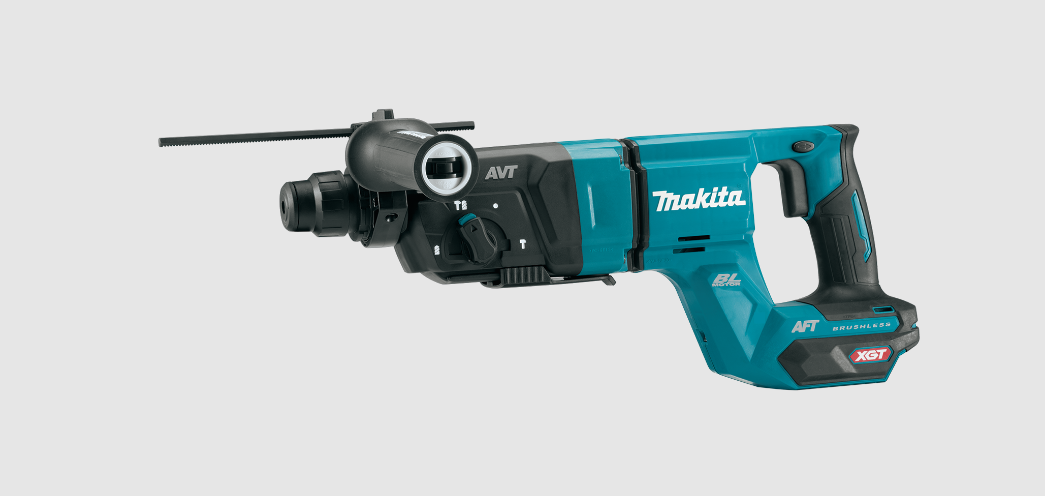
The Makita Cordless Combination Hammer GRH07 is a high-performance tool designed for heavy-duty applications, ideal for both professional contractors and DIY enthusiasts. Featuring a powerful 40V max brushless motor, it delivers an impressive 2.7 ft-lbs of impact energy with a variable speed of up to 5,000 BPM, making it perfect for drilling and chipping in concrete. Its anti-vibration technology ensures comfort during extended use, while the D-handle design enhances maneuverability. The GRH07 is priced at approximately $399.00.
Specifications
| Model: | GRH07 | |
| Capacities | Concrete | 28 mm (1-1/8") |
| Core bit | 54 mm (2-1/8") | |
| Diamond core bit (dry type) | 65 mm (2-9/16") | |
| Steel | 13 mm (1/2") | |
| Wood | 32 mm (1-1/4") | |
| No load speed | 0 - 980 /min | |
| Blows per minute | 0 - 5,000 /min | |
| Rated voltage | D.C. 36 V - 40 V max | |
| Overall length | with BL4025 | 458 mm (18″) |
| with BL4040 | 473 mm (18-5/8″) | |
| Net weight | 3.8 - 4.8 kg (8.4 - 10.6 lbs) | |
Optional accessory
| Model: | DX15 |
| Suction performance | 290 l/min |
| Operating stroke | Up to 190 mm (7-1/2") |
| Suitable drill bit | Up to 260 mm (10-1/4") |
| Net weight | 1.3 kg (2.9 lbs) |
- Due to our continuing program of research and development, the specifications herein are subject to change without
- Specifications may differ from country to
- The weight may differ depending on the attachment(s), including the battery cartridge. The lightest and heavi- est combination, according to EPTA-Procedure 01/2014, are shown in the
Applicable battery cartridge and charger
| Battery cartridge | BL4020* / BL4025* / BL4040* / BL4050F * : Recommended battery |
| Charger | DC40RA / DC40RB / DC40RC |
WARNING: Only use the battery cartridges and chargers listed above. Use of any other battery cartridges and chargers may cause injury and/or fire.
FUNCTIONAL DESCRIPTION
CAUTION: Always be sure that the tool is switched off and the battery cartridge is removed before adjusting or checking the function of the tool.
Installing or removing battery cartridge
CAUTION: Always switch off the tool before installing or removing of the battery cartridge.
CAUTION: Hold the tool and the battery cartridge firmly when installing or removing the battery cartridge. Failure to hold the tool and the battery cartridge firmly may cause them to slip off your hands and result in damage to the tool and battery cartridge and a personal injury.

To remove the battery cartridge, slide it from the tool while sliding the button on the front of the cartridge.
To install the battery cartridge, align the tongue on the battery cartridge with the groove in the housing and slip it into place. Insert it all the way until it locks in place with a little click. If you can see the red indicator as shown in the figure, it is not locked completely
CAUTION: Always install the battery cartridge fully until the red indicator cannot be seen. If not, it may accidentally fall out of the tool, causing injury to you or someone around you.
CAUTION: Do not install the battery cartridge forcibly. If the cartridge does not slide in easily, it is not being inserted correctly.
Indicating the remaining battery capacity
Press the check button on the battery cartridge to indi- cate the remaining battery capacity. The indicator lamps light up for a few seconds

NOTE: Depending on the conditions of use and the ambient temperature, the indication may differ slightly from the actual capacity.
NOTE: The first (far left) indicator lamp will blink when the battery protection system works
Tool/battery protection system
The tool is equipped with a tool/battery protection sys- tem. This system automatically cuts off power to the motor to extend tool and battery life. The tool will auto- matically stop during operation if the tool or battery is placed under one of the following conditions:
Overload protection
When the battery is operated in a manner that causes it to draw an abnormally high current, the tool automat- ically stops without any indication. In this situation, turn the tool off and stop the application that caused the tool to become overloaded. Then turn the tool on to restart
Overheat protection
When the tool or battery is overheated, the tool stops automatically. In this case, let the tool and battery cool before turning the tool on again.
NOTE: When the tool is overheated, the lamp blinks.
Over-discharge protection
When the battery capacity is not enough, the tool stops automatically. In this case, remove the battery from the tool and charge the battery.
Protections against other causes
Protection system is also designed for other causes that could damage the tool and allows the tool to stop automatically. Take all the following steps to clear the causes, when the tool has been brought to a temporary halt or stop in operation.
- Turn the tool off, and then turn it on again to restart.
- Charge the battery(ies) or replace it/them with recharged battery(ies).
- Let the tool and battery(ies) cool
If no improvement can be found by restoring protection system, then contact your local Makita Service Center.
Switch action
WARNING: Before installing the battery car- tridge into the tool, always check to see that the switch trigger actuates properly and returns to the "OFF" position when released.
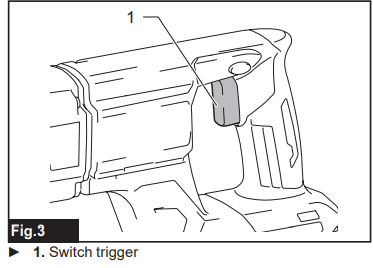
To start the tool, simply pull the switch trigger. Tool speed is increased by increasing pressure on the switch trigger. Release the switch trigger to stop.
Lighting up the front lamp

CAUTION: Do not look in the light or see the source of light directly.
CAUTION: Do not look in the light or see the source of light directly.
Pull the switch trigger to light up the lamp. The lamp keeps on lighting while the switch trigger is being pulled. The lamp goes out approximately 10 seconds after releasing the switch trigger.
CAUTION: If the lamp goes off after blinking for a few seconds, the active feedback sensing technology is not working properly. Ask your local Makita Service Center for repair.
NOTE: Use a dry cloth to wipe the dirt off the lens of the lamp. Be careful not to scratch the lens of lamp, or it may lower the illumination.
NOTE: The front lamp cannot be used while the dust col-lection system (optional accessory) is installed in the tool.
Reversing switch action
CAUTION: Always check the direction of rotation before operation.
CAUTION: Use the reversing switch only after the tool comes to a complete stop. Changing the direc-tion of rotation before the tool stops may damage the tool.
CAUTION: When not operating the tool, always set the reversing switch lever to the neutral position.
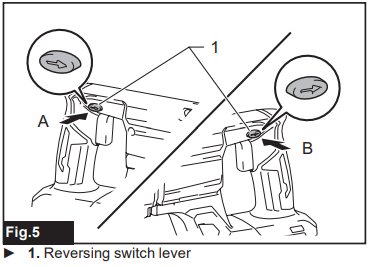
This tool has a reversing switch to change the direction of rota-tion. Depress the reversing switch lever from the A side for clock-wise rotation or from the B side for counterclockwise rotation. When the reversing switch lever is in the neutral posi-tion, the switch trigger cannot be pulled.
Selecting the action mode
NOTICE: Do not rotate the action mode changing knob when the tool is running. The tool will be damaged.
NOTICE: To avoid rapid wear on the mode change mechanism, be sure that the action mode changing knob is always positively located in one of the three action mode positions.
Rotation with hammering
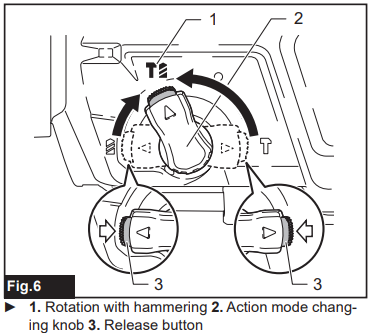
For drilling in concrete, masonry, etc., turn the action mode changing knob to the![]() symbol while pressing the release button on the knob. Use a tungstencarbide tipped bit (optional accessory).
symbol while pressing the release button on the knob. Use a tungstencarbide tipped bit (optional accessory).
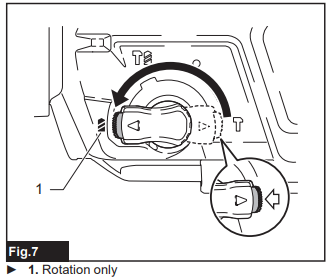
Rotation only
For drilling in wood, metal or plastic materials, turn the action mode changing knob to the![]() symbol while pressing the release button on the knob. Use a twist drill bit or wood drill bit.
symbol while pressing the release button on the knob. Use a twist drill bit or wood drill bit.
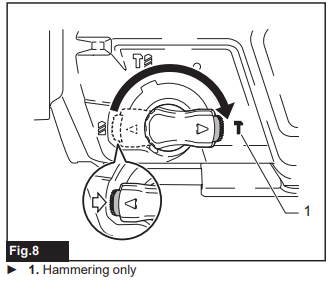
Hammering only
For chipping, scaling or demolition operations, turn the action mode changing knob to the symbol while pressing the release button on the knob. Use a bull point, cold chisel, scaling chisel, etc.
Hook
Optional accessory
CAUTION: Always remove the battery when hanging the tool with the hook.
CAUTION: Never hook the tool at high location or on potentially unstable surface.
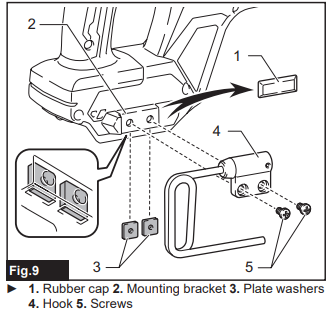
The hook is convenient for temporarily hanging the tool.Before installing the hook, remove the rubber cap from the screw holes in the mounting bracket. Insert the plate washers under the bracket, and then tighten the hook with screws in place.
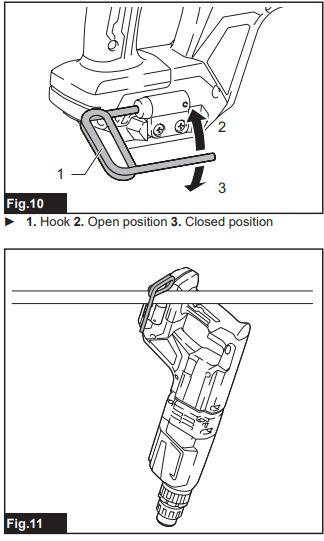
For use, lift up the arm of the hook until it snaps into the open position.
When not in use, be sure that the hook is folded back in the closed position.
Connecting lanyard (tether strap) to the hook
CAUTION: Do not use damaged hook and screws. Before use, always check for damages, cracks or deformations, and make sure that the screws are tightened.
CAUTION: Make sure that the hook is securely installed with the screws.
CAUTION: Do not install or remove any accessory while hanging the tool. The tool may fall if the screws are not tightened.
CAUTION: Always use a locking carabiner (multi-action and screw gate type) and be sure to attach the lanyard (tether strap) to the double looped portion of the hook. Improper attachment may cause tool drop from the hook and result in personal injury.
The hook is also used for connecting the lanyard (tether strap). Be sure to connect the lanyard (tether strap) to the double looped portion of the hook.
_to.png)
Safety warnings about connecting lanyard (tether strap) to the hook
Safety warnings specific for use at height
Read all safety warnings and instructions. Failure to follow the warnings and instructions may result in serious injury.
- Always keep the tool tethered when working "at height". Maximum lanyard length is 2 m (6.5 ft). The maximum permissible fall height for lanyard (tether strap) must not exceed 2 m (6.5 ft).
- Use only with lanyards appropriate for this tool type and rated for at least 8.0 kg (17.6 lbs).
- Do not anchor the tool lanyard to anything on your body or on movable components. Anchor the tool lanyard to a rigid structure that can withstand the forces of a dropped tool.
- Make sure the lanyard is properly secured at each end prior to use.
- Inspect the tool and lanyard before each use for damage and proper function (including fabric and stitching). Do not use if damaged or not functioning properly.
- Do not wrap lanyards around or allow them to come in contact with sharp or rough edges.
- Fasten the other end of the lanyard outside the working area so that a falling tool is held securely.
- Attach the lanyard so that the tool will move away from the operator if it falls. Dropped tools will swing on the lanyard, which could cause injury or loss of balance.
- Do not use near moving parts or running machinery. Failure to do so may result in a crush or entanglement hazard.
- Do not carry the tool by the attachment device or the lanyard.
- Only transfer the tool between your hands while you are properly balanced.
- Do not attach lanyards to the tool in a way that keeps switches or trigger-lock (if supplied) from operating properly.
- Avoid getting tangled in the lanyard.
- Keep lanyard away from the drilling area of the tool.
- Use a locking carabiner (multi-action and screw gate type). Do not use single action spring clip carabiners.
- In the event the tool is dropped, it must be tagged and removed from service, and should be inspected by a Makita Factory or Authorized Service Center.
Torque limiter
NOTICE: As soon as the torque limiter actuates, switch off the tool immediately. This will help prevent premature wear of the tool.
NOTICE: Drill bits such as hole saw, which tend to pinch or catch easily in the hole, are not appropriate for this tool. This is because they will cause the torque limiter to actuate too frequently. The torque limiter will actuate when a certain torque level is reached. The motor will disengage from the output shaft. When this happens, the drill bit will stop turning.
Electronic function
The tool is equipped with the electronic functions for easy operation.
- Electric brake
This tool is equipped with an electric brake. If the tool consistently fails to quickly cease to function after the switch trigger is released, have the tool serviced at a Makita service center. - Constant speed control
The speed control function provides the constant rotation speed regardless of load conditions. - Active Feedback sensing Technology
If the tool is swung at the predetermined acceleration during operation, the motor is forcibly stopped to reduce the burden on the wrist.
NOTE: This function does not work if the acceleration does not reach the predetermined one when the tool is swung.
NOTE: If the bit is swung at the predetermined acceleration during chipping, scaling, or demolishing, the motor is forcibly stopped. In this case, release the switch trigger, and then pull the switch trigger to restart the tool.
OPERATION
CAUTION: Always make sure that the workpiece is secured before operation.
CAUTION: Do not pull the tool out forcibly even the bit gets stuck. Loss of control may cause injury.
CAUTION: The dust collection system is intended for drilling in concrete only. Do not use the dust collection system for drilling in metal or wood.
CAUTION: When using the tool with the dust collection system, be sure to attach the filter to the dust collection system to prevent dust inhalation.
CAUTION: Before using the dust collection system, check that the filter is not damaged. Failure to do so may cause dust inhalation.
CAUTION: The dust collection system collects the generated dust at a considerable rate, but not all dust can be collected.
NOTICE: If the tool is operated continuously at low speed for a long time, the motor will get overloaded, resulting in tool malfunction.
NOTICE: Do not use the dust collection system for core drilling or chiseling.
NOTICE: Do not use the dust collection system for drilling in wet concrete or use this system in wet environment. Failure to do so may cause malfunction.
NOTE: If the battery cartridge is in low temperature, the tool’s capability may not be fully obtained. In this case, warm up the battery cartridge by using the tool with no load for a while to fully obtain the tool’s capability.
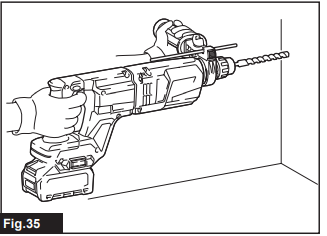
Hammer drilling operation
CAUTION: There is tremendous and sudden twisting force exerted on the tool/drill bit at the time of hole break-through, when the hole becomes clogged with chips and particles, or when striking reinforcing rods embedded in the concrete.
- Always use the side grip (auxiliary handle) and firmly hold the tool by both side grip and switch handle during operations.
- Failure to do so may result in the loss of control of the tool and potentially severe injury.
- Set the action mode changing knob to the symbol.
- Position the drill bit at the desired location for the hole, then pull the switch trigger. Do not force the tool. Light pressure gives best results. Keep the tool in position and prevent it from slipping away from the hole.
- Do not apply more pressure when the hole becomes clogged with chips or particles. Instead, run the tool at an idle, then remove the drill bit partially from the hole. By repeating this several times, the hole will be cleaned out and normal drilling may be resumed.
NOTE: Eccentricity in the drill bit rotation may occur while operating the tool with no load. The tool automatically centers itself during operation. This does not affect the drilling precision.
Chipping/Scaling/Demolition
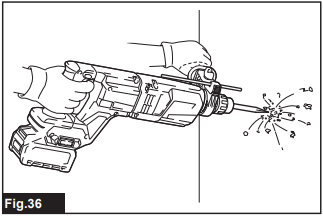
- Set the action mode changing knob to the symbol.
- Hold the tool firmly with both hands. Turn the tool on and apply slight pressure on the tool so that the tool will not bounce around, uncontrolled.
- Pressing very hard on the tool will not increase the efficiency.
Drilling in wood or metal
CAUTION: Hold the tool firmly and exert care when the drill bit begins to break through the workpiece. There is a tremendous force exerted on the tool/drill bit at the time of hole break through.
CAUTION: A stuck drill bit can be removed simply by setting the reversing switch to reverse rotation in order to back out. However, the tool may back out abruptly if you do not hold it firmly.
CAUTION: Always secure workpieces in a vise or similar hold-down device.
NOTICE: Never use “rotation with hammering” when the drill chuck is installed on the tool. The drill chuck may be damaged.
Also, the drill chuck will come off when reversing the tool.
NOTICE: Pressing excessively on the tool will not speed up the drilling. In fact, this excessive pressure will only serve to damage the tip of your drill bit, decrease the tool performance and shorten the service life of the tool.
Set the action mode changing knob to the symbol.
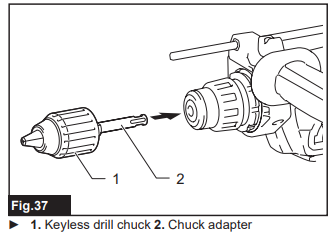
Installing drill chuck set
Optional accessory
Attach the chuck adapter to a keyless drill chuck to which 1/2"-20 size screw can be installed, and then install them to the tool. For details on how to install the adapter into the chuck, refer to the instructions on installing drill bit.
Diamond core drilling
NOTICE: If performing diamond core drilling operations using “rotation with hammering” action, the diamond core bit may be damaged. When performing diamond core drilling operations, always set the action mode changing knob to the position to use "rotation only" action.
Beating dust on the filter
Optional accessory
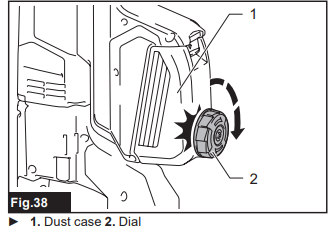
CAUTION: Do not turn the dial on the dust case while the dust case is removed from the dust collection system. Doing so may cause dust inhalation.
CAUTION: Always switch off the tool when turning the dial on the dust case. Turning the dial while the tool is running may result in the loss of control of the tool.
By beating the dust on the filter inside the dust case, you can keep the vacuum efficiency and also reduce the number of times to dispose of the dust. Turn the dial on the dust case three times after collecting every 50,000 mm3 of dust or when you feel the vacuum performance declined.
NOTE: 50,000 mm3 of dust equivalents to drilling 10 holes of ø10 mm and 65 mm depth (14 holes of ø3/8″ and 2″ depth).
Disposing of dust
Optional accessory
CAUTION: Always be sure that the tool is switched off and the battery cartridge is removed before carrying out any work on the tool.
CAUTION: Be sure to wear dust mask when disposing of dust.
CAUTION: Empty the dust case regularly before the dust case becomes full. Failure to do so may decrease the dust collection performance and cause dust inhalation.
CAUTION: The performance of dust collection decreases if the filter in the dust case become clogged. Replace the filter with new one after approximately 200 times of dust fulfillment as a guide. Failure to do so may cause dust inhalation.
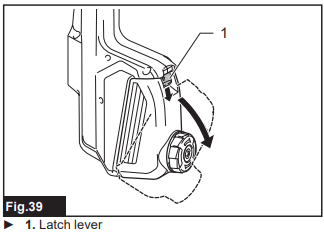
Remove the dust case while pressing down the latch lever of the dust case.
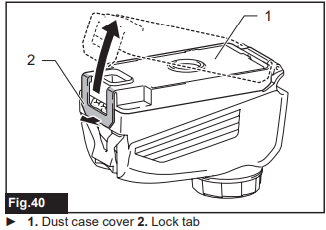
Lift the lock tab slightly outwards and open the dust case cover.
Dispose of the dust, and then clean the filter.
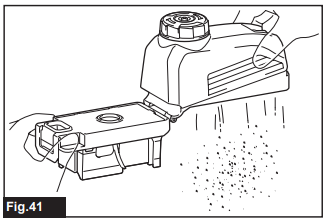
NOTICE: When cleaning the filter, tap the case of the filter gently by hand to remove dust. Do not tap the filter directly; touch the filter with brush or similar; or blow compressed air on the filter. Doing so may damage the filter.
Blow-out bulb
Optional accessory
After drilling the hole, use the blow-out bulb to clean the dust out of the hole.
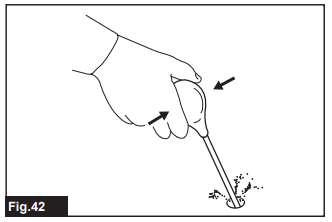
Using dust cup set
Optional accessory
Fit the dust cup set against the ceiling when operating the tool.
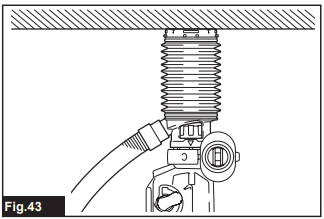
NOTICE: Do not use the dust cup set when drilling in metal or similar. It may damage the dust cup set due to the heat produced by small metal dust or similar.
NOTICE: Do not install or remove the dust cup set with the drill bit installed in the tool. It may damage the dust cup set and cause dust leak.
WIRELESS ACTIVATION FUNCTION
What you can do with the wireless activation function
The wireless activation function enables clean and comfortable operation. By connecting a supported vacuum cleaner to the tool, you can run the vacuum cleaner automatically along with the switch operation of the tool.
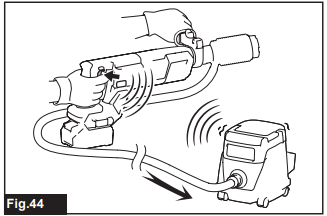
To use the wireless activation function, prepare following items:
- A wireless unit (optional accessory)
- A vacuum cleaner which supports the wireless activation function
The overview of the wireless activation function setting is as follows. Refer to each section for detail procedures.
- Installing the wireless unit
- Tool registration for the vacuum cleaner
- Starting the wireless activation function
Installing the wireless unit
Optional accessory
CAUTION: Place the tool on a flat and stable surface when installing the wireless unit.
NOTICE: Clean the dust and dirt on the tool before installing the wireless unit. Dust or dirt may cause malfunction if it comes into the slot of the wireless unit.
NOTICE: To prevent the malfunction caused by static, touch a static discharging material, such as a metal part of the tool, before picking up the wireless unit.
NOTICE: When installing the wireless unit, always be sure that the wireless unit is inserted in the correct direction and the lid is completely closed.
Open the lid on the tool as shown in the figure.
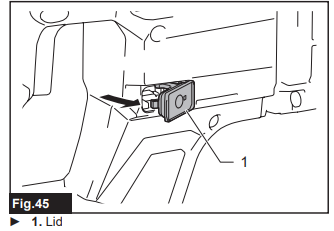
Insert the wireless unit to the slot and then close the lid.
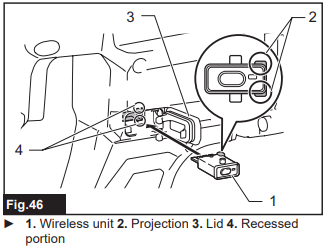
When inserting the wireless unit, align the projections with the recessed portions on the slot.
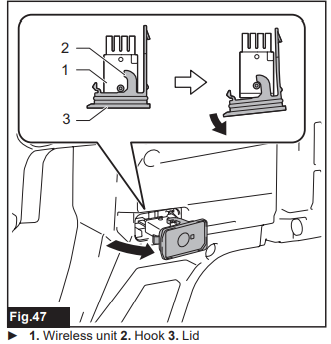
When removing the wireless unit, open the lid slowly.
The hooks on the back of the lid will lift the wireless unit as you pull up the lid.
After removing the wireless unit, keep it in the supplied case or a static-free container.
NOTICE: Always use the hooks on the back of the lid when removing the wireless unit. If the hooks do not catch the wireless unit, close the lid completely and open it slowly again.
Tool registration for the vacuum cleaner
NOTE: A Makita vacuum cleaner supporting the wireless activation function is required for the tool registration.
NOTE: Finish installing the wireless unit to the tool before starting the tool registration.
NOTE: During the tool registration, do not pull the switch trigger or turn on the power switch on the vacuum cleaner.
NOTE: Refer to the instruction manual of the vacuum cleaner, too.
If you wish to activate the vacuum cleaner along with the switch operation of the tool, finish the tool registration beforehand.
- Install the batteries to the vacuum cleaner and the tool.
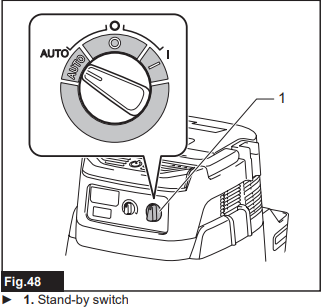
- Set the stand-by switch on the vacuum cleaner to "AUTO".
- Press the wireless activation button on the vacuum cleaner for 3 seconds until the wireless activation lamp blinks in green. And then press the wireless activation button on the tool in the same way. If the vacuum cleaner and the tool are linked successfully, the wireless activation lamps will light up in green for 2 seconds and start blinking in blue.
NOTE: The wireless activation lamps finish blinking in green after 20 seconds elapsed. Press the wireless activation button on the tool while the wireless activation lamp on the cleaner is blinking. If the wireless activation lamp does not blink in green, push the wireless activation button briefly and hold it down again.
NOTE: When performing two or more tool registrations for one vacuum cleaner, finish the tool registration one by one.
Setup Guide
To operate the Makita Cordless Combination Hammer GRH07,
- Start by ensuring the battery is fully charged and securely attached to the tool. Attach the side handle if needed for better control.
- Choose the appropriate drill bit or chisel for your task and insert it into the tool holder, ensuring it is securely locked in place.
- Turn on the tool by pressing the trigger switch. Adjust the speed setting as needed using the variable speed control.
- For pairing with other Makita tools, ensure all devices are on the same 40V max XGT platform and follow the manufacturer's guidelines for compatibility.
Troubleshooting
Troubleshooting for wireless activation function
Before asking for repairs, conduct your own inspection first. If you find a problem that is not explained in the manual, do not attempt to dismantle the tool. Instead, ask Makita Authorized Service Centers, always using Makita replacement parts for repairs.
| State of abnormality | Probable cause (malfunction) | Remedy |
| The wireless activation lamp does not light/blink. | The wireless unit is not installed into the tool. The wireless unit is improperly installed into the tool. | Install the wireless unit correctly. |
| The terminal of the wireless unit and/or the slot is dirty. | Gently wipe off dust and dirt on the terminal of the wireless unit and clean the slot. | |
| The wireless activation button on the tool has not been pushed. | Push the wireless activation button on the tool briefly. | |
| The stand-by switch on the vacuum cleaner is not set to "AUTO". | Set the stand-by switch on the vacuum cleaner to "AUTO". | |
| No power supply | Supply the power to the tool and the vacuum cleaner. | |
| Cannot finish tool registration / can- celling tool registration successfully. | The wireless unit is not installed into the tool. The wireless unit is improperly installed into the tool. | Install the wireless unit correctly. |
| The terminal of the wireless unit and/or the slot is dirty. | Gently wipe off dust and dirt on the terminal of the wireless unit and clean the slot. | |
| The stand-by switch on the vacuum cleaner is not set to "AUTO". | Set the stand-by switch on the vacuum cleaner to "AUTO". | |
| No power supply | Supply the power to the tool and the vacuum cleaner. | |
| Incorrect operation | Push the wireless activation button briefly and perform the tool registration/cancellation procedures again. | |
| The tool and vacuum cleaner are away from each other (out of the transmission range). | Get the tool and vacuum cleaner closer to each other. The maximum transmission distance is approximately 10 m however it may vary according to the circumstances. | |
Before finishing the tool registration/cancellation; - the switch trigger on the tool is pulled or; - the power button on the vacuum cleaner is turned on. | Push the wireless activation button briefly and perform the tool registration/cancellation procedures again. | |
The tool registration procedures for the tool or vacuum cleaner have not finished. | Perform the tool registration procedures for both the tool and the vacuum cleaner at the same timing. | |
| Radio disturbance by other appliances which generate high-intensity radio waves. | Keep the tool and vacuum cleaner away from the appliances such as Wi-Fi devices and microwave ovens. | |
| The vacuum cleaner does not run along with the switch operation of the tool. | The wireless unit is not installed into the tool. The wireless unit is improperly installed into the tool. | Install the wireless unit correctly. |
| The terminal of the wireless unit and/or the slot is dirty. | Gently wipe off dust and dirt on the terminal of the wireless unit and clean the slot. | |
| The wireless activation button on the tool has not been pushed. | Push the wireless activation button briefly and make sure that the wireless activation lamp is blinking in blue. | |
| The stand-by switch on the vacuum cleaner is not set to "AUTO". | Set the stand-by switch on the vacuum cleaner to "AUTO". | |
| More than 10 tools are registered to the vacuum cleaner. | Perform the tool registration again. If more than 10 tools are registered to the vacuum cleaner, the tool registered earliest will be cancelled automatically. | |
| The vacuum cleaner erased all tool registrations. | Perform the tool registration again. | |
| No power supply | Supply the power to the tool and the vacuum cleaner. | |
| The tool and vacuum cleaner are away from each other (out of the transmission range). | Get the tool and vacuum cleaner closer each other. The maximum transmission distance is approximately 10 m however it may vary according to the circumstances. | |
| Radio disturbance by other appliances which generate high-intensity radio waves. | Keep the tool and vacuum cleaner away from the appliances such as Wi-Fi devices and microwave ovens. | |
| The vacuum cleaner runs while the tool's switch trigger is not pulled. | Other users are using the wireless activation of the vacuum cleaner with their tools. | Turn off the wireless activation button of the other tools or cancel the tool registration of the other tools. |
Pros & Cons
Pros
- High Performance: Delivers powerful drilling and hammering capabilities.
- Cordless Convenience: Offers greater mobility and flexibility.
- Advanced Technology: Features AVT for reduced vibration and improved accuracy.
- Compatibility: Works with Makita's 40V max XGT battery platform.
- Ergonomic Design: Includes contoured grip and rubberized handle for comfort.
Cons
- Cost: Expected to be on the higher side compared to other cordless hammers.
- Battery Life: May require frequent charging for heavy-duty use.
- Weight: While lightweight, it may still be heavy for some users during extended use.
- Maintenance: Requires regular maintenance to ensure optimal performance.
Customer Reviews
Customers have praised the Makita Cordless Combination Hammer GRH07 for its exceptional power and durability. Many reviewers appreciate the tool's ease of use and the convenience of its cordless design. However, some users have noted that the tool can be expensive and that battery life may vary depending on usage.
Common complaints include the cost and the need for more frequent battery charging during heavy use. Despite these, the overall consensus is that the GRH07 is a reliable and powerful addition to any toolkit.
Makita Cordless Combination Hammer GRH07 WARRANTY
Please refer to the annexed warranty sheet for the most current warranty terms applicable to this product. If annexed warranty sheet is not available, refer to the warranty details set forth at below website for your respective country.
Faqs
What is the battery platform used by the Hammer?
How many BPM and RPM does the Makita deliver?
What safety features does the Makita GRH07 have?
Is the Makita Cordless Combination suitable for heavy-duty tasks?
How do I assemble and configure the GRH07?
What are common issues with the Makita Cordless Combination and how do I troubleshoot them?
Can the Makita Cordless be used in tight spaces?
How do I maintain the Makita for optimal performance?
What are the pros and cons of using the Makita Cordless Combination Hammer GRH07?
Leave a Comment
