Eltako Actuator Universal Dimmer Switch FUD61NPN-230V | Connection
Content

Introducing the Eltako Actuator Universal Dimmer Switch FUD61NPN-230V
The Eltako Actuator Universal Dimmer Switch is a versatile and high-quality product designed to meet all your dimming needs. This switch is perfect for use with incandescent, halogen, and LED bulbs, making it a great choice for any home or office. With an estimated price of $80 and a launching date set for late 2023, now is the perfect time to consider upgrading your lighting setup with this top-of-the-line dimmer switch.
Detailed Specifications
- Power supply: 230V AC
- Load capacity: 250W (incandescent), 50W (LED)
- Dimming range: 1-100%
- Dimming curve: trailing edge
- Protection class: II
- IP protection class: IP20
- Mounting type: flush-mounted
- Color: white
Description of FUD61NPN-230V
The Eltako Actuator Universal Dimmer Switch is a high-quality and reliable product that offers smooth and precise dimming control for a wide range of bulbs. Its sleek and modern design makes it a stylish addition to any room, while its easy-to-use push-button controls make it simple to operate. With its load capacity of 250W for incandescent bulbs and 50W for LED bulbs, this dimmer switch is suitable for use in a variety of settings, from small bedrooms to large conference rooms.
Setup Guide
- Turn off the power supply to the circuit.
- Remove the existing switch from the wall box and disconnect the wires.
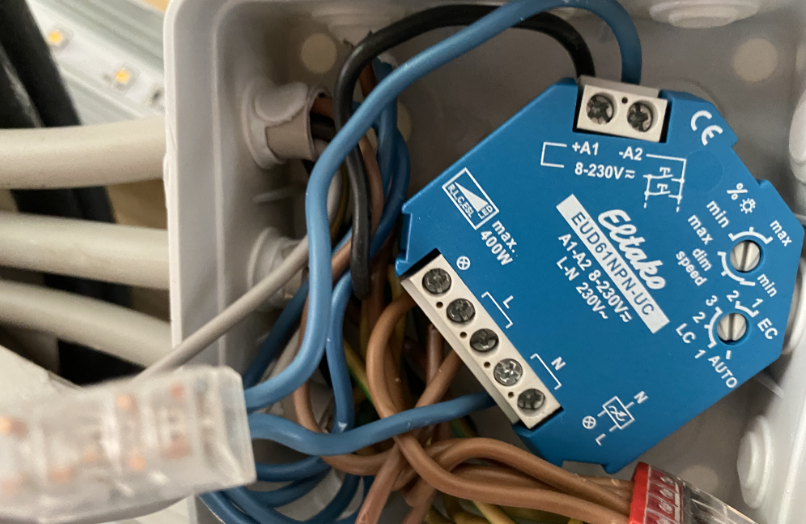
- Connect the wires to the corresponding terminals on the Eltako Actuator Universal Dimmer Switch FUD61NPN-230V, following the wiring diagram provided in the manual.
- Mount the switch in the wall box, making sure it is secure and level.
- Turn on the power supply to the circuit and test the switch to ensure it is functioning properly.
300W power MOSFET, ESL up to 100W and LED up to 100W. Only 0.6 watt standby loss. With adjustable minimum brightness or dimming speed. With switching operations for light alarm clocks, children's rooms and snooze function. Also with light scene control by PC or wireless pushbuttons. Bidirectional wire-less and with repeater function. For installation. 45mm long, 55mm wide, 33mm deep. Universal dimmer switch for R, L and C loads up to 300 watts, depending on ventilation conditions. Dimmable energy-saving lamps ESL up to 100 watts and dimmable 230V LED lamps up to 100 watts. Automatic detection of load R+L or R+C, when the lower rotary switch is in position R, L, C. ESL and LED, is manually settable.
Zero passage switching with soft ON and soft OFF to protect lamps.
- Switching voltage and control voltage local 230V. No minimum load.
- The brightness level is stored on switch-off (memory).
- In case of a power failure the switch position and the brightness stage are stored and may be switched on when the power supply is restored.
- Automatic electronic overload protection and overtemperature switch-off.
- From production week 15/2011 with bidirectional wireless communication and a repeater function switch on facility. Every status change and incoming central control telegrams are confirmed by a wireless telegram. This wireless telegram can be taught into other actuators,
- FUA55 universal displays and the FVS-Software. The current dimming value is also displayed in % in the FVS-Software.
Function rotary switches
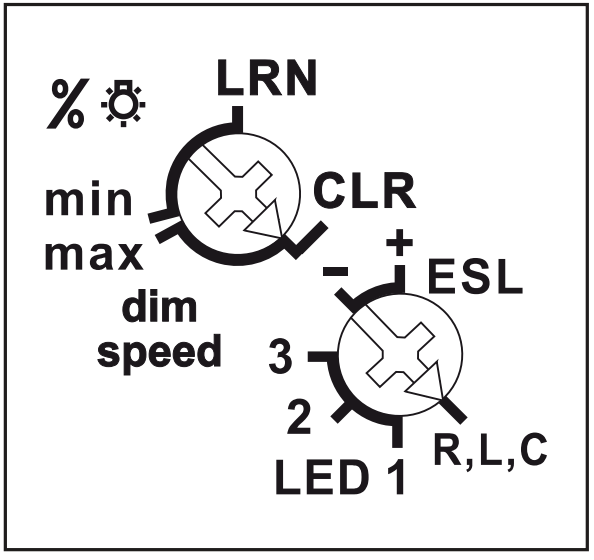
The minimum brightness (fully dimmed) or the dimming speed is adjustable with the % /dimming speed rotary switch. In the setting LRN up to 35 wireless pushbuttons can be assigned, of which one or more central pushbuttons.
- Position R,L,C is the setting for all load types except for ESL and LED. In particular for 230V glow and halogen lamps.
- The settings +ESL and -ESL consider the special conditions regarding dimmable energy-saving lamps: The starting operation is optimized and adapted to the dimming curve. In these settings the special switching operation for children's rooms is not possible and no wound (inductive) transformer must be dimmed. In position -ESL Memory is switched off. This can be of advantage for energy-saving lamps because cold energy-saving lamps require a higher minimum brightness as it will possibly be stored in Memory for warmer energy saving lamps.
- The position LEDs take account of special conditions with dimmable 230V LED
In addition to the wireless control input via an internal antenna, this universal dimmer switch can also be controlled locally by a conventional 230V control switch if fitted previously. Either separate local control inputs for dim brighter and dim darker as a direction switch, or these two inputs can be bridged and controlled with a single switch as a universal switch. The dimming direction can then be changed by interrupting the control. Short control commands switch on/off. - The wireless pushbuttons can be taught in either as direction switches or universal switches
When installed as a direction switch, one side is then 'switch on and dim up' and the other side is 'switch off and dim down'. A double-click on the switch-on side activates automatic dim-up to full brightness at dim speed. A double click on the switch-off side activates the snooze function. The children's room function is implemented on the switch-on side. - As a universal switch, change the direction by briefly releasing the pushbutton. With switching operation for children's rooms and snooze function.
- Switching for light alarm clocks: A wireless signal of a time clock which was taught-in accordingly starts the wake-up function by switching on the light at the lowest brightness level and dims up slowly until the maximum level is reached. Dependent on the set dim speed the wake up time is between 30 and 60 minutes. The dimming process is stopped by tapping briefly, e.g. on the hand-held transmitter. At setting ESL is no switching for light alarm clocks possible.
Switching operation for children's rooms
(universal switch or direction switch on the switch-on side): If the light is switched on by holding down the pushbutton, it starts at the lowest brightness level after approx.
1 second and dims up slowly as long as the pushbutton is held down without modifying the last stored brightness level. - Snooze function (universal switch or direction switch on the switch-off side): With a double impulse the lighting is dimmed down from the current dimming position to the minimum brightness level and switched off. The current dimming position as well as the adjustable minimum brightness level determine the dimming time (max. = 60 minutes) which can be reduced as required. It can be switched off at any time by short-time control commands during the lighting is dimmed down.
- Lights scenes with wireless switches are taught in on the FUD61NPN device. Up to four brightness values which can be taught-in in light scene pushbuttons with double rocker.
Either an FBH or an FAH can be taught in. - If a wireless motion-brightness sensor FBH is taught in, the switching threshold at which the lighting with memory value switches on (from approx. 30 lux in the position R,L,C to approx. 300 lux in the position ESL-) depending on the brightness (in addition to the motion) is de -termined with the lower rotary switch during teach-in. If the FBH is taught in in position ESL+, it is only evaluated as a motion sensor. A dropout delay of 1 minute is fixed in the FBH. If a wireless brightness sensor FAH is taught in, the threshold at which the lighting switches on or off (from approx. 0 lux in the position R,L,C to approx. 50 lux in the position ESL+) depending on the brightness is determined with the lower rotary switch. In the "%bright-ness" mode, switching on takes place with the memory value on dropping below the brightness threshold. Switching off takes place at a brightness of > 200 lux. In the "dim speed" mode the taught brightness threshold is not evaluated. The lighting is switched on and the dimmer is turned up to maximum brightness when it is dark. The lighting is dimmed continuously as the surroundings become brighter. The lighting is switched off at a brightness of > 200 lux.
- The LED performs during the teach-in process accord ing to the operation manual. It shows wireless control commands by short flickering during operation.
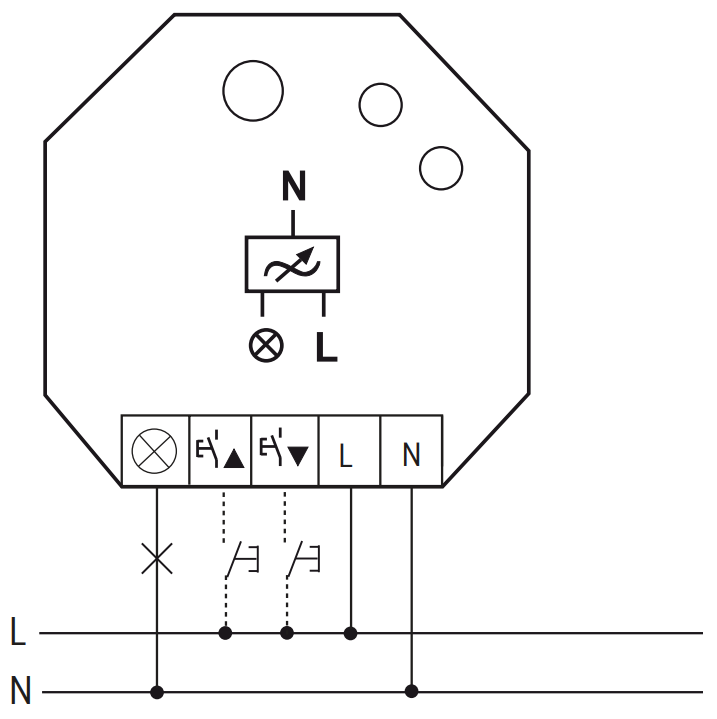
Typical connection
- Teaching-in wireless sensors in wireless actuators
All sensors must be taught-in in the actuators so that they can detect and execute commands. - Teaching-in actuator FUD61NPN-230V
The teach-in memory is empty on delivery from the factory. If you are unsure whether the teach-in memory contains something or not, you must first clear the memory contents completely- Set the upper rotary switch to CLR. The LED flashes at a high rate.
- Within the next 10 seconds, turn the lower rotary switch three times to the right stop (turn clockwise) and then turn back away from the stop. The LED stops flashing and goes out after 2 seconds. All taught-in sensors are cleared.
- Clear individual taught-in sensors in the same way as in the teach-in procedure, except that you set the upper rotary switch to CLR instead of LRN, and operate the sensor. The LED previously flashing at a high rate goes out.
Teaching-in sensors
- Setting of the lower rotary switch to the desired teaching-in function: The flashing of the LED as soon as a new setting range has been reached when turning the rotary switch helps to find the desired position reliably.
ESL- = timer as wake-up light;- 1 = teach-in 'central off';
- 2 = universal switch on/off and dim; Universal switches must be taught identically at top and bottom if the switch is to have the same function at top and bottom.
- 3 = teach-in 'central on';
ESL+ = Direction switches; - Direction switches are fully taught-in auto-matically when pressed. Where you press defines the switch-on and dim-up functions; the opposite side is then for switch-off and dim-down.
- R, L,C = teach in light scene pushbutton, a complete pushbutton with double rocker is assigned automatically;
- R, L,C = teach in a PC using the Wireless Visualisation and Control Software FVS. The percentage brightness can be set there between 0 and 100 per cent and saved. Several dimmer switches can be linked to form a light scene.
- Set the upper rotary switch to LRN. The LED flashes at a low rate.
- Operate the sensor which should be taught-in. The LED goes out.
To teach-in, further sensors, turn the upper rotary switch briefly away from position LRN. Continue the procedure from pos 1.
After teach-in, set the rotary switches of the actuators to the required function.
Saving light scenes
Up to four brightness values retrievable with a direct light scene pushbutton can be saved.
- Adjust the required brightness level with a previously taught-in universal or direction switch.
- Press the pushbutton 3-5 seconds on one of the four rocker ends of the light scene pushbutton with double rocker to save the brightness value.
- Repeat from point 1 to save further directly retrievable light scenes.
- Switching the repeater on and off
The repeater is switched on or off if the control voltage is applied to the local ▼ control input when connecting the supply voltage. The LED lights up for 2 seconds as a status signal when applying the supply voltage = repeater off (as-delivered state) or 5 seconds = repeater on. - Teaching-in feedback of this actuator in other actuators or FSV software
For switching ON and OFF and simultaneously transmitting of feedback the local control input has to be applied. - Teaching-in feedback of other actuators in this actuator
'Switch on' will be taught-in in position 'central ON'. 'Switch off' will be taught-in in position 'central OFF'. After teach-in the function and the desired minimum brightness or dimming speed will be set.
When an actuator is ready for teach-in (the LED flashes at a low rate), the very next incoming signal is taught-in. Therefore, make absolutely sure that you do not activate any other sensors during the teach-in phase.
Important Note
Only skilled electricians may install this electrical equipment otherwise there is the risk of fire or electric shock.
Technical data
| Load Type | Maximum Capacity |
|---|---|
| Incandescent and halogen lamps 230V (R) | up to 300W |
| Inductive transformers (L) | up to 300W |
| Electronic transformers (C) | up to 300W |
| Dimmable energy-saving lamps ESL | up to 100W |
| Dimmable 230V LEDs | up to 100W |
| Max./min. temperature at mounting location | +50°C/-20°C |
| Standby loss (active power) | 0.6W |
Pros & Cons of Eltako FUD61NPN-230V
Pros
- Versatile and suitable for use with a wide range of bulbs
- Sleek and modern design
- Easy-to-use push-button controls
- High load capacity for incandescent bulbs
- Smooth and precise dimming control
Cons
- May not be compatible with all types of LED bulbs
- Higher price point compared to some other dimmer switches on the market
Customer Reviews about Eltako Actuator Universal Dimmer Switch
"I love the Actuator Universal Dimmer Switch FUD61NPN-230V! It is so easy to use and the dimming control is smooth and precise. I also appreciate the high load capacity for my incandescent bulbs. Highly recommend!" - Sarah P.
"I was hesitant to spend the extra money on this dimmer switch, but it was definitely worth it. The sleek design looks great in my living room and the dimming control is fantastic. I have had no issues with compatibility with my LED bulbs either." - John D.
The most common complaint about the Eltako Actuator Universal Dimmer Switch is its higher price point compared to some other dimmer switches on the market. However, most customers agree that the high quality and reliability of the product make it worth the investment.
Faqs
How is the Eltako FUD61NPN-230V Dimmer Switch installed?
Is it possible to utilise LED lights with the Eltako Dimmer?
What should I do if the light level is not being correctly controlled by the dimmer?
How can I change the Eltako dimmer's minimum brightness setting?
Which safety features are included with the Eltako Dimmer?
Can I use the Eltako FUD61NPN-230V with smart home automation systems?
How can the Eltako Dimmer Switch be reset to its original factory settings?
What type of upkeep is necessary for the Eltako Dimmer Switch?
What is the process for setting up various lighting scenarios on the Eltako FUD61NPN-230V?
What is the duration of the Eltako Universal Dimmer Switch warranty?
Leave a Comment