Iboard APS Running Boards IB-R404 Instruction Manual
Content
Introduction
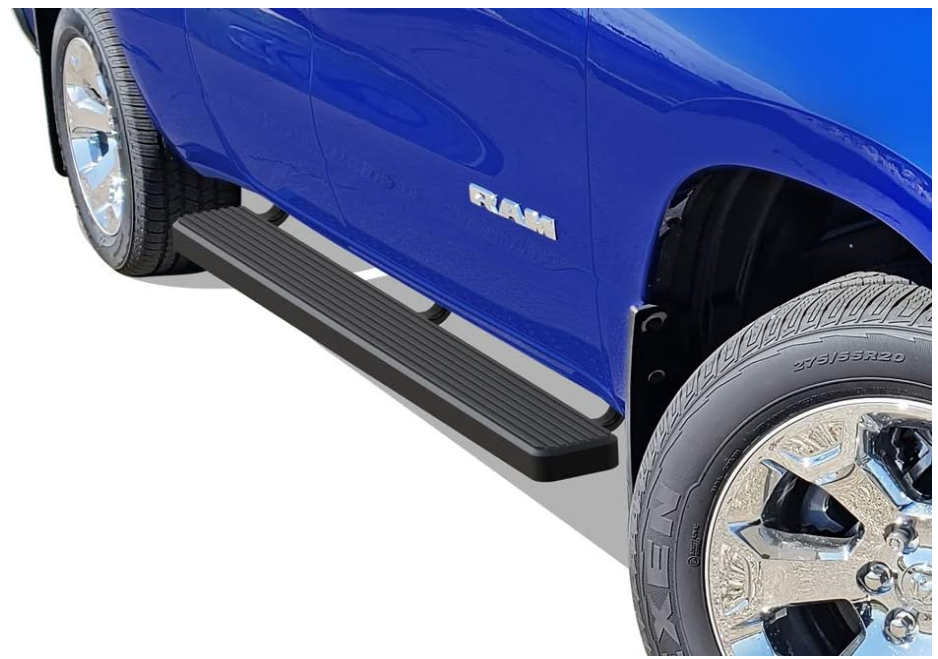
The iBoard APS Running Boards IB-R404 are designed to enhance accessibility and style for trucks and SUVs. Constructed from durable aluminum, these running boards feature a sleek, low-profile design that complements any vehicle while providing a secure stepping surface. The easy installation process ensures a perfect fit for various makes and models, making them a popular choice among vehicle owners. The cost of the iBoard running boards typically starts around $268.38.
Specifications
- Material: Heavy-duty aluminum alloy
- Dimensions: 65 inches long, 4.5 inches wide, 3 inches high
- Weight Capacity: Up to 300 lbs per step
- Installation Type: Bolt-on, no drilling required
- Finish: Textured black powder coat for enhanced grip and durability
- Compatibility: Fits various SUV and truck models (check manufacturer's list for specific compatibility)
READ INSTRUCTIONS CAREFULLY BEFORE START ING INSTALLATION. REMOVE CONTENTS FROM BOX AND VERIFY ALL PARTS ARE PRE-SENT. ASSISTANCE IS RECOMMENDED.
- ROCKER PANEL MOUNT
- DRILLING IS REQUIRED
Fastener Size | Tightening Torque(ft-lbs) | Required |
6mm | 6-7 | √ |
8mm | 16-18 | √ |
10mm | 31-32 | √ |
12mm | 56-58 | X |
14mm | 92-94 | X |
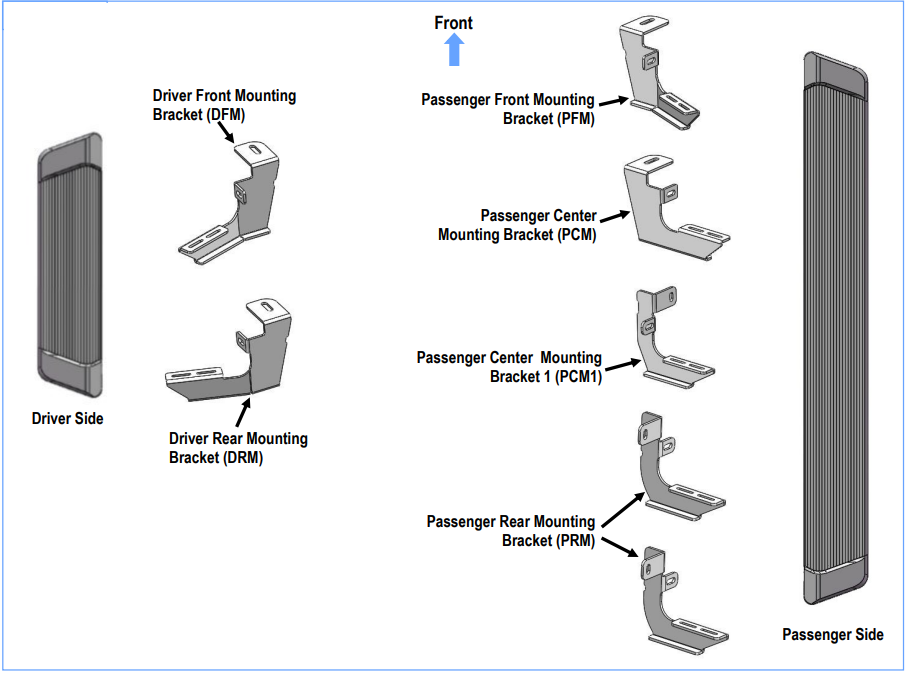
iBoard APS Running Boards IB-R404 PART LIST
Hardware Package
Hardware PackageA (For Bracket Installation) | |||||
Item | QTY | Description | Item | QTY | Description |
1# | 1 | M8 Insert Installation Tool | 8# | 1 | M8X1.25-40mm Hex Bolt |
2# | 2 | M10X40 Bolt Plates | 9# | 11 | M8 Flat Washers |
3# | 2 | M10X35 Bolt Plates | 10# | 10 | M8 Lock Washers |
4# | 4 | M10 Flat Washers | 11# | 1 | M8 Hex Nut |
5# | 4 | M10 Lock Washers | 12# | 10 | M8 Clip Nuts |
6# | 4 | M10 Hex Nuts | 13# | 3 | M8 Rivet Nuts |
7# | 10 | M8X1.25-25mm Hex Bolts | |||
 | |||||
Hardware Package B (For StepBar Installation) | |||||
Item | QTY | Description | Item | QTY | Description |
1# | 14 | M6X1-20mm Square HeadBolts | 3# | 14 | M6 Nylon LockNuts |
2# | 14 | M6 Large FlatWashers | |||
 | |||||
Description
The iBoard APS Running Boards IB-R404 features a robust design with textured surfaces to ensure maximum grip even in wet or slippery conditions. The boards are ergonomically shaped to provide a comfortable stepping area, reducing fatigue and strain on the knees and back. The aluminum alloy construction ensures lightweight yet strong performance, making them ideal for both on-road and off-road use.
The IB-R404 model comes with a sleek black powder coat finish that not only enhances aesthetics but also protects the material from corrosion and wear. The bolt-on installation system allows for a hassle-free setup without requiring any drilling, ensuring that the vehicle's original warranty remains intact.
Installation Instructions
- Starting installation from the driver side front of the vehicle. Locate and remove the rubber plug near the front tire opening, (Fig 1). Select (1) M10X35 Bolt Plate, (Fig 2). Insert the Bolt Plate into and across the opening, (Fig 3).
- Select the Driver Front Mounting Bracket (DFM). Attach the Bracket to the installed M10X35 Bolt Plate with (1) M10 Flat Washer, (1) M10 Lock Washer and (1) M10 Hex Nut, (Fig 4). Do not fully tighten hardware at this time.
- Line up the mounting tab on the Bracket with the factory hole in the pinch weld. Slide (1) M8 Clip Nut over the hole in the pinch weld with the nut toward the outside of the vehicle, (Fig 3).
Note: On some models, 5/16” holes may require to drill on the pinch weld to attach the Mounting Bracket.- Line up the tab on the Bracket with a flat area on the back of the pinch weld.
- Fully tighten the M10 Hex Nut on the M10X35 Bolt Plate. Use the tab on the Bracket for a guide and drill a 5/16” hole through the tab and the pinch weld. MPORTANT!Any cutting or drilling tool may break or shatter. Gov-ernment regulations require safety glasses & equip-ment at all times when cutting or drilling.
- Slide (1) M8 Clip Nut over the drilled hole in the pinch weld with the nut toward the outside.
Attach the lower mounting hole on the Bracket to the M8 Clip Nut with (1) M8X1.25-25mm Hex Bolt, (1) M8 Lock Washer and (1) M8 Flat Washer, (Fig 4). Do not fully tighten the hardware.
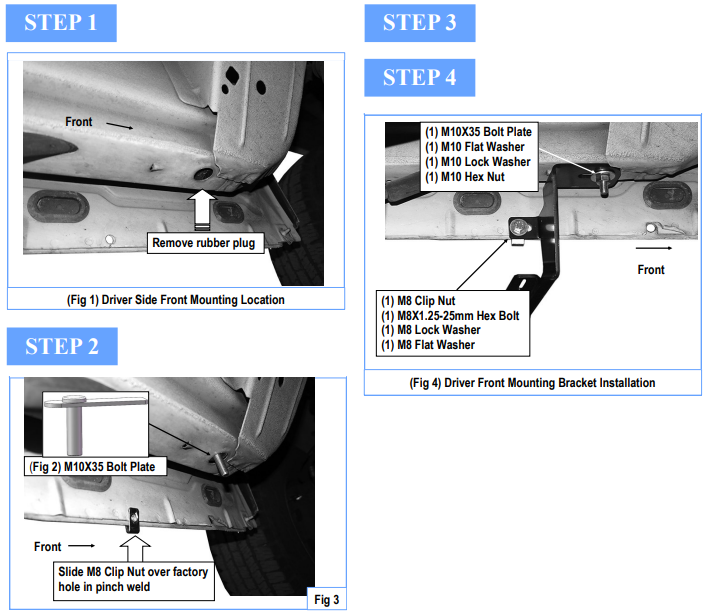
- Move to the driver side rear of the vehicle, (Fig 6). Locate and remove the large oval rubber plug. Insert (1) M10X40 Bolt Plate into the opening, (Figs 5 & 6).
Attach the Driver Rear Mounting Bracket (DRM) to the M10X40 Bolt Plate with (1) M10 Flat Washer, (1) M10 Lock Washer and (1) M10 Hex Nut, (Fig 7). Repeat Steps 3 & 4 to attach the Mounting Bracket to the back of the pinch weld (Fig 7). Once all (2) mounting brackets are installed. Select the Driver Side Running Board (the short one). Slip (2) M6x1-20mm Square Head Bolts into each bottom channel (Fig 8). Carefully position the Running Board onto the (2) Mounting Brackets. Attach the Running Board to each Mounting Bracket with (2) M6x1-20mm Square Head Bolts, (2) M6 Large Flat Washers and (2) M6 Nylon Lock Nuts, (Fig 9). Do not fully tighten hard-ware at this time.
IMPORTANT: Do not slide the Running Board on the Brackets or the bottom surface of the board will be damaged.
Level and adjust the Running Board and fully tighten all hard-ware.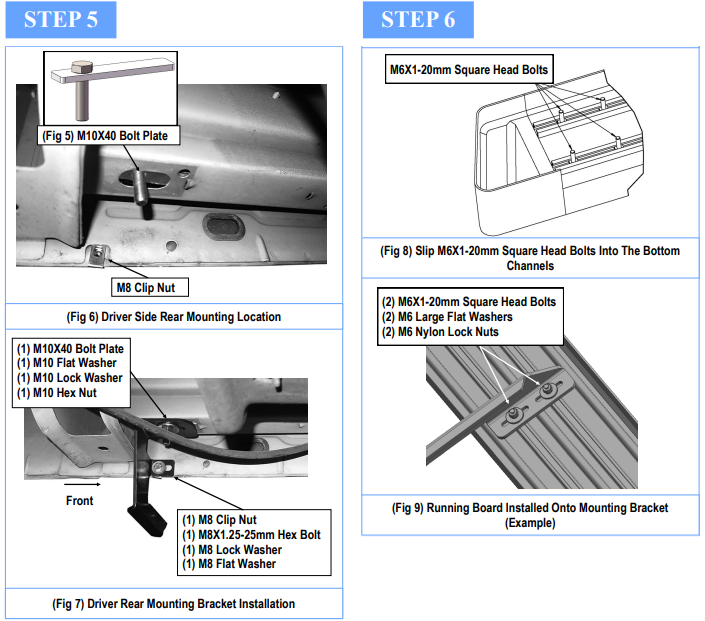
- Move to the passenger side of the vehicle.
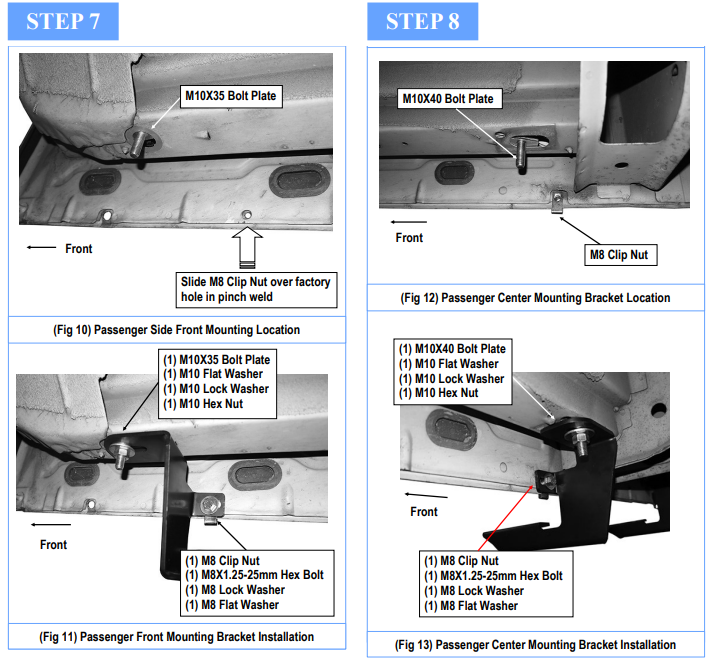
Start installation from the passenger side front of the vehicle, (Fig 10). Repeat Steps 1—4 to install the Passenger Front Mounting Bracket (PFM), (Fig 11). Do not fully tighten hard-ware at this time. Move to the 2nd Mounting Bracket location, (Fig 12). Repeat Step 5 to install the Passenger Center Mounting Bracket (PCM), (Figs 12 & 13). Do not fully tighten hardware at this time.
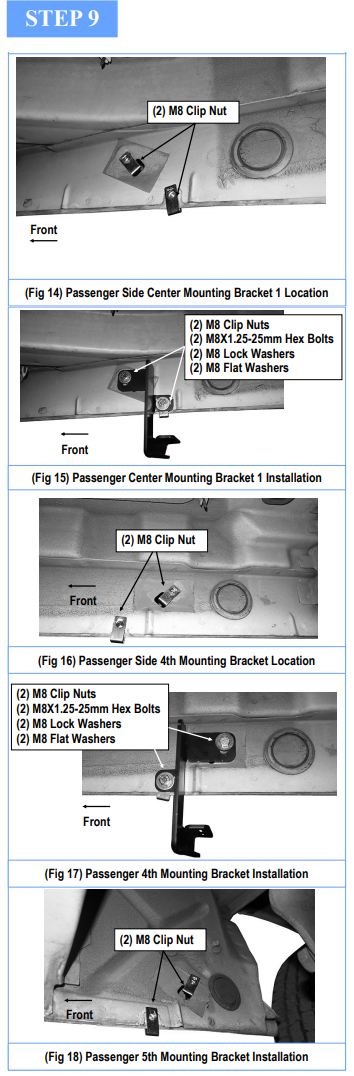
Move to the 3rd Bracket location below the siding door, (Fig 14). Determine the correct procedure for your year/model for the remaining (2) passenger side Brackets:
Models with factory holes in pinch weld and inner body panel:
- Locate the factory hole in the pinch weld. Also locate the square hole and small round hole in the inner body panel near and above the hole in the pinch weld, (Fig 14). NOTE: Hold the appropriate Mounting Bracket up in each location to help determine the correct holes to use.
- Slide (1) M8 Clip Nut into the square hole and in line with the smaller round hole. Next, slide (1) M8 Clip Nut over the hole through the pinch weld as described in Step 3,(Fig 14).
- Select the Passenger Center Mounting Bracket 1 (PCM1). Attach the Bracket to the (2) M8 Clip Nuts with (2) M8X1.25-25mm Hex Bolts, (2) M8 Lock Washers and (2) M8 Flat Washers, (Fig 15). Do not fully tighten hardware at this time.
Move to 4th & 5th mounting bracket locations, repeat Steps a—c to install (2) Passenger Rear Mounting Brack-ets (PRM), (Figs 16-18).
Models without factory holes in the pinch weld and/or in-ner body panel:
- Repeat Step 7 to attach the Running Board to the front and 2nd Mounting Brackets.
- Use a stand or a jack to hold the Running Board up and level with the front (2) Brackets.
- Select the 3rd Passenger Center Mounting Bracket 1 (PCM1). With the Running Board level to the vehicle, hold the Bracket up in position against the back of the pinch weld and body panel. Mark the location of the slots in the Bracket onto the sheet metal, (Fig 19). NOTE: Use a clamp or locking pliers to temporarily attach the Bracket to the pinch weld.
- Drill a 7/16” hole in the center of the mark for the top mounting tab, (Fig 19).
IMPORTANT: Make sure the Run-ning Board is level to the vehicle before drilling any mounting holes. - Select (1) M8 Insert Installation Tool, (1) M8X1.25-40mm Hex Bolt, (1) M8 Flat Washer and (1) M8 Rivet Nut. As-semble the Insert as pictured in Fig 20 .
NOTE: Select 8 mm hole on Insert Installation Tool (Fig 21). Firmly hold the handle and push the Rivet Nut into the hole. Use a small hammer to gently tap the insert into the hole if necessary. Once inserted, hold the handle with one hand and turn the M8 Hex Bolt, (tighten), with a wrench to expand the Rivet Nut in the body panel. Continue to tight-en the M8 Hex Bolt until the Rivet Nut is fully compressed and close to flush with the surface. Remove bolt and tool from the Rivet Nut, (Fig 22).
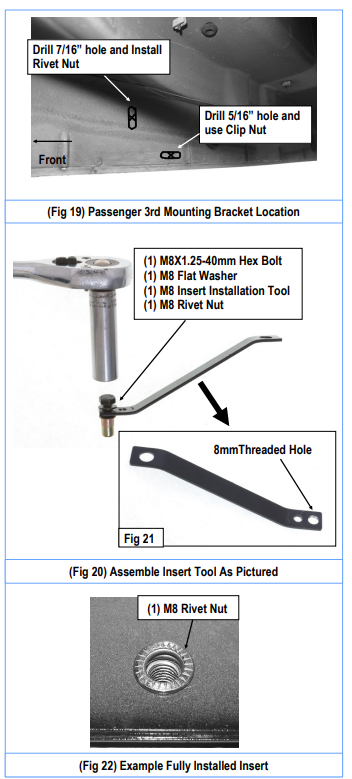
WARNING: Do not over tight-en the hex bolt or the Rivet Nut may become damaged.
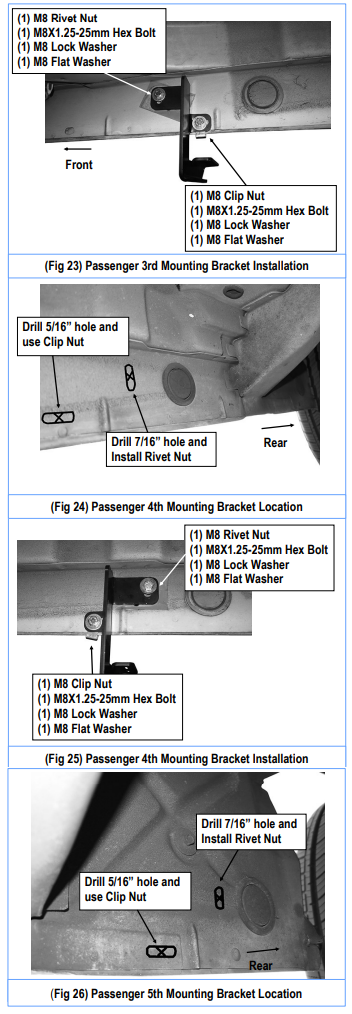
- Repeat Step 3 to drill the 5/16” hole through the pinch weld as needed.
- Select the passenger side 3rd Mounting Bracket. Attach the Bracket to the M8 Rivet Nut and M8 Clip Nut with (2) M8X1.25-25mm Hex Bolts, (2) M8 Lock Washers and (2) M8 Flat Washers, (Fig 23). Do not fully tighten hardware at this time.
- Repeat Steps a—h to install the identical 4th & 5th Brack-et, (Figs 24-26).
- Select the Passenger Side Running Board. Slip (5) M6X1-20mm Square Head Bolts into each bottom channel, (Fig 8). Carefully position the Running Board onto the (5) Mounting Brackets.
Repeat Step 6 to attach the Running Board to the Mounting Brackets. Level and adjust the Running Board and fully tighten all hard-ware. The installation is completed.
Attention
- Do periodic inspections to the installation to make sure that all hardware is secure and tight.
- In order to protect your bars/boards, please use mild soap/non-abrasive products for cleaning only.
Setup Guide
To set up the iBoard APS Running Boards IB-R404, follow these steps:
- Ensure the vehicle is parked on level ground and apply the parking brake.
- Locate the mounting points on the vehicle's frame and align them with the running boards' brackets.
- Use the provided bolts to secure the brackets to the frame. Tighten them firmly but avoid overtightening.
- Check the alignment and stability of the boards before finalizing the installation.
- Test the boards by applying weight and ensuring they are securely attached.
Troubleshooting
If you encounter any issues with your iBoard APS Running Boards IB-R404, here are some common problems and solutions:
- Loose Bolts: Check and tighten all bolts periodically to ensure the boards remain securely attached.
- Alignment Issues: Realign the brackets with the mounting points on the vehicle's frame and resecure them.
- Slippery Surface: Clean the boards regularly to maintain grip. Apply a non-slip coating if necessary.
Warning: Always follow the manufacturer's instructions for installation and maintenance to avoid any potential risks or damage to your vehicle.
Pros & Cons
Pros
- Enhanced durability and strength
- Ergonomic design for easy access
- Textured surface for improved grip
- Bolt-on installation without drilling
- High-quality materials and finish
Cons
- Potentially higher cost compared to basic models
- Specific compatibility requirements may limit usage on certain vehicles
- May require periodic tightening of bolts
Customer Reviews
Customer reviews for the iBoard APS Running Boards IB-R404 have been overwhelmingly positive, with many users praising their durability, ease of installation, and aesthetic appeal. However, some users have noted that the boards can be slightly more expensive than other models on the market.
Common Complaints
Some users have reported issues with alignment during installation, which can be resolved by carefully following the manufacturer's instructions. Others have mentioned the need for occasional tightening of the bolts to ensure the boards remain securely attached.
Faqs
What is the weight capacity of the iBoard APS Running Boards IB-R404?
Are these running boards compatible with all SUVs and trucks?
How do I clean and maintain these running boards?
What material are the iBoard APS Running Boards IB-R404 made of?
Can I install these running boards myself, or do I need professional help?
How long does it typically take to install these running boards?
What finish do the iBoard APS Running Boards IB-R404 come in?
Are there any specific tools required for installation?
Do these running boards come with a warranty?
Leave a Comment