Epson EcoTank Wireless Printer ET-3843 User Manual
Content
Introduction
The EcoTank Wireless Printer ET-3843 is an innovative all-in-one solution designed for efficient, cartridge-free printing. Utilizing high-capacity ink tanks, it eliminates the need for costly cartridges, offering significant savings on ink costs—up to 90% compared to traditional cartridges. The ET-3843 is priced at approximately $299.99. This printer features fast printing speeds, a built-in scanner and copier, and modern connectivity options, making it ideal for home offices.
Technical Specifications
These sections list the technical specifications for your product.
Windows System Requirements
To use your product and its software, your computer should use one of these Microsoft operating systems:
- Windows 11
- Windows 10
- Windows 8.x
- Windows 7
- Windows Vista
Mac System Requirements
To use your product and its software, your Mac should use one of these operating systems:
- macOS 12.x
- macOS 11.x
- macOS 10.15.x
- macOS 10.14.x
- macOS 10.13.x
- macOS 10.12.x
- OS X 10.11.x
- OS X 10.10.x
- OS X 10.9.x
- OS X 10.8.x
- OS X 10.7.x
Paper Specifications
Note: Since the quality of any particular brand or type of paper may be changed by the manufacturer at any time, Epson cannot guarantee the quality of any non-Epson brand or type of paper. Always test a sample of paper stock before purchasing large quantities or printing large jobs.
Single-Sheets
- Size:
- A4 (8.3 × 11.7 inches [210 × 297 mm])
- A6 (4.1 × 5.8 inches [105 × 148 mm])
- Letter (8.5 × 11 inches [216 × 279 mm])
- Legal (8.5 × 14 inches [216 × 356 mm])
- 8.5 × 13 inches (216 × 330 mm)
- 3.5 × 5 inches (89 × 127 mm)
- 4 × 6 inches (102 × 152 mm)
- 5 × 7 inches (127 × 178 mm)
- 8 × 10 inches (203 × 254 mm)
- Executive (7.25 × 10.5 inches [184 × 267 mm])
- Half Letter (5.5 × 8.5 inches [140 × 216 mm])
- Mexico-Oficio (8.5 × 13.4 inches [216 × 340 mm])
- Oficio 9 (8.46 × 12.4 inches [215 × 315 mm])
Paper Types
- Plain paper
Note: Your product also supports compatible papers distributed by Epson. Select the link at the end of this topic to view a list of compatible Epson papers.
Weight
- Plain paper: 17 lb (64 g/m²) to 24 lb (90 g/m²)
Envelopes
- Size:
- No. 10 (4.1 × 9.5 inches [105 × 241 mm])
Paper Types
- Plain bond paper
Weight
- 20 lb (75 g/m²) to 27 lb (100 g/m²)
Even if the paper thickness is within this range, the paper may not feed in the printer or the print quality may decline depending on the paper properties or quality.
Printable Area Specifications
Note: When printing borderless, quality may decline in the expanded printable area.
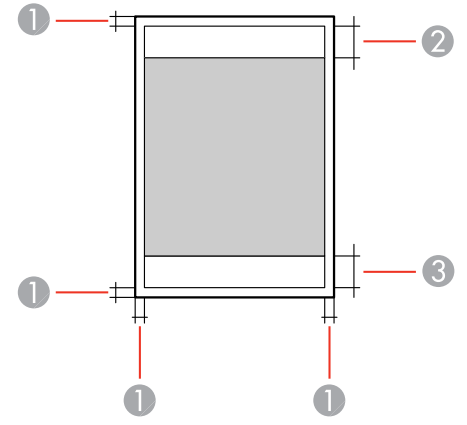
Single Sheets
- Top/Bottom Margins: 0.12 inch (3 mm)
- Reduced Print Quality Area (Top): 1.61 inches (41 mm)
Reduced Print Quality Area (Bottom): 1.46 inches (37 mm)
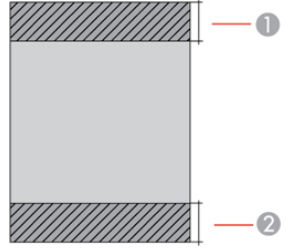
Borderless
- Reduced Print Quality Area (Top): 1.73 inches (44 mm)
Reduced Print Quality Area (Bottom): 1.57 inches (40 mm)
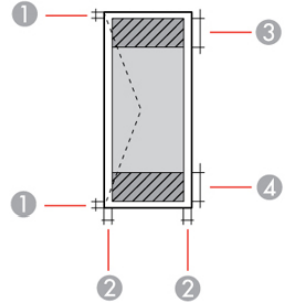
Envelopes
- Left/Right Margins: 0.12 inch (3 mm)
- Top/Bottom Margins: 0.12 inch (3 mm)
- Reduced Print Quality Area (Left): 0.71 inch (18 mm)
Reduced Print Quality Area (Right): 1.61 inches (41 mm)
Automatic Document Feeder (ADF) Specifications
Paper Specifications
- Size:
- Letter, A4, Legal, or 8.5 × 13 inches (216 × 330 mm)
- Type: Plain paper
- Weight: 17 lb (64 g/m²) to 25 lb (95 g/m²)
Loading Capacity
- Approximately 30 sheets: Letter or A4 size
- Approximately 10 sheets: Legal or 8.5 × 13 inches (216 × 330 mm) size
Scanning Specifications
- Type: Flatbed, color
- Photoelectric Device: CIS
- Effective Pixels: 10200 × 14040 pixels (1200 dpi)
- Document Size:
- Maximum: 8.5 × 11.7 inches (216 × 297 mm)
- Scanner Glass: Letter or A4
Scanning Resolution
- Main Scan: 1200 dpi
- Sub Scan: 2400 dpi
Output Resolution
- 50 to 9600 dpi in 1 dpi increments
Image Data
- Color:
- Internal: 48 bits per pixel (16 bits per pixel per color)
- External: 24 bits per pixel (8 bits per pixel per color)
- Grayscale:
- Internal: 16 bits per pixel
- External: 8 bits per pixel
- Black and White:
- Internal: 16 bits per pixel
- External: 1 bit per pixel
Light Source
- LED
Ink Specifications
Note:
- Epson's warranties do not extend to any damage caused by the use of third-party ink or ink not designed for your printer.
- The included initial ink bottles must be used for printer setup and are not for resale.
- The printer ships with full ink bottles, and part of the ink from the first bottles is used to charge the print head.
- Yields vary considerably based on images printed, print settings, paper type, frequency of use, and temperature.
Ink Information
- Colors: Black, Cyan, Magenta, Yellow
- Ink Life:
- Opened Package: Use as soon as possible.
- Unopened Package: Use before the expiration date on the package.
Temperature
- Storage: –4 to 104 °F (–20 to 40 °C)
- Up to 1 month at 104 °F (40 °C)
- Freezing Point: Ink freezes at 5 °F (–15 °C)
- Thawing: Ink becomes usable after approximately 2 hours at 77 °F (25 °C)
Dimension Specifications
- Height:
- Stored: 9.1 inches (231 mm)
- Printing: 10 inches (255 mm)
- Width:
- Stored: 14.8 inches (375 mm)
- Printing: 16.4 inches (417 mm)
- Depth:
- Stored: 13.7 inches (347 mm)
- Printing: 19.8 inches (503 mm)
- Weight (without ink or power cord)
- 14.8 lb (6.7 kg)
Electrical Specifications
Power Supply Rating
- Voltage Range: 100 to 240 V
- Input Voltage Range: 90 to 264 V
- Rated Frequency Range: 50/60 Hz
- Input Frequency Range: 49.5 to 60.5 Hz
- Rated Current: 0.4 to 0.2 A
Power Consumption (with USB connection)
- Standalone Copying: Approximately 12 W (ISO/IEC24712)
- Ready Mode: Approximately 5.3 W
- Sleep Mode: Approximately 0.9 W
- Power Off Mode: Approximately 0.2 W
Environmental Specifications
Temperature
- Operating: 50 to 95 °F (10 to 35 °C)
- Storage: –4 to 104 °F (–20 to 40 °C)
- Up to 1 month at 104 °F (40 °C)
Humidity (without condensation)
- Operating: 20 to 80% RH
- Storage: 5 to 85% RH
Interface Specifications
- Interface type: Hi-Speed USB (Device Class for computers; USB 3.0 cables are not supported)
Network Interface Specifications
Wi-Fi
- Standard: IEEE802.11 b/g/n; IEEE802.11n available only on the 20 MHz channel
- Security:
- WEP (64/128 bit)
- WPA-PSK (TKIP)
- WPA2-PSK (AES); complies with WPA2 with support for WPA/WPA2 Personal
- WPA3-SAE (AES)
- Frequency Band: 2.4 GHz
- Connection Modes:
- Infrastructure mode
- Wi-Fi Direct (Simple AP); not supported for IEEE802.11b
- Note: Wi-Fi Direct can be used simultaneously with Infrastructure or Ethernet modes.
- Maximum Radio Frequency Power Transmitted: 20 dBm (EIRP)
Ethernet
- Standard:
- IEEE802.3i (10BASE-T); use a category 5e or higher STP (shielded twisted pair) cable to prevent risk of radio interference
- IEEE802.3u (100BASE-TX)
- IEEE802.3az (Energy Efficient Ethernet); connected device should be IEEE802.3az compliant
- Communication Modes:
- Auto
- 10 Mbps Full Duplex
- 10 Mbps Half Duplex
- 100 Mbps Full Duplex
- 100 Mbps Half Duplex
- Connector: RJ-45
- Security Protocols:
- SSL/TLS
- HTTPS Server/Client, IPPS
- SNMPv3
Description
The Epson EcoTank Wireless Printer ET-3843 is a multifunctional device that combines printing, scanning, and copying capabilities. Its compact design makes it suitable for small spaces, while its robust build ensures durability. The printer uses Epson's proprietary PrecisionCore technology to deliver sharp text and vibrant colors. The refillable EcoTank system eliminates the need for cartridges, providing a significant reduction in operating costs and environmental impact.
The ET-3843 also features a user-friendly interface with a 2.4-inch color display, making it easy to navigate and manage print jobs. Additionally, it supports automatic two-sided printing, reducing paper usage and enhancing productivity.
Product Basics
Product Parts Locations
Front

- Automatic Document Feeder (ADF) cover
- ADF input tray
- ADF edge guides
- ADF document support
- ADF output tray extension
- ADF output tray
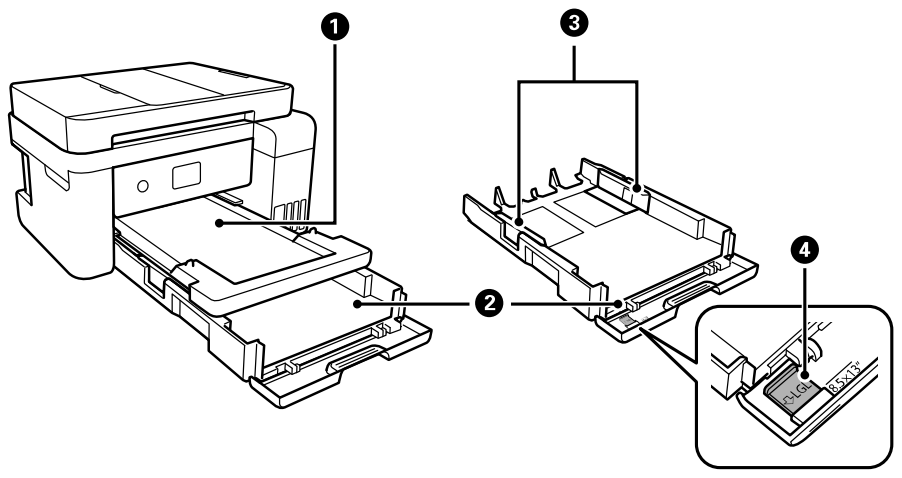
- Output tray
- Paper cassette
- Paper cassette edge guides
- Legal-size paper guide
Inside
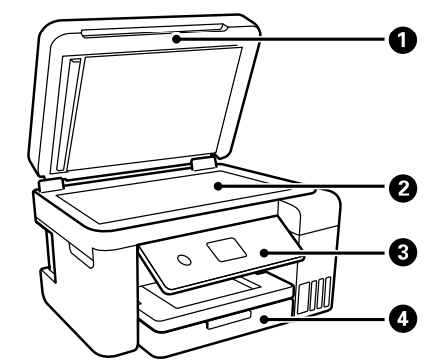
- Document cover
- Scanner glass
- Control panel
- Front cover
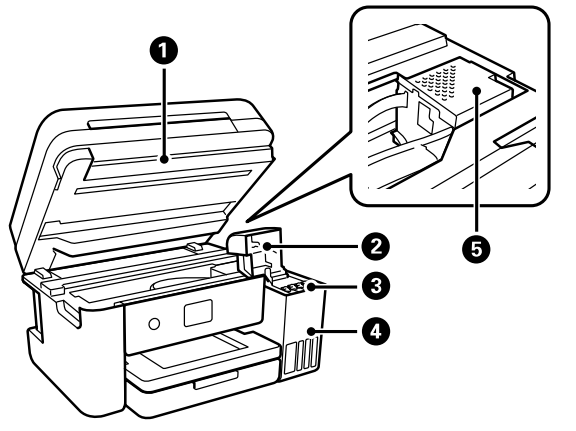
- Scanner unit
- Ink tank cover
- Ink tanks
- Ink tank unit
- Print head
Back

- Maintenance box cover
- Rear cover (duplexer)
- AC inlet
- LAN port
- USB port
Using the Control Panel
Control Panel Buttons and Lights
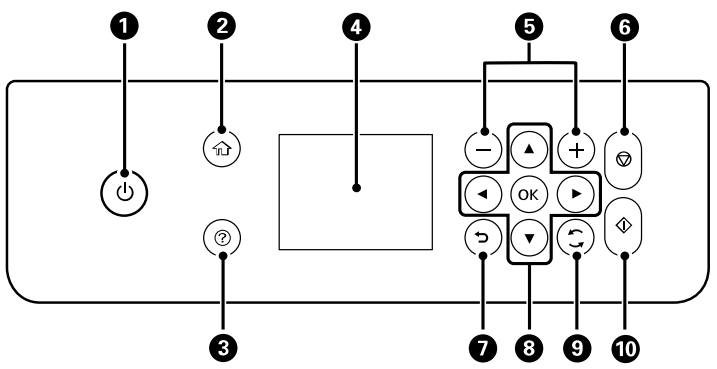
 power button and light
 home button
 help button
- LCD screen
- + and – buttons
 stop button
 back button
- Arrow buttons and OK button
 reset button
 start button
The LCD Screen
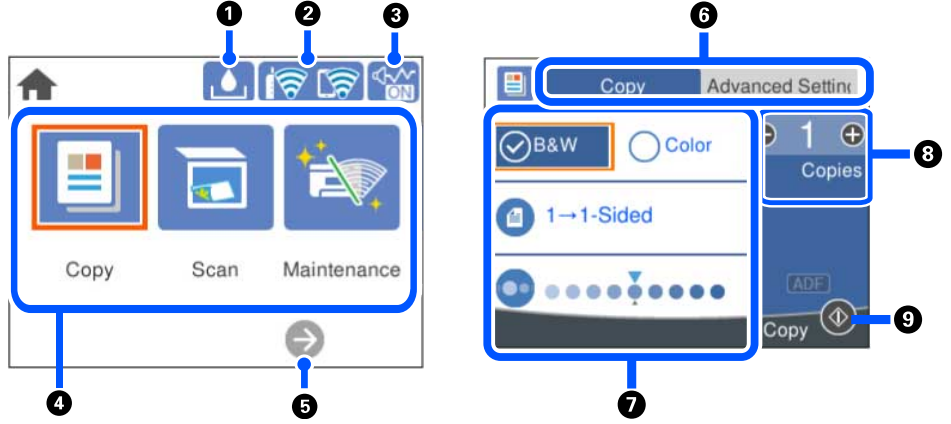
- Displays the maintenance box status
- Displays the network connection status
- Displays the Quiet Mode screen
- Menu options
- Scrolls the screen to the right
- Select a tab to view different options and settings
- Settings options
- Displays available options
- Performs the selected action
Status Icon Information
Icons | Description |
INFO | Displays additional information or instructions, such as loading paper or placing a document. |
| Displays the maintenance box status. | |
 | Displays the network connection status; select the icon to set up or changeyour network connection. • • • • • • • |
The Quiet Mode setting is enabled or disabled. Select the icon to change the setting. Depending on the selected paper type and print quality, when this featureis enabled noise is reduced during printing, but print speed may also be reduced. | |
⚠ | There is a problemwith the indicated setting. Select the icon to resolve theproblem. |
Entering Characters on the LCD Screen
Follow these guidelines to enter characters for passwords and other settings.
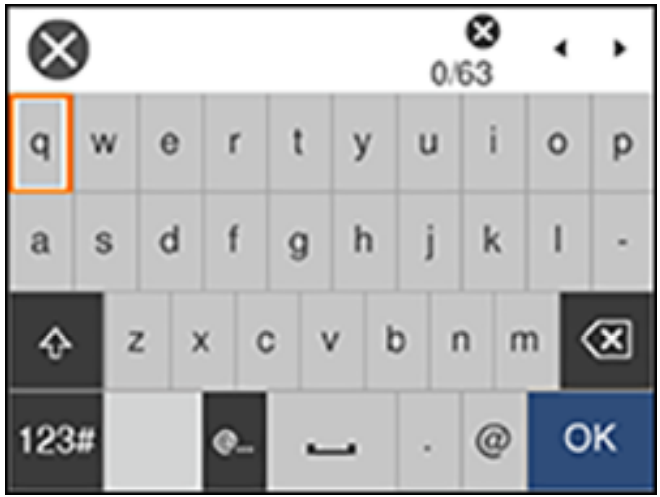
- To move the cursor, select the left or right arrows.
- To change the case of letters, select
 .
. - To delete the previous character, select
 .
. - To enter numbers or symbols, select
 .
. - To enter a commonly used domain name, select
 .
. - To enter a space, select
 .
.
Changing LCD Screen Language
You can change the language used on the LCD screen.
- Press the
 home button, if necessary.
 - Select Settings > General Settings > Basic Settings > Language.
- Select a language.
Viewing Animations
You can view animations on the LCD screen to help guide you with a procedure or to troubleshoot a problem.
- Press the
 help button.
 - Select Troubleshooting if you are experiencing a problem or How To to view instructions on common procedures.
- Select a topic from the list of available topics and follow the on-screen instructions.
Adjusting the Screen Brightness
You can adjust the brightness of the LCD screen.
- Press the
 home button, if necessary.
 - Select Settings > General Settings > Basic Settings > LCD Brightness.
- Press the – or + buttons to decrease or increase the brightness.
- Select Done to exit.
Turning Off the Operation Time Out Setting
The Operation Time Out setting causes the LCD screen to return to the Home screen after a few minutes of inactivity. This feature is enabled by default, but you can turn it off.
- Press the
 home button, if necessary.
 - Select Settings > General Settings > Basic Settings.
- Scroll down and set Operation Time Out to Off.
Using Power Saving Settings
Your product enters sleep mode automatically and turns off the LCD screen if it is not used for a period of time. You can make the time period shorter and select other options to save energy and resources.
Changing the Sleep Timer Settings
You can adjust the time period before your product enters sleep mode and turns off the LCD screen.
- Press the
 home button, if necessary.
 - Select Settings > General Settings > Basic Settings > Sleep Timer.
- Do one of the following:
- Press the + or – button to increase or decrease the number of minutes.
- Press the OK button to display the on-screen keypad, select the number of minutes, and select OK.
- Select Done.
Changing the Power Off Timer Settings
You can have the product turn off automatically if it is not used for a specified period of time.
- Press the
 home button, if necessary.
 - Select Settings > General Settings > Basic Settings.
- Select Power Off Timer, then select a time period between 30minutes and 12h (12 hours).
Using the Epson Smart Panel Mobile App
Use this free Apple and Android app to set up your Epson product and then print, copy, or scan with your networked Epson product. Epson Smart Panel also lets you check ink levels and product status.
- Visit epson.com/connect (U.S.) or epson.ca/connect (Canada) to learn more about Epson Smart Panel and check the compatibility of your mobile device.
- Download Epson Smart Panel from the Apple App Store or Google Play.
- Connect your mobile device to the wireless network that you want to connect your product to or to the same wireless network as your product (if your product is already set up).
- Do one of the following:
- If you haven't set up your product, open Epson Smart Panel and follow the instructions to set up your product.
- If your product is already set up, open Epson Smart Panel and select your Epson product, if necessary.
Now you are ready to print, copy, or scan with your mobile device and your Epson product.
Voice-activated Printing
Take advantage of voice-activated, hands-free printing from your Epson product with Alexa, Siri, and Google Assistant. Depending on which voice assistant you use, you can ask your product to print photos, calendars, recipes, photo props, and more. Click here for more information.
- Connect your product to your network. See the link below.
- Set up your product's email address for use with Epson Connect. See the link below to activate it from the product control panel.
- Click here for instructions on how to set up your product and voice assistant to use the voice-activated printing feature.
Now you are ready to print with your voice and your Epson product.
Epson Connect Solutions for Smartphones, Tablets, and More
Use your smartphone, tablet, or computer to print and scan documents, photos, emails, and web pages from your home, office, or even across the globe.
Note: If you are using your Epson product with the Windows 10 S operating system, you cannot use the software described in this section. You also cannot download and install any Epson product software from the Epson website for use with Windows 10 S; you must obtain software only from the Windows Store.
Print from anywhere with these Epson Connect solutions:
- Epson Email Print
- Epson Remote Print
Scan and send a file as an email or upload it to an online service directly from your Epson product with Epson Scan to Cloud.
Setting Up Epson Connect Services
If you did not activate your product's email address for use with Epson Connect when you set up your product, you can activate it using the product control panel.
- Press the
 home button, if necessary.
 - Select Settings > General Settings > Web Service Settings > Epson Connect Services.
- Select Register.
- Follow the instructions on the screen to activate your product's email address.
Using Epson Email Print
With Epson Email Print, you can print from any device that can send email, such as your smartphone, tablet, or laptop. Just activate your product's unique email address. When you want to print, attach a PDF, Microsoft Office document, or photo to an email and send it to your product. Both the email and the attachments will print automatically.
- Connect your product to your network. See the link below.
- If you did not already set up Email Print when you installed your product software, see the link below to use your product control panel to activate your unique email address. Or visit epson.com/connect (U.S.) or epson.ca/connect (Canada) to learn more about Email Print, create your Epson Connect account, and register your product to the Epson Connect service.
- Now you are ready to send and print emails to your product's Email Print address.
Note: Go to epsonconnect.com and log into your Epson Connect account to personalize your product's email, adjust print settings, and set up other Epson Connect services.
Using Epson Remote Print
With Epson Remote Print software, you can print from your laptop or desktop computer to an Epson Email-enabled product anywhere in the world.
- Connect your Epson product to your wireless network. See the link below.
- If you did not already set up an Epson Connect account when you installed your product software, visit epsonconnect.com to create your account and register your product to the Epson Connect service.
Note: Make a note of your product's email address. - Visit epsonconnect.com to learn more about Remote Print and how to download the Remote Print Driver software.
- Download and install the Remote Print software.
- Enter the email address and optional access key of your Epson product during Remote Print setup.
- Now you are ready to print remotely. Select the print command in your laptop or desktop computer application and choose the Remote Print option for your Epson product.
Using Epson Scan to Cloud
The Epson Scan to Cloud service allows you to scan and send a file as an email or upload it to an online service directly from your Epson product. Register an email address or online services such as Box,
DropBox, Evernote, or Google Drive with your Epson Connect account.
- Connect your Epson product to your network. See the link below.
- If you did not already set up an Epson Connect account when you installed your product software, visit epsonconnect.com to create your account and register your product to the Epson Connect service.
Note: Make a note of your product's email address and password. - Visit epsonconnect.com to sign into your account with the email address and password you selected.
- Select your product, select Scan to Cloud, and select Destination List.
- Click Add, then follow the instructions on the screen to create your destination list.
- Now you are ready to use Scan to Cloud. Select the setting for scanning to Scan to Cloud on your Epson product control panel.
Using AirPrint
AirPrint enables instant wireless printing from iPhone, iPad, iPod touch, and Mac without the need to install drivers or download software.
Note: If you disabled paper configuration messages on your product control panel, you cannot use AirPrint. See the link below to enable the messages, if necessary.
- Load paper in your product.
- Set up your product for wireless printing. See the link below.
- Connect your Apple device to the same wireless network that your product is using.
- Print from your device to your product.
Setting Up Printing on a Chromebook
Your Epson printer supports native printing on Chromebook, allowing you to print from a Chromebook without drivers or cables.
Android Printing Using the Epson Print Enabler
You can wirelessly print your documents, emails, photos, and web pages right from your Android phone or tablet (Android v4.4 or later). With a few taps, your Android device will discover your nearby Epson product and print.
- Connect your Epson product to your wireless network. See the link below.
- On your Android device, download the Epson Print Enabler plug-in from Google Play.
- Go to Settings on your Android device, select Printing, and enable the Epson plug-in, if necessary.
- Connect your Android device to the same wireless network as your product.
- Now you are ready to print. From an Android application such as Chrome or Gmail, tap the menu icon and print whatever is on the screen.
Note: If you do not see your product, tap All Printers and select your product.
Using Fire OS Printing
You can wirelessly print from Amazon Fire tablets and phones to your nearby networked Epson product. There is no software to download, no drivers to install, and no cables to connect. With just a few taps in Email, Calendar, Contacts, and WPS Office, you can send whatever is on the screen to an Epson product.
- Connect your Epson product to your wireless network. See the link below.
- Connect your Amazon device to the same wireless network as your product.
- Now you are ready to print. From your Amazon application, tap the print option and select your product to print whatever is on the screen.
Note: If you see a message telling you that a plug-in is required, tap OK and tap Download. If your Amazon Fire product uses Fire OS 5 and above, your device automatically uses the built-in Mopria Print Service app to print.
Using Windows 10 Mobile Printing
You can wirelessly print from Windows 10 Mobile tablets and phones to your nearby networked Epson product. There is no software to download, no drivers to install, and no cables to connect. Look for the print option in your Windows 10 application to send whatever is on the screen to an Epson product.
- Connect your Epson product to your wireless network. See the link below.
- Connect your Windows 10 Mobile device to the same wireless network as your product.
Now you are ready to print. From your Windows 10 application, tap the print option and select your product to print whatever is on the screen.
Using Epson Print and Scan App with Windows Tablets
You can use this free app to print photos and scan from your Windows (Windows 8 or higher) Surface RT or Pro tablet with networked Epson products. The Epson Print and Scan app allows you to scan and capture images right to your tablet or to Microsoft OneDrive.
Note: The Epson Print and Scan app does not support Windows 10 Mobile printing and does not supply scanning functions for products without scanners.
- Connect your Epson product to your wireless network. See the link below.
- Download the Epson Print and Scan app from the Microsoft Windows Store.
- Connect your Windows tablet to the same wireless network as your product.
- Open the Epson Print and Scan app and select your Epson product.
Now you are ready to print photos or scan.
Using the Mopria Print Service
You can use the Mopria Print Service to print from your Android phone or tablet (Android v4.4 or later) to your Epson product or any Mopria-certified product from other manufacturers. You can download the Mopria Print Service from Google Play.
Note: For details on the Mopria Print Service, click here (U.S.) or click here (Canada).
- Connect your Epson product to your wireless network. See the link below.
- On your Android device, download the Mopria Print Service app from Google Play.
Note: On some Samsung Galaxy devices, Mopria may come preinstalled. - Go to Settings on your Android device, select Printing, and enable the Mopria Print Service, if necessary.
- Connect your Android device to the same wireless network as your product.
- Now you are ready to print. From an Android application such as Chrome or Gmail, tap the menu icon and select Print. Then select All printers, select your Epson product, adjust your print settings, and print.
Setup Guide
To set up the Epson EcoTank Wireless Printer ET-3843,
- Start by unpacking and placing the printer on a flat surface.
- Connect the power cord and turn on the device. Follow the on-screen instructions to initialize the printer and install the ink tanks.
- For wireless setup, go to the printer's control panel and select the Wi-Fi setup option.
- Choose your network from the list of available networks and enter your Wi-Fi password.
- Alternatively, use the Epson Smart Panel app to connect your printer to your network.
- Once connected, install the necessary drivers and software from the included CD or download them from Epson's website.
- This will enable you to start printing, scanning, and copying documents seamlessly.
EcoTank Wireless Printer ET-3843 Troubleshooting
If you encounter issues with your Epson, here are some common problems and solutions:
- No Connection: Ensure that your Wi-Fi network is active and the printer is properly connected. Restart both your router and printer if necessary.
- Low Ink Levels: Check the ink levels regularly. If any tank is empty, refill it according to the manufacturer's instructions.
- Paper Jam: Open the printer's top cover or rear paper feed slot to locate and remove any jammed paper. Restart the print job after clearing the jam.
- Print Quality Issues: Check for any clogged nozzles or misaligned printheads. Run a head cleaning cycle through the printer's maintenance menu.
Pros & Cons
Pros:
- Cost-Effective: The refillable ink tank system significantly reduces long-term costs.
- High Print Quality: Delivers sharp text and vibrant colors with high resolution.
- Wireless Connectivity: Easy printing from various devices via Wi-Fi or the Epson Smart Panel app.
- Eco-Friendly: Reduces waste by eliminating cartridge replacements.
- Multifunctional: Includes scanning, copying, and automatic two-sided printing capabilities.
Cons:
- Initial Cost: Higher initial purchase price compared to traditional cartridge-based printers.
- Ink Refill Complexity: Some users may find refilling the ink tanks slightly cumbersome.
- Large Footprint: Although compact, it may still occupy more space than some other multifunction printers.
Customer Reviews
Customers have praised the Epson EcoTank Wireless Printer ET-3843 for its excellent print quality, ease of use, and cost savings. Many users appreciate the convenience of wireless printing and the eco-friendly design. However, some reviewers have noted that the initial setup can be a bit complex and that refilling the ink tanks requires some care.
Faqs
Does the ET-3843 support automatic two-sided printing?
How do I connect my EcoTank Printer to my Wi-Fi network?
What are the typical print speeds of the Epson Printer?
Is the Epson EcoTank compatible with macOS devices?
How do I troubleshoot a paper jam issue on my Epson EcoTank Wireless Printer ET-3843?
Can I use third-party ink refills with my Wireless Printer?
Does the Epson EcoTank come with a warranty?
How do I update the firmware of my ET-3843?
Can I print directly from my smartphone using the Epson?
Leave a Comment


.png) Theproduct is not connected to a wired(Ethernet) network.
Theproduct is not connected to a wired(Ethernet) network. Wi-Fi Direct is enabled.