Epson Home Cinema Gaming Projector 2350 User Manual
Content
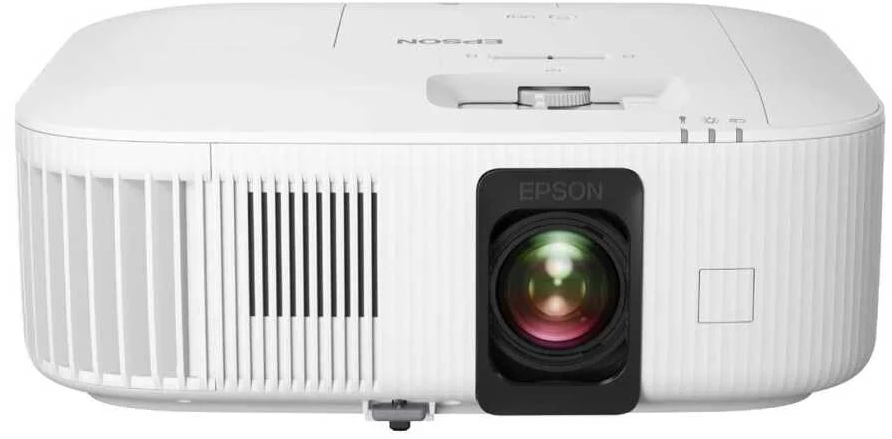
Epson Home Cinema Gaming Projector 2350
Introducing the Home Cinema is a powerful 4K PRO-UHD smart gaming projector designed to elevate your home entertainment experience. With its advanced 3-chip 3LCD technology, it delivers stunning brightness and color accuracy, making it perfect for both movies and gaming. The projector supports HDR10 and features low input lag for seamless gameplay. Priced at $1,299, it also includes built-in Android TV for easy streaming of your favorite content.
Product Box Contents
Save all the packaging in case you need to ship the projector. Always use the original packaging (or equivalent) when shipping.
Make sure your projector box includes all of these parts:

- Projector
- Projector remote control (two AAA batteries)
- Android TV remote control (two AAA batteries)
- Alternate rear cover
- Power cord
Additional Components
Depending on how you plan to use the projector, you may need to obtain additional components.
Note: To connect a Mac that does not include a compatible video output port, you need to obtain an adapter that allows you to connect to an input port on the projector. Contact Apple for compatible adapter options. To connect a smartphone or tablet, you may need to obtain an adapter that allows you to connect to the projector. This allows you to mirror your smartphone or tablet screens, watch movies, and more. Contact your device manufacturer for compatible adapter options.
Unless listed as available from Epson in this table, see your local computer or electronics dealer for purchase information.
Signal or connection type | Additional component necessary |
HDMI | Compatible HDMI cable Available for purchase froman authorized Epsonreseller.
Note: Older Mac computers (2009and earlier) may not supportHDMI audio. |
Warranty and Registration Information
Your projector comes with a basic warranty that lets you project with confidence. Register your product online at this site: epson.com/webreg
Projector Part Locations
Front/Top
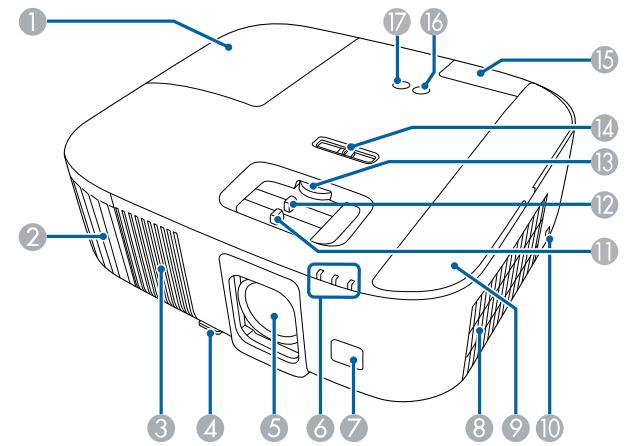
- Lamp cover
- Air exhaust vent
- Speaker
- Foot release lever
- Lens
- Indicators
- Remote receiver
- Air intake vent (air filter)
- Air filter cover
- Kensington security slot
- Focus slider
- Zoom slider
- Vertical lens shift dial
- Horizontal keystone slider
- Rear cover
- Power button
- Source button
Rear
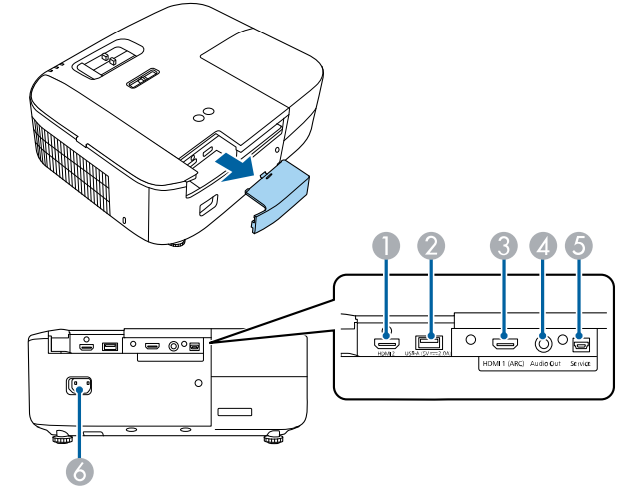
- HDMI2 port
- USB-A port (5VDC @ 2.0A)
- HDMI1 (ARC) port
- Audio Out port (3.5mm stereo)
- Service port
- Power inlet
Base
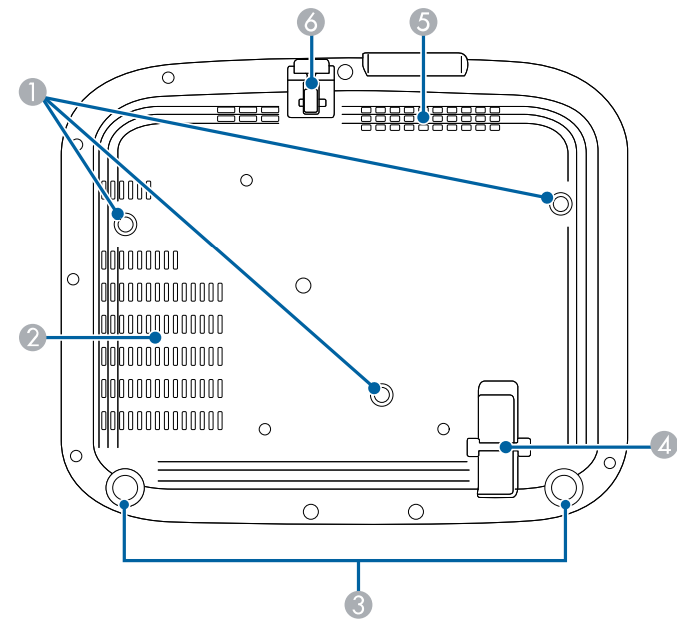
- Ceiling mount fixing points (three M4×9mm screw points)
- Air exhaust vent
- Rear feet
- Security cable attachment point
- Air intake vent
- Front adjustable foot
Remote Control
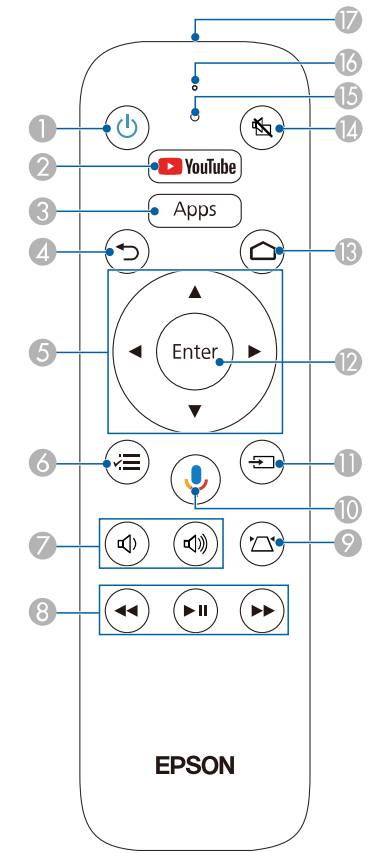
- Power button
- YouTube button
- Apps button (displays Android TV streaming apps)
 return button
- Arrow buttons (move through on-screen options)
 menu button
 volume up and
  volume down buttons
 rewind,
  play/pause, and
  fast forward buttons (control connected streaming device)
 keystone button (corrects image distortion)
- Google Assistant
 mic button (operates Android TV using voice commands)
  source button
- Enter button (selects options)
 home button (displays the Android TV home screen)
 A/V mute button (turns off picture and sound)
- Indicator
- Microphone
- Remote control emitter
Note: This remote control is used to control the projector and the connected streaming device after it has been paired to the projector.
Android TV remote control

- Power button
- Directional pad
- Enter button
- Back button
- Volume buttons
- YouTube button
- Netflix button
- Google Play button
- Home button (displays the Android TV home screen)
- Installed apps button
- Command indicator
- Google Assistant
 mic button (operates Android TV using voice commands)
 - Microphone
- Remote control emitter
Note: This remote control is used to control the streaming device only if it is connected to a different device or projector. You do not need to use this remote control in addition to the projector remote control.
Specifications
General Projector Specifications
- Type of display
Poly-silicon TFT active matrix - Resolution
1920 × 1080 pixels (3840 × 2160 pixels with 4K Enhancement) - Lens
F=1.49 to 1.77- Focal length: 18.2 to 29.2 mm
- Color reproduction
Up to 1.07 billion colors - Brightness
High Power Consumption mode: White light output 2800 lumens (ISO 21118 standard) Color light output 2800 lumens
Standard Power Consumption mode: White light output 2300 lumens (ISO 21118 standard)
Low Power Consumption mode: White light output 1900 lumens (ISO 21118 standard)
Note: Color brightness (color light output) and white brightness (white light output) will vary depending on usage conditions. Color light output measured in accordance with IDMS 15.4; white light output measured in accordance with ISO 21118. - Contrast ratio: 35000:1 with Auto Iris on, Dynamic Color Mode, High Power Consumption mode, and Wide zoom mode
- Image size (in native aspect ratio)
Note: For screen sizes above 300″, a high-gain screen and a light-controlled environment may be required. - Projection distance (in native aspect ratio)
45 inches (115 cm) to 945 inches (2400 cm) - Projection methods
Front/Ceiling, Rear, Rear/Ceiling - Optical aspect ratio (width-to-height)
16:9 - Focus adjustment
Manual - Zoom adjustment
Manual - Zoom ratio (Tele-to-Wide)
1 to 1.62 - Internal sound system
10 W monaural - Noise level
36 dB (High Power Consumption mode)
32 dB (Standard Power Consumption mode)
28 dB (Low Power Consumption mode) - Keystone correction angle
Vertical: ± 30° (manual or using Auto Keystone)
Horizontal: ± 30° (manual) - Service port
USB type mini-B port for firmware updates only
Projector Lamp Specifications
- Type
UHE (Ultra High Efficiency) - Power consumption
200 W - Lamp life
High Power Consumption mode: Up to about 4500 hours
Standard Power Consumption mode: Up to about 4500 hours
Low Power Consumption mode: Up to about 7500 hours
Note: Turn off this product when not in use to prolong the life of the projector. Lamp life will vary depending upon mode selected, environmental conditions, and usage. Brightness decreases over time.
Remote Control Specifications
- Reception range
19.7 feet (6 m) - Batteries
Two alkaline or manganese AAA
Bluetooth Specifications
Streaming device
- Version Bluetooth
Ver. 5.0 - Output
Class 2 - Communication distance
Approximately 32.8 ft (10 m) - Supported profiles
A2DP, AVRCP - Frequency used
2.4 GHz - Supported codecs
SBC
Projector Dimension Specifications
- Height (excluding feet)
4.8 inches (123 mm) - Width
13.1 inches (333 mm) - Depth
10.9 inches (276.4 mm) - Weight
9.0 lb (4.1 kg)
Projector Electrical Specifications
- Rated frequency
50/60 Hz - Power supply
100 to 240 V AC ±10% 3.2 to 1.5 A - Power consumption (100 to 120 V)
Operating:
High Power Consumption mode: 316 W
Standard Power Consumption mode: 280 W
Low Power Consumption mode: 242 W
Sleep mode: 0.3 W - Power consumption (220 to 240 V)
Operating:
High Power Consumption mode: 301 W
Standard Power Consumption mode: 268 W
Low Power Consumption mode: 231 W
Sleep mode: 0.3 W
Projector Environmental Specifications
- Temperature
Operating:
Up to 7500 ft (2286 m): 41 to 95 °F (5 to 35 °C)
7500 ft (2286 m) to 10000 ft (3048 m): 41 to 86 °F (5 to 30 °C)
Storage: 14 to 140 °F (–10 to 60 °C) - Humidity (relative, noncondensing)
Operating: 20 to 80%
Storage: 10 to 90% - Operating altitude
Up to 4921 feet (1500 m) 4921 feet (1500 m) to 10000 feet (3048 m) with High Altitude Mode enabled
Description
Projector 2350 is engineered with advanced technology to provide an exceptional viewing experience. Its 3LCD system ensures vibrant colors and high brightness, making it suitable for both bright and dark environments. The projector's sleek design and compact size make it easy to place in any room without taking up too much space.
The projector comes with a range of connectivity options, including HDMI 2.1, which supports the latest gaming consoles and devices. The built-in wireless connectivity allows for seamless streaming from smartphones, tablets, and other devices.
Adjusting the Menu Settings
Using the Projector's Menus
You can use the projector's menus to adjust the settings that control how your projector works. The projector displays the menus on the screen.
Press the
 menu button on the projector remote control.
You see a screen like this:
- Press the up or down arrow button to move through the menus listed on the left. The settings for each menu are displayed on the right.
Note: The available settings depend on the current input source. - To change settings in the displayed menu, press Enter.
- Press the up or down arrow button to move through the settings.
- Change the settings using the buttons listed on the bottom of the menu screens.
- To return all the menu settings to their default values, select Reset.
- When you finish changing settings on a menu, press the
 return button.
 - Press the
 menu button to exit the menu or the
 return button to return to the previous screen.
Using the Displayed Keyboard
You can use the displayed keyboard to enter numbers and characters.
- Use the arrow buttons on the remote control to highlight the number or character you want to enter and press Enter.
Note: Each time you select the CAPS key, the characters change between upper case and lower case. Each time you select the SYM1/2 key, the symbols enclosed by the frame change. - After entering the text, select Finish on the keyboard to confirm your entries. Select Cancel to cancel entering text.
Available Keyboard Text
You can enter the following text when using the displayed keyboard.
Text type | Details |
Numbers | 0123456789 |
Alphabet | ABCDEFGHIJKLMNOPQRSTUVWXYZ abcdefghijklmnopqrstuvwxyz |
Symbols | ! " # $ % & ' ( ) * + , - . / : ; < = > ? @ [ \ ] ^ _ ` { | } ~ |
Image Quality Settings
Image Menu
Settings on the Image menu let you adjust the quality of your image for the input source you are currently using. The available settings depend on the currently selected input source.
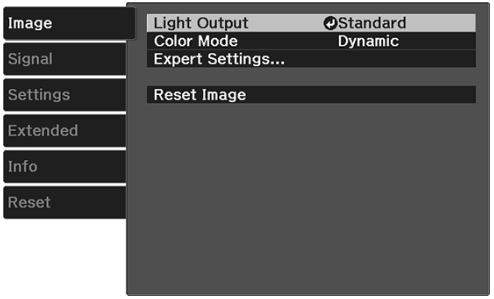
Setting | Options | Description |
Light Output | High Standard Low | Adjusts lamp brightness |
Color Mode | See thelist of available Color Modes | Adjusts the vividness of image colors for various imagetypes and environments |
Expert Settings | Brightness | Lightens or darkens the overall image |
Contrast | Adjusts the difference between light and darkareas in the image | |
Color Saturation | Adjusts thecolor intensity of the image | |
Tint | Adjusts thebalance of greento magenta tones in the image | |
Sharpness | Adjusts the sharpness or softness of image details | |
White Balance | Color Temp.: sets the color temperature according to the selected color mode; lower values tint the image red, and higher values tintthe image blue | |
Custom: adjuststhe individual RGB components of the offset and gain |
Expert Settings | Frame Interpolation | Adjusts the smoothness of image movement |
Image Enhancement | 4K Enhancement: projects at a doubled resolution | |
| Image Preset Mode: selects preset Image Enhancement settings | ||
Noise Reduction: reduces flickering in images | ||
MPEG Noise Reduction: reduces thenoise or staticin MPEG video | ||
DetailEnhancement: enhances details to create clear outlines | ||
Scene Adaptive Gamma | Adjusts the color depending on the displayed scene; larger numbers enhance contrast | |
Gamma | Adjusts thecolors by selecting one of the gamma correction values or referring to a gamma graph | |
RBGCMY | Adjusts the hue, saturation, and brightness for each color | |
Auto Iris | Adjusts the projected luminance based on the image brightness | |
Reset Image | — | Resets all adjustment values on the Image menu to their default settings. |
Note: The Brightness setting does not affect lamp brightness. To change the lamp brightness, adjust the Light Output setting.
Input Signal Settings
Signal Menu
Normally the projector detects and optimizes the input signal settings automatically. If you need to customize the settings, you can use the Signal menu. The available settings depend on the currently selected input source.
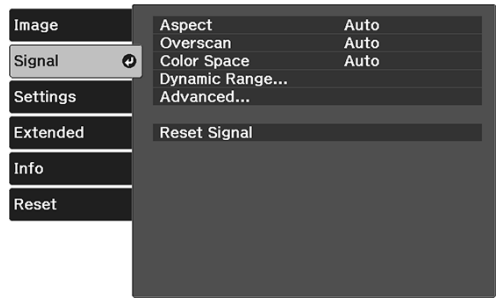
To change settings for an input source, make sure the source is connected and select that source.
Setting | Options | Description |
Aspect | See thelist of available aspect ratios | Sets the aspect ratio (width-to- height ratio) for the selected input source |
Overscan | Auto Off 4% 8% | Changes the projected image ratio to make the edgesvisible by a selectable percentage or automatically |
Color Space | Auto BT.709 BT.2020 | Sets the conversion system for the colorspace (set to Auto for most cases) |
Dynamic Range | Dynamic Range | Changes the rangeof dark and bright areas in the image (set to Auto for most cases) |
Signal Status | Displays the detected input signal | |
HDR10 Setting | Adjusts the PQ curve of the dynamic range (available when Dynamic Range or Signal Status is set to HDR10) | |
HLG Setting | Adjusts the HLG curve of the dynamic range (available when Dynamic Range or Signal Status is set to HLG) |
Advanced | Video Range | Sets the video range to match the setting of the device connected to the HDMIinput port Auto: detects the videorange automatically Limited: for images from a device other than a computer; can also be selected if the black areas of the imageare too bright Full: for images from a computer; can also be selected if the image is too dark |
EDID | Selects EDID settings Normal: supports 3840 × 2160 30Hz signals 21:9: supports 2560 × 1080 60Hz signals | |
Image Processing | Improves the response speedfor images projected at high speed Fast: increases image processing speed Fine: increase imagequality | |
Reset Signal | — | Resets all adjustment values on the Signal menu to their default settings. |
Projector Feature Settings
Settings Menu
Options on the Settings menu let you customize various projector features.
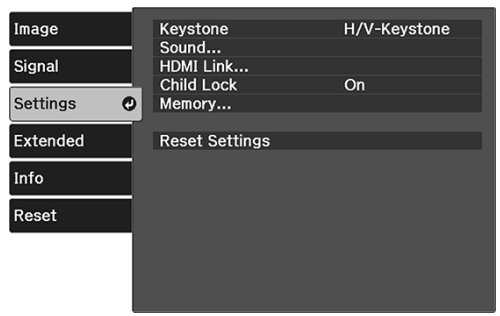
Note: Turning off your input devices will not power down the projector even if you select On as the Power Off Link setting.
Setting | Options | Description |
Keystone | H/V-Keystone Quick Corner | Adjusts image shape to rectangular (horizontally and vertically) H/V-Keystone: lets you manually correct horizontal and vertical sides; turn on or off Auto V- Keystone and the H-Keystone Adjuster setting (Auto V- Keystone only functions when the Projection setting is set to Front) Quick Corner: selectto correct image shape and alignment using an on-screen display |
Sound | Volume Sound Mode | Adjusts the projector's sound output Volume: adjusts the volume of the projector’s speaker system or external device connected to the Audio Out port Sound Mode: selects a sound mode depending on the projected content |
HDMI Link | DeviceConnections HDMI Link Audio Out Device Power On Link Power Off Link | Adjusts the HDMI Link options that allow the projector remoteto control HDMI-connected devices that support the CEC standard Device Connections: lists the devices connected to the HDMI 1 and HDMI 2 ports HDMI Link: enables or disables the HDMI Link function Audio Out Device: selects whether to output audiofrom the internal speakers or a connected audio/video system Power On Link: controls the projector or a linked device
Power Off Link: controls whether linked devices are turned off whenthe projector is turned off |
Child Lock | On Off | Locks the powerbutton |
Memory | Load Memory Save Memory Erase Memory Rename Memory | Controls memoryfunctions for current projector settings Load Memory: letsyou load a saved memory Save memory: letsyou save current projector settings to memory EraseMemory: lets youdelete a saved memory RenameMemory: lets you rename a saved memory |
Reset Settings | — | Resets all adjustment valueson the Settings menu to their default settings, except for the following:
|
Projector Setup Settings
Extended Menu
Settings on the Extended menu let you customize various projector setup features that control its operation.

Setting | Options | Description |
Display | Messages Display Background Startup Screen | Selects various displayoptions Messages: controls whether messages are displayed on the screen DisplayBackground: selects the screen color or logo to display when no signal is received Startup Screen: controls whether a special screen appears when theprojector starts up |
| Panel Alignment | Corrects colormisalignment in the projected image Panel Alignment: set to On to correct color misalignment in the projected image SelectColor: select thecolor to correct PatternColor: select the pattern used for correction Start Adjustments: startpanel alignment Memory: saves, loads, renames, or erases panel alignment settings Reset: resets all panelalignment settings to their defaults | |
Projection | Front Front/Ceiling Rear Rear/Ceiling | Selects the way the projector faces the screenso the imageis oriented correctly |
Operation | Direct PowerOn | Turns on the projector when you plug it in |
| Sleep Mode | Automatically places the projector in standby mode after an interval of inactivity | |
| Sleep ModeTimer | Sets the interval for sleep mode | |
| Illumination | Turns off the powerand status lights on the projector | |
| High Altitude Mode | Regulates the projector’s operating temperature at altitudes above 4921feet (1500 m) | |
| USB Power | AlwaysOn: continues supplying power to the streaming media player connected to the projector even when it is not projecting images On While Projecting: supplies power to the streaming media player only whenthe projector is projecting images | |
Language | Various languages available | Selects the language for projector menu and message displays (not changed by Reset option) |
Reset Extended | — | Resets all adjustment valueson the Extended menu to their default settings, except for the following:
|
Projector Information Display
Info Menu
You can display information about the projector and input sources by viewing the Info menu. However, you cannot change any settings in the menu.

Select Version to display the projector's firmware version. Select Projector Info to display the settings described below.
Information item | Description |
Lamp Hours | Displays the number of hours (H) the lamp hasbeen used; if the information is displayed in yellow, obtain a genuine Epson replacement lamp soon |
Source | Displays the name of the portto which thecurrent input sourceis connected |
Input Signal | Displays the inputsignal setting of the current input source |
Resolution | Displays the resolution of the current input source |
Scan Mode | Displays the scanmode of the current inputsource |
Refresh Rate | Displays the refresh rate of the current inputsource |
Sync Info | Displays information thatmay be neededby a service technician |
Color Depth | Displays the colordepth |
Color Format | Displays information on the Color Spaceand Dynamic Range |
Status | Displays information about projector problems that may be needed by a service technician |
Serial Number | Displays the projector's serial number |
Projector Reset Options
Reset Menu
You can reset most of the projector settings to their default values using the Reset All Config option on the Reset menu.
You can reset the projector's lamp usage timer to zero when you replace the lamp using the Reset Lamp Hours option and you can also reset all memory entries using the Reset Memory option.

You cannot reset the following settings using the Reset All Config option:
- Language
- Lamp Hours
- Memory
- Panel Alignment
Setup Guide
To set up the Epson Home Cinema Gaming Projector 2350,
- Start by placing the projector at an optimal distance from your screen or wall.
- Connect your device via HDMI or wirelessly using Wi-Fi or Bluetooth.
- Use the included remote control to power on the projector and navigate through the menu to configure your settings.
- Adjust the focus and zoom to ensure a clear image.
- You can also use the keystone correction feature to adjust the image if it's not perfectly aligned.
- For gaming, ensure that the "Gaming Mode" is selected to minimize input lag.
Solving Problems
Projection Problem Tips
If the projector is not working properly, try turning it off and unplugging it. Then plug it back in and turn it on.
If this does not solve the problem, check the following:
- The lights on the projector may indicate what the problem is.
- The solutions in this manual can help you solve many problems.
If none of these solutions help, you can contact Epson for technical support.
Note: After repairing the projector, Epson may return the projector to you in its initial status. Make sure you make a note of the account information of each online service before you contact your local dealer or the nearest Epson repair center.
Projector Light Status
The lights on the projector indicate the projector status and let you know when a problem occurs. Check the status and color of the lights and look for a solution in the table here.
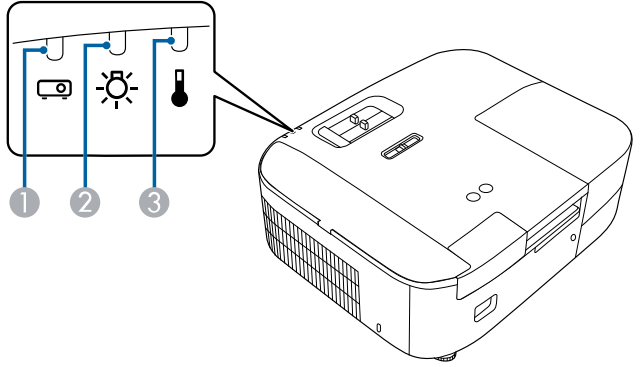
- Status light
- Lamp light
- Temp (temperature) light
Note: If the lights display a pattern not listed in the table above, turn the projector off, unplug it, and contact Epson for help.
Solving Image or Sound Problems
Check the solutions in these sections if you have any problems with projected images or sound.
Solutions When No Image Appears
If no image appears, try the following solutions:
- Make sure the lens cover is off.
- Press the A/V mute button on the projector remote control to see if the image was temporarily turned off.
- Check the status lights to confirm the projector is operating normally.
- Make sure all necessary cables are securely connected and the power is on for the projector and connected video sources.
- Try using a shorter HDMI cable.
- Try connecting the video source directly to the projector.
- Press the projector's power button to wake it from standby or sleep mode. Also see if your connected computer is in sleep mode or displaying a blank screen saver.
- If you are projecting from a streaming device, make sure the USB power cable inside the projector powers it. Turn on the connected streaming device or video source, and press the play button to start a video, if necessary.
- Make sure the connected device meets the HDMI CEC standard. See the documentation supplied with the device for more information. If necessary, set the CEC function for the connected device again and restart the device. Turn off the projector and the connected streaming device or video source, and then turn them back on.
- If you are projecting from a laptop computer, make sure it is set up to display on an external monitor.
- Make sure the computer's display resolution does not exceed the projector's resolution and frequency limits. If necessary, select a different display resolution for your computer.
- If the other solutions do not solve the problem, reset all of the projector settings using the options on the Reset menu.
Solutions When "No Signal" Message Appears
If the "No Signal" message appears, try the following solutions:
- Press the source button on the projector remote control or control panel and then select from the displayed sources. Wait a few seconds for an image to appear.
- Turn on the connected computer or video source, and press its play button to begin your presentation, if necessary.
- Check the connection from the projector to your video sources.
- If you are projecting from a laptop computer, make sure it is set up to display on an external monitor.
- If necessary, turn the projector and the connected computer or video source off and then on again.
- Try a different video cable.
- If the other solutions do not solve the problem, reset all of the projector settings using the options on the Reset menu.
Displaying From a PC Laptop
If you see the "No Signal" message when you display from a PC laptop, you need to set up the laptop to display on an external monitor.
- Hold down the laptop's Fn key and press the key labeled with a monitor icon or CRT/LCD. (See your laptop manual for details.) Wait a few seconds for an image to appear. To display on both the laptop's monitor and the projector, try pressing the same keys again.
Note: On Windows 7 or later, hold down the Windows key and press P at the same time, then click Duplicate. - If the same image is not displayed by the laptop and projector, check the Windows Display utility to make sure the external monitor port is enabled and extended desktop mode is disabled. (See your computer or Windows manual for instructions.)
- If necessary, check your video card settings and set the multiple display option to Clone, Mirror, or Duplicate.
Displaying From a Mac Laptop
If you see the "No Signal" message when you display from a Mac laptop, you need to set up the laptop for mirrored display. (See your laptop manual for details.)
- Open the System Preferences utility and select Displays, Display, or Color LCD.
- Click the Arrange or Arrangement tab.
- Select the Mirror Displays checkbox.
Solutions When "Not Supported" Message Appears
If the "Not Supported" message appears, try the following solutions:
- Make sure the computer's display resolution does not exceed the projector's resolution and frequency limit. If necessary, select a different display resolution for your computer.
- As a test, try setting the computer's display resolution to the lowest possible setting, and then gradually increase it as necessary.
- Check the input resolution under Projector Info in the Info menu and make sure that the projector supports that resolution.
Solutions When Only a Partial Image Appears
If only a partial computer image appears, try the following solutions:
- Select a different image aspect ratio in the Signal menu.
- Adjust the image size using the Zoom slider.
- Check your computer display settings to disable dual display and set the resolution within the projector's limits. (See your computer manual for details.)
- Check the resolution assigned to your presentation files to see if they are created for a different resolution than you are projecting in. (See your software help for details.)
- Make sure you selected the correct Projection setting in the Extended menu.
Solutions When the Image is Not Rectangular
If the projected image is not evenly rectangular, try the following solutions:
- Place the projector directly in front of the center of the screen, facing it squarely, if possible.
- Adjust the image shape using the keystone settings in the projector's menu.
- Adjust the position of the projector's horizontal keystone slider.
Solutions When the Image Contains Noise or Static
If the projected image seems to contain electronic interference (noise) or static, try the following solutions:
- Check the cables connecting your computer or video source to the projector. They should be:
- Separated from the power cord to prevent interference
- Securely connected at both ends
- Not connected to an extension cable
- No longer than 24 feet (7.3 m) for HDMI cables
- Try decreasing the Sharpness setting in the Image menu.
- Try adjusting the Noise Reduction or MPEG Noise Reduction setting in the Image menu.
- Select a computer video resolution and refresh rate that are compatible with the projector.
- If you connected an extension power cable, try projecting without it to see if it caused interference in the signal.
Solutions When the Image is Fuzzy or Blurry
If the projected image is fuzzy or blurry, try the following solutions:
- Adjust the image focus.
- Clean the projector lens.
Note: To avoid condensation on the lens after bringing the projector in from a cold environment, let the projector warm up to room temperature before using it. - Position the projector close enough to the screen.
- Position the projector so the keystone adjustment angle is not so wide that it distorts the image.
- Adjust the Sharpness setting to improve image quality.
- If you are projecting from a computer, try using a lower resolution or try to match the projector's native resolution.
Solutions When the Image Brightness or Colors are Incorrect
If the projected image is too dark or light, or the colors are incorrect, try the following solutions:
- Try selecting a color mode that best fits the image and environment.
- Check your video source settings.
- Adjust the available settings on the Image menu for the current input source, such as Brightness, Contrast, Tint, and/or Color Saturation.
- Make sure you selected the correct Video Range setting on the Signal menu, if available for your image source.
Note: For screen sizes above 300″, a high-gain screen and a light-controlled environment may be required. - Make sure all the cables are securely connected to the projector and your video device. If you connected long cables, try connecting shorter cables.
- Position the projector close enough to the screen.
- If the image has been progressively darkening, you may need to replace the projector lamp soon.
Solutions When the Image is Upside Down
If the projected image is upside down, make sure you selected the correct Projection setting in the Extended menu.
Solutions to Sound Problems
If there is no sound when you expect it or the volume is too low or high, try the following solutions:
- Adjust the projector's volume settings.
- Press the A/V mute button on the projector remote control to resume video and audio if they were temporarily stopped.
- Make sure the Audio Out Device settings are correct.
- Check your computer or video source to make sure the volume is turned up and the audio output is set for the correct source.
- Check the audio out cable connection between the projector and your external speakers.
- If you do not hear sound from an HDMI source, set the connected device to PCM output.
- If you are using a Mac and you do not hear sound from an HDMI source, make sure your Mac supports audio through the HDMI port. If not, you need to connect an audio cable directly to your speaker system.
Solving Projector or Remote Control Operation Problems
Check the solutions in these sections if you have problems operating the projector or remote control.
Solutions to Projector Power or Shut-Off Problems
If the projector does not come on when you press the power button or it shuts off unexpectedly, try the following solutions:
- Make sure the power cord is securely connected to the projector and to a working electrical outlet.
- The projector's power button may be locked for security. Unlock it or use the projector remote control to turn on the projector.
- If the power button on the remote control does not turn on the projector, check its batteries.
- Make sure you are using the projector remote control and not the remote control for Android TV.
- Make sure Sleep Mode is not in effect. Perform any operation to wake the projector. To turn off Sleep Mode, select Off as the Sleep Mode setting.
- The power cord may be defective. Try another power cord. If that doesn't work, disconnect the cord and contact Epson.
- The cooling fans may run in standby status depending on the projector settings. Also, when the projector wakes from standby status, the fans may cause an unexpected noise. This is not a malfunction.
Solutions to Remote Control Problems
If the projector does not respond to remote control commands, try the following solutions:
- Check that the remote control batteries are installed correctly and have power. If necessary, replace the batteries.
- Make sure you are operating the remote control within the reception angle and range of the projector.
- Make sure the projector is not warming up or shutting down.
- Check to see if a button on the remote control is stuck down, causing it to enter sleep mode. Release the button to wake the remote control up.
- Make sure the projector remote control is paired to the streaming device to operate Android TV features (if applicable).
- Make sure you are using the projector remote control and not the remote control for Android TV.
- Strong fluorescent lighting, direct sunlight, or infrared device signals may be interfering with the projector's remote receivers. Dim the lights or move the projector away from the sun or interfering equipment.
- If you lose the remote control, you can purchase another from an Epson parts distributor
Solutions to HDMI Link Problems
If you cannot control an HDMI device using the HDMI Link feature, try the following solutions:
- Make sure all necessary cables are securely connected and the power is on for the projector and connected video sources.
- Make sure the cables meet the HDMI CEC standard.
- Make sure the connected device meets the HDMI CEC standard. See the documentation supplied with the device for more information.
- Replace the HDMI cable or try a shorter one.
- Make sure the HDMI Link setting is set to On.
- Check if the device is available in the Device Connections list in the Settings menu. If the device does not appear, it does not meet the HDMI CEC standards. Connect a different device.
- Make sure the connected devices are turned on and in standby status. See the documentation supplied with the device for more information.
- If you connected a new device or changed any connections, make sure the CEC function is set for the connected device. You may need to restart the device.
Epson Home Cinema Gaming Projector 2350 Pros & Cons
Pros
- High brightness and contrast ratio for vivid images
- Low input lag ideal for gaming
- Advanced color technology with HDR10 and HLG support
- Multiple connectivity options including HDMI 2.1 and wireless
- Long-lasting lamp life up to 15,000 hours in Eco mode
Cons
- Higher price point compared to budget projectors
- No built-in streaming services (requires external devices)
- Some users may find the built-in speakers insufficient for large rooms
Customer Reviews
Customers have praised the Epson Home Cinema Gaming Projector 2350 for its excellent image quality and low input lag. Many reviewers have noted that it significantly enhances their gaming experience. However, some users have mentioned that the built-in speakers could be more powerful and that the projector's menu interface could be more intuitive.
Common complaints
Including the lack of built-in streaming services and the higher price compared to other projectors on the market.
Faqs
What is the resolution of the Cinema Projector?
How much input lag does the Epson have?
Does the Epson Home Cinema support HDR?
What connectivity options are available on the Epson Home?
How long does the lamp last in the Gaming Projector?
Can I use the Epson Home Cinema in bright rooms?
Does the Epson Home Cinema Gaming Projector 2350 come with built-in speakers?
How do I adjust the image focus on the Gaming Projector?
Is the Epson Home Cinema compatible with gaming consoles?
Leave a Comment
