Epson Small-in-One Printer XP-424 User Guide
Content
Introduction of Epson Small-in-One Printer XP-424
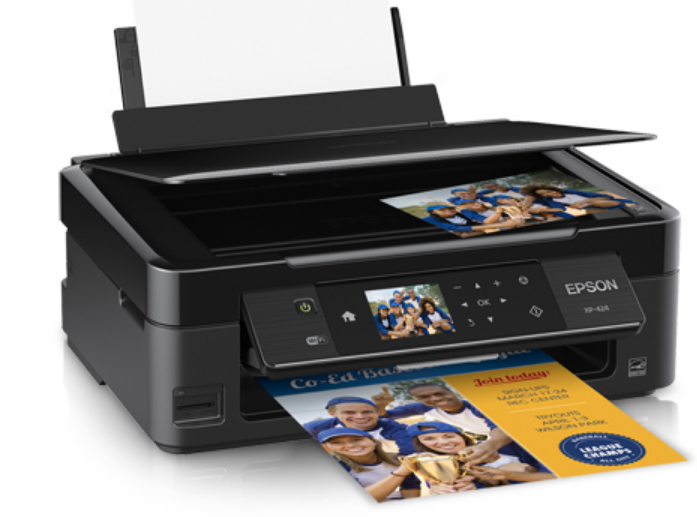
The Epson Small-in-One Printer XP-424 is a compact and versatile inkjet all-in-one printer designed for home and small office use. This printer boasts an affordable estimated price range of $150 to $200, making it an attractive option for those seeking a cost-effective solution for printing, scanning, and copying tasks. With its sleek design and impressive feature set, the XP-424 was launched in 2021 to meet the demands of modern users who require a reliable and space-saving device.
Detailed Specifications
The Epson Small-in-One Printer XP-424 offers the following key features:
- Printing technology: Individual Ink System
- Print speed: Up to 10 ISO ppm (black) and 5 ISO ppm (color)
- Connectivity: Wi-Fi, Wi-Fi Direct, USB, and Ethernet
- Mobile printing: Epson Connect, AirPrint, Google Cloud Print, and Mopria Print Service
- Scanning resolution: Up to 4800 x 4800 dpi
- Automatic document feeder (ADF): 30-sheet capacity
- Display: 2.7-inch color LCD touchscreen
- Dimensions: 14.8 x 14.4 x 5.4 inches (WxDxH)
- Weight: 10.9 lbs
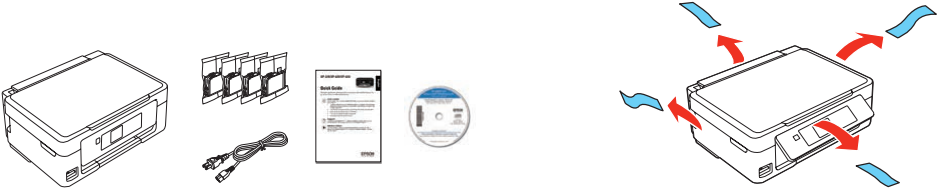
Unpack
Note: Do not open ink cartridge packages until you are ready to install the ink. Cartridges are vacuum packed to maintain reliability.
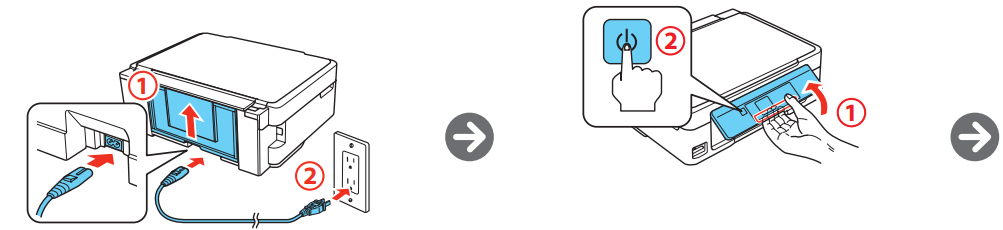
Turn on and configure
- Caution: Do not connect to your computer yet.
- Caution: Do not lower the control panel without first squeezing the release bar underneath or you may damage the product.
To select English as your language, press OK. If you want to change the language, press or to select it, then press OK. Note: You can change the language later using the product’s control panel.
Install ink cartridges
- Press
 to prime the ink delivery system. Priming takes about 4 minutes.
Note - The printer is designed for use with Epson cartridges only, not third-party cartridges or ink.
The cartridges included with the printer are designed for printer setup and not for resale. After some ink is used for priming, the rest is available for printing.
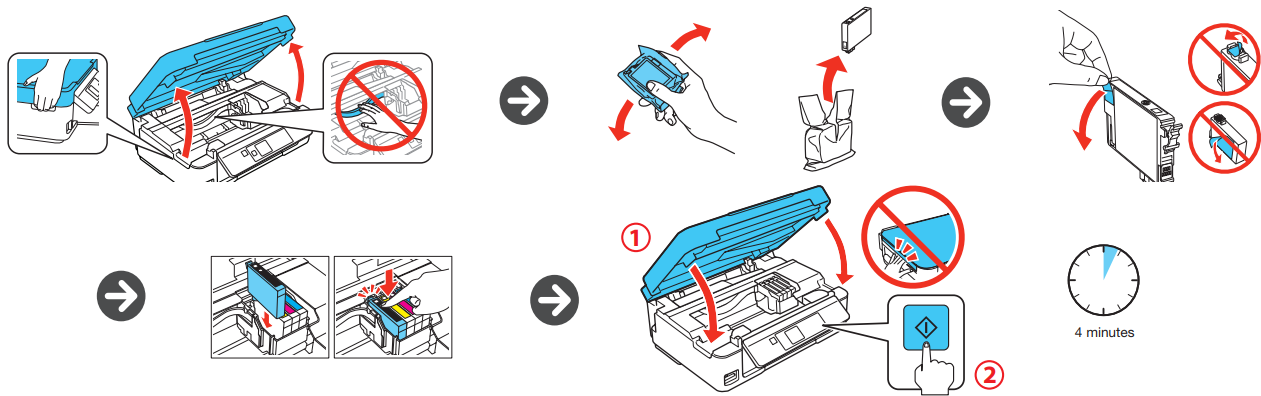
Caution: Don’t turn off the printer while it is priming or you’ll waste ink.
Load paper
- Check the current paper settings on the control panel.
- To use these settings, press OK.
- If you want to change the settings, press
 or
or  to select Change, then press OK.
 Select paper size, press OK, select paper type, then press OK to confirm settings.


Description
Epson Small-in-One Printer XP-424 is intended to offer consumers a compact and feature-rich solution for their printing requirements.. The 30-sheet automatic document feeder facilitates the scanning, copying, and faxing of multi-page documents, while the Individual Ink System guarantees high-quality prints. Users can effortlessly navigate and manage printer settings with the assistance of the 2.7-inch color LCD interface. Furthermore, the XP-424 is compatible with a variety of mobile printing platforms, which guarantees a seamless integration with your devices.
Install software
Note: If your computer does not have a CD/DVD drive or you are using a Mac, an Internet connection is required to obtain the printer software.
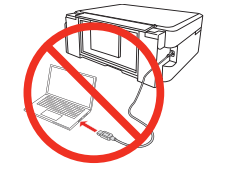
- Make sure the printer is NOT CONNECTED to your computer.
Windows: If you see a Found New Hardware screen, click Cancel and disconnect the USB cable. - Insert the product CD or download and run your product’s software package:
XP-320: epson.com/support/xp320 (U.S.) or epson.ca/support/xp320 (Canada)
XP-420: epson.com/support/xp420 (U.S.) or epson.ca/support/xp420 (Canada)
XP-424: epson.com/support/xp424 (U.S.) or epson.ca/support/xp424 (Canada) - Follow the instructions on the screen to run the setup program.
OS X: Make sure you install Software Updater to receive firmware and software updates for your product. - When you see the Select Your Connection screen, select one of the following:
Wireless connection
In most cases, the software installer automatically attempts to set up your wireless connection. If setup is unsuccessful, you may need to enter your network name (SSID) and password.
Direct USB connection
Make sure you have a USB cable (not included).
Setup Guide
To start using the Epson Small-in-One Printer XP-424, follow these steps:
- Unbox the printer and remove any packaging materials.
- Install the ink cartridges by opening the ink access door and following the instructions provided in the user manual.
- Turn on the printer and connect it to your computer or network using the provided USB cable or via Wi-Fi or Ethernet.
- Install the printer drivers and software from the installation CD or download them from the Epson website.
- Select the XP-424 as your default printer and perform a test print to ensure proper functionality.
Mobile printing
To print from a mobile device, your product must be set up for wireless printing or Wi-Fi Direct. See the online User’s Guide for instructions.
Epson Connect
Connect wirelessly from your tablet, smartphone, or computer. Print documents and photos from across the room or around the world.epson.com/connect
Any problems?
Network setup was unsuccessful.
- Make sure you select the right network name (SSID).
- If you see a firewall alert message, click Unblock or Allow to let setup continue.
- If your network has security enabled, make sure you enter your network password (WEP key or WPA passphrase) correctly. Passwords must be entered in the correct case.
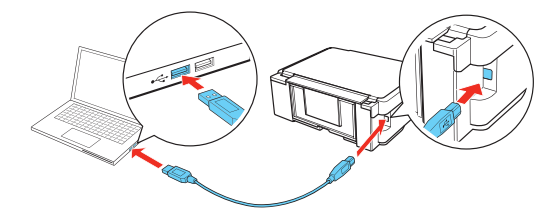
The printer’s screen is dark. Press any button to wake your product from sleep mode. Setup is unable to find my printer after connecting it with a USB cable. Make sure it is securely connected as shown:
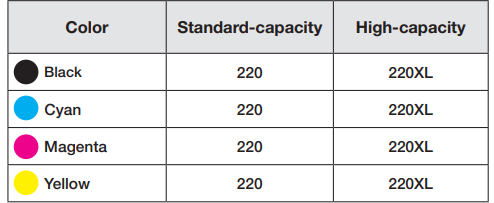
XP-320/XP-420/XP-424 replacement ink cartridges
Troubleshooting
Here are some common issues and solutions for the Epson Small-in-One Printer XP-424:
- Printer not responding: Make sure the printer is powered on and properly connected to your device or network.
- Low ink levels: Replace the necessary ink cartridges as indicated by the printer's status monitor.
- Poor print quality: Clean the print head using the printer's utility software or run the print head alignment process.
- Paper jams: Carefully remove any jammed paper, ensuring that the paper path is clear before resuming printing.
Epson Small-in-One Printer XP-424 Pros & Cons
Pros
- Compact and stylish design
- Individual Ink System for high-quality prints
- Automatic document feeder for convenient scanning, copying, and faxing
- Compatible with various mobile printing platforms
Cons
- Slower print speeds compared to some competitors
- Ink cartridges may need frequent replacement for heavy usage
Customer Reviews
The Epson Small-in-One Printer XP-424 has received positive feedback from users, praising its compact size, ease of use, and high-quality prints. However, some customers have expressed concern about the ink cartridge costs and print speeds.
Faqs
How do I configure my Epson Small-in-One Printer XP-424 for the first time?
What form of ink is utilized by the Epson XP-424?
How can I connect my Epson Small-in-One Printer XP-424 to Wi-Fi?
Is it possible to print from a mobile device using the Epson Small-in-One Printer XP-424?
What is the process for replacing the ink cartridges in the Epson XP-424?
Which paper varieties and sizes are compatible with the Epson?
What is the process for scanning a document with the Epson XP-424?
Is tandem printing supported by the Epson XP-424?
In the event that my Epson XP-424 is not printing accurately, what actions should I take?
How can I restore the Epson XP-424 to its original factory settings?
Leave a Comment