Epson WorkForce Inkjet Printer WF-7110 Instruction Manual
Content
Introduction
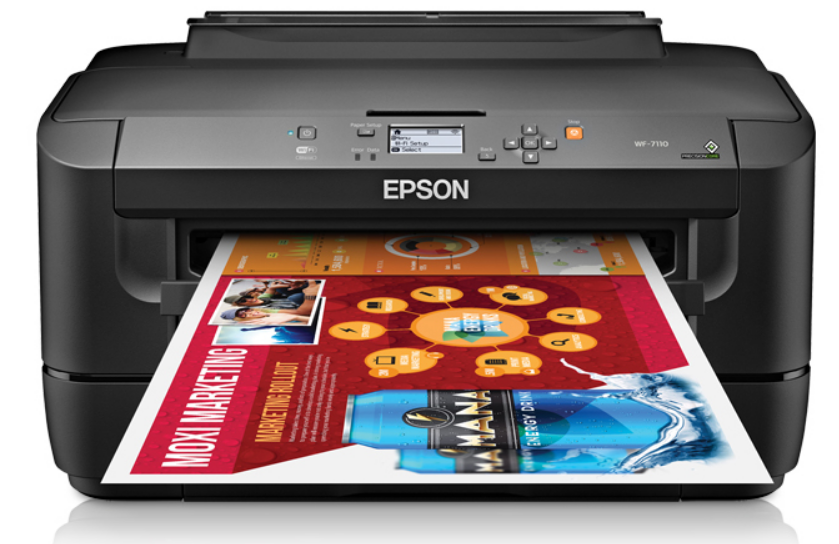
The Epson WorkForce Inkjet Printer WF-7110 is a versatile wide-format printer designed for small offices and creative professionals. It utilizes Epson's PrecisionCore technology to deliver high-quality, borderless prints up to 13" x 19", making it ideal for producing vibrant marketing materials and detailed graphics. With a fast print speed and three paper trays that hold up to 500 sheets, it enhances productivity while reducing ink costs by up to 40% compared to color laser printers. Priced at $199, this printer combines efficiency with exceptional performance for all your printing needs.
Technical Specifications
Windows System Requirements
To use your product and its software, your computer should use one of these Microsoft operating systems:
- Windows 8.x
- Windows 7
- Windows Vista
- Windows XP Professional x64 Edition
- Windows XP SP3
OS X System Requirements
To use your product and its software, your Mac should use one of these operating systems:
- OS X 10.9.x
- OS X 10.8.x
- OS X 10.7.x
- OS X 10.6.x
- OS X 10.5.8
Printing Specifications
- Paper Path:
- Rear paper feed slot, top entry
- Paper cassette 1 and 2, front entry
- Capacity:
- Rear paper feed slot: 0.01 inch (0.3 mm) stack thickness
- Paper cassette 1 and 2: 1.08 inches (27.5 mm) stack thickness
Paper Specifications
Note: Since the quality of any particular brand or type of paper may be changed by the manufacturer at any time, Epson cannot guarantee the quality of any non-Epson brand or type of paper. Always test a sample of paper stock before purchasing large quantities or printing large jobs. Poor quality paper may reduce print quality and cause paper jams or other problems. If you encounter problems, switch to a higher grade of paper.
Single-sheets
- Sizes:
- A3 (11.7 × 16.5 inches [297 × 420 mm])
- A4 (8.3 × 11.7 inches [210 × 297 mm])
- A5 (5.8 × 8.2 inches [148 × 210 mm])
- A6 (4.1 × 5.8 inches [105 × 148 mm])
- B5 (7.2 × 10.1 inches [182 × 257 mm])
- Half Letter (5.5 × 8.5 inches [140 × 279 mm])
- Letter (8.5 × 11 inches [216 × 279 mm])
- Legal (8.5 × 14 inches [216 × 357 mm])
- 11 × 14 inches (279 × 356 mm)
- 11 × 17 inches (279 × 432 mm)
- 13 × 19 inches (330 × 483 mm)
- 4 × 6 inches (102 × 152 mm)
- 5 × 7 inches (127 × 178 mm)
- 5 × 8 inches (127 × 203 mm)
- 8 × 10 inches (203 × 254 mm)
- 3.5 × 5 inches (89 × 127 mm)
- 16:9 wide (4 × 7.1 inches [102 × 181 mm])
- 3.9 × 5.8 inches (100 × 148 mm)
- Paper Types: Plain paper and paper distributed by Epson
- Thickness:
- 0.003 inch (0.08 mm) to 0.004 inch (0.11 mm)
- Weight:
- 17 lb (64 g/m²) to 24 lb (90 g/m²)
Envelope Specifications
- Size: No. 10 (4.1 × 9.5 inches [105 × 241 mm])
- Paper Types: Plain paper
- Weight:
- 20 lb (75 g/m²) to 24 lb (90 g/m²)
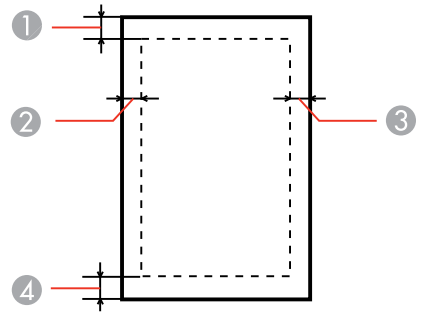
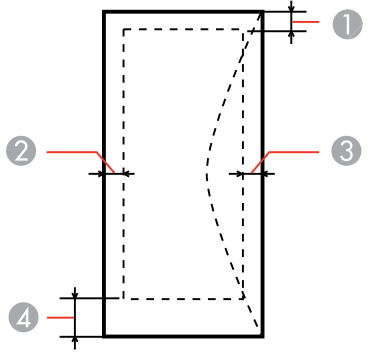
Printable Area Specifications
Note: When printing borderless, quality may decline in the expanded printable area.
Single sheets
- Top: 0.12 inch (3 mm) minimum
- Left: 0.12 inch (3 mm) minimum
- Right: 0.12 inch (3 mm) minimum
Bottom: 0.12 inch (3 mm) minimum
Envelopes
- Left: 0.12 inch (3 mm) minimum; 0.83 inch (21 mm) recommended
- Bottom: 0.20 inch (5 mm) minimum
- Top: 0.20 inch (5 mm) minimum
Right: 0.12 inch (3 mm) minimum; 1.97 inches (50 mm) recommended
Ink Cartridge Specifications
Note: We recommend that you use genuine Epson cartridges and do not refill them. The use of other products may affect your print quality and could result in printer damage. The cartridges included with the printer are designed for printer setup and not for resale. After some ink is used for priming, the rest is available for printing. Yields vary considerably based on images printed, print settings, paper type, frequency of use, and temperature. For print quality, a variable amount of ink remains in the cartridge after the "replace cartridge" indicator comes on.Color: Black, Cyan, Magenta, YellowCartridge Life:
- Opened package: 6 months
- Unopened package: Do not use if the date on the package has expired
Temperature Storage:
- –4 to 104 ºF (–20 to 40 ºC)
- 1 month at 104 ºF (40 ºC)
- Ink freezes at 10.4 ºF (–12 ºC)
- Ink thaws and is usable after 3 hours at 77 ºF (25 ºC)
Note: For best printing results, use up a cartridge within 6 months of opening the package.
Dimension Specifications
- Height:
- Stored: 12 inches (304 mm)
- Printing: 12.7 inches (323 mm)
- Width:
- Stored: 22.3 inches (567 mm)
- Printing: 22.3 inches (567 mm)
- Depth:
- Stored: 16.7 inches (424 mm)
- Printing: 31.8 inches (807 mm); with the output tray extension extended
- Weight:
- 32.8 lb (14.9 kg) (without ink cartridges or power cord)
Electrical Specifications
- Input Voltage Range: 100 to 240 V (model: 90 to 264 V)
- Rated Frequency Range: 50/60 Hz
- Input Frequency Range: 49.5/60.5 Hz
- Rated Current: 0.7/0.4 A
Power Consumption
- Printing: 22 W (ISO/IEC 24712)
- Ready Mode: 5.8 W
- Sleep Mode: 1.5 W
- Power Off Mode: 0.3 W
Environmental Specifications
- Temperature:
- Operating: 50 to 95 °F (10 to 35 °C)
- Storage: –4 to 104 °F (–20 to 60 °C)
- Usable for 1 month at 104 °F (40 °C)
- Humidity (without condensation):
- Operating: 20 to 80% RH
- Storage: 5 to 85% RH
Interface Specifications
- Interface type: Hi-Speed USB (Device Class for computers)
Network Interface Specifications
Wi-Fi
- Standard: IEEE 802.11 b/g/n; complies with either IEEE 802.11 b/g or IEEE 802.11 b/g/n, depending on purchase location.
- Security:
- WEP (64/128 bit)
- WPA-PSK (TKIP/AES); complies with WPA2 with support for WPA/WPA2 Personal
- Frequency Band: 2.4 GHz
- Communication Mode:
- Infrastructure mode
- Ad hoc mode
- Wi-Fi Direct
Note: Wi-Fi Direct Simple AP mode available even if you connect the product to an Ethernet network.
Ethernet
- Standard: IEEE802.3i/u, IEEE802.3az
- Communication Mode: Ethernet 100BASE-TX/10BASE-T
Note: The connected device should be IEEE802.3az compliant.
Security Protocol
- SSL/TLS: HTTPS Server/Client or IPPS
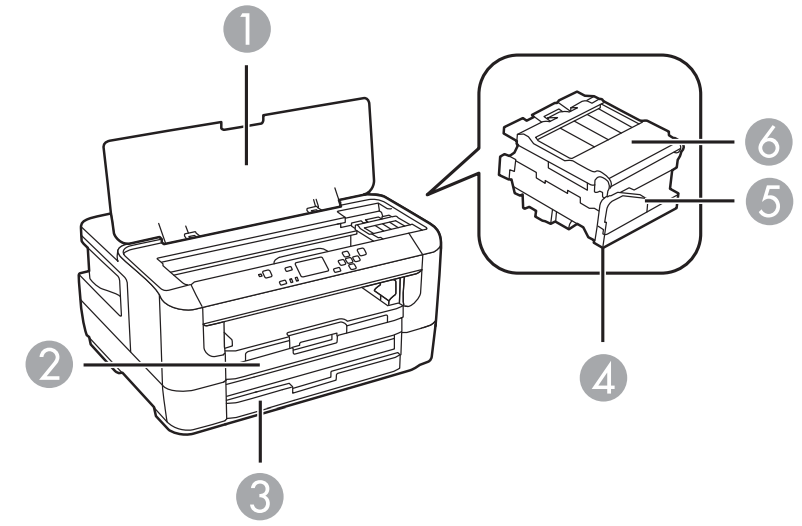
Product Parts Locations
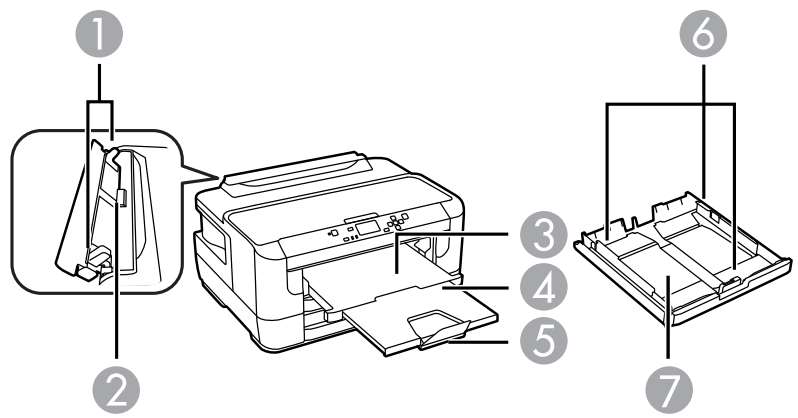
Top
- Sheet feeder edge guides
- Rear paper feed slot
- Output tray
- Output tray extension
- Paper stopper
- Cassette edge guides
- Paper cassette
Inside
- Printer cover
- Paper cassette 1
- Paper cassette 2
- Print head (do not remove)
- Cartridge holder
- Cartridge cover
Back
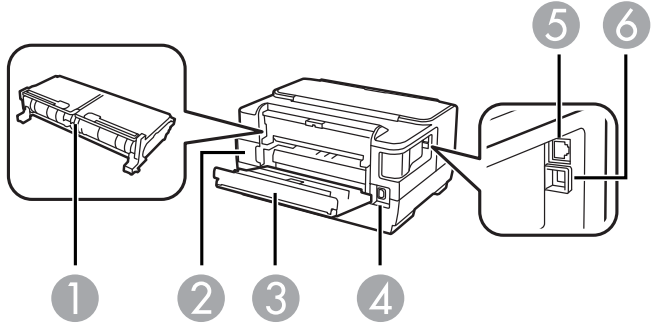
- Duplexer
- Maintenance box
- Rear cover
- AC inlet
- Ethernet LAN port
- USB port
Description
The Epson WorkForce WF-7110 is built with durability and performance in mind. It features a large 3.7-inch color touchscreen for easy navigation and operation. The printer supports a wide range of paper types and sizes, making it versatile for different printing tasks. With its PrecisionCore technology, it delivers sharp and vibrant prints with minimal maintenance.
The printer also includes advanced features such as automatic two-sided printing and a dedicated photo tray, enhancing its functionality for various user needs. Additionally, its energy-efficient design helps reduce power consumption, making it an environmentally friendly option.
Wi-Fi or Wired Networking
Wi-Fi Infrastructure Mode Setup
You can set up your product to communicate with your computer using a wireless router or access point. The wireless router or access point can be connected to your computer over a wireless or wired network.
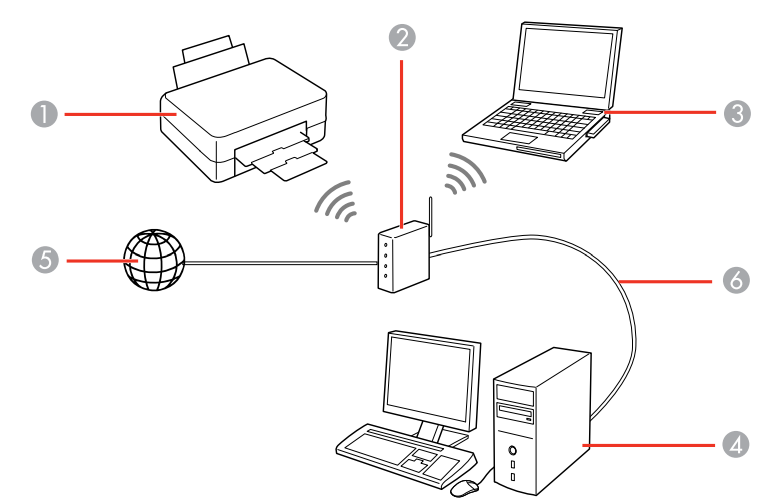
- Epson product
- Wireless router or access point
- Computer with a wireless interface
- Computer
- Internet
- Ethernet cable (used only for wired connection to the wireless router or access point)
Selecting Wireless Network Settings From the Control Panel
You can select or change wireless network settings using your product control panel.
To install your product on a wireless network, follow the instructions on the Start Here sheet and install the necessary software. The installer program guides you through network setup.
Note: Breakdown or repair of this product may cause loss of network data and settings. Epson is not responsible for backing up or recovering data and settings during or after the warranty period. We recommend that you make your own backup or print out your network data and settings.
Press the up or down arrow buttons, select Wi-Fi Setup, and press the OK button.
You see this screen: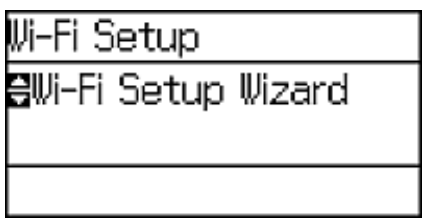
- Select Wi-Fi Setup Wizard and press the OK button.
Note: If you need to disable the wireless network to set up your product on an Ethernet network, press the down arrow button, select Disable Wi-Fi, and press the OK button. Then follow the instructions on changing to a wired network connection in this guide. - Select the name of your wireless network and press the OK button.
Note: To enter the wireless network name manually, select Other Networks and press the OK button. Use the printer's buttons to enter your network name. Enter your wireless password using the control panel buttons.
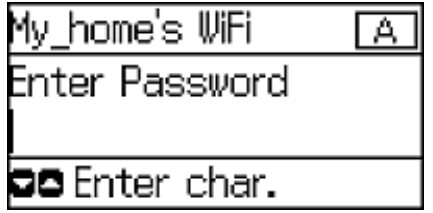
Note: The network name and password are case sensitive. Be sure to correctly enter uppercase and lowercase letters, and numeric or special characters.
- To enter letters or symbols, press the up or down arrow buttons to scroll through characters, and press the right arrow button to select one.
- To enter numbers or change the case of letters, press the Stop button.
- To delete the previous character, press the left arrow button.
- To enter a space, press the right arrow button.
- Press the OK button when you’re finished entering your password.
- Confirm the displayed network settings and press the OK button to save them.
Note: If you need to change a setting, press the Back button. - If you want to print a network setup report, press the down arrow button, select Print connection report, and press the OK button. (Otherwise, press the OK button.)
If the network connection is successful, the Wi-Fi icon appears in the upper-right corner of ( the LCD screen. )
Wi-Fi Direct Mode Setup
You can set up your product to communicate directly with your computer or another device without requiring a wireless router or access point.
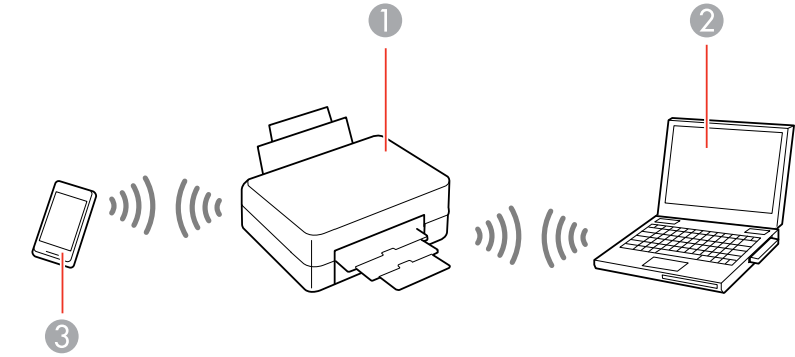
- Epson product
- Computer with a wireless interface
- Another wireless device
Your product automatically selects one of these modes to communicate with your computer or device:
Access point mode
If your product is not already connected to a wireless network, it enters access point mode and the product itself acts as the network access point for up to 4 devices. When operating in this mode, your product displays an AP connection symbol on the LCD screen.
Peer-to-peer mode
If your product is already connected to a wireless network, it enters peer-to-peer mode and disconnects from any other networks. This also disables any other product features requiring access to the Internet. When operating in this mode, your product displays a Direct or D connection symbol on the LCD screen.
Note: To disconnect a peer-to-peer mode connection, release the connection to your product from your computer or other device. Your product will reconnect to the previously used network.
Enabling Wi-Fi Direct Mode
You can enable Wi-Fi Direct mode to allow direct communication between your product and a computer or other devices without a wireless router or access point.
Note: You may need to enable the Wi-Fi Direct setting in the Advanced Settings menu before you can enable Wi-Fi Direct mode.
Press the up or down arrow buttons, select Wi-Fi Setup, and press the OK button.
You see this screen: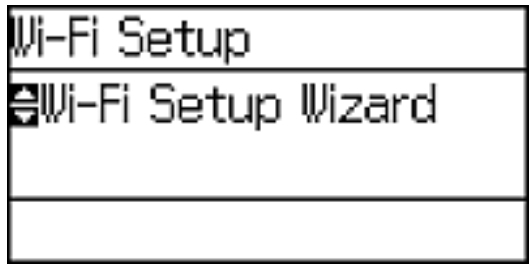
- Press the down arrow button, select Wi-Fi Direct Setup, and press the OK button.
- Press the down arrow button, select Connection Setup, and press the OK button.
- Press the down arrow button, select Change Password, and press the OK button.
- Press the OK button.
Note: If you have already connected devices or computers to your product via Wi-Fi Direct, they will be disconnected when you change the password. Enter a Wi-Fi Direct password using the control panel buttons.
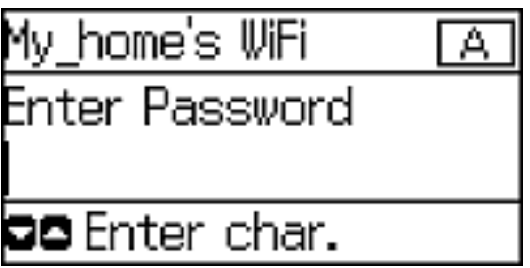
Note: Your password must be at least 8 and no more than 22 characters long.
- To enter letters or symbols, press the up or down arrow buttons to scroll through characters, and press the right arrow button to select one.
- To enter numbers or change the case of letters, press the
 Stop button.
 - To delete the previous character, press the left arrow button.
- To enter a space, press the right arrow button.
- Press the OK button when you’re finished entering your password.
Press the up arrow button.
You see this screen: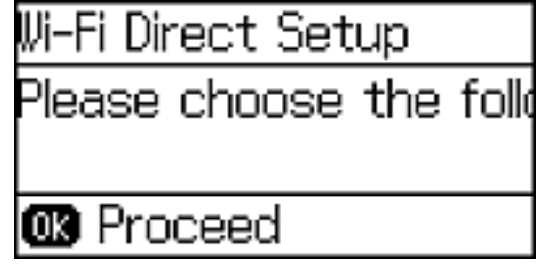
- Press the OK button to view the SSID (Wi-Fi network name) and password.
- Use your computer or wireless device to select the Wi-Fi network name (SSID) displayed on the LCD screen, and enter the password shown.
- Press the
 Back button to return to the Home screen.
You see either the connection symbol on the LCD screen and should be able to print directly to your product from your computer or device.
Note: If the connection symbol is not displayed on the LCD screen, Wi-Fi Direct mode is not enabled. Repeat these steps to try again.
Wi-Fi Protected Setup (WPS)
If your network uses a WPS-enabled wireless router or access point, you can quickly connect your product to the network using Wi-Fi Protected Setup (WPS).
Note: To check if your router is WPS-enabled, look for a button labeled WPS on your router or access point. If there is no hardware button, there may be a virtual WPS button in the software for the device.
Using WPS to Connect to a Network
If you have a WPS-enabled wireless router or access point, you can use Wi-Fi Protected Setup (WPS) to connect your product to the network.
Press the down arrow button, select Wi-Fi Setup, and press the OK button.
You see this screen: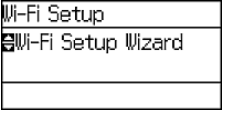
- Press the down arrow button, select Push Button Setup (WPS), and press the OK button.
- Follow the instructions on the LCD screen to complete the WPS setup.
- Press the Back button to return to the Home screen.
If the network connection is successful, the Wi-Fi icon ( ) will appear in the upper-right corner of the LCD screen.
Printing a Network Status Sheet
You can print a network status sheet to help you determine the causes of any problems you may have using your product on a network.
Press the up or down arrow buttons, select Menu, and press the OK button.
You see this screen: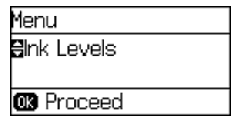
- Press the down arrow button, select Network Status, and press the OK button.
- Press the down arrow button, select Wi-Fi/Network Settings, and press the OK button.
Press the down arrow button, select Wi-Fi/Network Status, and press the OK button.
You see a screen like this: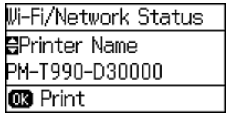
- Press the OK button to print the network status sheet.
Examine the settings shown on the network status sheet to diagnose any problems you have. Parent topic: Wi-Fi or Wired Networking
Setup Guide
To set up the Epson WorkForce WF-7110, follow these steps:
- Unbox the printer and remove all packaging materials.
- Connect the power cord and turn on the printer.
- Install the ink cartridges according to the on-screen instructions.
- Load paper into the input tray and adjust the paper guides.
- Connect the printer to your network via Wi-Fi, Ethernet, or USB.
- Download and install the Epson printer driver from the official Epson website.
- Follow the on-screen instructions to complete the setup process.
Changing or Updating Network Connections
Accessing the Web Config Utility
You can select your product's network settings and confirm its operating status using a web browser. You do this by accessing your product's built-in Web Config utility from a computer or other device that is connected to the same network as your product.
- Print a network status sheet.
- Locate the IP Address for your product that is listed on the network status sheet.
- On a computer or other device connected to the same network as your product, open a web browser.
- Enter your product's IP address into the address bar.
You see the available Web Config utility options.
Changing a USB Connection to a Wi-Fi Connection
If you have already connected your product to your computer using a USB connection, you can change to a Wi-Fi connection or add a Wi-Fi connection to print wirelessly.
- Do one of the following:
- If you want to use only a Wi-Fi connection, disconnect the USB cable from your product. With Windows, also uninstall your product software.
- If you want to add a Wi-Fi connection in addition to a USB connection, leave the USB cable connected to your product.
- Download your product software from the Epson website using the instructions on the Start Here sheet.
Changing a Wi-Fi Connection to a Wired Network Connection
If you have already connected your product to your computer wirelessly, you can change to a wired network connection if necessary.
- Disable your product's Wi-Fi features.
- Connect one end of an Ethernet network cable to the product's LAN port.
- Connect the other end to any available LAN port on your router or access point.
- Download and install your product software from the Epson website.
- Follow the on-screen instructions to install the software.
- When you see the Select Your Connection screen, select Wired network connection.
- If you see a Select Setup Option screen, select Setup printer for the first time.
- Continue following the rest of the on-screen instructions.
Connecting to a New Wi-Fi Router
If you change the wireless router you have been using on your network, you can update your product's Wi-Fi connection to the new router.
- Do one of the following:
- Windows: Uninstall your product software.
- OS X: Go to the next step.
- Download your product software from the Epson website using the instructions on the Start Here sheet.
Disabling Wi-Fi Features
You may need to disable your product's Wi-Fi features if you change your network connection type or need to solve a problem with your network connection.
Note: Before disabling Wi-Fi features, make a note of your product's SSID (network name) and password, and any network settings selected for the Epson Connect services you may use.
Press the down arrow button, select Wi-Fi Setup, and press the OK button.
You see this screen: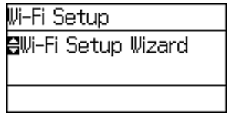
- Press the down arrow button, select Disable Wi-Fi, and press the OK button.
- Press the up arrow button to disable Wi-Fi.
Troubleshooting
If you encounter any issues with your Epson WorkForce WF-7110, here are some common problems and solutions:
- Paper Jam: Turn off the printer, open the top cover, and carefully remove the jammed paper. Restart the printer.
- Ink Cartridge Issues: Ensure the ink cartridges are properly installed. If the problem persists, try replacing the cartridges.
- Network Connectivity: Check your network settings and ensure the printer is connected to the correct network. Restart both the printer and your router if necessary.
Epson WorkForce WF-7110 Pros & Cons
Pros:
- High-quality print resolution and speed
- Supports large-format printing (A3+)
- Robust and durable design
- Advanced connectivity options (Wi-Fi, Ethernet, USB)
- Energy-efficient and environmentally friendly
Cons:
- Higher cost compared to some other inkjet printers
- Larger footprint due to its robust design
- Ink replacement can be expensive over time
Customer Reviews
Customers have praised the Epson WorkForce WF-7110 for its excellent print quality, reliability, and ease of use. Many have noted its ability to handle large print jobs efficiently and its robust build quality. However, some users have mentioned that the ink cartridges can be expensive to replace and that the printer's size might be a concern for smaller workspaces.
Faqs
What is the maximum paper size supported by the WorkForce?
How do I connect the Epson WorkForce Inkjet Printer WF-7110 to my Wi-Fi network?
Can I print from my mobile device using the Inkjet Printer?
How often do I need to replace the ink cartridges in the Epson Printer?
Is the Epson compatible with both Windows and Mac operating systems?
What is PrecisionCore technology in the Epson Inkjet?
Can I print double-sided documents automatically with the WF-7110?
How do I troubleshoot a paper jam in the WorkForce?
Is the Epson WorkForce energy-efficient?
Leave a Comment
