Eufy Robot Vacuum Cleaner G40+ User Guide
Content
Introduction
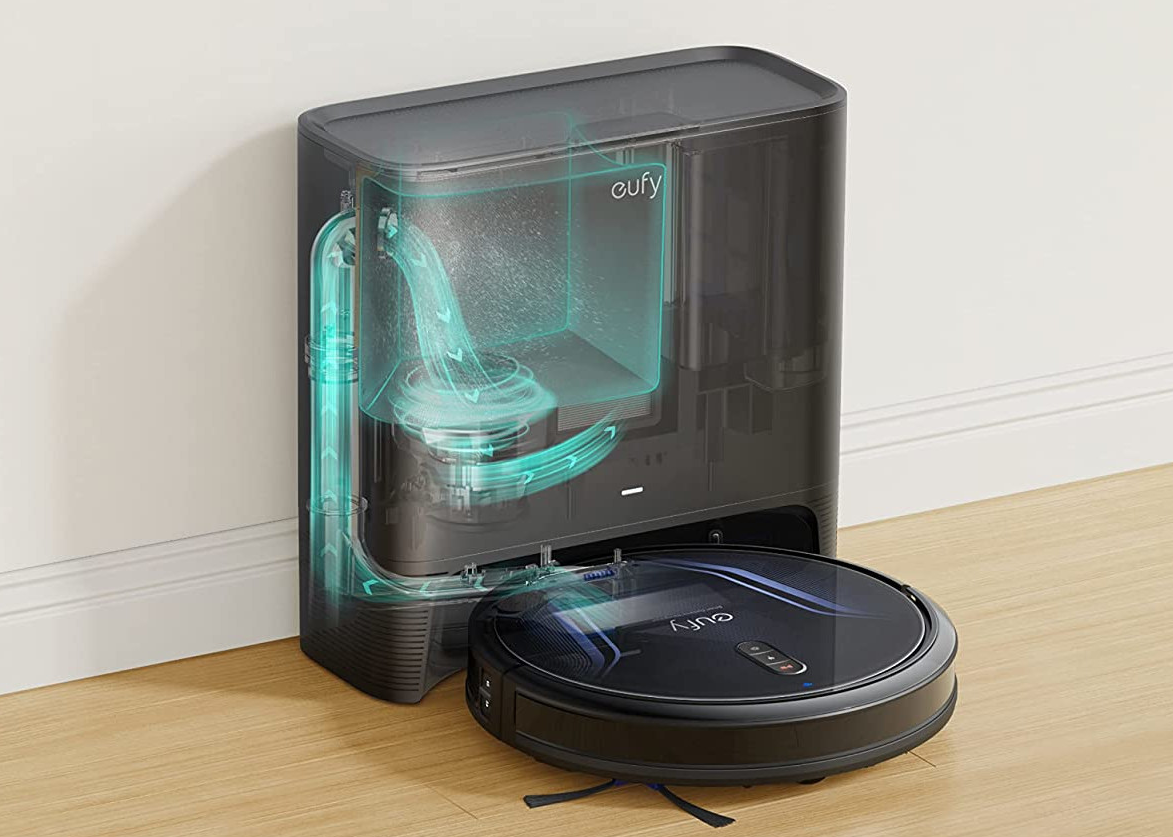
The eufy Robot Vacuum Cleaner G40+ is a cutting-edge robotic cleaning device designed to simplify household chores. Equipped with powerful 2,500Pa suction and a self-emptying feature, it ensures efficient cleaning without the hassle of manual maintenance. The G40+ utilizes planned pathfinding technology for systematic cleaning, and navigating under furniture with its ultra-slim design. Controlled via the eufy Clean app, it allows users to schedule cleanings and adjust settings remotely. Priced at approximately $369, it offers a blend of convenience and performance for modern homes.
Specifications
| Input | 19V 0.6A |
| Battery Voltage | 14.4 V | |
| Power Consumption | 48W | |
Battery Type | 14.4V
Li-ion 2600mAh | |
| Dust Box Capacity | 420ml | |
| Cleaning Time | Maximum 100 min | |
| Charging Time | 300 - 360 min | |
 |
Power Consumption |
1000W |
About Your RoboVac
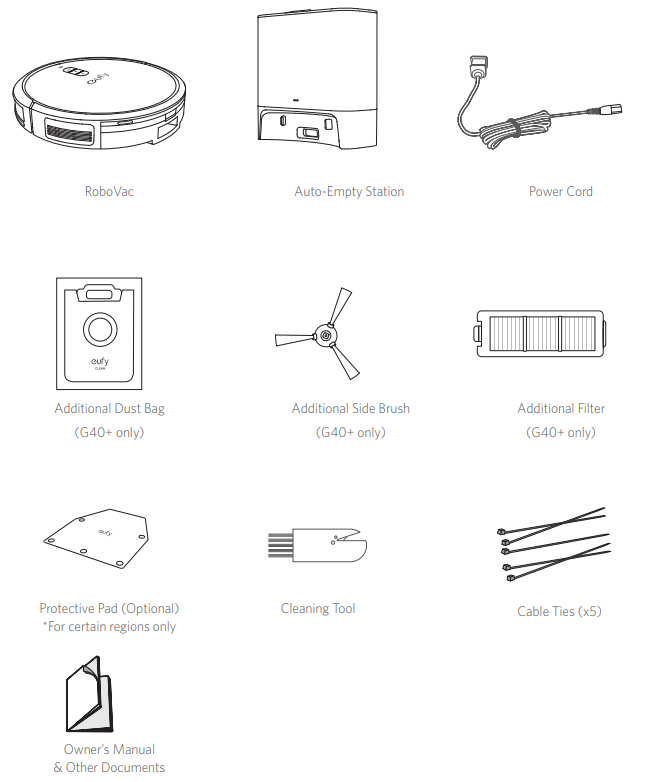
What's in the Box
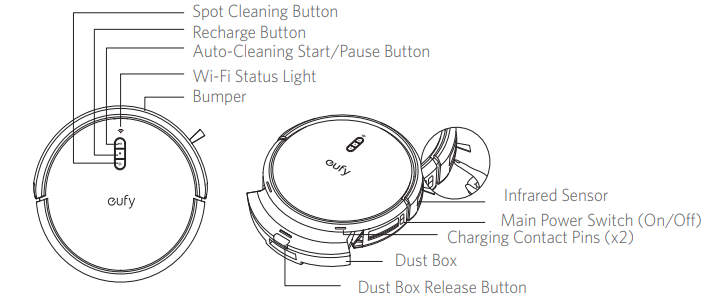
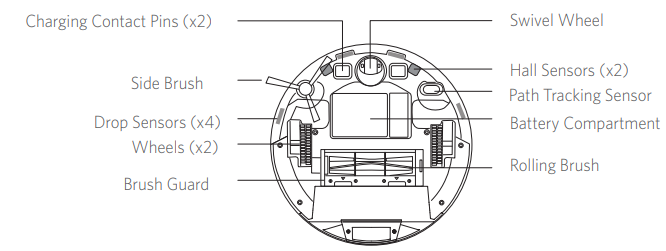
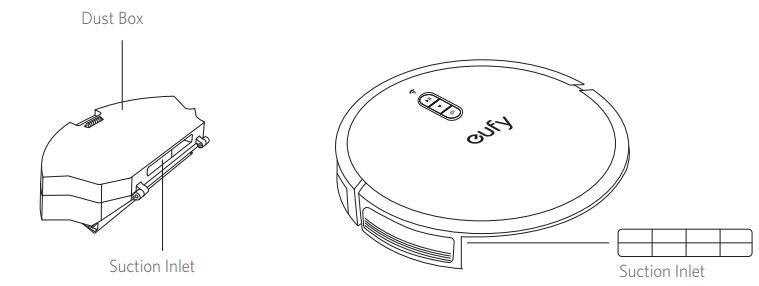
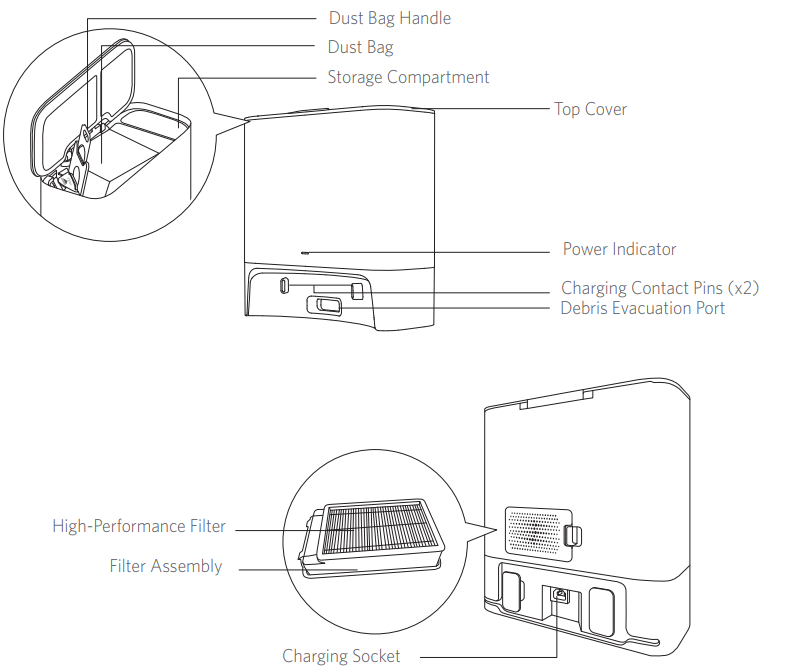
RoboVac Anatomy
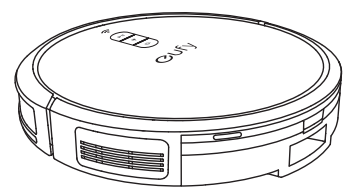
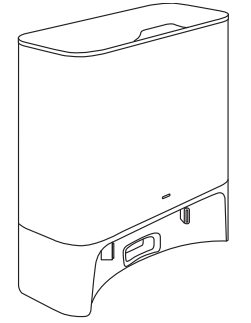
A. Top & Side
B. Bottom
C. Dust Box

D. Suction Inlet
E. Auto-Empty Station
LED Indication
You can see the status of RoboVac from the LED indicators.
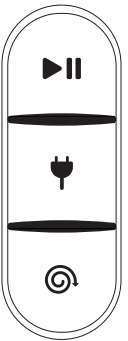 |
| Start / Pause Cleaning
Reset the Wi-Fi Connection (Press andhold for 10 seconds) |
Return to Auto-Empty Station
| ||
Spot Cleaning
|
- When you use the Find My Robot function via the eufy Clean app, all three LED indicators are steady blue and a voice prompt is heard.
- To conserve power, the blue light on the button becomes dim when:
- RoboVac is not docked to the auto-empty station and has been inactive for 10 minutes;
- RoboVac has been fully charged for 1 minute.
Description
The eufy Robot Vacuum Cleaner G40+ has a sleek and tiny design, measuring only 2.85 inches high, allowing it to effortlessly go under furniture and into tight areas. It has a powerful 2000Pa suction power that effectively collects dirt, dust, and debris. The vacuum has a rechargeable battery that may give up to 100 minutes of continuous cleaning time.
The gadget comes with a set of side brushes to help gather waste from walls and corners, as well as a huge 0.6L dustbin that requires less frequent emptying. The G40+ also has an anti-scratch tempered glass cover to ensure longevity and simplicity of maintenance.
Using Your RoboVac
Important Tips Before Use
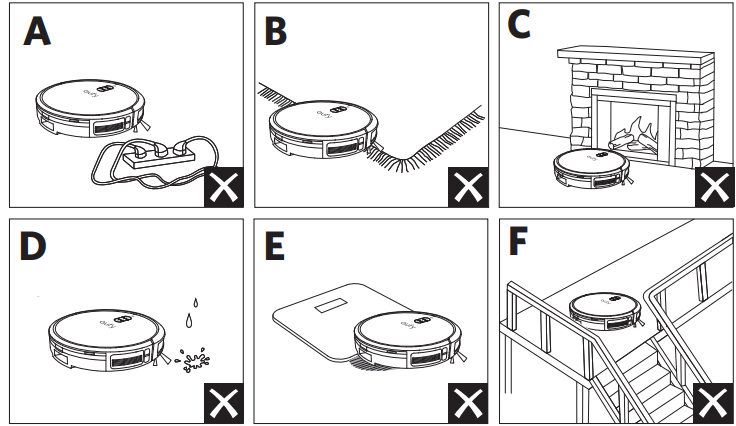
- Remove power cords and small objects from the floor that may entangle RoboVac.
- Fold tasseled edges of rugs underneath to prevent tangling RoboVac. Avoid cleaning dark-colored high-pile rugs or rugs thicker than 1.02 in / 26 mm as they may cause RoboVac to malfunction.
- It is strongly recommended to place physical barriers in front of fireplaces and certain areas (i.e. air vents) that may cause damage to RoboVac if entered.
- Keep RoboVac away from wet areas during cleaning.
- RoboVac may climb on top of objects less than 0.63 in / 16 mm in height. Remove these objects if possible.
- Anti-drop sensors will prevent RoboVac from tumbling down stairs and steep drops in most cases. Sensors are less effective if dirty or used on carpeted, reflective, or dark-colored floors. Place physical barriers to block off areas where RoboVac may fall.
Eufy Robot Vacuum Cleaner G40+ Preparation
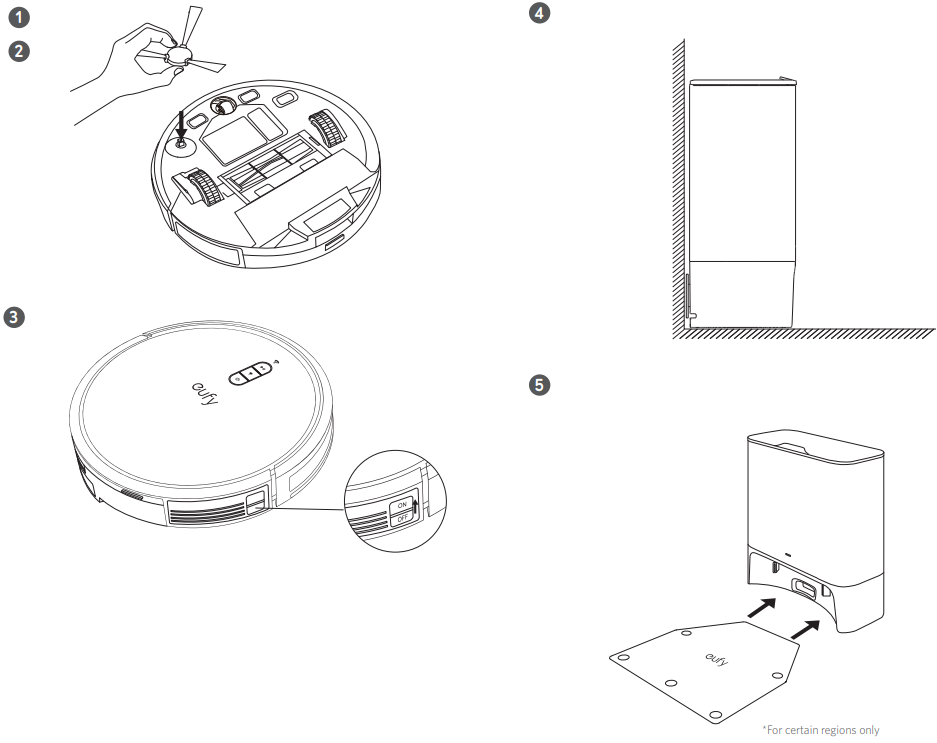
- Remove the foam blocks beside the bumper before use.
- Install the side brush before use.
- Turn on the main power switch on the right side of RoboVac.
- Place the auto-empty station on a level surface and against a wall.
Install the supplied protective pad under the auto-empty station before using it on a carpet.
- Remove objects within 3.3 ft/1 m to the left and right sides and within 6.6 ft / 2m of the front of the auto-empty station. If you cannot remove the objects, check whether RoboVac can return to the auto-empty station normally. If not, contact eufy Customer Service for help.
Connect the power cord to the auto-empty station and a wall outlet.
When the auto-empty station connects to AC power, the LED indicator on the auto-empty station is steady white.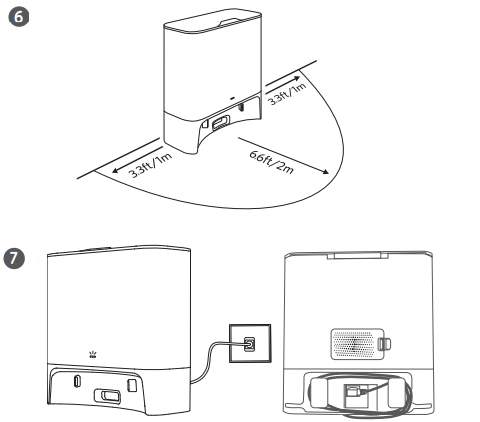
TIPS
- The auto-empty station has two versions: high-voltage and low-voltage. The voltage information can be found on the bottom of the device. Make sure you have purchased the device with the correct voltage, otherwise it may not work normally.
- Install the auto-empty station in a location that RoboVac can easily access. It is recommended to place the auto-empty station against a wall, and on a hard, level surface rather than on rugs or carpets.
- Always keep the auto-empty station plugged in, otherwise RoboVac will not automatically return to it.
Use the Auto-Empty Station
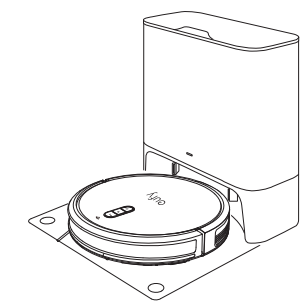
- RoboVac will return to the auto-empty station at the end of a cleaning cycle or when its battery is running low.
- Make sure the power cord is connected to a power outlet and the dust bag is properly installed.
- Based on eufy's internal laboratory tests, the dust bag can lock 99.7% of allergens (such as dust, garbage, dust mites, pet dander, etc.) to prevent them from emitting into the air.
- If the cleaning time or the time period between two cleaning sessions is too short, the auto-empty station may not empty the dust box automatically.
- The emptying function will not be activated if you have selected the Do- Not-Disturb mode in the eufy Clean app.
- Certain noise may exist when the auto-empty station is working. You are recommended to place the device in a proper location or select the Do- Not-Disturb mode in the eufy Clean app to prevent noise interference.
Attach RoboVac to the auto-empty station by aligning its charging pins.
- RoboVac starts charging automatically.
- If RoboVac has finished a round of cleaning (more than 15 minutes), it will empty the dust box automatically by default when it returns to the auto-empty station.
| LED Indicator | Status of Auto-Empty Station |
| Steady white, with 50% brightness | Standby |
| Flashing white slowly | Working normally |
Flashing white quickly | Working abnormally (Refer to the "Troubleshooting" section in this manual for solutions) |
- Turn off the main power switch if RoboVac will not be used for a long period of time. To preserve the battery's lifespan, recharge at least once every 6 months.
Store Accessories
Store your frequently-used accessories in the storage compartment of the auto-empty station, such as the filter, side brush, dust bag, and cleaning tools. To prevent any damage or unpleasant smells, things that are damp should not be stored inside the auto-empty station.
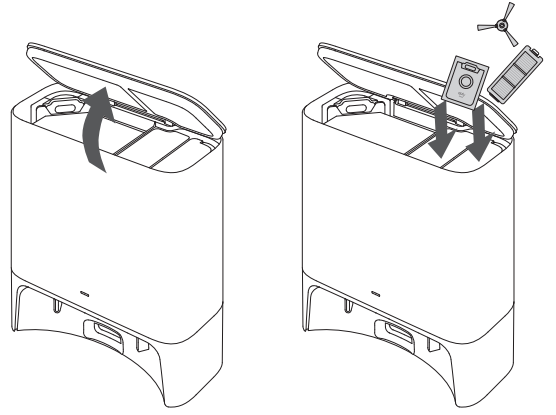
Use Your RoboVac with the eufy Clean App
To enjoy all the available features, it is recommended to control your RoboVac via the eufy Clean app.
Before you start, make sure that:
- Your smartphone or tablet is running iOS 10.0 (or above) or Android 5.0 (or above).
- The 2.4GHz band wireless signal is enabled on your wireless router.
- RoboVac is attached to the auto-empty station to ensure it has enough power during setup.
- Download the eufy Clean app from the App Store (iOS devices) or Google Play (Android devices).
- Open the app and create a user account.
- Tap the “+” icon to add RoboVac to your eufy Clean account.
- Follow the instructions in the app to set up the Wi-Fi connection. After connecting successfully, you can control RoboVac via the app. With the app, you can select a cleaning mode, set the time, schedule a cleaning, adjust suction power, view system status, receive notifications, and access additional features.
 | Slowly flashing blue | Waiting for connection |
| Rapidly flashing blue | Connecting with your wireless router | |
| Steady blue | Connected with your wireless router |
If RoboVac gets stuck in any space, tap Find My Robot in the app to find the device.
Restore Factory Settings
Press![]() and hold on RoboVac for 10 seconds to restore factory settings if necessary. You will hear a voice prompt when the settings have been reset and the Wi-Fi status light will slowly flash blue. Now you can follow the Wi-Fi instructions in the eufy Clean app to set up the Wi-Fi connection.
and hold on RoboVac for 10 seconds to restore factory settings if necessary. You will hear a voice prompt when the settings have been reset and the Wi-Fi status light will slowly flash blue. Now you can follow the Wi-Fi instructions in the eufy Clean app to set up the Wi-Fi connection.
Schedule Cleaning
With the eufy Clean app, you can schedule RoboVac to start cleaning at a particular time.
TIP: You can set the time and customize the cleaning schedules from Sunday to Saturday on the eufy Clean app. This function is only available on the app.
Start / Pause Cleaning
- Make sure the main power switch at the side of RoboVac is turned on before use.
- You can also start or pause cleaning via the eufy Clean app.
- Press
 on RoboVac to start cleaning in Auto-Cleaning mode.
 - Press
 again to pause cleaning.
Select a Cleaning Mode
- You can also select the cleaning mode via the eufy Clean app.
Auto-Cleaning Mode
- After startup, RoboVac moves from the auto-empty station and automatically determines its cleaning route, following a Z-shaped cleaning path. When the cleaning is finished,
RoboVac automatically returns to the auto-empty station.
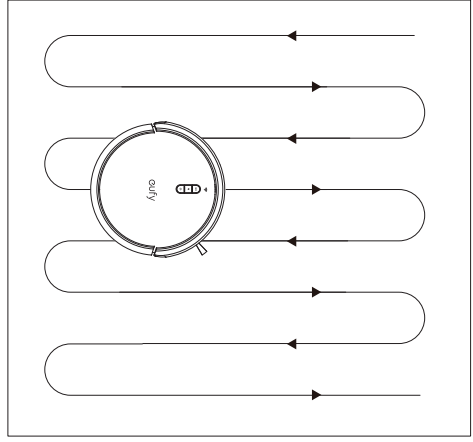
Press
 to start cleaning in Auto-Cleaning mode.
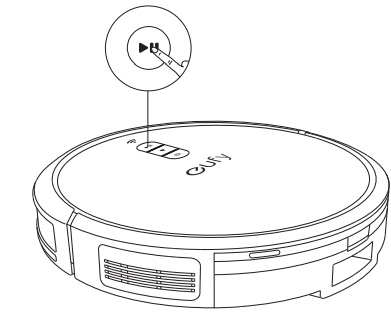
In the eufy Clean app, RoboVac can be set to return to the auto-empty station automatically if the battery level becomes low. Once recharged, RoboVac will resume cleaning.
- By default, RoboVac starts in Auto-Cleaning mode when it is turned on.
Spot Cleaning Mode
RoboVac intensively cleans a specific area in a spiral pattern, which is useful if there is a concentrated area of dust or debris. In Spot Cleaning mode, RoboVac will stop cleaning after 2 minutes.
- Press
 on RoboVac to start cleaning in Spot Cleaning mode.
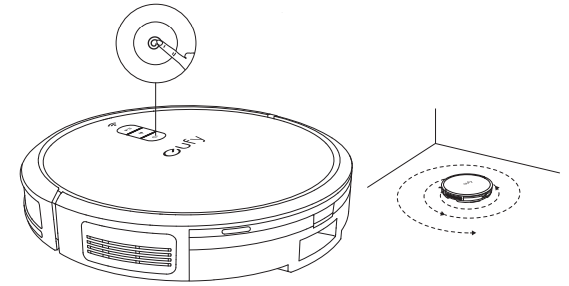
Select a Suction Power Level
In the eufy Clean app, select a suction power level according to your needs:
- Quiet
- Standard (Default)
- Turbo
- Max
TIP: When RoboVac starts cleaning next time, it will clean according to the suction power level you previously selected.
Select BoostIQ feature
In the eufy Clean app, select the BoostIQ™ feature according to your needs. RoboVac will automatically increase suction power if it detects that stronger power is needed to ensure the best clean. BoostIQ™ is ideal for cleaning thicker carpets and hard-to-sweep messes, which will reduce the total cleaning time but increase the noise level. If the vacuuming noise caused by BoostIQ™ disturbs you, you can disable this feature.
Use RoboVac with Amazon Alexa / Google Assistant
Amazon Alexa or Google Assistant is a smart voice control device that enables you to control RoboVac with your voice.
Before you start, make sure that:
- RoboVac is attached to the auto-empty station to ensure there is enough power.
- RoboVac is connected with the eufy Clean app.
- You have an Amazon Alexa-enabled device (i.e. Amazon Echo, Echo Dot, Amazon Tap, Echo Show, or Echo Spot) or a device enabled with the Google Assistant (i.e. Google Home, Google Home Mini). These devices are sold separately.
- The Amazon Alexa app or Google Home app is already installed on your smart device, and you have created an account.
To control RoboVac with Amazon Alexa or the Google Assistant:
- Open the eufy Clean app and find “Smart Integrations” in the top left.
- Follow the on-screen instructions to complete the setup.
TIP: Currently, this feature only supports a few languages including English, German, French, Portuguese, and Spanish. For more supported languages, check https://www.eufylife.com/support/
Setup Guide
To set up your eufy Robot Vacuum Cleaner G40+, follow these steps:
- Unbox the vacuum and all included accessories.
- Charge the vacuum for at least 4 hours before first use.
- Download and install the EufyHome app on your smartphone.
- Connect the vacuum to your Wi-Fi network through the app.
- Place the charging dock in a designated area and ensure it is plugged in.
- Start a cleaning session either manually or by scheduling it through the app.
For pairing with smart home devices, follow the in-app instructions to link your eufy G40+ with Amazon Alexa or Google Assistant.
Cleaning and Maintenance
Prior to cleaning and maintaining, turn off the device and unplug the power cord. For optimal performance, follow the instructions below to clean and maintain RoboVac regularly. The cleaning and replacement frequency will depend on your RoboVac usage habits.
Recommended Cleaning and Replacement Frequency
| RoboVac Part | Cleaning Frequency | Replacement Frequency |
| Dust Collector | Once a week | - |
| Filter | Once a week (Twice a week if you have a pet) | Every 6 months or after every 50 rounds of cleaning |
| Side Brush | Once a month | Every 3-6 months (or when visibly worn) |
| Brush Guard | Once a month | Every 3-6 months (or when visibly worn) |
| Rolling Brush | Once a month | Every 6-8 months |
| Sensors | Once a month | - |
| Charging Pins | Once a month | - |
| Swivel Wheel | Once a month | - |
| Dust Bag | - | Every 45 days (G35+) Every 2 months (G40+) |
Clean the Dust Box and Filter
- Press the release button to remove the dust box.
- Open and empty the dust box.
- Remove the filters.
Tap the filters to remove dust.

- Rinse the dust box and filters thoroughly with water.
Do not use a brush, hot water, or any detergent to clean the filter. - Air-dry the dust box and filters completely before next use.
Do not use the filters if they are not completely dry, otherwise it may affect the cleaning performance. - Place the filters back into the dust box and the auto-empty station.
Push the dust box back into the main unit.
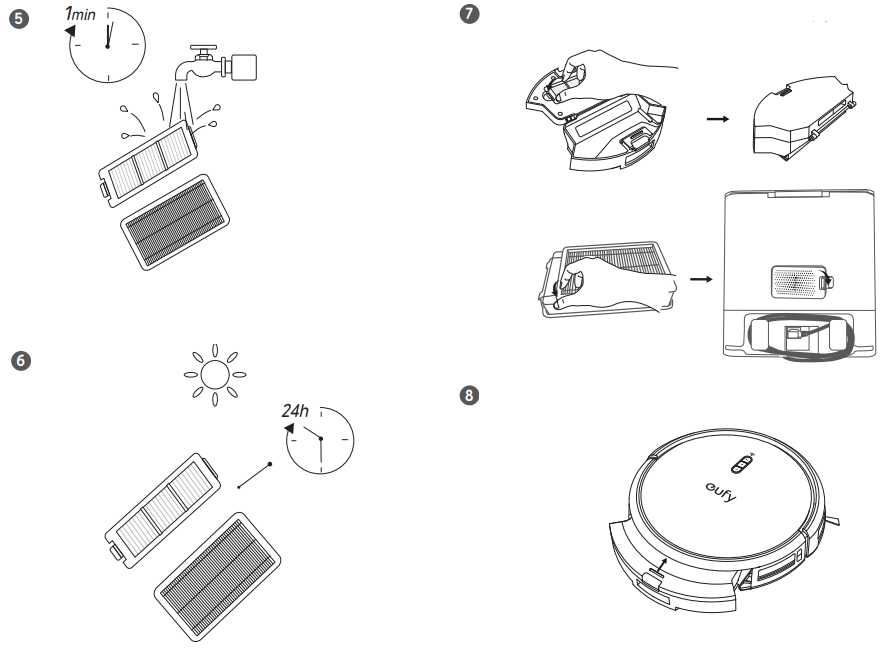
Clean the Rolling Brush
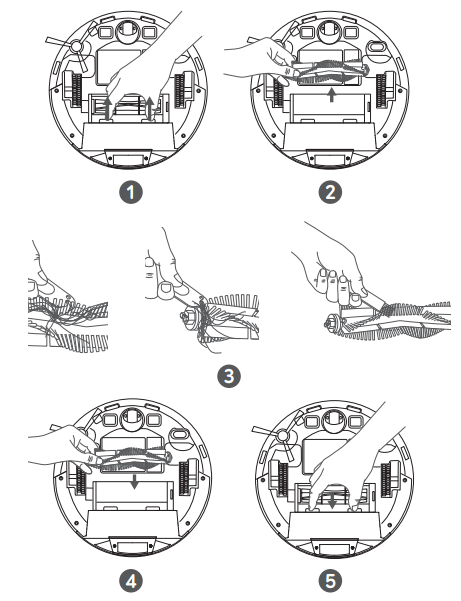
- Pull on the release tabs to unlock the brush guard, as shown.
- Lift the rolling brush to remove.
- Clean the rolling brush with the cleaning tool.
- Reinstall the rolling brush by inserting the fixed protruding end first.
- Press down to snap the brush guard into place.
Clean the Side Brush
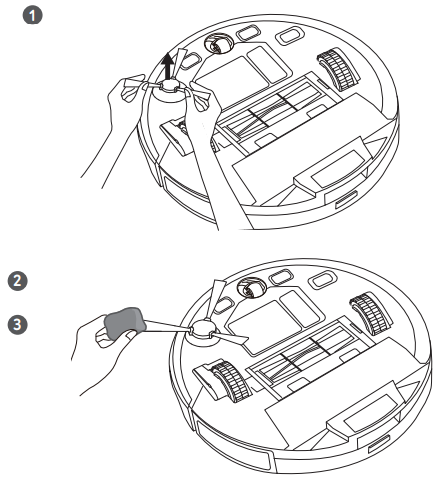
Foreign substances, such as hair, can easily get tangled in the side brush, so it is best to clean it regularly.
- Remove the side brush.
- Carefully unwind and pull off any hair or substances that are wrapped between the main unit and the side brush.
- Use a cloth dampened with warm water to remove dust from the brush or to gently reshape it.
Only use the side brush when it is completely dry.
Replace the Side Brush
The side brush may become bent or damaged after being used for a period of time. Follow the instructions below to replace it.
Pull off the old side brush and snap the new one into place until you hear a click.
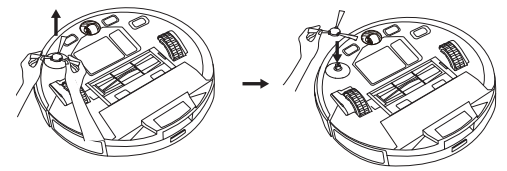
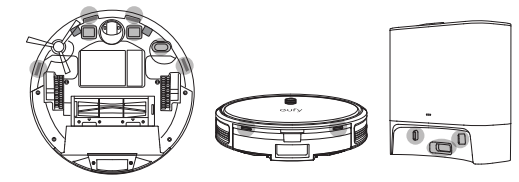
Clean the Sensors and Charging Pins
To maintain the best performance, clean the sensors and charging contact pins regularly.
Dust off the sensors and charging contact pins using a cloth or cleaning brush.
Clean the path tracking sensor with a soft, dry cloth.
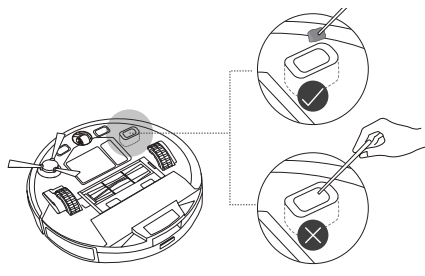
- Be careful not to touch the path tracking sensor with your hands.
- Do not clean the path tracking sensor with sharp-pointed objects, as it may damage the sensor.
Clean the Swivel Wheel
Hair or dust particles can easily get entangled in the swivel wheel. Be sure to clean the swivel wheel periodically and as needed.
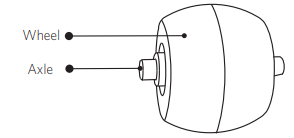
Pull out the swivel wheel with a tool (such as a screwdriver).
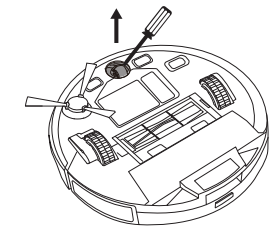
- Clean any hair or debris wrapped around the wheel or entangled inside the wheel cavity.
- Reinstall the wheel and push it in until it clicks into place.
Do not clean the swivel wheel with water.
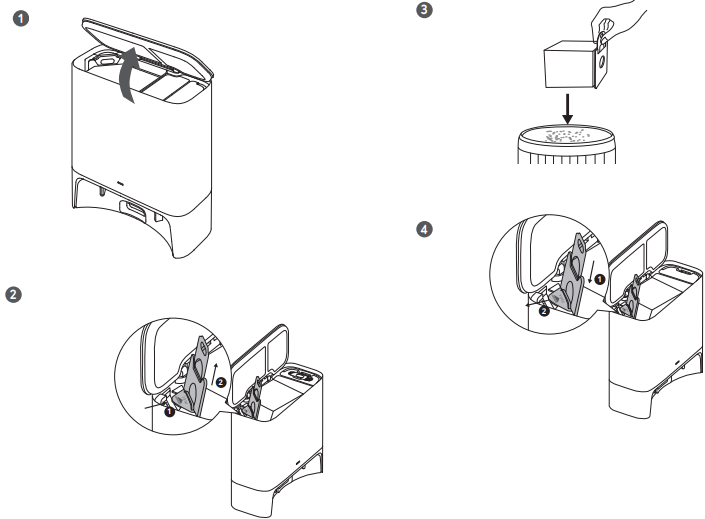
Replace the Dust Bag
- Lift open the top cover.
- Remove the dust bag.
- Discard the used dust bag.
- Install a new dust bag.
Press down to close the top cover.
Clean the Auto-Empty Station
- Do not disassemble the auto-empty station by yourself to avoid the risk of electric shock.
Do not handle the auto-empty station with wet hands.
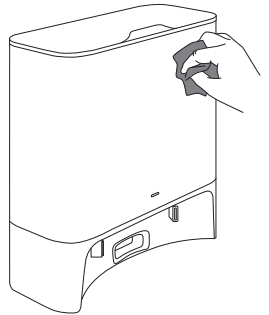
Wipe the auto-empty station gently with a dry cloth.
Troubleshooting
The solutions below are for general questions. If your problem persists, visit www. eufylife.com, go to the eufy Clean app, or contact [email protected] for help.
| Problems | Solutions |
RoboVac will not turn on. | • Make sure the main power switch is turned on. • Make sure the battery is fully charged. • If it still has no response, turn off the main power switch and then turn it back on. |
RoboVac stops working suddenly. | • Check if RoboVac is trapped or stuck on an obstacle. • Check if the battery level is too low. • If you still have trouble, turn off the main power switch, wait for 2 seconds, and then turn it back on. • Check if RoboVac has alerted you with any voice prompts or LED indicators. Refer to the “Voice Alert” section in this manual. |
You cannot schedule cleanings. | • Make sure the main power switch is turned on. • Make sure the scheduled time has been set correctly. Check if the time zone in the eufy Clean app is consistent with that on your mobile device. • Check if RoboVac’s battery is charged. • Cleaning schedules are erased when RoboVac is powered off. If RoboVac is powered on without Internet access, cleaning schedules will not synchronize and must be reset via the app. |
Suction power is weak. | • Check if any obstructions are blocking the suction inlet. • Empty the dust box. •Check if the filter is wet due to water or other liquid on the floor. Air-dry the filter completely before use. |
RoboVac cannot be charged. | • Check if the indicator on the auto-empty station lights up. If not, reconnect the power cord with the auto-empty station and try a new power outlet. If the problem persists, contact the eufy Service Center to repair or replace the auto-empty station. • Dust off the charging contact pins with a dry cloth. • Check if you can hear the “Charging” voice prompt when RoboVac is attached to the auto-empty station. If not, contact the eufy Service Center to repair or replace the auto-empty station. |
RoboVac cannot return to the auto-empty station. | • Remove objects within 3.3 ft / 1 m to the left and right side and within 6.6 ft / 2 m of the front of the auto-empty station. • Check if RoboVac is stuck on any objects. • Clean the charging contact pins. |
The LED on the auto-empty station flashes white quickly. | • Install a dust bag if it is missing or replace the old one if it is full. Next time when the auto-empty station works normally, the LED will stop flashing automatically. • Make sure the top cover is pushed down and firmly sealed. • Make sure the dust bag is securely installed. • Remove any debris from the evacuation port at the bottom of the auto-empty station. |
| RoboVac’s movements or travel path are abnormal. | • Clean the sensors carefully with a dry cloth. • Restart RoboVac by turning the power switch off and on. |
RoboVac cannot connect to a Wi-Fi network. | • Make sure you entered the Wi-Fi password correctly. • Make sure your RoboVac, router, and mobile phone are close enough to ensure a strong signal strength. • Make sure your Wi-Fi router supports a 2.4GHz and 802.11b/g/n band; a 5GHz band is not supported. |
You cannot control RoboVac with Amazon Alexa. | • Check if there are any Internet connection problems. • Check whether you have installed the Amazon Alexa app onto your smart device and enabled “eufy Clean - RoboVac” Skill in the Amazon Alexa app. For details, refer to the “Smart Integrations” page in the eufy Clean App. • Make sure you have an eufy Clean account and have connected to RoboVac. • Make sure you are using correct Alexa voice- commands. |
You cannot control RoboVac with the Google Assistant. | • Check if there are any Internet connection problems. • Check if you have installed the Google Home app onto your smart device and initiated the “eufy Clean” action in the Google Home app. For details, refer to the “Smart Integrations” page in the eufy Clean App. • Check if you are using the proper commands when talking to the Google Assistant. When making your request, first say the wake phrase “Ok Google”. • Repeat your question. Speak clearly to the Google Assistant. |
Voice Alert
When RoboVac encounters a problem, the red indicator on RoboVac will flash and you will hear the relevant voice prompts.
The voice prompts below are only for reference and may be changed after voice pack updates. Please follow the voice prompts you have heard to find the cause and solution below.
| Voice Prompt | Cause and Solution |
| Error 1: Front bumper stuck. | Front bumper is stuck. Tap it repeatedly to remove any dust, if not, then move the device to a new position and try again. |
Error 2: Wheel stuck. Check the wheel and move it to a new position. |
Wheel may be stuck or trapped. Clear any obstacles in the surrounding area and check the wheel for any trapped dust. Move the device to a new position and try again. |
| Error 4: Rolling brush stuck. Remove and clean the rolling brush. | Remove the rolling brush, roller joint, roller brush cover, and suction inlet to clean it. Once cleaned, place the items back into the device and try again. |
Error 5: Device trapped. Clear the surrounding area. |
Device is trapped. Clear any obstacles in the surrounding area and try again. |
| Error 6: Device trapped. Place device near the position where the problem occurred. |
Device may be suspended in air. Move it to a new position close to the original position and try again. If the device is still unable to start, clean the edge sensor and try again. |
Error 7: Wheel suspended. Please move the device to a new position. |
Wheels may be suspended in air. Move the device to a flat surface and a new position close to the original position then try again. |
| Error 8: Low battery, shutting down device. Please charge your device. |
Low Battery; system will shut down. Charge the device and try again. |
| Error 9: Magnetic Boundary Strip detected. Move device to a different area. |
Device is too close to a strong magnetic field or strip. Move the device to a different area and try again. |
| Error 21: Auto-empty station blocked by surrounding obstacles. |
Auto-empty station is blocked by obstacles, clear any obstacles around the auto-empty station and try again. |
Error S1: Battery Error. Refer to Owner's Manual or App for help. | • Open the battery compartment and check whether the battery is connected and restart the device. • Battery Temperature may be too high or low; wait until the battery falls to normal temperatures before usage (0°C ~ 40°C / 32°F ~ 104°F). • If the issue persists, contact customer support for help. |
| Error S2: Wheel Module Error. Refer to Owner's Manual or App for help. | • Check whether the wheels are stuck or dust is trapped inside before restarting the device. • If the issue persists, contact customer support for help. |
| Error S3: Side Brush Error. Refer to Owner's Manual or App for help. | • Check whether the side brush is stuck in an unknown object before restarting the device. • If the issue persists, contact customer support for help. |
| Error S4: Suction Fan Error. Refer to Owner's Manual or App for help. | • Check whether the fan blades are stuck in an unknown object before restarting the device. • Clean the dust box and filters before restarting the device. • If the issue persists, contact customer support for help. |
| Error S5: Rolling Brush Error. Refer to Owner's Manual or App for help. | • Remove and clean the roller brush, roller brush connection, roller brush cover and suction inlet before restarting the device. • If the issue persists, contact customer support for help. |
| Error S8: Path Tracking Sensor Error. Refer to Owner's Manual or App for help. | • Check and clean the path tracking sensor for unknown objects before restarting the device. • If the issue persists, contact customer support for help. |
Error 54: Please install the dust bag. |
• Check if the dust bag is missing or installed incorrectly. |
| Error 66: Auto-empty station input voltage error, please check. | • Check if the input voltage of your region is consistent with the information printed at the bottom of the auto- empty station. If not, contact customer support for help. |
Pros & Cons
Pros:
- Powerful Suction: The 2000Pa suction power effectively cleans various types of flooring.
- Long Battery Life: Up to 100 minutes of continuous cleaning time.
- Wi-Fi Connectivity: Remote control and scheduling through the EufyHome app.
- Compact Design: Easily navigates under furniture and tight spaces.
- Affordable Price: Offers great value for its price range.
Cons:
- No Mopping Functionality: Unlike some other models, it does not include a mopping feature.
- No Advanced Mapping: While it has navigation capabilities, it lacks advanced mapping features found in more expensive models.
- Large Debris Issues: May struggle with very large debris or high piles of mess.
- Some Connectivity Issues: Some users report occasional issues connecting to the app or maintaining a stable connection.
Customer Reviews
Customers generally praise the eufy Robot Vacuum Cleaner G40+ for its ease of use, quiet operation, and effective cleaning performance. Many appreciate its affordability and the convenience of remote control via the app. However, some users note that it can struggle with very large debris and that occasional connectivity issues may arise.
A common complaint is the lack of advanced mapping features, which can lead to less efficient cleaning in larger spaces. Despite these minor drawbacks, the G40+ remains a popular choice among those seeking a reliable and affordable robot vacuum.
Faqs
How long does the Vacuum Cleaner take to fully charge?
Can I control the eufy G40+ with voice commands?
Is the eufy G40+ suitable for pet owners?
How often should I clean the filters of the eufy?
Is the eufy G40+ compatible with different types of flooring?
What is the noise level of the Robot Vacuum Cleaner?
Can I schedule cleanings in advance with the Vacuum Cleaner?
What happens if the eufy runs out of battery during cleaning?
Is there a warranty available for the Eufy Robot Vacuum Cleaner G40+?
Leave a Comment

