How to Use: Evenflo Car seat All4One DLX User Manual
Content
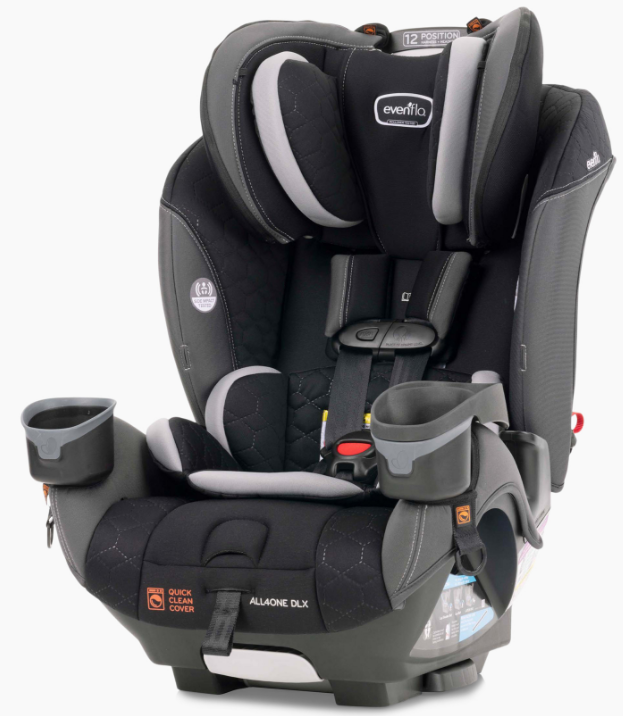
Introducing the Evenflo Car Seat All4One DLX
The Evenflo Car Seat All4One DLX is a multipurpose car seat that offers comfort and safety from infancy to toddlerhood. It is covered in this tutorial. It guarantees a safe and enjoyable ride every time with its cutting-edge safety technology, simple installation, and changeable comfort settings that grow with your child.
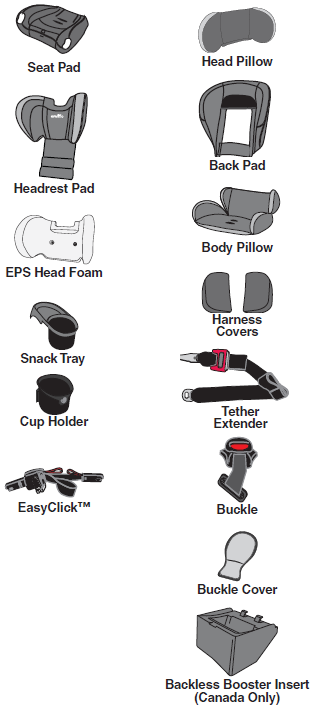
Replacement Parts
To order replacement parts you can order online at www.evenflo.com or contact Evenflo. When you contact us, please have the product model number and date of manufacture (found on the back of the child restraint). Not available on all models. Styles may vary.
Detailed Specifications
The Evenflo Car Seat All4One DLX has many key features that make it a great choice for parents. It has a 5-point harness system that can be adjusted to fit children of different sizes. The car seat also has multiple recline positions, allowing for a comfortable ride for your child. The seat cushion is removable and machine washable for easy cleaning. The car seat also has integrated cup holders and a removable head pillow. The dimensions of the car seat are 22 x 20 x 28 inches and it weighs 18.3 pounds.
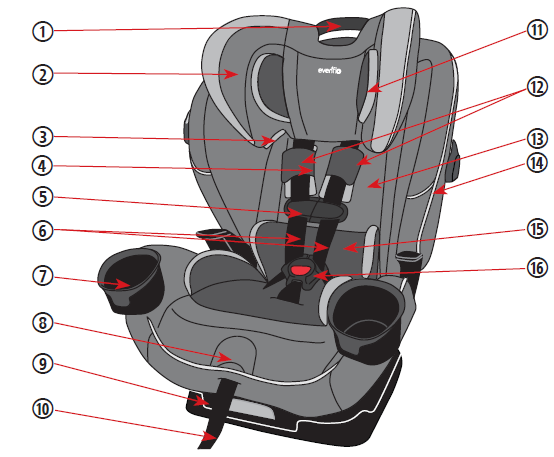
Child Restraint Features
Front
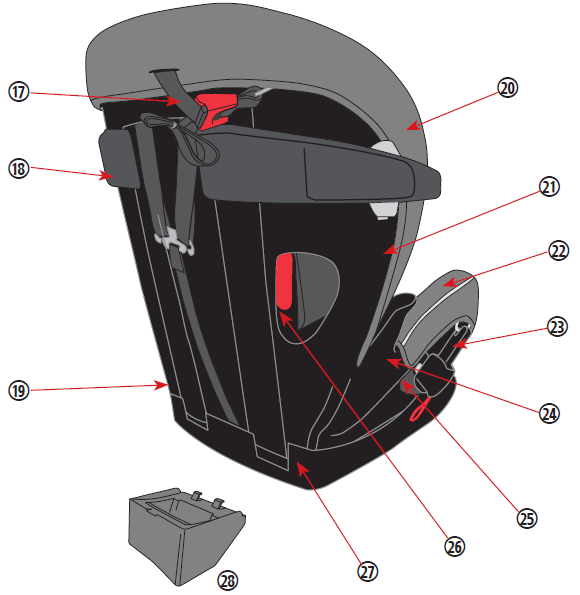
Back
Description
- Headrest Adjustment Handle
- Adjustable Headrest
- Shoulder Belt Guide
- Instruction Manual Storage (see pg. 81)
- Chest Clip
- Harness Straps
- Cup Holders (both sides of seat) with Cup Holder Screws
- Harness Release Button (under flap)
- Recline Handle (under front edge of seat)
- Harness Adjust Strap
- Head Pillow
- Harness Covers
- Headrest Pad
- Buckle Tongue Pocket (both sides of seat)*
- Body Pillow
- Buckle and Strap
- Tether Strap and Hook (shown fastened to storage clip)
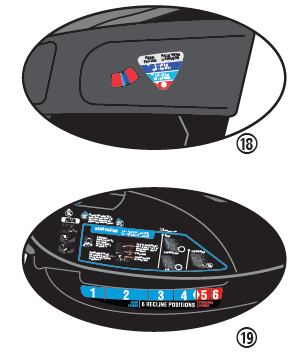
- Level Indicator
- Recline Indicator
- Back Pad
- LATCH/UAS Storage (right side of seat)
- Seat Pad
- Lower Anchor (UAS) Connector Assembly
- No-Back Booster
- Rear-facing Lock-off
- Forward-facing Lock-off
- Seat Base
- Backless Booster Insert
Cup Holders
IMPORTANT: Cup holders MUST be installed before use of this Child Restraint and MUST remain attached to the restraint at all times.
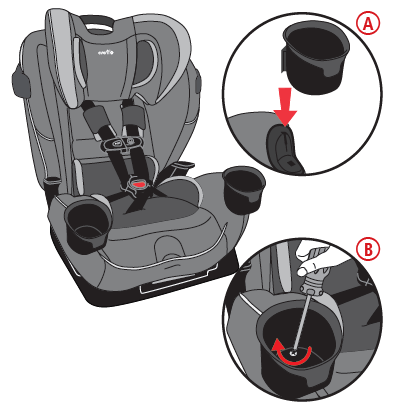
- Snap each cup holder onto seat and press down to secure A.
CANADA ONLY: Insert screw (provided) through recess in base of cup holder B. Screw in but do not overtighten. - Pull up vertically to ensure proper installation.
- Cup holders are removable and are top rack dishwasher safe. Remove screw (if used), tilt cup holder slightly forward at base, then pull up to release from seat.
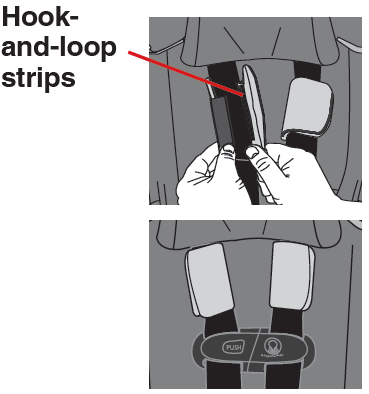
Harness Covers*
- Install Harness Covers above Chest Clip. Harness covers are optional for added comfort. Wrap Harness Covers around harness straps and attach hook-and-loop strips as shown.
Always check that the harness covers DO NOT bunch up when tightening the harness.
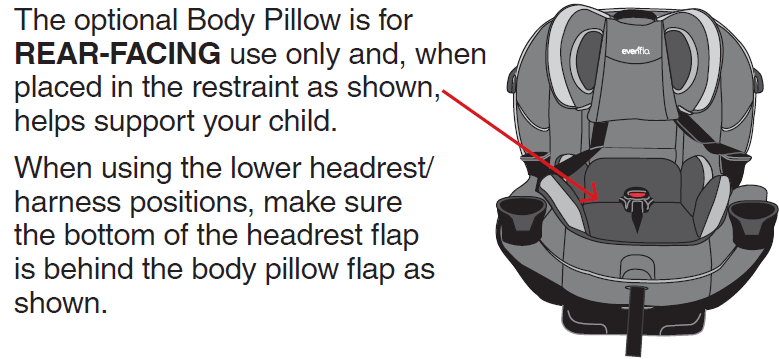
Body Pillow
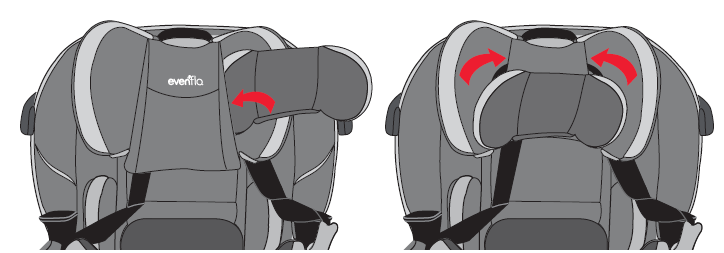
Head Pillow

The optional head pillow is for REAR-FACING use only. The head pillow helps support your child's head. Your head pillow may be one of two different styles.
To install:
- Slide head pillow into sleeve on headrest as shown.
Insert tabs on head pillow into slots on headrest and attach hook-and-loop fasteners to back of headrest.
IMPORTANT: Infants may have difficulty breathing when in an upright seated position. Using additional padding or pillows other than the Head Pillow behind the infant’s head or failing to properly recline the child restraint could increase the child’s risk of serious injury or death.
Not all features are available on all models. Styles may vary.
Child Restraint Features
Lower Anchor Connector (UAS)
Which Type of Lower Anchor Connector Is on Your Child Restraint?
Your child restraint will have the EasyClick Lower Anchor Connector (shown below).
_evenflo_car_seat_all4one_dlx.png)
- Use the instructions on the following pages to properly install the Lower Anchor Connector Assembly on your child restraint.
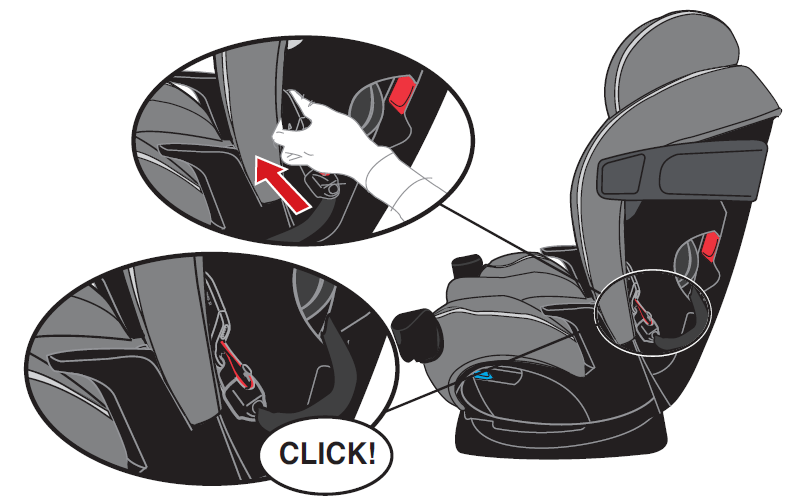
Remove Lower Anchor (UAS) Connectors
To remove the lower anchor (UAS) connector from its storage location, pull the red Release Strap.
_connectors_evenflo_car_seat_all4one_dlx.png)
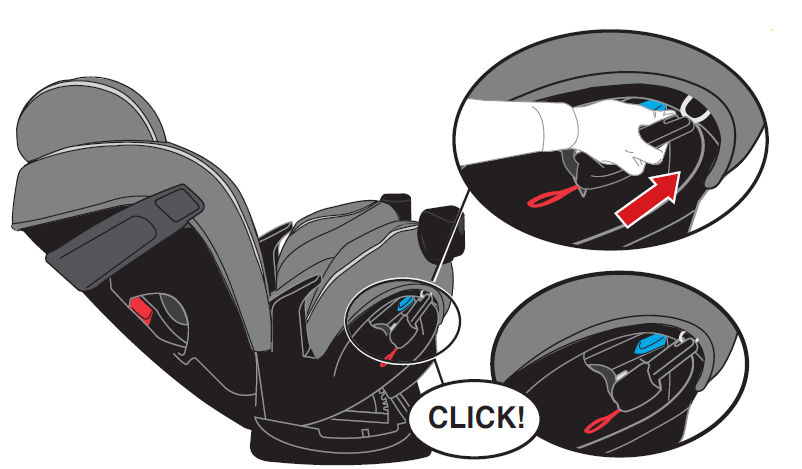
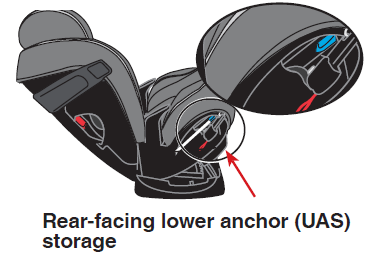
Store Lower Anchor (UAS) Connectors
To store the lower anchor (UAS) connector, push UNTIL it clicks into position as shown below:
Rear-Facing
Forward-Facing
Detailed Description
The Evenflo Car Seat All4One DLX is a 3-in-1 car seat that can be used as a rear-facing car seat, a forward-facing car seat, and a booster seat. This means that you can use this car seat from the time your child is a newborn until they no longer need a car seat. The car seat has a maximum weight limit of 120 pounds, making it a great choice for growing families. The car seat is also equipped with Evenflo's SureSafe installation system, which makes it easy to install and ensures a secure fit in your vehicle. The car seat has also side impact tested and meets or exceeds all federal safety standards.
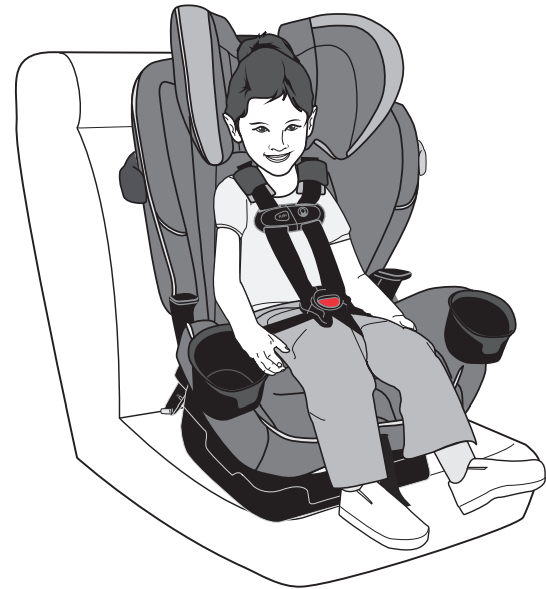
Using the Child Restraint Forward-facing with Harness
Child Requirements
- Weight: 10 - 29.5 kg (22 - 65 lbs)
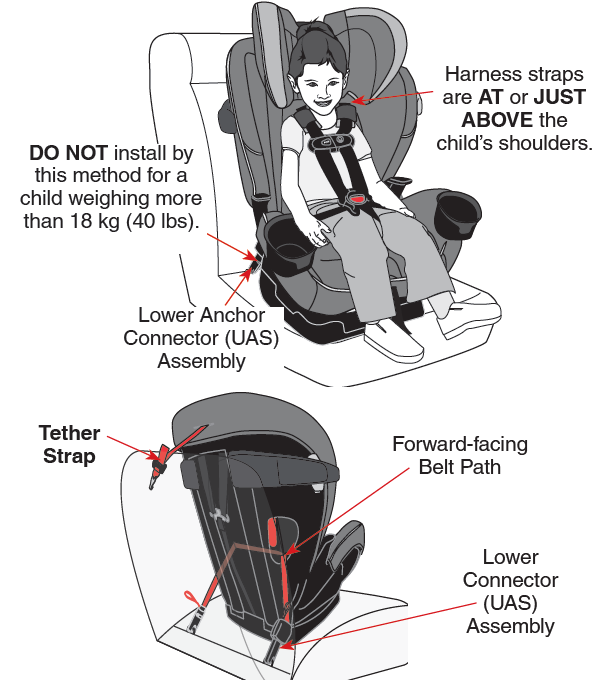
- Height: 71 - 124 cm (28 - 49 in.) and tops of child’s ears are at or below the top of the child restraint headrest.
- Age: At least 2 years old
IMPORTANT: ALWAYS USE THE TOP ANCHORAGE (TETHER) STRAP FORWARD-FACING..
IMPORTANT: Once your child exceeds any of the size requirements for forward-facing with harness use above, and is at least 4 years old, you MUST discontinue use of this child restraint with its internal harness and begin using it in booster mode.
Forward-facing Installation with Lower Anchor (UAS) Connectors
Moving Lower Anchor Connector Assembly to Forward-facing Belt path
To access the Lower Anchor Connector Assembly, you will first need to remove the Lower Anchor Connectors from their storage location.
(Illustrations below show pad off for clarity only)
To install this child restraint properly in the forward-facing position, the Lower Anchor Connector (UAS) Assembly MUST be in the forward-facing belt path.
If the Lower Anchor Connector strap is in the rear-facing belt path, follow these steps:
- Raise the headrest to its highest level.
- Lift the headrest pad up and out of the way.
- Remove the seat pad from the seat.
- Pull the Lower Anchor Connector strap to the center of the seat.
- Route the Lower Anchor Connector strap out through the forward-facing belt path.
Replace the seat pad.
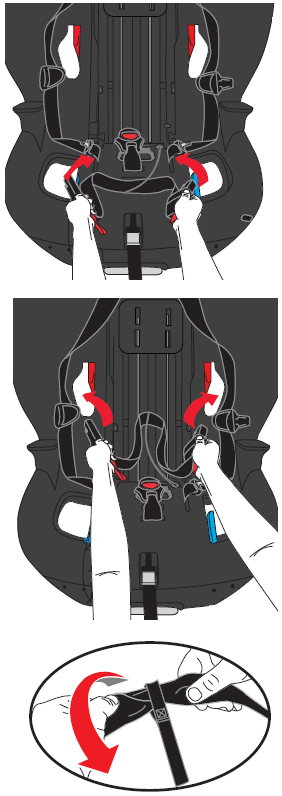
IMPORTANT: Make sure the Lower Anchor Connector strap does not interfere with the internal harness straps.
NOTE: After moving the Lower Anchor Connector strap, make sure the strap lies flat against the seat shell. You may have to twist the strap to achieve this.
Forward-facing Installation with Lower Anchor (UAS) Connectors
DO NOT install by this method for a child weighing more than 18 kg (40 lbs).
Infants who weigh less than 10 kg (22 lbs) MUST always be rear-facing.
- Remove Lower Anchor Connectors from storage location (pg. 24). MAKE SURE Lower Anchor strap is in forward-facing belt path.
Lift up on the recline handle as shown and adjust the seat to the fullyupright position (Position 6).
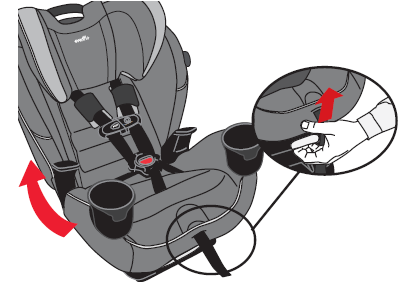
NOTE: Only use recline Position 5 for children weighing more than 18 kg (40 lbs).- Place child restraint in your vehicle forward-facing, as shown. Always make sure the bottom of the child restraint sits flat on the vehicle seat.
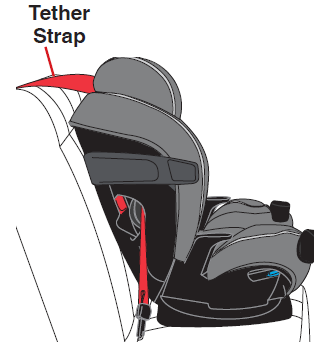
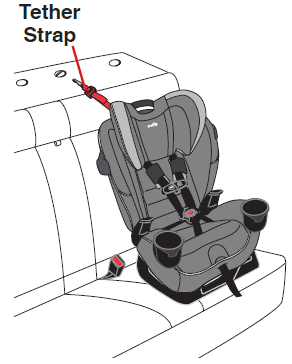
- Unhook tether strap from the rear of the child restraint and place tether hook with red adjuster over back of vehicle seat.
Ensure child restraint is secure using the lower anchor connectors.
Forward-facing Installation with Lower Anchor (UAS) Connectors
Securing the Restraint with EasyClick
Attach lower anchor (UAS) connectors to the vehicle lower anchor bars until they lock onto the bars on bothsides of the seat.

IMPORTANT: Make sure both lower anchor connectors are facing upward and the straps are not twisted.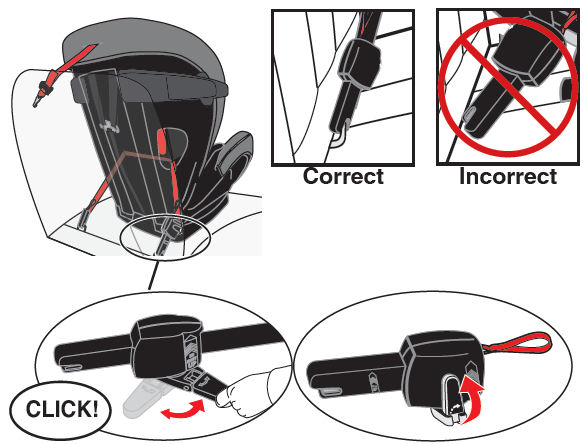
- Tighten the strap by moving the handle back and forth on the lower anchor connector as shown until the seat is tight.
Forward-facing Installation with Lower Anchor (UAS) Connectors
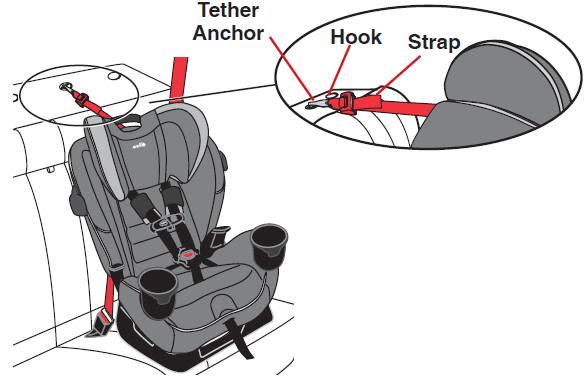
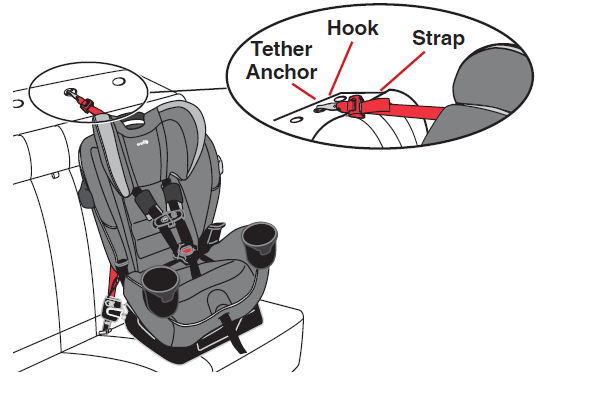
Attaching the Tether Strap
WARNING! DEAINJURTH or SERIOUSY can occur.
- Failure to follow these instructions could result in serious injury to your child or other vehicle occupants.
- The tether strap is for forward-facing use only. The tether is not used in rear-facing mode. Attach the tether hook to the storage clip on the seat in rear-facing mode only. This will keep an unused tether or tether hook from hitting someone during a crash.
- After adjusting the tether strap, you may have excess strap; DO NOT cut it off. If you do, it may not be long enough to use in another vehicle. Instead, tightly roll up the excess tether strap and place the rubber band around the bundle.
- To avoid a strangulation hazard, you MUST tightly roll or fold excess tether strap and secure with the strap/rubber band.
NOTE: Refer to your vehicle owner’s manual for the location of the tether anchor in your vehicle. Older vehicles may not come equipped with tether anchor hardware. Check with your vehicle dealer. - If your Tether Strap is too short to reach from your child restraint to your Tether Anchor, you will need a Tether Extender. Please call Parentlink at 1-800-233-5921 (U.S.), 1-937-773-3971 (Canada), or 800-706-1200 (Mexico).
Connect the tether hook to the vehicle tether anchor behind the vehicle seat, as shown. (Please consult your vehicle owner’s manual, as tether anchor locations may vary.) Pull the strap and tighten the tether securely.
Forward-facing Installation with Vehicle Seat Belts
IMPORTANT
- Before installing this child restraint forward-facing with the vehicle seat belt, you MUST move the Lower Anchor Connector (UAS) Assembly to the rear-facing belt path so that it does not interfere with the vehicle seat belt. Refer to pg. 27 for instructions on moving the Lower Anchor Connector Assembly (UAS) to the rear-facing belt path.
- Check your vehicle owner’s manual to determine how to lock your seat belt for child restraint installation. If vehicle seat belt is not lockable see pg. 13 for installation of locking clip.
- ALWAYS USE tether strap forward-facing.
Reroute the lower anchor connector strap through the rear-facing belt path (pg. 27). Store the lower anchor connector (UAS) in the rear-facing belt path as shown.
Lift up on the recline handle as shown and adjust the seat recline to one of the upright positions.
NOTE: Only use recline Position 5 for children weighing more than 18 kg (40 lbs).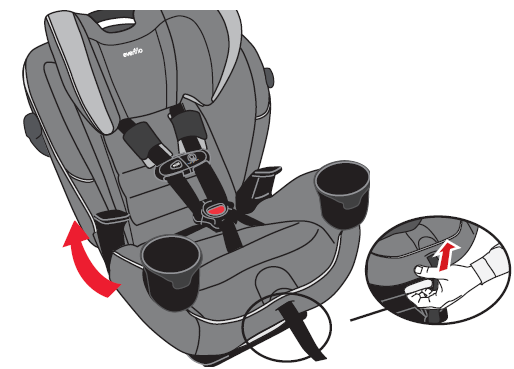
Unhook tether strap from the rear of the child restraint and place tether hook with red adjuster (pg. 68) over back of vehicle seat.
- Place child restraint in your vehicle forward-facing, as shown. Always make sure the bottom of the child restraint sits flat on the vehicle seat while the vehicle is on level ground..
- Ensure child restraint is secure.
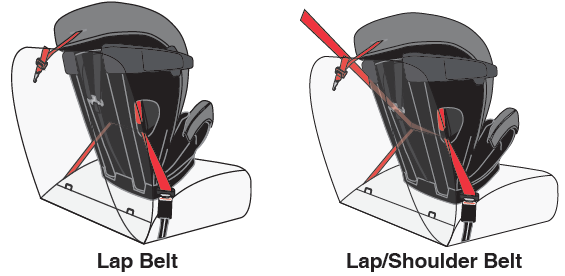
- For Forward-Facing Installation with Lap Belt.
- For Forward-Facing Installation with Lap/Shoulder Belt.
Forward-facing Installation with Vehicle Seat Belts
Forward-facing with Lap Belt Only
- Raise the headrest to its highest position, then lift the headrest pad away from the child restraint for easier access. Route the lap belt through the forward-facing belt path and continue through the opposite opening of the child restraint. Fasten the buckle.
IMPORTANT: Make sure the lap belt lies flat without twisting. DO NOT use the lock-off with a lap belt-only installation.
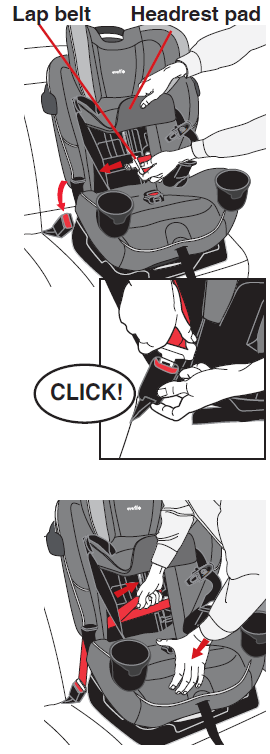
- The vehicle seat belt must be as tight as possible. Using your full weight, push the child restraint firmly into the vehicle seat as you tighten the vehicle seat belt, as shown. Lower the headrest pad.
- Test for tightness. Make certain the belt is tight and locked. If you can move the child restraint more than 2.5 cm (1 in.) side to side or front to back at the rear-facing belt path, the vehicle belt is not tight enough. If you have not tightly secured the child restraint, try again, move it to another location, or install it with the lower anchor connector assembly..
- Recheck that the child restraint is in the proper recline zone for the weight of the child.
Forward-facing Installation with Vehicle Seat Belts
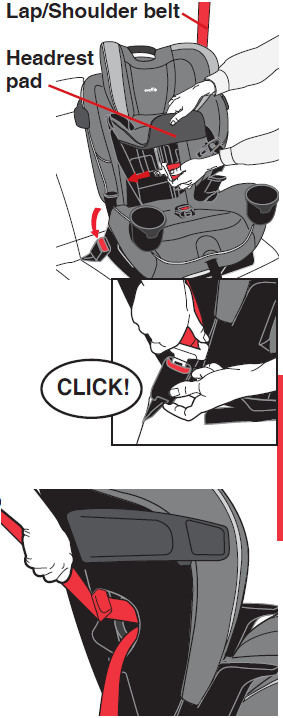
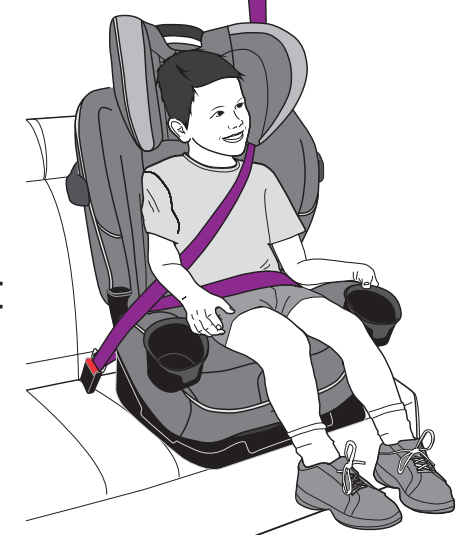
Forward-facing with Lap/Shoulder Belt
- Raise headrest to its highest position (pg. 62), then lift headrest pad away from child restraint for easier access. Route the lap/shoulder belt through the forward-facing belt path and continue through the opposite opening of the child restraint. Fasten the buckle.
IMPORTANT: Make sure the lap/shoulder belt lies flat without twisting. - The vehicle seat belt must be as tight as possible. Using your full weight, push the child restraint firmly into the vehicle seat as you tighten the vehicle seat belt. Lower the headrest pad.
- Insert the shoulder belt into the forward-facing lock-off on the side of the restraint opposite the seat belt buckle. The shoulder belt MUST be routed through the lock-off. If vehicle seat belt is not lockable see pg. 13 for installation of locking clip.
- Test for tightness. Make certain the belt is tight and locked. If you can move the child restraint more than 2.5 cm (1 in.) side to side or front to back at the rear-facing belt path, the vehicle belt is not tight enough. If you have not tightly secured the child restraint, try again, move
it to another location, or install with the lower anchor connector assembly. Recheck that the child restraint is in the proper recline zone for the weight of the child and continue with “Attaching the Tether Strap”
Forward-facing Installation with Vehicle Seat Belts
Attaching the Tether Strap
WARNING! DEAINJURTH or SERIOUSY can occur.
- Failure to follow these instructions could result in serious injury to your child or other vehicle occupants.
The tether strap is for forward-facing use only. The tether is not used in rear-facing mode. Attach the tether hook to the storage clip on the seat in rear-facing mode only. This will keep an unused tether or tether hook from hitting someone during a crash.
- After adjusting the tether strap, you may have excess strap; DO NOT cut it off. If you do, it may not be long enough to use in another vehicle. Instead, tightly roll up the excess tether strap and place the rubber band around the bundle.
- To avoid a strangulation hazard, you MUST tightly roll or fold excess tether strap and secure with the strap/rubber band.
NOTE: Refer to your vehicle owner’s manual for the location of the tether anchor in your vehicle. Older vehicles may not come equipped with tether anchor hardware. Check with your vehicle dealer. - If your Tether Strap is too short to reach from your child restraint to your Tether Anchor, you will need a Tether Extender. Please call Parentlink at 1-800-233-5921 (U.S.) or 1-937-773-3971 (Canada), or 800-706-1200 (Mexico).
Forward-facing Installation with Vehicle Seat Belts
Attaching the Tether Strap
Connect the tether hook to the vehicle tether anchor behind the vehicle seat, as shown. (Please consult your vehicle owner’s manual, as tether anchor locations may vary.) Pull the strap and tighten the tether securely.
Setup Guide
Setting up the Evenflo Car Seat All4One DLX is easy.
- First, you will need to choose a location in your vehicle to install the car seat.
- It is recommended to install the car seat in the back seat of your vehicle.
- Once you have chosen a location, you can use the SureSafe installation system to secure the car seat in place. The system includes a built-in level to ensure that the car seat is installed at the correct angle.
- After the car seat is installed, you can adjust the harness to fit your child's size. The car seat also includes a manual with detailed instructions on how to use and install the car seat.
Safety Instructions
Child Requirements
WARNING: Failure to follow these Child Requirements could result in serious injury or death.
This child restraint is designed for use by children in both rear-facing and forward-facing orientations. To use this child restraint properly, children MUST meet the size and age requirements below. In addition, Evenflo recommends consulting with your child’s physician before allowing your child to transition from rear-facing to forward-facing use of this child restraint.
The American Academy of Pediatrics (AAP) recommends keeping children rear-facing for as long as possible, until they reach the maximum height or weight for their Car Seat in rear-facing orientation.* Additionally, some states’ laws require children to be rear-facing until age 2. Accordingly, you will see this guidance reflected in the Child Requirements on the following pages. Please review any applicable local, state or provincial laws related to child passenger safety before installing and using this Car Seat.
Pediatrics. 2018;142(4):e20182460
Rear-facing
- 1.8 - 18 kg (4 - 40 lbs)
- 43 - 102 cm (17 - 40 in.)
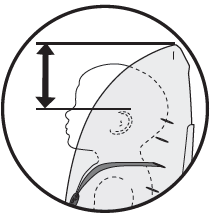
- Top of the child’s head is at least 2.5 cm (1 in.) or more below the top of the child restraint headrest
IMPORTANT: Once your child exceeds any of the size requirements above, they MUST use this child restraint in the forward-facing orientation, if possible. If your child exceeds any of the size requirements above and is less than 2 years old, however, you MUST discontinue use of this child restraint.
DO NOT use this or any other child restraint for a premature newborn before having consulted your doctor (see pg. 6). Premature babies may have difficulty breathing when in a sitting position.
Forward-facing with Harness
- 10 - 29.5 kg (22 - 65 lbs
- 71 - 124 cm (28 - 49 in.)
- Tops of the child’s ears are at or below the top of the child restraint headrest
- At least 2 years old
IMPORTANT: Once your child exceeds any of the size requirements for forward-facing use above, you MUST discontinue use of this child restraint with its internal harness and begin using it in booster mode, if possible. If your child exceeds any of the size requirements for forward-facing use above and is less than 4 years old, however, you MUST discontinue use of this child restraint.
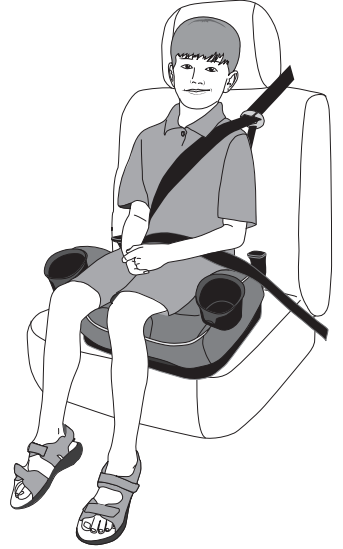
Booster Mode
- 18 - 54.4 kg (40 - 120 lbs)
- 112 - 145 cm (44 - 57 in.)
- Tops of the child’s ears are at or below the top of the booster seat headrest (high-back mode) or vehicle seat headrest (backless mode)
- At least 4 years old
IMPORTANT: Once your child exceeds any of the size requirements above for booster mode, you MUST discontinue use of this seat. Your child may be ready for use of the vehicle belt system only at this time.
Premature Infant Use
Before using this child restraint for preterm or low birth weight infants, ensure the Child Requirements are met and follow the guidelines in this section. According to NHTSA, a properly installed Child Restraint reduces the risk of death by over 70% for infants involved in crashes. Federal Motor Vehicle Safety Standard (FMVSS) 213 establishes design and dynamic performance requirements for Child Restraint systems. However, the standard has no minimum weight limit and does not address the special medical needs of preterm or low-birth weight infants. To ensure that preterm and low-birth weight infants are transported safely, the guidelines published by the American Academy of Pediatrics (AAP) in Pediatrics 2009; 123:1424–1429 (reaffirmed June 2018)must be followed.
Preterm and low-birth weight infants are at additional risk of breathing difficulties and heart problems when placed in a Child Restraint. Evenflo requires that the evaluation recommended by the AAP be conducted for all infants born earlier than 37 weeks and all newborn infants who weigh less than 2.26 kg (5 lbs) at birth before their first car trip to check for breathing difficulties or heart rate problems when traveling in a rear-facing Child Restraint. Newborn infants should NEVER travel in a forward-facing Child Restraint.
The AAP recommends that appropriate hospital staff observe your infant in the Child Restraint for a period of 90 - 120 minutes or the duration of travel, whichever is longer. This period of observation must be performed with the infant properly positioned as described in these instructions and with the Child Restraint placed at an angle that is approved for use in the vehicle. The hospital staff will check for any breathing difficulties or heart rate problems. Your child’s pediatrician will let you know if there are any special considerations for travel.
The number of trips and the duration of time the infant is seated in the Child Restraint should be minimized. A caregiver should ride in the back seat to monitor the infant during travel. You can learn more about the AAP’s recommendations for observation of newborns and the guidelines for safe transportation of preterm and low-birth weight infants, as well as other resources for parents and medical professionals, at https://www.healthychildren.org/english/safety-prevention/on-the-go/Pages/default.aspx
WARNING! DEAINJURTH or SERIOUSY can occur.
Airbag Warnings
WARNING: DO NOT place rear-facing child seat on front seat with air bag. DEATH OR SERIOUS INJURY CAN OCCUR. The back seat is the safest place for children 12 and under.
DO NOT use this child restraint in the front seat of a vehicle equipped with an air bag, unless the air bag has been deactivated. Interaction between a rear-facing restraint and air bags may cause serious injury or death. Air bags may cause serious injury or death to children 12 years of age and under. If your vehicle has an air bag, refer to your vehicle owner’s manual for child restraint installation.
- DO NOT place any objects between the restraint and the side air bag, as an expanding air bag may cause the items to strike your child.
- If the rear seat of your vehicle is equipped with side air bags, refer to the following information for proper usage:
- Vehicles built prior to the 2002 model year:
DO NOT use this restraint in a vehicle seating position equipped with a side air bag unless authorized by the vehicle manufacturer. - Model year 2002 and newer vehicles:
Refer to your vehicle owner’s manual before placing this restraint in a seating position equipped with a side air bag.
- Vehicles built prior to the 2002 model year:
The forward-facing back seat is the safest place for children 12 and under.
Care and Cleaning
- DO NOT lubricate or immerse in water the LATCH/UAS connectors, the buckle, or any other part of this child restraint, unless rinsing is permitted, as stated on the back of the buckle for your restraint.
- Plastic and metal parts may be wiped clean with mild soap and water and dried with a soft cloth. Do not use abrasive cleaners or solvents.
- Take care not to damage any labels.
- The harness can be wiped clean with mild soap and water. Allow harness to air dry.
- Machine wash soft goods separately in cold water, delicate cycle, NO CHLORINE BLEACH. Tumble dry 10 - 15 minutes on low heat. Remove immediately. Soft goods include seat pad, headrest pad, back pad, head pillow, body pillow, harness cover, and buckle cover.*
- NEVER use child restraint without the seat pad.
- To protect the child restraint from damage caused by weather, rodents, and other elements common to garages, the outdoors, and other storage locations, remove the seat pad and thoroughly clean the restraint and pad prior to storage. Take care to clean in the areas where crumbs and other debris tend to accumulate.
Troubleshooting
- If you are having trouble installing the Evenflo Car Seat All4One DLX, you can check the manual or contact Evenflo's customer service for assistance.
- Some common problems include the car seat not being installed at the correct angle or the harness not being adjusted properly.
- It is important to make sure that the car seat is installed correctly to ensure the safety of your child. It is also important to regularly check the car seat for any damage or wear and tear.
- If you notice any damage, you should stop using the car seat and contact Evenflo's customer service.
Limited Warranty
For a period of 90 days from the original purchase of this Product, Evenflo warrants to the original end-user (“Purchaser”) this Product (including any accessories) against defects in material or workmanship. Evenflo’s sole obligation under this express limited warranty shall be, at Evenflo’s option, to repair or replace any Product that is determined to be defective by Evenflo and determined to be covered by this warranty.
Evenflo Car Seat All4One DLX Pros & Cons
Pros
- Versatile: can be used as a rear-facing, forward-facing and booster seat
- Easy to install: with SureSafe installation system
- Side impact tested: meets or exceeds federal safety standards
Cons
- Price: on the higher end of the price range
- Weight: heavier than some other car seats on the market
Customer Reviews
The Evenflo Car Seat All4One DLX has received many positive reviews from parents. They praise the car seat for its versatility, ease of use, and safety features. However, some parents have mentioned that the car seat is on the heavier side and the price is on the higher end. But, overall, parents are happy with their purchase and feel that the car seat is a great investment for their family.
Faqs
What is the weight limit for the All4One DLX?
Is the Evenflo Car Seat All4One DLX side impact tested?
Can the car seat cushion be removed for cleaning?
What is the weight of the Evenflo?
What are the dimensions of the Evenflo Car Seat?
Leave a Comment