Evenflo Child Restraint System LiteMax 35 Owners Manual | Installation
Content
Evenflo Child Restraint System LiteMax 35 Introduction
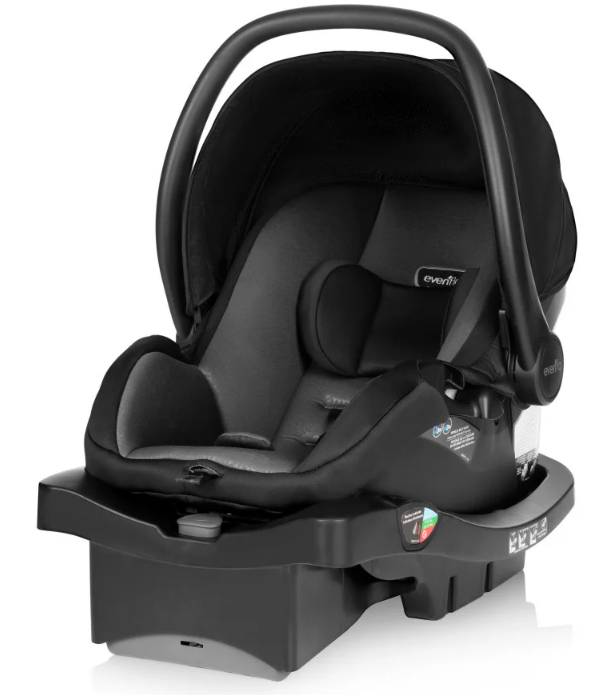
The Evenflo Child Restraint System LiteMax 35 is a lightweight and user-friendly infant car seat designed for infants weighing between 4 to 35 pounds. Its ergonomic handle and easy installation make it a convenient choice for parents on the go. The seat features a 5-point harness system and multiple reclining positions to ensure maximum comfort and safety for your child. Priced at $125.49, the LiteMax 35 combines practicality with advanced safety features to support parents and their little ones.
Replacement Parts
Not available on all models. Styles may vary.
To order replacement parts you can order online at https://www.evenflo.com or contact Evenflo. When you contact us, please have the product model number and date of manufacture (found on the back of the child restraint).
Detailed Specifications
The Evenflo LiteMax 35 comes packed with several key features that set it apart from other infant car seats:
- Weight Range: 4-35 pounds
- Height Range: 19 inches
- Installation Methods: Base installation with InRight LATCH or vehicle seat belt
- Material: Durable, washable fabric
- Additional Features: Machine washable pad, adjustable canopy, and ergonomic handle
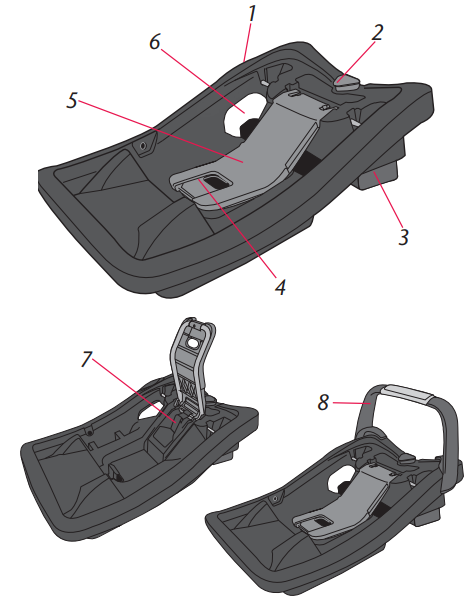
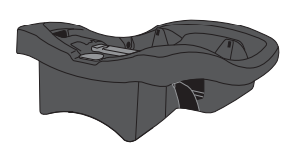
Base Features
LiteMax Convenience Base with One-Step Lock-Off
- Angle Indicator
- Level Adjustment Knob
(Not available on all models) - Leveling Foot
- Lock-Off Release Tab
- One Step Lock-Off
- Vehicle Seat Belt/Lower Anchor Connector Assembly Belt Path
- Vehicle Belt Clip
(Not available on all models) - Anti-Rebound Bar
(Not available on all models)
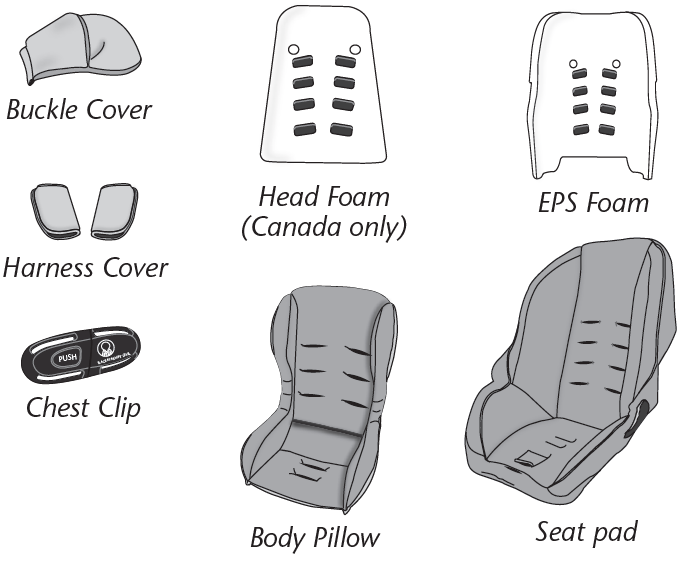
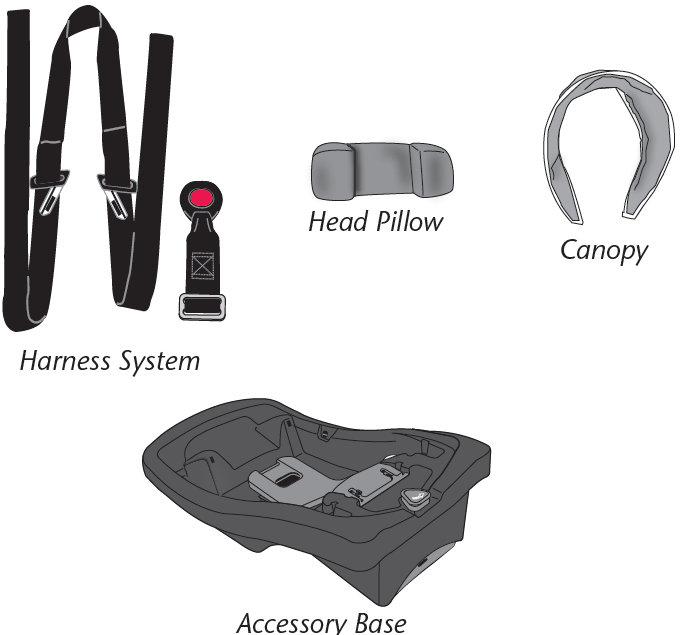
Child Seat Features
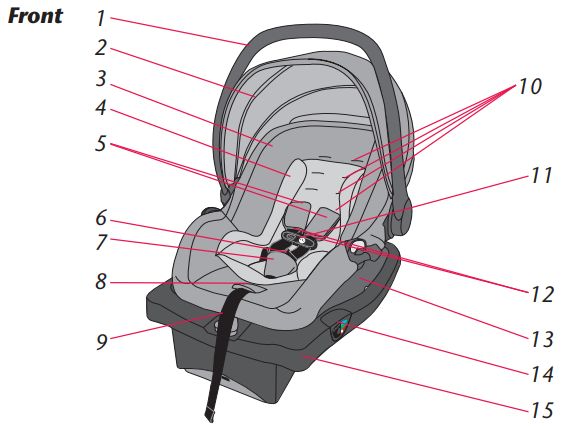
- Handle*
- Canopy*
- Seat Pad
- Body Pillow*
- Harness Covers*
- Crotch Buckle
- Crotch Buckle Cover*
- Harness Release Button
- Harness Adjuster Strap
- Harness Slots
- Chest Clip
- Harness Straps
- Carrier
- Level Indicator
- Convenience Base
- Handle Release
- Harness Straps
- Splitter Plate
- Carrier Release Handle
- Harness Slots
- Crotch Strap Anchor
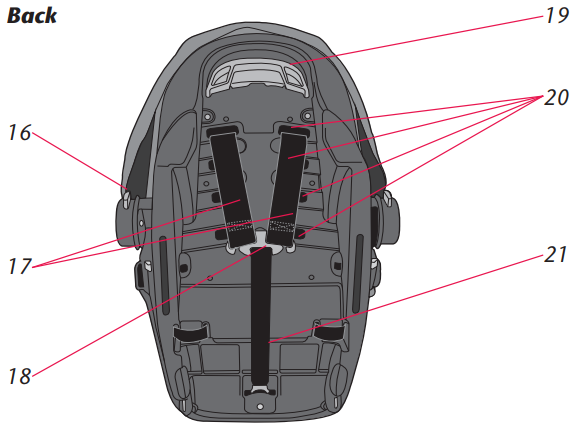
Not all features are available on all models. Styles may vary.
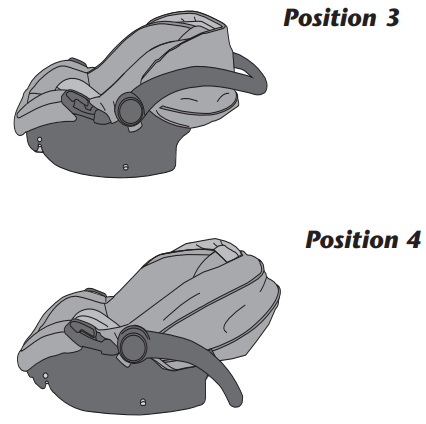
Using the Handle
To change handle positions, squeeze both Handle Releases and rotate the handle to the desired position until it locks into place.
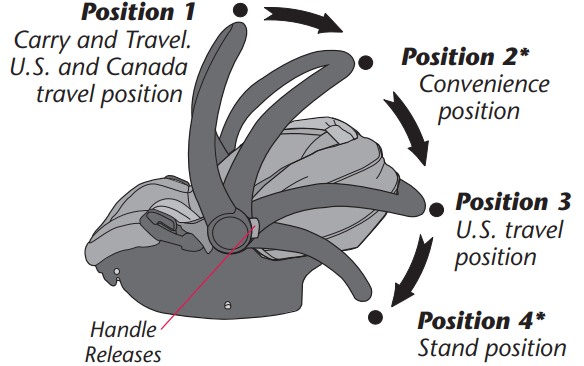
IMPORTANT: NEVER use Positions 2 or 4 when traveling in a vehicle. U.S. and Canadian models differ in acceptable handle positions for travel.
IMPORTANT: Always secure the child in the carrier.
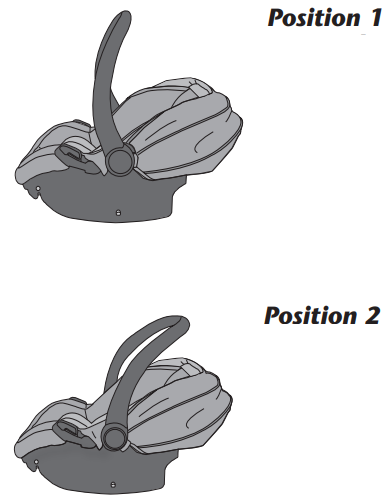
Position 1 (Carry and Travel – U.S. and Canada)
This position is to be used to carry your child. For Canadian models, you MUST place the handle in this position when traveling in a vehicle.
Position 2 (Convenience)
NEVER use this position to carry your child in the carrier. NEVER use this position in the vehicle.
Position 3 (Travel – U.S.)
For U.S. models, you may place the handle in this position while traveling in a vehicle.
Position 4 (Stand)
Place the handle in this position when you set the carrier on the floor. NEVER use this position in a vehicle.
Proper Installation WITH the Convenience Base
Child Requirements
- Weight: 1.8 – 15.8 kg (4 – 35 lbs)
- Height: 43 – 81 cm (17 – 32 in.) and top of child’s head is at least 25 mm (1 in.) below the top of the child restraint seat back.

IMPORTANT: Once your child exceeds any of the size requirements above, they MUST discontinue use of this child restraint..
Description
The Evenflo LiteMax 35 boasts a robust and ergonomic design tailored for infant safety. The car seat features an adjustable canopy to protect your child from harsh sunlight and a machine washable pad for easy cleaning. The ergonomic handle ensures comfortable carrying, while the InRight LATCH system makes installation a breeze. Additionally, the seat includes multiple recline positions to ensure your baby's comfort during travel.
Installation Checklist
- Secure convenience base to the vehicle seat.
- The convenience base is securely installed with lower anchor connector assembly (shown).
- The convenience base is securely installed with vehicle seat belt.
IMPORTANT: A properly secured convenience base does NOT move more than 25 mm (1 in.) from side-to-side or from front-to-back at the lower anchor connector assembly/vehicle belt path. - The convenience base is adjusted so that level indicator is in correct color zone for your child.
- If necessary, a towel/small blanket is rolled up and placed beneath the front edge of the base for additional leveling.
- Secure child to the carrier.
- Harness straps are at, or below, shoulder level.
- Both buckle tongues are fastened .
- Chest clip is connected and positioned at armpit level.
- Harness straps are snug against the child and you should not be able to pinch the harness.
- Crotch strap is snug against the child but NOT under the child’s bottom.
- Waist straps are snug against the child but NOT under the child’s legs.
- Check your work.
- The convenience base does NOT move more than 25 mm (1 in.) from side-to-side or from front-to-back at the lower anchor connector assembly/vehicle belt path.
- The base is level when level indicator is in the correct color zone for your child.
- The handle is in Position 1 or 3 (U.S. models ONLY), or Position 1 (Canadian models ONLY)
WARNING! DEATH or SERIOUS
- This lower anchor connector assembly is intended to be used ONLY as described in these instructions. Serious injury or death may result from misuse.
- In addition to these instructions, read and follow your vehicle owner’s manual regarding installation of the child restraint and LATCH. If there is a discrepancy, follow your vehicle owner’s manual.
- ONLY use for securing convenience base to vehicle lower anchor bars.
- NEVER attach two lower anchor assembly connectors to one vehicle lower anchor bar.
- NEVER use the vehicle seat belts when using the lower anchor connector assembly. Using both together can cause slack in a sudden stop or crash.
- When not in use, the lower anchor connector assembly should be securely stored in the storage area located under the convenience base or on the side of the base. Keep out of reach of children.
- ALWAYS be sure that the lower anchor connectors are fully engaged onto the vehicle lower anchor bars by pulling hard on the lower anchor connector assembly harness. If they are not totally engaged, the lower anchor connector assembly system will not secure your child restraint. Serious injury or death may result.
- DO NOT use this child restraint if it moves more than 25 mm (1 in.) side-to-side or front to back at the vehicle belt path. Serious injury or death may result from poor installation. If you can not tightly secure the child restraint, try again or move it to another location.
- This child restraint MUST face the rear of the vehicle.
- The carrier MUST be locked firmly into the base. Check by lifting up on the carrier.
- NEVER use this child restraint in the forward-facing position.
Evenflo Child Restraint System LiteMax 35 Installation
Installing the Convenience Base with the Lower Anchor Connector
Before you begin, be sure the vehicle is on a level ground. Remove lower anchor connectors. Place base rear-facing on an approved vehicle seat location.
Note: NEVER allow white indicator line to appear in red zones.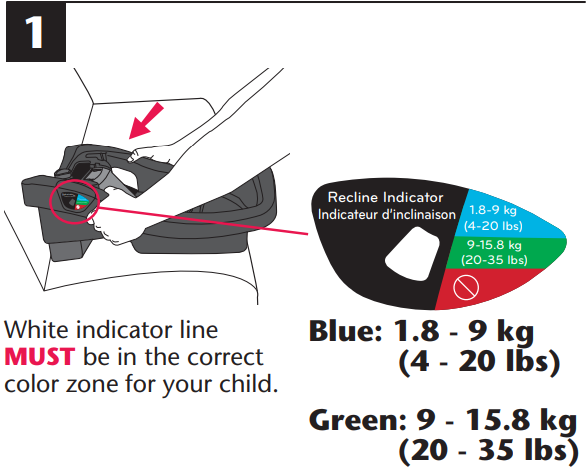
The Leveling Foot that comes with your child restraint will be one of the following types (2a or 2b).
Note: NEVER allow white indicator line to appear in red zones.
Note: If you need to use the leveling foot, follow these steps.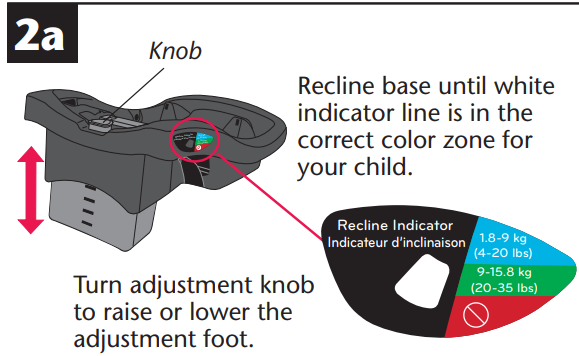
Turn the base over and rotate leveling foot up, as shown.
Push the leveling foot down until the locking tabs snap in place, as shown.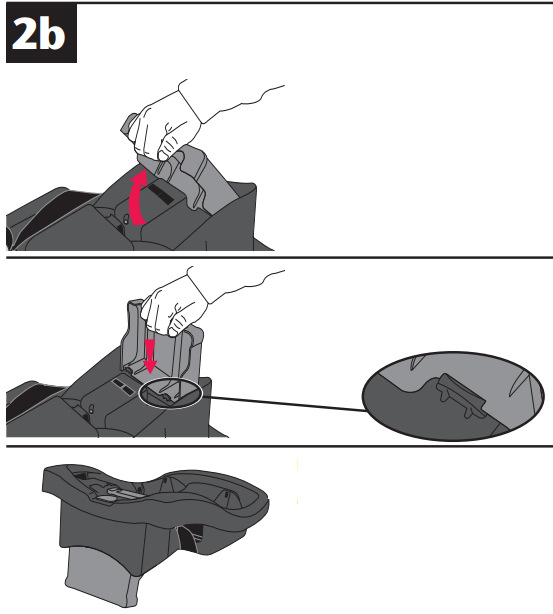
Base shown with leveling foot extended.
Note: To store the leveling foot, follow these steps.
Turn base over. While holding the base down with one hand, pull leveling foot up to disengage the locking tabs.
Rotate leveling foot to stored position.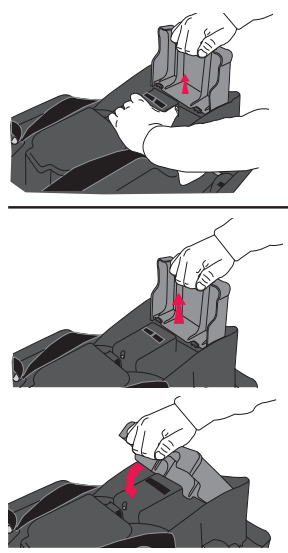
Base shown with leveling foot in stored position.
Turn the convenience base upside down. Depending on your model, the Lower Anchorage Storage will be under the base or on the sides of the base.
Remove both lower anchor hooks or clips.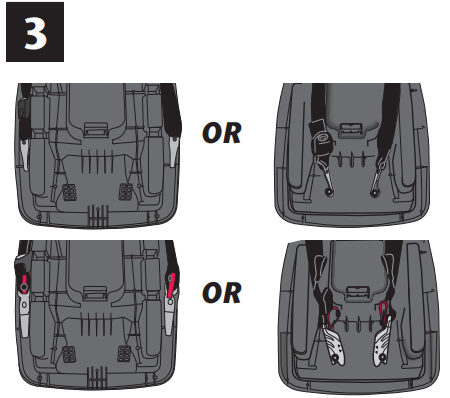
Open One Step Lock-Off
Turn the convenience base right side up. Push down on Lock-Off while pushing back on Lock-Off Release Tab. Lift the Lock-Off up to reveal the belt path.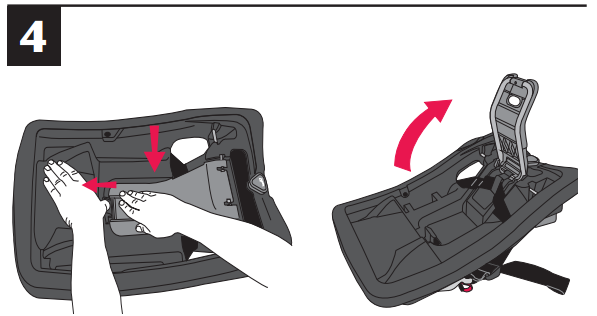
Know Your Lower Anchor Connector Assembly
The lower anchor connector assembly that comes with your child restraint will be one of the types below.
Refer to your vehicle owner’s manual to locate the lower anchor bars on your vehicle seat. Attach the right hook, or clip, to the right anchor bar and the left hook, or clip, to the left anchor bar. DOUBLE CHECK that the lower anchor connector hook, or clip, is fully engaged by pulling hard on the lower anchor connector strap.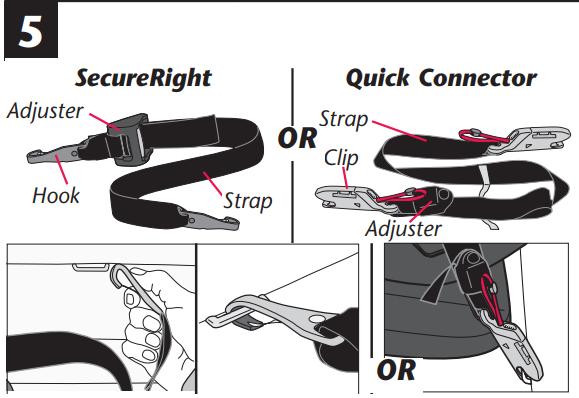
- Using your full weight, push the base into the vehicle seat, while pulling up on the strap to remove all slack from the lower anchor connector assembly.
Close One-Step Lock-Off
Place any excess lower anchor connector webbing to the side of the base. Do Not route it back under the Lock-off. Close the Lock-Off until it clicks into place.
Note: If unable to close the Lock-Off, loosen the lower anchor connector assembly, and try again.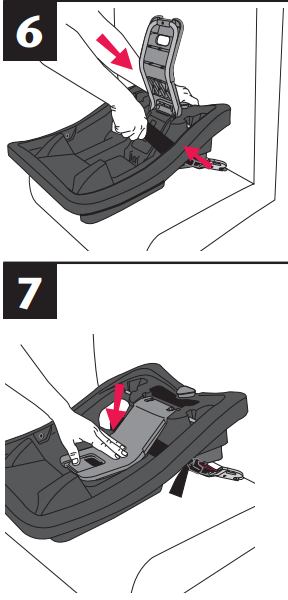
Make sure the lower anchor connector assembly harness is tight. Grab
the base at the areas, as shown. If you can move the base more than 25 mm (1 in.) side-to-side or front to back, the harness is not tight enough. You will need to try again, or find another location for your convenience base.
Place carrier on base, re-check level.
To remove lower anchor connector.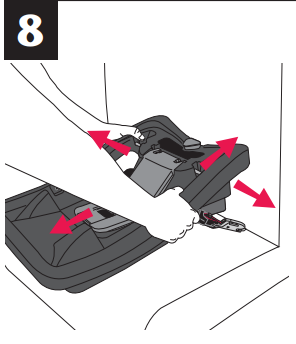
Installing the Convenience Base with the Vehicle Seat Belt
Before you begin, be sure the vehicle is on level ground. Store the lower anchor connectors
Using your full weight, push the base into the vehicle seat and check the level indicator.
Note: NEVER allow white indicator line to appear in red zones.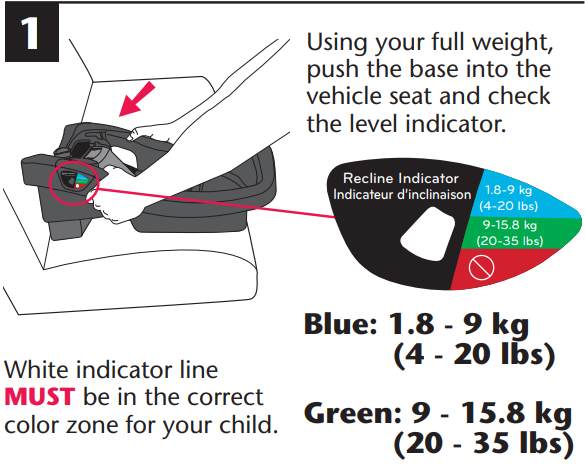
The Leveling Foot that comes with your child restraint will be one of the following types (2a or 2b).
Note: NEVER allow white indicator line to appear in red zones.
Note: If you need to use the leveling foot, follow these steps.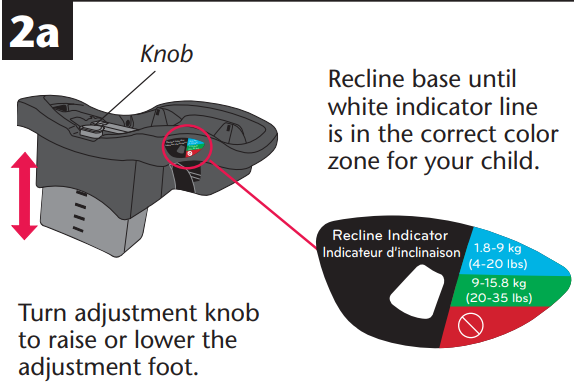
Turn base over and rotate leveling foot up, as shown.
Push leveling foot down until the locking tabs snap in place, as shown.
Base shown with leveling foot extended.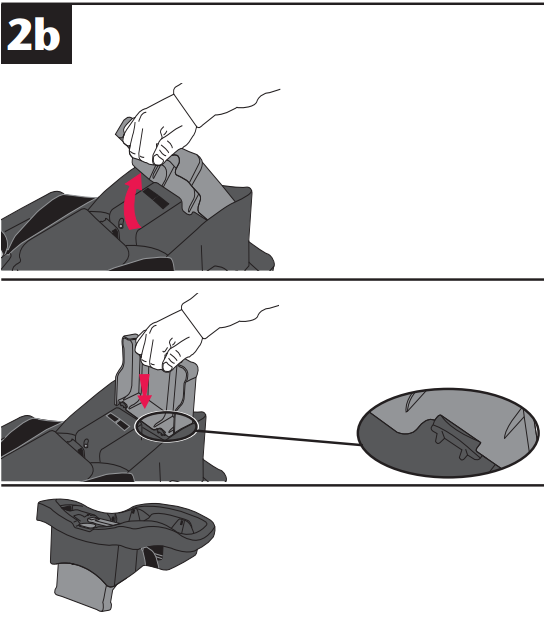
Note: To store the leveling foot, follow these steps.
Turn base over. While holding the base down with one hand, pull leveling foot up to disengage the locking tabs.
Rotate leveling foot to stored position.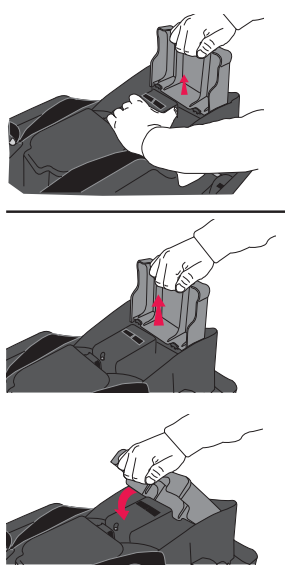
Base shown with leveling foot in stored position.
The Lock-Off provides a way to lock the child restraint without needing to lock your vehicle seat belt. (Refer to Vehicle‘s Owners Manual for vehicle seat belt use.)
Open One Step Lock-Off
Push down on Lock-Off while pushing back on Lock-Off Release Tab. Lift the Lock-Off up to reveal the belt path.
Secure the base to your vehicle seat by routing the lap/shoulder belt through the belt path openings on the sides of the base and through the vehicle belt clip. Fasten the buckle.
LAP / SHOULDER BELT
Pull the shoulder belt tightly to remove all slack from the lap portion of the belt, at the same time use your full weight to push down on the base.
Note: If seat belt Stop Button interferes with the Lock-Off, shift base to the left or right in order to prevent interference.
Secure the base to your vehicle seat by routing the lap belt through the belt path openings on the sides of the base and through the vehicle belt clip. Fasten the buckle.
LAP BELT
Pull the seat belt tightly to remove all slack from the lap portion of the belt, at the same time use your full weight to push down on the base.
IMPORTANT!For models without Vehicle Belt Clip, route lap/shoulder belt or lap belt as shown.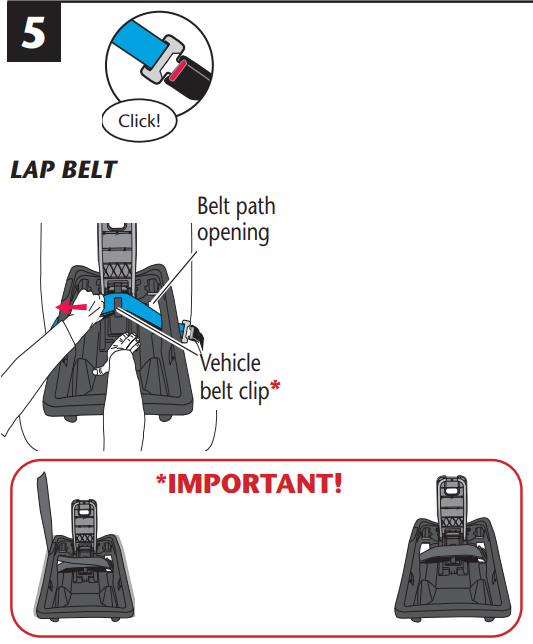
- Close the Lock-Off until it clicks into place.
WARNING!: DEATH or SERIOUS INJURY can occur,
Make sure the vehicle belt is tight. Grab the base at the areas, as shown. If you can move the base more than 25 mm (1 in.) side-to-side or front to back the vehicle belt is not tight enough. You will need to try again, or find another location for your convenience base.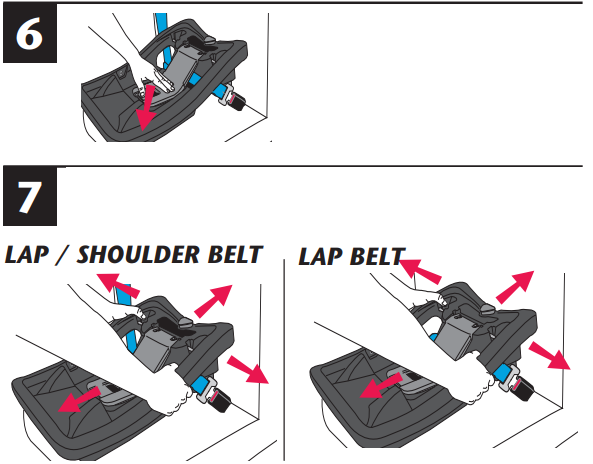
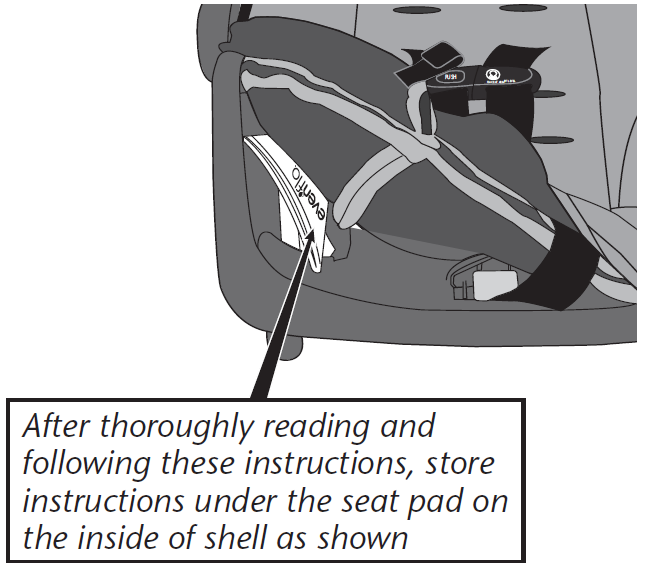
Storing Your Instructions
Setup Guide
To set up your Evenflo LiteMax 35, follow these steps:
- Unpack and Inspect: Ensure all components are included and undamaged.
- Install Base: Use the InRight LATCH system or vehicle seat belt to secure the base in your car.
- Position Seat: Place the infant car seat onto the installed base and adjust as necessary.
- Secure Baby: Buckle your baby into the seat using the provided harness and ensure proper fit.
Care and Cleaning
- DO NOT lubricate or immerse in water the LATCH connectors, the buckle, or any other part of this child restraint, unless rinsing is permitted, as stated on the back of the buckle for your restraint.
- Plastic and metal parts may be wiped clean with mild soap and water and dried with a soft cloth. Do not use abrasive cleaners or solvents.
- Take care not to damage any labels.
- The harness can be wiped clean with mild soap and water. Allow harness to air dry.
- Machine wash the seat pad separately in cold water, delicate cycle. Tumble dry 10 to 15 minutes on low heat.
- NEVER use child restraint without the seat pad.
- To protect the child restraint from damage caused by weather, rodents, and other elements common to garages, the outdoors, and other storage locations, remove the seat pad and thoroughly clean the restraint and pad prior to storage. Take care to clean in the areas where crumbs and other debristend to accumulate.
TIP: To help protect the vehicle upholstery, place a towel beneath and behind the child restraint.
WARNING: To reduce the risk of serious injury or death, read this owner's manual prior to installing and using this child restraint.
- More children are killed every year as passengers in car crashes than by any other type of injury.
- To reduce the risk of SERIOUS INJURY or DEATH, read this owner’s manual and your vehicle owner’s manual before installing and using this child restraint.
- Using a child restraint makes a big difference. By properly using this child restraint and following these instructions (and the instructions that accompany your vehicle), you will greatly reduce the risk of serious injury or death to your child from a crash.
- Do not be misled by the commonly used term “safety seat”; no restraint system can prevent all injuries in all crashes. Many properly restrained adults and children are injured in motor vehicle crashes, including relatively minor crashes.
- A properly used child restraint is the best way to minimize injuries to your child and to increase the chances for your child’s survival in most crashes.
Child Requirements
Warning: Failure to follow these Child Requirements could result in serious injury or death.
This child restraint is designed for use by children in rear-facing orientation only. To use this child restraint properly, children MUST meet the size and age requirements below. In addition, Evenflo recommends consulting with your child’s physician before allowing your child to transition from a rear-facing to forward-facing child restraint.
The American Academy of Pediatrics (AAP) recommends keeping children rear-facing until 2 years old or until they reach the maximum height or weight for their child restraint in rear-facing orientation. Additionally, some states’ laws require children to be rear-facing until age 2. Accordingly, you will see this guidance reflected in the Child Requirements. Please review any applicable local, state or provincial laws related to child passenger safety before installing and using this child restraint.
Rear-facing Use
- 1.8 to 15.8 kg (4 to 35 lbs)
- 43 to 81 cm (17 to 32 in.) and top of child’s head is at least 25 mm (1 in.) below the top of the child restraint seat back.

IMPORTANT: Once your child exceeds any of the size requirements above, they MUST discontinue use of this child restraint.
PREMATURE INFANT USE
Before using this child restraint for preterm or low birth weight infants, ensure the Child Requirements are met and follow the guidelines in this section.
According to the U.S. National Highway Traffic Safety Administration, a properly installed child restraint reduces the risk of death by over 70% for infants involved in crashes. Federal Motor Vehicle Safety Standard (FMVSS) 213 establishes design and dynamic performance requirements for child restraint systems. However, the standard has no minimum weight limit and does not address the special medical needs of preterm or low birth weight infants. To ensure that preterm and low birth weight infants are transported safely, the guidelines published by the American Academy of Pediatrics (AAP) in Pediatrics 2009;123:1424–1429 must be followed.
All children should ride rear-facing in the vehicle as long as possible. Preterm and low birth weight infants are at additional risk of breathing difficulties and heart problems when placed in a child restraint. Evenflo requires that the evaluation recommended by the AAP be conducted for all infants born earlier than 37 weeks and all newborn infants who weigh less than 5 lb at birth before their first car trip to check for breathing difficulties or heart rate problems when traveling in a rear-facing child restraint.
The AAP recommends that appropriate hospital staff observe your infant in the child restraint for a period of 90 to 120 minutes or the duration of travel, whichever is longer. This period of observation must be performed with the infant properly positioned as described in these instructions and with the child restraint placed at an angle that is approved for use in the vehicle. The hospital staff will check for any breathing difficulties or heart rate problems. Your child’s pediatrician will let you know if there are any special considerations for travel. The number of trips and the duration of time the infant is seated in the child restraint should be minimized. A caregiver should ride in the back seat to monitor the infant during travel. You can learn more about the AAP’s recommendations for observation of newborns and the guidelines for safe transportation of preterm and low birth weight infants, as well as other resources for parents and medical professionals, at https://www.healthychildren.org/english/safety-prevention/on-the-go/Pages/default.aspx
WARNING! DEATH or SERIOUS INJURY can occur,
General Warnings
- Child restraints should be used only for travel. Potential adverse health effects from excessive use of infant child restraints have been documented. You should limit the time spent each day in a child restraint as much as possible. You must NEVER use your child restraint as a sleeping environment in the home. NEVER leave your infant unattended in a child restraint in or out of the vehicle.
- Failure to follow these installation instructions and the instructions and warnings on the product can result in your child striking the vehicle’s interior during a sudden stop or crash. Serious injury or death may result. These instructions and the instructions in your vehicle owner’s manual must be followed carefully. If there is a conflict between the two, the vehicle owner’s manual regarding child restraint installation must be followed.
- This child restraint MUST ALWAYS face the rear of the vehicle. Serious injury or death can occur if used forward-facing.
- NEVER leave child unattended.
- DO NOT use child restraint if it is damaged, broken, or missing parts.
- DO NOT use this restraint if it has been involved in a crash. It must be replaced.
- DO NOT attach additional padding, toys or other devices not made by Evenflo, or described in these instructions, to the child restraint. Items not tested with the child restraint could injure the child.
- Be sure that the handle is firmly locked in Position 1 (Carry) before lifting the child restraint.
- This child restraint must be securely belted to the vehicle at all times, even when unoccupied. An unsecured child restraint may injure someone if a crash occurs.
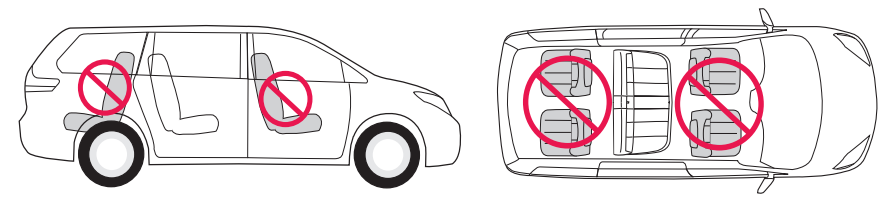
- DO NOT place rear-facing child seat on front seat with an air bag. DEATH OR SERIOUS INJURY can occur. The back seat is the safest place for children 12 and under.
Air Bag Warnings
To help prevent serious injury or death:
- DO NOT use this restraint in the front seat of a vehicle equipped with an air bag. Interaction between a rear-facing restraint and air bags may cause serious injury or death. If your vehicle has an air bag, refer to the vehicle owner’s manual for child restraint installation. If the rear seat of your vehicle is equipped with side air bags, refer to the following information for proper usage.
- Vehicles built prior to the 2002 model year:
DO NOT use this restraint in a vehicle seating position equipped with a side air bag unless authorized by the vehicle manufacturer. - Model year 2002 and newer vehicles:
Refer to your vehicle owner’s manual before placing this restraint in a seating position equipped with a side air bag.
- Vehicles built prior to the 2002 model year:
- DO NOT place any objects between the restraint and the side air bag, as an expanding air bag may cause the items to strike your child.
The forward facing back seat is the safest place for children 12 and under.
Troubleshooting
If you encounter any issues with your Evenflo LiteMax 35, here are some common problems and solutions:
- Issue: Difficult Installation
- Solution: Ensure correct positioning of LATCH connectors or seat belt.
- Issue: Harness Not Adjusting
- Solution: Check for any blockages or kinks in the harness straps.
- Issue: Canopy Not Adjusting
- Solution: Make sure no parts are obstructed; refer to user manual for adjustment instructions.
Always refer to the user manual for detailed instructions and warnings.
Limited Warranty
For a period of 90 days from the original purchase of this Product, Evenflo warrants to the original end user (“Purchaser”) this Product (including
any accessories) against defects in material or workmanship.
Evenflo Child Restraint System LiteMax 35 Pros & Cons
Pros
- Lightweight Design: Easy to carry between vehicles.
- Easy Installation: InRight LATCH system simplifies the process.
- Adjustable Canopy: Protects baby from sunlight.
- Machine Washable Pad: Easy to clean and maintain.
Cons
- Limited Height Capacity: May need to transition to a different seat earlier than expected.
- No Built-In Level Indicator: Requires manual checking of correct angle.
- Some Users Report Harness Issues: Occasional difficulty adjusting harness straps.
Customer Reviews
Customers generally praise the Evenflo LiteMax 35 for its lightweight design and easy installation process. However, some users have reported issues with harness adjustments and limited height capacity. Here’s what some customers have said:
"This car seat is a lifesaver So light and easy to install. My baby loves it!" - Sarah M.
"Had some trouble adjusting the harness straps but overall very happy with this purchase." - John D.
Faqs
How do I properly install the Evenflo LiteMax 35 using LATCH?
What is the weight limit for the Evenflo LiteMax 35?
Can I use this car seat without the base?
How do I clean my Evenflo Child Restraint System LiteMax 35?
What if my baby outgrows this seat quickly?
Are replacement parts available for purchase?
Can I use this car seat in different vehicles?
How long does it typically take to set up this car seat?
Does this car seat come with additional accessories?
Leave a Comment