Evenflo Maestro RightFit Belt Path Instruction Manual
Content
Introduction
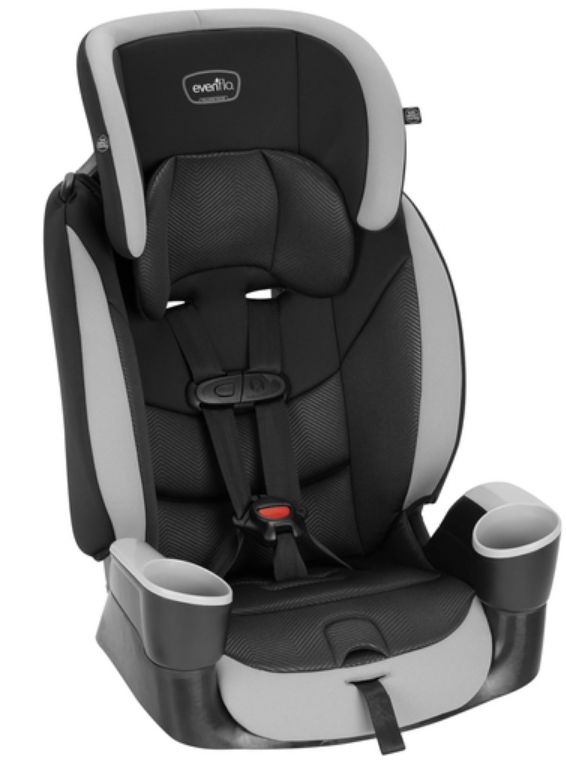
The Evenflo Maestro RightFit Belt Path is a versatile car seat designed for children weighing between 22 to 110 pounds. It features the exclusive RightFit™ Belt Path Technology, which ensures proper belt positioning for enhanced safety during travel. With multiple height adjustments, this booster seat accommodates growing children comfortably. Additionally, the Maestro includes integrated cup holders and a removable, machine-washable cover for easy maintenance. The cost of the Evenflo Maestro RightFit typically ranges around $100.
Visual Glossary
Your vehicle components may be significantly different than pictured. Consult your owner’s manual to help you identify your vehicle components.

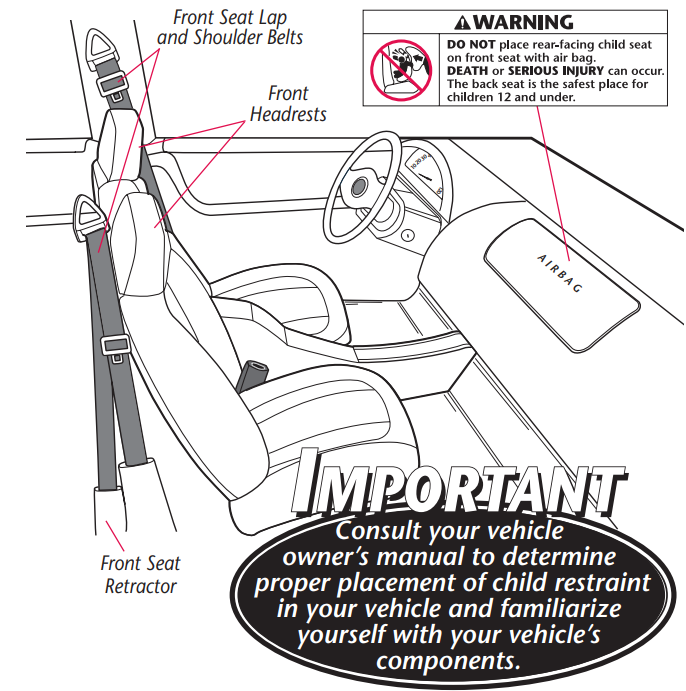
IMPORTANT: If your vehicle has side air bags.
Key Features
- Weight Range: 5-50 lbs
- Height Range: Up to 50 inches
- Convertible Design: Rear-facing (5-25 lbs) and forward-facing (22-50 lbs)
- RightFit Belt Path System: Ensures proper vehicle belt positioning
- Multiple Recline Positions: Enhances comfort and safety
- Adjustable Headrest and Harness: Easy to customize as your child grows
- Integrated Cup Holders: Convenient for storing snacks or drinks
- Machine Washable Pads: Easy to maintain
Using Maestro with the Internal 5-pt Harness
Child Requirements
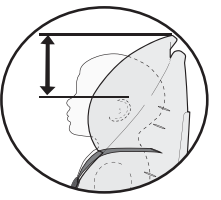
Weight: 10 – 22.6 kg (22 – 50 lbs) Height: 71 – 127 cm (28 – 50 inches) tall, or less, AND the tops of the child’s ears are at, or below, the top of the child restraint headrest.
Age: At least one year old
IMPORTANT
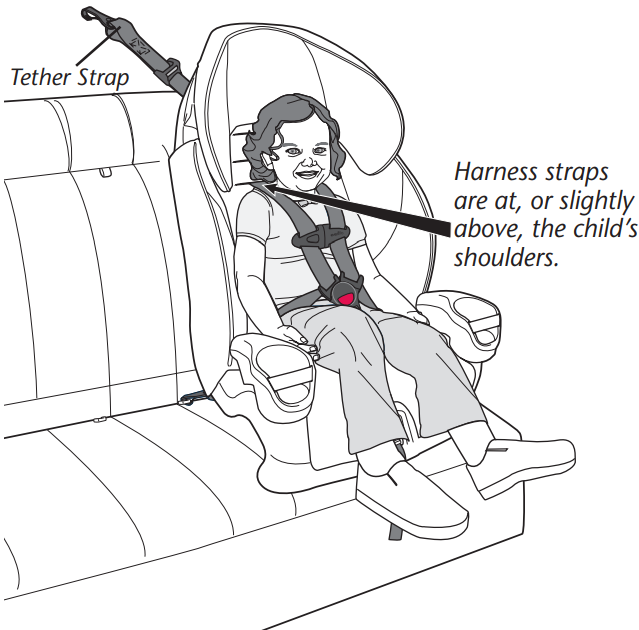
Evenflo strongly recommends using the top anchorage (tether) strap when using this seat with the internal harness. Using the tether strap will improve the stability of the child restraint and may reduce the risk of injury.
WARNING
If the child weighs more than 22.6 kg (50 lbs) or their shoulders are above the highest harness level, you MUST use this child restraint as a Booster.
Installation Checklist
- Secure child restraint to the vehicle seat.
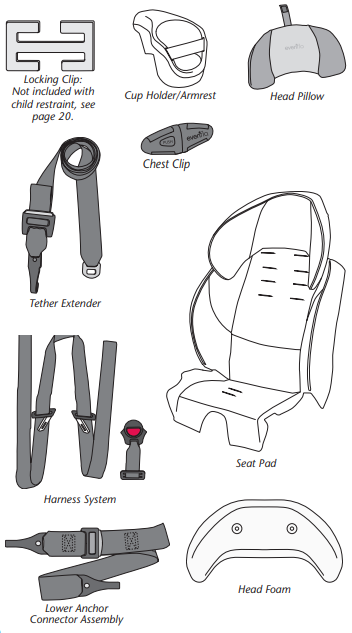
Locking clip is installed, if necessary (p. 20).
Child restraint is securely installed with lower anchor connector assembly (shown at left) through belt path (p. 16)
OR
Child restraint is securely installed with vehicle seat belt through belt path (p. 19)
Tether strap is attached and tightened (p. 18-21). - Place the child in the child restraint.
The child’s back and bottom are flat against the back and bottom surfaces of the child restraint.
The tops of the child’s ears MUST be at, or below, the top of the child restraint headrest. - Make necessary adjustments.
Harness straps are snug against the child’s shoulders, with no slack (p. 23).
Crotch strap is properly positioned (p. 27). - Fasten both buckle tongues. Refer to page 22.
- Position and connect chest clip.
Chest clip MUST be at armpit level (p. 23). - Check your work.
To properly protect the child, the child restraint MUST NOT move more than 25 mm (1 inch) from side-to-side or from front-to-back at the belt path.
To make installation easier, watch the installation video of this child restraint at https://www.evenflo.com
Detailed Description
The Evenflo Maestro RightFit Belt Path car seat is engineered with a focus on safety and convenience. Its steel-reinforced frame provides durability, while the RightFit Belt Path system ensures the proper positioning of the vehicle belt for your child’s protection. Multiple recline options and adjustable headrests ensure a comfortable fit as your child grows. It also features integrated cup holders for added convenience, while the machine-washable pads make cleaning effortless.
Using with the 5-pt Harness
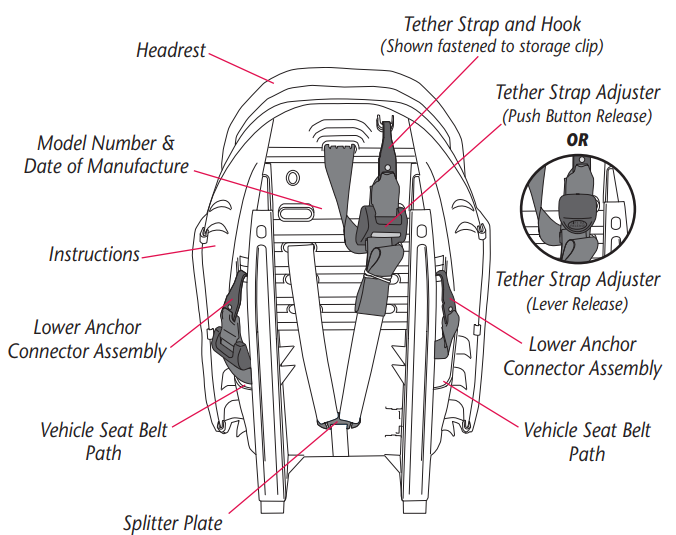
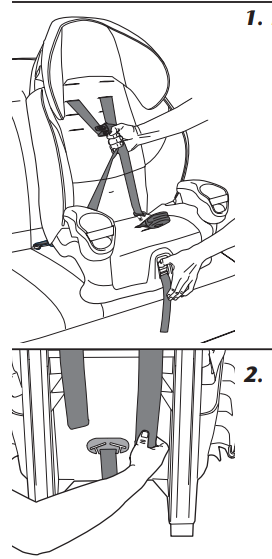
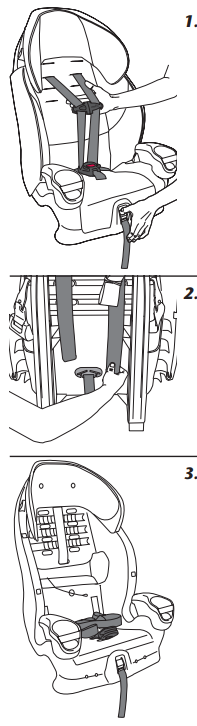
Installation with lower anchor connector assembly
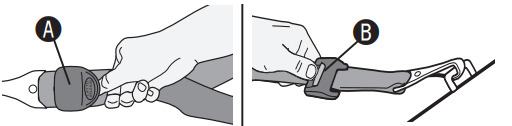
The lower anchor connector assembly that comes with your child restraint will be one of the two types below.
- Tilt and slide the adjuster A to loosen.
- Press the adjuster release button B to loosen.
IMPORTANT: If you are using the vehicle seat belt to secure the child restraint, DO NOT use the lower anchor connector assembly.
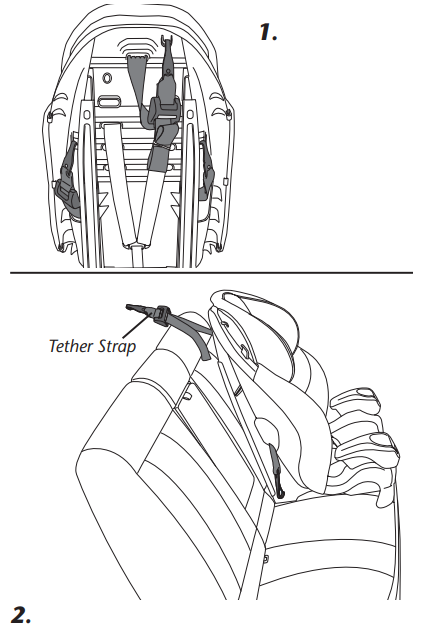
- Disconnect tether hook and lower anchor connectors from the back of the child restraint.
Place the child restraint in position. Set child restraint on vehicle seat in forward-facing position. Lay the tether strap over the back of the vehicle seat.
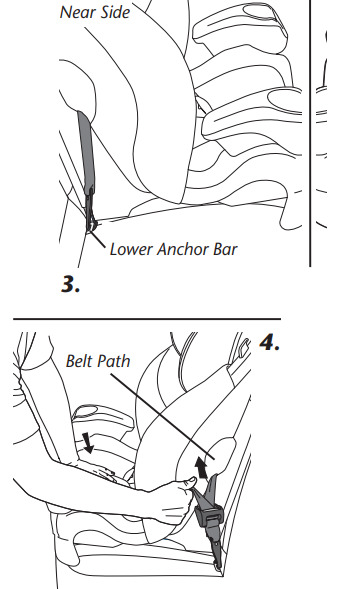
- Attach lower anchor connectors. Attach a lower anchor connector onto each seat anchor.
IMPORTANT: Make sure both lower anchor connectors are facing upward and the harness straps are not twisted. Secure the child restraint. Using your full weight, push the child restraint firmly into the vehicle seat while pulling up on the lower anchor connector assembly strap to tighten.
IMPORTANT: To properly protect the child, the child restraint MUST NOT move more than 25 mm (1 inch) from side-to-side or from front-to-back at the belt path. If you cannot tightly secure the child restraint, try again or move it to another location.
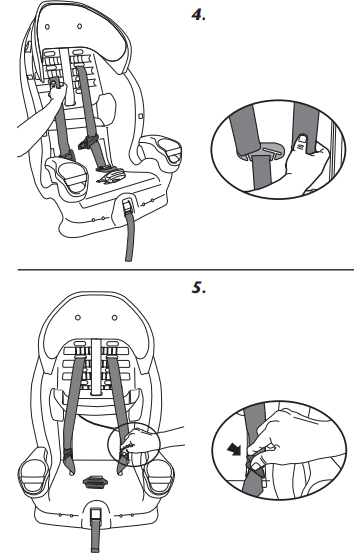
The Tether Strap that comes with your child restraint will be one of the two types below.- Tilt and slide the adjuster A to loosen.
Press the adjuster release button B to loosen.
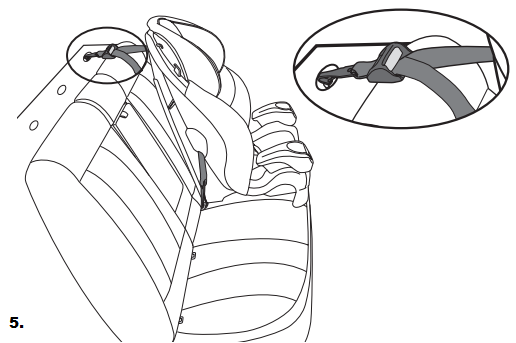
Connect and tighten tether strap. Connect the tether hook to the anchor behind the vehicle seat, as shown. (Please consult your vehicle owner’s manual, as tether anchor locations may vary.) Pull the strap and tighten the tether securely.
IMPORTANT: If your tether strap is too short to reach from the child restraint to your vehicle tether anchor, you will need a Tether Extender. Please call ParentLink (see back cover).
Installation with Seat Belt
IMPORTANT: If you are using the vehicle seat belt to secure the child restraint, DO NOT use the lower anchor connector assembly.
- Disconnect tether hook from the back of the child restraint.
- Place the child restraint in position. Set child restraint on vehicle seat in forward-facing position. Lay the tether strap over the back of the vehicle seat.
Route vehicle seat belt through belt path and buckle it, as shown.
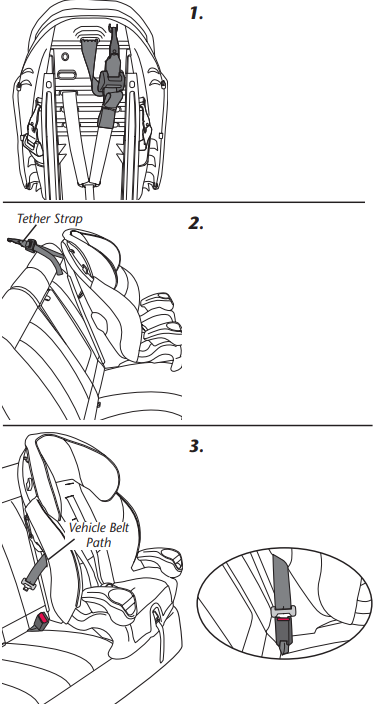
- Remove all slack from the seat belt. Push downward on child restraint while tightening seat belt to remove excess slack.
Install Locking Clip, if necessary.
If your vehicle was built prior to model year 1996, and has either a lap belt or lap/shoulder belt that is equipped with an emergency locking retractor (ELR), you MUST use a Locking Clip. Check your vehicle owner’s manual to identify which vehicle belt system is in your vehicle.
If your vehicle is model year 1996 or newer, it likely has a vehicle belt system that can be locked when tightened, and will not require use of a Locking Clip.
Consult your vehicle owner’s manual before installing a Locking Clip.
If your vehicle requires a Locking Clip, please call ParentLink (see back cover) to obtain a Locking Clip and instructions on how to install and use it.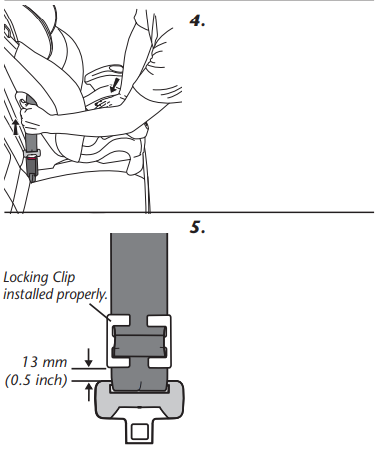
WARNING
- Remove Locking Clip from vehicle seat belt when not used with a child restraint, or the vehicle seat belt will not properly restrain an adult or child. Serious injury could occur.
- DO NOT use a Locking Clip in booster mode.
- Ensure child restraint is secure. Try to move the child restraint in all directions.
IMPORTANT: To properly protect the child, the child restraint MUST NOT move more than 25 mm (1 inch) from side-to-side or from front-to-back at the vehicle belt path. If you cannot tightly secure the child restraint, try again or move it to another location.
The Tether Strap that comes with your child restraint will be one of the two types below.
Tilt and slide the adjuster A to loosen.
Press the adjuster release button B to loosen. Connect and tighten tether strap.
Connect the tether hook to the anchor behind the vehicle seat, as shown. (Please consult your vehicle owner’s manual, as tether anchor locations may vary.) Pull the strap and tighten the tether securely.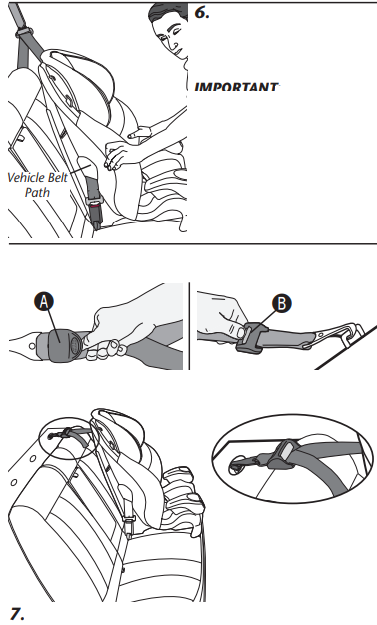
IMPORTANT: If your tether strap is too short to reach from the child restraint to your vehicle tether anchor, you will need a Tether Extender. Please call ParentLink (see back cover).
Securing the Child
- Loosen harness.
Press the harness release button on the front of the seat while pulling the harness straps. - Position harness straps.
Unfasten chest clip and place the child in the child restraint.
Bring each harness strap over the child’s shoulders.
IMPORTANT: The child’s back and bottom should be flat against the restraint. If there is a gap, the child will not be comfortable. Buckle the harness.
Insert both buckle tongues into the buckle. Note: Pull up on the harness straps to ensure that the buckle tongues are fastened securely.
- Fasten and adjust chest clip.
Snap the two halves of the chest clip together, as shown, and slide to armpit level. Tighten harness.
Pull the harness adjuster strap to tighten the harness.
Note: Check the harness straps near the shoulders for slack. You should NOT be able to pinch the harness (see illustration). Adjust as needed.
IMPORTANT: A snug strap should not allow any slack. It lies in a relatively straight line without sagging. It does not press on the child’s flesh or push the child’s body into an unnatural position.
Check the harness straps near the shoulders for slack and adjust as needed.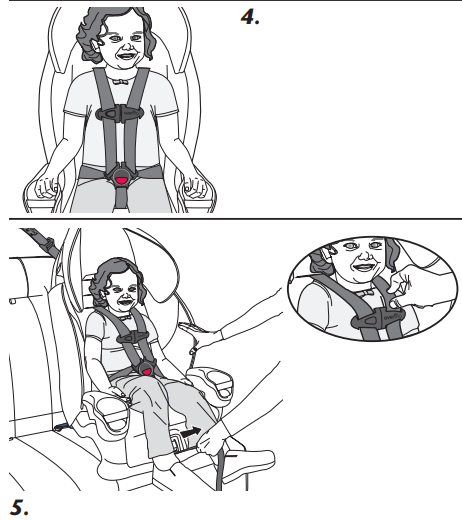
Removing the Child
- Loosen harness straps.
Press the harness release button on the front of the seat while pulling the har-ness strap outward behind the fastened chest clip. - Disconnect chest clip.
Push the release button and pull the chest clip apart. - Unbuckle harness.
Press the red button on the buckle and release both buckle tongues.
You may now remove the child.

Positioning the Harness Strap
- Loosen harness straps.
Press the harness release button on the front of the seat while pulling the harness straps. Remove both Harness Straps from the Splitter Plate.
- Move harness strap.
Remove both harness straps from the slots and feed them into the new slot, as shown.
Pull the harness strap to the back of the child restraint.
Note: Straps must be positioned at the child’s shoulder level or slightly above.
IMPORTANT: When inserting harness straps through the slots in the seat pad, make sure you route them correctly through their corresponding slots in the seat shell. Attach Harness Straps to Splitter Plate.
Attach the loop at the end of each harness strap onto the splitter plate.
IMPORTANT: Make sure both harness straps are installed completely on the splitter plate, as shown.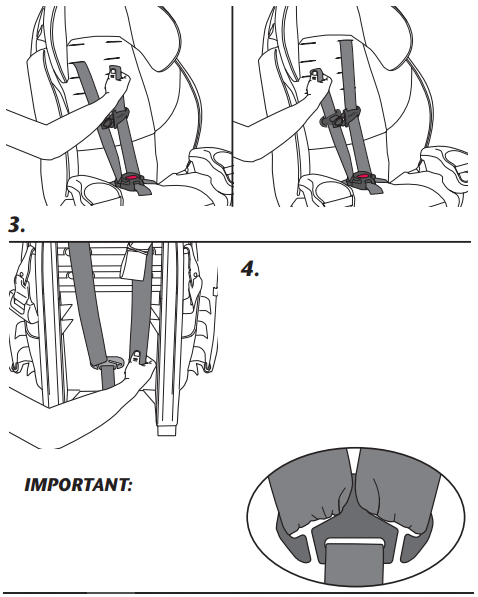
Positioning the Crotch Strap
As your child grows, you will need to change the crotch strap position so that it is in the slot closest to your child. The crotch strap should ALWAYS be as close as possible to, but NEVER under, the child’s bottom.
IMPORTANT: You MUST place the crotch strap in the front slot if your child weighs 18 kg (40 lbs) or more.
- Remove Crotch Strap.
Loosen the harness straps and move them out of the way.
Push the anchor up through the slot to the top of the seat. Insert Crotch Strap into new slot.
Insert the crotch strap anchor into the slot that is the closest to the child AND the most comfortable for the child.
Pull the crotch strap to make sure it is secure.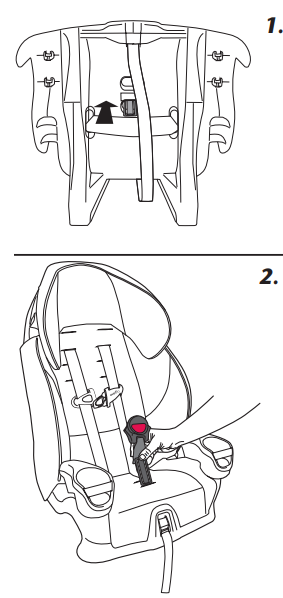
When to Put Your Child in a Booster Sea
Booster seats raise the child up and help to position the vehicle lap and shoulder belt correctly. When the child is properly restrained in a booster seat, their risk of injury in all types of crashes is reduced, as the lap and shoulder belt provides excellent restraint of both the upper and lower torsos.
It is important for the child to sit properly within the vehicle seat belts. When the vehicle seat belt is buckled, the lap belt should be low on the hips, just touching the thighs, and the shoulder belt should lie across the middle of the shoulder. If the child leans out or moves the belt behind the back or places it under the arm, it will not provide the intended restraint.
There are a number of things to consider when deciding whether the child is ready to sit in a booster seat, including: the weight and height rating on their current child seat, the child’s own weight and height, their maturity, and the seat-ing positions available in your vehicle.
How is a booster seat used?
Using a booster seat is very similar to buckling yourself into the vehicle:
- Read the instruction manuals for both the booster seat and the vehicle before you start.
- Put the booster in the back seat in a location with a lap and shoulder belt. Never use a booster with only a lap belt, as this could cause serious injuries.
- After the child is in the booster, pull the lap and shoulder belt across him/her and buckle it.
- Check that the shoulder belt lies across the middle of the shoulder and that the lap belt is low on the hips, just touching the thighs.
How can you tell if your child is ready to transition to a booster seat?
You should consider using a booster seat if the following conditions apply:
- The child is mature enough to sit in the booster seat and not put the belts under their arm or behind their back.
- The child is approaching the weight or height limit of the child restraint they are currently using.
- If you have a vehicle that does not have a tether anchor-age but has lap/shoulder belts available in the back seat, a booster seat may provide better protection than an internal harness seat without the tether.
Using as a Booster Seat
Child Requirements
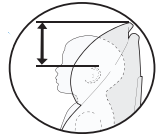
- Weight: 18 – 49.8 kg (40 – 110 lbs) Height: 110 – 145 cm (43.3 – 57 inches) tall AND the tops of the child’s ears are at, or below, the top of the child restraint headrest.
- Age: At least four years old
IMPORTANT
Always secure the booster seat with the LATCH connectors or vehicle seat belt when not occupied. An unsecured booster seat can fly into and injure other occupants in the event of a crash.
Booster Installation Checklist
- Convert child restraint to booster seat.
See “Converting into a Booster Seat,” p. 32. - Secure booster seat to the vehicle seat.
- Make sure the bottom and back of the booster seat are touching vehicle seat and back.
- If your vehicle has LATCH, you may secure the booster seat to the vehicle with the LATCH connectors, p. 16.
- Place the child in the booster seat.
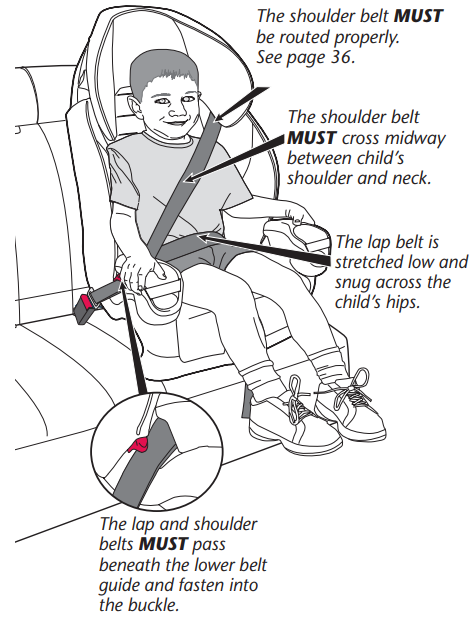
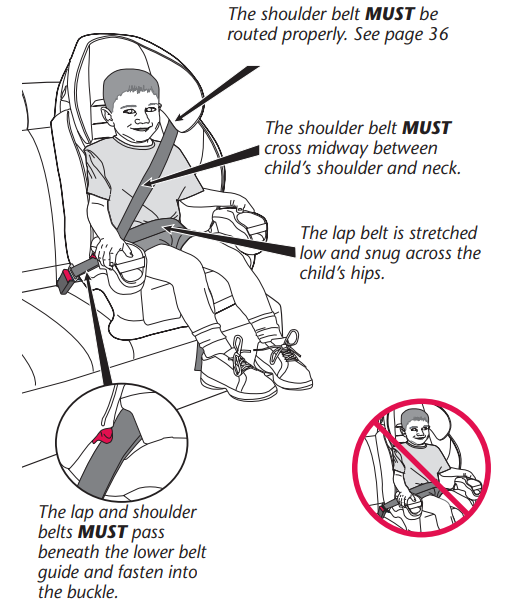
Make sure the child’s back and bottom are flat against the back and bottom surfaces of the booster seat. - Secure child and booster seat to vehicle seat. Stretch the lap/shoulder belt across the child and fasten the buckle. Make certain the shoulder belt is threaded through the shoulder belt guide. The shoulder belt MUST be routed properly (p. 36).
- Check your work.
Make sure the lap belt is stretched low and snug across the child’s hips, within the belt guides, and fastened into the buckle. The shoulder belt must cross the child midway between his/her shoulder and neck.
WARNING
The shoulder belt MUST NOT cross the child’s neck or fall off the child’s shoulder. If you cannot adjust the shoulder belt to properly lay midway between the child’s shoulder and neck AND at or above the shoulder, try another seating location, or do not use the booster seat.

TIP: To make installation easier, watch the installation video of this booster seat at https://www.evenflo.com
Converting into a Booster Seat
- Loosen harness.
Press the harness release button while pulling outward on the harness straps, as shown. Disconnect the chest clip. - Remove both Harness Straps from the Splitter Plate and pull them through to the front of the seat.
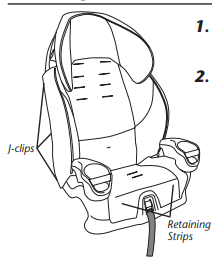
Disconnect all J- clips and all Retaining Strips, then remove the Seat Pad.
- Route the Harness Straps through Adjustment Slots, then attach to Splitter Plate.
IMPORTANT: Make sure both harness straps are installed completely on the splitter plate. Tuck the Chest Clip and Buckle Tongues into the recesses on either side of the seat shell.
Remove the Crotch Strap.
Locate the crotch strap anchor on the bottom.
Turn the anchor sideways and push it through the seat shell to remove, as shown.
Insert the crotch strap anchor back into the opening from the bottom of the child restraint.
Pull the anchor through the seat and adjust so it lies flat.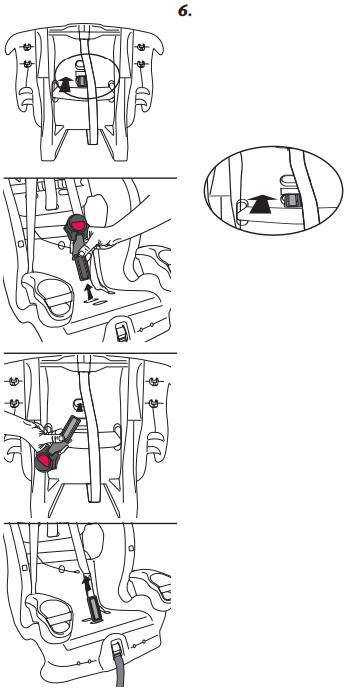
Install the Seat Pad.
Your child restraint is now in Booster Mode and ready for a child who weighs 18 – 49.8 kg (40 – 110 lbs), is 110 – 145 cm (43.3 – 57 inches) tall, and is at least four years old. Make sure the tops of his/her ears are below the top of the child restraint headrest.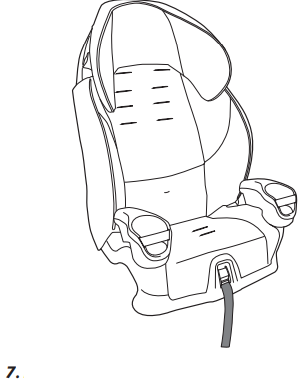
Note: to convert the seat back into 5-point harness mode, reverse these steps.
Shoulder belt routing while in booster mode
While the seat is used in booster mode the shoulder belt must be routed over the child’s shoulder.
The belt must pass under the head rest, between the head rest and the seat as long as the child’s shoulders are at or below the opening between the head rest and shell.
If the child’s shoulders are high enough that routing the shoulder belt under the head rest causes the belt to be pulled down the back side of the child’s shoulder (before passing through the head rest) the belt should not be routed between the seat and the head rest.
If the shoulder height causes the belt to route behind the back and the top of the ears are still at or below the top of the head rest, the shoulder belt should be routed on top of the head rest.

General Information
Installing the Cup Holders
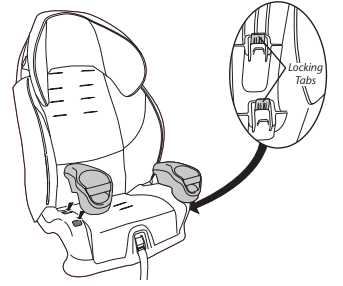
Snap each cup holder onto the seat, as shown, until you hear it snap into place. Turn the seat over and make sure the locking tabs on each cup holder are securely locked in place.
Removing Seat Pad
- Disconnect the harness straps from the splitter plate.
- Disconnect J-clips and two retaining strips. Remove the seat pad.
Securing Your Child Restraint in Aircraft
The Federal Aviation Administration (FAA) recommends that you secure your child for air travel in an appropri-ate child restraint based on your child’s weight and size. Turbulence can happen with little or no warning. When turbulence occurs, the safest place for your child is in a properly installed child restraint, not in an adult’s lap or on the aircraft seat with its seat belt. Keeping your child in a child restraint during the flight will help ensure your family arrives safely at your destination.
The FAA recommends that a child weighing:*
- more than 18 kg (40 lbs) use an aircraft seat belt;
- less than 9 kg (20 lbs) use a rear-facing child restraint; and
- from 9 to 18 kg (20 to 40 lbs) use a forward-facing child restraint.
* Please note that these FAA recommendations may vary from those applicable to the use of your child restraint in a motor vehicle.
IMPORTANT
You must use the internal harness when installing the child restraint in aircraft.
Installing Child Restraint in Aircraft
IMPORTANT: Before installing the child restraint, make sure the aircraft seat is in a fully upright position.
Place the child restraint in position.
Place the child restraint on the aircraft seat forward-facing, as shown above.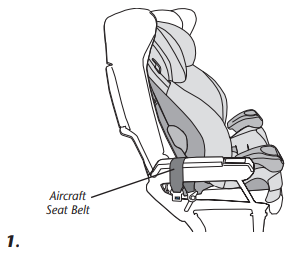
Route aircraft seat belt through belt path.
Route the aircraft seat belt through the belt path opening in the back of the child restraint and continue through the opening on the opposite side of the child restraint.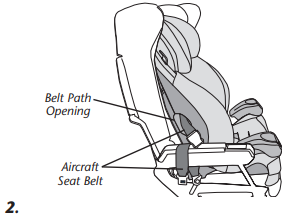
Note: Lift the restraint’s seat pad away for easier access.
Fasten the aircraft seat belt, then remove all slack from the belt.
The aircraft seat belt must be as tight as possible. Route the excess aircraft seat belt strap back through the belt path opening. Using your full weight, push the child restraint firmly onto the aircraft seat while pulling on the excess seat belt strap to tighten.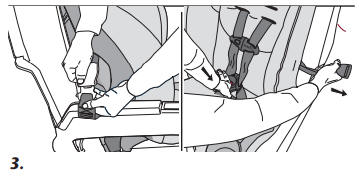
Note: Because of the fixed length of aircraft seat belts, the belt buckle could be behind the child’s back after tightening the belt. For your child’s comfort, Evenflo recommends cushioning the child’s back by placing a small pillow or folded-up blanket, or a folded-up jacket, over the belt buckle.
Check your work: Reconnect the seat pad to the front of the child restraint. Try to move the child restraint in all directions. If you can move the restraint more than 25 mm (1 inch) from side-to-side or front to back at the belt path, the aircraft seat belt is not tight enough, and you MUST install again until the seat belt is tight.
Replacement Parts
Not available on all models.
You can order replacement parts on-line at https://www.evenflo.com or contact Evenflo. When you contact us, please have the product model number and date of manufacture (found on the back of the child restraint).
Proper Disposal of this Child Restraint
At the end of this child restraint’s useful life, Evenflo encourages you to dispose of it properly. Most of the components in this child restraint are recyclable.
- Remove all fabric and padding.
- Remove all screws and disassemble the restraint.
- Recycle all plastic/foam parts and discard the rest. If your local recycling center won’t accept the padding, you may dispose of it in the landfill.
Note: Evenflo uses recycled materials in the manufacturing process whenever possible but never for components that are critical for safety.
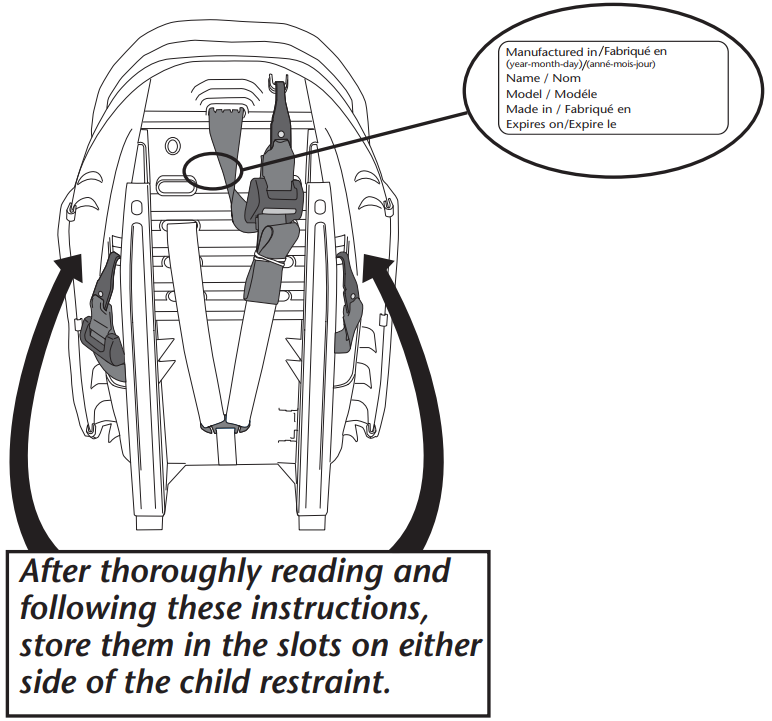
To prevent injury due to hidden damage, lost instructions, outdated technology, etc., discontinue use of this restraint after date on the Date/Model label (below), OR if it has been involved in a crash.
Setup Guide
- Unpacking: Remove the car seat from its packaging and inspect for any damages.
- Installation Mode: Select rear-facing or forward-facing based on your child's age and weight.
- Rear-Facing Installation: Place the seat in the vehicle with its back against the vehicle's backseat. Secure it using the LATCH system or seatbelt. Adjust the recline as needed for your child's age.
- Forward-Facing Installation: Position the seat upright with the back against the vehicle's backseat. Secure it using either the LATCH system or seatbelt.
- Belt Path Alignment: Utilize the RightFit Belt Path system to position the vehicle belt correctly across your child’s chest and hips.
- Adjusting the Harness: Ensure the harness and headrest are properly adjusted for a snug fit.
Care and Cleaning
- DO NOT lubricate or immerse the LATCH connectors, the buckle, or any part of this child restraint.
- Plastic and metal parts may be wiped clean with mild soap and water and dried with a soft cloth. Do not use abrasive cleaners or solvents.
- Take care not to damage any labels.
- The harness can be wiped clean with mild soap and water. Allow harness to air dry. DO NOT immerse buckle in water.
- The seat pad can be machine washed separately in cold water, delicate cycle, tumble dry 10 – 15 minutes on low heat.
- NEVER use child restraint without the seat pad.
TIP: To help protect the vehicle upholstery, place a towel beneath and behind the child restraint.
Troubleshooting
| Problem | Solution |
|---|---|
| Improper Belt Alignment | Ensure the RightFit Belt Path system is used correctly. |
| Loose Harness | Regularly tighten the harness straps for a secure fit. |
| Inconsistent Recline | Adjust recline positions based on your child’s age/weight. |
For persistent issues, refer to the user manual or contact Evenflo customer support.
Warranty
For a period of 90 days from the original purchase of this Prod-uct, Evenflo warrants to the original end user (“Purchaser”) this Product (including any accessories) against defects in material or workmanship. Evenflo’s sole obligation under this express limited warranty shall be, at Evenflo’s option, to repair or re-place any Product that is determined to be defective by Evenflo and determined to be covered by this warranty.
Evenflo Maestro RightFit Belt Path Pros & Cons
Pros
- Converts easily from rear-facing to forward-facing
- Simplified installation with the RightFit Belt Path system
- Adjustable recline positions, headrest, and harness
- Integrated cup holders for convenience
- Machine-washable pads for easy maintenance
Cons
- Bulkier than some other convertible car seats
- Maximum weight limit of 50 lbs in forward-facing mode
- Some users find transitioning between modes challenging
Customer Reviews
Parents praise the Evenflo Maestro RightFit Belt Path for its ease of installation and adjustable features. However, a few users have reported that switching between rear-facing and forward-facing modes can be complicated.
Common Complaints
- The seat may feel bulkier than anticipated
- Difficulty in adjusting harness straps for some users
Faqs
What is the weight range for the Evenflo?
Can the Evenflo Maestro RightFit be used in both rear-facing and forward-facing modes?
How does the RightFit Belt Path system work?
Is the Evenflo Maestro RightFit Belt Path easy to install?
Can I machine wash the pads of the Evenflo Maestro RightFit Belt Path?
Are there any integrated storage features in the Evenflo?
How many recline positions does the Evenflo Maestro RightFit Belt Path offer?
Is the Evenflo Maestro compatible with all vehicle types?
How often should I inspect my Evenflo Maestro RightFit Belt Path?
Leave a Comment