How to Use: Evenflo NurtureMax Infant Car Seat User Manual
Content
Introduction
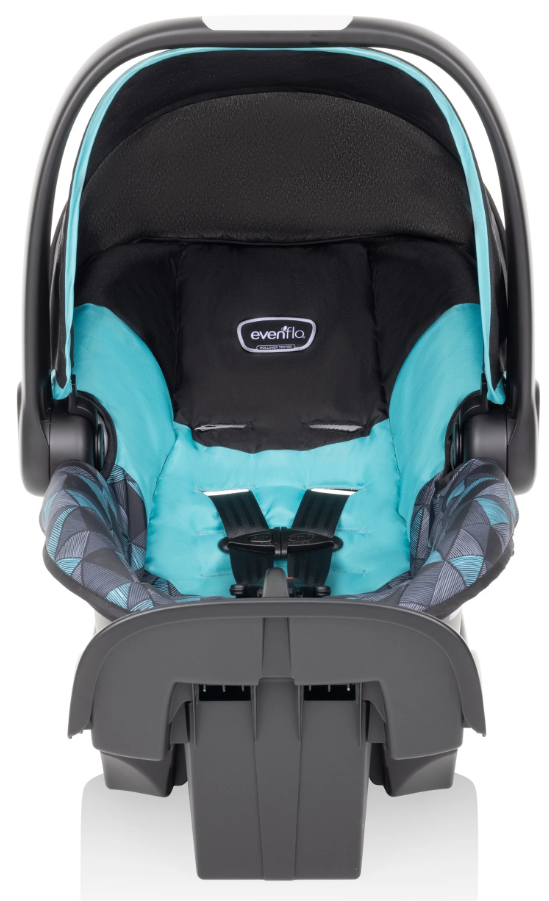
The Evenflo NurtureMax Infant Car Seat is designed to provide safety and comfort for your newborn. This rear-facing car seat accommodates infants weighing between 4 to 22 pounds and measuring up to 29 inches tall. It features a lightweight design for easy transport and an anti-rebound base that enhances stability during travel. The car seat is equipped with a five-point harness system, ensuring a secure fit for your child. Additionally, it meets or exceeds all federal safety standards, giving parents peace of mind. The Evenflo NurtureMax Infant Car Seat is priced at approximately $49.99.
Keep instructions for future use.
Rear-facing with Base
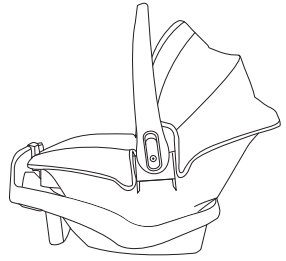
- 1.8 to 10 kg
- (4 to 22 lbs)
- 43 to 73 cm
- (17 to 29 in.)
Rear-facing without Base
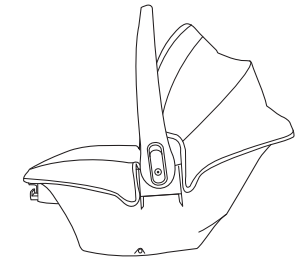
- 1.8 to 10 kg
- (4 to 22 lbs)
- 43 to 73 cm
- (17 to 29 in.)
WARNING!
To reduce the risk of serious injury or death, read this owner’s manual prior to installing and using this child restraint.
WARNING! DEAINJURTH or SERIOUSY can occur.
General Warnings
- Failure to follow the Child Requirements for use of this child restraint could result in serious injury or death.
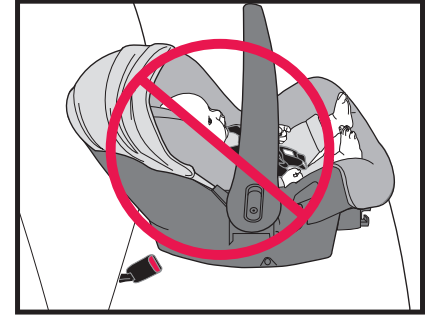
- Child Restraints should be used only for travel. Potential adverse health effects from excessive use of infant child restraints have been documented. You should limit the time spent each day in a child restraint as much as possible. You must NEVER use your child restraint as a sleeping environment in the home. NEVER leave your infant unattended in a child restraint in or out of the vehicle.
- Failure to follow installation instructions and the instructions and warnings on the product can result in your child striking the vehicle’s interior during a sudden stop or crash. Serious injury or death may result. These instructions and the instructions in your vehicle owner’s manual must be followed carefully. If there is a conflict between the two, the vehicle owner’s manual regarding child restraint installation must be followed.
- This child restraint MUST ALWAYS face the rear of the vehicle. Serious injury or death can occur.
- NEVER leave child unattended.
- DO NOT use child restraint if it is damaged, broken, or missing parts.
- DO NOT use this restraint if it has been involved in a crash. It must be replaced.
- DO NOT attach additional padding, toys or other devices not made by Evenflo, or described in these instructions, to the child restraint. Items not tested with the child restraint could injure the child.
- Be sure that the handle is firmly locked in Position 1 before lifting the child restraint (see “Using the Carrier Handle” on page 18).
- This child restraint must be securely belted to the vehicle at all times, even when unoccupied. An unsecured child restraint may injure someone if a crash occurs.
- NEVER use child restraint without the seat pad.
Airbag Warnings
- DO NOT place rear-facing child seat on front seat with air bag. DEATH OR SERIOUS INJURY CAN OCCUR. The back seat is the safest place for children 12 and under.
- DO NOT use this child restraint in the front seat of a vehicle equipped with an air bag, unless the air bag has been deactivated. Interaction between a rear-facing restraint and air bags may cause serious injury or death. Air bags may cause serious injury or death to children 12 years of age and under. If your vehicle has an air bag, refer to your vehicle owner’s manual for child restraint installation.
- If the rear seat of your vehicle is equipped with side air bags, refer to the following information for proper usage:
Vehicles built prior to the 2002 model year:
DO NOT use this restraint in a vehicle seating position equipped with a side air bag unless authorized by the vehicle manufacturer.
Model year 2002 and newer vehicles:
Refer to your vehicle owner’s manual before placing this restraint in a seating position equipped with a side air bag. DO NOT place any objects between the restraint and the side air bag, as an expanding air bag may cause the items to strike your child.
The forward-facing rear seat is the safest place for children 12 and under.

Specifications
The Evenflo NurtureMax Infant Car Seat boasts several key features that make it stand out:
- Weight Range: Suitable for infants from 4 to 35 pounds.
- Height Range: Designed for infants up to 32 inches tall.
- Installation Methods: Compatible with vehicle seatbelts and Evenflo Click Connect system.
- Safety Features: Includes a steel frame, impact-absorbing foam, and a secure harness system.
- Comfort Features: Features a plush, machine-washable seat pad and multiple recline positions for comfort.
Child Restraint Features
Front View
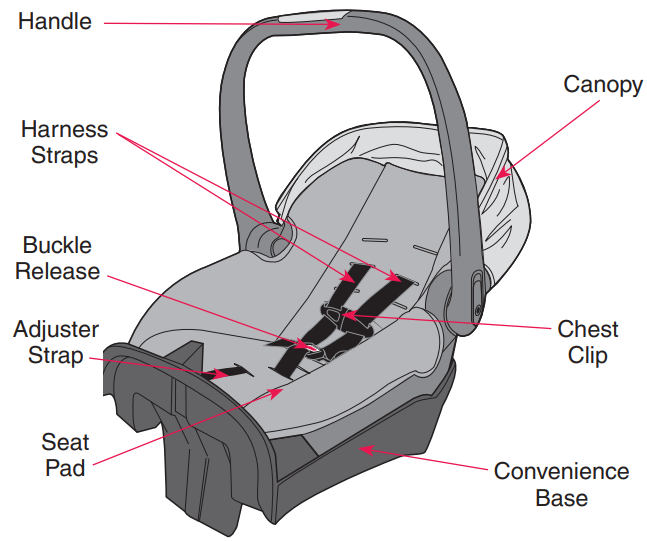
Back View
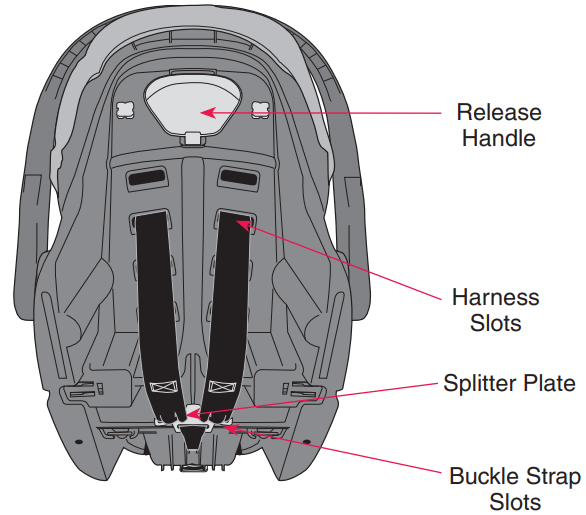
NurtureMax Convenience Base (Bottom)
_evenflo_nurturemax_infant_car_seat.png)
Removing and Storing Lower Anchor Connectors
- Press the adjuster release button to loosen lower anchor connector assembly
Press the tab and twist, then remove the hook from the anchor.
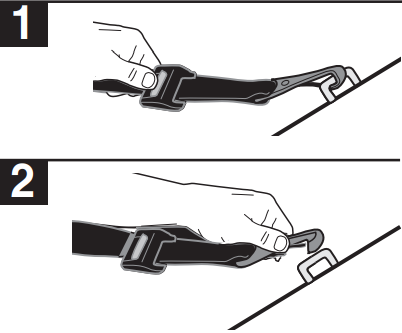
- When the lower anchor connector system is not in use, you MUST securely store it on the base as shown above using the storage bars on the underside of the base. A loose lower anchor connector strap and hook may injure your child.
Using the Carrier Handle
To change carrier handle positions, push down and rotate the handle to the desired position until it locks into place.
IMPORTANT
- ONLY use Positions 1 or 3 when traveling in a vehicle.
- NEVER use Positions 2 or 3 to carry your child.
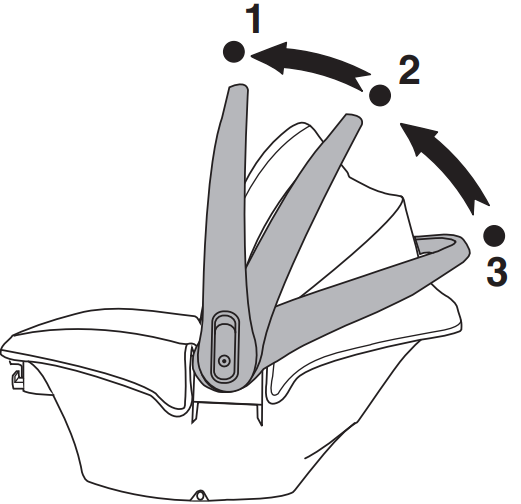
IMPORTANT: ALWAYS secure the child in the carrier.
- Position 1 (Carry/Travel)
ONLY use this position to carry your child or while traveling in a vehicle. - Position 2 (Safety)
NEVER use this position to carry your child or while traveling in a vehicle. Position 3 (Travel/Convenience)
ONLY use this position when traveling in a vehicle or removing your child from the carrier.
NEVER use this position to carry your child.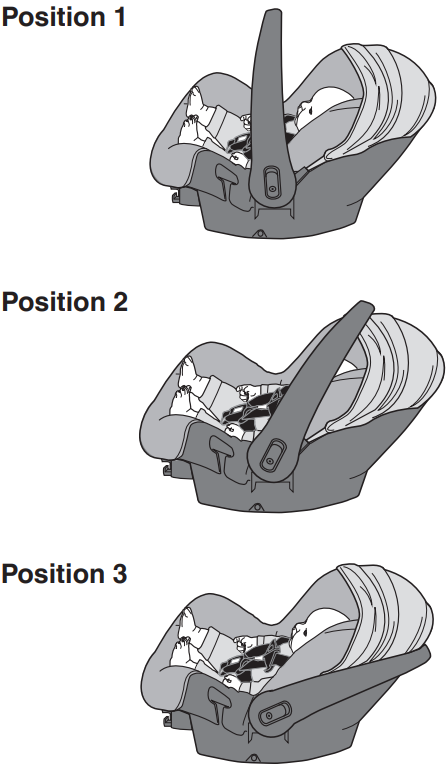
Proper Installation WITH the Convenience Base
Child Requirements
- Weight: 1.8 to 10 kg (4 to 22 lbs)
- Height: 43 to 73 cm (17 – 29 in.) and top of child’s head is at least 2.5 cm (1 in.) below the top of the child restraint seat back.
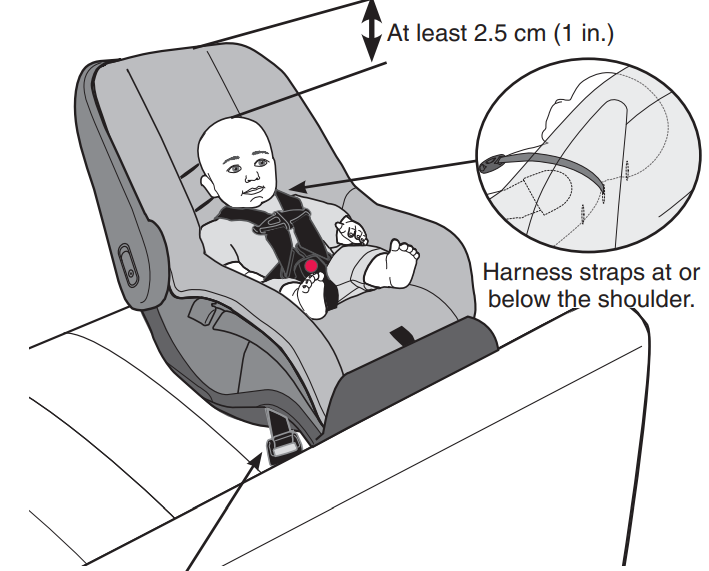
Vehicle Seat Belt / Lower Anchor Connector Assembly
IMPORTANT: Once your child exceeds any of the size requirements above, you MUST discontinue use of this child restraint.
Installing the Convenience Base with Lower Anchor Connectors
WARNING! DEAINJURTH or SERIOUSY can occur.
- This lower anchor connector assembly system is intended to be used ONLY as described in these instructions.
- In addition to these instructions and the instructions on your child restraint, read and follow your vehicle owner’s manual regarding installation of the child restraint and LATCH/UAS. If there is a discrepancy, follow your vehicle owner’s manual.
- ONLY use for securing convenience base to vehicle lower anchor bars.
- NEVER attach two lower anchor connector hooks to one vehicle lower anchor bar.
- NEVER use the vehicle seat belts when using the lower anchor connector. Using both together can cause slack in a sudden stop or crash.
- When not in use, the lower anchor connectors should be securely stored in the storage area located in the convenience base (see page 17). Keep out of reach of children.
- ALWAYS be sure that the lower anchor connectors are attached to the vehicle lower anchor bars by pulling hard on the lower anchor connectors. If they are not attached, the lower anchor connector assembly will not secure your child restraint. Serious injury or death may result.
- To avoid strangulation, you MUST store the unused LATCH/UAS straps. Roll or fold the excess LATCH/UAS strap and secure with a rubber band to prevent serious injury to vehicle occupants.
- This child restraint MUST face the rear of the vehicle.
- NEVER use this child restraint in the forward-facing position.
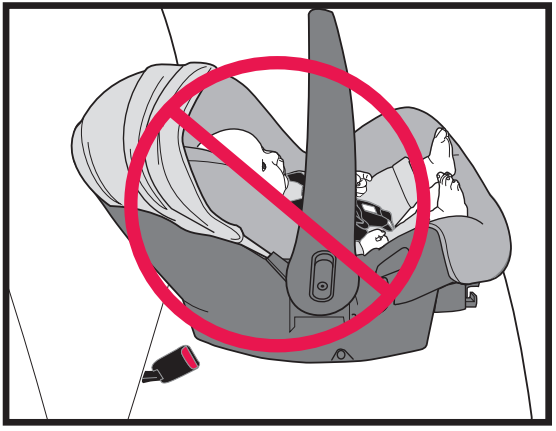
Installing the Convenience Base with Lower Anchor Connectors
- Before you begin, be sure the vehicle is on a level surface.
Place the base on the vehicle seat. Route the lower anchor connector strap and hook through the lower anchor connector strap openings.
Refer to your owner’s manual to locate the lower anchor bars on your vehicle seat.
Attach the right hook to the right anchor bar and the left hook to the left anchor bar. DOUBLE
CHECK that the hooks are fully engaged by pulling hard on the lower anchor connector strap. Using your full weight, push the base firmly into the vehicle seat, while pulling up on the strap to tighten.
The lower anchor connector assembly strap must be as tight as possible.
WARNING! DEAINJURTH or SERIOUSY can occur.
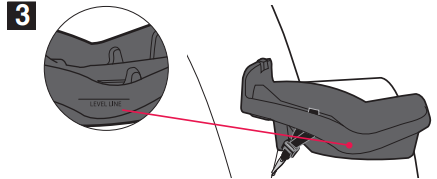
DO NOT use this child restraint if it moves more than 2.5 cm (1 in.) side-to-side or front to back at the belt path. Move the child restraint to another seating location, try to tighten the lower anchor assembly again, or install with vehicle belts as shown on the following pages.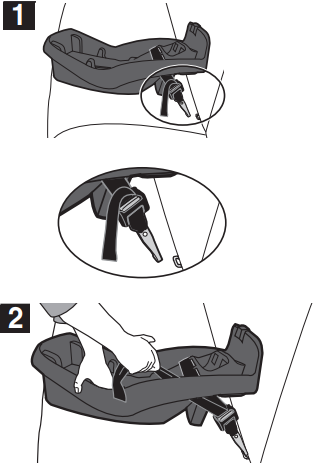
Adjust the base so that the level line is level with the ground and continue with Placing the Carrier in the Base.
Installing the Convenience Base with the Vehicle Seat Belt
WARNING! DEAINJURTH or SERIOUSY can occur.
- The carrier MUST be locked firmly into the convenience base. Check by lifting up on the carrier.
- NEVER use the vehicle seat belts when using the lower anchor connector. Using both together can cause slack in a sudden stop or crash.
- This child restraint MUST face the rear of the vehicle.
- NEVER use this child restraint in the forward-facing position.
- Check your vehicle owner’s manual to determine how to lock your seat belt for child restraint installation. The seat belt MUST be locked to properly secure the child restraint.
Before you begin, be sure the vehicle is on a level surface.
Secure the convenience base to your vehicle seat by routing the vehicle seat belt through the openings as shown, then buckle the seat belt.
IMPORTANT: Some ELR vehicle belts can be switched into locking mode for child restraint installation. It may not be necessary to use a locking clip in these situations. To install a locking clip, refer to page 44.
Refer to the vehicle owner’s manual to determine which type of belt retractor is in the vehicle.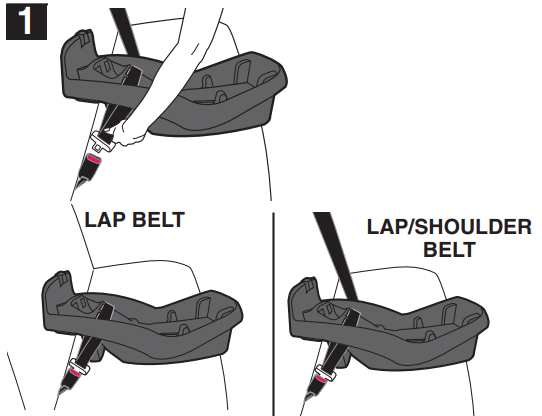
Pull the shoulder belt tightly to remove all slack from the lap portion of the vehicle seat belt and, at the same time, push down on the base using your full weight. Check to be sure the base is secured in the vehicle seat.
WARNING! DEAINJURTH or SERIOUSY can occur.
DO NOT use this child restraint if it moves more than 2.5 cm (1 in.) forward or side-to-side at the seat belt path. Move the child restraint to another seating location, try to tighten the seat belt again, or use the lower anchors instead.
Adjust the base so that the level line is level with the ground and continue with Placing the Carrier in the Base.

Description
The Evenflo NurtureMax Infant Car Seat is engineered with both safety and comfort in mind. The steel frame provides added strength and stability, while the impact-absorbing foam helps to absorb and distribute crash forces. The seat features a secure five-point harness that adjusts easily to accommodate growing infants. The plush, machine-washable seat pad ensures that the seat remains clean and comfortable, even after repeated use.
The car seat also includes multiple recline positions to help find the perfect fit for your vehicle and your baby's comfort level. Additionally, the canopy provides shade and protection from the sun, making it an all-around solution for infant transportation.
Changing the Buckle Strap Position
As your child grows, you will need to change the buckle strap position so that it is in the slot closest to your child. The buckle strap should always be as close as possible to, but not under, the child’s bottom.
There are four positions in which to use the buckle strap, based upon your child’s comfort.
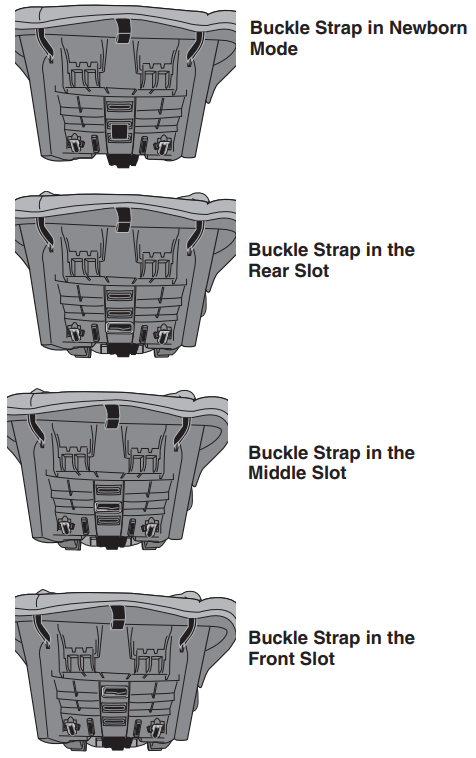
Changing the Buckle Strap Position
- Loosen the harness straps (p. 37) and move the strap out of the way.
Remove the Buckle Strap anchor from its position on the bottom of the carrier, and push the anchor up through the slot to the top of the seat. Insert the Buckle Strap anchor into the slot that is the closest to the child, but not under the child’s bottom.
Make sure the anchor is completely through and is lying flat against the bottom of the seat. Pull up on the Buckle Strap to make sure it is securely fastened.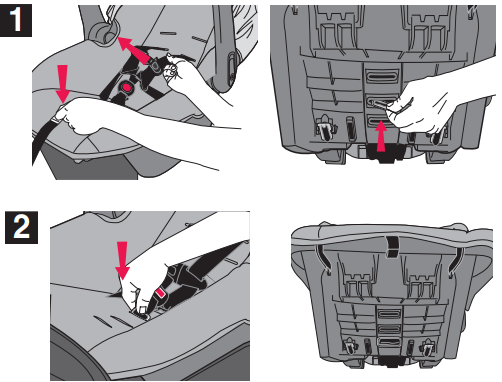
For Newborn Mode, place the anchor through the rear slot then feed it through the middle slot.
Make sure the anchor is completely through the middle slot and is lying flat against the bottom of the seat.
Changing the Waist Strap Position
As your child grows, you will need to change the waist strap position so that it is in the slot closest to your child. The waist strap should always be as close as possible to, but not under, the child’s legs, as suggested in the chart below.
| Approximate Child Size | Suggested Waist Strap Positioning |
|---|---|
| Small 1.8 - 2.7 kg (4 - 6 lbs) | Inner Slot |
| Medium/Large 2.7 - 10 kg (6 - 22 lbs) | Outer Slot |
NOTE: NurtureMax ships with both waist anchors in the outer slots.
- To reposition waist straps from outer to inner slots, loosen the harness straps by pressing the harness release button while pulling on the harness straps.
Push the Buckle Strap through the slot in the seat pad.
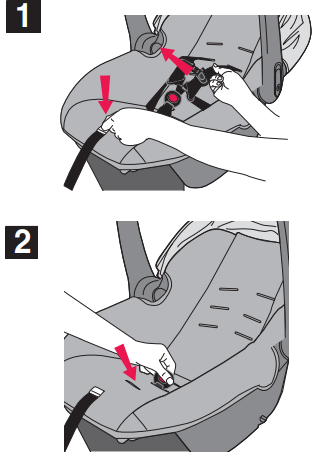
- Unhook the front of the child restraint’s seat pad and move it out of the way to expose the waist strap slots and anchors.
Remove the waist strap anchor from the outer slot on bottom of the seat, and push the anchor up through the slot to the top of the seat. Repeat for other side. Push the anchor down through the appropriate inner slot to the bottom of the seat then feed it through the outer slot to the top of the seat and repeat for other side.
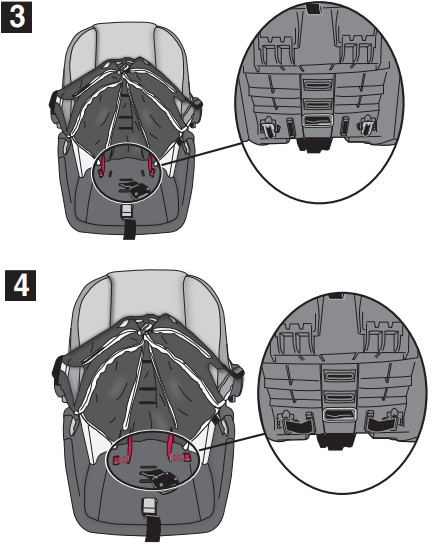
NOTE: See chart on page 42 to find the appropriate waist strap slots for your child’s size.
Using a Locking Clip of Evenflo NurtureMax Infant Car Seat
If your vehicle was built prior to model year 1996, and has a lap/shoulder belt that is equipped with an emergency locking retractor (ELR) AND sliding latch plate, you MUST use a Locking Clip. Check your vehicle owner’s manual to identify which vehicle belt system is in your vehicle and contact ParentLink to obtain a Locking Clip. If your vehicle is model year 1996 or newer, it likely has a vehicle belt system that can be locked when tightened, and will not require use of a Locking Clip. Consult your vehicle owner’s manual before installing a Locking Clip.
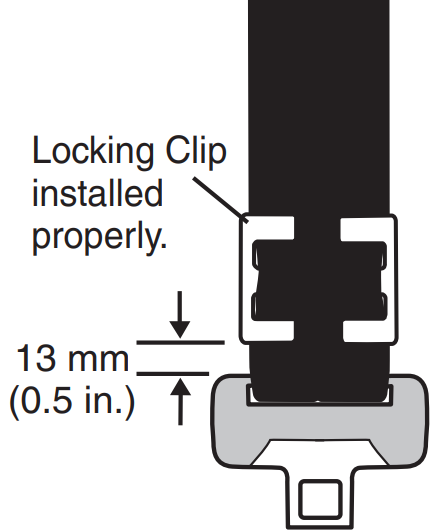
- Thread the seat belt through the base (or child restraint) and buckle the seat belt.
- Push down on the base while pulling the shoulder belt tightly to remove all slack from the lap portion of the belt.
Hold the lap and shoulder belts together just behind the free sliding buckle tongue and unbuckle the seat belt.
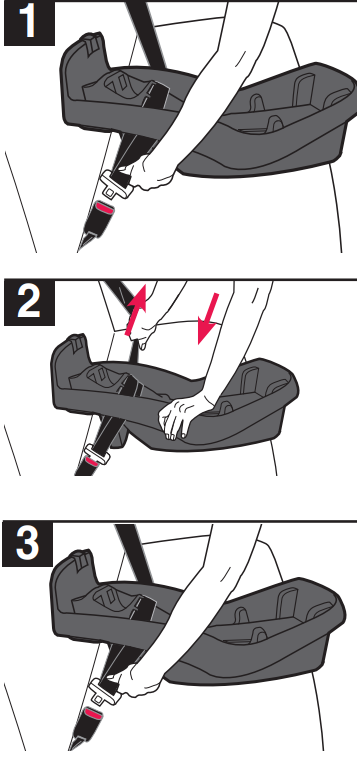
- While holding the belts and buckle tongue, thread the locking clip onto the seat belt, and slide it into place.
Note: Locking clip must be placed within 13 mm (0.5 in.) of seat belt buckle. Buckle the seat belt with the locking clip in place.
If using a vehicle seat belt and installing the convenience base only, return to page 23, Step 1.
If using a vehicle seat belt and installing the carrier with no base, return to page 31, Step 3.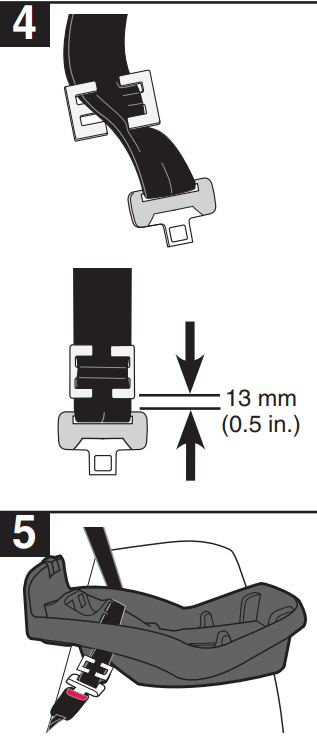
WARNING! DEAINJURTH or SERIOUSY can occur.
Remove locking clip from vehicle seat belt when not used with a child restraint, or the vehicle seat belt will not properly restrain an adult or child.
Setup Guide
Setting up the Evenflo NurtureMax Infant Car Seat is straightforward and user-friendly:
- Vehicle Preparation: Ensure your vehicle has a compatible seatbelt path or LATCH connectors.
- Seat Installation: Choose between using the vehicle's seatbelt or the Evenflo Click Connect system for installation.
- Harness Adjustment: Adjust the five-point harness to fit your baby securely, ensuring the straps are snug but not too tight.
- Recline Adjustment: Adjust the recline position to ensure your baby is comfortable and the seat is properly aligned with your vehicle's seat.
Care and Cleaning
- DO NOT lubricate or immerse in water the LATCH/UAS connectors, the buckle, or any other part of this child restraint, unless rinsing is permitted, as stated on the back of the buckle for your restraint.
- Plastic and metal parts may be wiped clean with mild soap and water and dried with a soft cloth. Do not use abrasive cleaners or solvents.
- Take care not to damage any labels.
- The harness can be wiped clean with mild soap and water. Allow harness to air dry.
- Machine wash the seat pad separately in cold water, delicate cycle. Tumble dry 10 to 15 minutes on low heat.
- To protect the child restraint from damage caused by weather, rodents, and other elements common to garages, the outdoors, and other storage locations, remove the seat pad and thoroughly clean the restraint and pad prior to storage. Take care to clean in the areas where crumbs and other debris tend to accumulate.
TIP: To help protect the vehicle upholstery, place a towel beneath and behind the child restraint.
Replacement Parts
To order replacement parts, you can order online at https://www.evenflo.com or contact Evenflo. When you contact us, please have the product model number and date of manufacture (found on the back of the child restraint).
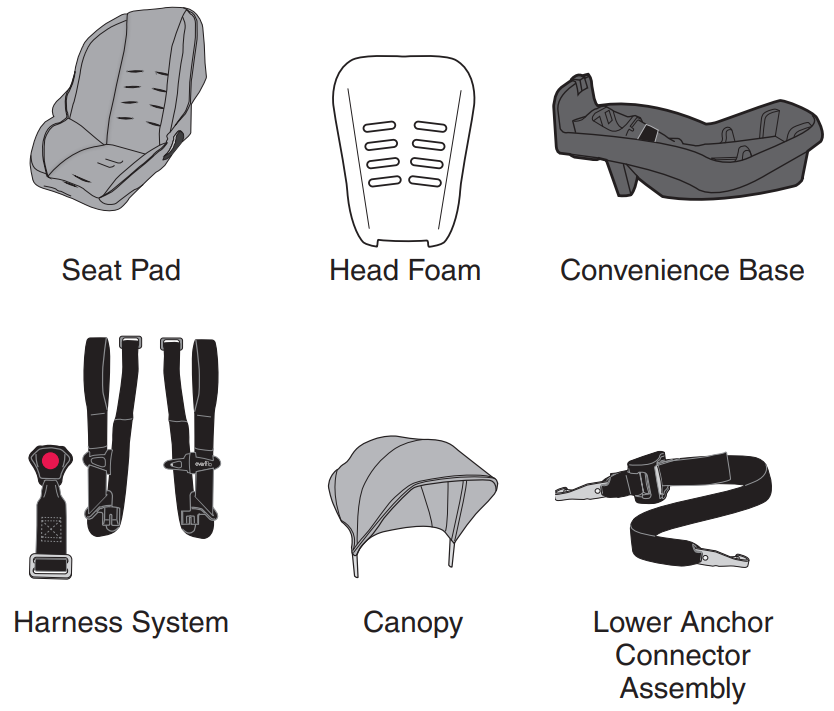
IMPORTANT
If you decide to obtain an additional base for your NurtureMax child restraint, look for sku/part number “6401000.” This sku/part number will appear on a label on the back of the base and will be printed on the front of the carton.
Storing Your Instructions
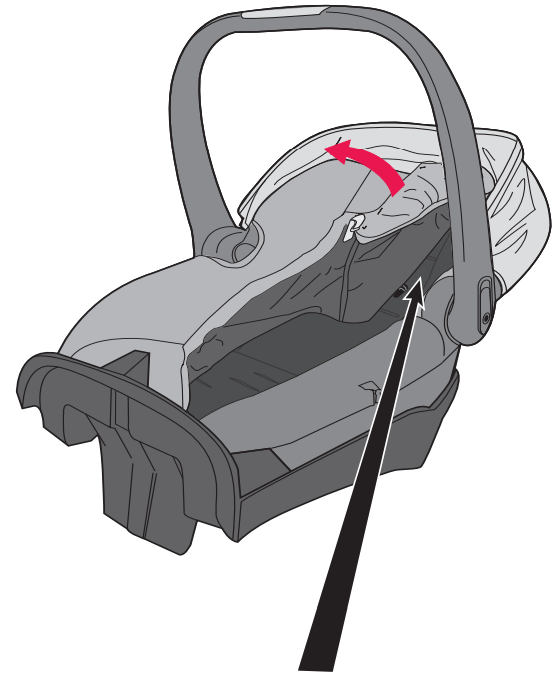
After thoroughly reading and following these instructions, store them in the carrier behind the seat pad, as shown.
Troubleshooting
Common issues with the Evenflo NurtureMax Infant Car Seat and their solutions include:
- Incorrect Installation: Double-check the installation instructions to ensure proper setup. Consult the user manual or contact Evenflo customer support if needed.
- Harness Adjustment Issues: Make sure the harness is snug but not too tight. Adjust the harness straps according to your baby's growth.
- Warning Signs: Always check for warning signs such as improper installation, loose straps, or expired product life.
Warranty
For a period of 90 days from the original purchase of this Product, Evenflo warrants to the original end user (“Purchaser”) this Product (including any accessories) against defects in material or workmanship. Evenflo’s sole obligation under this express limited warranty shall be, at Evenflo’s option, to repair or replace any Product that is determined to be defective by Evenflo and determined to be covered by this warranty.
Pros & Cons
Pros
- Advanced Safety Features: Includes a steel frame and impact-absorbing foam for enhanced safety.
- Ease of Installation: Simple installation process using the Click Connect system or vehicle seatbelt.
- Comfortable Design: Features a plush, machine-washable seat pad and multiple recline positions.
Cons
- Weight Limitation: Limited to infants up to 35 pounds, which may not be suitable for larger babies.
- Price Point: While competitive, the price range may be higher than some budget options.
Customer Reviews
Parents have generally praised the Evenflo NurtureMax Infant Car Seat for its ease of installation, comfort, and safety features. Some reviewers have noted that the seat feels sturdy and secure, providing peace of mind during travel. However, a few users have mentioned that the weight limitation can be a drawback for larger infants.
Common complaints include the higher price point compared to some other infant car seats on the market and the occasional difficulty in adjusting the recline positions. Overall, the NurtureMax is well-regarded for its performance and user-friendly design.
Faqs
What is the weight range for the Evenflo NurtureMax Infant Car Seat?
How do I install the Evenflo NurtureMax Infant Car Seat?
Is the seat pad of the Evenflo NurtureMax Infant Car Seat washable?
Does the Evenflo NurtureMax Infant Car Seat come with a canopy?
What are some common issues with installing this car seat?
How do I adjust the recline positions on this car seat?
What safety features does this car seat offer?
Can I use this car seat in any vehicle?
How long can I use this car seat for my baby?
Does this car seat have any expiration date?
Leave a Comment
