Feniex Industries Typhoon Controller C-4017 User Guide

Content
Feniex Industries Typhoon Controller C-4017
Introducing the Feniex Industries is a versatile and powerful handheld device designed for emergency vehicle applications. This controller integrates a 100-watt siren with multiple programmable outputs, allowing users to customize their alerts and signals effectively. With features like air horn functionality and radio rebroadcast capabilities, it enhances communication and safety on the road. Priced at approximately $199.99, it provides an essential tool for first responders and emergency personnel.
BOX CONTENTS
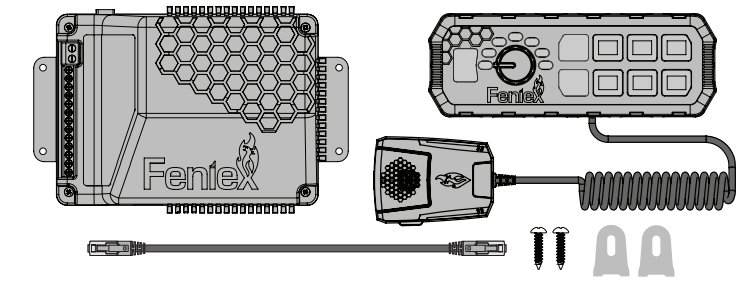
| COMPONENTS | QUANTITY |
|---|---|
| Typhoon Amplifier | 1 |
| Full Function Keypad w/external Mic | 1* |
| Short Arm L-Bracket | 2* |
| Screws | 2* |
| RJ45 Cable (15') | 1 |
| Button Legends | 130 |
| Microphone Clip | 1 |

| COMPONENTS | QUANTITY |
|---|---|
| Typhoon Amplifier | 1 |
| Handheld Controller w/integrated Mic | 1* |
| Microphone Nest | 1* |
| Screws | 2* |
| Coiled RJ45 Cable (15') | 1 |
| Button Legends | 130 |
DIMENSIONS
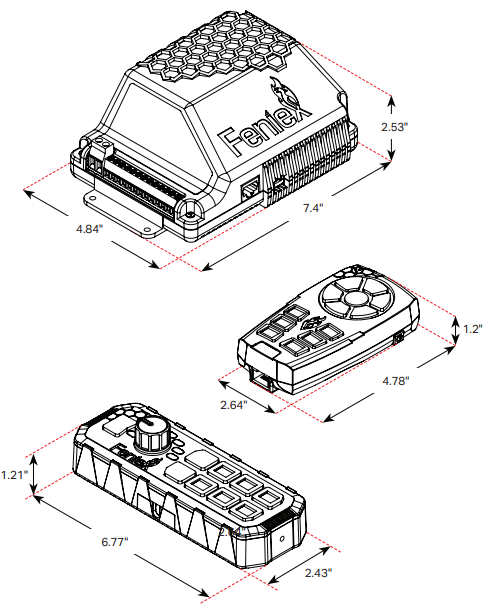
SYSTEM SPECIFICATIONS
| SPECIFICATION | VALUE |
|---|---|
| Input Voltage | 12 VDC |
| Max Amperage | 25 Amps |
| Standby Current | 50mA |
| Main Fuse | 30 Amp [onboard] |
| Impedance | 11 Ohms |
| Siren Output | 100 Watts |
| Siren Voltage | 35v RMS |
| Dimensions | 2.33" H x 13.94" L x 8.06" W |
| Amp Dimensions | 4.84" W x 7.4" D x 2.53" H |
| FF Dimensions | 6.77" W x 2.43" D x 1.21" H |
| HH Dimensions | 2.64" W x 1.2" D x 4.78" H |
| Housing | Aluminum |
| External Fuse | 125% of Circuit Load |
| Warranty | 2 Years |
Warning: The Typhoon is capable of outputting a maximum total of 12 amps for all 6 outputs, or 2 amps divided equally across all 6 output. The unit will power off if that capacity is surpassed.
PATTERNS, TONES, & WIRING
INTEGRATED FLASHER PATTERNS
| FLASH PATTERN | DESCRIPTION |
|---|---|
| Single Flash [Slow] | |
| Quad Flash [Slow] | |
| Single Flash [Fast] | |
| Quad Flash [Fast] | |
| Single Flash [Combo] | |
| Quad Flash [Combo] | |
| Triple Flash [Slow] | Combination #1 |
| Triple Flash [Fast] | Combination #2 |
| Triple Flash [Combo] |
SIREN TONES
| NUMBER | SIREN SOUND |
|---|---|
| 1 | Wail |
| 2 | Yelp |
| 3 | Fast Yelp |
| 4 | Phaser |
| 5 | Mechanical |
| 6 | Manual Wail |
| 7 | Hi/Lo |
| 8 | P-Call [Slow] |
| 9 | P-Call [Fast] |
| 10 | Horn & Phaser |
| 11 | Horn & Yelp |
| 12 | Phaser & Yelp |
| 13 | Ecto Siren |
| 14 | Bad Boys |
| 15 | Move Out of the Way |
| 16 | Pull Over |
| 17 | Step Out of the Vehicle |
| 18 | Step Out w/Hands Up |
| 19 | Remain in your Vehicle |
| 20 | Remain... Windows Down |
| 21 | Test Tone |
| 22 | Italian Police |
| 23 | Italian Ambulance |
FULL FUNCTION M1 & M2 TONES
| SIREN SOUND | ACTION |
|---|---|
| Manual Wail | Step Out of the Vehicle |
| Ecto Siren | Step Out w/Hands Up |
| Move Out of the Way | Remain In Your Vehicle |
| Pull Over | Remain... Windows Down |
WARNING: User settings for siren tones are stored in keypad/handheld, not in the amplifier.
Components

| KEY | FUNCTION | POLARITY | CONNECTION |
|---|---|---|---|
| A | Positive | 12v (+) | Positive Terminal |
| B | Ground | 12v (-) | Ground Terminal |
| C | Output #1 FC1 | 12v (+) | Latching Switch |
| D | Output #2 FC2 | 12v (+) | Momentary Switch |
| E | Output #3 | 12v (+) | Latching Switch |
| F | Output #4 | 12v (+) | Latching Switch |
| G | Output #5 | 12v (+) | Latching Switch |
| H | Output #6 | 12v (+) | Latching Switch |
| I | Airhorn Input | 12v (+) | External Button/Horn Ring |
| J | Park-Kill | 12v (+) | Signal from Vehicle BCM |
| K | Rebroadcast On | 12v (+) | External Switch |
| L | Radio Input | N/A | Audio Output from Radio |
| M | Radio Input | N/A | Audio Output from Radio |
| N | Siren Speaker | N/A | 100w Siren Speaker |
| O | Siren Speaker | N/A | 100w Siren Speaker |
When configured, outputs 1 & 2 are flasher channels 1 & 2
Description
The Feniex Industries Typhoon Controller C-4017 is built with a robust design that ensures long-lasting performance under demanding conditions. Its user-friendly interface allows operators to easily switch between different light patterns and siren modes, enhancing the effectiveness of emergency responses. The controller supports a wide range of light bars and sirens, making it highly versatile and adaptable to various vehicle setups.
The LED display provides clear visual feedback, allowing operators to quickly identify the current mode and make necessary adjustments. The controller also features dimming capabilities, enabling the adjustment of light intensity to suit different scenarios.
CONFIGURATION INSTRUCTIONS
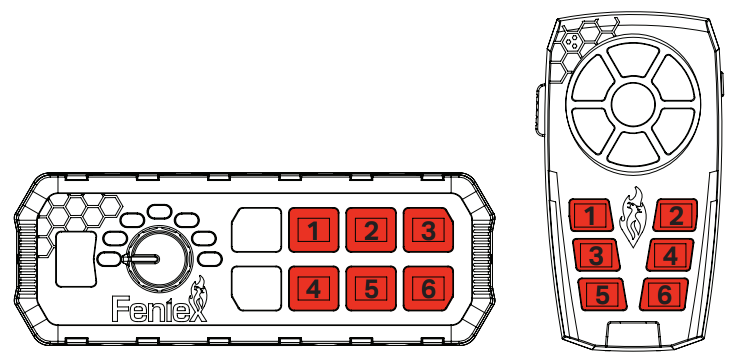
POWER
To power the unit, extend the red wire to a 12v (+) post. Extend the black wire to the ground post.
LATCHING OR MOMENTARY BUTTONS
WARNING: Only the buttons highlighted in red (above) can be programmed.
- Press the “On/Off” button to turn the system off.
- Press and hold the desired button you wish to program as momentary.
- Continue holding the selected button while holding down the “On” button for 3 seconds. A beep will sound when programmed.
- The button is now set as a momentary button. To reverse the function, repeat the steps above.
ACTIVATING FLASHER FUNCTIONALITY
- Press the “On/Off” button to turn the system off.
- Press and hold buttons 1 and 2 simultaneously.
- Continue holding buttons 1 and 2 while holding down the “On” button for 3 seconds. A beep will sound when programmed.
- You have now enabled button 1 as the “On/Off” for wig-wag and the button 2 as the pattern select.
To reverse the functionality, repeat the steps above.
POWER-UP FUNCTIONALITY
- Auto Power-Up: Keypad activates upon starting vehicle
- Manual Power-Up: Keypad remains off until manually activated using power button.
WARNING: To use this functionality, the Red Wire must be connected to an ignition switched circuit capable of providing current for all 6 outputs and the siren amplifier.
- Press the “On/Off” button to turn the system off.
- Press and hold the power button for 3 seconds. A beep will sound when programmed.
You have now Toggled the “Auto-On” function.
To reverse the functionality, repeat the steps above.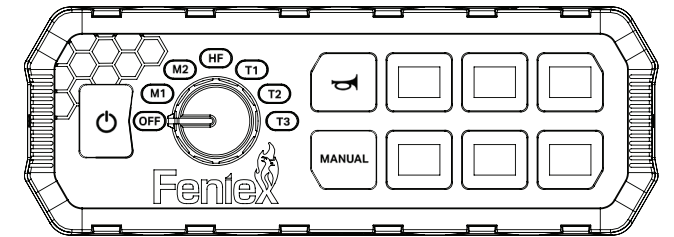
| CC | FUNCTION | ACTIVATION |
| OFF | Siren Off | N/A |
| M1 | Ramp Up/Down | Manual [Momentary] |
| M2 | Ramp Up/Stop | Manual [Momentary] |
| HF | Continuous | Manual x1 & Manual x2 |
| T1 | Continuous | Manual to switch tones |
| T2 | Continuous | Manual to switch tones |
| T3 | Continuous | Manual to switch tones |
CONFIGURATION INSTRUCTIONS & FEATURE INFORMATION

WARNING: Only the buttons highlighted in red (above) are siren functions.
SETTING SIREN BUTTONS TO MOMENTARY
- With the system powered off, press and hold the desired button you wish to program as momentary.
- Continue holding the selected button while holding down the “On” button until a beep is heard.
- The button is now set as momentary. To reverse the function, repeat these steps.

PARK-KILL
Park-Kill is used to deactivate any activated standard siren tone. Park-Kill does not deactivate audio recordings. The Park-Kill wire can be connected to your vehicle's overhead light, door trigger, or park-signal so that the siren is disabled when the door is opened or the vehicle is shifted to park.
RADIO REBROADCAST & MICROPHONE
When either Radio Rebroadcast or the Microphone is activated, any activated tone, standard siren tone or audio recording gets deactivated.
MICROPHONE VOLUME
To adjust the microphone volume, locate the mic volume dial (see diagram) on the side or top of the controller. Use a small phillips-head screwdriver to adjust the volume.
Setup Guide
To set up the Feniex Industries Typhoon Controller C-4017,
- Start by connecting the controller to your vehicle's electrical system according to the provided wiring diagram.
- Ensure all connections are secure and free from any potential shorts.
- Next, connect your light bars and sirens to the designated outputs on the controller.
- Power on the system and use the buttons to navigate through the different modes and patterns.
- You can program custom settings using the built-in memory feature.
MOUNTING INSTRUCTIONS
TYPHOON AMPLIFIER MOUNTING
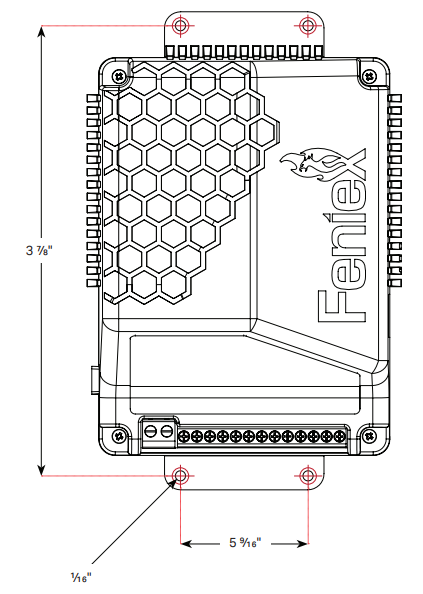
- Place the unit against the intended mounting surface.
- Mark the areas where the mounting holes will be drilled. If the mounting surface is part of the vehicle, make sure no vital components could be damaged by the drilling process.
- Pre-drill four 1/16" mounting holes on the mounting surface, making sure no vital components of the surface are damaged.
- Make sure to deburr the holes thoroughly.
TYPHOON HANDHELD MOUNTING
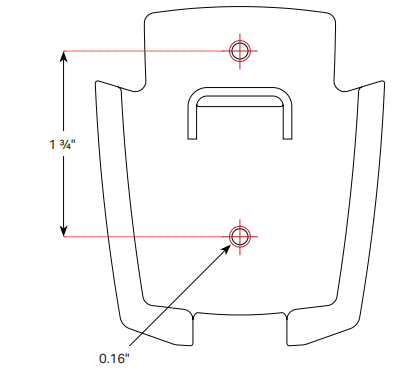
- Place the Handheld nest against the intended mounting surface.
- Mark the areas where the mounting holes will be drilled. Ifthe mounting surface is part of the vehicle, make sure no vital components could be damaged by the drilling process.
- Drill two 0.16" mounting holes on the mounting surface, making sure no vital components of the surface are damaged.
- Using customer provided screws, secure the Typhoon Siren to the mounting surface.
- Place the Typhoon Handheld Controller into the clip to hold the unit when not in use.
MOUNTING SWIVEL BRACKET
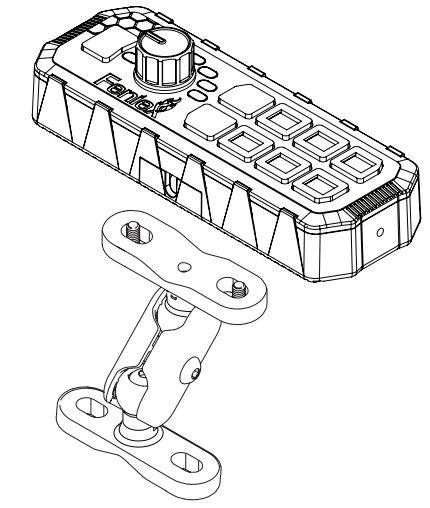
- Secure the Swivel Ball to the base of the controller using the #10-32 screw.
- Attach the swivel ball to the swivel bracket base using the provided screw.
- Using the provided screw, secure the two clamps loosely together.
- Place the clamps and screw around the 2 swivel balls. Tighten the clamp screw, thereby attaching the swivel bracket base to the full function controller.
- Secure the Swivel Bracket to the rear of the controller (as shown in the diagram).
- Place the unit against the intended mounting surface.
- Mark the areas where the mounting holes will be drilled. If the mounting surface is part of the vehicle, make sure no vital components could be damaged by the drilling process.
- Drill two mounting holes on the mounting surface, making sure no vital components of the surface are damaged.
- Using customer provided screws, secure the Full Function controller to the mounting surface.
MOUNTING L-BRACKET
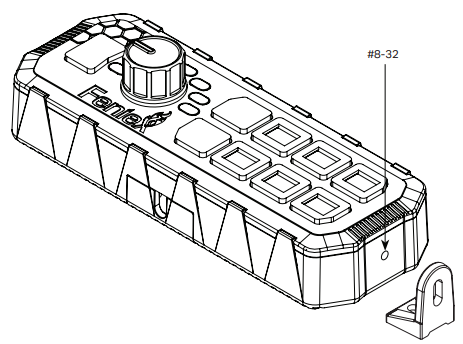
- Utilizing the provided screws, secure the L-Brackets to each sides of the controller using a Phillips head screwdriver at a torque setting of 1 in*lb.
- Place the unit against the intended mounting surface and mark the areas where the mounting holes will be drilled. If the mounting surface is part of the vehicle, make sure no vital components could be damaged by the drilling process.
SAFETY REGULATIONS
The following provides all the information necessary to safely operate the previously listed products of Feniex Industries, Inc. Please read this manual thoroughly before installing or operating your new product in order to prevent any damage or injury. Failure to follow the listed instructions in this manual may result in damage to your products or personal injury.
- Proper installation of this product requires good knowledge of automotive systems, electronics & procedures.
- Please guarantee all vital components of the vehicle are not in danger of being damaged by drilling holes necessary for installation. Check all sides of the mounting surface before drilling any holes into the vehicle.
- Do not install this product in any way that interferes with the deployment of the air bag. Doing so may damage the effectiveness of the air bag & can lead to serious personal and vehicle injury. The installer will assume full responsibility of proper installation of the new unit.
- Please clean the mounting surface before installation of the unit when using tape, brackets, magnet, Velcro or suction cups.
- The product’s ground wire must be connected directly to the negative (-) battery post for effective use of the unit. Please follow all wiring guidelines provided to guarantee long lifespan & productivity. Failing to follow these instructions may result in damage to the product.
Troubleshooting
If you encounter issues with the Typhoon Controller C-4017, check the following common problems and solutions:
- No Power: Ensure all connections are secure and check the fuse or circuit breaker.
- Incorrect Mode: Use the buttons to select the correct mode or pattern.
- Dimming Issues: Adjust the dimming settings or check for any obstructions in the light path.
Always follow safety instructions when troubleshooting electrical systems to avoid injury or damage.
Feniex Industries Typhoon Controller C-4017 Pros & Cons
Pros
- Highly programmable with up to 10 different patterns
- Robust and durable construction
- Easy-to-use interface with clear LED display
- Compatible with a wide range of light bars and sirens
- Adjustable dimming capability
Cons
- Higher price point compared to basic controllers
- May require professional installation for complex setups
- Limited compatibility with older model lights or sirens
Customer Reviews
Customers have praised the Feniex Industries Typhoon Controller C-4017 for its reliability, ease of use, and extensive customization options. Many have noted that it significantly enhances their emergency response capabilities by providing clear and effective communication through light and sound.
However, some users have mentioned that the initial setup can be complex, especially for those without prior experience with similar controllers. Additionally, there have been some reports of compatibility issues with certain older models of lights or sirens.
WARRANTY
Feniex Industries, Inc. warrants to the original purchaser that the product shall be free from defects in material & workmanship for 5 years from the date of purchase for all LED products. Feniex Industries warranties speakers, sirens, flashers, & controllers for 2 years.
Faqs
Is the Typhoon Controller easy to install?
Can I program custom light patterns on the Controller C-4017?
What safety precautions should I take when using the Feniex Industries?
Can I adjust the brightness of the lights controlled by the C-4017?
Does the Feniex Industries Typhoon come with a warranty?
Can I use multiple Feniex Industries Typhoon Controller C-4017 in one vehicle?
Leave a Comment
