Tips For Using: Giani Granite Countertop Kit Instruction Manual

Content

Introduction of Giani Granite Countertop Kit
Introducing the Giani Granite Countertop Kit, a revolutionary product that empowers you to transform your outdated counters into stunning granite-like surfaces. With an estimated price range of $150 to $200 and available now, this kit is an affordable and exciting way to upgrade your kitchen or bathroom.
Detailed Specifications
The Giani Granite Countertop Kit includes the following high-quality components to ensure a professional-looking result:
- Specialty base coat
- Granite-effect topcoat
- Decorative accent colors
- Application sponges and rollers
- Protective finish
- Detailed instructions
Giani Granite Countertop Kit Instructions
Before Using Giani
- Clean with a scouring pad such as a SOS or Brillo pad to remove grease and dirt (Do not use any other cleaners)
- Rinse with water at least twice to remove all cleaner residue
- Use FrogTape Painter’s Tape to stop bleed through
- Apply two rows of tape above back splash
- Patch deep nicks and seams with wood patch. Sand the patch smooth
Giani will cover thin scratches
- Remove any loose latex or silicone caulk
- Replace with paintable caulk or clear caulk after painting. If you are using a fast drying caulk that advertises 30 min. dry time, you will still want to wait 8 hours before painting over the caulk.
IMPORTANT: Not for sinks, tubs, flooring, or shower floors, as it is not designed to be submerged in water.
Roll on Primer
- After shaking the primer can well, use the foam brush to paint narrow ½” wide strip of primer at the bottom and top of your backsplash in a small, three foot wide section.
- Next, working in small 3-foot sections, use the roller to apply a thin coat of primer starting with the backsplash and working your way to the countertop surface.
- Move onto the next 3 foot section so the 2 sections blend while they are both still wet and repeat until the entire countertop is covered. Wait 8 hours for the primer to dry before starting step 2.
- Clean your foam brush for re-use and dispose of the roller cover.
Helpful Tip: After you are done, if you go back and notice a spot that you missed, first allow the counters to dry for an hour before touching it up with the foam brush.
NOTE: Plastics and virgin wood must be pre-primed before applying Giani Primer. Apply with a foam roller for a smooth finish and wait 8 hours before apply Giani Primer.
Giani Granite Countertop Kit Sponge on Minerals
Recommended: Practice the Mineral application on the Kit’s Black Practice Sheet (or regular black construction paper to mimic black primer) before beginning to paint on your counters.
- Cut the sponge in half, then cut each piece in half again giving you 4 pieces.
- Pour small amounts of each Mineral onto its own paper plate.
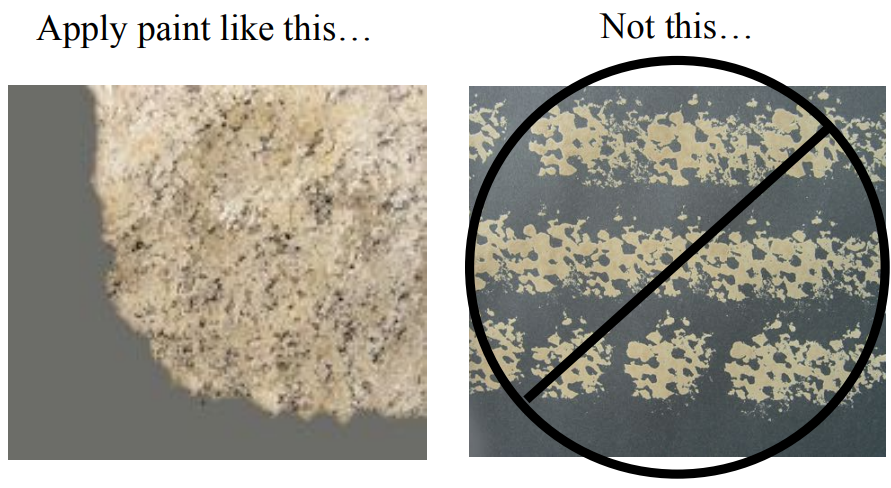
- Dip the textured side of the sponge into Step 2A Mineral and dab off excess on a clean paper plate. (Cans are not filled to the top because standardized cans are used. Adequate volumes are provided to complete the coverage.)
Working in small 2’x2’ foot sections tap
2A lightly onto your counter creating a nice imprint of the sponge. (If you get a “paint blob” you are pushing down too hard.) Let some of the black show through but be sure to have each imprint overlap each other. While 2A is still wet, use another piece of sponge to apply Step 2B Mineral over the top of 2A following the same application. Repeat again with Step 2C Mineral.
Tip for Chocolate Brown kit and Slate kit
After 2C has been applied, use the 4th piece of sponge and to dry sponge and blend the colors. For Chocolate Brown, tap very lightly over the section to cut down some of the red showing through in the brown and to slightly blend. For Slate, push down with more pressure to blend all three colors together. This is a personal preference, as some may like it more blended than others.
Move on to the 2’x2’ section right next to the section you just completed following the same application technique as above, overlapping as you sponge. Don’t forget to sponge the backsplash as you finish up each 2’x2’ section that you are working on. Let dry for 4 hours before applying the topcoat. Sand down any peaks, if needed.
Backsplash Tip: To get into the crevice, attach a piece of the sponge to the end of a pencil. Watch the application video for the backsplash at https://gianigranite.com/
Special Note for Bombay Black
Be sure to stir your Pearl Mica and Bronze Minerals because their metallic flecks may settle. You may use a plastic grocery bag in place of the sponge to apply the minerals to create natural looking veins that appear in granite. You may also like to apply Black Onyx after Pearl has dried to create a deeper black granite look. Apply the Bronze color sparingly as a little goes a long way.

Roll on Clear Topcoat
- Use the Kit’s foam brush and apply a narrow strip of the Topcoat to the top and bottom of your backsplash in a section that is about 3’ wide.
- Next, use the Kit’s second roller pad and apply a thin coat of the Topcoat to the backsplash in same section. (Don’t push the roller cover onto the roller arm too far because it may affect its ability to roll easily)
- Now apply the Topcoat with the roller to the 3’ section countertop surface. (If your tops have a sloping front edge, continue your roll stroke over the edge.) Immediately after coating the section, roll back over the area by using one set of end-to-end, one way, roll strokes across the top. Be sure to not create lap lines by pushing too hard while rolling.
- If you missed a spot, don’t worry, you will get it on your next coat. DON’T re-roll the area, as you will create a tacky surface that will have texture on it once dry. Repeat the process with each adjoining section until the entire countertop is covered.
- When done, clean the roller cover with warm water and let dry.
- Wait 4 hours before applying the second coat. There is no need to sand between coats unless it is not completely smooth. Once dry, run your hand over the surface to make sure that there is no texture. If there is, lightly sand with a #600 grit sandpaper and clean up with a damp cloth. Make sure the surface is completely dry and dust free before applying the 2nd coat.
- After your final topcoat (recommended to apply 2, max of 3), wait 1 hour and score the tape with blade and slowly pull. Be sure to wait 12 hours before applying clear caulk around your sink’s rim.
When can I use my countertops again?
Wait 24 hours after the final topcoat layer before using your countertops and dishwasher. After 3 days, you may set light appliances back on your surface (such as a toaster, cutting board, knife holder), but it is recommended to wait the full cure time of 14 days before placing heavy appliances (such as a microwave) back on your counters.
Full cure time for Giani is 14 days. While you can clean gently during this time we do not recommend cleaning aggressively until after the 14 day cure time. (Please note: We recommend only using soap and warm water to clean your counters, do not clean with harsh chemicals or household cleaners.)
Giani Granite Countertop Kit Description
Transform your counters in just three steps with the Giani Granite Countertop Kit. This user-friendly product delivers a luxurious granite-like finish with a durable protective coating. The kit is available in various colors to suit any style, from classic to contemporary. With its easy-to-follow instructions, you can achieve professional results without the need for special skills or hiring a costly contractor.
Cold Weather Alert
Important
Due to lower outside temperatures during the winter, the temperature of your countertop is likely to be cooler than your room because of the unheated cabinet space below, and their attachment to outside walls. Colder countertop temperatures will slow down the drying times, which may adversely impact the coating. Therefore, it’s important to increase your countertop’s temperature with the following steps -
- Make sure your GIANI™ kit is inside your home for at least 48 hours before you start your project
- Turn your heat up to 72○F the night before your start your project - and until you apply your last coat -
- Open your cabinet doors to allow the heat in underneath your countertops the night before you begin.
Giani Granite cures in 14 days at 77F and 50% relative humidity. You may fully use your countertops one day after you completed your application. Simply minimize aggressive cleaning for the first 14 days. Avoid leaving trapped water on your countertops over night, such as under a washcloth, cutting board, coffee pot or dish rack. If this occurs, the liquid may react with the Topcoat, creating a temporary texture, which will totally disappear and fully recover in approximately six hours if left untouched.
Cleaning: NEVER use harsh chemicals such as bleach, vinegar, household cleaners, or any abrasives such as Comet or Soft Scrub. Never use scratch pads. ONLY use mild dish soap and water or Giani Cleaner. If food gets stuck on, lay a warm wet cloth over the food for a few minutes and remove with cloth. Also always use a cutting board and hot pads
Customer Reviews
"I couldn't believe how easy it was to transform my kitchen counters with the Giani Granite Countertop Kit. It looks fantastic, and I saved so much money!" - Susan M.
"This kit is an absolute game-changer. I was able to update my bathroom counters in a single weekend, and they look amazing. Highly recommend!" - James C.
Giani Granite Countertop Kit Potential Complaints
Some users have reported that the kit can be time-consuming to apply, but the impressive results make the effort worthwhile. Additionally, ensure proper surface preparation for optimal adhesion and longevity.
Faqs
How much time does the Giani Granite Countertop Kit take to install?
Can I use any kind of countertop material with the Giani Granite Countertop Kit?
What is the total square footage covered by a single Giani Granite Countertop Kit?
What comes with the Granite Countertop Kit from Giani?
How should I use the Giani Granite Countertop Kit to get my countertops ready for painting?
Is there something that the Giani Granite Countertop Kit cannot be used on?
What upkeep is necessary following the application of the Giani Granite Countertop Kit?
How should my recently refinished counters be maintained and cleaned?
Is there a material that the Giani Granite Countertop Kit cannot be used on?If I make a mistake when applying, what should I do?
How many coatings of the Giani Granite Countertop Kit are needed for each component?
Leave a Comment
