Gld Products RENO-II Pool Table 64-0126 User Guide
Content
Introduction
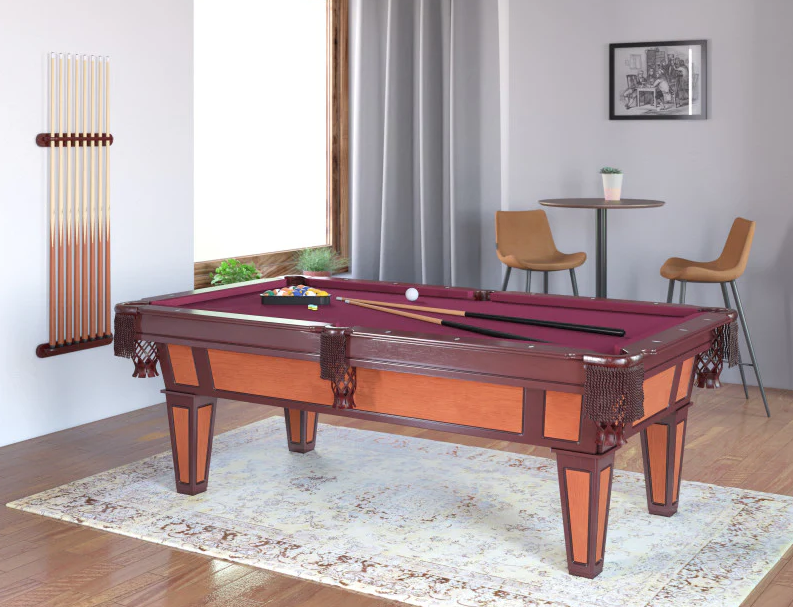
The GLD Products RENO-II Pool Table 64-0126 is a stunning addition to any game room, designed for both casual players and serious billiards enthusiasts. This 7.5-foot table features a durable Accuslate playing surface that ensures consistent play, complemented by elegant six-inch rails with white diamond inlays and burgundy wool cloth. With its solid construction and stylish design, it promises hours of entertainment for family and friends. Priced at $1,199.99, the RENO-II combines quality craftsmanship with aesthetic appeal for an exceptional gaming experience.
Specifications
- Table Size: 7-foot (89" x 45")
- Material: Solid wood with a rich walnut finish
- Cloth: High-quality, tournament-grade felt
- Pockets: Leather drop pockets with chrome accents
- Frame: Sturdy, heavy-duty frame with reinforced brackets
- Balls: Includes a set of 2.25" regulation size pool balls
- Cues: Two-piece cue sticks included
- Weight: Approximately 450 lbs
Parts Identifier


- If replacement bolts are needed a 7/16" Hex Head Bolt can be used.
Common fasteners are available at your local hardware store.
Preparing for Assembly
- Be sure to unpack all of the parts included in this package. Some parts may be in obscure locations of the packaging. Check inside any tubes or sleeves. Save all packing material until the product is fully assembled and functional.
- Compare the parts in your package with the Parts Identifier description on page 5.
- After unpacking large products, some disassembly may be required prior to beginning the assembly.
GLD Products RENO-II Pool Table 64-0126 Tools Required
- Wrench (#23) - included with table
- 5/32" Allen wrench (#24) - included with table
- Phillips screwdriver (not included)
- Flat head screwdriver (not included)
- Level (not included)
- Electric screwdriver may be helpful. CAUTION: You must set at LOW TORQUE and use extreme caution because you could overtighten the hardware, strip the screws, or damage the table.
- 12 mm Hex socket or wrench (not included)
Assembly Tips
Make sure you understand the following before you begin to assemble your game table.
- READ THIS MANUAL all the way through before beginning assembly.
- When installing parts that have more than one bolt, start ALL bolts in that part by hand before tightening anything.
- Some drawings or images in this manual may not look exactly like your product.
- You will need a second adult to assist with this assembly.
Note: Save all packing materials until the parts have been inspected and the table is assembled.
Description
GLD Products boasts a classic walnut finish that adds a touch of sophistication to any room. The table features a solid wood construction, ensuring stability and longevity. The tournament-grade felt provides a smooth and consistent playing surface, while the leather drop pockets add a professional touch. The chrome accents on the pockets and the reinforced frame brackets enhance the table's durability and aesthetic appeal.
This pool table comes with all the necessary accessories, including a set of regulation size pool balls and two-piece cue sticks. The overall design and build quality of the RENO-II make it an excellent choice for both home and commercial use.
Unpack the Pieces
- Lay the box on a flat surface (floor). You may want this near your area of assembly.
- Several boxes should be visible and strapped to the underside of the table top.
- The table top should be at the bottom.
- The straps should be removed and the boxes opened. Some table designs require that the legs be shipped separately.
- Unpack the boxes and part bags. Inspect and count the parts. The Parts Identifier page can be used to record your results.
- If any parts are damaged or missing contact GLD customer service.
- Missing fasteners may be purchased at a hardware store using the descriptions on the Parts Identifier page(s).
STEP 1 - ASSEMBLE THE APRONS
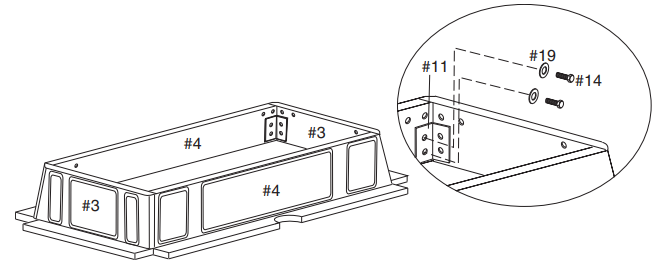
- Place the four apron side pieces (#3 and #4) in position. They should be upside down.
- Use an angle bracket (#11) in each corner. Finger start four bolts (#14) with washers (#19) through the angle bracket and into two of the apron pieces.
- Repeat in all four corners.
- Tighten all the bolts (wrench #23). When tightening the bolts, be certain the two pieces are properly lined up at the corners.
STEP 2 - ASSEMBLE LEG BRACKET
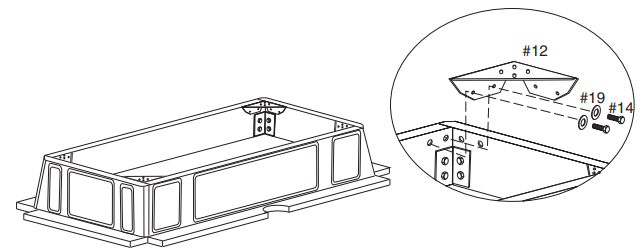
- Install one leg mounting bracket (#12) in each corner. Use four bolts (#14) with washers (#19). Finger start all the bolts. Note that the flat part of the bracket will be up and even with the side aprons.
- Hold the bracket in position and tighten all the bolts (wrench #23).
STEP 3 - ASSEMBLE THE LEGS
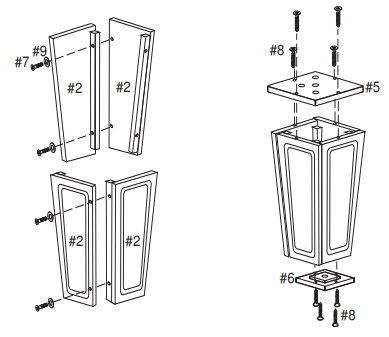
All of the leg sides are the same and can be assembled interchangably.
- Select two leg sides (#2) and position them as shown.
- Start two screws (#7) with washers (#9) then tighten with Allen wrench (#24). Repeat with remaining sides to form 4 legs.
- Prepare the leg tops (#5) by starting the 4 screws (#8) from the finished side of the top piece. To make assembly easier, a small length of the screw tips should be protruding out on the rough side of the leg top.
- Position the top piece with the screw points in the predrilled holes in the top of the leg assemblies.
- Start each screw into the leg. Tighten all 4 screws in each leg using a Phillips screwdriver and turn the legs over.
- Prepare the 4 leg bottoms (#6) by starting the 4 screws (#8) from the finished side of the leg bottom. To make assembly easier, a small length of the screw tips should be protruding out on the rough side of the leg bottom.
- Position the bottom piece with the screw points in the predrilled holes in the leg sides.
- Start each screw into the leg. Tighten all 4 screws using a Phillips screwdriver.
- Repeat for the remaining legs.
STEP 4 - ATTACH THE LEGS
- Each leg is held in place by four bolts (#15) with washers (#19).
- Position the leg on top of the bracket. Insert a bolt with washer through the bracket and into the leg.
- Finger start all four bolts, then hold the leg in its final position.
- Tighten the bolts using the wrench (#23). Repeat for the other 3 legs.
- Screw the leveler (#21) half-way into the bottom of each leg.
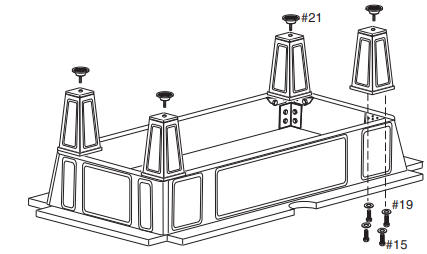
STEP 5 - TURN BASE OVER
The base assembly is ready to be turned over.
USE AT LEAST TWO PEOPLE TO LIFT THE BASE ASSEMBLY AND TURN IT OVER TO REST ON THE LEGS.
DO NOT ROLL THE TABLE OVER. This will place a sideways force on the legs. The legs should be off the floor until the base assembly is rotated completely. Set the base assembly down.
If visually the leg positions need adjusting, loosen the bolts, adjust, and retighten.

STEP 6 - INSTALL SUPPORT BEAMS
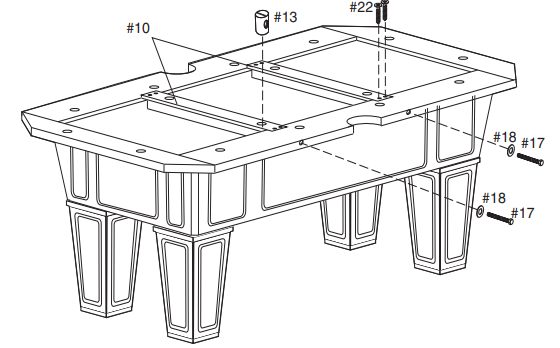
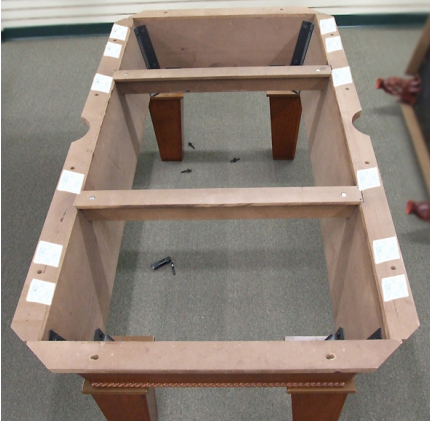
- The table base is now right-side up. To install the two support beams (#10), position the support beams on the base assembly in the appropriate slots.
- Insert a bolt (#17) with a washer (#18) through the side support.
- Insert a barrel nut (#13) into the hole at the end of the beam, making sure the slot is visible and the slot lines up with the bolt. Thread the bolt into the barrel nut. If the barrel nut drops too far into the hole in the support beam, the threads will not engage. If this happens, use a magnet or turn the support beam over to remove the barrel nut. Thread the bolt into the barrel nut.
- When the bolt is in place the nut can be pushed down to line up with the bolt. Thread the bolt into the barrel nut.
- Hold the support beam in place by screwing in the side support bolt until snug, not tight.
- Insert two screws (#22) in the ends of the support beams and tighten with a Phillips screwdriver.
- Tighten the bolts using a 12 mm socket wrench.
NOTE: The support beams should not rise up above the surrounding frame. If this happens loosen the bolt until the support drops. The bolt can be tightened after the top is on and secure. - The base can now be leveled.
STEP 7 - LEVEL THE TABLE BASE
Do not drag the table to a new position. Lift and carry it. Do not lift using the pockets.
- Put the base where you will be using the table.
- Use a carpenters level to find the low side.
- Lift the table leg off the floor and unscrew the leveler in the bottom of the leg a small amount.
- Repeat until the base is level. Be sure to check level at both ends side to side as well as the longer length.
STEP 8 - ATTACH THE TABLETOP
- Inspect the underside surface of the table top (#1). When the table is shipped there are several wooden shipping blocks screwed to the bottom. These must be removed. The area of the table top that rests on the side supports must be free of raised material around screw holes.
NOTE: Be certain the two support beams (#10) are screwed down, not over-tightened and will not push up on the table top. - Using at least two people, lower the table top (#1) onto the base.
- Line up one or two of the holes in the top with the holes in one end of the base assembly.
- Finger start a bolt (#16) with a washer (#20) into the hole(s).
- Line up the remaining holes and finger start a bolt with a washer in each.
- Check the position of the table top.
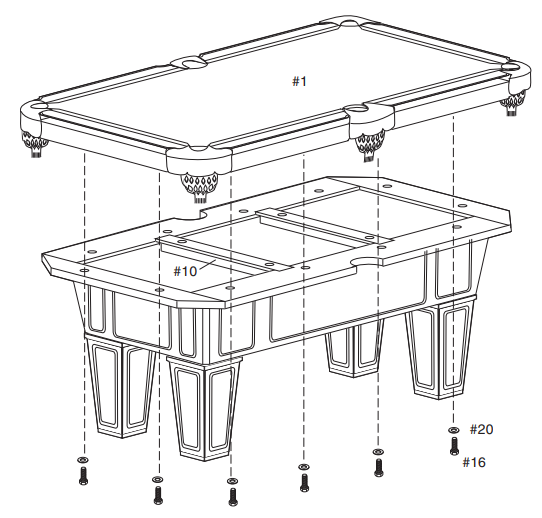
STEP 9 - SECURING AND LEVELING THE TABLE TOP
When the table top is in position, and not screwed down, it is flat.
- Be certain the table base is in it’s final position and level.
- The table top must be in it’s final position.
- Finger tighten all the bolts.
CAUTION: If using a power tool to tighten the bolts, be certain it is on a low torque setting. - Using the proper wrench, lightly tighten each bolt without crushing the underside supports.
- When the bolts are secure, test for level. Roll one of the pool balls slowly over the playing surface. If the ball rolls on a straight path, the table is level. If the path curves, the table needs to be leveled (see Step 7).
- If the two support beams need to be tightened do it now. Tighten the four bolts until snug. Over-tightening may lift the table top upward.
THE TABLE IS ASSEMBLED. IF IT IS NOT ALREADY IN POSITION FOR PLAY, IT CAN BE MOVED.
DO NOT SLIDE OR DRAG. Use at least two adults to lift into position, then re-level.
Setup Guide
To set up your RENO-II Pool Table 64-0126,
- Start by carefully unboxing all components. Ensure you have a flat, level surface to assemble the table on.
- Follow the provided instructions to attach the legs, frame, and slate top. Align the slate pieces precisely and secure them using the recommended fasteners. Install the pockets and attach the cloth to the slate surface using the supplied staples or glue.
- Once assembled, level the table to ensure even play. Place the balls and cues in their respective positions, and your table is ready for use.
- It is recommended to have at least two people to help with the assembly process due to the weight and size of the components.
Care and Use of your Table
- This product is intended for INDOOR use only.
- DO NOT sit, climb, or lean on the table.
- DO NOT drag the table when moving it. This will damage the legs.
- Keep your table covered. The playing surface can be brushed or lightly vacuumed with low suction.
- DO NOT lift the table by placing your hands under the pockets, and do not sit, lean or put pressure on the pockets.
- The cloth playing surface can rip or tear. Keep sharp objects off the playing surface.
- Some “trick shots” may tear or dimple the cloth surface.
- To clean the hard surfaces spray a cloth with a mild cleaner and wipe.
TROUBLESHOOTING
Problem: Pool balls change direction and roll toward one of the pockets.
Cause: The corner of the table top is low.
Solution: Loosen the bolts that hold the table top to the supports. Place shims (.010 inch thick) on each side of the corner pocket. Tighten the bolts and roll pool balls to test.

Problem: Pool balls roll to edges.
Cause: The playing surface is high in the center.
Solution: Loosen the bolts that hold the table top to the supports. Add shims (.010 inch thick) along the two side supports. Tighten the bolts on the two short ends first. Then lightly tighten the bolts along the edges. Roll pool balls to test.
GLD Products RENO-II Pool Table 64-0126 Pros & Cons
Pros
- High-quality, durable construction
- Tournament-grade felt for smooth gameplay
- The elegant walnut finish adds style to any room
- Includes essential accessories like balls and cues
- Reinforced frame for stability and longevity
Cons
- Heavy and requires multiple people for assembly
- Higher price point compared to some other models
- Requires regular maintenance to keep the cloth and surface in good condition
Customer Reviews
Customers praise the GLD Products RENO-II Pool Table 64-0126 for its exceptional build quality and smooth gameplay. Many reviewers appreciate the stylish design and the inclusion of high-quality accessories. However, some users have noted that the assembly process can be challenging due to the weight and complexity of the components.
Common complaints include the high price and the need for regular maintenance to keep the table in optimal condition. Despite these, the overall satisfaction rate among customers is high, with many recommending this product for serious pool enthusiasts.
90-DAY LIMITED WARRANTY
The Manufacturer warrants to the original retail purchaser that this product is free from defects in material and workmanship under normal use and conditions for a period of ninety (90) days from the date of original purchase. Further, the Manufacturer warrants to the original retail purchaser that the Accu Slate playing surface of your game table will remain flat, within a tolerance of +/- 30/1000 of an inch, measuring from any flat plane within the Accu Slate playing surface for a period of seven (7) years from the date of original purchase. The Manufacturer’s liability is limited to the repair or replacement, at its option, of any defective product and shall not include any liability for indirect, incidental or consequential damages of any kind.
PRODUCT REGISTRATION
Important: The product registration form on page 19 and a copy of your receipt must be completed and returned within 10 days of purchase to validate your warranty.
Online registration is also available. Go to http://gldproducts.com/warrantyinformation or click on this link. Follow the online instructions.
Faqs
What is the size of the GLD 64-0126?
What material is the Table made of?
Does the RENO-II Pool Table come with accessories?
How much does the GLD Products weigh?
Is the cloth on the RENO-II Pool Table tournament-grade?
What kind of pockets does the RENO-II Pool Table have?
How difficult is it to assemble the RENO-II?
What maintenance is required for the RENO-II Pool Table?
Is the GLD Products suitable for commercial use?
What are some common issues with the Table?
Where can I purchase the Table?
Leave a Comment
