Graco SnugRide 35 Lite Elite Infant Car Seat User Manual
Content
Graco SnugRide 35 Lite Elite Infant Car Seat Introduction
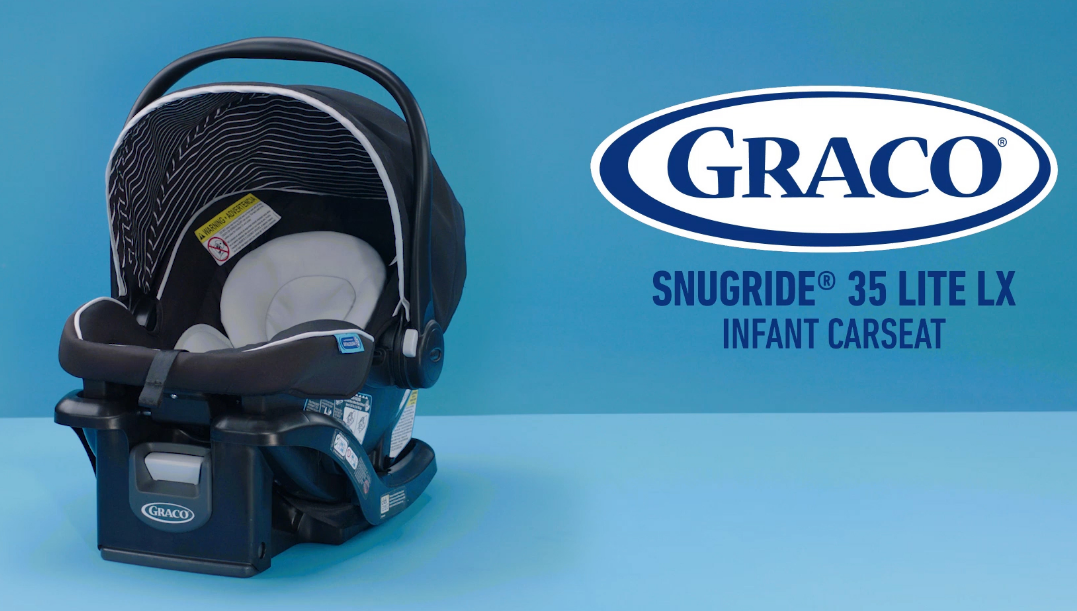
Car Seat is designed for safety and comfort, accommodating infants from 4 to 35 pounds and up to 32 inches tall. This lightweight car seat features a convenient stay-in-car base for easy installation and a multi-position canopy for added protection. With its soft head and body support, it ensures a snug fit for your baby. The price of the Graco SnugRide 35 Lite Elite is approximately $179.
Specifications
- Weight Capacity: 4-35 pounds
- Height Limit: Up to 32 inches
- Lightweight Design: Approximately 7.5 pounds
- Impact-Absorbing Foam: For enhanced crash protection
- Click Connect Technology: Easy one-step attachment to Graco strollers
- LATCH System: Simplified installation in vehicles
- Adjustable Canopy: Provides shade and protection from the sun
- Machine Washable Seat Pad: Easy cleaning and maintenance
Description
The Graco SnugRide 35 Lite Elite Infant Car Seat is crafted with parents' needs in mind. Its lightweight yet robust design ensures that it is easy to move around while maintaining superior safety features. The impact-absorbing foam and rigorous crash testing standards guarantee a safe environment for your infant. The Click Connect technology allows for seamless attachment to compatible Graco strollers, making transitions between car and stroller smooth and hassle-free.
The adjustable canopy provides additional comfort by shielding your baby from direct sunlight, and the machine washable seat pad ensures that cleaning is a breeze. This car seat is designed to be user-friendly, with a simple installation process using either the LATCH system or the vehicle's seatbelt.
Car Seat Features


- A Carry Handle
- B Handle Adjustment Button C Canopy
- D Infant Head Support
- E Harness Covers
- F Rear-Facing Belt Path (When Used Without Base)
- G Infant Body Support
- H Harness Release Lever (Under Pad)
- I Harness Adjustment Strap
- J Removable Base
- K Car Seat Shell
- L Base Release Lever M Instruction Manual Storage (Under Base) N Harness Straps
- O Chest Clip
- P Buckle Tongues
- Q Buckle
- R Buckle Strap


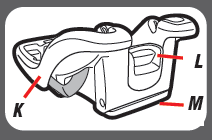
- A Base Release Lever
- B Harness Strap Slots
- C Harness Straps
- D Buckle Metal Clip
- E Splitter Plate
- F Car Seat Base Lock
- G Recline Level Indicator
- H Base Rear-Facing Belt Path
- I Lower Anchor Attachment Strap
- J Instruction Manual Storage (Under Base)
- K Lower anchor Attachment Storage (Under Base)
- L Base Recline Lever
- M Base Recline Foot
Removing Car Seat from Base
To Remove Car Seat from Base
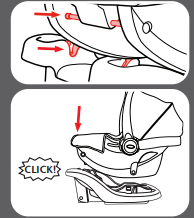
From the back of the car seat, squeeze the base release handle and lift the car seat out of the base.

Attaching Car Seat to Base
Attaching Car Seat To Base
- Align the locking bar at the front of the car seat with the locks in the base. Set car seat in the base. Push down on the front of the car seat.
- You will hear a “click” when it is locked.
Pull up on the front corners of the seat to make sure it is locked
Adjusting Carry Handle
- To Rotate Handle Press the handle adjustment button at the top of the handle and rotate the handle.
When moving from position A, handle will stop at position B. Release and push the button again to rotate the handle from position “B” to position “C” or “D”. MAKE SURE handle locks into position “A” before lifting the carrier. Handle Has 4 Positions
Rotate handle to any of the 4 locked positions. Push and pull the handle to make sure handle is in a lock position.
Carry handle MUST be upright in position A when carrying.
Handle can be in any locked position when used in the vehicle.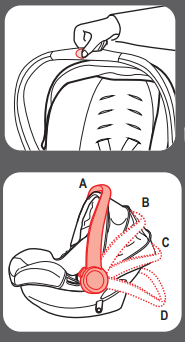
Reclining the Base
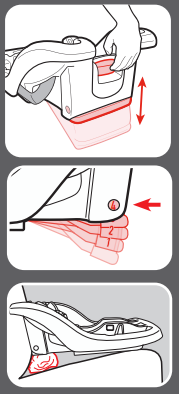
Base Has 4 Recline Positions
- Squeeze the base recline lever and lift the base to extend the foot.
- Squeeze the base recline lever and lower the base to retract the foot. Check the level indicator for appropriate install. (See Next Page)
When the foot is completely extended and the level indicator is not correct for your child’s age, you may raise the foot and place a rolled towel under the foot until the indicator shows correctly.
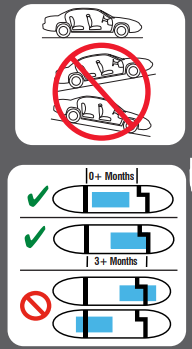
When Reading The Level Indicator
Vehicle MUST be on level ground. Use corrected age for preemies.
- If the blue indicator is in the clear area, the restraint is level for infants 0+ months in age.
- If blue indicator is partially in the notched area, the restraint is level for a child 3+ months in age.
If any blue appears outside the black lines, the child restraint is NOT level. You must adjust your recline position.
Choosing Vehicle Seat Location
Review your vehicle owner’s manual for seating locations. Review section 6 for additional information. Some vehicles have specific requirements for where the car seat can be installed. Be sure to check your vehicle owner’s manual for all available seating positions. According to accident statistics, children are safer when properly restrained in the rear seating positions than in the front seating positions. The center of the back seat can be the safest during a possible side impact.

WARNING
NEVER place this child restraint rear-facing in a vehicle seating location has an active front air bag.
Choosing Lower Anchor Attachment or Seat Belts
This car seat can be installed in your vehicle using either the vehicle seat belt OR the Lower anchor attachment system. Both systems are equally safe to use. DO NOT USE BOTH AT THE SAME TIME. Review section 6 for additional information.
What is Lower Anchor Attachment?
Lower anchor attachment consists of lower anchors, which are built-in to your vehicle, and connecting hooks that are built-in to your car seat. Lower anchors are used INSTEAD of the vehicle’s seat belt to secure the child seat to the vehicle.
Review your vehicle’s owner manual for exact location and use. Review section 6 for additional information.

Typical seat in a passenger vehicle. Other vehicle types may have different lower anchor attachment locations.
Setup Guide
To set up the Graco SnugRide 35 Lite Elite Infant Car Seat, follow these steps:
- Choose the installation method: Either use the LATCH system or the vehicle's seatbelt.
- Position the car seat: Ensure it is rear-facing and at a 30-45 degree angle.
- Secure the car seat: If using LATCH, attach the hooks to the vehicle's anchors. If using a seatbelt, thread it through the designated path and buckle it.
- Adjust the harness: Ensure the harness straps are at or below the baby's shoulders and snugly fitted.
- Attach to stroller (optional): Use the Click Connect technology to attach the car seat to a compatible Graco stroller.
Cleaning Seat Pad
- Remove Canopy
Undo the snaps on the sides of the canopy from the seat pad. Push the release button on the canopy arm while pulling on the canopy to remove. Repeat on the other side. Loosen Harness Straps
Push down on the harness release lever while pulling out on the harness straps at the chest clip.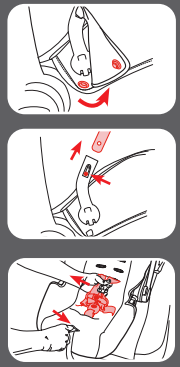
- Remove Harness Straps from Splitter Plate
- Pull Harness Straps Out From the Front of Car Seat
Pull Out the 4 Plastic Flaps from Sides of Seat
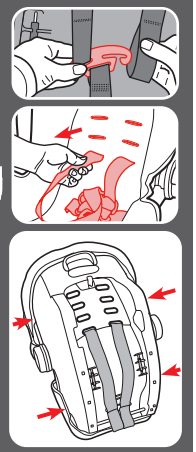
Pull Pad Off Shell
Machine wash pad and canopy in cold water with gentle soap on delicate cycle and drip-dry. DO NOT USE BLEACH.
Reverse the steps to reattach the pad and canopy. Make sure harness straps are not twisted.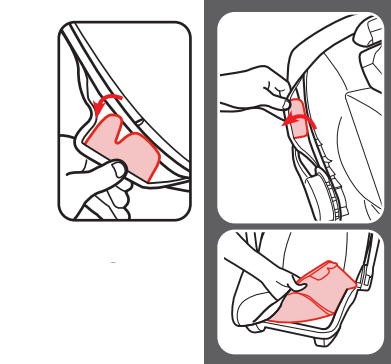
Cleaning Buckle
Remove the Buckle to Clean
- From the bottom of car seat, insert the buckle’s metal clip up through the shell and pad. From the front, pull the buckle out of the pad and shell.
- To clean, place in a cup of warm water and gently agitate the buckle.
Press the red button several times while in the water.
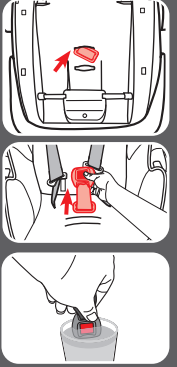
DO NOT SUBMERGE THE BUCKLE STRAP. DO NOT USE SOAPS, HOUSEHOLD DETERGENTS, or LUBRICANTS.
Shake out excess water and allow to air dry. Repeat steps as needed until it fastens with a click. Re-insert the buckle into the same slot it was removed. Pull up on crotch buckle to make sure it is secured.
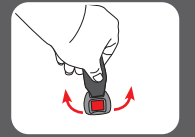
WARNING! Inspect and clean the buckle from time to time to remove any objects or debris that could prevent latching.
Cleaning Harness and Lower Anchor Attachment
Surface wash only with mild soap and damp cloth. DO NOT IMMERSE THE HARNESS STRAPS or LOWER ANCHOR ATTACHMENT STRAP IN WATER. Doing so may weaken the straps.
Troubleshooting
If you encounter issues with your Graco SnugRide 35 Lite Elite Infant Car Seat, here are some common problems and solutions:
- Incorrect Angle: Ensure the car seat is at a 30-45 degree angle. Use a level or the built-in angle indicator.
- Loose Installation: Check that the LATCH hooks or seatbelt are securely fastened and tightened.
- Harness Issues: Make sure the harness straps are not twisted and are snugly fitted around the baby.
Instructions and Warnings: Always refer to the user manual for detailed instructions. Never leave a child unattended in the car seat, and ensure proper installation to avoid any safety risks.
Graco SnugRide 35 Lite Elite Infant Car Seat Pros & Cons
Pros
- Lightweight and easy to transport
- Superior safety features including impact-absorbing foam
- Easy installation with LATCH system or seatbelt
- Compatible with various Graco strollers
- Adjustable canopy and machine washable seat pad
Cons
- Pricier compared to some other infant car seats on the market
- Some users find the canopy adjustment tricky
- Limited storage space for accessories
Customer Reviews
Customers generally praise the Graco SnugRide 35 Lite Elite Infant Car Seat for its ease of use, lightweight design, and robust safety features. However, some users have noted that the canopy can be a bit tricky to adjust and that it is on the higher end of the price spectrum.
Faqs
What is the weight capacity of the Graco SnugRide 35 Lite?
How do I install the Graco Elite Infant Car Seat in my vehicle?
Is the Graco Infant Car Seat compatible with all Graco strollers?
How do I clean the Graco?
What safety features does the Graco SnugRide 35 Lite Elite Infant Car Seat offer?
Can I use this car seat in airplanes?
How do I adjust the canopy on the SnugRide?
Does the SnugRide Infant Car Seat come with a warranty?
Leave a Comment
