Inkbird C929-A Smart Wi-Fi Controller for Aquarium User Manual
Content
Introduction
The Inkbird C929-A Smart Wi-Fi Controller for Aquarium is a versatile device designed to maintain optimal conditions for aquatic life. It allows users to remotely monitor and control temperature, lighting, and other environmental factors through a user-friendly app, ensuring a healthy habitat for fish and plants. With its reliable performance and smart features, this controller simplifies aquarium management. The Inkbird C929-A is priced at approximately $79.99.
Get to Know the Device


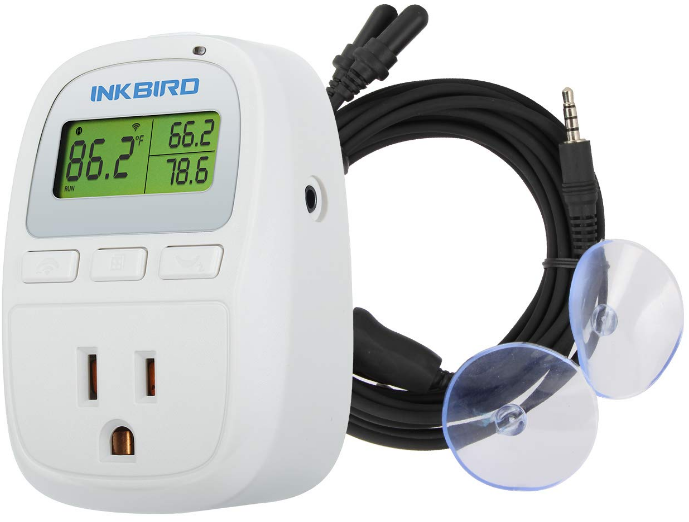
Inkbird C929-A Smart Wi-Fi Controller Features
- Plug-n-Play, easy to use
- Dual relay controlling, one for control output, another for abnormal protection
- Support Celsius and Fahrenheit reading
- LCD Display, more intuitive
- Dual temperature probes to ensure the accuracy of the water temperature
- Temperature calibration
- High and low-temperature alarm
- Probe abnormal alarm
- Continuous heating time alarm
Technical Parameters
Power parameter
- Voltage: 120Vac 60Hz
- Current: 10A
- Maximum Wattage: 1200W
- Type of temperature probe: R25℃=10KΩ±1%
R0℃=26.74~27.83KΩ B25/85℃=3435K±1% - Temperature control range: 0.0℃~45.0℃/32.0℉~113℉
- Temperature measurement range: -40℃~100℃/-40℉~212℉
- Temperature display accuracy: 0.1℃/℉ (<100℃/℉), 1℃/℉ (>=100℃/℉)
Temperature measurement accuracy:
Range of Temperature (T) Celsius Celsius Error Range of Temperature (T) Fahrenheit Fahrenheit Error -40°C ≤ T < 10°C ±2°C -40°F ≤ T < 50°F ±3°F 10°C ≤ T < 80°C ±1°C 50°F ≤ T < 176°F ±2°F 80°C ≤ T ≤ 100°C ±2°C 176°F ≤ T ≤ 212°F ±3°F - Display unit: Celsius ℃ or Fahrenheit ℉
- Ambient temperature: -20℃~40℃/-4℉~104℉
- Storage environment: temperature: 0℃~60℃/32℉
140℉; Humidity: 2080%RH (Unfrozen or condensation state) - Warranty: Controller 2 years, probe 1 year
Indicator light
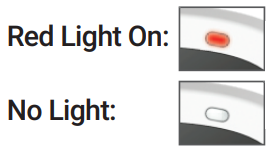
- Red Light On: Heating output is on.
- No Light: No power output.
Control Panel Instruction
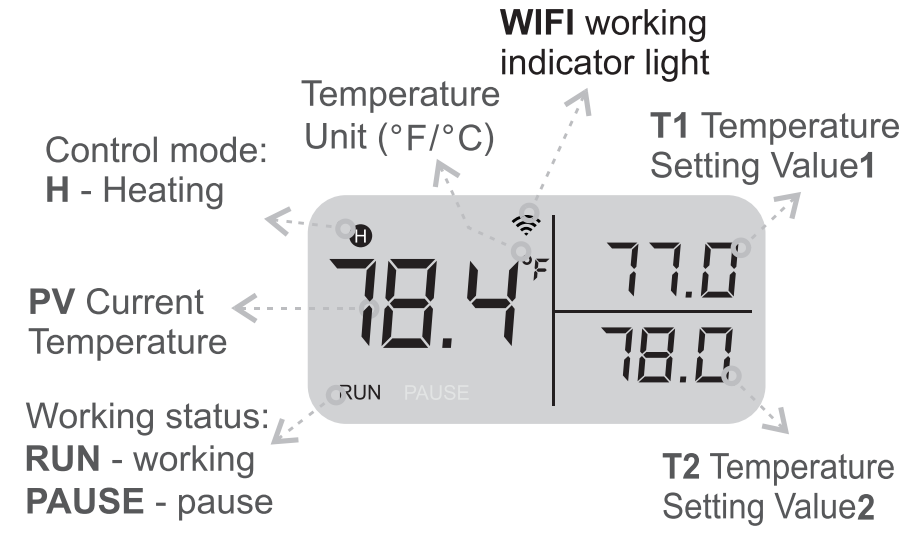
- PV: It shows the measured temperature when the temperature probe is inserted.
- T1: In normal mode, it will display the temperature setting value1. In setting mode, it will display the menu code.
- T2: In normal mode, it will display the temperature setting value2. In setting mode, it will display the setting value.
Inkbird Smart APP Setting
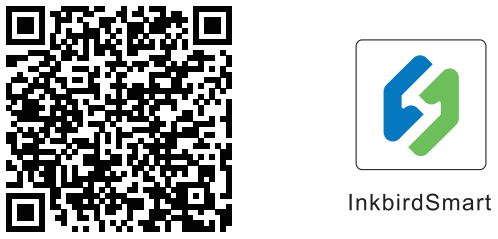
Download the APP
Search the keyword “InkbirdSmart” in Appstore or Google Play, or scan the following QR code to download and install the APP.
Pair with your phone

- Open the app, it will ask you to register or log in to your account on the APP. Select the country and enter your Mobile number or Email to finish the registration. Then press the “Add Home ”button to create your home.
- Tap the “+” or “add device” button in the home page of the APP to add the device.
- If the controller is in the normal working state, you can long press
 2 seconds to reset the WIFI. It will enter the Smartconfig configuration state by default. You can quickly press
  to switch the Smartconfig configuration state and the AP mode. If you change the WIFI state, it will take about 5 seconds to display the corresponding LED symbol and state, because of the WIFI module data processing.
Add device in quick connection
- Plug the device in the socket and make sure that the device is in the Smartconfig configuration state (the LED symbol is flashing, interval flashing 250ms).
- Click “Confirm indicator rapidly blink” and then select Wi-Fi network, enter Wi-Fi password, click “confirm” to enter connection process.
The device only supports 2.4GHz Wi-Fi router.

Add device in AP mode:
- Plug the device in the socket and make sure that the device is in the AP Configuration State (the LED symbol is flashing slowly, interval flashing 1500ms).
- Click “Confirm indicator slowly blink” and then select Wi-Fi network, enter Wi-Fi password, click “confirm” to enter connection process.
Press “Connect now” and it will go to your WLAN Setting in your smart phone, select the “SmartLife-XXXX” to directly connect to the router without putting in password. Go back to app to enter into the automatic connection interface.

- Click “Done” after adding the device successfully and enter into the device controlling interface.
- In the temperature control mode, user can set the control function via APP.

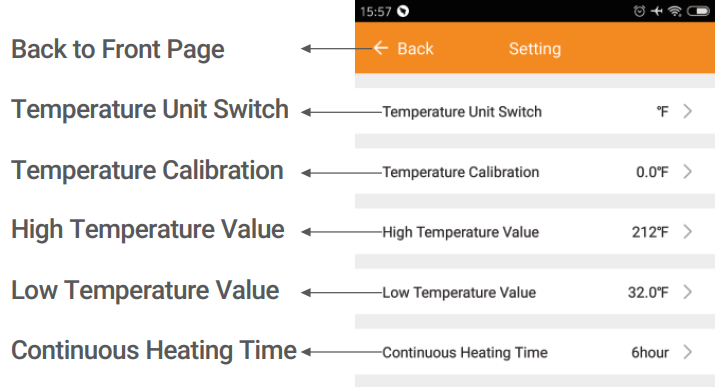
Controlling Function Description
Button Instructions
Power button
In any case, it will be turned off when long pressing for 2 seconds and no output no display. After the power is off, quickly press to restore the power-on state. In the power-on state, quickly press the button, it will turn on or suspend outlet power.
Set controlling temperature
In normal working mode, quickly ![]() press to enter the settings of temperature controlling state, at this time T1 setting temperature flashes, press
press to enter the settings of temperature controlling state, at this time T1 setting temperature flashes, press ![]() or
or ![]() button to increase or decrease the setting temperature value, quickly press
button to increase or decrease the setting temperature value, quickly press ![]() to confirm the T1 setting value, and enter the T2 setting, T2 setting temperature flashes, press
to confirm the T1 setting value, and enter the T2 setting, T2 setting temperature flashes, press ![]() or
or ![]() to increase or decrease the setting temperature value, quickly press
to increase or decrease the setting temperature value, quickly press ![]() to confirm saving and exit the setting of temperature controlling state. And if there is no action for 10 seconds, it will automatically exit and save the data.
to confirm saving and exit the setting of temperature controlling state. And if there is no action for 10 seconds, it will automatically exit and save the data.
The default value of T1 is 77.0°F or 25.0°C, the default value of T2 is 78.0°F or 26.0°C, and the temperature range of T1 and T2 is 0.0℃~45.0℃ or 32.0℉~113℉.
Menu Parameter Setting
In the normal working mode, press the button ![]() for 2 seconds to enter the menu parameter setting state. At this time, T1 displays the menu code, T2 displays the menu setting value, presses
for 2 seconds to enter the menu parameter setting state. At this time, T1 displays the menu code, T2 displays the menu setting value, presses ![]() to scroll down the menu option and saves the previous menu parameter, then presses
to scroll down the menu option and saves the previous menu parameter, then presses ![]() or
or ![]() button to change the current setting value. In the setting state, long press
button to change the current setting value. In the setting state, long press ![]() for 2 seconds or without operation in 30 seconds, it will exit the setting state and save the parameters, then return to the working mode.
for 2 seconds or without operation in 30 seconds, it will exit the setting state and save the parameters, then return to the working mode.
Setup Menu Flow Chart

Setting Menu Instruction
| Code | Symbol | Menu Function | Setting Range | Default | Remarks |
|---|---|---|---|---|---|
| CF | Fahrenheit or Celsius setting | C or F | F | More details on 6.8 | |
| AH | High Temperature Alarm | -40.0100°C / -40.0212°F | 100°C / 212°F | More details on 6.5 | |
| AL |  | Low Temperature Alarm | -40.0100°C / -40.0212°F | 0.0°C / 32.0°F | More details on 6.5 |
| CT |  | Continuous Heating Time | 0~96 hours | 6 hours | More details on 6.6 |
| CA |  | Temperature Calibration | -9.99.9°C / -15.015.0°F | 0.0°C / °F | More details on 6.7 |
Control Function Description(TS1/TS2)
When the controller is working normally, the controller will automatically select the smaller temperature value of the two settings TS1 and TS2 to start the heating, and will stop heating when the temperature reach the larger one (the minimum absolute value of TS1 and TS2 is 0.3 °C or 0.5°F)
High/Low Temperature Alarm(AH,AL)
When measured temperature ≥the setting value of high temperature AH, it will alarm and turn off heating output. The screen will rotate to display“AH”and current temperature, buzzer will ”bi-bi-Biii”, until the temperature < AH, buzzer will be off and return to normal display and control. Or press any button to only turn the buzzer alarm off.
When measured temperature ≤ the setting value of low temperature AL, it will alarm. The screen will rotate to display“AL”and current temperature, buzzer will“bi-bi-Biii”, until the temperature > AL, buzzer will be off and return to normal display and control. Or press any button to only turn the buzzer alarm off.
High and low temperature alarm will be pushed to mobile APP and remind the customer that the product is in alarm state.=
Continuous Heating Time Alarm(CT)
When measured temperature ≤ the starting heating temperature, the output control is turned on. If the continuous heating time arrives, but the measured temperature has not risen to the stop heating temperature, at this time the heater is abnormal or the probe is abnormal, and the output is forcibly turned off. PV will show E5, the buzzer keeps ringing, and the alarm status is pushed to the mobile APP to remind the customer that the product is in an alarm state and need to check in time.
When CT = 0, it means that the continuous heating alarm function has been cancelled.
Temperature Calibration(CA)
When the measured temperature deviates from the standard temperature, the temperature calibration function can be used to calibrate the measured value consistent with the standard value. The calibrated temperature = the measured temperature value + the calibration value.
Fahrenheit or Celsius Setting(CF)
Support setting Fahrenheit or Celsius. The default temperature unit is Fahrenheit. If you need to display the unit in Celsius, please set the CF to C and note that when the CF is changed , all setting values will be restored to the default setting and the buzzer will beep.
Setup Guide
To set up the Inkbird C929-A, begin by connecting the device to your Wi-Fi network using the Inkbird app.
- Once connected, attach the sensors to their respective ports on the controller.
- Next, configure the settings according to your desired parameters using the app's intuitive interface.
- Pair the controller with your aquarium devices such as heaters and pumps by connecting them to the corresponding output ports on the controller.
- Finally, test all connections and ensure that all devices are functioning correctly within the app.
Follow the on-screen instructions for any additional steps or calibrations required for optimal performance.
Caution
- KEEP CHILDREN AWAY
- TO REDUCE THE RISK OF ELECTRIC SHOCK, USE ONLY INDOORS
- RISK OF ELECTRIC SHOCK. DO NOT PLUG INTO ANOTHER RELOCATABLE POWER TAPS OR AN EXTENSION CORD.
- USE ONLY IN DRY LOCATION
Abnormal Situation
- Temperature Abnormal: The temperature difference between the two temperature probes is greater than or equal to 3℃/5℉.
- Probe Abnormal: Any probe is not inserted properly, or there is an open and short circuit in the probe or the wire.
- Heater Abnormal: The heater is heating but the water temperature is decreasing.
Note: When the product is abnormal, the PV display will show as follows:
- Er&E1&E2: Temperature Probe Abnormal
- E4: The temperature difference between the two temperature probes is greater than or equal to 3℃/5.0℉
- E5: Continuous Heating Time Alarm
Inkbird C929-A Smart Wi-Fi Controller Troubleshooting
APP Q&A
Status | Possible Reason | Preliminary Solution |
Login failed | Password or account entryerror | Double check the account and password |
Network server maintenance | Try again later | |
Connection failed | Improper steps (ignoring some important steps) | Confirm the correct steps and try again |
Connection failed | WiFi password input error | Plain-text input WiFi password |
Poor network | Try again or change the network later | |
Problem of Phone model and system version | Please switch to another mobile phone to try | |
Failtoload data | Network server maintenance | Try again later |
APPBlank Screen | App running in the background occupy too much memory | Clear App running in the background |
Incomplete installation | Uninstall InkbirdSmart App and re-install |
Technical Assistance and Warranty
Technical Assistance
If you have any problem installing or using this controller, please carefully and thoroughly review the instruction manual. If you require assistance, please write us to [email protected]. We will reply your emails in 24 hours from Monday through Saturday. You can also visit our website http://www.ink-bird.com to find the answers to the common technical questions.
Warranty
INKBIRD TECH. C.L. warrants this controller for two years (temperature probe for one year) from the date of purchase when operated under normal conditions by the original purchaser (not transferable), against defects caused by INKBIRD’s workmanship or materials. This warranty is limited to the repair or replacement, at INKBIRD’s discretion, of all or part of the controller. The original receipt is required for warranty purposes.
Pros & Cons
Pros
- Remote monitoring and control via mobile app.
- Comprehensive automation capabilities.
- Accurate real-time data readings.
- Customizable alerts for parameter deviations.
- User-friendly interface and setup process.
Cons
- Dependence on stable Wi-Fi connection.
- Potential calibration issues with sensors.
- Higher cost compared to basic controllers.
Customer Reviews
Customers have praised the Inkbird C929-A for its ease of use and comprehensive features. Many have noted significant improvements in the health and stability of their aquarium environments since using the controller. However, some users have reported occasional connectivity issues and calibration problems with the sensors.
Faqs
What are the key features of the Inkbird C929-A Smart Wi-Fi Controller?
How do I set up the Inkbird?
What if I encounter inaccurate readings from the sensors?
Can I control multiple devices with one Inkbird?
Is the Inkbird C929-A compatible with all types of aquariums?
How do I troubleshoot connection issues with my Inkbird C929-A?
Can I monitor my aquarium parameters when I am away from home?
When is the Inkbird expected to be available in the market?
Does the Inkbird C929-A come with a built-in alert system?
Leave a Comment


