Great Northern Popcorn Maker Machine 83-DT6091 Guide User Guide
Content
Introduction of Great Northern Popcorn Maker Machine 83-DT6091
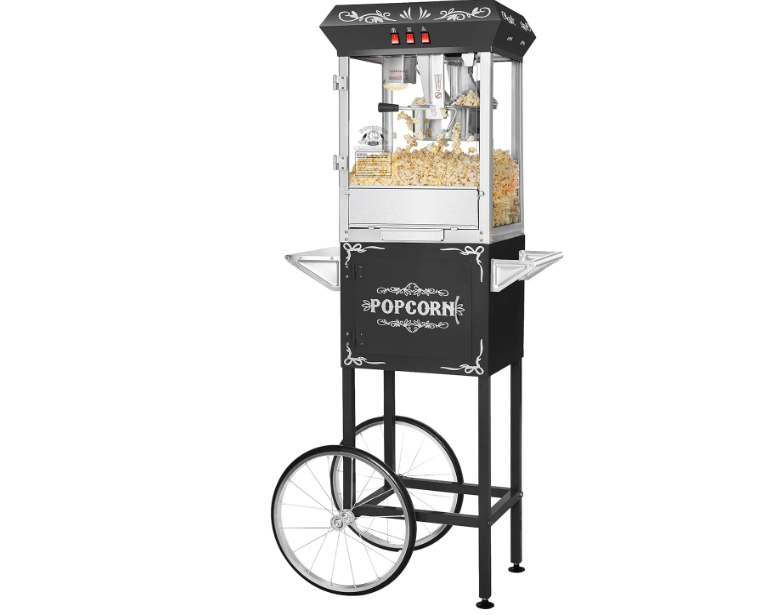
The Great Northern Popcorn Maker Machine 83-DT6091 is a commercial-grade popcorn maker that's perfect for movie nights, concession stands, or any event where you want to serve fresh, delicious popcorn. This machine is designed to produce large quantities of popcorn quickly and efficiently. With its stainless steel construction and powerful heating element, you can rely on the 83-DT6091 to deliver consistent results every time. The estimated price for this product is around $200, and it was launched in 2021.
PARTS LIST

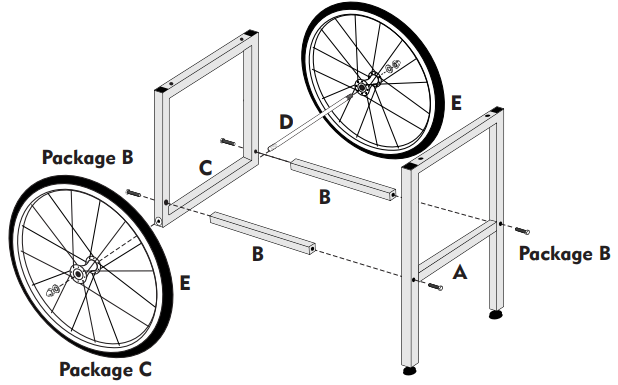
A. Long Stand
B. Square Cross Members x 2 pcs.
C. Short Wheel base
D. Axle
E. Wheels x 2 pcs.
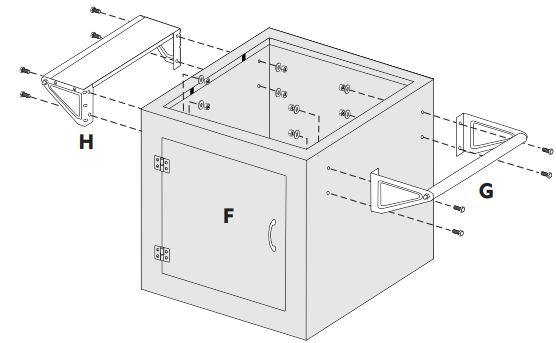
F. Storage cabinet
G. Hand Rail
H. Work Platform
I. Popper Cabinet
J. Popper Cabinet Door
K. Kettle
L. Front Tilt Door
M. Old Maids Drawer
N. Popcorn scoop
O. Measure cup set
P. Assembly Wrench Set 9/16” / 14mm
Package A, 9/16”x 1/2” bolts, nuts, washers - 8 pcs. each
Package B, 9/16”x1-3/8” bolts x 8 pcs., washers x 4 pcs.
Package C, 9/16”, Cap Nuts, washers x 2 pcs. each
Package D, wrench x 2 pcs.
Detailed Specifications
The Great Northern Popcorn Maker Machine 83-DT6091 has the following key features:
- Stainless steel construction for durability and easy cleaning
- 8 ounce kettle capacity for large batches of popcorn
- Old-fashioned stirring system to prevent burning
- Cool-touch handles for safe operation
- Removable parts for easy cleaning
- Non-skid feet for stability
- Powerful 640 watt heating element
- Dimensions: 16 x 16 x 24 inches
- Weight: 21.5 pounds
ASSEMBLY PROCEDURE of Great Northern Popcorn Maker Machine 83-DT6091
Use (2) 9/16”x 1-3/8” bolts (Package B) provided to connect the long stand (A) and the 2 square poles (B) together.
Connect the assembly above (step 1) with the short stand (C) by using (2) 9/16”x 1-3/8” bolts (Package B).
Add a cap nut and washer (Package C) to one end of the axle (D). Insert axle (D) through one wheel (E) and into the short stand axle hole (C). Place the second wheel (E) on the opposite end of the axle (D). Next, place a cap nut and washer (Package C) onto the exposed end of the axle (D). Tighten cap nut with the wrench provided (P). Check cap nut tightness periodically during routine maintenance.
Install the handrail (G) onto the right-hand side of the storage unit (F) and the working platform (H) on the left-hand side with the nuts, bolts, and washers included (Package A).
Turn the storage cabinet (F) upside down for convenient assembly. Insert both ends of the short and long stands onto the bottom of the cabinet (wheels opposite of the handle attachment) and attach with bolts (Package B). Use the wrench provided to thoroughly tighten bolts. Turn the completed unit back to an upright position.
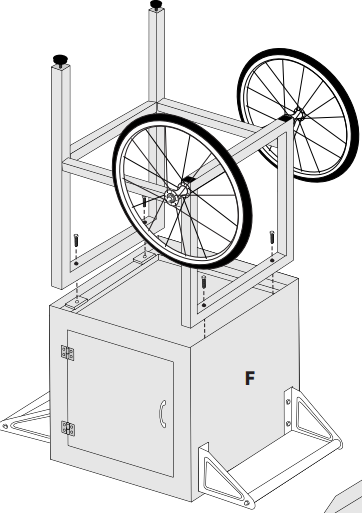
Note: This task should be performed on carpet or a section of cardboard to avoid scraping the cabinet or damaging your floor. This is a two-person task.
Place the main popper unit (I) onto the topside of the storage cabinet (F). Use the four spring-loaded latches to secure the popping unit to the storage cabinet.
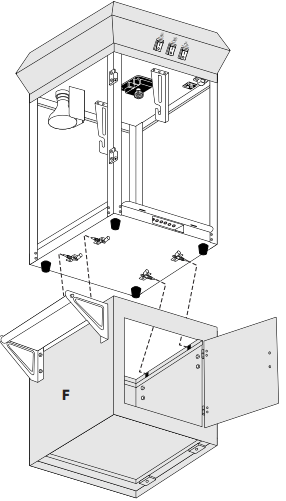
Caution: Do not attempt to move your popper without securing the latches. The popping unit will topple off causing property and/or personal damage.
The glass door (J) simply slides into the two anchor hinges on the popping unit (I). The door is easy to remove for cleaning.
Note: The metal handle should align with the magnetic latch on the popping unit (I).Align the two bottom tabs on the Stainless Steel tilt door (L) with the slots on the bottom platform of the popping unit. The side panels will bend in slightly to maneuver past the corner rails.
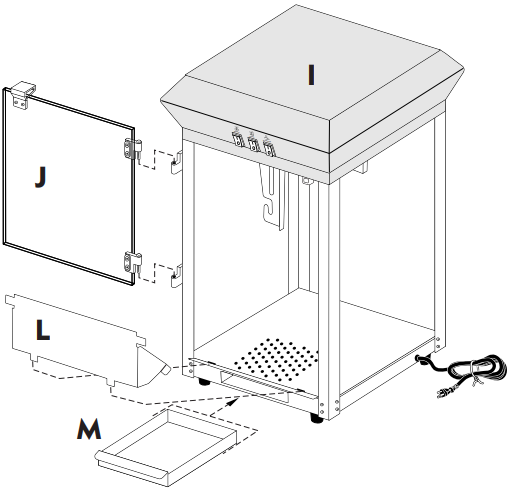
The “Old Maids” drawer (M) slides into the opening at the bottom of the popper unit.
Next, place the pot (K) onto the hangers located in the popper unit. Hold the pot centered at approximately a 70-degree angle as illustrated here. Place the two hanger bars into the slots on the hanger. Do not force. Make sure the hangers are well seated before swinging the axle shaft up to the motor. The roller pin will fit into the niche on the motor and will help align the gears. Check to make sure the gears properly mesh together before starting the motor.

CAUTION: The pot on this popper will become extremely hot when in use. DO NOT Remove or install the pot until it is completely cooled off. DO NOT Load pot before installing or while hot. Avoid steam released from the pot. It can scald and cause severe burns. Note: The “Old Maids” drawer is designed to catch un-popped kernels that fall through the sized holes. Occasionally empty the drawer. Debris that may not make it into the drawer should be removed before replacing the drawer tray. Loose debris can prevent the drawer from shutting properly.The last step is to plug the pot into the outlet located on the ceiling of the popper cabinet. Before plugging the pot into the cabinet outlet, make sure the pot is seated properly on the hangers, the gear shaft is properly aligned and all the switches are in the off position. NEVER plug the pot cord directly into an electrical outlet.
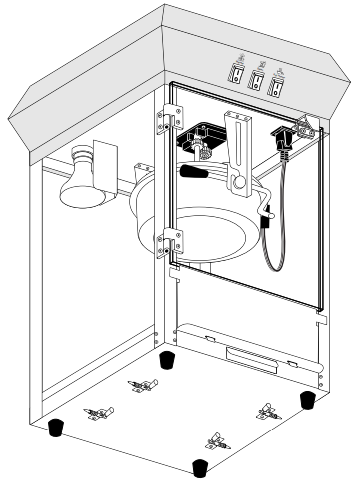
Note: The upper cabinet is equipped with rubber feet and can be used separately from the storage cabinet on a sturdy countertop. Do Not place the popper near a heat source such as a stove or oven. Allow a minimum of 12” of open space on all sides. Do Not place this unit near water or a water source. Do Not use electric circuits that do not meet the minimum requirements as specified.
SUCCESS!
Now that you have assembled your popper, you are ready to make popcorn the way it’s made in theaters and concessions everywhere. Below are instructions on how to operate your popper. Read them carefully to make yourself a popping expert. When operated correctly your popper will give you many years of service and happiness.


WARMER
The Warmer switch operates the light in the back left corner of the popper unit and the warming element in the bottom tray. The warmer can be left on for extended periods of time. The two elements work together to keep the popcorn fresh and warm. Ready to Eat!
Warning: Do not dump liquid toppings onto popped corn while in the popper. It will cause a huge mess and result in much clean-up time. Remove popcorn to a serving bowl before adding wet toppings.
Stirrer
The Stirrer switch operates the stirrer located inside the pot. Make sure it is free of obstruction and the axle gear and the motor gear are properly seated before turning the Stirrer switch on. If the pot is not cleaned at appropriate intervals or recommended popping oils are not used, the bottom of the pot will gum with burnt oil and debris. If the stirrer sounds the least bit strained, switch off immediately and solve the problem.
Pot Heater
The Pot Heater switch operates the heating element in the bottom of the pot (Kettle). It is engineered to deliver the perfect temperature for popping popcorn. It is extremely hot! Care should be taken when in close proximity to the pot. When the pot is hot, use heat-resistant gloves. Only touch the safety knob on the pouring handle.
NOTE: The 4 and 6-ounce machines only have two switches. One controls the light (and heater in the 6 ounce), the other controls the kettle heater and stirrer together.
Description
The Great Northern Popcorn Maker Machine 83-DT6091 is a high-quality popcorn maker that's built to last. Its stainless steel construction ensures durability and easy cleaning, while the 8 ounce kettle capacity allows you to make large batches of popcorn quickly and efficiently. The old-fashioned stirring system helps prevent burning, ensuring that every batch is evenly cooked and delicious. The cool-touch handles make it easy to handle the machine, even when it's hot, while the removable parts make cleaning a breeze. The non-skid feet keep the machine stable, even when it's in use. With its powerful 640 watt heating element, the 83-DT6091 can produce large quantities of popcorn quickly and efficiently, making it the perfect choice for any event.
4oz Kettle Foundation Popcorn Maker
| Type | Voltage | Power | Frequency | With Cart | Top Only |
|---|---|---|---|---|---|
| 4oz Kettle Foundation Popcorn Maker | 110 volts | 600 watts | 60HZ | 6108 Black, 6109 Red, 6110 Blue | 6111 Black, 6112 Red, 6113 Blue |
6oz Kettle Foundation Popcorn Maker
| Type | Voltage | Power | Frequency | With Cart | Top Only |
|---|---|---|---|---|---|
| 6oz Kettle Foundation Popcorn Maker | 110 volts | 640 watts | 60HZ | 6102 Black, 6103 Red, 6114 Blue | 6115 Black, 6116 Red, 6117 Blue |
8oz Kettle Foundation Popcorn Maker
| Type | Voltage | Power | Frequency | With Cart | Top Only |
|---|---|---|---|---|---|
| 8oz Kettle Foundation Popcorn Maker | 110 volts | 850 watts | 60HZ | 6096 Black, 6097 Red, 6098 Blue | 6099 Black, 6100 Red, 6101 Blue |
4oz Kettle All Star Popcorn Maker
| Type | Voltage | Power | Frequency | With Cart | Top Only |
|---|---|---|---|---|---|
| 4oz Kettle All Star Popcorn Maker | 110 volts | 600 watts | 60HZ | 6130 Red | 6131 Black |
8oz Kettle All Star Popcorn Maker
| Type | Voltage | Power | Frequency | With Cart | Top Only |
|---|---|---|---|---|---|
| 8oz Kettle All Star Popcorn Maker | 110 volts | 850 watts | 60HZ | 6128 Red | 6129 Black |
HOW TO MAKE GREAT POPCORN
CAUTION: Pot, oil, and popcorn are extremely hot. Escaping steam can cause severe scalding. Children are naturally attracted to the excitement of the popping event. Keep children well back out of harm’s way.
We recommend using the Great Northern Popcorn Co. Gourmet pre-measured portion packs for PERFECT POPCORN EVERY TIME! No need to preheat the kettle, just cut off the top of the portion pack and empty the contents into the kettle. (Note: Run warm water over the portion pack for a few minutes to loosen the oil portion.) If using other suitable ingredients, have pre-measured portions ready in advance. For best results use 1/4 cup oil per 1/2 or 3/4 cup kernels, or 1/3 cup oil for 1 full cup of kernels.
Close lid and door.
Switch the Stirrer to ON so that it starts stirring. Switch the kettle heater to ON. You will hear the sizzle in just a few minutes.
Switch the warming tray and spotlight to ON.
Popcorn starts popping out through the lid after about 3 to 4 minutes.
When popping action stops (no more popping sound from the pot), switch the Stirrer and Pot Heater to the OFF position. Popping is complete. Rotate the handlebar on the pot and pour out all remaining popcorn. Gently shake if necessary.
Pot Heater switch must remain OFF if the unit is not popping. Only the spotlight and warming deck should be left ON, this will keep the popcorn warm, dry, and tasty for a longer period of time.
Serve popcorn with the scoop provided.
Note: Do not add butter or other liquid flavoring in the main unit popcorn bin. Avoid a big mess! Remove popcorn to a suitable serving bowl or popcorn container before adding this type of flavoring. 9. Always remove the plug from the power supply before cleaning and if the unit is not being used for a period of time.
Setup Guide
Setting up the Great Northern Popcorn Maker Machine 83-DT6091 is easy. Here's how to do it:
- Assemble the machine by attaching the kettle to the base and securing it in place.
- Plug in the machine and turn it on.
- Add oil and popcorn to the kettle.
- Close the lid and wait for the popcorn to finish popping.
- Once the popcorn is done, open the lid and use the scoop to remove it from the kettle.
- Enjoy your fresh, delicious popcorn!
Great Northern Popcorn Maker Machine 83-DT6091 CLEANING
IT’S EASY! CALL THE KETTLE CLEANING CREW
When the show's over and everyone’s left the theater it’s time for GNP’s “Kettle Cleaning Crew” to go to work. Our specially formulated cleaner will dissolve built-up, burnt-on, grimy gooey cooking oils used to pop kettle corn. Keeps your popper looking good for years.
Unplug the popper from the electrical source. Closely follow the directions on the “Kettle Cleaning Crew” label for best results. Thoroughly rinse and wipe clean. For heavy burned kettles, repeat the process. For light regular cleaning, use dish soap. Only use mild synthetic scouring pads. Do Not submerge the pot in liquid.
To minimize burning use only GNP Movie Theater Popping Oil. To order GNP products, go to: https://www.greatnorthernpopcorn.com/
Clean glass with a mild glass cleaner solution. Check the label to make sure the product used is compatible with food preparation equipment.
Vacuum out small debris left on the warming deck. Empty the “Old Maids” tray. Wipe the deck and tray with a sponge dipped in dish soap. Rinse the sponge in clean water thoroughly. Sponge wipe until clean. Avoid attracting pesky varmints. Do Not leave food particles in your popper.
READ ALL INSTRUCTIONS BEFORE USING YOUR POPCORN MACHINE.
DANGER! HOT!
EXTREME CAUTION must be used when dumping kettle after popping action stops; a heat-resistant mitt is recommended. Our kettles can reach temperatures UP TO 475°F. DO NOT touch hot surfaces. Always use the handle to operate. Touching the kettle directly WILL RESULT IN BURNS.
KEEP LOOSE CLOTHING and other flammables away from the hot kettle to avoid combustion, melting, or burns.
KEEP PLASTIC BAGS or other containers not recommended for use away from hot kettles to avoid melting, combustion, or burns from melted plastic.
STEAM IS HOT! It is NOT recommended that you open the lids of the kettle when in use or when hot. Escaping steam can BURN. Use only the kettle handle to tilt the kettle to extract any hot contents.
DO NOT use this appliance for anything other than the indicated usage. This Great Northern Popcorn Popper is intended for residential or personal use only. This appliance is NOT intended for commercial use.
The popper must be properly assembled before using it. Follow instructions and recommendations carefully.
ONLY connect to an electrical outlet with the correct electrical supply and proper grounding to reduce the risk of shock and fire. Do Not cut or remove the grounding pin. If you do not have a three-prong electric receptacle outlet available, have a certified electrician install a proper outlet. DO NOT use a wall receptacle that is not properly grounded. Consult a qualified electrician to make sure your wiring and circuit can handle the electrical load required to operate this appliance.
Make sure ALL switches are in the "OFF" position after each use, disconnect the power cord from the electric outlet before cleaning.
DO NOT immerse cord or plug into water or other liquids. DO NOT use extension cords or adapters to connect the unit to an electrical power source.
DO NOT operate the appliance with a damaged cord or plug, malfunction or with any mechanical damages.
ALWAYS wear safety glasses when servicing this popper.
DO NOT move the popper during operation. Allow hot parts to cool down before moving or handling.
DO NOT add kernels into a dry pot (without oil). To avoid overheating, always have oil and kernels ready before turning on the heat.
DO NOT place kettle into a dishwasher. DO NOT immerse kettle into water.
DO NOT place the unit on or near a gas or electric burner or near a heated oven.
DO NOT use outdoors, in wet environments, or near a swimming pool, pond, or hot tub/Jacuzzi.
DO NOT use accessories or attachments that are not provided or recommended by the manufacturer.
KEEP CHILDREN well away from the popper while in operation.
DO NOT use abrasive cleaning products or abrasive cloth or materials on any surface of this machine. A mild synthetic abrasive cloth may be used on the inside of the pot. Absolutely NO Steel Wool.
NEVER force any parts or brackets into position.
SAVE these instructions for future reference.
IMPORTANT KNOWLEDGE FOR UNPACKING
Unpacking the shipping crate that holds your new popper is the most exciting moment for a true popcorn aficionado like yourself. The Great Northern Popcorn Co. (GNP) has carefully engineered this shipping carton to ensure your popper arrives in pristine condition.
Upon removing anything from the carton, inspect the parts for damage. Photograph any damage that may have occurred to the outside of the carton. Photograph any damage to the popper. If you do encounter damage, you will have to file a claim with the shipping company. Do not return merchandise to GNP without an RMA number.
Troubleshooting
Here are some common problems that you may encounter with the Great Northern Popcorn Maker Machine 83-DT6091, along with solutions:
- Problem: Popcorn is burning.
Solution: Make sure to stir the popcorn consistently, and don't overfill the kettle. - Problem: Popcorn is not popping.
Solution: Make sure you're using the right kind of popcorn, and that the oil is hot enough. - Problem: Machine is smoking.
Solution: Turn off the machine and let it cool down before cleaning it thoroughly.
Five Year Warranty
Great Northern Popcorn Company (GNP) popcorn machines are warranted to be free from defects in materials and workmanship for five years from the date of purchase.
Pros & Cons about Great Northern Popcorn Maker Machine 83-DT6091
Pros
- Durable stainless steel construction
- Large 8 ounce kettle capacity
- Old-fashioned stirring system to prevent burning
- Cool-touch handles for safe operation
- Removable parts for easy cleaning
- Non-skid feet for stability
- Powerful 640 watt heating element
Cons
- May be too large for some kitchens
- Can be noisy when in use
Faqs
How do I clean the kettle after use Great Northern Popcorn Maker Machine 83-DT6091 ?
How much oil and Great Northern Popcorn Maker Machine 83-DT6091 should I use for a full batch?
What should I do if Great Northern Popcorn Maker Machine 83-DT6091 stirrer sounds strained?
How do I keep the Great Northern Popcorn Maker Machine 83-DT6091 warm after popping?
What type of electrical outlet is required for this Great Northern Popcorn Maker Machine 83-DT6091?
Can I use other types of oil in the Great Northern Popcorn Maker Machine 83-DT6091?
How often should I clean the Great Northern Popcorn Maker Machine 83-DT6091?
What should I do if the Great Northern Popcorn Maker Machine 83-DT6091 does not turn on?
What should I do if the Great Northern Popcorn Maker Machine 83-DT6091 makes unusual noises during operation?
What is covered under Great Northern Popcorn Maker Machine 83-DT6091 five-year limited warranty?
Leave a Comment