Grizzly 3 HP Shaper Power Table Saws G1026 User Guide
Content
Introduction
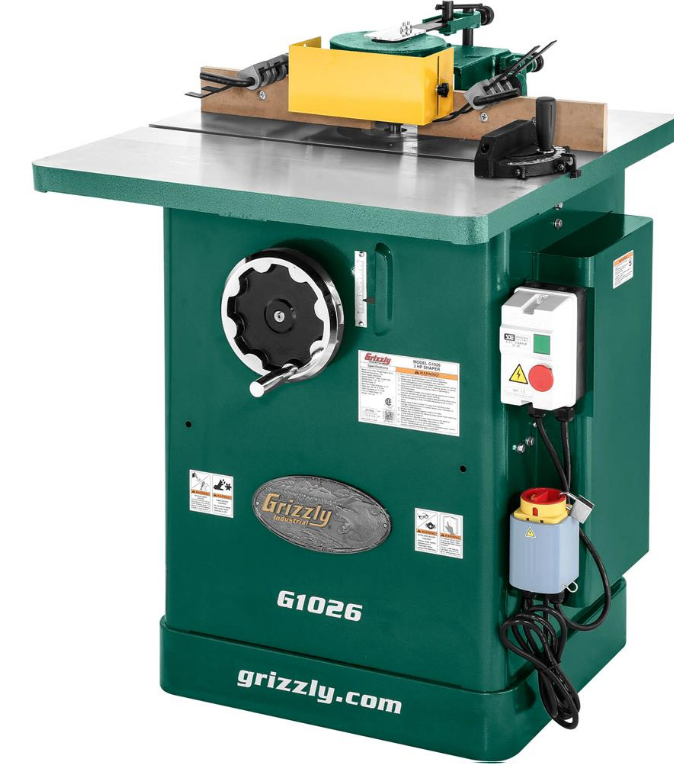
The Grizzly 3 HP Shaper Power Table Saw G1026 is a robust woodworking tool designed for precision and versatility in crafting intricate furniture and projects. Featuring a powerful 3 HP motor, it operates at spindle speeds of 7,000 and 10,000 RPM, accommodating various cutter sizes. Manufactured by Grizzly Industrial, this shaper is priced at approximately $1,199, making it an excellent investment for both professional woodworkers and hobbyists seeking high-quality performance. The G1026 combines durability with user-friendly features for enhanced productivity.
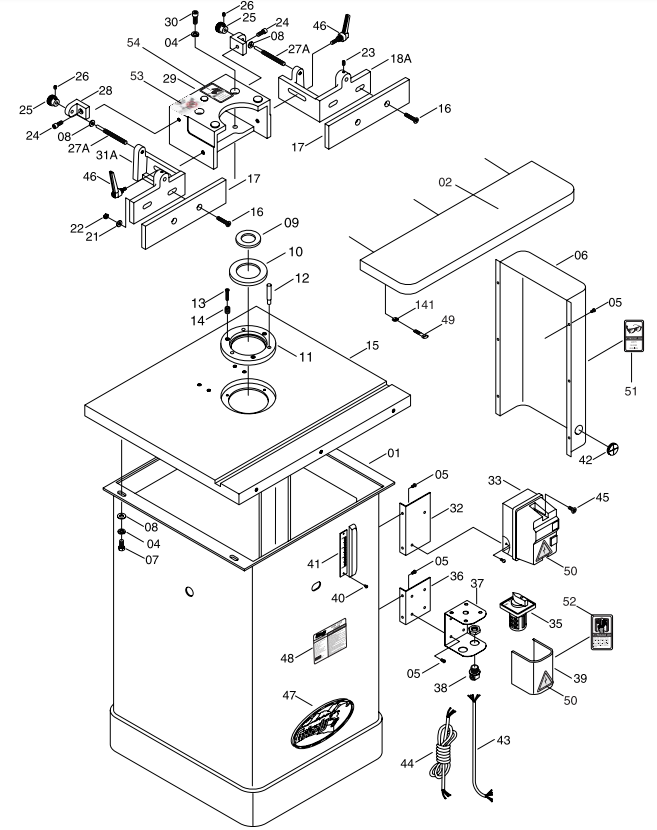
| 001 | P1026001 | STAND BODY |
| 002 | P1026002 | EXTENSION WING |
| 003 | PB18 | HEX BOLT 3⁄8"-16 x 11⁄4" |
| 004 | PLW04 | LOCK WASHER 3⁄8" |
| 005 | PS07 | PHLP HD SCR 1⁄4"-20 x 3⁄8" |
| 006 | P1026006 | COVER |
| 007 | PB21 | HEX BOLT 3⁄8"-16 x 3⁄4" |
| 008 | PW02 | FLAT WASHER 3⁄8" |
| 009 | P1026009 | TABLE INSERT |
| 010 | P1026010 | TABLE INSERT |
| 011 | P1026011 | TABLE INSERT |
| 012 | P1035012 | STARTING PIN |
| 013 | PFH02 | FLAT HD SCREW 10-24 x 1" |
| 014 | 1035010 | BARREL SCREW |
| 015 | P1026015 | TABLE |
| 016 | PFH07 | FLAT HD SCREW 5⁄16"-18 x 11⁄2" |
| 018A | P1026018A | FENCE MOUNT RIGHT |
| 021 | PW07 | FLAT WASHER 5⁄16" |
| 022 | PN02 | HEX NUT 5⁄16"-18 |
| 023 | PSS07 | SETSCREW 1⁄4"-20 x 1⁄2" |
| 024 | PSB16 | CAP SCREW 3⁄8"-16 x 3⁄4" |
| 025 | P1026025 | HAND KNOB 3⁄8" |
| 026 | PSS17 | SETSCREW 5⁄16"-18 x 5⁄16" |
| 027A | P1026027A | FENCE ADJ SCREW |
| 028 | P1026028 | ADJ SCREW BRACKET |
| 029 | P1026029 | MAIN FENCE HOUSING |
| 030 | PSB14 | CAP SCREW 3⁄8"-16 x 1" |
| 031A | P1026031A | FENCE MOUNT LEFT |
| 032 | P1026032 | SWITCH MOUNT BRACKET |
| 033 | PSW01 | 3 H.P. MAGNETIC SWITCH |
| 035 | PSW03 | FWD/REV SWITCH |
| 036 | P1035034 | BRACKET |
| 037 | P1035031 | SWITCH BOX |
| 038 | P1071075 | STRAIN RELIEF |
| 039 | P1035033 | SWITCH BOX COVER |
| 040 | PHTEK1 | SELF-TAPPING SCREW |
| 041 | P1026041 | SCALE |
| 042 | P1026042 | GROMMET |
| 043 | P1026043 | MOTOR CORD |
| 044 | P1026044 | POWER CORD |
| 045 | PSW01-1 | REPLACEMENT SCREW |
| 046 | P1026046 | LOCK HANDLE |
| 047 | G8588 | GRIZZLY NAMEPLATE |
| 048 | P1026048 | ID/WARNING LABEL |
| 049 | PB16 | HEX BOLT 3⁄8"-16 X 11⁄4" |
| 050 | P1026050 | ELECTRICITY LABEL |
| 051 | P1026051 | SAFETY GLASSES LABEL |
| 052 | P1026052 | READ MANUAL LABEL |
| 053 | P1026053 | HAND/CUTTER LABEL |
| 054 | P1026054 | UNPLUG MACHINE LABEL |
We regret to inform you that the wood facing for the G1026 Shaper fences are no longer available as a replacement part. For your convenience we have included a measured drawing so you may construct you own.

We apologize for any inconvenience this may cause you.

101 | P1026101 | HANDLE |
102 | P1026102 | HANDWHEEL |
103 | PSS17 | SETSCREW 5⁄16"-18 x 5⁄16" |
105 | P1026105 | SLEEVE |
107 | PB07 | HEX BOLT 5⁄16"-18 x 3⁄4" |
108 | P1026108 | SHAFT MOUNT |
111 | P1026111 | WORM SHAFT |
112 | P1026112 | GIB |
113 | PN02 | HEX NUT 5⁄16"-18 |
114 | PSS14 | SETSCREW 5⁄16"-18 x 13⁄8" |
115 | P1026115 | ELEVATION HOUSING |
116 | PB56 | HEX BOLT 1⁄2"-13 x 13⁄4" |
117 | PW01 | FLAT WASHER 1⁄2" |
120 | P1026120 | POINTER |
123 | P1026123 | POINTER MOUNT |
126 | PB19 | HEX BOLT 1⁄4"-20 x 1⁄2" |
128 | P1026128 | LOCK KNOB |
130 | PLN07 | LOCK NUT 5⁄8"-11 |
133 | P1026133 | GEAR |
133A | P1026133A | THRUST BEARING 51103 |
135 | PK14M | KEY 5 x 5 x 18 |
136 | P1026136 | ELEVATION LEAD SCREW |
139 | PRP24M | ROLL PIN 5 x 16 |
140 | PB16 | HEX BOLT 1⁄2"-13 x 13⁄8" |
141 | PLW04 | LOCK WASHER 3⁄8" |
142 | PW07 | FLAT WASHER 5⁄16" |
143 | PLW01 | LOCK WASHER 5⁄16" |
145 | PSS23 | SETSCREW 5⁄16"-24 x 5⁄8" |
146 | P1026146 | V-BELT M7 x 690 |
147 | P1026147 | MOTOR PULLEY |
148 | PB03 | HEX BOLT 5⁄16"-18 x 1" |
149 | PB56 | HEX BOLT 1⁄2"-13 x 13⁄4" |
151 | P1026151 | MOTOR MOUNT PLATE |
152 | P1026152 | 3H.P. MOTOR |
153 | PK15M | KEY 5 x 5 x 35 |
154 | PB09 | HEX BOLT 5⁄16"-18 x 1⁄2" |
155 | PW14 | FLAT WASHER 5⁄8" |
156 | PW06 | FLAT WASHER 1⁄4" |

| 201 | PS01 | PHILLIPS® HD SCR 10-24 x 1⁄2" |
| 202 | PR12M | SNAP RING 35MM |
| 203 | P1026203 | FLANGE |
| 204 | P1026204 | SPINDLE CARTRIDGE |
| 205 | PK20M | KEY 5 x 5 x 15 |
| 206 | P6205 | BEARING |
| 207 | PR11M | SNAP RING 25MM |
| 209 | P1026209 | HOUSING |
| 210 | PR14M | SNAP RING 70MM |
| 211 | P1026211 | PULLEY |
| 212 | P1035218 | TOOTHED WASHER |
| 213 | P1025219 | SPANNER NUT |
| 214 | P1026214 | 1⁄2" SPINDLE |
| 215 | P1026215 | 3⁄4" SPINDLE |
| 216 | P1026216 | 1" SPINDLE |
| 217 | P1026217 | DRAW BAR |
| 218 | P1026218 | DRAW NUT |
| 219 | P1035201C | 1⁄2" SPINDLE NUT |
| 220 | P1026220D | 3⁄4" SPINDLE NUT |
| 221 | P1026221 | 1" SPINDLE NUT |
| 222 | P1026222 | PIN |
| 223 | P1026223 | 1⁄2" SPINDLE WASHER |
| 224A | P1026224A | 3⁄4" SPINDLE WASHER |
| 225A | P1026225A | 1" SPINDLE WASHER |
| 226 | P1026219 | SPINDLE WRENCH SET |
SPACERS
| Bore Diameter Height Replacement Part # | |||
| 1⁄2'' | 1'' | 1⁄4'' | G2454 |
| 1⁄2'' | 1'' | 3⁄8'' | G2455 |
| 1⁄2'' | 1'' | 1⁄2'' | G2456 |
| 1⁄2'' | 1'' | 3⁄4'' | G2457 |
| 3⁄4'' | 11⁄4'' | 1⁄4'' | G2460 |
| 3⁄4'' | 11⁄4'' | 3⁄8'' | G2461 |
| 3⁄4'' | 11⁄4'' | 1⁄2'' | G2462 |
| 3⁄4'' | 11⁄4'' | 3⁄4'' | G2463 |
| 1'' | 11⁄2'' | 1⁄4'' | G2466 |
| 1'' | 11⁄2'' | 3⁄8'' | G2467 |
| 1'' | 11⁄2'' | 1⁄2'' | G2468 |
| 1'' | 11⁄2'' | 3⁄4'' | G2469 |
| 1'' | 11⁄2'' | 1'' | G2470 |
| 11⁄4'' | 13⁄4'' | 1⁄4'' | G2472 |
| 11⁄4'' | 13⁄4'' | 3⁄8'' | G2473 |
| 11⁄4'' | 13⁄4'' | 1⁄2'' | G2474 |
| 11⁄4'' | 13⁄4'' | 3⁄4'' | G2475 |
| 11⁄4'' | 13⁄4'' | 1'' | G2476 |

| 301 | PSS02 | SETSCREW 5⁄16"-18 x 3⁄8" |
| 302 | P1026302 | SHAFT MOUNT |
| 303 | PW02 | FLAT WASHER 3⁄8" |
| 304 | PB21 | HEX BOLT 3⁄8"-16 x 3⁄4" |
| 305 | P1026305 | EXTENSION BRACKET |
| 306 | P1026306 | LOCK KNOB |
| 309 | P1026309 | SHAFT |
| 310 | P1026310 | LOCK HANDLE |
| 313 | PN02 | HEX NUT 5⁄16"-18 |
| 314 | P1026314 | GUARD EXTENSION |
| 315 | P1026315 | GUARD |
| 316 | PFH14 | FLT HD SCREW 5⁄16"-18 x 3⁄4" |

| 501 | P1026501 | HOLD-DOWN BAR |
| 502 | P1026502 | HOLD-DOWN |
| 503 | P1026503 | BRACKET HOLD-DOWN |
| 504 | PSS02 | SETSCREW 5⁄16"-18 x 3⁄8" |

| 601 | P1023401 | KNOB |
| 602 | P1023402 | FLAT WASHER 5⁄16" |
| 603 | P1023403 | MITER GAUGE BODY |
| 604 | P1023406 | MITER BAR |
| 607 | P1023407 | HEX NUT |
| 608 | P1023408 | SETSCREW |
| 609 | P1023409 | SETSCREW |
| 610 | P1023410 | STOP |
| 611 | P1023411 | POINTER |
| 612 | P1023212 | SCALE |
| 613 | P1023413 | STUD |
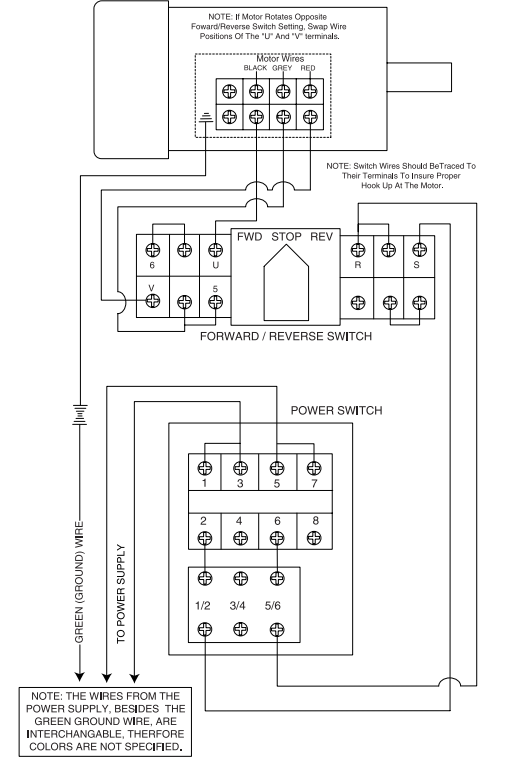
Wiring Diagram
Specifications
GRIZZLY MODEL G1026 3 H.P. SHAPER
- Design Type...................................................................................................... Floor Model
Overall Dimensions
- Table ........................................................................................................213⁄4" x 281⁄4"
- Table with Extension Wing........................................................................301⁄2" x 281⁄4"
- Height (Includes Fence) ........................................................................................391⁄2"
- Height From Table To Floor ....................................................................................34"
- Length....................................................................................................................301⁄2"
- Width......................................................................................................................281⁄4"
- Weight (Shipping)..............................................................................................353 lbs.
- Weight (in place) ..............................................................................................345 lbs.
- Box Size......................................................................................32" L x 25" W x 43" H
- Footprint ........................................................................................................21" x 20"
Capacities
- Spindle Sizes ................................................................................................1⁄2", 3⁄4", 1"
- Spindle Lengths ..................................................................1⁄2" - 23⁄4"; 3⁄4" - 31⁄2"; 1"- 3"
- Spindle Capacity Under Nut ................................................1⁄2" - 2", 3⁄4" - 21⁄2", 1" - 21⁄4"
- Spindle Travel ............................................................................................................3"
- Spindle Openings ........................................................................13⁄8", 23⁄4", 4" and 51⁄2"
- Table Counter-bore ..................................................................7" Diameter x 5⁄8" Deep
- Max. Cutter Diameter ..............................................................................................51⁄2"
- Spindle Speeds ........................................................................7,000 & 10,000 R.P.M.
- Spindle Bearings..................................................Shielded & Lubricated Ball Bearings
Construction
- Table ....................................................................................Surface Ground Cast Iron
- Fence Assembly ..................................................................Surface Ground Cast Iron
- Body Assembly ..............................................................................................Cast Iron
- Base....................................................................................................Pre-formed Steel
- Wing......................................................................................Surface Ground Cast Iron
Motor
- Type ............................................................................TEFC Capacitor-Start Induction
- Horsepower..........................................................................................................3 H.P.
- Phase ⁄ Voltage ............................................................................Single Phase ⁄ 220V
- Amps..........................................................................................................................18
- Cycle ⁄ R.P.M.............................................................................60 Hertz ⁄ 3450 R.P.M.
- Bearings..............................................................Shielded & Lubricated Ball Bearings
- Switch ..........................................................Magnetic w/ Thermal Overload Protector
Features
- Independently Adjustable Split Fence
- Magnetic w/ Thermal Overload Protector
- Starting Pins
- Hold Downs
- Guard
- Vertical Spindle Lock
- Standard Miter Gauge
Description
The Grizzly 3 HP Shaper Power Table Saws G1026 boasts a sturdy cast iron table and trunnions, ensuring stability and precision during operation. The saw features a robust 3 HP motor that can handle demanding tasks with ease. The table saw is designed with safety in mind, including a blade guard and anti-kickback pawls to protect the user from potential hazards.
The saw also comes with a miter gauge for precise crosscuts and a dust collection port to keep your workspace clean. With its extensive rip capacity and powerful motor, this table saw is ideal for cutting through thick lumber and performing intricate woodwork.
CIRCUIT REQUIREMENTS
220V Operation
The G1026 Shaper is furnished with a 3450 R.P.M. 3 H.P., 220V motor, push-button ON-OFF magnetic starter switch, forward-reverse switch and a cord set. Under normal use, the motor draws approximately 18 amps at 220V. We rec-ommend a 20 amp circuit breaker or a 20 amp slow-blow fuse. If frequent circuit failures occur when using the shaper, contact our service department.
The shaper motor must be connected to its own dedicated 20 amp circuit. It should not share a cir-cuit with any other machine. A standard 2-pole breaker should be satisfactory for use with the shaper.
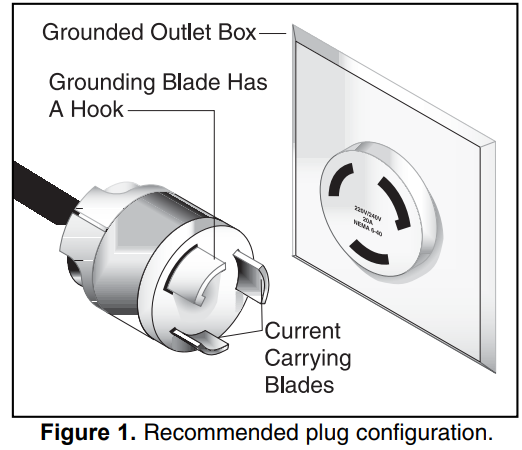
We recommend using a NEMA-style L6-20 plug and outlet shown Figure 1. You may also “hard-wire” the shaper directly to your panel, provided you place a disconnect near the machine. Check the electrical codes in your area for specifics on wiring requirements.
Grounding
In the event of a malfunction or breakdown, grounding provides electric current a path of least resistance to reduce the risk of electric shock. This tool is equipped with an electric cord having an equipment-grounding conductor which must be properly connected to a grounding plug. The plug must be plugged into a matching outlet that is properly installed and grounded in accordance with all local codes and ordinances.
Improper connections of the electrical-grounding conductor can result in risk of electric shock. The conductor with green or green and yellow striped insulation is the electrical-grounding conductor. If repair or replacement of the electric cord or plug is necessary, do not connect the equipment grounding conductor to a live terminal.
WARNING
This equipment must be grounded. Verify that any existing electrical outlet and circuit you intend to plug into is actually grounded. Under no cir-cumstances should the grounding pin from any three-pronged plug be removed. Serious injury may occur.
INTRODUCTION
Commentary
Grizzly Industrial, Inc. is proud to offer the Model G1026 Shaper. The Model G1026 is part of Grizzly’s growing family of fine woodworking and metalworking machinery. When used according to the guidelines stated in this manual, you can expect years of trouble-free, enjoyable operation.
The Model G1026 is intended for heavy-duty pro-fessional use. This shaper features a 3 H.P., 220V single-phase motor, magnetic power switching and full reversing capabilities. The Model G1026 also features a precision-ground cast iron table, hold-down springs, three spindles and an extended table wing. This shaper is capa-ble of operating at two spindle speeds: 7,000 and 10,000 R.P.M., giving you a versatile shaper at a reasonable price.
A number of optional accessories for the Model G1026 are available. Please refer to the current Grizzly catalog for more information.
We are also pleased to provide this manual with the Model G1026. It was written to guide you through assembly, review safety considerations, and cover general operating procedures. It repre-sents our latest effort to produce the best docu-mentation possible. If you have any criticisms that you feel we should address in our next printing, please write to us at the address below:
Unpacking
The Model G1026 Shaper is shipped from the manufacturer in a carefully packed carton. If you discover the machine is damaged after you’ve signed for delivery, and the truck and driver are gone, you will need to file a freight claim with the carrier. Save the containers and all packing mate-rials for possible inspection by the carrier or its agent. Without the packing materials, filing a freight claim can be difficult. If you need assis-tance determining whether you need to file a freight claim, or with the procedure to file one, please contact our Customer Service.
WARNING
The G1026 is a heavy machine, 353 lbs. ship-ping weight. DO NOT over-exert yourself while unpacking or moving your machine –consider using power equipment to move the machine. Serious per-sonal injury may occur if safe moving methods are not followed.
WARNING
If your shaper must be moved up or down a flight of stairs, be sure the stairs are capable of supporting the combined weight of people and machine. Serious personal injury may occur if this warning is ignored.
NOTICE
A full parts list and breakdown can be found toward the end of this manual. For easier assembly, or to identify missing parts, please refer to the detailed illustrations at the end of the manual.
Piece Inventory
After all the parts have been removed from the carton, you should have:
- Shaper Unit
- Miter Gauge
- Extension Wing
- 2 Wood Fences
- Hardware Box
The G1026 Hardware Box contains:
| Hardware | Qty |
|---|---|
| 1⁄2" Spindle | 1 |
| 3⁄4" Spindle | 1 |
| 1" Spindle | 1 |
| 1⁄2" Spindle Nut | 2 |
| 3⁄4" Spindle Nut | 2 |
| 1" Spindle Nut | 2 |
| Spacer Set* | 18 |
| Draw Bar | 1 |
| Draw Nut | 1 |
| Spindle Wrench Set | 2 |
| Safety Guard | 1 |
| Safety Guard Shaft | 1 |
| Starting Pins | 3 |
| Hold Downs | 4 |
| Hold Down Bars | 2 |
| Hold Down Brackets | 4 |
| 5⁄16"-18 x 11⁄2" Flat Head Screws | 4 |
| 5⁄16"-18 x 3⁄4" Flat Head Screws | 2 |
| 5⁄16" Flat Washers | 4 |
| 5⁄16" Hex Nuts | 6 |
| Handle For Handwheel | 1 |
| 1⁄2" Flat Washers | 2 |
| 3⁄4" Flat Washers | 2 |
| 1" Flat Washers | 2 |
| Extension Bracket | 1 |
| Lock Handle | 1 |
| Lock Knob | 1 |
| Guard Extension | 1 |
| Setscrew 5⁄16"-18 x 3⁄8" | 4 |
In the event that any nonproprietary parts are missing (e.g. a nut or a washer), we would be glad to replace them, or replacements can be obtained at your local hardware store.
Refer to page 37 for a detailed listing of spacers supplied.
Clean Up
The unpainted surfaces are coated with a waxy oil to protect them from corrosion during ship-ment. Remove this protective coating with a sol-vent cleaner or citrus-based degreaser such as Grizzly’s G7895 Degreaser. Avoid chlorine-based solvents as they may damage painted sur-faces should they come in contact. Always follow the usage instructions on any cleaning product.
WARNING
Do not use gasoline or other petroleum-based solvents to clean with. They have low flash points which makes them extremely flammable. A risk of explosion and burning exists if these products are used. Serious personal injury may occur.
WARNING
Do not smoke while using solvents. A risk of explo-sion or fire exists and may result in serious personal injury.
CAUTION
Many of the solvents commonly used to clean machinery can be toxic when inhaled or ingested. Always work in well-venti-lated areas far from potential ignition sources when dealing with sol-vents. Use care when dis-posing of waste rags and towels to be sure they do not create fire or environ-mental hazards.
Site Considerations
FLOOR LOAD
Your Model G1026 Shaper represents a moder-ately large weight load in a small footprint. Most commercial or home shop floors will be adequate for the 345 lb. weight of the Model G1026. Some floors may require additional support. Contact an architect or structural engineer if you have any question about the ability of your floor to handle the weight.
WORKING CLEARANCES
Working clearances can be thought of as the dis-tances between machines and obstacles that allow safe operation of every machine without limitation. Consider existing and anticipated machine needs, size of material to be processed through each machine, and space for auxiliary stands and/or work tables. Also consider the rel-ative position of each machine to one another for efficient material handling. Be sure to allow your-self sufficient room to safely run your machines in any foreseeable operation.
LIGHTING AND OUTLETS
Lighting should be bright enough to eliminate shadow and prevent eye strain. Electrical circuits should be dedicated or large enough to handle combined motor amp loads. Outlets should be located near each machine so power or exten-sion cords are not obstructing high-traffic areas. Be sure to observe local electrical codes for prop-er installation of new lighting, outlets, or circuits.
Make your shop “child safe.” Ensure that your workplace is inaccessible to youngsters by closing and locking all entrances when you are away. Never allow visitors in your shop when assembling, adjust-ing or operating equip-ment.
CAUTION
Make your shop “child safe.” Ensure that your workplace is inaccessible to youngsters by closing and locking all entrances when you are away. Never allow visitors in your shop when assembling, adjust-ing or operating equip-ment.
ASSEMBLY
Beginning Assembly
Most of your Model G1026 Shaper has been assembled at the factory, but some parts must be assembled or installed after delivery. We have organized the assembly process into steps. Please follow along in the order presented here.
WARNING
- Keep loose clothing rolled up and out of the way of machinery and keep hair pulled back.
- Disconnect power to the machine when perform-ing any maintenance or assembly. Failure to do this may result in serious personal injury.
- Wear safety glasses dur-ing the entire assembly process. Failure to com-ply may result in serious personal injury.
CAUTION
Some metal parts may have sharp edges on them after they are formed. Please examine the edges of all metal parts before handling them. Failure to do so could result in injury.
Handwheel
The handwheel, pre-installed at the factory, is made of high impact plastic. It is used to raise and lower the spindle to accommodate the height required by your cutter.
Thread the crank handle onto the hand- wheel.
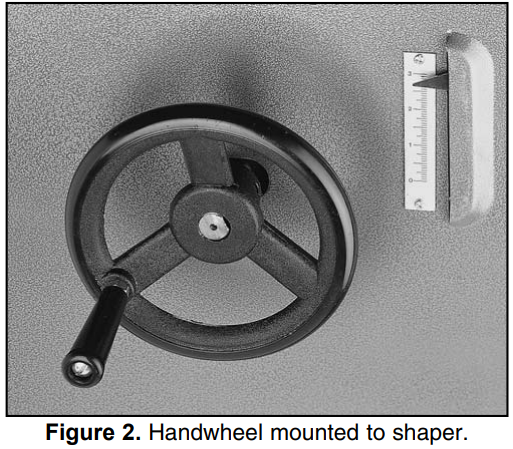
- While holding handle screw with a flat head screwdriver, tighten the lock nut against the handwheel.
Spindle Installation
The Model G1026 comes with 1⁄2", 3⁄4", & 1" inter-changeable spindles. Each spindle is sized to work efficiently with different sized cutters and spacers. The spindles must be inserted correctly and remain securely locked in the machine in order to produce quality work. When installing and changing spindles, make sure the spindle seats snugly and that there is enough drawbar threaded into the bottom of the spindle to safely secure it in place.
To install a spindle:
- Disconnect the power first.
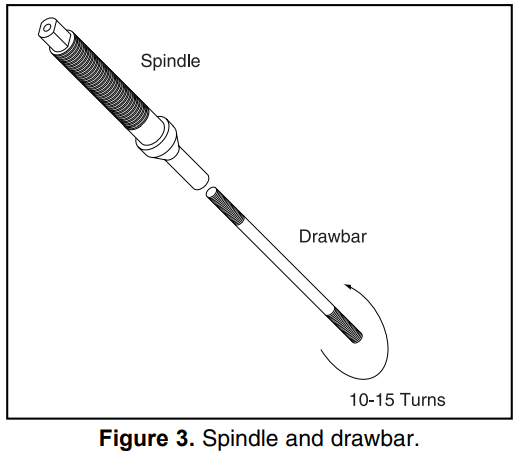
Thread the drawbar approximately 10-15 turns into the bottom of the spindle. The drawbar has two threaded ends. One of them remains exposed. See Figure 3.
NOTICE
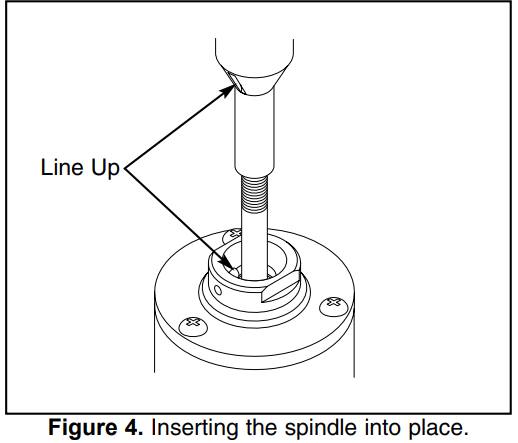
On initial assembly, make sure all rust inhibitor has been removed from spindle and spindle cartridge taper.Place the spindle/drawbar into the spindle cartridge at the top of the table. Line up the keyway on the spindle with the locating pin at the top of the spindle cartridge. You will feel the spindle seat itself. See Figure 4.
CAUTION
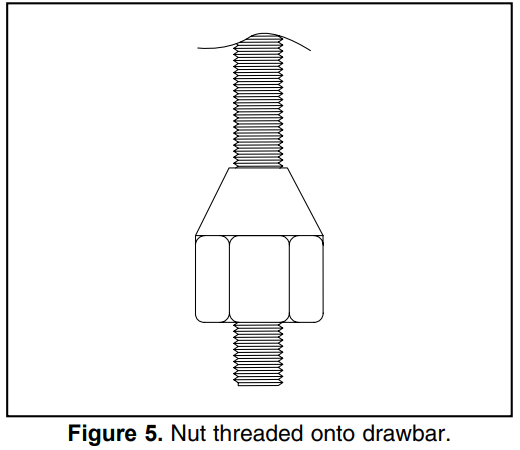
Make certain the spindle keyway and pin are aligned and properly seated before tighten-ing the drawbar nut. Improper assembly can create an unsafe condition and possible injury to the operator.Thread the drawbar nut, tapered side up, onto the bottom of the drawbar. See Figure 5.
Place the spindle wrench on top of the spin- dle, so it fits over the head of the spindle. Place a 15mm wrench on the drawbar nut. See Figure 6.
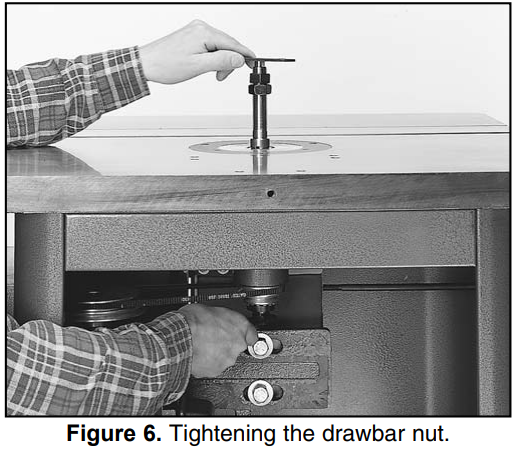
- Hold the spindle in place and tighten the drawbar nut. DO NOT use excessive force.
WARNING
Make certain the spindle is properly assem-bled before operating the shaper. Incorrect assembly can allow the spindle and cutter to fly off the machine causing injury to the operator. If you are uncertain of any aspect of this assembly, please review these instructions again or contact Grizzly’s Customer Service.
Extension Wing
The cast iron wing extends your work surface area to provide support for larger workpieces. Follow the instructions below to ensure your extension wing is flush with the shaper table.
- Make sure the contact surfaces are free of dirt or grit.
- Put the three bolts with lock washers through the wing and thread them into the tapped holes at the front of the shaper. Leave them loose, for now.
Raise the wing up on one side and make sure it’s flush to the table edge. Tighten the first bolt. See Figure 7.
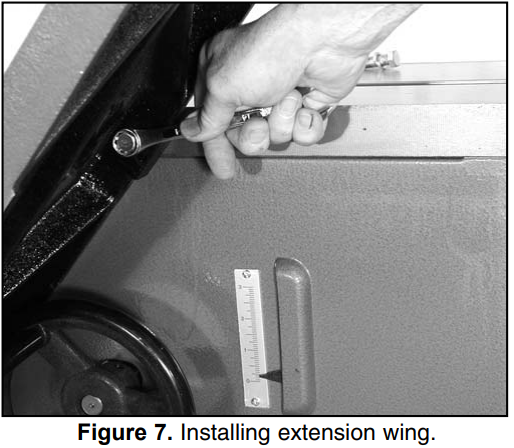
- By raising or lowering the far end of the wing, you can locate the center of the wing flush with the shaper table. Secure the cen-ter bolt.
- The end of the wing at the last bolt may not be flush with the surface of the table. Don’t be alarmed. Make sure the wing edge is flush at the first two bolts and that the bolts are tight.
Now adjust the wing, either up or down, at the last bolt. If necessary, use a clamp and a couple of blocks to make the two surfaces flush. Tighten the final bolt when the two surfaces are flush. See Figure 8.
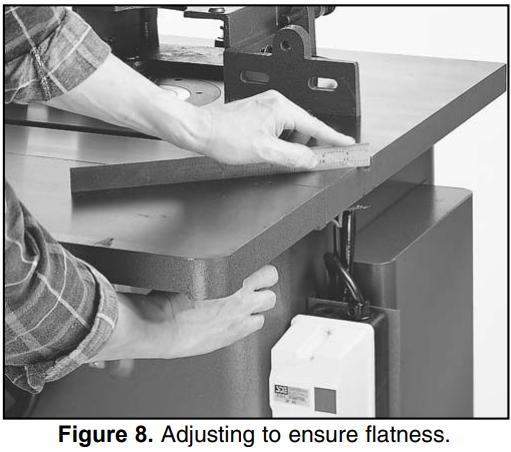
- Once you’ve secured the wing to the table, inspect your results. Use a good-quality straightedge. If the wing is slightly tilted either up or down, you can place some masking tape along the whole length, between the table and the wing. Place the tape above the bolts to lower the wing and below the bolts to raise it. Remember to tighten the bolts in the same sequence, after making adjustments.
Fence Assembly
To install the wood facing:
Secure the wooden fence pieces with the 5⁄16''-18 x 1'' Phillips head screws, washers and hex nuts provided. See Figure 9.
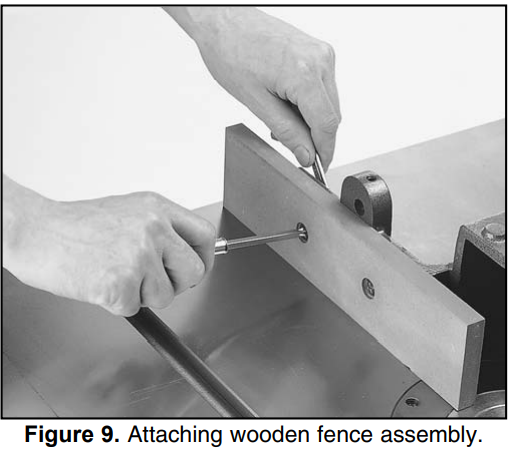
- If using your own wood pieces, make sure the countersunk holes in your fence materi-al are deep enough to keep the entire screw head below the fence surface.
Safety Guard
To assemble the safety guard:
- Place the safety guard support rod into the hole at the back of the table with the V-groove facing away from the machine.
Using the two 5⁄16" - 18 x 3⁄4" Phillips head screws, tightly secure the extension bar to the main guard. See Figure 10.
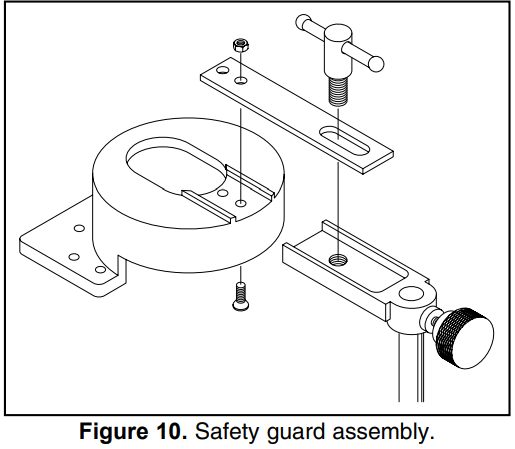
- Attach the guard assembly to the support rod and tighten the lock handle.
Under most conditions, this guard is used when doing freehand work. This should be used in addi-tion to the starting pin—never as an alternative.
Hold-Downs
Hold-downs are used to hold the workpiece flat on the table and snug against the fence. See Figure 11.
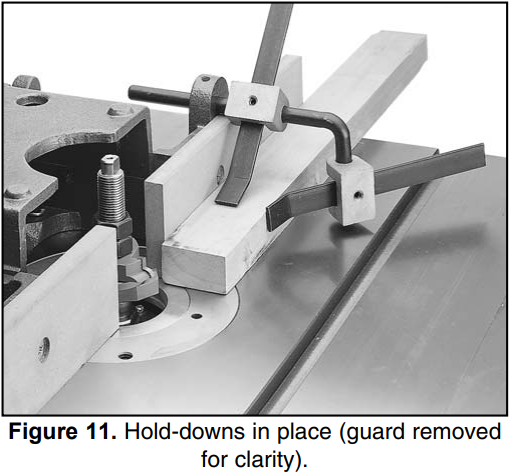
To assemble the spring hold-downs:
- Slide two aluminum hold-down brackets onto each of the hold-down bars.
- Slide the hold-down bars through the holes in the cast iron fence brackets.
- Partially screw the 1⁄4" - 20 x 3⁄8" setscrews into the hold-down brackets.
- Slide each hold-down between a bracket and hold-down bar.
- Position the hold-downs according to the size of your workpiece.
- Tighten the setscrews in the fence brackets and the hold-down brackets to fix the posi-tion of the hold-downs.
Remove the hold-down assembly when not in use.
ADJUSTMENTS
WARNING
- Keep clothing rolled up and out of the way of machinery and keep hair pulled back.
- Disconnect power to the machine when perform-ing any maintenance or assembly. Failure to do this may result in serious personal injury.
- Wear safety glasses dur-ing the entire adjustment process. Failure to com-ply may result in serious personal injury.
Pulleys & V-Belts
Improper pulley alignment sharply reduces the effectiveness of power transmission and belt life expectancy.
To align the pulleys:
- Open the motor cover on the side of the shaper cabinet.
Check the alignment with a straightedge. If the pulleys are in alignment, the straight-edge should touch two sides of each pulley evenly. See Figure 12.
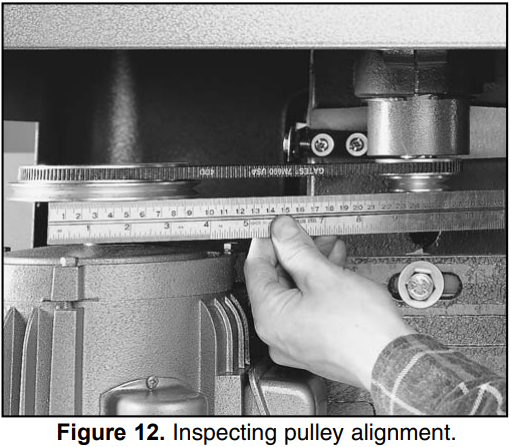
- If pulleys are parallel with each other, but not in line, remove the belt from the spindle assembly and slide the spindle cartridge assembly either up or down.
- The side cover can be removed from the shaper to improve access to the motor. Inspect for tilt on the motor pulley. If the pul-ley is tilted, loosen the four bolts holding the motor onto the motor plate. Wiggle the motor into position. (Do not loosen the bolts that hold the motor onto the motor mount; this plate is preset with blocks that hold it in position and it cannot be adjusted.)
- Inspect your results. If they are satisfactory, tighten all fasteners. Remember to tighten the bolt in the split housing that holds the spindle cartridge in position.
- You can also align the motor pulley by rais-ing or lowering it along the motor shaft. Loosen the two setscrews and tap into the desired position with a dead blow hammer.
NOTICE
DO NOT over-tighten. Cast iron threads are more easily stripped than steel.
WARNING
Disconnect power to the machine when perform-ing any maintenance or assembly. Failure to do this may result in serious personal injury.
V-Belt Tension
You should be able to deflect the belt 1⁄4" with moderate finger pressure. This may seem tight compared to most other V-belts, but since the belt is small and runs fast, this much tension is nec-essary. The V-belt will slip if too loose and squeal or cause vibration if too tight. To adjust V-belt ten-sion:
- Make sure the pulleys are properly aligned.
- Loosen the two motor mount plate bolts and slide the motor left or right to modify the belt tension.
- Tighten the motor mount plate bolts, test the tension, and check pulleys.
- Repeat steps 2-3 until tension is correct and pulleys are aligned.
Speed Changes
The Model G1026 Shaper is equipped with a spe-cial high speed V-belt. It was designed to with-stand vibration and sudden shock loads associat-ed with the operation of a shaper.
To change spindle speeds:
- Loosen the two motor plate bolts and slide the motor toward the spindle assembly. DO NOT take the bolts out.
Select the desired speed. See Figure 13.
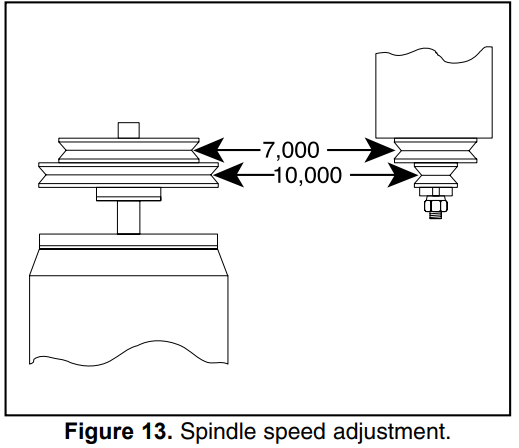
- Slide the motor back into position and tight-en the belt. When the belt is properly ten-sioned, there should be approximately 1⁄4" of deflection in the center of the belt when you press it with your thumb.
- Tighten all the adjusting bolts.
- Spin the pulley to ensure proper setup.
Fence Adjustment
The fence is a two-piece adjusting system. Each fence is independently adjustable to compensate for different cutting thicknesses and special shap-ing applications. One turn of the knob moves the split fence approximately 5⁄64" (.078"). To adjust the fence:
- Loosen the fence lock handle.
- Turn the fence adjustment knob until fence is set to the desired position.
- Tighten the fence lock handle.
More detailed information concerning fence adjustments are covered in the “Straight Shaping” instructions in Section 6.
Truing The Fence
The following procedure will ensure that the fence is parallel with itself and square with the table.
- Ensure that the bolts through the wood fac-ing on each side are tight and adequately countersunk.
- To align the wood facing, adjust one or both fence halves so they are in close alignment. Micro-adjust and check the alignment with a straightedge.
- If the wood fences are not coplanar with each other, use electrical washers between the fence and the fence bracket to shim the fence into the correct position.
Table Inserts
The Model G1026 is supplied with three table inserts which give you four possible opening diameters in the shaper table surface. Use the smallest opening that a particular cutter will allow. This offers more support for the workpiece and reduces the amount of chips that can fall into the machine. The correct spindle opening will also allow any unused portion of the cutter to remain below the table surface—increasing operator pro-tection. There are two aluminum table inserts and one cast iron table insert.
The cast iron table insert must be flush with the top of the table.
To adjust the insert:
- Remove the three Phillips head screws that hold the cast iron insert in place.
By using a straightedge and a screwdriver, turn the barrel screws clockwise or counter-clockwise to level the cast iron insert with the table. See Figure 14.
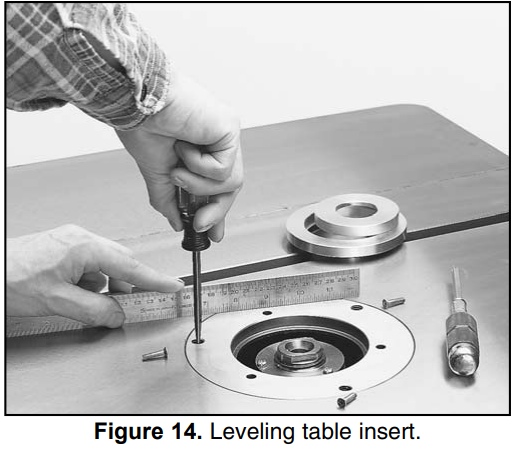
- Inspect with a straightedge, replace the Phillips head screws, and secure.
Gib Adjustments
Elevate the spindle to its maximum 3" height. Test the spindle for movement from left to right after tightening the spindle assembly lock knob. If there is movement, adjust the gib against the elevation housing, using the adjustment screws at the top and bottom of the elevation housing. Figure 15 shows the two upper gib adjustment screws and locknuts. One of the two lower adjust-ment screws is also visible in the photo.
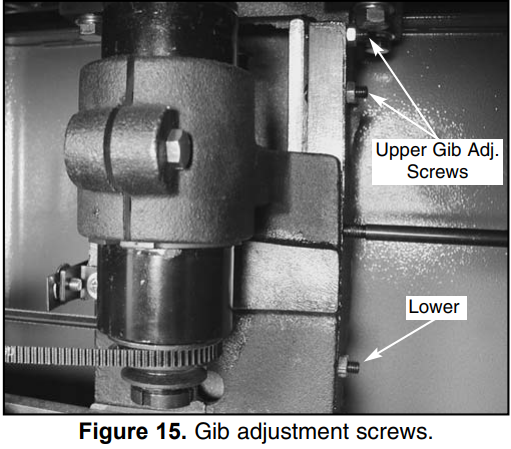
- Loosen the four 12mm locknuts and remove the slack between the elevation housing and spindle cartridge slide by tight-ening the four 5⁄16" setscrews with a 4mm Allen wrench. Alternate between the upper and lower adjustments to ensure consistent tightness. Failure to do so may cause dis-appointing results. DO NOT over-tighten the gib. Over-tightening will restrict spindle movement. Loosen the spindle assembly lock knob and raise or lower the spindle to check for free movement.
- Since there is an unbalanced weight distri-bution on the cartridge slide, you may have to perform a number of adjustments before you find the ideal location. Don’t get dis-couraged; it may take a few tries to get it right.
NOTICE
The lock knob keeps the spindle in a fixed position during shaper operation. Do not over-tighten the lock knob. A snug fit is all that’s needed to keep the spindle from mov-ing during shaper use.
OPERATIONS
WARNING
- Keep clothing rolled up and out of the way of machinery and keep hair pulled back.
- Disconnect power to the machine when perform-ing any maintenance or assembly. Failure to do this may result in serious personal injury.
- Wear safety glasses dur-ing the entire operation process. Failure to com-ply may result in serious personal injury.
- Always wear a dust mask when operating the shaper. Using this machine produces saw-dust which may cause allergic reactions or res-piratory problems.
NOTICE
The following section was designed to give instructions on the basic operations of this shaper. However, it is in no way compre-hensive of every shaper application. WE STRONGLY RECOMMEND that you read books, trade magazines, or get formal train-ing to maximize the potential of your shaper. There are many different jigs not mentioned in this manual that can be built to increase safety and accuracy for special-ized cuts.
Test Run
- Once assembly is complete and adjustments are done to your satisfaction, you are ready to test the machine.
- Turn on the power supply at the main panel. Press the START button. Make sure that your fin-ger is poised on the STOP button, just in case there’s a problem. The shaper should run smooth-ly, with little or no vibration or rubbing noises. Strange or unnatural noises should be investigat-ed and corrected before operating the machine further.
- If the shaper seems to be running correctly, check the directional switch. The spindle should be rotating in a counterclockwise direction when the switch is in the FORWARD position. Run the Model G1026 for a short time to ensure that the moving parts are working properly with no exces-sive vibration. If any problem develops, correct them before attempting to use the machine.
- If you cannot locate the source of unusual noises, contact our service department for help.
Cutter Installation
Your shaper operates at speeds of 7,000 and 10,000 R.P.M. Cutters 31⁄2" or larger must be operated at the slower speed. Always use the largest spindle size possible, and never use a cut-ter more than one size smaller than the spindle size.
To install a cutter:
- Place an appropriate spacer or collar at the base of the spindle to support the shaper cutter.
- Place the cutter on the spindle. Make sure the rotation is correct for your application.
- Use spacers or collars to suit your particular application.
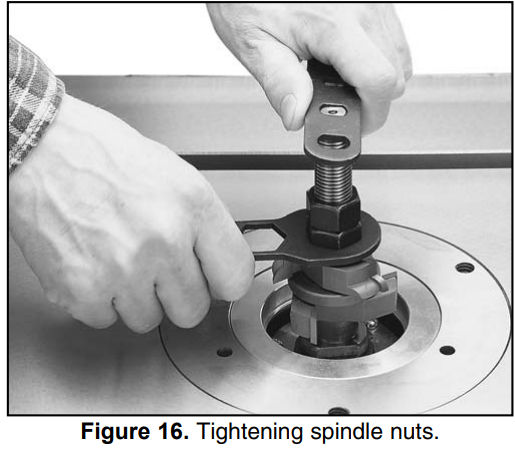
- Place the spindle washer under the nut. Screw on the nut and locknut.
Tighten the nuts while holding the spindle as shown in Figure 16. Tighten the lower nut against the cutter, then tighten the upper lock nut against the lower nut.
Rotation
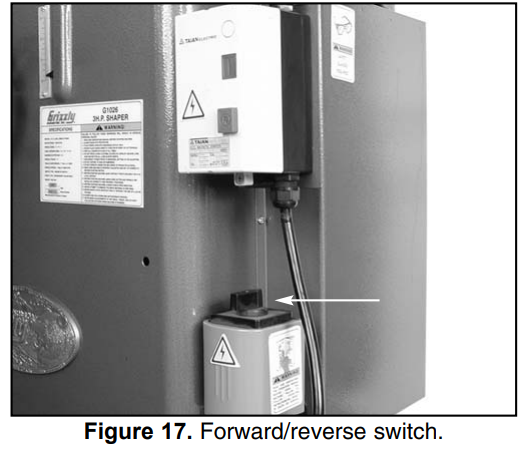
Your shaper is equipped with a FORWARD/REVERSE switch. See Figure 17. In many instances, it will be necessary to flip the cut-ter over and reverse cutter rotation. Whenever possible, mount the cutter so the board is milled on the bottom side. This does a better job and is safer for the operator.
CAUTION
Always check the direction of cutter rotation before any shaping operation. Cutters rotat-ing backwards will cause unsafe conditions.
Spindle Height
To adjust the cutter height:
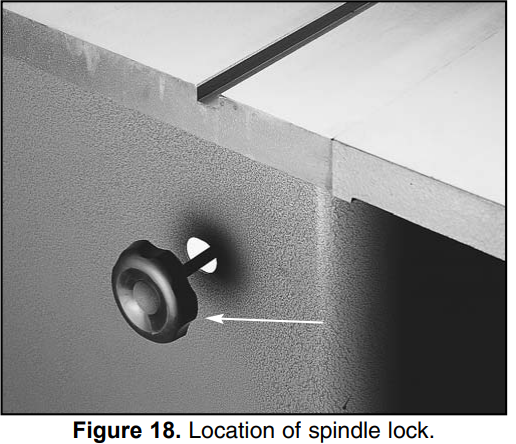
Loosen the spindle lock. See Figure 18.
- Move the spindle up or down until the desired position is obtained.
- Lock the spindle into position.
Straight Shaping
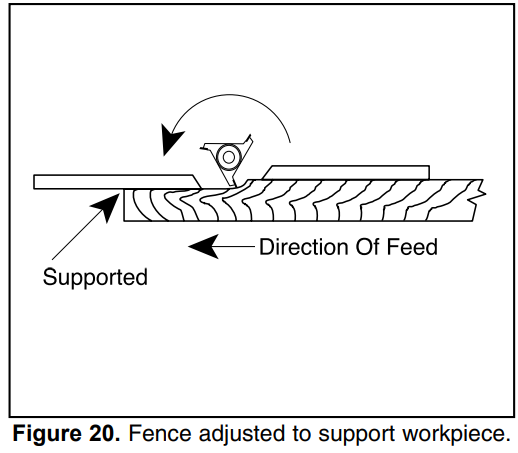
The fence assembly is a two-piece, independent-ly adjustable system. When removing material from the whole face of your workpiece, the out-feed fence can be adjusted to provide support for the workpiece as it passes over the cutter, or it can be set up for partial face removal.
WARNING
This section requires you to run the shaper to make several test pieces. Read through the entire manual before attempting to make cuts using your shaper. Always turn off the shaper and disconnect the power before making adjustments. Use a hold-down or other safety device whenever you run the shaper or serious personal injury will occur.
If removing material from the whole face, observe the following steps:
Loosen the locking handles that hold the fences in place. See Figure 19.
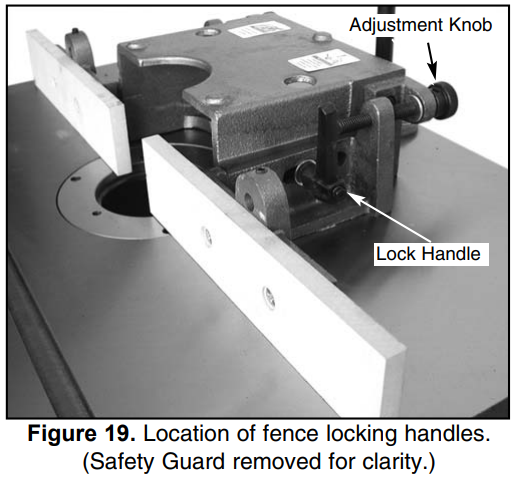
- Adjust the infeed fence by turning the knurled adjustment knobs until the work-piece contacts the cutter in the desired loca-tion.
- Use a test piece at least 24" long to deter-mine the best setting.
- Lock the infeed fence in position with the locking handle.
- Advance a test sample of the desired cut about 8'', then stop.
When the shaper is turned off and the cut-ter has come to a complete stop, adjust the outfeed fence to support the new profiled edge. See Figure 20.
CAUTION
The miter gauge should not be used to feed material along the fence face when straight shaping. Use a push stick and hold downs to keep the workpiece in position. The fence may not always be perfectly parallel to the miter slot; therefore, using the miter gauge can cause binding and possible kickback of the workpiece towards the operator. If this happens, serious personal injury may occur.
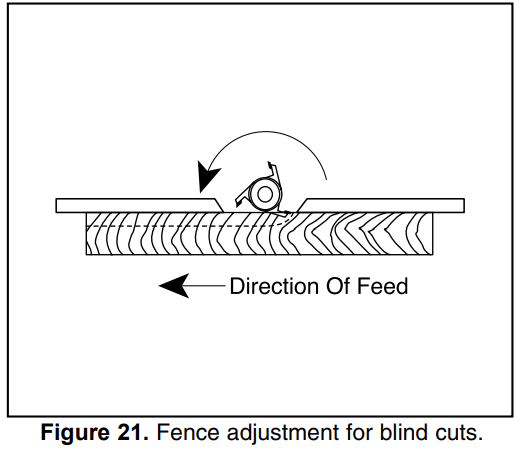
If the face of the workpiece will only be par-tially removed, observe the following steps:
- Adjust the infeed fence approximately to the the desired depth of cut. Lock the infeed fence in place.
- Use a straightedge to adjust the outfeed fence to the same plane as the infeed fence. Lock the outfeed fence in place.
- Set the right and left wood faces so they barely clear the cutter. This allows the max-imum support possible for the workpiece when passing the cutter. Remember to tighten the wood facing before starting the shaper.
Run a test piece through the shaper. See Figure 21.
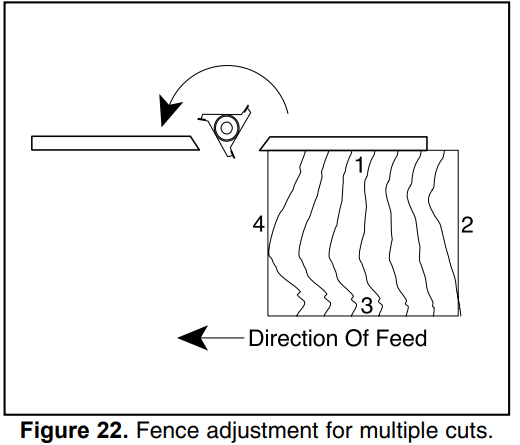
Always cut the end grain first when putting an edge around the perimeter of your work-piece. See Figure 22.
WARNING
The sound of this machine when it is run-ning may be less than that of other devices such as a dust collector which may be run-ning at the same time. Because of this, it may be difficult to determine if the machine is ON merely by listening. It is necessary to make certain that this machine is OFF and unplugged before attempting any setup or adjustments. If this warning is ignored, seri-ous personal injury will occur.
Shaping Small Stock
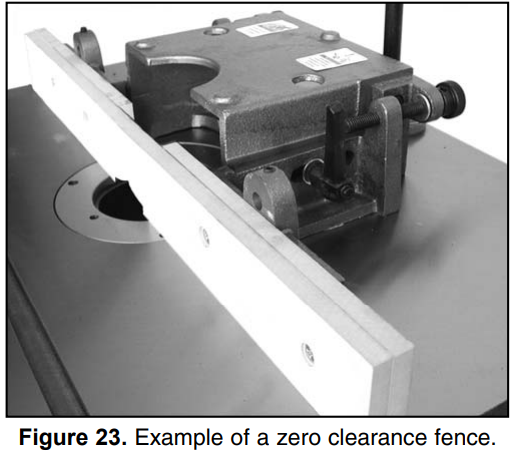
Shaping small stock is inherently dangerous on a shaper. Consider making a zero-clearance fence to increase your safety. A zero-clearance fence will provide more support that the standard fence and reduce tearout on narrow or fragile stock.
To make a zero-clearance fence:
- Fasten a 5⁄8" piece of plywood to both ends of the split fence. This can be done using screws or less permanently with clamps (as long as they are positioned out of the way and are secure).
Turn on the shaper and carefully move the the plywood into the cutterhead by moving both sides of the fence. Only remove enough of the plywood to expose the cut-terhead to where it will be needed for the cut.
CAUTION
Always use a jig when when shaping small or narrow stock. Jigs will keep your hands away from the spinning cutterhead and sup-port the stock sufficiently to allow a safe and effective cut. Failure to follow this warning may lead to injury.
Rub Collars
Rub collars are used when shaping curved or irregular workpieces, such as arched doors or round table tops, and to limit the depth of your cut.
There are two types of rub collars: solid and ball-bearing. We recommend against the use of solid rub collars. Grizzly carries an extensive line of ball bearing rub collars designed for use with Grizzly shapers. See the current catalog for listings.
Rub collars may be used in any of the following positions:
Rubcollar above the cutter (preferred):
When the rub collar is used above the cut-ter, the cut cannot be seen. See Figure 24. This offers some advantage: the stock is not affected by slight variations in thickness and accidental lifting will not damage the work-piece. If lifting occurs, simply correct the mistake by repeating the operation.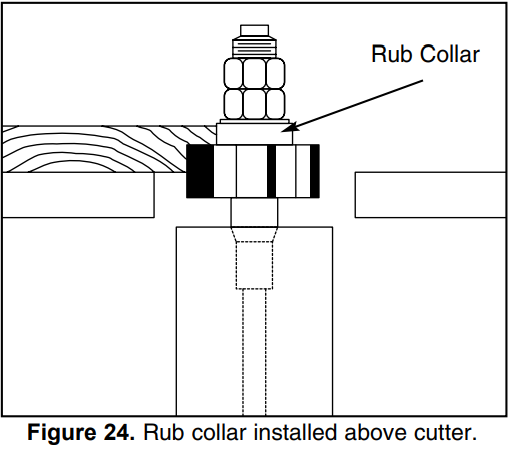
Rub collar below the cutter:
When the rub collar is used below the cutter (See Figure 25), the progress of the cut can be observed. However, any unintentional movement may lift the workpiece into the cutter, damaging your work and creating a dangerous situation. We DO NOT recom-mend this setup.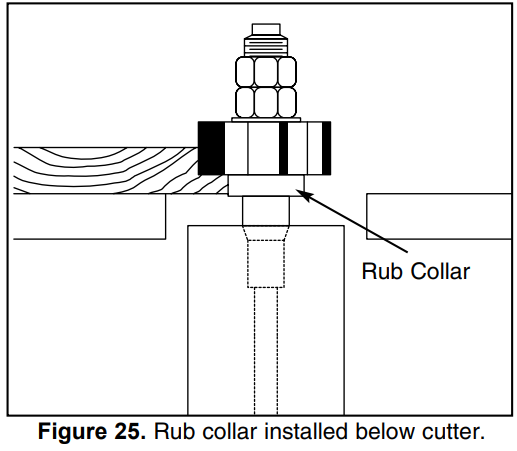
Rub collar between two cutters:
Using a rub collar between two cutters has the dis-tinct advantage of performing two cuts at once or eliminating the need to change cut-ters for two different operations. See Figure 26. Notice that part of the edge is left uncut. The uncut portion rides on the rub collar.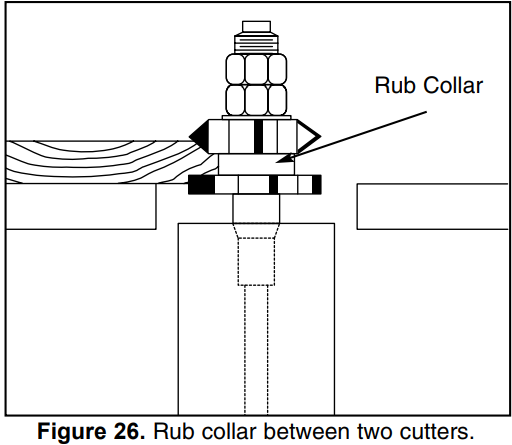
CAUTION
Freehand shaping is one of the most dan-gerous operations on the shaper. Guards should be in place. Hands can be exposed to cutters if care is not used. Serious injury to hands and other body parts is possible.
Irregular Shaping
Irregular or freehand shaping takes a high degree of skill and dexterity. The fence assembly is not used in irregular shaping, so rub collars must be used. See the rub collar section for details.
When doing freehand work, a starting pin must be used. The purpose of the starting pin is to support the workpiece during the beginning of the cut. Your shaper is supplied with a starting pin which is placed in one of the holes located in the shaper table.
The work should be placed in the starting position using the starting pin for support as shown in Figure 27. Next, swing the work into the cutter while holding the workpiece firmly against the starting pin.
After the cut has been started, the work is swung away from the starting pin and is supported just by the rub collar as you hold it. This is shown by the broken line positions in Figure 27.
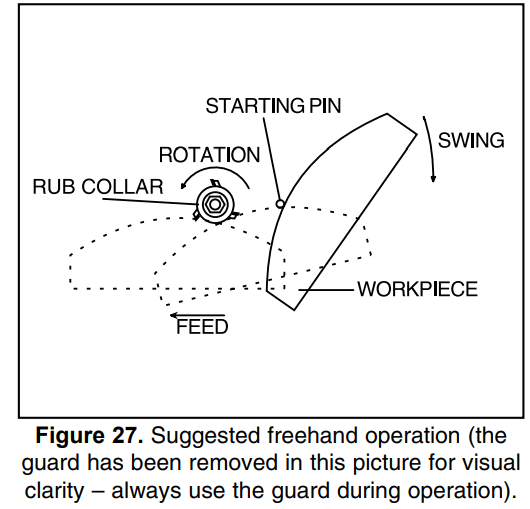
ALWAYS FEED AGAINST THE ROTATION OF THE CUTTER.
For irregular shaping:
- Unplug shaper and remove the fence assembly.
- Choose the appropriate cutter for your application and lock it in place with a rub collar.
- Check cutter rotation.
- Adjust the spindle height to align your work-piece to the cutter. Check that the rub collar will contact the workpiece edge or pattern edge (if used).
- Insert a starting pin into the cast iron table insert, using one of the pin locations that best supports your work.
Use some type of hold-down fixture and guard when doing irregular work. Figure 28 shows the Grizzly Model G3642 Shop Fox Right Angle Jig. This is just one example. A good shaper book will provide many differ-ent ideas for making jigs for almost all shap-ing operations.

- Make a sample cut on a piece of scrap wood.
- If everything is correct, feed your workpiece along the cutter, using firm pressure to keep your work against the rub collar. Feed against the cutter rotation only.
Sometimes the starting pin will not be in the most advantageous position. Firmly clamp a board in the desired position to act as a starting pin. See Figure 29. Some type of pivot point must be used. Notice in Figure 28 & 29 the operator is not exposed to the cutting edge of the cutter.
The jig in Figure 29 is designed to keep hands away from the blade by securing the workpiece to the bottom, while providing the operator a firm grip. This is just one example. For more complete information on the many jigs and fences that can be made to enhance the shaper, seek out train-ing, books, or magazines that specialize in shapers. We cannot stress this enough—your safety is important!

CAUTION
Incorrectly feeding stock (feeding with the rotation of the cutter) creates a potentially uncontrollable feed situation that can pull your hands into the spinning cutter or yank stock from your hands. Follow the above instruction at all times or serious personal injury can occur.
Pattern Work
When using a pattern, the rub collar can be posi-tioned either above or in-between cutters. We do not recommend using the rub collar below the cut-ters. This exposes the cutterhead to the same surface level where your hands will pass, poten-tially causing a serious injury.
The pattern is usually used when the entire edge is to be shaped or when many duplicate pieces are needed. Pattern work is particularly useful when rough cutting irregular shapes oversize and then shaping the edge in a simple two-step oper-ation. A pattern can be incorporated into a fixture by way of adding toggle clamps, hand holds, or other safety devices.
You have greater flexibility when choosing the correct diameter rub collar for pattern work than for non-pattern work. If you look at Figure 30, you’ll notice that the position of the pattern deter-mines the depth of cut. In other words, your pat-tern size is dependent upon the inter-relationship of cutting circle, the desired amount of material removed and the rub collar size. The cutting circle is the given in the equation, while the pattern and the rub collar size are the variables.
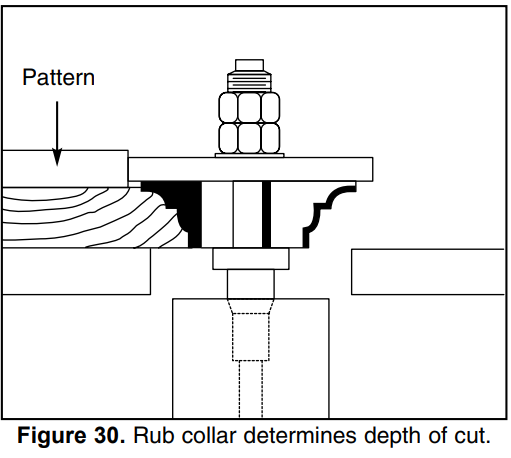
Changing one or both of these will change the amount of material removed. You can decide which rub col-lars are best suited for your application by plan-ning ahead.
When making a pattern, jig, or fixture, here are a few things to consider:
- Use a material that will smoothly follow the rub collar or fence.
- Make the fixture stable. Use proven meth-ods and materials.
- Fasten hand holds for operator comfort and safety.
- Secure your workpiece on three sides with toggle clamps or fasten the workpiece to the fixture with wood screws. Make sure they do not protrude through the workpiece.
- Ensure that clamps and hidden screws do not come into contact with the cutter.
- Design your fixture so that all cutting occurs underneath the workpiece.
- Always consider cutting circle and rub collar diameter for correct depth of cut when designing your pattern.
- Make sure the workpiece rests flat on the table, not on the fixture.
- Remember, there is tremendous cutting force on the workpiece. Fixtures must be solid, stable and the workpiece must be firmly secured.
CAUTION
Use care in designing and making fixtures. Clamps and screws must not touch the cut-ter and the fixtures must be stable in use, with the workpiece resting on the shaper table, not on the fixture. The workpiece must be fixed securely to the fixture.
Setup Guide
To set up the Grizzly 3 HP Shaper Power Table Saws G1026,
- Start by carefully unpacking and inspecting all components for damage.
- Assemble the table saw according to the provided instructions, ensuring all parts are securely fastened.
- Adjust the blade alignment and tram the saw to ensure accurate cuts.
- Install the blade guard and anti-kickback pawls according to the manufacturer's guidelines.
- Connect the saw to a suitable power source and test it under light load conditions before proceeding with heavy-duty tasks.
- Always follow safety guidelines and wear protective gear when operating the saw.
MAINTENANCE
WARNING
Wear safety glasses during the entire maintenance process. Failure to comply may result in serious personal injury.
General
Regular periodic maintenance on your Model G1026 Shaper will ensure its optimum perfor-mance. Make a habit of inspecting your shaper each time you use it. Check for the following con-ditions and repair or replace when necessary.
- Loose mounting bolts.
- Worn switch.
- Worn or damaged cords and plugs.
- Damaged V-belt.
- Any other condition that could hamper the safe operation of this machine.
Lubrication
The only parts on this machine that require peri-odic lubrication are the ways where the cartridge slide rides on the elevation housing and where the worm gear and bushing are located. Use a light grease or anti-seizing compound on the ways and worm gear and give the shaft mount a shot of light oil. The frequency of lubrication depends on the amount you use the shaper. As a habit, inspect the machine at least once a month.
Table
The table and other non-painted surfaces on the Model G1026 should be protected against rust and pitting. Wiping the table clean after every use ensures that wood dust isn’t allowed to trap mois-ture against bare metal surfaces.
Tables can be kept rust-free with regular applica-tions of products like Boeshield T-9. For long term storage you may want to consider products like Kleen Bore's Rust Guardit.
V-Belt
Avoid getting grease or oil on the V-belt or pul-leys.
Check the V-belt, as part of your monthly inspec-tion, for proper tension and belt condition. Cracking and glazing could result in belt failure. Replace the belt if such conditions appear.
Spindle Bearings
The spindle bearing housing equipped with the Model G1026 features factory-sealed bearings. A sealed bearing requires no lubrication during its lifetime.
Should a bearing fail, your shaper will probably develop a noticeable rumble that will increase when the machine is put under load. If allowed to get worse, overheating of the journal containing the bad bearing could occur. If the bad bearing is not replaced, it will eventually seize—doing dam-age to other parts of the machine. Bearings are standard sizes and can be replaced through Grizzly.
You must remove the complete bearing housing assembly to replace the bearings. To remove the bearing housing assembly:
- Remove the V-belt.
Loosen the locking bolt on the spindle slide shown in Figure 31.
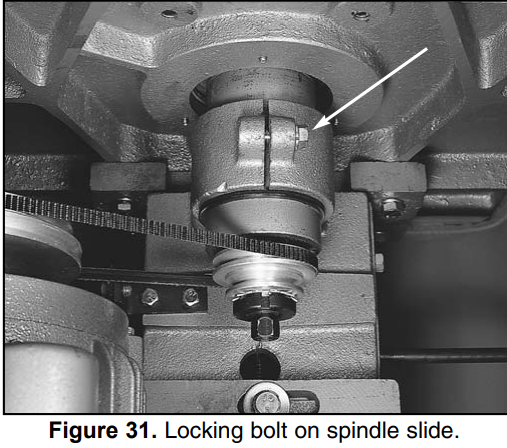
- The bearing housing will drop down. If you need to spread the casting more, use a screwdriver.
CAUTION: Use care when spreading the casting—it will break if too much pressure is applied. When the casting is spread, the housing can fall down. Watch your fingers to avoid being pinched. Place a pad underneath to protect the housing from being damaged if it falls. - Remove the spindle and replace the bear-ings inside the bearing housing. If you need pointers regarding bearing replacement, call our service department.
- To slide the housing back in, reverse the procedure. Make sure the locking bolt is tightened securely.
CLOSURE
The following pages contain general machine data, parts diagrams/lists, troubleshooting guide and Warranty/Return information for your Model G1026 3 H.P. Wood Shaper.
If you need parts or help in assembling your machine, or if you need operational information, we encourage you to call our Service Department. Our trained service technicians will be glad to help you.
If you have comments dealing specifically with this manual, please write to our Bellingham, Washington location using the address in Section 3: Introduction. The specifications, drawings, and photographs illustrated in this manual repre-sent the Model G1026 as supplied when the man-ual was prepared. However, due to Grizzly’s poli-cy of continuous improvement, changes may be made at any time with no obligation on the part of Grizzly. Whenever possible, though, we send manual updates to all owners of a particular tool or machine. Should you receive one, add the new information to this manual and keep it for refer-ence.
We have included some important safety mea-sures that are essential to this machine’s opera-tion. While most safety measures are generally universal, Grizzly reminds you that each work-shop is different and safety rules should be con-sidered as they apply to your specific situation.
WARNING
Operating this equipment has the potential for flying debris to cause eye injury. Always wear safety glasses or goggles when oper-ating equipment. Everyday glasses or read-ing glasses only have impact resistant lens-es, they are not safety glasses. Be certain the safety glasses you wear meet the appro-priate standards of the American National Standards Institute (ANSI).
We recommend you keep a copy of our current catalog for complete information regarding Grizzly's warranty and return policy. If you need additional technical information relating to this machine, or if you need general assistance or replacement parts, please contact the Service Department listed in Section 3: Introduction.
Additional information sources are necessary to realize the full potential of this machine. Trade journals, woodworking magazines, and your local library are good places to start.
WARNING
The Model G1026 was specifically designed for wood shaping operations only. DO NOT MODIFY AND/OR USE THIS MACHINE FOR ANY OTHER PURPOSE. Modifications or improper use of this tool will void the war-ranty. If you are confused about any aspect of this machine, DO NOT use it until all your questions have been answered. If you DO, serious personal injury may occur.
WARNING
Like all power tools, there is danger associ-ated with the Model G1026 Wood Shaper. Accidents are frequently caused by lack of familiarity or failure to pay attention. Use this tool with respect and caution to lessen the possibility of operator injury. If normal safety precautions are overlooked or ignored, serious personal injury may occur.
Troubleshooting
Making sure the blade is parallel to the miter slot and adjusting the trunnions are two ways to address common problems with the Grizzly 3 HP Shaper Power Table Saws G1026,
- Such as incorrect blade alignment. Examine the saw for dull blades or incorrect blade tension if the cutting is not smooth.
- Make sure the power cord is firmly attached and free of wear or damage if there are any electrical problems.
Warning: Always unplug the saw when performing maintenance or adjustments to avoid accidental start-ups.
Pros & Cons
Pros
- Powerful 3 HP motor for heavy-duty tasks
- Sturdy cast iron table for stability and durability
- Extensive rip capacity for large projects
- Includes safety features like blade guard and anti-kickback pawls
- Dust collection port for a cleaner workspace
Cons
- Heavy weight makes it difficult to move around
- Higher cost compared to smaller table saws
- Requires significant space for setup and operation
- No built-in mobility features
Customer Reviews
A common complaint is the complexity of the assembly process, but overall, users are satisfied with the saw's performance and value.
WARRANTY
Grizzly Industrial, Inc. warrants every product it sells for a period of 1 year to the original purchaser from the date of purchase. This warranty does not apply to defects due directly or indirectly to misuse, abuse, negligence, accidents, repairs alterations or lack of maintenance.
Faqs
What is the power rating of the Grizzly 3 HP Shaper?
What is the maximum rip capacity of the G1026?
Does the Grizzly 3 HP Shaper Power Table Saws G1026 come with a dust collection port?
What safety features are included with the Grizzly?
Is the Grizzly 3 HP Shaper suitable for professional use?
How do I assemble the Grizzly 3 HP Shaper Power Table Saws G1026?
What is the recommended maintenance for the Grizzly 3 HP Shaper?
Leave a Comment
