How to Use: Hamilton Beach Sandwich Maker 25483 Instruction Manual

Content
Hamilton Beach Sandwich Maker 25483 Introduction
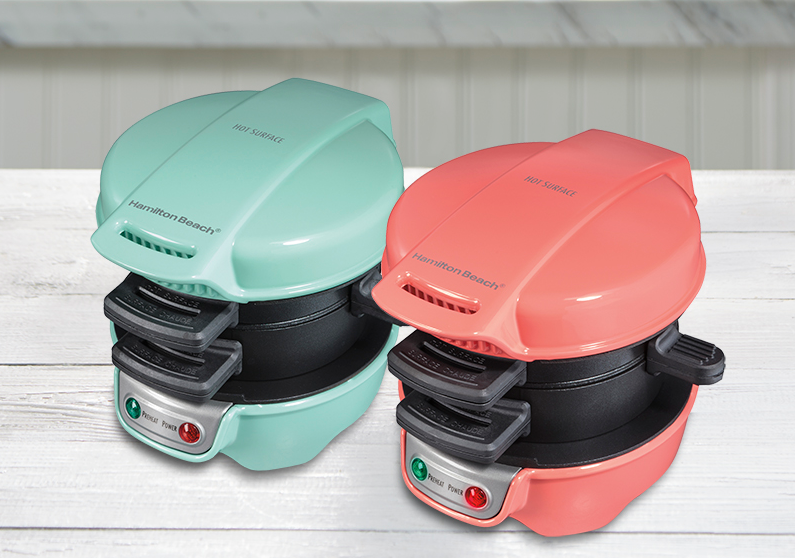
The Hamilton Beach Sandwich Maker 25483 allows you to create delicious breakfast, lunch, or dinner sandwiches in just five minutes. With a simple design that lets you customize ingredients, this compact appliance makes meal preparation quick and easy. Priced at $29.99, it’s perfect for busy mornings or quick meals.
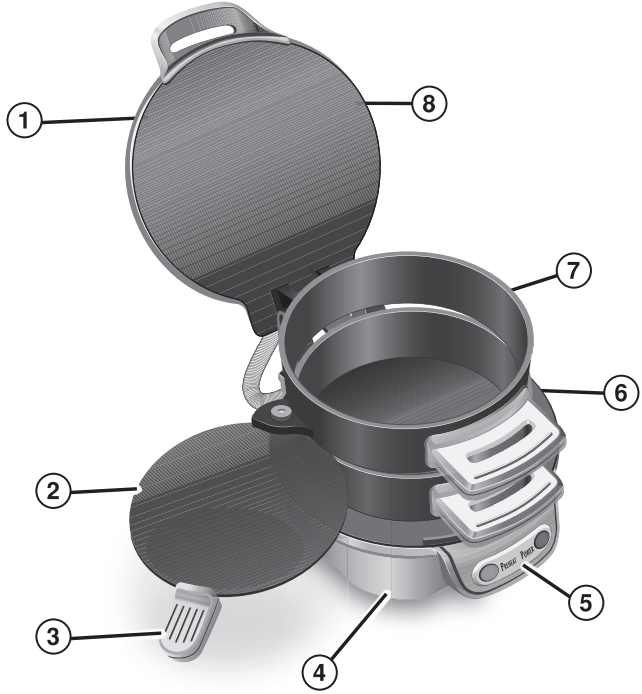
Parts and Features
To order parts, visit: hamiltonbeach.com/parts


- Cover
- Cooking Plate
- Cooking Plate Handle
- Base
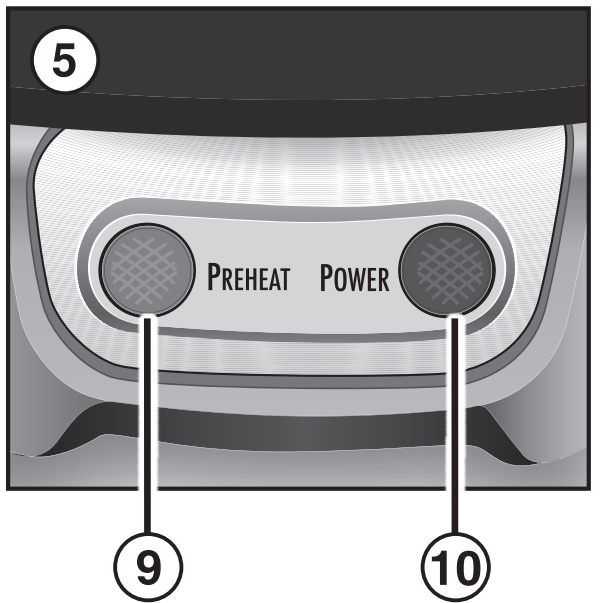
- Indicator Lights
- Bottom Heating Plate
- Removable Ring Assembly
- Top Heating Plate
- Green PREHEAT Light
- Red POWER Light
Before first use
Lift the Cover to remove the Ring Assembly. Wash the Removable Ring Assembly in the dishwasher or in hot, soapy water. Rinse and dry. Wipe the Top and Bottom Heating Plates with a damp, soapy cloth. Remove soap with a damp cloth; dry thoroughly. Spray Rings with nonstick cooking spray, or wipe or brush with vegetable oil.
How to Use
WARNING
Burn Hazard. Always use an oven mitt to protect your hand when opening the cover. Hot surfaces and escaping steam can burn.
- Plug into an outlet. Red POWER Light will glow. Lightly spray Rings with nonstick cooking spray before each use.
- Let the unit preheat with the Cover closed and the Cooking Plate rotated in between the Rings. NOTE: Green PREHEAT Light will come on when the unit is heated to the correct temperature and will cycle on and off during cooking. It is NOT an indicator of when the sandwich is ready. The red POWER Light stays on.
- Use Handles to lift the Cover, top ring, and Cooking Plate.
- Place the bottom half of the bread (such as an English muffin, small bagel, or biscuit) onto the Bottom Heating Plate.
- Top bread with ingredients such as precooked meats, vegetables, and cheese. Do not overfill the Breakfast Sandwich Maker. Overfilling will cause food to spill over Rings and get stuck in Hinges.
- Move the top with the ng and Cooking Plate down. Make sure the Cooking Plate is rotated securely to the back of the Ring as far as it will go to prevent the leaking of the egg.
- Crack an egg onto the Cooking Plate. Pierce the yolk with a fork or toothpick. (You can use a whole large egg, egg white, or a scrambled egg.)
- Top with the other half of the bread.
- Close Cover. Cook the sandwich for 4 to 5 minutes.
NOTE: Do not push Cover all the way down when loaded with ingredients or when using a jumbo egg. The cover may rise as the scrambled egg cooks. - When finished cooking, rotate the Cooking Plate Handle clockwise until it stops.
- Using an oven mitt, lift the Ring Assembly and Cover it by holding the bottom Handle to open. Some sandwiches are easier to remove if Rings are lifted individually.
- Remove the breakfast sandwich with plastic or wooden utensils. Never use metal. Always wait 2 minutes between cooking sandwiches to ensure the Breakfast Sandwich Maker is heated to the correct temperature.
- Unplug. Allow to cool.
TIPS
- Get your ingredients together before cooking your sandwich.
- Always keep the over closed with the Rings and the Cooking Plate in place when preheating.
- Check to make sure Cooking Plate is in place before preheating, and when adding food.
Detailed Specifications
- Compact design for easy storage
- Non-stick cooking plates for effortless food release and cleaning
- Dishwasher-safe parts for convenient maintenance
- Indicator lights for ready-to-cook and ready-to-eat notifications
- Upright storage capability to save counterspace
- Cool-touch exterior for safe handling
- Powerful 750-watt heating element for fast cooking
Description
The Hamilton Beach Sandwich Maker 25483 boasts a sleek and modern design that fits seamlessly into any kitchen decor. The non-stick cooking plates are coated with a durable layer that prevents food from sticking, making it easy to clean and maintain. The cool-touch exterior ensures safety while handling the appliance, even when it's in use.
The indicator lights provide clear signals when the sandwich maker is ready to cook and when your meal is ready to eat. This feature helps in achieving perfectly cooked sandwiches every time. Additionally, the upright storage capability allows you to store the appliance vertically, saving valuable counter space.
IMPORTANT SAFEGUARDS
When using electrical appliances, basic safety precautions should always be followed to reduce the risk of fire, electric shock, and/or injury to persons, including the following:
- Read all instructions.
- This appliance is not intended for use by persons (including children) with reduced physical, sensory, or mental capabilities, or lack of experience and knowledge, unless they are closely supervised and instructed concerning the use of the appliance by a person responsible for their safety.
- Close supervision is necessary when any appliance is used by or near children. Cleaning and user maintenance shall not be made by children unless they are supervised. Children should be supervised to ensure that they do not play with the appliance.
- To protect against the atherisk of electrical shock, do not immerse the cord, plug, or any part of the appliance in water or other liquid.
- Unplug from the outlet when not in use and before cleaning. Allow to cool before cleaning. Allow to cool before putting on or taking off parts, or moving the appliance. To unplug, grasp the plug and pull from the outlet. Never pull from the power cord.
- Do not operate any appliance with a damaged supply cord or plug, or after the appliance malfunctions or has been dropped or damaged in any manner. Supply cord replacement and repairs must be conducted by the manufacturer, its service agent, or similarly qualified persons to avoid a hazard. Contact Customer Service for information on examination, repair, or adjustment as outlined in the Limited Warranty.
- Do not place on or near a hot gas or electric burner or in a heated oven.
- Do not let the cord hang over the edge of
- Do not use outdoors.
- Do not use the appliance for other than the intended purpose.
- Do not touch hot surfaces. Use handles or knobs.
- Do not operate the appliance using an external timer or a separate remote-control system.
- Do not leave the appliance unattended while the appliance is connected to an electrical outlet.
- Extreme caution must be used when moving an appliance containing hot oil or other hot liquids.
- The use of accessory attachments not recommended by the appliance manufacturer may cause injuries.
- To disconnect, turn all controls to OFF; then remove the plug from the wall outlet. To unplug, grasp the plug and pull from the outlet. Never pull from the power cord.
- Place the appliance only on a dry, level, and nonflammable surface.
- During use, provide 4 to 6 inches of air space above, behind, and on both sides for air circulation. Do not use it on surfaces where heat may cause a problem.
- Never remove food with any kind of cutting device or other metallic kitchen utensil.
- Always allow the appliance to cool down completely before putting it away. Never wind the cord around the appliance while it is still hot.
- CAUTION: HOT SURFACE. The temperature of accessible surfaces may be high during and after operation.
SAVE THESE INSTRUCTIONS
Other Consumer Safety Information
This appliance is intended for household use only.
WARNING
Electrical Shock Hazard: This product is provided with either a polarized (one wide blade) or grounded (3-prong) plug to reduce the risk of electric shock. The plug fits only one way into a polarized or grounded outlet. Do not defeat the safety purpose of the plug by modifying the plug in any way or by using an adapter. If the plug does not fit fully into the outlet, reverse the plug. If it still does not fit, have an electrician replace the outlet.
The length of the cord used on this appliance was selected to reduce the hazards of becoming tangled in or tripping over a longer cord. If a longer cord is necessary, an approved extension cord may be used. The electrical rating of the extension cord must be equal to or greater than the rating of the appliance. If the appliance is of the grounding type, the extension cord should be a grounding-type, 3-wire cord. Care must be taken to arrange the extension cord so that it will not drape over the countertop or tabletop where it can be pulled on by children or accidentally tripped over.
To avoid an electrical circuit overload, do not use another high-wattage appliance on the same circuit with this appliance. If using an extension cord, it should be connected to the unit’s power cord before it is plugged into the outlet. In the case of a power failure, the same procedure should be followed.
Care and Cleaning
WARNING
Electrical Shock Hazard. Disconnect power before cleaning. Do not immerse the cord, plug, or base in any liquid.
Unplug. Allow to cool.
- To remove the Ring Assembly for cleaning, hold the bottom Handle to open, and then lift it straight up.
- Wash the Removable Ring Assembly in the top rack only of the dishwasher or in hot, soapy water. Rinse and dry. Do not use steel wool, scouring pads, or abrasive cleansers on any part of the unit. Never use sharp or pointed objects for cleaning.
- DO NOT use the “SANI” setting when washing in the dishwasher. “SANI” cycle temperatures could damage your product.
- Wipe the Top and Bottom Heating Plates with a damp, soapy cloth. Remove soap with a damp cloth; dry thoroughly.
- To replace the Ring Assembly, align tabs on the Ring Assembly with openings on the hinge of the Base, and lower.
- Wipe the outside of the nit with a damp cloth.
Hamilton Beach Sandwich Maker 25483 Troubleshooting
Low, poor, or slow heating
- The breakfast Sandwich Maker wasn’t preheated until the PREHEAT Light was illuminated. The green PREHEAT Light will come on in about 5 to 7 minutes indicating the unit is heated to the correct temperature. Light will cycle and does not indicate sandwich is ready.
- Allow 2 minutes between making sandwiches for the Breakfast Sandwich Maker to heat to the correct temperature.
- Overfilled. Reduce the amount of ingredients in your sandwich.
- Unit needs to be preheated with Cover closed with Rings and Cooking Plate in place.
- Make sure the Cooking Plate is rotated securely to the back of the Ring as far as it will go, to prevent the leaking of the egg, and the Cover is closed when preheating.
Egg undercooked, bread not done
- Extra large eggs, frozen, or very cold ingredients may lengthen cooking time. Add additional cooking time.
Egg overcooked
- Cooking time is about 5 minutes. Cooking time may vary if you are using small eggs, scrambled or egg whites. Reduce cooking time for future recipes.
Ingredients stick to Rings or nonstick Cooking Plate
- Use a plastic or wooden utensil to loosen any baked-on ingredients. Lightly spray with nonstick cooking spray before preheating for next use.
Eggs leak out of Rings
- The unit is overfilled. Only use large eggs and reduce the amount or size of ingredients. Do not press down on the Cover.
- The cooking Plate may not have been in the correct position. Make sure the Cooking Plate is rotated securely to the back of the Ring as far as it will go to prevent the leaking of the egg.
- Used very thin purchased egg whites. Use fresh egg whites or try a different brand of egg whites.
The cover rises when cooking my sandwich
- Air whisked into a large scrambled egg may cause the cover to rise while the egg is cooking. Do not press down on the Cover.
Bread too brown
- Higher fat contents and sugars may cause bbreadto darken. Cook egg for several minutes without bread and Cover down. Then add bread to finish cooking your sandwich.
Limited Warranty
This warranty applies to products purchased and used in the U.S. and Canada. This is the only express warranty for this product and is instead of any other warranty or condition. This product is warranted to be free from defects in material and workmanship for a period of five (5) years from the date of original purchase in Canada and one (1) year from the date of original purchase in the U.S.
Read before use
For recipes, tips, product information, and registration: https://hamiltonbeach.com
ENTER TO WIN $100 TO SPEND ON THE WEBSITE Visit https://register.hamiltonbeach.com
Customer Reviews
Customers have praised the Hamilton Beach Sandwich Maker 25483 for its ease of use, quick cooking time, and versatile capabilities. Many reviewers have noted that the non-stick plates work well and that cleaning is a breeze. However, some users have reported issues with the durability of the appliance over time and occasional uneven heating.
Most common complaints
It includes the possibility of uneven heating if the sandwiches are not placed correctly and minor durability issues after prolonged use. Despite these, the overall feedback remains positive, with many users recommending this product for its convenience and performance.
Faqs
What types of sandwiches can I make with the Sandwich Maker?
Is the Hamilton Beach Sandwich Maker 25483 easy to clean?
How long does it take to cook a sandwich using the Hamilton?
What are the dimensions of the 25483?
Can I store the Hamilton Beach Sandwich Maker 25483 vertically?
How much power does the Hamilton Beach consume?
Can I use the 25483 for anything other than sandwiches?
How do I know when my sandwich is ready using the Sandwich Maker?
Leave a Comment
