Hamilton Beach Travel Steam Iron 10092 User Guide

Content
Introducing the Travel Steam Iron 10092
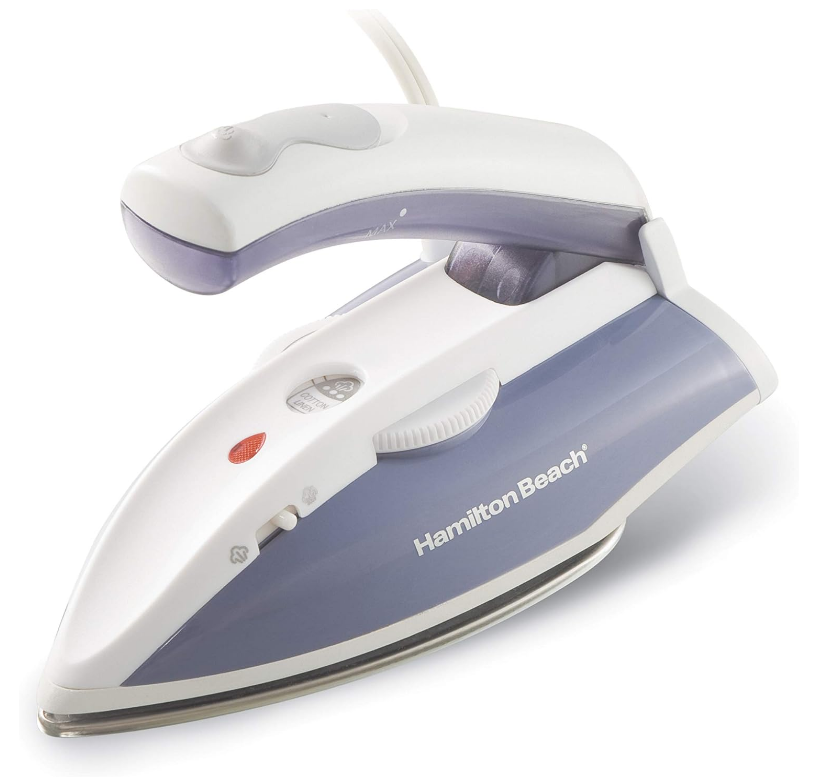
Hamilton Beach Travel Steam Iron 10092 is a compact and efficient appliance designed for on-the-go ironing needs. With a lightweight design and dual voltage capability, this travel iron is perfect for international trips, ensuring your clothes stay wrinkle-free wherever you are. It features a non-stick soleplate for smooth gliding over fabrics and a steam function for quick wrinkle removal. The price for this travel steam iron typically starts around $24.99, making it an affordable travel essential.
Parts and Features
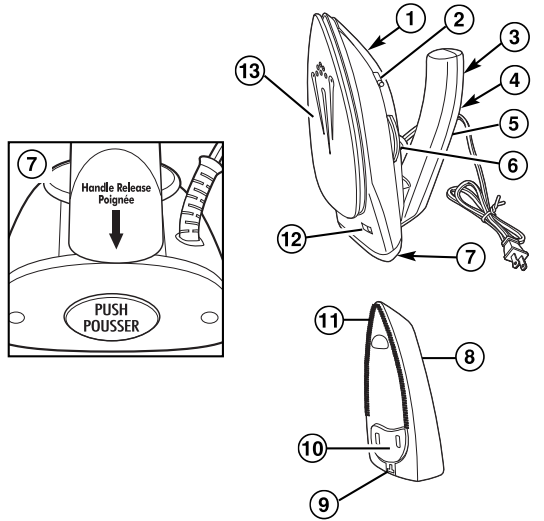
- Power Light
- Steam Switch
- Steam Button
- Water Tank Plug
- Handle/Water Tank
- Temperature Control Dial
- Handle Release/Lock Button
- Fabric Brush Attachment
- Steam Brush Latch
- Lint Pad
- Steam Brush
- Dual-Voltage Switch
- Stainless Steel Soleplate
Storage Bag not shown.

NOTE: Power light remains ON when travel iron is plugged in, even in OFF (O) setting.
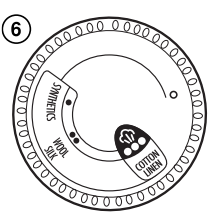
Fabric Setting Chart

Steam Setting | Temperature Setting | Ironing Instructions | |
Dry Iron |
| Off | |
Synthetics | • Low | Dry iron using spray if necessary. | |
Silk, Wool | •• Medium | Iron silk on wrong side. | |
 Steam Range | Cotton, Linen | ••• High | For cotton, iron while still damp or use spray. For linen, iron fabric on wrong side. |
Detailed Specifications
The Hamilton Beach Travel Steam Iron 10092 comes with several key features that make it a reliable choice for travel ironing needs. Here are some of the detailed specifications:
- Compact Design: Weighs only 1.3 pounds and measures 5 inches long, making it perfect for travel.
- Steam Function: Produces continuous steam to remove wrinkles efficiently.
- Non-Stick Soleplate: Prevents clothes from sticking and ensures smooth gliding.
- Adjustable Temperature: Allows users to set the temperature based on fabric types.
- Travel Pouch Included: Convenient storage bag for easy packing.
Description
Travel Steam Iron 10092 is engineered with portability and functionality in mind. Its compact size allows it to fit easily into any luggage or bag, while its powerful steam feature helps in removing wrinkles quickly. The non-stick soleplate ensures that the iron glides smoothly over fabrics without causing damage or sticking. The adjustable temperature control feature makes it suitable for ironing various types of fabrics, from delicate silks to robust cottons. The travel pouch included with the iron provides additional convenience for travelers.
To Change Voltage
Make sure the unit is unplugged.

- For 120 volts: Slide switch to the right.
- For 240 volts: Slide switch to the left. If using 240 volts, you must use an appropriate adapter plug.
NOTICE: Damage to unit and garments may occur if unit is operated at 240V with switch set to 120V.
To Dry Iron

- With travel iron/steamer unplugged, pull up the handle until it locks into position.
- Make sure Dual-Voltage Switch is set to correct voltage and then plug travel iron/steamer into power supply.
- Slide Steam
 Switch to the
 (Dry Iron) position. This will also prevent water leakage.
 - Turn Temperature Control Dial to desired temperature. With travel iron/steamer resting on heel rest, allow 3 minutes for travel iron/steamer to reach desired temperature. Do not preheat travel iron/ steamer with soleplate facing down.
- To turn travel iron/steamer off, turn
Temperature Control Dial to O (OFF). - Unplug travel iron/steamer and allow to cool completely.
Press the Handle Release/Lock Button (labeled PUSH on heel rest of iron) and push the handle down until it locks into the storage position. Place travel iron/steamer in storage bag.
To Steam Iron
- With travel iron/steamer unplugged, pull up the handle until it locks into position.
- Remove Water Tank Plug. Slowly pour 2 ounces (60 ml) of tap water into water tank opening up to the MAX Fill Indicator. Replace Water Tank Plug.
- Make sure Dual-Voltage Switch is set to correct voltage and then plug travel iron/steamer into power supply.
- Turn Temperature Control Dial to desired temperature. With travel iron/steamer resting on heel rest, allow 3 minutes for travel iron/steamer to reach desired temperature. Do not pre-heat travel iron/steamer with soleplate facing down.
- Slide Steam Switch to the (Steam)
 position.
 - For steam burst, press Steam Button on handle.
- To turn travel iron/steamer off, turn Temperature Control Dial to O (OFF).
- Unplug travel iron/steamer. Empty water from the travel iron/steamer water tank following directions in “Caring for Your Travel Iron/Steamer.” Set Steam Switch to
 (Dry Iron) position.
 - Allow to cool completely. Press the Handle Release/Lock Button (labeled PUSH on heel rest of iron) and push the handle down until it locks into the storage position. Place travel iron/steamer in storage bag.
To Use Steam Brush
- With travel iron/steamer unplugged, pull up the handle until it locks into position.
- Remove Water Tank Plug. Slowly pour 2 ounces (60 ml) of tap water into the water tank opening up to the MAX Fill Indicator. Replace Water Tank Plug.
- Slide Brush Attachment over soleplate until the latch locks it into place.
- Make sure Dual-Voltage Switch is set to correct voltage and then plug travel iron/steamer into power supply.
- Turn Temperature Control Dial to desired temperature. With travel iron/steamer resting on heel rest, allow 3 minutes for travel iron/steamer to reach desired temperature. Do not preheat travel iron/steamer with soleplate facing down.
- Slide Steam Switch to the (Steam)
 position.
 - Clothing should be on a hanger. Pull fabric taut. Hold steamer upright against fabric. Press Steam Button every 3 seconds for steam.
NOTE: The Steam Brush may be used as a lint remover.
If using on delicate fabric that may snag, remove Brush Attachment by pulling straight up prior to heating travel iron/steamer. - To turn travel iron/steamer off, turn Temperature Control Dial to
 (OFF).
 - Unplug travel iron/steamer. Empty water from the travel iron/steamer reservoir following directions in “Caring for Your Travel Iron/Steamer.” Set Steam Switch to
 (Dry Iron) position.
 - Allow to cool completely. Slide latch to unlock and remove Steam Brush. Press the Handle Release/Lock Button
(labeled PUSH on heel rest of iron) and push the handle down until it locks into the storage position. Place in storage bag.
To Remove Lint
- Lint and hair may be removed from fabrics with the lint pad by brushing the pad across fabric slowly from left to right.
- To clean lint pad, brush on scrap fabric or towel from right to left.
Caring for Your Travel Iron/Steamer
- The Water Tank of your travel iron/steamer should be emptied after each use. Turn Temperature Control Dial to
 (OFF). Set Steam Switch to
  (Dry Iron) position. Unplug the travel iron/steamer and hold over a sink. Turn travel iron/steamer nose down until water tank opening is parallel with sink. Water will run out of water tank opening.
 - To store the travel iron/steamer after it has completely cooled, press Handle Release/Lock Button and press down handle to storage position.
- Put Brush Attachment over the soleplate.
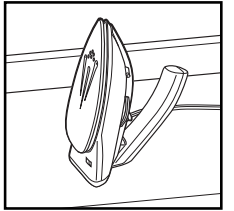
- Place the travel iron/steamer in the storage bag and store resting on its side. Do not store travel iron/steamer laying flat on soleplate.
Soleplate
- Never iron over zippers, pins, metal rivets, or snaps since these may scratch the soleplate.
- To clean occasional buildup on the soleplate, wipe with a sudsy cloth. Do not use abrasive cleansers or metal scouring pads.3. Always store travel iron/steamer resting on its side.
- Always store travel iron/steamer resting on its side.
Setup Guide
Setting up the Hamilton Beach is straightforward and easy:
- Fill the water reservoir with distilled water to the recommended level.
- Plug in the iron and turn it on.
- Wait for the iron to heat up; this should take a few minutes.
- Adjust the temperature setting according to your fabric type.
- Use the steam function by pressing the steam button while ironing.
Troubleshooting
PROBLEM | PROBABLE CAUSE |
Won’t heat |
|
Water is leaking |
|
Won’t steam |
|
Leaves spots |
|
Twisted cord |
|
Water is leaking during storage |
|
Hamilton Beach Travel Steam Iron 10092 Pros & Cons
Pros
- Compact and lightweight design ideal for travel.
- Powerful steam function for efficient wrinkle removal.
- Adjustable temperature control suitable for various fabrics.
- Affordable pricing with great value for money.
Cons
- Limited soleplate surface area compared to full-sized irons.
- Water reservoir capacity is small, requiring frequent refills.
- Some users report issues with durability over long-term use.
Customer Reviews
Customer reviews highlight the convenience and effectiveness of the Hamilton Beach Travel Steam Iron 10092. Many users appreciate its compact size and powerful steam function, making it a must-have for travelers. However, some users note that the iron's soleplate can be prone to mineral buildup and that the water reservoir needs frequent refilling. Overall, it is praised for its ease of use and affordability.
Common complaints include issues with durability over long-term use and occasional problems with steam output consistency.
Faqs
What are the dimensions of the Hamilton Beach?
Is the Hamilton Beach Travel suitable for all fabric types?
Does the Hamilton Beach Travel Steam Iron come with a travel pouch?
How do I clean the non-stick soleplate of my Hamilton Beach Travel Steam Iron 10092?
Why isn't my Hamilton Beach Travel Steam Iron producing steam?
Can I use tap water in my Hamilton Beach Steam Iron?
Is the Hamilton Beach Travel Steam energy-efficient?
How long does it take for the Hamilton Steam Iron to heat up?
Can I use my Hamilton Beach Travel Steam Iron 10092 overseas?
What kind of warranty does the Hamilton Beach Travel Steam Iron come with?
Leave a Comment
