Hanvon Go Go Bird 102-Blue Remote Control Toy Instruction Manual

Content
Introduction of Hanvon Go Go Bird 102-Blue Remote Control Toy
The Hanvon Go Go Bird is a remote control toy that is designed to provide hours of fun and entertainment for children and adults alike. This bird-like drone is equipped with advanced technology, making it easy to maneuver and control. The estimated price of the Hanvon Go Go Bird is around $60, and it is now available for purchase in major online and offline stores.
Go Go Bird & Accessories
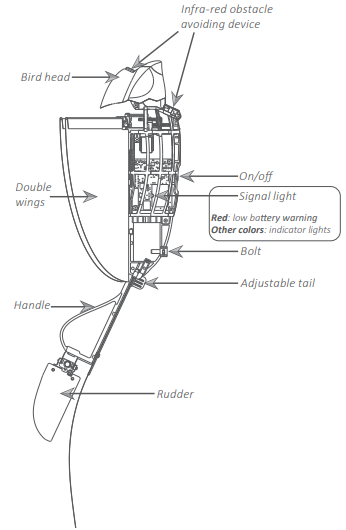
Go Go Bird(Go Go Bird 102)
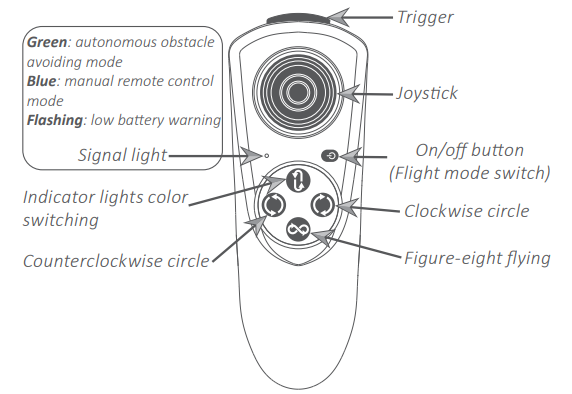
Remote control (FYC 102)
Detailed Specifications
The Hanvon Go Go Bird has the following key features:
- Built-in gyroscope for stable flight
- LED lights for night flying
- 2.4Ghz remote control for long-range transmission
- Rechargeable battery with up to 8 minutes of flight time
- Charging time of about 40 minutes
- Easy to use one-key takeoff and landing
- Max flight range of up to 100 meters
- Lightweight and durable design
- Available in various colors
Flight preparation
Go Go Bird lithium battery
How to Charge the Lithium Battery
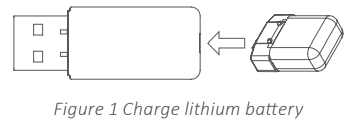
- Insert lithium battery into USB charger (figure 1). Connect the charger to an adapter, computer, or any DC 5.0V USB charging port.
- Two LED indicator lights will illuminate. The green light indicates that the power source is working and the red light indicates that the battery is charging.
When charging is complete, the red light will turn off. Unplug the USB charger from the power source and remove the lithium battery promptly. (Charging time is around 20 mins, flight duration is around 10 mins).
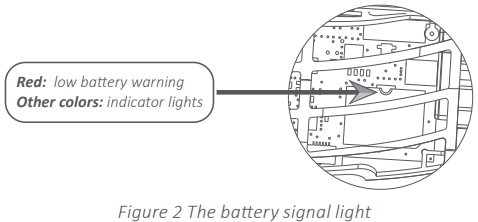
When Go Go Bird’s signal light turns red, the lithium battery is running low. Replace the exhausted lithium battery as soon as possible (figure 2).
How to Install the Lithium Battery into Go Go Bird
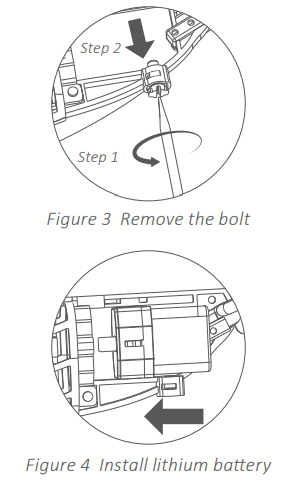
- Use the screwdriver to rotate the bolt located at the bottom of Go Go Bird 90° counterclockwise and remove it (figure 3).
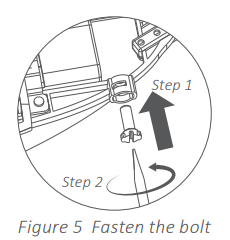
Plug the fully charged lithium battery into the slot (figure 4). Make sure the lithium battery is completely connected to the electric socket.
Replace the bolt and turn it 90° clockwise to lock the battery into place (figure 5).
Remote Control
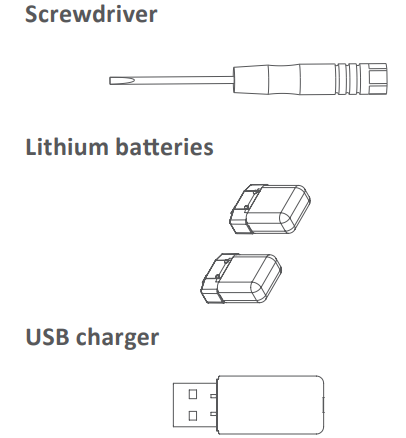
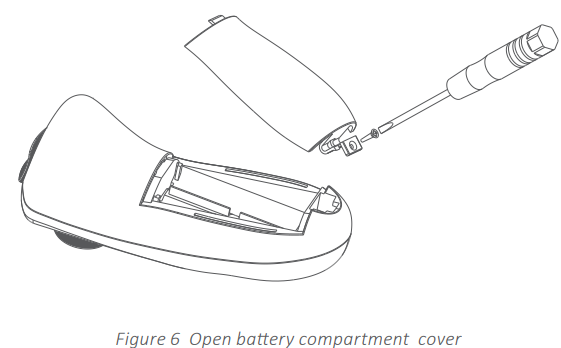
- Use the screwdriver to remove the remote control battery compartment cover (figure 6).
- Insert two 1.5V AAA batteries into the remote control with the correct polarity, then replace the cover and tighten the screw afterwards.
- Press the on/off button to turn the remote control on. Hold the on/off button until the signal light turns off to turn the remote control off.
- The remote control will turn off automatically if there is no input for 12 mins.
- The signal light will start to flash when AAA batteries are running out of power. If Go Go Bird is currently flying, land it before replacing the batteries. The signal light will flash for 30 seconds before the remote control goes out automatically.
Exhausted AAA batteries are to be removed from the remote control battery compartment cover immediately.
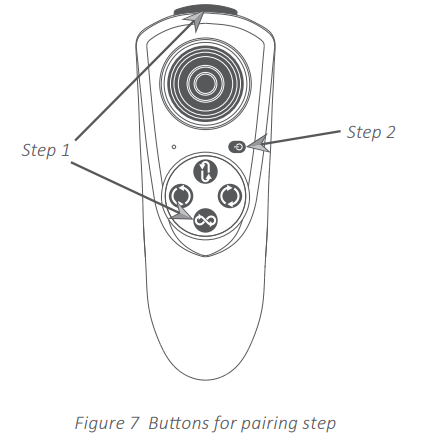
Pairing Go Go Bird with Remote Control:
- Turn on the switch of Go Go Bird and check to see that the green signal light is on.
- Place the remote control close to Go Go Bird.
- Start with the remote control off. While holding the top trigger button and the bottom
 button at the same time, press the on/off button to turn the remote control on (figure 7).
- Go Go Bird’s signal light should be flashing indicating that the pairing was successful.
- If it fails to match, please repeat the above steps.
If the remote control is off, Go Go Bird will automatically stop flapping its wings.
Description
The Hanvon Go Go Bird is a remote control toy that is designed to look and fly like a bird. It has a lightweight and durable design, making it easy to carry around and use in various environments. The drone is equipped with a built-in gyroscope that ensures stable flight, even in windy conditions. It also has LED lights that make it possible to fly the drone at night. The 2.4Ghz remote control allows for long-range transmission, and the rechargeable battery provides up to 8 minutes of flight time. The Hanvon Go Go Bird is available in various colors, making it a great gift for children and adults alike.
Flight Operation
Methods to Begin Flight
- Turn on the on/off switch of Go Go Bird and remote control.
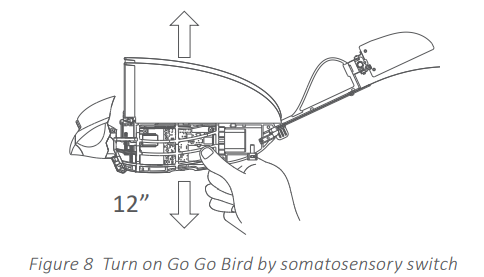
Method 1: By Somatosensory Switch
Hold Go Go Bird horizontally (figure 8) and drop your arm about 12” until the wings start to flap. Repeat if Go Go Bird doesn’t start flapping. Gently toss Go Go Bird forward to begin flight.
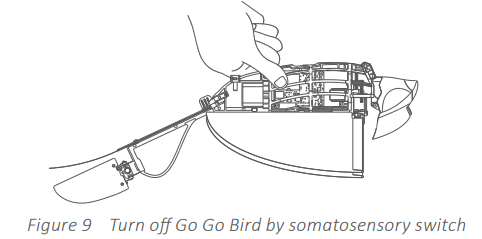
Turn Go Go Bird off by turning it upside down. The wings will stop flapping immediately (figure 9).
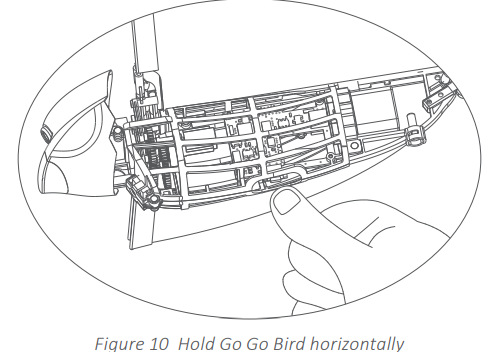
Method 2: By Remote Control
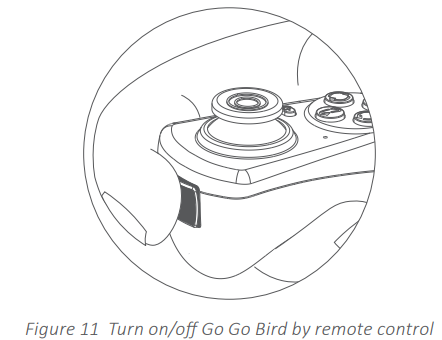
- Hold Go Go Bird horizontally (figure 10) and press the trigger button on the remote control (figure 10) to make the wings begin to flap. Gently toss Go Go Bird forward to begin flight.
Press the top trigger button again (figure 11) to make the wings stop flapping.
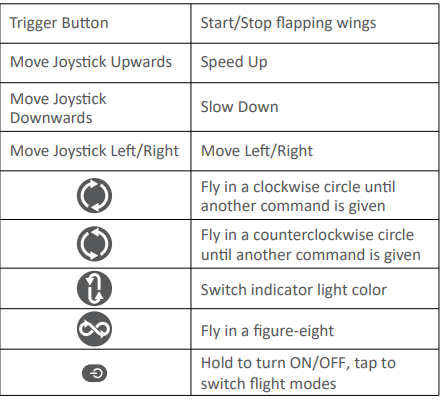
Flight Modes
- Go Go Bird has two different flight modes: autonomous obstacle avoidance mode and manual remote control mode.
- When in autonomous obstacle avoidance mode, Go Go Bird will automatically turn to avoid a collision without remote control operation when it senses an obstacle. It may have some troubles detecting and avoiding transparent, dark, or small objects.
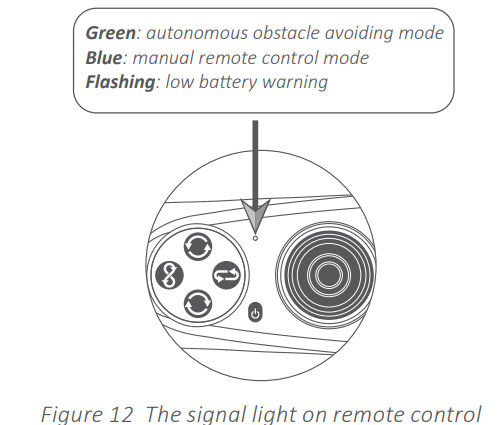
- Autonomous obstacle avoidance mode is on by default when you turn Go Go Bird on and the signal light on the remote control will be green.
To switch to manual remote control mode, tap the on/off button (remote control should be on). The signal light on the remote control will turn blue. You will need to guide Go Go Bird away from obstacles manually (figure 12).
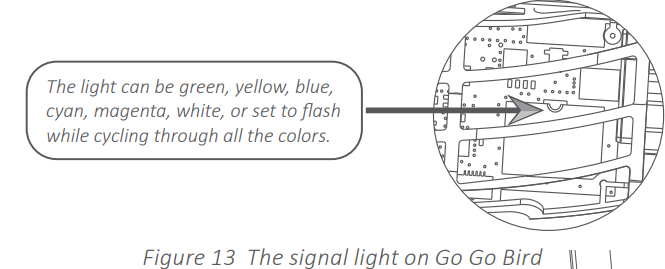
You can assign your Go Go Bird signal light a unique color when flying with other Go Go Birds to help distinguish them from each other. Press the button on the remote control to change the signal light color (figure 13). Press it again until you arrive at the color you want.
How to Monitor Remote Control
Go Go Bird is with altitude hold sensor. When you fly Go Go Bird, please hold it higher with your hand then release. Go Go Bird will be on auto fly mode.
- The default setting for Go Go Bird is to fly straight and at the same altitude at which it was released. Move the joystick in any direction to control the flight.
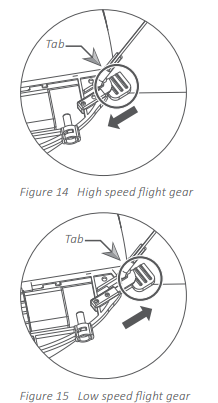
Go Go Bird’s flight speed can be set by manually adjusting the tab near Go Go Bird’s tail. Push the tab all the way for high-speed flight (figure 14). Pull the tab back until you hear a click for low-speed flight (figure 15).
Setup Guide
Setting up the Hanvon Go Go Bird 102-Blue Remote Control Toy is easy and straightforward. Here are the steps to follow:
- Charge the drone's battery fully before use.
- Insert the batteries in the remote control.
- Turn on the remote control and the drone.
- Press the one-key takeoff button on the remote control to launch the drone.
- Use the left joystick to control the drone's altitude and the right joystick to control its direction.
- To land the drone, press the one-key landing button on the remote control.
Wireless Control Information
- Product: Bionic flapping-wing bird
- Declaration for EU Compliance
- Frequency bands: 2424~2472 MHz
- Max. Output Power: -0.56dBm (remote control), 3.64dBm (bird)
Tips & Tricks
- Get longer flight times: Increase altitude and then slow down to maintain level flight.
- Fun spirals: Keep spinning to lower your altitude.
- Swoop maneuver: Turn off the wings mid-flight to glide, then turn them back on to swoop.
- Prevent stalls: Turn in any direction after a swoop.
- Gaining height: Fly straight and at full speed.
- Extra battery: Charge your extra battery while flying to swap when needed.
- Reverse controls: Remember controls are reversed when the bird is flying toward you.
- Launching: Gently push the Go Go Bird away from you to launch, rather than throwing it.
- Table launch: Place the Go Go Bird upside-down on a table edge and double-tap the trigger button to launch.
- Low battery indicator: Land the Go Go Bird when the red light starts blinking.
- Outdoor use: Avoid using in wind speeds of ≥ Level 3 (12–19 km/h).
Warnings
Handling: Avoid grabbing the wings and tail when removing Go Go Bird from the box (Figure 16). Keep away from heat sources and sharp objects.

- Pairing multiple birds: Pair each Go Go Bird individually to its remote control. Do not pair multiple birds simultaneously.
- Visibility: Keep the Go Go Bird in sight when flying. Avoid water, trees, and power lines.
- Emergency landing: Press the trigger button to stop flying and land immediately. Regularly check wires, battery, shell, and other parts for damage.
- Age suitability: Not suitable for children under 3 years old. Keep the user manual and packaging for important information.
- Battery usage: Use only the customized lithium batteries provided. Do not mix with other batteries. Charge rechargeable batteries under adult supervision and remove them before charging.
- AAA battery insertion: Insert AAA batteries with correct polarity. Do not charge non-rechargeable batteries. Do not mix different types of batteries or new and used batteries. Remove exhausted batteries promptly.
Lithium Battery Safety
- Keep out of reach of children: Small cells and batteries may be swallowed.
- Swallowing risk: Swallowing may cause burns, perforation of soft tissue, and death. Severe burns can occur within 2 hours of ingestion. Seek medical assistance promptly if swallowed.
- Handling precautions: Do not disassemble, short circuit, dispose of in fire, expose to high temperatures (60°C/140°F), open, or crush.
- Markings: If the battery surface is too small to accommodate all markings, refer to the specification sheet or instruction manual for information (Figure 17).
Troubleshooting
No response when turning on the remote control:
- Solution: Double-check whether the batteries are installed correctly according to the polarity identification, or replace them with new AAA batteries.
No response or lack of power when turning on Go Go Bird:
- Solution: 1) Double-check whether the lithium battery is fully inserted into the Go Go Bird battery compartment; 2) Make sure the lithium battery of Go Go Bird is fully charged.
Remote control fails to control Go Go Bird:
- Solution: Turn Go Go Bird and remote control off, then repeat the pairing steps.
Pros & Cons
Pros
- Easy to use and control
- Lightweight and durable design
- Built-in gyroscope for stable flight
- LED lights for night flying
- Available in various colors
Cons
- Short flight time of only 8 minutes
- Charging time is relatively long
- May be difficult for young children to use
Customer Reviews about Hanvon Go Go Bird 102-Blue Remote Control Toy
Customers who have purchased the Hanvon Go Go Bird have given it positive reviews, praising its ease of use, stable flight, and durable design. The drone's bird-like design and LED lights have also been well-received. However, some customers have expressed disappointment with the short flight time and long charging time. Some have also noted that the drone may be difficult for young children to use.
Faqs
What is the flight time of the Hanvon Go Go Bird 102-Blue Remote Control Toy?
How long does it take to fully charge the Hanvon Go Go Bird 102-Blue Remote Control Toy?
What is the range of the Hanvon Go Go Bird 102-Blue Remote Control Toy?
What materials is the Hanvon Go Go Bird 102-Blue Remote Control Toy made of?
How can I ensure the Hanvon Go Go Bird 102-Blue Remote Control Toy flies smoothly?
What should I do if the Hanvon Go Go Bird 102-Blue Remote Control Toy crashes?
How do I perform a reset on the Hanvon Go Go Bird 102-Blue Remote Control Toy?
What is the warranty period for the Hanvon Go Go Bird 102-Blue Remote Control Toy?
How can I improve the battery life of the Hanvon Go Go Bird 102-Blue Remote Control Toy?
How durable is the Hanvon Go Go Bird 102-Blue Remote Control Toy design?
Leave a Comment