Hauppauge HD PVR Pro 60 User Manual | Recording and Streaming
Content
Introduction of Hauppauge HD PVR Pro 60
The Hauppauge HD PVR is a high-quality video game capture device designed for serious gamers and streamers. This powerful tool allows you to record and stream your gaming sessions in stunning 1080p60 resolution, with minimal lag and excellent audio quality. With a suggested retail price of $249.99, the HD PVR Pro 60 is a worthwhile investment for those looking to elevate their gaming content. The device launched in late 2020 and has since gained popularity in the gaming community.
Detailed Specifications of HD PVR Pro 60
Key features of the HD PVR Pro 60 include
- HDMI and Component video input with passthrough
- Up to 1080p60 recording and streaming
- Hardware h.264 video encoder
- 1080p60 HDMI and SPDIF audio input
- Component and S-Video input for legacy consoles
- IR blaster for controlling your gaming console
- USB 2.0 interface for PC connectivity
Description of Hauppauge HD PVR
The HD PVR is a compact and sleek device, designed to seamlessly fit into your gaming setup. This capture card features HDMI and Component inputs, allowing you to connect various gaming consoles, including the latest generation systems such as the PS5 and Xbox Series X. The pass-through feature ensures that your gaming experience remains uninterrupted while recording. The hardware h.264 video encoder ensures high-quality recordings with minimal lag, and the SPDIF audio input delivers crisp and clear audio.
Included with HD PVR Pro 60
- HD PVR Pro 60 HD video recorder: H.264 high definition video recorder, 4K in/out, USB Type C connector, hardware 1080p 60fps encoder
- USB Type C to USB Type A cable - 1 meter
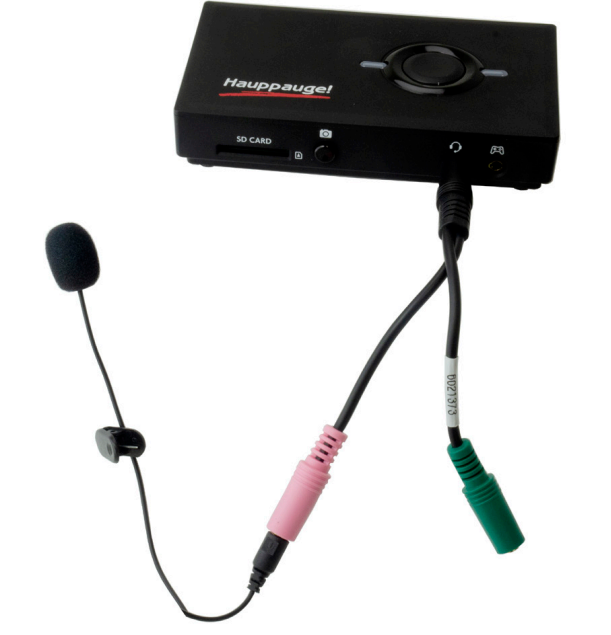
- 4 -pin 3.5mm to 4-pin 3.5 mm audio cable (for connecting a gaming controller)
- 4-pin to 2 pin audio adapter (for connecting headsets with separate microphone jacks)
- High-Speed HDMI 2.0 cable
- Hauppauge Capture (download)
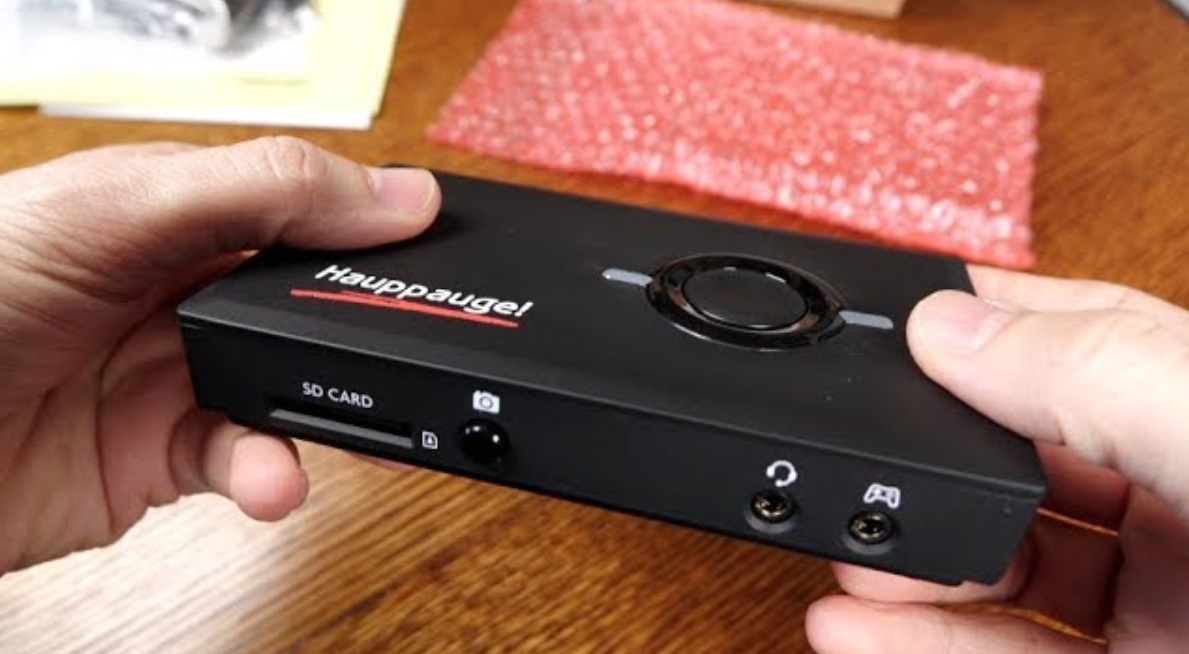
Overview Of Hauppauge HD PVR Pro 60
The HD PVR Pro 60 is a high definition video encoder which has 4K HDMI in and out (pass through) with a built-in down converter from 4K to 1080p and a hardware 1080 60 frame per second H.264 encoder. HD PVR Pro 60 can connect to either 4K video sources, such as the Xbox One X and the PS4 Pro, or 1080p sources such as a PS4, Xbox One, Nintendo Switch, a PC game system or the WiiU.
HD PVR Pro 60 can record in two ways
- HD PVR Pro 60 recordings can be made onto a computer’s hard drive in a compressed H. 264 format. Hauppauge Capture, OBS, XSplit, and Skype are applications that can use HD PVR Pro 60 as a video source.
- HD PVR Pro 60 also has a standalone mode, where you can plug the unit into a USB power supply (5v at .9 amp minimum) and record directly to an SD card (not supplied). In stand-alone mode, recordings are made in the . MOV file format. SD cards currently need to be formatted as FAT32 and we have tested up to 256GB cards.
HD PVR Pro 60 also has a built-in audio mixer to record and stream game audio, game commentary and multi-party chat.
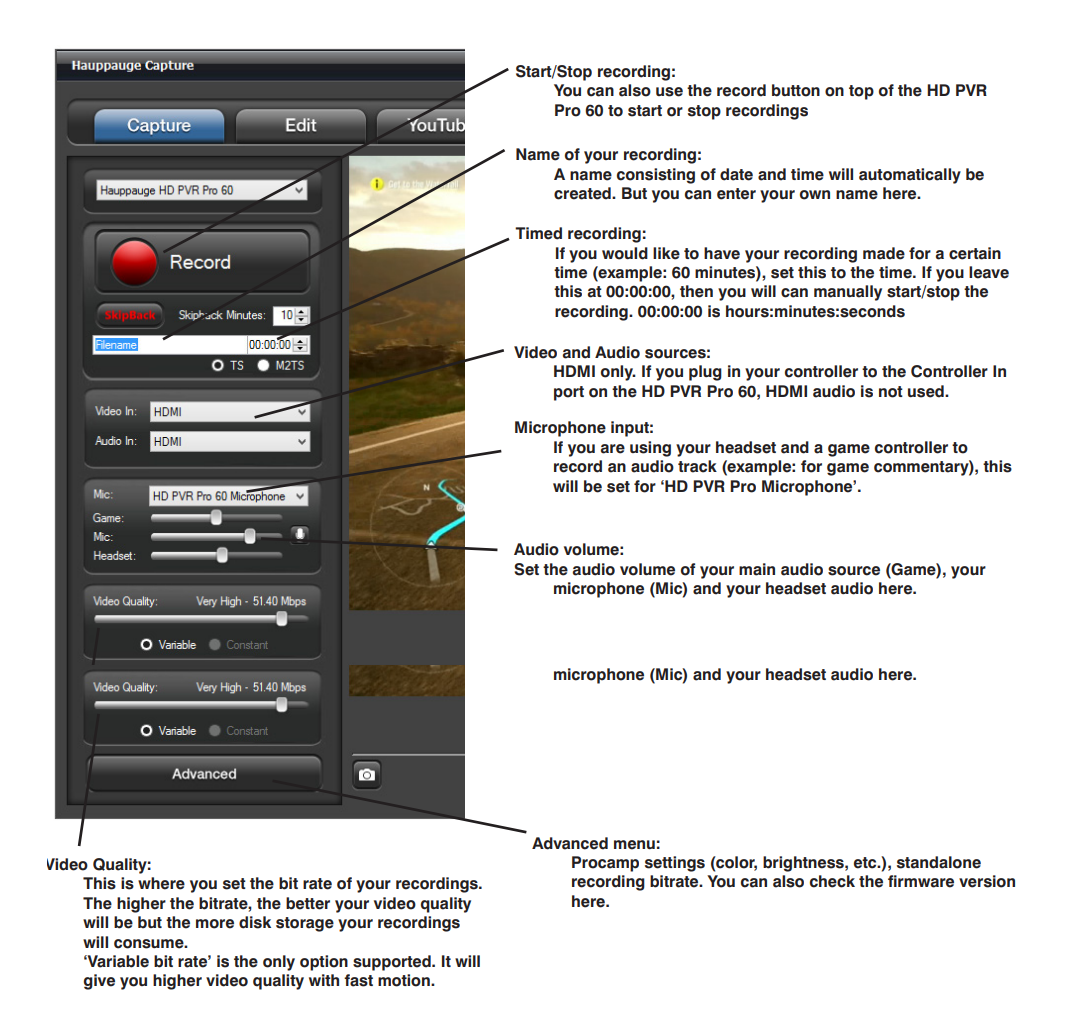
HD PVR Pro 60 comes with the Hauppauge Capture application for Windows. Hauppauge Capture can record 1080p60 video with an audio mixer to make volume adjustments for game, microphone and headset audio. It also has a fast trim feature which preserves the quality of the original video recording.
HD PVR Pro 60 records in a TS file format and can be converted to MP4 after recording.
The maximum bit rate for HD PVR Pro 60 recordings is 60Mbits/sec. Please note: you need a fast PC to record at the maximum bit rate. If you see dropped frames in your recordings, you will need to either lower your bit rate, upgrade your PC, or add an SSD drive to your PC and use it for recordings. SSD drives very often fix problems related to dropped frames.
Setup Guide of Hauppauge Pro 60
Setting up the HD PVR Pro 60 is a straightforward process:
- Connect the device to your gaming console using an HDMI or Component cable.
- Connect the device to your PC using the included USB 2.0 cable.
- Install the Hauppauge Capture software included with the device.
- Configure the software to suit your recording and streaming preferences.
- Use the IR blaster to control your gaming console remotely (optional).
Operating HD PVR in Stand Alone mode
HD PVR Pro 60 can be operated without being connected to a computer. To do this
- Plug the Type-A end of the supplied USB-C to USB-A cable into a 5V .9 amp minimum power adapter (the same type of power adapter used to charge phones and tablets).
- Plug an SD card formatted as FAT32 or exFAT into the SD card slot on the front of the HD PVR Pro 60.
- Set the REC MODE switch on the side of the HD PVR Pro 60 to SD. This directs the re-cordings to the SD card slot. Set the switch back to PC when you want to connect the HD PVR Pro 60 to a computer.
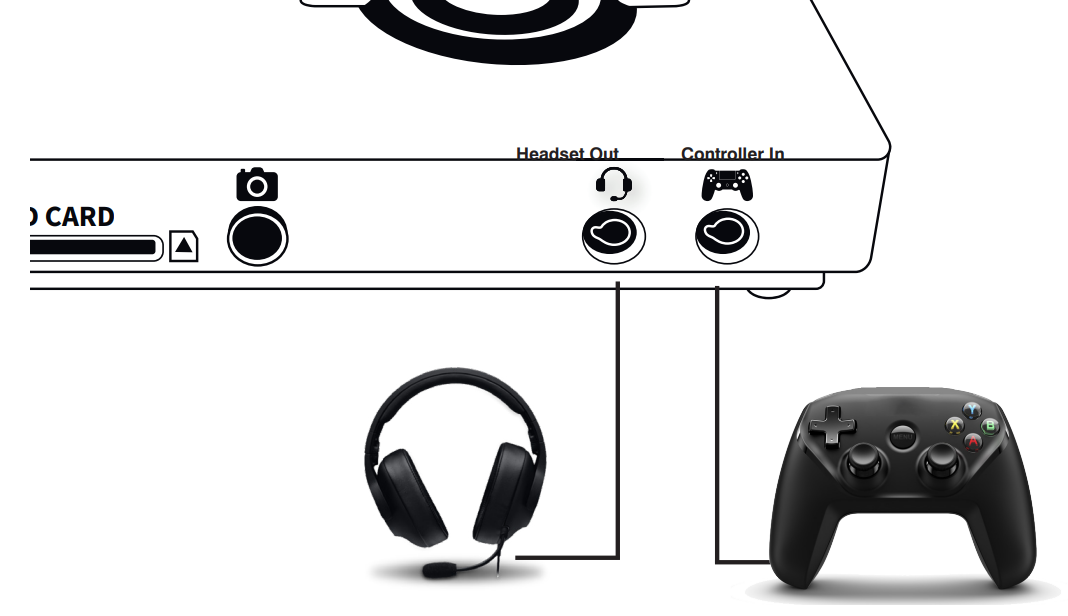
- Connect your headset and controller (if desired) into the Controller In and Headset Out connectors on front of the HD PVR Pro 60. Hit the record button to start recording, and once again to stop recording.
- After recording, do not remove the SD card until the blinking green light becomes solid green. This indicates that the recording is complete and you can remove the SD card.
You can change the bit rate of your stand alone recordings in Hauppauge Capture. Look in the Advanced menu -> Standalone Mode. There are three bit rates you can select from.
Operating HD PVR Pro 60 in the PC-connected mode
- Connect the HD PVR Pro 60 to your PC
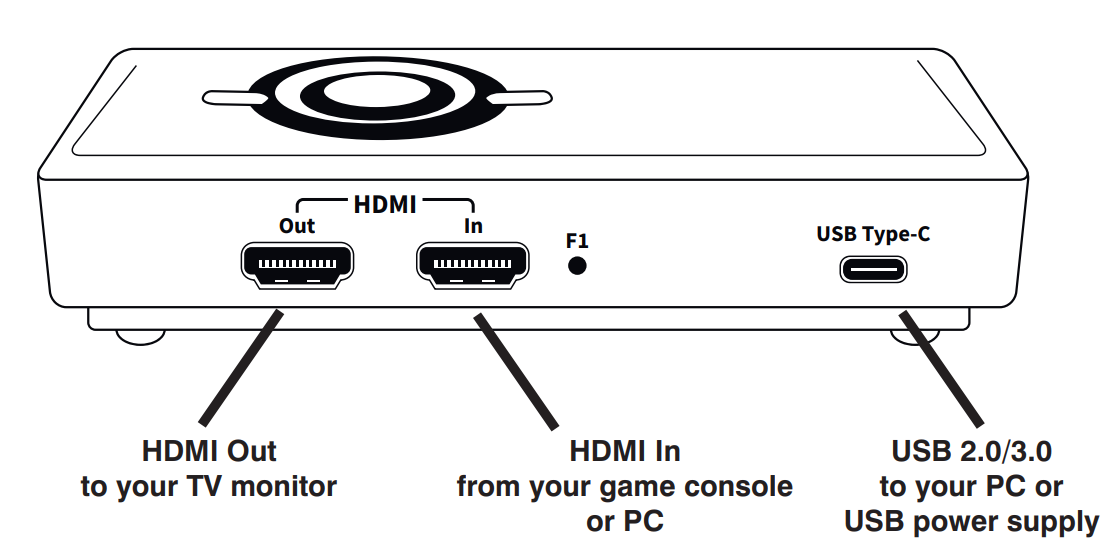
Connect the supplied USB Type-C to USB Type-A cable between the HD PVR Pro 60 and a USB 2.0 or USB 3.0 port on your PC. - Set the REC MODE switch to PC
Set the REC MODE switch on the side of the HD PVR Pro 60 to PC. This directs the record-ings to the USB port. - Connect HD PVR Pro 60 to your video source
If recording from a 4K video source such as the Xbox One X game console, use a High-Speed HDMI v2.0 cable from your game console to the HDMI In port on the back of the HD PVR Pro 60. Otherwise, you can use a standard speed HDMI cable. - Connect HD PVR Pro 60 to your TV monitor
Using the supplied High-Speed HDMI v2.0 cable, connect the HD PVR Pro 60 HDMI Out port to your TV monitor. You can use either 4K or 1080p60 monitors. - Install Hauppauge Capture
You can find Hauppauge Capture at: www.hauppauge.com/pro60 Hauppauge Capture is downloaded to your Downloads directory. It will be called up-paugecapture_1_1_zzzzz.exe where zzzzz is the version number. Run this file to start the installation. - Use Hauppauge Capture to record and trim your videos
After installing Hauppauge Capture, you will see the Hauppauge Capture icon on your Win-dows desktop. Click this icon to start Hauppauge Capture. For more information on Hauppauge Capture, how-to videos and the latest version of Haup-pauge Capture, please look here: https://www.hauppauge.com/pages/support/support_capture.html
Connecting your headset and game controller
HD PVR Pro 60 has a build-in audio mixer which can be used to mix together
- game audio and third party game chat coming from your game controller
- game commentary from your headset’s microphone
Plug your game controller into the Controller In port using the supplied 4-pin 3.5mm cable. Then plug your 4-pin 3.5mm headset into the Headset Out jack.
Note: when you plug a connector into the Controller In jack, game audio from comes from your game controller through the Controller In jack. Game audio from your controller will be mixed inside the HD PVR Pro 60 with headset microphone audio.
Connecting a microphone to add commentary to your recordings and streams
If you just want to add commentary to your recordings and streams, you can connect a microphone to the Headset Out port on the HD PVR Pro 60. In this case, game audio will come from the HDMI In port and be mixed inside the HD PVR Pro 60 with headset microphone audio.
Using Hauppauge Capture
After restarting your PC, you will see the Hauppauge Capture icon on your Windows desktop. Click this icon to start Hauppauge Capture.
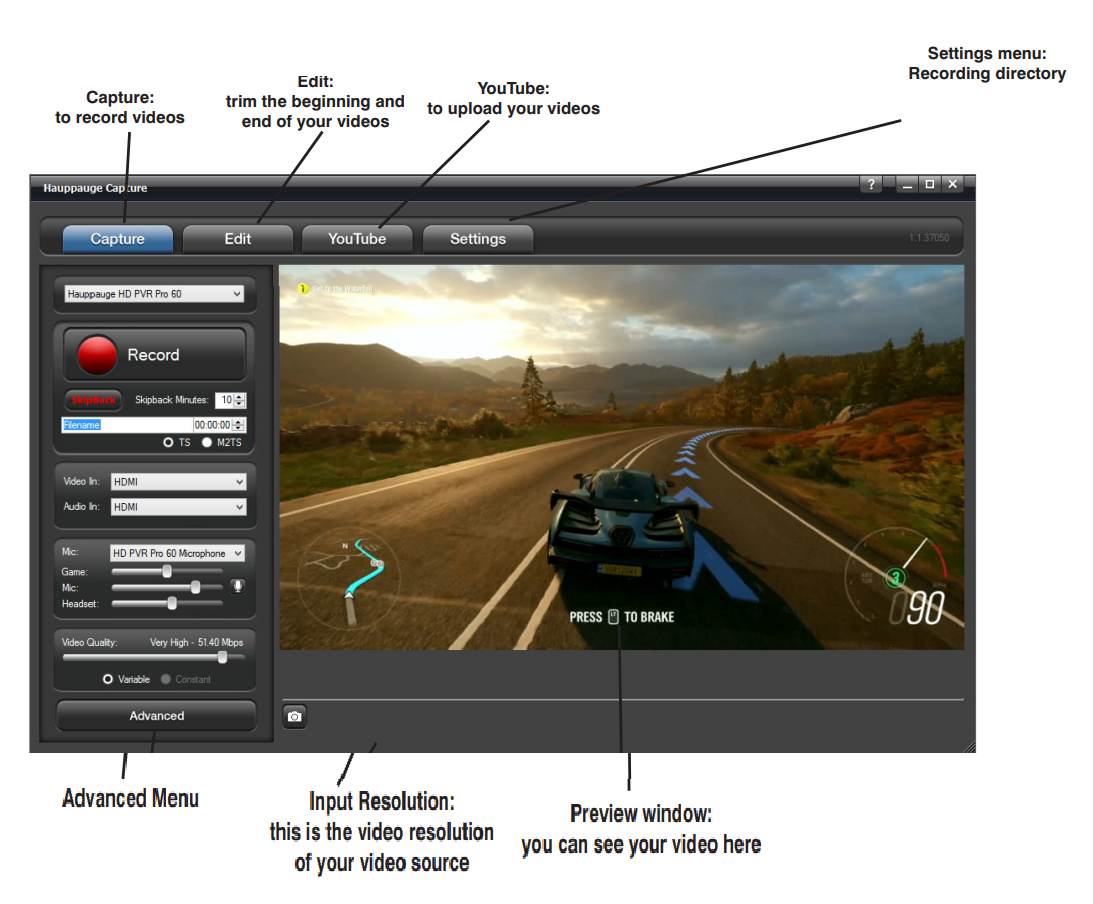
Capture tab
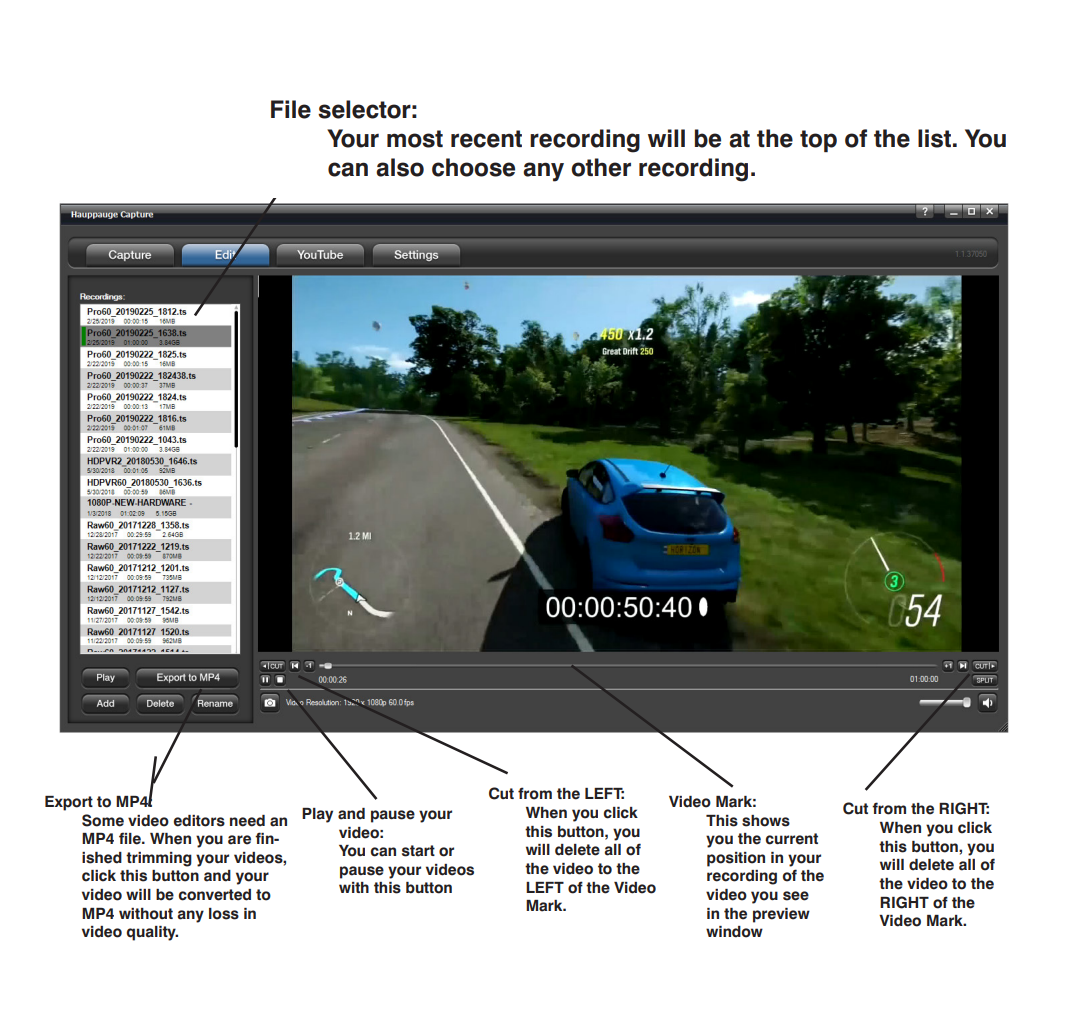
Edit tab
The Edit tab uses a fast cut and trim, which preserves the video quality of your recording
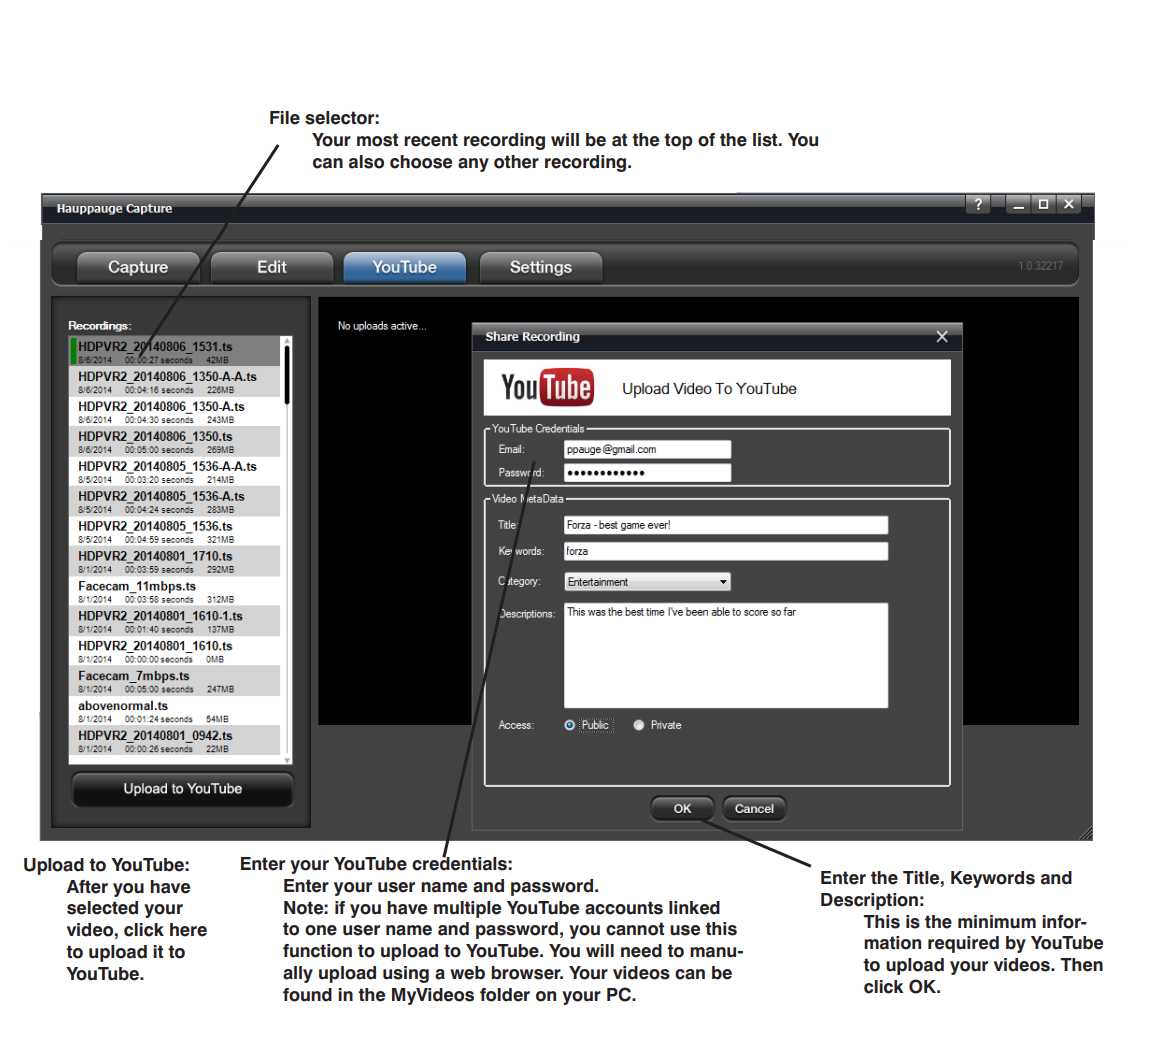
YouTube tab
The YouTube allows you to enter your YouTube credentials and quickly upload your video recordings to your YouTube channel.
Troubleshooting Of Hauppauge HD PVR Pro 60
What do the lights on the top of HD PVR Pro 60 mean?
- Red light: When HD PVR Pro 60 is powering on but with no video source, the status light on top of HD PVR Pro 60 will be solid red. Once you connect a good video source, the light will go to green.
- Green light means ready to record: in both PC connected and stand alone, the HD PVR Pro 60 status light will be green when it is ready to start recording.
- Blinking green light: in both PC connected and in stand alone mode, the status light will blink green when recording or streaming.
- Two red blinks when recording standalone: two red blinks and a return to solid green means that the SD card is write protected.
- Blinking red light when recording standalone: in stand alone mode, the red light will blink if: - the SD card is damaged (may need to be reformatted), unformatted, or for-matted with the wrong format. Currently, only FAT32 or exFAT are supported SD card formats. The red light will also blink if there is a recording error.
- Blinking white light: firmware upgrade in process
If you find you are seeing dropped frames in your recordings
It’s possible the selected bit rate is too high for your PC. The solution is to either decrease the bit rate or to add an SSD drive to your PC. SSD drives are always recommended for video recording.
No video in the Hauppauge Capture preview window
- Make sure HD PVR Pro 60 is listed in the Capture tab. If not, then please check your USB cables and make sure the green light is on on the top of HD PVR Pro 60. If you cannot see HD PVR Pro 60 listed, reinstall Hauppauge Capture. Power cycle the HD PVR Pro 60 and reboot your PC after reinstalling the drivers.
- Check the video mode of your console. It must be set at either 4K 60fps, 1080p60 or 720p. If you are using a PC game system, check our website at: https://www.hauppauge.com/pages/support/support_hdpvr2.html#pcrecording
- Check for HDCP copy protection
Verify your source device does not use HDCP copy protection. If your video source has HDCP copy protection, you will see a black screen. To turn off HDCP on your PS4, see here: https://www.hauppauge.com/pages/support/support_ps4.html - Check your HDMI cables. Remove each cable and make sure it’s firmly reseated into each device you are using. If using HDMI cables, try swapping the HDMI cables.
- If the HD PVR Pro 60 green light is on after you start Hauppauge Capture and you still see a black preview window, try recording some video. If you can successfully playback a recording but you cannot see live video in the Preview window, enable hardware acceleration (select “hardware acceleration” in the Settings menu in Hauppauge Capture). If capture fails, it is likely something is wrong with the video input to HD PVR Pro 60. This could be a broken or loose video cable or you plugged the cables into the wrong connector.
Pass through video problems
No video on my TV set
Open Hauppauge Capture and verify that you can see video in the preview window. Also, check the video mode on your PS3 or Xbox 360. The video mode should be 1080p or 720p.
No video on my TV set but I can see video in the preview window
Check that the HDMI cable from the HD PVR Pro 60 (HDMI Out) is connected to your TV monitor and the TV is set to the correct HDMI port if multiple are available on your TV. Try changing the output resolution from your game console. Some TV monitors may not support all HDMI output resolutions.
Pros & Cons of HD PVR Pro 60
Pros
- Excellent 1080p60 recording and streaming
- Versatile input options, including HDMI and Component
- Minimal lag and high-quality audio
- Sleek and compact design
Cons
- More expensive than some competing capture cards
- No 4K passthrough or recording support
- USB 2.0 interface may limit data transfer speeds
Customer Reviews about Hauppauge HD PVR Pro 60
Customers appreciate the Hauppauge HD PVR Pro 60 high-quality recordings, minimal lag, and versatile input options. Common complaints include the USB 2.0 interface limiting data transfer speeds and the absence of 4K support. Overall, the device receives positive reviews from gamers and streamers looking for a reliable and feature-rich capture card.
Faqs
What is the HD PVR Pro 60 Hauppauge?
How should my Haippauge HD PVR Pro 60 be configured for recording?
Can I use the HD PVR Pro 60 to stream live gameplay?
Which devices can I use the Hauppauge HD PVR Pro 60 with?
How can I edit videos that the Hauppauge HD PVR Pro 60 has captured?
Can I record audio from games and parties with the HD PVR Pro 60?
How can I make a warranty claim for my HD PVR Pro 60 from Hauppauge?
Can I use the HD PVR Pro 60 to record and stream at the same time?
Which file formats can be recorded with the Haippauge HD PVR Pro 60?
What kind of warranty does the Hauppauge HD PVR Pro 60 come with?
Leave a Comment