Operating System: Heimvision HM243 NVR Security Camera User Guide
Content
Introduction of Heimvision HM243 NVR Security Camera
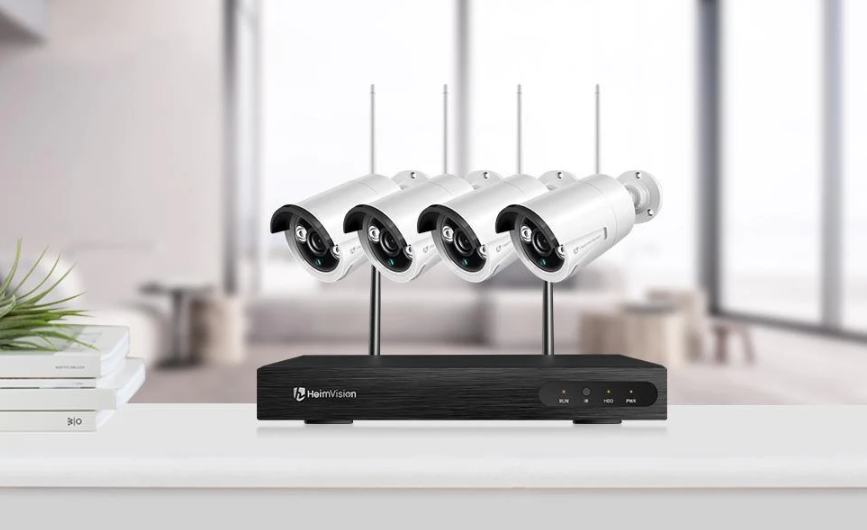
The Heimvision HM243 NVR Security Camera is a powerful and versatile home security solution that provides users with peace of mind. This system includes four weatherproof cameras, each with a 1080p resolution and a 130-degree viewing angle. The NVR (Network Video Recorder) has a 2TB hard drive, allowing for extensive storage of footage. The system is easy to install and can be accessed remotely through a smartphone or computer. The Heimvision HM243 NVR Security Camera is priced at around $400 and is now available for purchase.
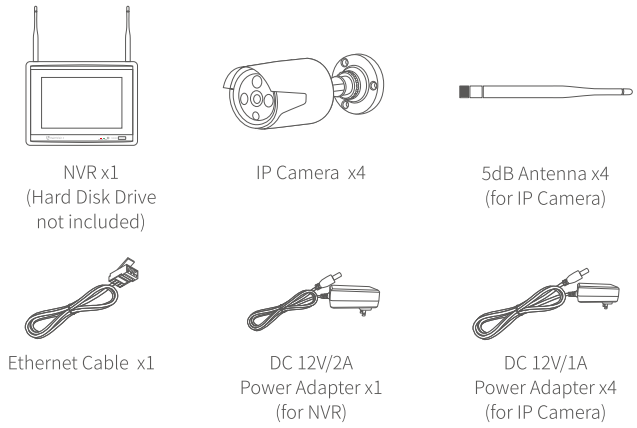
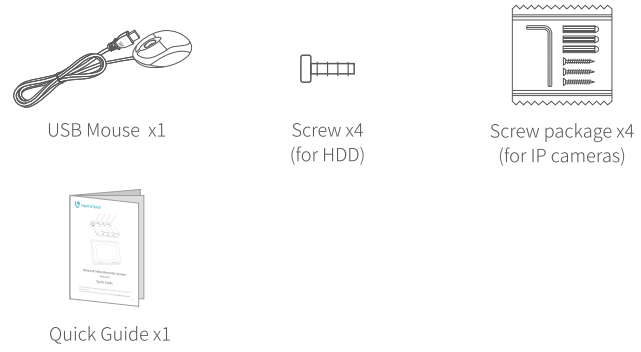
PACKAGE LIST
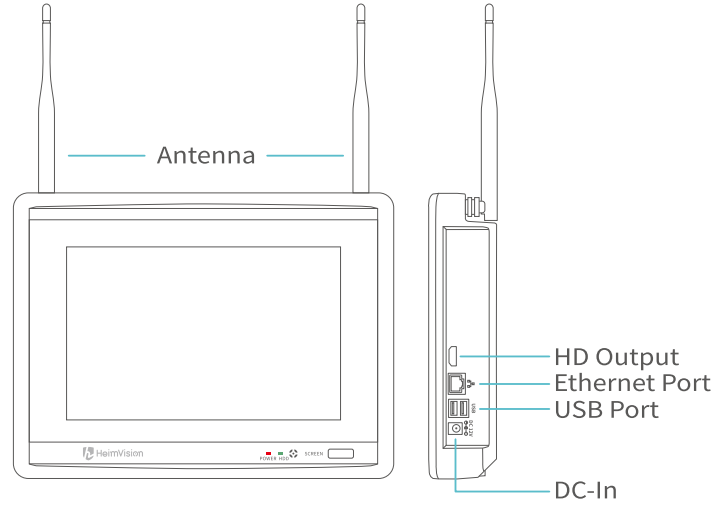
NVR PRODUCT OVERVIEW
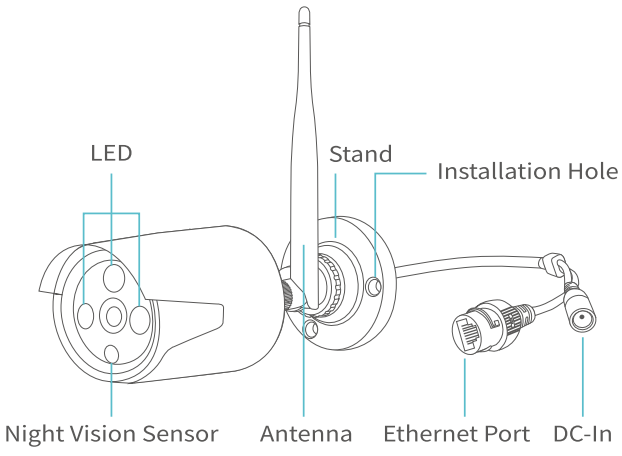
Specifications of Heimvision HM243 NVR Security Camera
- 1080p resolution for clear and detailed footage
- 130-degree viewing angle for wide coverage
- Weatherproof cameras for use in any conditions
- 2TB hard drive for ample storage
- Remote access through a smartphone or computer
- Motion detection and alert notifications
- Night vision up to 100 feet
- Up to 128GB microSD card slot for additional storage
- 4 cameras included with the NVR system
HARD DISK DRIVE INSTALLATION AND SYSTEM CONNECTIONS
Hard Disk Drive Installation
Notice
- To record video and play the recorded video, the installation of the Hard Disk Drive is a must. Otherwise, you can only watch the live picture.
- A Hard Disk Drive is not included in this NVR System.
- This NVR system works with a 3.5" SATA HDD. The HDD shoud be formatted if it's installed.
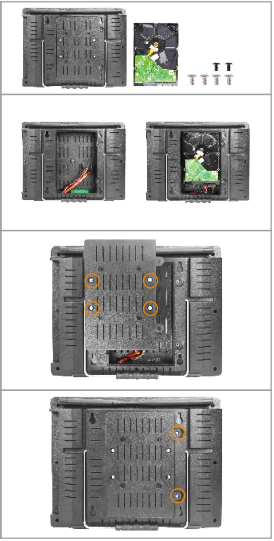
- Loosen the screws on the back of the NVR and then remove the cover.
- Connect the power cables and data cables to the corresponding ports of your HDD.
- Fasten the cover and HDD with the four screws.
Fasten the cover on the back of the NVR with the two screws.
System Connections
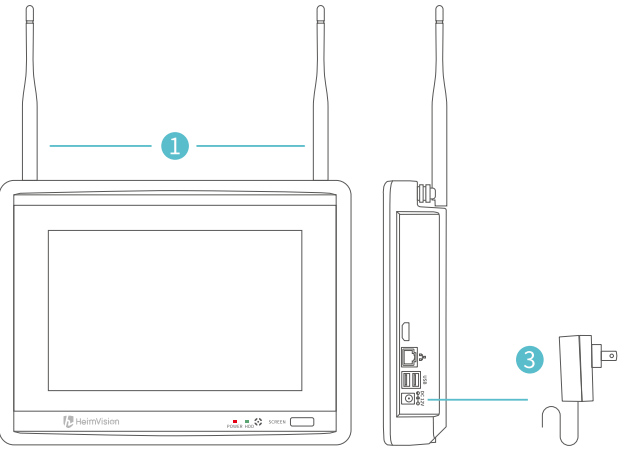
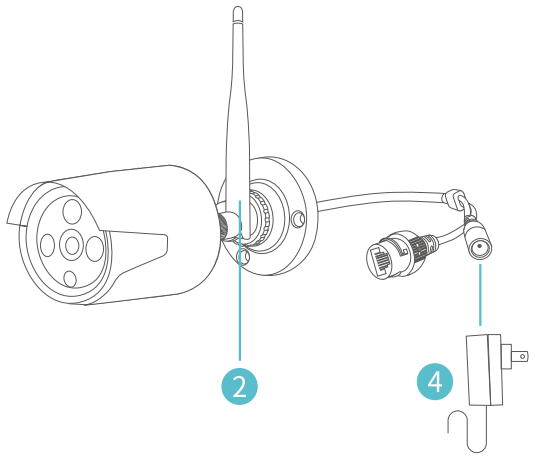
- Do not fix the IP Camera with the screws before you can see the image on the screen and know the ideal position to install it.
- Unwind the antennas of the NVR;
- Install and tighten the antennas on the IP cameras;
- Plug the power adapter (12V/2A) into the NVR and the socket;
- Plug the power adapter (12V/1A) into the IP Camera and the socket.
OPERATE NVR SYSTEM
Live Picture
Plug the NVR and cameras in, and wait for 2-3 minutes. The live pictures from the cameras will be displayed on the screen. Then you can connect the mouse to the NVR and start operating the NVR system.
Notes
- The default Username for the NVR system is admin and the default Password is empty ( no need to enter anything);
- This NVR system can be only connected to the network by Ethernet cable currently;
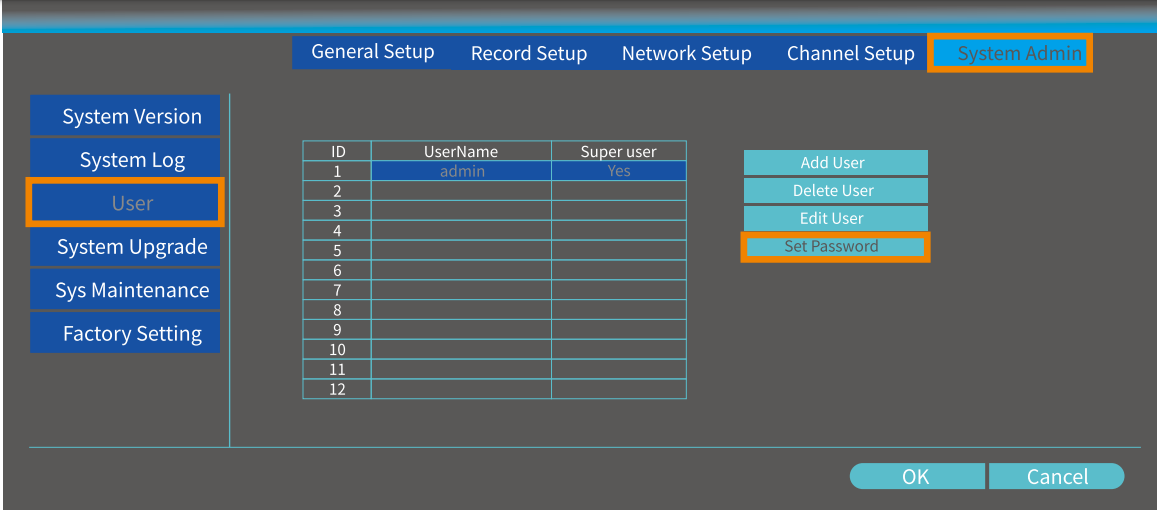
To protect your privacy, please set the password at your earliest convenience. Right click the mouse on the main interface, then go to System setup> System Adm in> User> Set password to set a password;
Hard Disk Drive Formatting
Install the HDD first, then right click the mouse on the main interface and go to System Setup> General setup> HDD Setup to check its status. If it's not Formatted, select the right H DD, then click Format.
Video Recording
Right click the mouse on the main interface, then select System setup> Record setup> Record Plan to set the record mode. The default record mode of the NVR is 24/7 all time record.
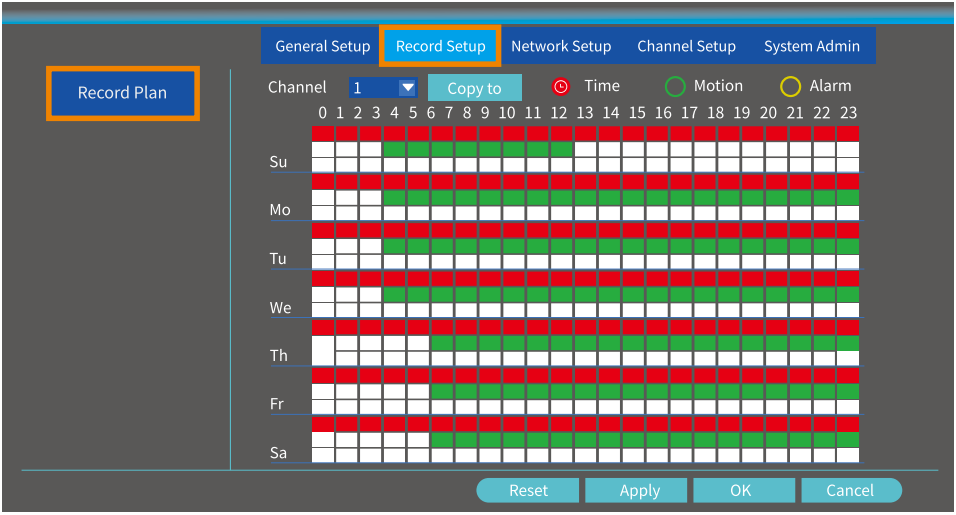
Notice: Click Reset before you change the record mode.
Scheduled Record
After reset, select Channel and click (![]() ) Time to start scheduled record setup. Left click the mouse and then select the day and hour you plan for recording. The area selected will turn to Red and click Apply to save the setting. The system will start recording at a specific time on a daily/weekly schedule.
) Time to start scheduled record setup. Left click the mouse and then select the day and hour you plan for recording. The area selected will turn to Red and click Apply to save the setting. The system will start recording at a specific time on a daily/weekly schedule.
Motion Record
- After reset, select Channel and click
 Motion to start motion record setup. Left click the mouse and then select the day and hour you plan for recording. The area selected will turn to Green and click Apply to save the setting. The system will start recording when the camera detects any motion.
Tips
- Changing the setting from 24/7 recording to motion recording helps to prolong your HDD storage time.
- External device is required for Alarm record and this NVR does not support it.
Video Playback
Right click the mouse on the main interface, then select Video Playback to play the recorded videos. Select the date with green color, Channel and Record Mode (®),then click Search to list all the filtered videos .
- CD Display the timeline by Day/Hour
- Video Recording Time
- Area for Video Playing
- Pause/Play/Fast Forward
- Filtered Videos List
Filters
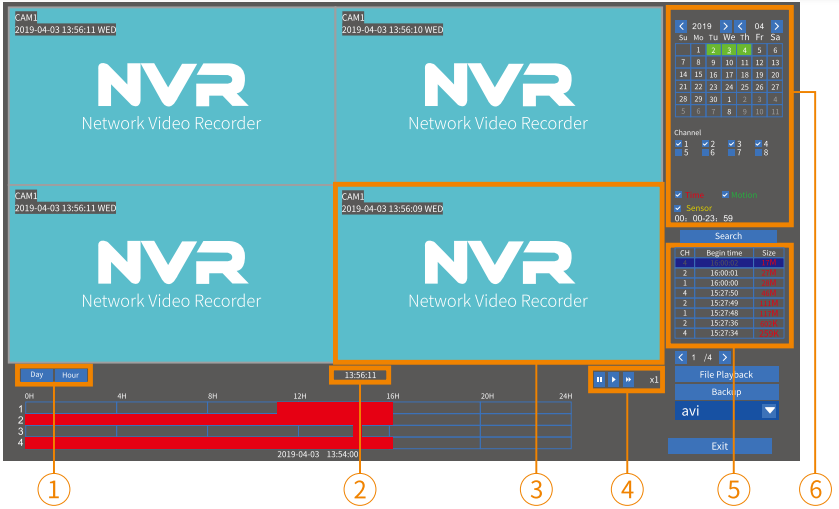
- Select one video file from the Filtered Videos List ,then click Play or File Playback to play the selected video.
- Left click the mouse on the Red/Green (Red for Scheduled Record and Green for Motion Record) part of the timeline. The videos recorded from 4 channels can be played at the same time.
Video Backup
- Insert a USB drive (up to 64GB and FAT32 format only), then select Video Playback to enter the interface below.
Right click the mouse on the main interface then select Video Playback to enter the interface below.
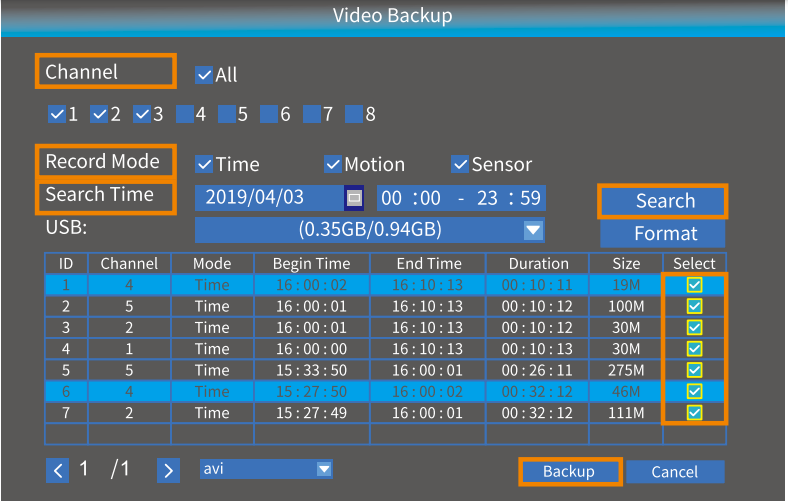
- Select Channel, Record mode and Search Time, then click Search to display the filtered videos list.
- Select the videos and click Backup, the videos will be downloaded to your USB drive.
Network Setup
Connecting the NVR to a router with the ethernet cable is a must if you want to remotely view the videos from a mobile device or a PC. You can check Cloud ID, IP address and Web port here.
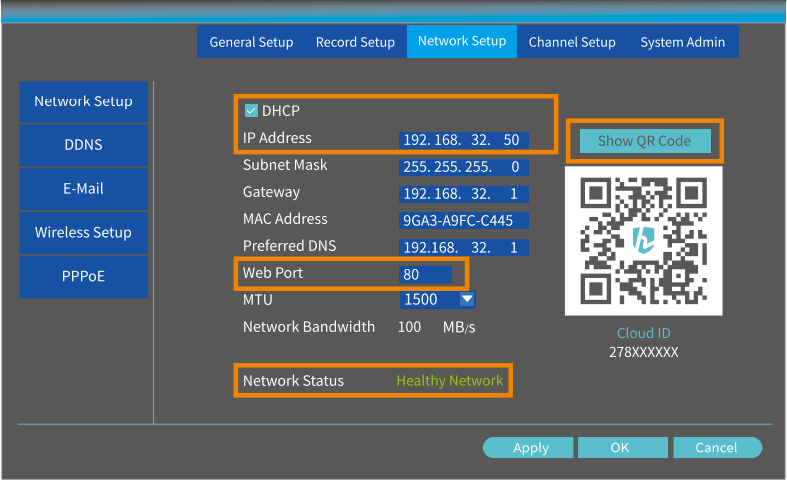
- Click Show QR Code, you can see the QR code and Cloud ID here.
- Make sure the Network status is Healthy Network;
- Web port may vary on different NVR systems.
Other Functions on the Menu Bar
Right click the mouse to show the main Menu bar as shown below, right click again to hide it.
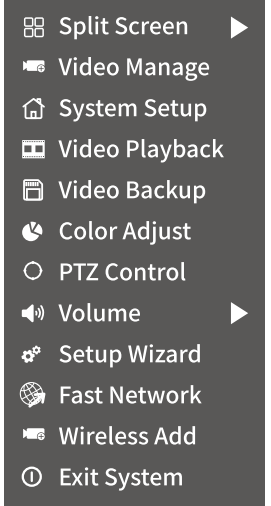
- Split screen
Select it to change the channel displayed on the screen or divide the screen into four/six/eight channels. - Video Manage
Select it to add IP cameras by Match Code, to manage IP cameras and channels, etc. System setup: It includes General setup, Record setup, - Network setup and System Admin
- General setup: change Language, set up the Time, change Display Resolution and check HDD information etc.
- Record setup: set up the record mode for each channel.
- Network setup: check the IP address, Cloud ID, etc.
- Channel setup: change the name of the camera, check the Bitrate, etc.
- System Admin: check the system version, update the system, User and password setup, make a factory reset and check the system log, etc.
- Color adjust
Select it to adjust the brightness, contrast and sharpness of each channel. PTZ Control: Select to pan/tilt/zoom, this NVR does not support the function. - Setup Wizard
Show the QR code to download the app and show the Cloud ID. - Fast network
Configure the network. - Exit System
Log out, reboot and shut down the system, etc.
OPERATE NVR SYSTEM FROM ESEECLOUD ON PC
EseeCloud Login
- Double click EseeCloud_Setup.exe to install and then run the software.
Log in to EseeCloud Client with the default User Name (ad min) and password (empty, namely enter nothing) if you did not set any password.
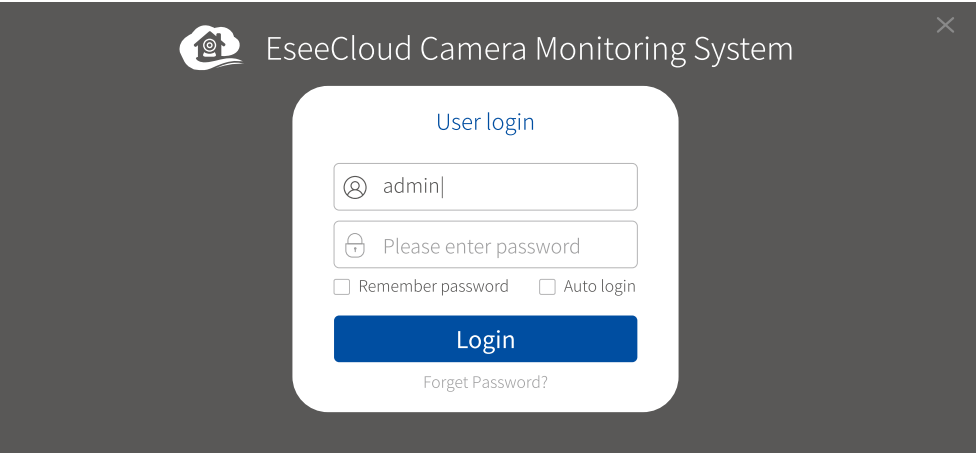
- Click Add (on the upper right corner) to add device.
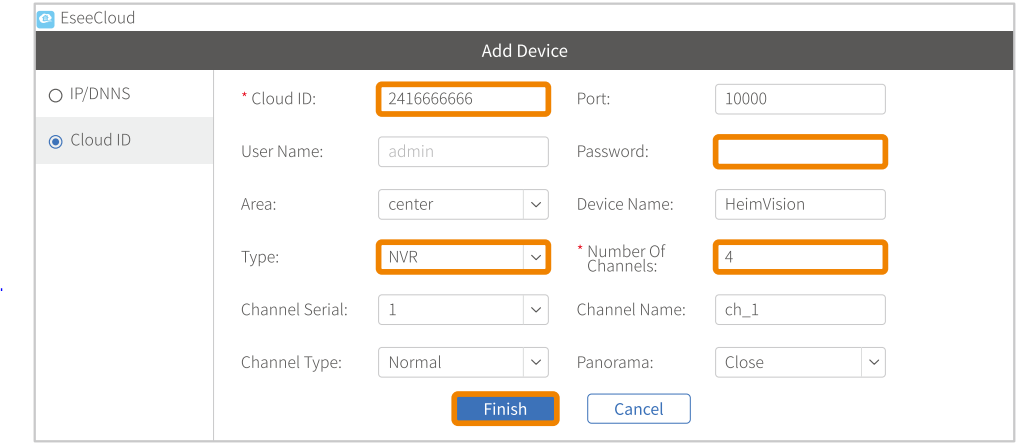
- Click Cloud ID (on the left side);
- Input your Cloud ID number, user name (ad min) and password (skip it if you didn't set one);
- Select NVR in the Type box and input4 in the box of Number of Channels;
- Click Finish.
Click
 to connect your NVR system and show the live pictures of the channels.
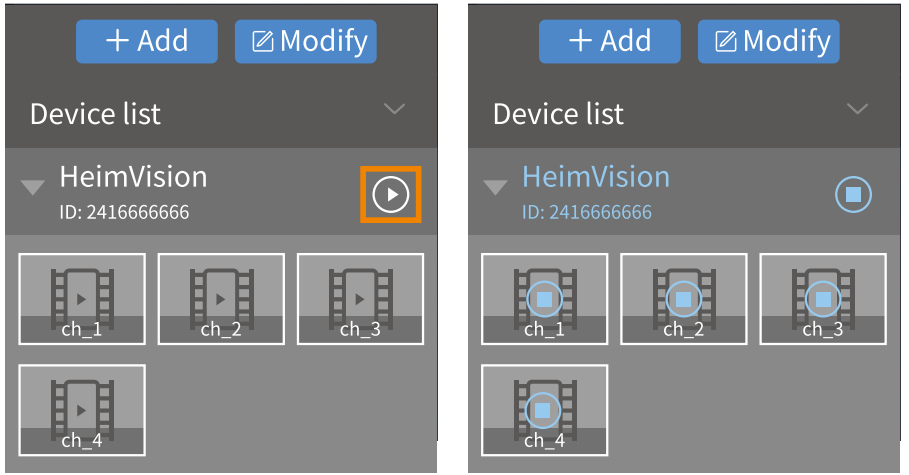
Tip: The Device list is displayed with the Graphic structure. If it's displayed with a Tree structure, please double click on the device name to connect the system.
Video Playback and Backup
- Click
 ( on the bottom menu bar), then click Confirm in the pop-up window to enter the interface of Video Playback.
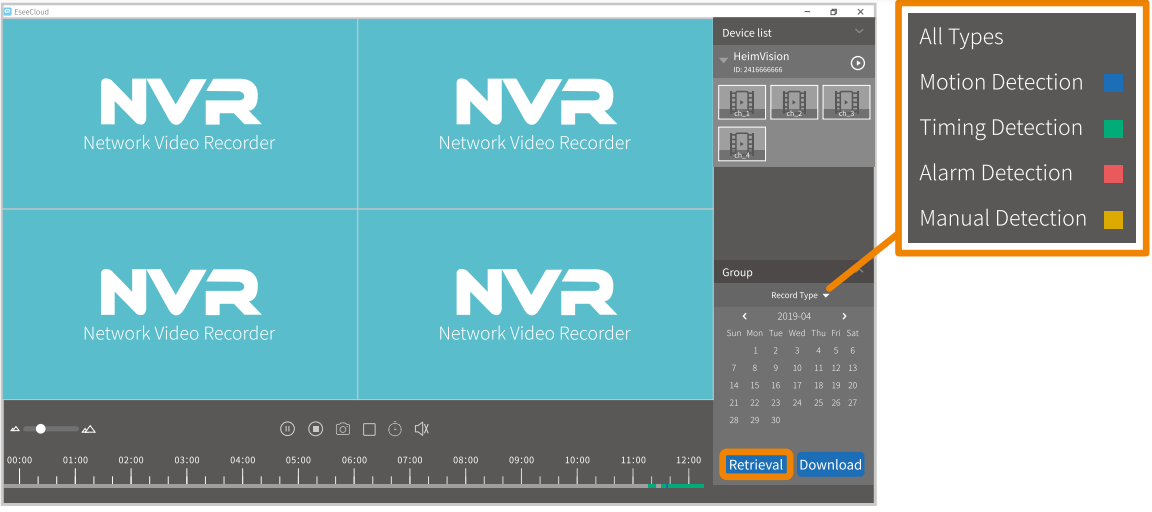
 Select Channel, Record type and Date to filter the videos, click Retrieval to display the recorded videos, then click on the colored timeline to see the recorded videos.
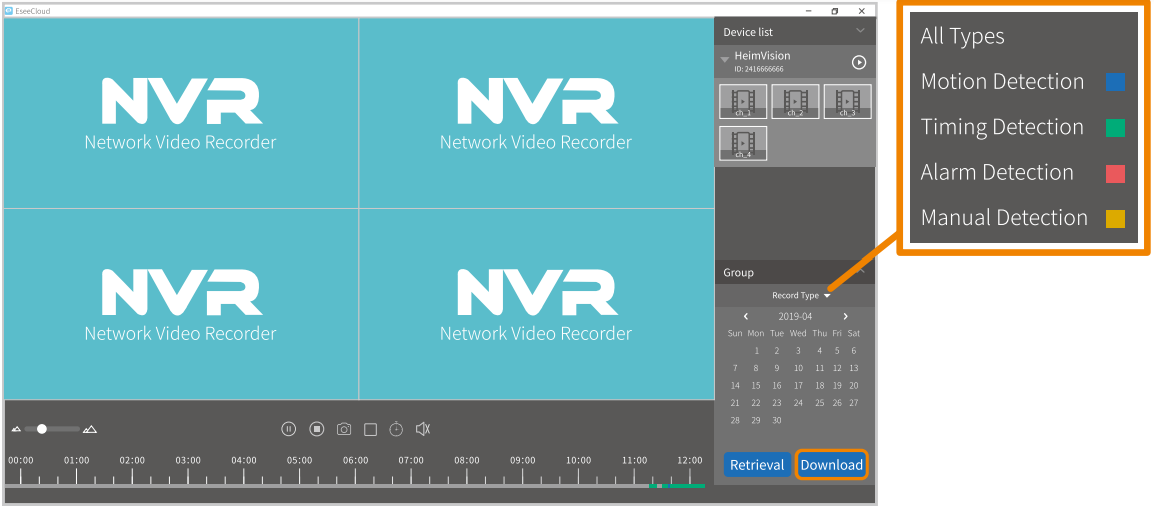
Click Download (on the lower right corner) to enter the interface of Download Resources.
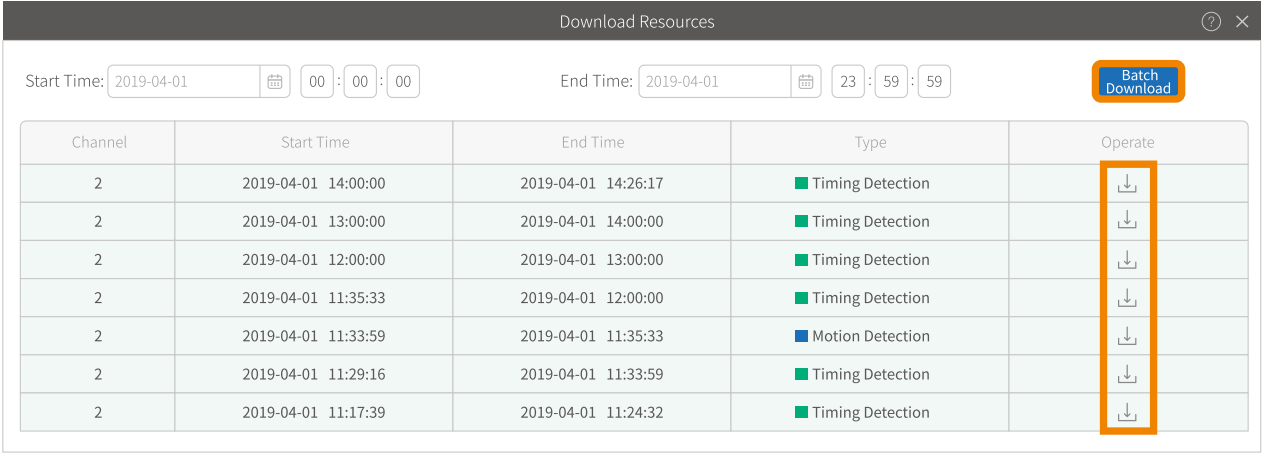
Click
 , to download the video one by one or click Batch Download to download all the videos together to your computer.
Click
 to exit from the video playback interface and get back to the live video interface.
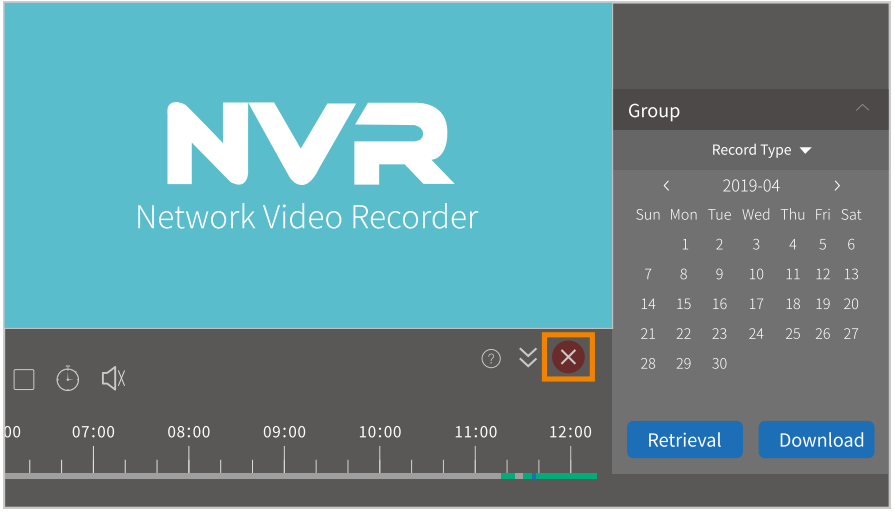
Other Functions of the Bottom Menu
- Device Management (
 ): To add/delete NVR devices; to modify the device information.
 - User Parameter (
 ): To select language; to change the storage paths of Screenshots and videos; to set time zone.
 - Record (
 ): To record the live videos on your computer.
 - Screenshot (
 ): To capture a screenshot of the live videos and save it on your computer
 - Disconnect all (
 ): To disconnect the NVR device.
 - Screen Number (
 ): To change the channels showing in the screen.
 - More Function (
 ): To change the password; to check the user logs; to check system messages .
OPERATE NVR SYSTEM ON A MOBILE DEVICE
Notice
- Your Cloud ID can be found in Network Setup (Page 09).
- Please make sure that your NVR is Internet connected through the ethernet cable, and the status of your network is Healthy Network.
- Please make sure the NVR System and the mobile device are connected to the same network the first time.
App Installation
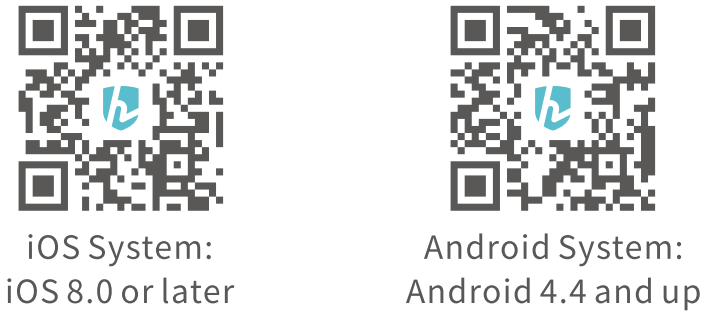
Search and download Heim Kits to your mobile device from App Store/Google Play or scan the QR codes below to download.
NVR System Adding
Install and open Heim Kits App, then follow the steps below to add the NVR system.
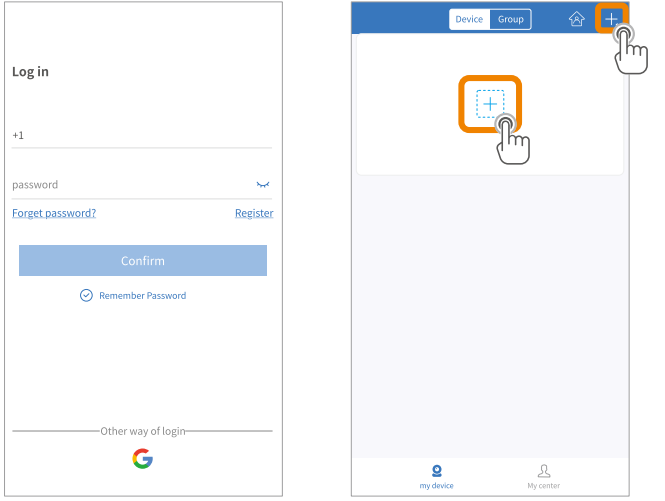
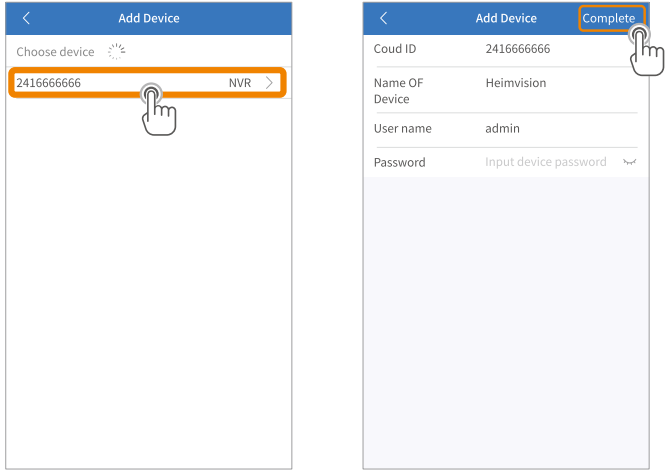
Register an account with your email address and log in to Heim Kits, then tap + in the center or on the upper right corner to continue.
Tap Kit to start adding your NVR system, then the App will scan the NVR system nearby automatically.
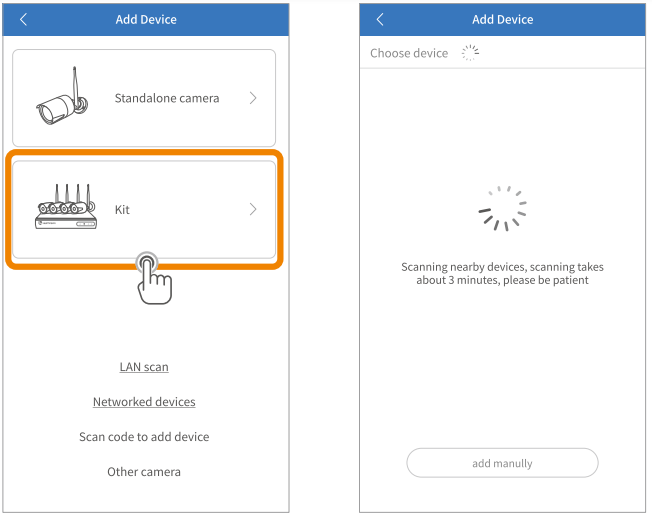
Tap on the correct NVR after scanning. Then input the required information (e.g. enter the password if you set one; if not, skip it.) Then tap on Complete to enter the main interface.
Tap on the picture to enter the live interface, then you can capture a screenshot, record the live videos on your mobile device and play the recorded videos from your NVR system.
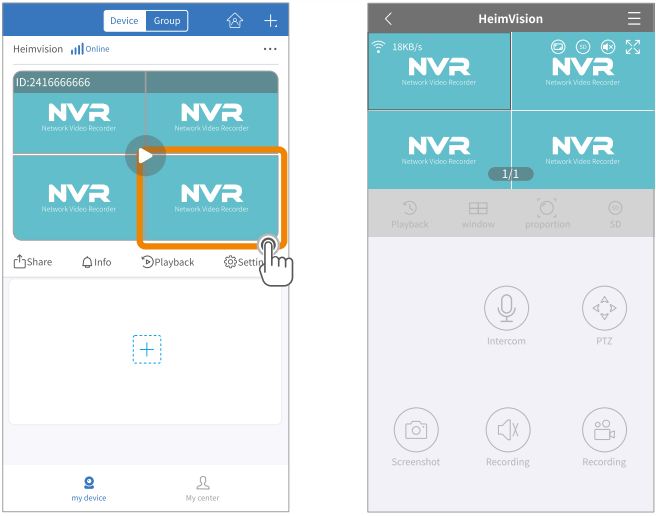
Tips: If the NVR is not added automatically, please tap add manually to add it. * This device does not support Intercom and PTZ function.
OPERATE NVR SYSTEM FROM A BROWSER ON PC
Notice
- Your Cloud ID, IP address and Web Port can be found in Network Setup(Page 09).
- Please make sure that your NVR is Internet connected through the ethernet cable, and the status of your network is Healthy Network.
- Internet Explorer (IE) browser is recommended.
When your PC is connected to the same Router as the NVR's, you can visit the local network to operate. Input your IP address (e.g. 192.168.32.213) into the search bar of your browser and log in to the NVR system. Please install Web View Control after your first login. And then change the Internet setting to allow the installation of Web
View Control: Then you can watch live videos, play and download the recorded videos and change the settings, etc.
Tip: If the Web port (e.g. 80) of your NVR system has been changed to another number, e.g. 1111, please enter 192.168.32.213:1111 into the IE browser.When your PC is connected to a different Router which is not the same as your NVR'S, you can visit the NVR system from Cloud then input your Cloud ID (e.g.2416666666) and Username to log in to the NVR system.
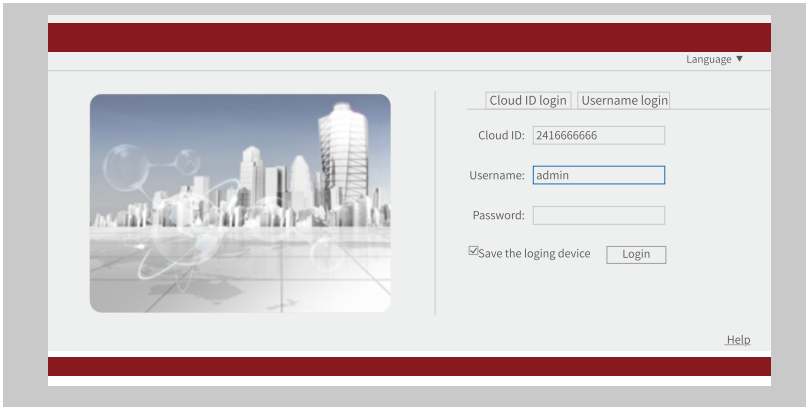
Description
The Heimvision HM243 NVR Security Camera is a comprehensive home security solution that provides users with high-quality footage and reliable performance. The cameras are weatherproof, making them suitable for use both indoors and outdoors. The 1080p resolution and 130-degree viewing angle ensure that users can see every detail, while the motion detection and alert notifications provide an added level of security. The system can be accessed remotely through a smartphone or computer, allowing users to check in on their property at any time. With a 2TB hard drive and up to 128GB microSD card slot, users have plenty of storage for their footage. The system includes four cameras, but additional cameras can be added for expanded coverage.
Heimvision HM243 Troubleshooting
There is no live picture sometimes
It may be caused by the poor network due to Wi-Fi interference, obstacle blocking and so on.
- When you are viewing the live picture from the Cloud, please make sure the network connection between the NVR and router works well. At the same time, make sure the router provides enough upload bandwidth. To improve the quality of network, you can reboot the router regularly.
- When you are viewing the live picture from the same network as your router's, please make sure the network connection between the camera and NVR works well. You can check each channel's signal strength on the upper right corner of their live pictures.
- If the Wi-Fi signal is good but the live picture of all the channels still buffers and lags, another device may interfere the connection between the NVR and cameras. Please keep as few signal interferences as possible between the NVR and the cameras.
- If the Wi-Fi signal of one channel is poor, move the camera close to the NVR to check whether the strength of Wi-Fi signal is stronger and make sure the antenna of the camera is fixed well and pointed at the right direction. If the Wi-Fi signal of all channels is poor, please slowly move the antennas of the NVR until they point at the right direction as mentioned in the section of Adjust the antennas to the appropriate angle from page 20.
There is no live picture when using a browser to log in to the NVR
Make sure you have installed the Web View Control correctly on your IE browser.
Can I add extra cameras
The camera with the same brand is recommended if you want to add more cameras. To get the link of buying camera and the detailed guide for adding the camera, please contact us at [email protected].
What should I do if I removed a camera from the NVR system
The steps to add it again are the same as adding a new camera mentioned in the section of Add Cameras on page 23. Find the camera that matches with the deleted channel, connect it to the NVR with the Ethernet cable, then go to Video Manage> Auto Add to add it.
How long is the storage time of the Hard Disk Drive
The example below is for an average data rate 1024Kbps and 4 cameras. Storing the videos for one day takes up about 42.19GB storage based on the formula below:
- 1024(Kbps)
- 3600(seconds per hour)
- 24(hours per day)
- 4(Channels)= 353,894,400Kbit
- 353,894,400Kbit= 44,236,S00KB
- 44,236,S00KB= 43,200MB
- 43,200MB= 42.19GB
If you have a 1 TB Hard Disk Drive, the capacity of it after formatting is around 921GB. The storage time is around 22 days (921GB/42.19GB""22). However, the data rate of the camera is Variable Bitrate which depends on the surveillance environment. If there are many moving objects in the live picture, the data rate will be higher. Go to System setup> Channel setup to check it, then use the formula mentioned above to calculate it.
NVR system cannot detect the Hard Disk Drive
- Make sure the NVR works well.
- Make sure the power cable and SATA cable of the Hard Disk Drive are connected correctly and firmly.
- Try another Hard Disk Drive.
- The Hard Disk Drive with brand and for 24/7 surveillance is recommended. Make sure you back up the important videos timely for safety.
What should I do if I forget the login password
Please send us the time (e.g. 2019-03-20 23:59:57 WED) displayed on the live picture of the channel. The server will generate a temporary password which is only valid for 15 minutes. Heim Vision support team will send you the password.
Pros & Cons
Pros
- High-quality footage with 1080p resolution
- Wide viewing angle for comprehensive coverage
- Weatherproof cameras for use in various conditions
- Large storage capacity with 2TB hard drive
- Motion detection and alert notifications
Cons
- Price may be higher than some competitors
- Some users may find the setup process complicated
Customer Reviews about Heimvision HM243
Customers have praised the Heimvision HM243 NVR Security Camera for its high-quality footage and reliable performance. However, some users have reported issues with the setup process, noting that it can be complicated and time-consuming. The most common complaint is the price, with some users feeling that it is higher than other home security solutions on the market.
Faqs
What sets apart other security systems from the Heimvision HM243 NVR Security Camera system?
In what way can I configure my Heimvision HM243 NVR Security Camera NVR System to provide all-encompassing home surveillance?
What is the Heimvision HM243 NVR Security Camera's capacity for capturing videos?
How does the Heimvision HM243 NVR Security Camera NVR system's remote viewing function operate?
What is the Heimvision HM243 NVR Security Camera's maximum storage capacity?
Is it possible to combine my current smart home system with the Heimvision HM243 NVR Security Camera?
What networking specifications does the Heimvision HM243 NVR Security Camera require?
How can I protect the confidentiality and privacy of the video captured by my Heimvision HM243 NVR security camera?
What night vision features are available on the Heimvision HM243 NVR Security Cameras?
How can a wireless Heimvision HM243 NVR security camera's signal problems be resolved?
Leave a Comment
