
Pair & Setup: Hisense Soundbar with wireless subwoofer HS312 User Guide
Content
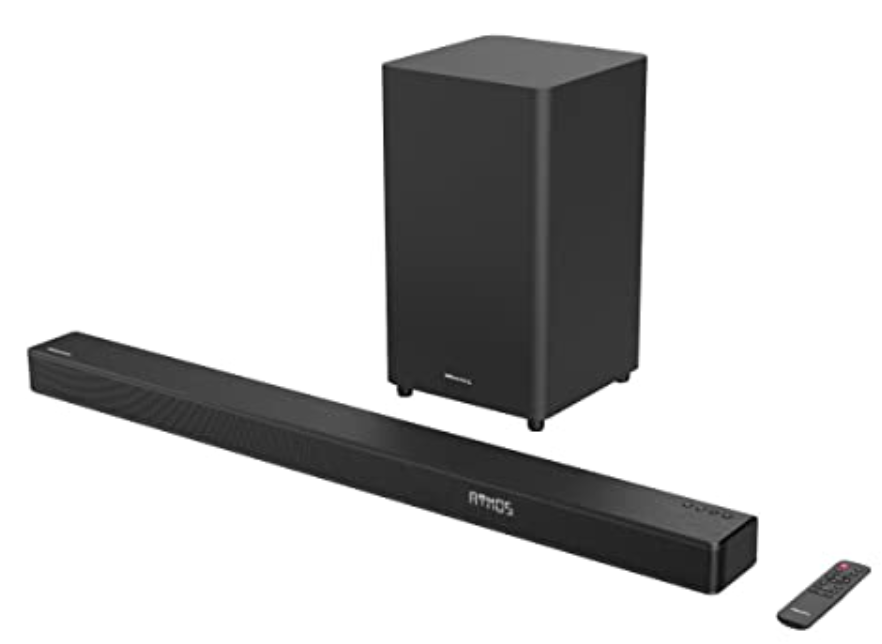
Hisense Soundbar with Wireless Subwoofer HS312
Introduction
The Hisense Soundbar with wireless subwoofer HS312 is designed to elevate your home entertainment experience with immersive audio capabilities. This 3.1 channel soundbar is equipped with Dolby Atmos technology, providing an immersive sound experience that envelops you from above and around. It features a powerful 300W output, which includes a wireless subwoofer for enhanced bass. The HS312 is perfect for those seeking a cinematic experience in their living room, particularly when paired with a 4K UHD TV.
Key benefits of the HS312 include its ability to fill rooms with powerful sound, thanks to its 300W output and virtual surround technology. It also supports 4K pass-through and HDR for seamless video and audio quality. The soundbar is easy to connect via HDMI, Bluetooth, or other inputs, making it versatile for various devices. Targeted at home theater enthusiasts and those upgrading their TV audio, the HS312 offers a balanced sound quality with different audio modes for movies, music, sports, and more.
The estimated price range for the HS312 is generally affordable, making it accessible to a wide audience. It is available for purchase on various online platforms and electronics stores. Whether you're enhancing your TV experience or creating a home theater setup, the Hisense HS312 is a compelling choice for delivering a cinematic experience in the comfort of your home.
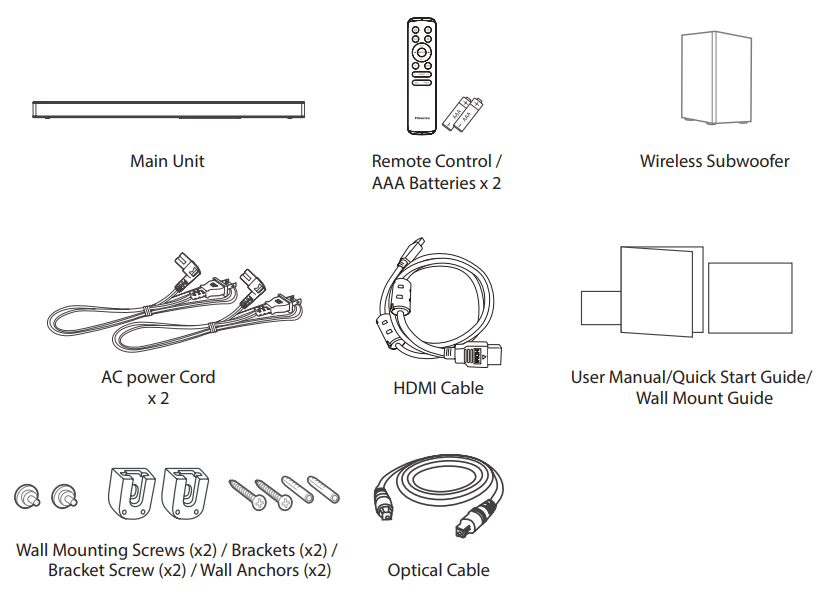
What’s in the Box
Preparations
Prepare the Remote Control
The provided Remote Control allows the unit to be operated from a distance.
- Even if the Remote Control is operated within the effective range 19.7 feet (6m), remote control operation may be impossible if there are any obstacles between the unit and the remote control.
- If the Remote Control is operated near other products which generate infrared rays, or if other remote control devices using infra-red rays are used near the unit, it may operate incorrectly. Conversely, the other products may operate incorrectly.
Replace the Remote Control Battery
- Press and slide the back cover to open the battery compartment of the remote control.
- Insert two AAA size batteries (included). Make sure the (+) and (–) ends of the batteries match the (+) and (–) ends indicated in the battery compartment.
- Close the battery compartment cover.
Precautions Concerning Batteries
- Be sure to insert the batteries with correct positive “-” and negative “+” polarities.
- Use batteries of the same type. Never use different types of batteries together.
- Either rechargeable or non-rechargeable batteries can be used. Refer to the precautions on their labels.
- Be aware of your fingernails when removing the battery cover and the battery.
- Do not drop the remote control.
- Do not allow anything to impact the remote control.
- Do not spill water or any liquid on the remote control.
- Do not place the remote control on a wet object.
- Do not place the remote control under direct sunlight or near sources of excessive heat.
- Remove the battery from the remote control wen not in use for a long period of time, as corrosion or battery leakage may occur and result in physical injury, and/or property damage, and/or fire.
- Do not use any batteries other than those specified.
- Do not mix new batteries with old ones.
- Never recharge a battery unless it is confirmed to be a rechargeable type.
Placement and Mounting
Placement
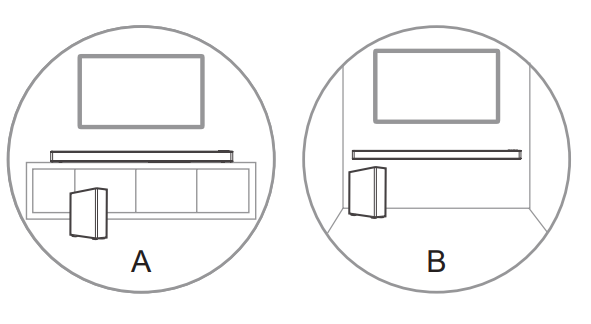
- A If your TV is placed on a table, you can place the unit on the table directly in front of the TV stand, centered with the TV screen.
- B If your TV is attached to a wall, you can mount the unit on the wall directly below the TV screen.
Wall Mounting (if using option-B)
Note:
- Installation must be carried out by qualified personnel only. Incorrect assembly can result in severe personal injury and property damage (if you intend to install this product yourself, you must check for installations such as electrical wiring and plumbing that may be buried inside the wall). It is the installer’s responsibility to verify that the wall will safely support the total load of the unit and wall brackets.
- Additional tools (not included) are required for the installation.
- Do not overtighten screws.
- Keep this instruction manual for future reference.
- Use an electronic stud finder to check the wall type before drilling and mounting.
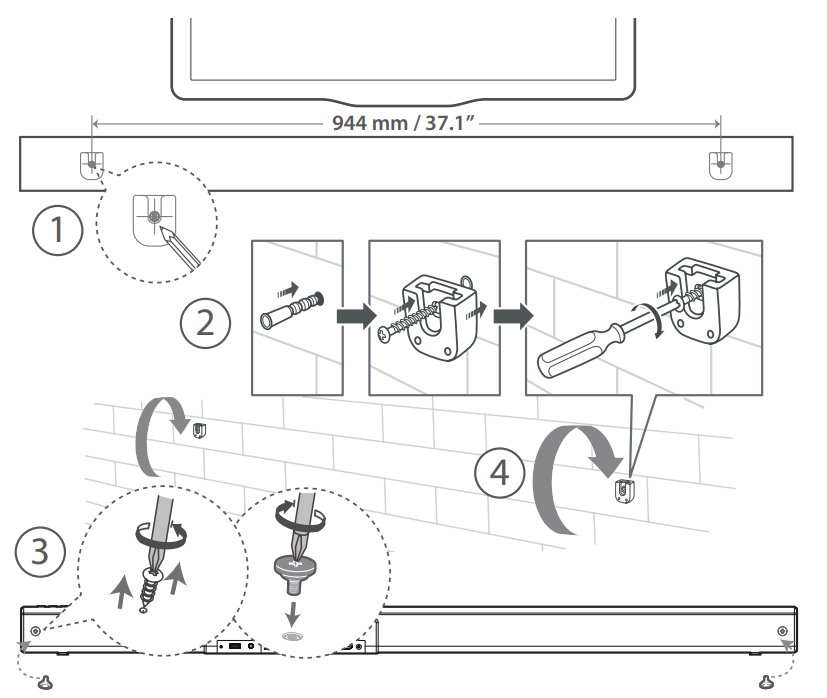
- Drill 2 parallel holes (Ø 5.5-6 mm each according to wall type) in the wall. The distance between the holes should be 944 mm.
- Firmly fix 1 dowel into each hole in the wall if necessary. Tighten the wall mount brackets on the wall with screws and screwdriver. Make sure that they are securely installed.
- Remove the screws at the back of the unit. Install the wall mounting screws into the back of the unit.
- Lift the unit onto the wall mount brackets and slot into place.
Pros and Cons of the Hisense Soundbar with Wireless Subwoofer HS312
Pros
- Powerful Sound Output: With a total output of 300W, the HS312 fills rooms with immersive sound, making every seat the best.
- Dolby Atmos Technology: Provides a three-dimensional audio experience, enhancing movie and gaming experiences.
- Wireless Subwoofer: Offers powerful bass without the hassle of cables.
- 4K Pass-Through and HDR Support: Ensures high-quality video and audio streaming.
- Multiple Audio Modes: Includes Movie, Music, Sports, Late Night, and News modes to suit different scenarios.
- Easy Connectivity: Supports HDMI ARC, Bluetooth 4.2, Optical, and more for seamless device integration.
Cons
- No Wi-Fi Connectivity: Limits smart features and app control.
- No DTS-X Support: May not be ideal for users who prefer DTS formats.
- Size and Placement: The subwoofer is relatively large, requiring careful placement.
- Sound Mode Limitations: Some users may find the pre-set modes insufficient for specific audio preferences.
Overall, the Hisense Soundbar with wireless subwoofer HS312 offers excellent value for money, providing a cinematic experience that rivals more expensive alternatives. However, it may not be the best choice for those requiring advanced smart features or specific audio formats.
Customer Reviews and Feedback
Users have praised the HS312 for its impressive sound quality and ease of setup. Many appreciate the immersive Dolby Atmos experience, which enhances movie nights and gaming sessions. However, some users mention that the subwoofer can be a bit large and may require careful placement to avoid clutter.
Common praises include the powerful bass and clear dialogue, while complaints often revolve around the lack of Wi-Fi connectivity and limited smart features. Overall, the Hisense HS312 is well-regarded for its performance and value.
Star ratings typically range from 4 to 5 stars, with many users recommending it for its balanced sound quality and affordability. If you're looking for a budget-friendly soundbar that delivers a cinematic experience, the HS312 is a solid choice.
Faqs
How do I set up the hisense Soundbar with wireless subwoofer HS312 for the first time?
What should I do if the wireless subwoofer of my hisense Soundbar HS312 is not connecting?
Can I adjust the bass and treble settings on the hisense Soundbar with wireless subwoofer HS312?
Is the hisense Soundbar with wireless subwoofer HS312 compatible with Bluetooth devices?
How do I switch input sources on the hisense Soundbar with wireless subwoofer HS312?
What are the recommended maintenance tips for the hisense Soundbar with wireless subwoofer HS312?
Why does my hisense Soundbar with wireless subwoofer HS312 have no sound when connected via HDMI ARC?
How can I optimize surround sound performance on the hisense Soundbar with wireless subwoofer HS312?
More hisense manuals
- Setup & Features : Hisense Portable Air Conditione Instruction Manual
- Hisense R6 Series Roku TV 55R6090G | Specs & Features
- Setup & Features: Hisense U5120GW+ 7.1.2Ch Soundbar with Wireless Subwoofer User Manual
- How to Connect: Hisense HDR Smart TV 65Q9G Setup Guide
- Setup & Features: Hisense HS218 2.1ch Soundbar with Wireless Subwoofer User Manual
- Setup & Features: Hisense HWF3S8514 Series 3 8.5kg Front Load Washer User Manual
Leave a Comment