How to Connect: Hisense HDR Smart TV 65Q9G Setup Guide
Content
Introduction of Hisense HDR Smart TV 65Q9G
Hisense, a leading electronics brand, has launched its latest Hisense HDR Smart TV, the 65Q9G. This TV is designed to provide an immersive and cinematic viewing experience, thanks to its 65-inch 4K ULED display and powerful image processing technology. The 65Q9G is priced at around $1,999 and is now available for purchase in electronics stores and online marketplaces.
What's in the box
Your Hisense TV comes with the following items
- TV
- power cord
- remote control
- 2 base stands
- Quick Setup Guide (this document)
- 1 set of AAA batteries
- Important Safety Information and Warranty Card
- 4 screws (M5×16)
IMPORTANT: To prevent accidentally discarding items that came with your TV, be sure to check ALL of the foam in the carton box. Please check foam for accessories before discarding.
You will also need the following items (which are not included) to set up your TV:
- Wireless router (not included) for Internet connectivity
- Phillips screwdriver (not included) to secure the TV stand
- HDMI and other types of cables (not included) to connect external devices to the TV
- Wall mount bracket (not included) if you prefer to mount the TV on the wall
Product Specifications
| Specification | 55H9G / 55Q9G | 65H9G / 65Q9G |
|---|---|---|
| Dimension (W x H x D) | ||
| Without Stand | 48.5 x 28.2 x 3.9 inches (1232 x 717 x 98 mm) | 57.1 x 33.1 x 4.1 inches (1450 x 840 x 104 mm) |
| With Stand | 48.5 x 30.7 x 10.2 inches (1232 x 779 x 260 mm) | 57.1 x 35.6 x 13.6 inches (1450 x 903 x 345 mm) |
| Weight | ||
| Without Stand | 38.1 lbs (17.3 kg) | 52.7 lbs (23.9 kg) |
| With Stand | 39.2 lbs (17.8 kg) | 55.3 lbs (25.1 kg) |
| TV Stand Width (W x D) | 28.4 x 10.2 inches (721 x 260 mm) | 35.4 x 13.6 inches (898 x 345 mm) |
| Class | 55" | 65" |
| Active Screen Size (Diagonal) | 54.6 inches | 64.5 inches |
| Screen Resolution | 3840 x 2160 | 3840 x 2160 |
| Audio Power | 10 W + 10 W | 300 W |
| Power Consumption | 240 W | 300 W |
| Power Supply | 120 V – 60 Hz | 120 V – 60 Hz |
| Connectivity | ||
| Ports | 4 HDMI ports, 2 USB ports, 1 LAN port for Ethernet, 1 Digital Audio Out, 1 RF Input, 1 Headphone Audio Output, 1 RCA Composite Video Input, 1 left/right Audio Input for Composite | |
| Receiving Channels | VHF: 2 - 13, UHF: 14 - 69, CATV: 1 - 135 | VHF: 2 - 13, UHF: 14 - 69, CATV: 1 - 135 |
| Tuner Type | Frequency synthesized | Frequency synthesized |
| Receiving System | Analog: NTSC, Digital: ATSC/QAM | Analog: NTSC, Digital: ATSC/QAM |
| Operating Temperature | 41°F - 95°F (5°C - 35°C) | 41°F - 95°F (5°C - 35°C) |
| Operating Humidity | 20% to 80%, non-condensing | 20% to 80%, non-condensing |
| Storage Temperature | 5°F to 113°F (-15°C to 45°C) | 5°F to 113°F (-15°C to 45°C) |
| Storage Humidity | 10% to 70%, non-condensing | 10% to 70%, non-condensing |
Hisense HDR Smart TV 65Q9G Getting started
Attach stand or mount
Before you start using your TV, attach your TV stand or mount it on the wall.
CAUTION
- Disconnect the A/C power cord before installing a stand or a wall mount bracket.
- The LED display on your TV is fragile. Make sure the TV screen is not scratched or damaged by hard objects or from pressure.
- After the installation is complete, make sure the TV is steady on a table or firmly attached to a wall mount, before removing all protective film, if any.
Attach the TV stand
To attach the TV stand legs to your TV
- Carefully place your TV face down on a clean, soft and flat surface.
- Insert the TV base stands into the bottom slots on your TV.
Use the screws provided to secure each leg tightly.

Attach the wall mount bracket
(not included)
Before you begin the third-party manufacturer instructions, be sure to do the following things:
- Place the TV face down on a clean, safe and cushioned surface.
- Remove the TV stand if you have already attached it.
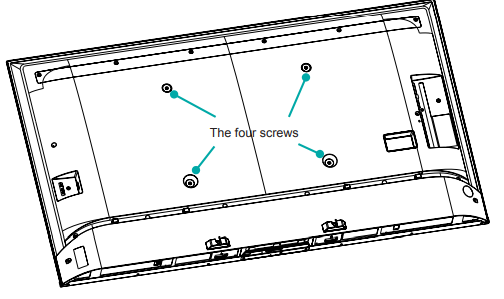
Remove the four screws on the back of the TV.
Place spacers (not included) in the corresponding bracket holes.
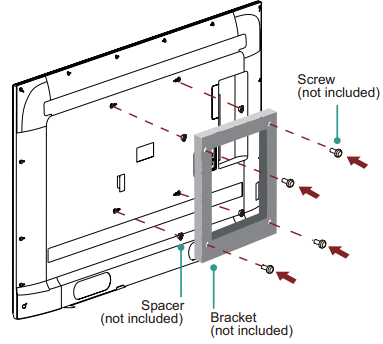
CAUTION
- When you attach the mount, be sure to use spacers (provided by the third-party manufacturer) between the TV and the bracket.
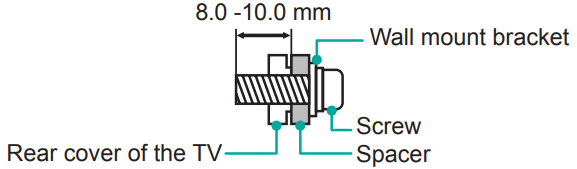
To prevent internal damage to the TV and to ensure it is mounted securely, be sure to use fixing screws (not included) that are 8.0 - 10.0 mm in length when measured from the attaching surface of the rear cover.
- Wall mount hole pattern (mm)
- 400 × 300 (55")
- 400 × 400 (65")
- Wall mount screw size (mm)
- M6
- Wall mount hole pattern (mm)
Follow instructions provided with the wall mount bracket.
- To complete the installation, please contact the wall mount manufacturer or the retailer from which you purchased the TV.
- The selected screws are 8.0 - 10.0 mm in length when measured from the attaching surface of the rear cover.
NOTE: The diameter and length of the screws differ depending on the wall mount bracket model.
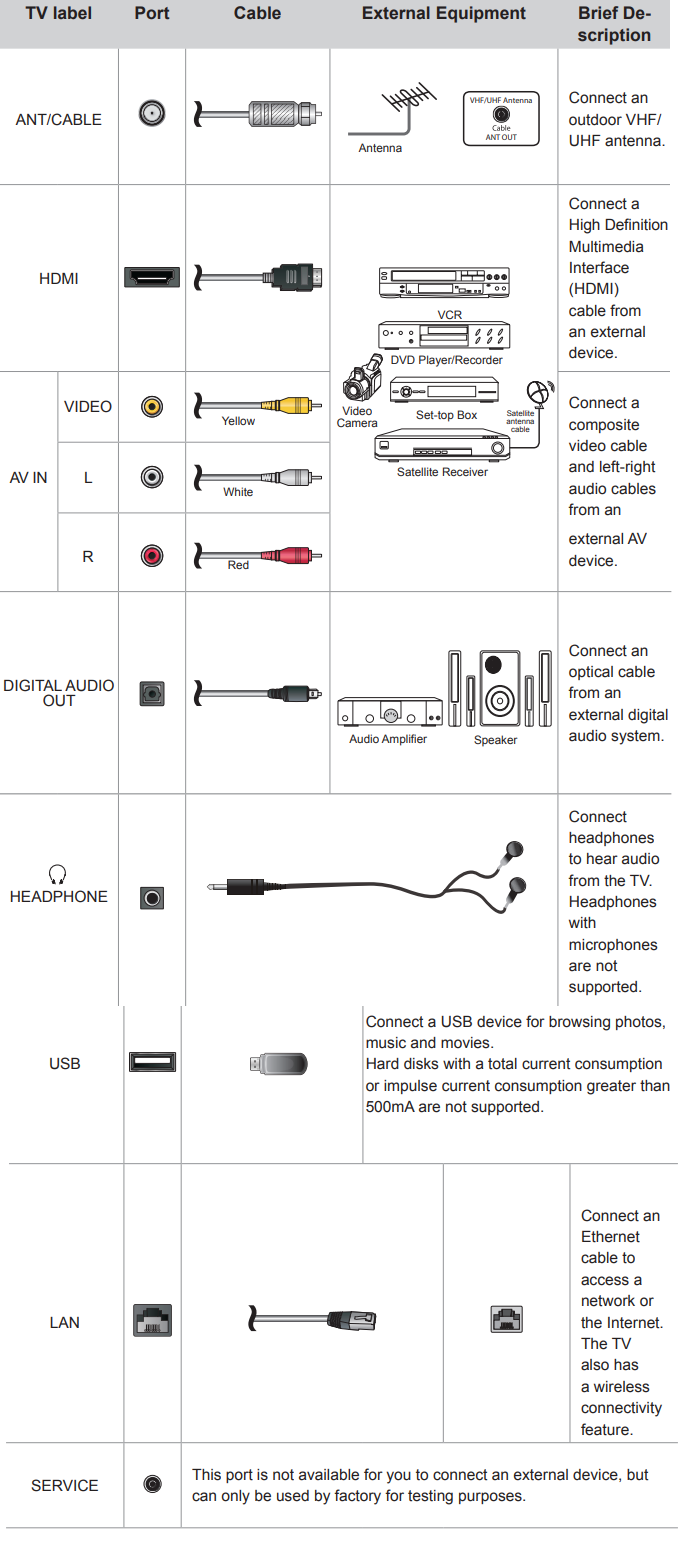
Connect devices to your TV
Check to ensure that you have connected right cables for right ports securely. Loose connections can affect the quality of the picture image and color.

Description of Hisense HDR Smart TV 65Q9G
The 65Q9G features a 65-inch 4K ULED panel with HDR10, Dolby Vision, and HLG support. It has a peak brightness of 2,500 nits, which ensures that highlights and bright scenes are displayed with stunning clarity and detail. The TV also supports a wide color gamut, delivering vibrant and lifelike colors. The 65Q9G runs on Hisense's VIDAA U5 smart TV platform, which provides access to popular streaming services such as Netflix, Amazon Prime Video, and Hulu. The TV also features built-in Bluetooth and Wi-Fi connectivity, allowing users to connect wireless headphones, sound bars, and other devices.
Get your remote ready
The following table shows the buttons on your remote control and describes what they are for.
| Button | Description |
|---|---|
| Power on/off (Red/Green/Yellow/Blue) | Special function buttons |
| INPUT | Change TV input source |
| Number | Enter Channels/input numbers |
| Google Assistant of TV | |
| CC | Turn Closed Caption On/Off and turn Closed Caption on when mute |
| TV | Return to the previous source |
| Menu | The button for the Menu |
| ˄ / ˅ / ˂ / ˃ | D-pad (up/down/left/right navigation buttons) |
| OK | Confirmation button |
| Return to the previous place in the menu or app | |
| Display the Home screen | |
| + VOL - | Volume (up/down) |
| ˄ CH ˅ | Channel (up/down) |
| Mute and restore sound | |
| MTS | Set the audio language (MTS) |
| Media content control function buttons | |
| NRT | Choose to leave the Video description feature On or Off |
| APPS | Quick access to all applications |
| Microphone | |
| App | Quick access buttons to apps Select a digital sub-channel |
NOTE: Buttons listed here are for reference only. Actual remote control models may vary.
Insert the batteries
- Take off the back cover to open the battery compartment of the remote control.
- Insert two AAA size batteries. Make sure to match the (+) and (-) ends of the batteries with the (+) and (-) ends indicated in the battery compartment.
- Restore the battery compartment cover.
Important Information about the remote and batteries
- Discard batteries in a designated disposal area. Do not throw them into a fire.
- Remove old batteries immediately to prevent them from leaking into the battery compartment.
- If you do not intend to use the remote control for a long time, then remove the batteries.
- Battery chemicals can cause a rash. If the batteries leak, clean the battery compartment with a cloth. If chemicals touch your skin then wash it immediately.
- Do not mix old and new batteries.
- Do not mix alkaline, standard (carbon-zinc) or rechargeable (NiCd, NiMH, etc.) batteries.
- Do not continue using the remote if it gets warm or hot.
- Call our Support Center immediately on the support website.
Remote Control Range Information
- The remote control can work at a distance of up to 26 feet in front of the TV set.
- It can work at a 30 degree horizontal or vertical angle.
Program Your Universal Cable or Satellite Remote Control to Operate Your New Television (only for USA) If you would like to program your other household remote controls to your new television, please refer to the User Manual supplied by your Cable or Satellite provider.
It should include instructions on how to program their remote to your television. A list of codes for the most common Cable and Satellite providers are listed below. Use the code that is associated with your Cable or Satellite provider (if applicable).
- DIRECTV.....0178, 10178, 10019, 10748, 11314, 11660, 11710, 11780, 12049, 10171, 11204, 11326, 11517, 11564, 11641, 11963, 12002, 12183
- Time Warner Cable.....386, 0178, 10178, 400, 450, 461, 456, 0748, 1463, 0463, 10463
- Comcast.....0178, 10178, 10463, 11463, 10748, 11314, 11660, 10171, 11204, 11326, 11517, 11641, 11780, 11785, 11892, 11963, 12002
- Cox Communications.....0178, 10178, 1326, 1463
- Dish Network.....505, 627, 538, 720, 659
If the code associated with your Cable or Satellite provider is not listed, does not work or you cannot locate the instructions to program your remote, call your local Cable or Satellite provider’s customer service center. If your Cable or Satellite provider does not have a code available, please contact us at one of the phone numbers. Using Your Cable Set-top Box or Satellite Receiver Remote as a ‘Universal’ Remote If you prefer to use your Cable Set-top Box or Satellite Receiver Remote as a ‘Universal’ Remote, then visit the Support page to view a list of the codes.
Pairing the remote control
- Pair the remote to the TV after you power it on. Keep the remote control within 10 feet from the TV. Press and hold the [ ] button at least 3 seconds to start pairing.
- If the remote pairs successfully, a confirmation will display on the screen. If it does not pair successfully, an unsuccessful message will display. Repeat step 1.
NOTE
- If an unknown error occurs with the remote, it could have been caused by interference. Try to remove what's causing the interference and pair the remote again.
- If an unknown error occurs with the remote control while the battery power is normal, you can take out the batteries and press any key for 1~2 seconds, and the remote control can work normally.
- The remote cannot be paired to the TV while the TV is in the standby mode.
Power on the TV
Connect your power cord to the TV and plug it into a power outlet. Your TV will display a launch screen showing the Hisense logo.
Complete the first-time setup
The first time you turn on your TV, there is a guided setup to make it easy to connect your TV to the Internet and complete the setup of your TV.
Establish a network connection
- Press the Home button on the remote control, and select the icon to select Settings to enter the Settings menu.
Select Network & Internet.
Smart TV 65Q9G Setup Guide
Setting up the Hisense 65Q9G is a straightforward process. First, unbox the TV and attach the stand to the base. Then, connect the power cable and plug it into a power outlet. Turn on the TV and follow the on-screen instructions to connect to your home network and set up your preferred settings. If you want to use the smart TV features, you will need to sign in to your VIDAA U5 account or create a new one. You can also connect your cable or satellite box, Blu-ray player, or gaming console to the TV's HDMI ports.
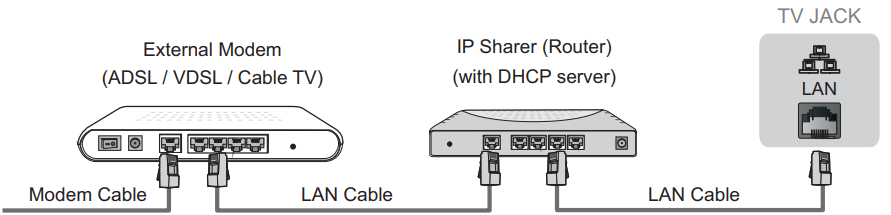
Establish a wired network connection
Automatically obtain an IP address
- If you connect to the wired network, the TV will automatically obtain an IP address and connect to the network.
NOTE: The default option of IP Settings Mode is DHCP. - If the connection fails, “Not Connected” will display for the Ethernet status. Retry or enter the IP settings, and select Static to input the information again.
Manually enter the IP address
- Enter the IP settings to select Static.
- Enter the IP address, Gateway, Network prefix length, DNS 1 and DNS 2 in the menu.
Establish a wireless network connection

The TV can directly receive network signals via wireless router.
- Turn on your Wi-Fi.
- The list of networks will display automatically.
- Select a wireless network from the list, input the password.
- If the network connection does not appear in the list, select See all to display all the list, or select Add new network to input a Wi-Fi name, select the type of security mode, and enter password.
Close the network connection
Unplug the network cable or turn off your Wi-Fi. The network connection will close.
Enjoy your TV!
- Now that you’ve completed the first-time setup, your Home screen is your starting point for using your TV. Your Hisense TV provides a variety of entertainment options, so you’ll always find something new.
- Use your TV to watch live channels, access video on demand to watch movies, and much more.
- Press the Home button on your remote to get started.
Text-to-Speech(TTS) and Video Description functionalities on TV
Text-to-Speech (TTS) and Video Description can help you to navigate the menus on the screen and hear an audio description of relevant programs. Text-to-Speech can convert written text into voice text to help visually impaired people listen to the information they are unable to read. In addition, the Video Description has an audio narration added to certain programs that will describe the main visual elements which visually impaired users may not be able to see.
Follow the steps below to enable the functions
- Press the ‘MENU’' button to access the Menu.
- Next, select Settings to enter the Device Preferences menu.
- Select Accessibility > TalkBack or Video Description to turn the Menu Audio or Video Description on or off by selecting the appropriate choice that is presented.
NOTE: TalkBack is enabled by selecting the checkbox. Video Description is enabled by selecting the Toggle button. https://www.hisense-usa.com/text-to-speech-hisense-android-tvs
Troubleshooting of Hisense HDR Smart TV 65Q9G
If you are having trouble with your TV, first try turning it off and on again. If this does not fix the problem, check the tips in the following table.
| Issues | Possible Solutions |
|---|---|
| No sound or picture | • Check if the power cord is plugged into a powered AC outlet. • Press the Power button on the remote control to activate the unit from 'Standby' mode. • Check to see if the LED light is on or not. If it is, then the TV is receiving power. |
| I have connected an external source to my TV and I get no picture and/or sound. | • Check for the correct output connection on the external source. • Check for the correct input connection on the TV. • Make sure you have made the correct selection for the input mode for the incoming signal. |
| When I turn on my TV, there is a delay for a few seconds before the picture appears. Is this normal? | • Yes, this is normal. The TV is initializing and searching for previous setting information. |
| The picture is normal but there is no sound. | • Check the volume settings. • Check if 'Mute' mode is set to On. • If the picture is black and white, unplug the TV from the AC outlet and replug it after 60 seconds. • Check that the Color is set to 50 or higher. • Try different TV channels. |
| Sound but no picture or black and white picture | • An electronic appliance may be affecting the TV. Turn off any appliances that are nearby and move it farther away from the TV. • Insert the power plug of the TV set into another power outlet. |
| The sound and/or picture is distorted or appears wavy | • If using an external antenna, check the direction, position and connection of the antenna. • Adjust the direction of your antenna or reset or fine-tune the channel. |
| The sound and picture is blurry or cuts out | • Check if there is an appliance or electric tool nearby that is causing interference. |
| A horizontal or vertical stripe appears on the picture and/or the picture is shaking | • Check if there is an appliance or electric tool nearby that is causing interference. |
| The plastic cabinet makes a "clicking" type of sound | • The 'click' sound can occur when the temperature of the television changes. This change causes the television cabinet to expand or contract, which makes the sound. This is normal and the TV is OK. |
| The remote control does not work | • Confirm that TV still has power and is operational. • Change the batteries in the remote control. • Check if the batteries are correctly installed. |
Smart TV 65Q9G Pros & Cons
Pros
- Stunning 4K ULED display with HDR support
- Powerful image processing technology
- Smart TV platform with access to popular streaming services
- Built-in Bluetooth and Wi-Fi connectivity
- Reasonable price point
Cons
- Limited app selection compared to other smart TV platforms
- No voice control feature
- No built-in tuner for over-the-air broadcasts
- No Dolby Atmos support
Customer Reviews about Hisense HDR Smart TV 65Q9G
Customers who have purchased the Hisense 65Q9G have praised its stunning display, powerful image processing, and smart TV features. However, some have criticized its limited app selection and lack of voice control feature. The most common complaint is the absence of a built-in tuner for over-the-air broadcasts, which may be a deal-breaker for some users. Overall, the Hisense 65Q9G is a great value for its price point and provides an excellent viewing experience for movies, TV shows, and gaming.
Faqs
What kind of display technology is employed by the 65Q9G Hisense HDR Smart TV?
Is high dynamic range content supported by the Hisense HDR Smart TV 65Q9G?
What clever features is the Hisense HDR Smart TV 65Q9G equipped with?
Which kinds of inputs is the 65Q9G equipped with?
Is voice assistant compatibility available for the Hisense HDR Smart TV 65Q9G?
How is the 65Q9G HDR Smart TV configured?
What is the Hisense Hisense HDR Smart TV 65Q9G refresh rate?
How should the Hisense HDR Smart TV 65Q9G screen be clean?
How can I solve the problem of the Hisense HDR Smart TV 65Q9G not turning on?
Which warranty is available for the HDR Smart TV?
Leave a Comment