Honnek Stein Indoor Security Camera QC21SE User Guide | Installation

Content
Introducing the Honnek Stein Indoor Security Camera QC21SE
The Honnek Stein Indoor Security Camera QC21SE is a powerful and versatile home security solution that offers high-quality video recording, motion detection, and two-way audio communication. With a sleek and compact design, this camera is perfect for monitoring any room in your home or office. The estimated price of the QC21SE is $79.99, and it is now available for purchase.
Honnek Package list
Camera Xl,
USB Power Cord Xl, Power
Adapter Xl,
Screw Kit Xl,
Mounting Bracket X1,
User Manual X1

Detailed Specifications
- 1080p full HD video recording
- 110° wide-angle lens
- Night vision up to 32 feet
- Motion detection with adjustable sensitivity
- Two-way audio communication
- Secure local storage with microSD card slot
- Wi-Fi connectivity
- Compact and discreet design
Camera Information Security Camera QC21SE
Note: Please don’t force the camera to turn around manually
Light Sensor
Lens
Microphone
TF Card Slot
Speaker
Reset Button
Power Interface
Product Installation
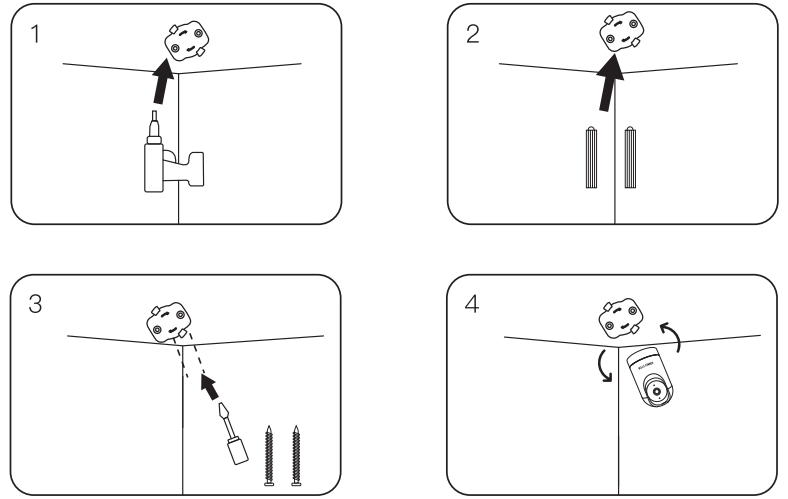
Place the mounting bracket on the wall before punching, mark it with a marker pen, then punch the hole
Insert the plastic anchor into the hole
Install the mounting bracket to the wall with a screwdriver and screws
Finally, install the camera on the wall with a mounting bracket
Note: upside-down and normal direction both methods are supported in the aspect of the installation
Basic Parameters of Honnek Stein Indoor Security Camera QC21SE
Product Name: Indoor Security Camera
Product Model: QC21SE
Video Resolution: 2.0MP,1920*1080
Video Coding-Decoding Technology: H.264
Image Enhancement: Digital Wide Dynamic, 3D Noise
Storage: TF Card/Cloud Storage
Wireless Encryption: WEP / WPA / WPA2
Power Input: 5V =1A(Min)
Total Power Consumption: 5W (Max)
Wireless Standard: 2.4G 802.11 b/g/n
Compatible System: Android/IOS
Note
To reset the camera: Long press the reset button for about 5 seconds when reconnecting the camera. There will prompt tone when resetting successfully
Please insert a TF card with the speed of class 10 or above, or it may cause storage abnormalities. The video files in the TF card will be overwritten cyclically when storage is full
In order to protect users’ privacy, the stored data will be encrypted. It can avoid video leakage, even if the TF card was lost accidentally.
(Note: The storage data on the TF card of the device can’t be copied to the computer for review)
Install the App
Scan the QR code below to download and install the App
Or search the App name of·smart Life” in App Store or Google Play to download

Scan QR Code Mode
- Make sure Wi-Fi is available and connected to the Internet.
- Connect the camera to the power, then system startup completed.
Open "Smart Life" APP, press the"+" in the upper right comer of the main screen (Figure 01 ); choose"Security & Sensor", click "Smart Camera" (Figure 02) to add camera; and then click "Next step" (Figure 03).

- Make sure Wi-Fi is available and connected to the Internet.
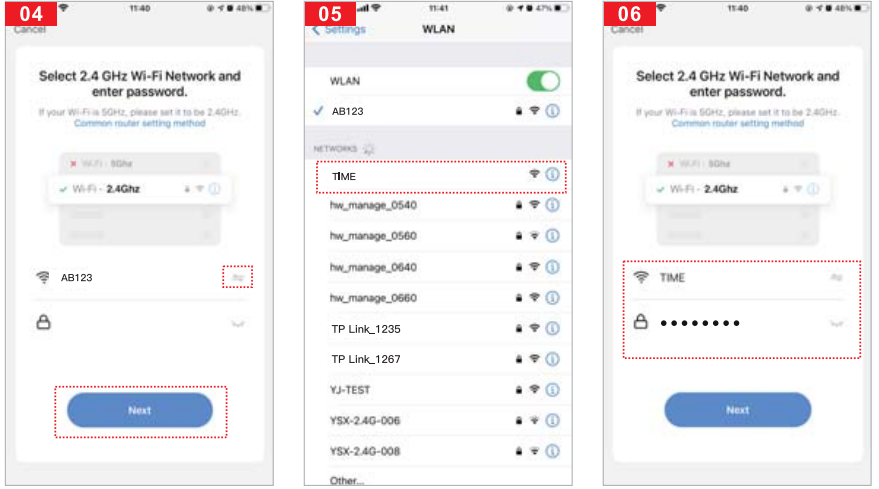
- It will jump to the WLAN interface and connects Wi-Fi (Figure 05). Please note that only 2.4 GH Wi-Fi network is supported.
If the phone is connected to Wi-Fi (Figure 06).
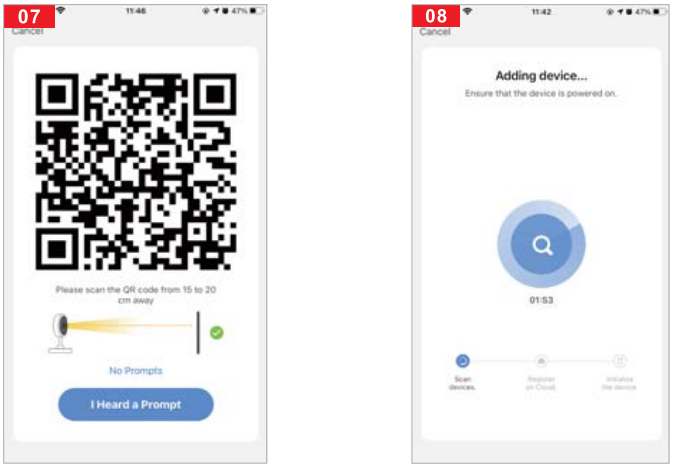
- A QR code will prompt on your screen and you need to scan it with the Smart Camera, (the camera is about 20-30 cm away from the mobile phone lens). Then click"I Hear a Prompt "when you hear the tone (Figure.07).
"Connecting" (Figure 08).

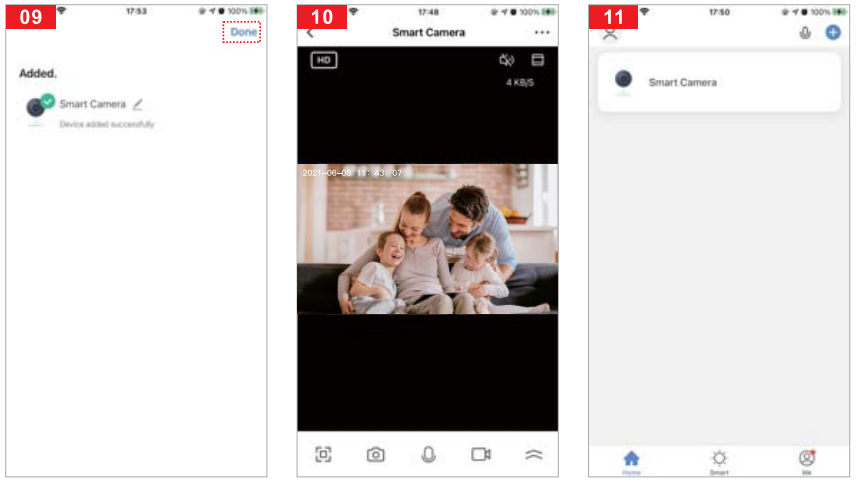
- Connection completed(Figure 09), and click "Done".
- Then jump to preview interface (Figure 1 0).
After closing the device preview interface, the interface returns to the APP home page. At this time, the connected device will appear on the APP home page (Figure 11 ). Then you can click directly to the device interface to see the monitoring situation without readding afterwards.
Add The Device-AP Mode
If you want to use AP Mode,press the reset button on the machine.
- Make sure Wi-Fi is available and connected to the Internet.
- Connect the camera to the power, system startup completed.
Open"Smart Life" APP, press the"+" in the upper right comer of the main screen (Figure 12); choose "Security & Sensor", click "Smart Camera" (Figure 13) to add camera ; Alternatively, choose "QR Code" to add (as shown in Figure 14).
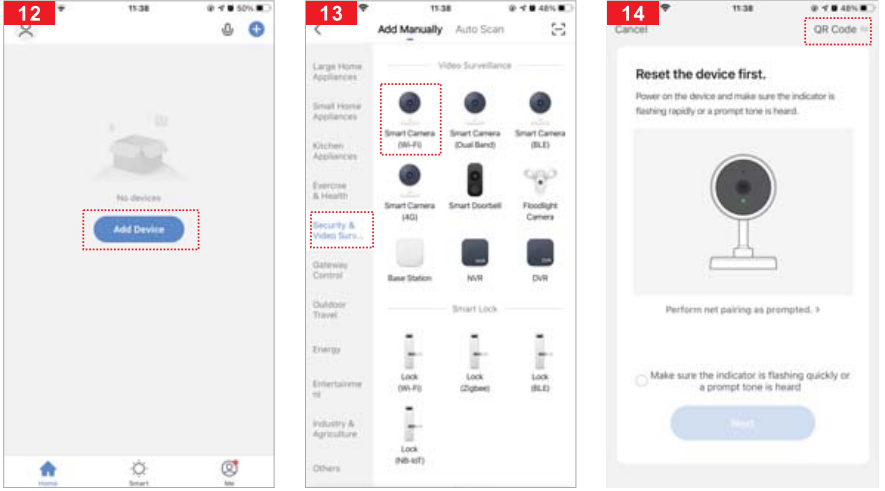
Note: Before using the"AP Mode",you need to switch to"AP Mode" by lightly pressing the"Reset key" of the device.
- Then click"AP Mode" (Figure 15.)
- Switch to"AP Mode", click"Next" (Figure 16).
Select the 2.4GHz Wi-Fi network and enter the password, click" "(Figure 17), if it is already a 2.4GHz network, click"Next"(skip to Figure 20).
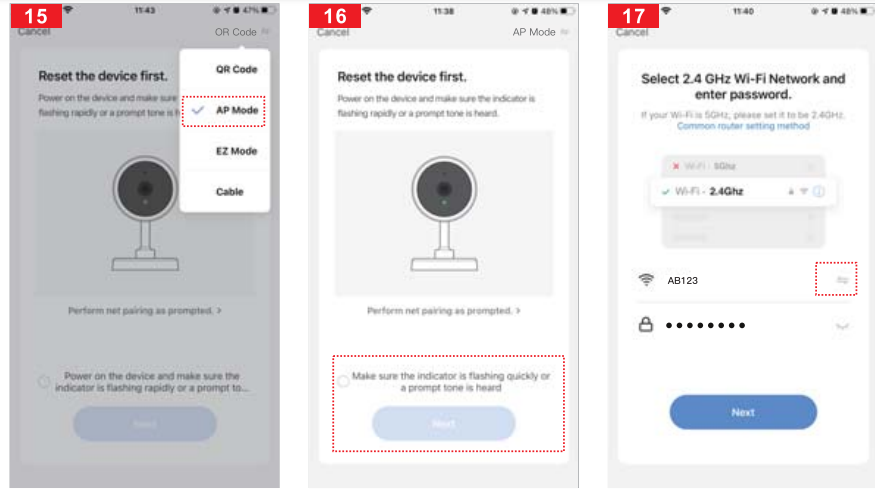
- Then select a 2.4GHz WiFi and enter the password to complete the connection (Figure 18).
- Click Back and return to the APP compatible mode interface, where the Wi-Fi name and the connected Wi-Fi name are displayed Password, click the "Next" button (Figure 19).
The page jumps to where the interface prompts "Wi-fl" to connect to the device hotspot and clicks "Connect" (Figure 20) .
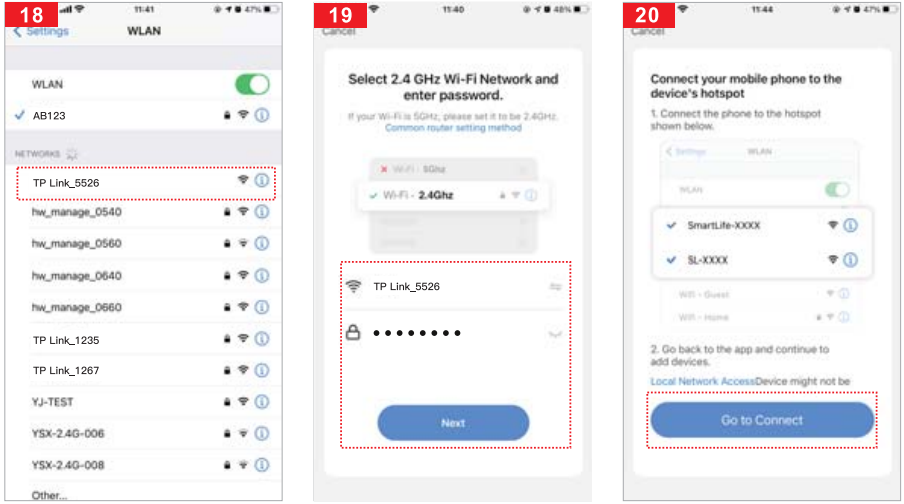
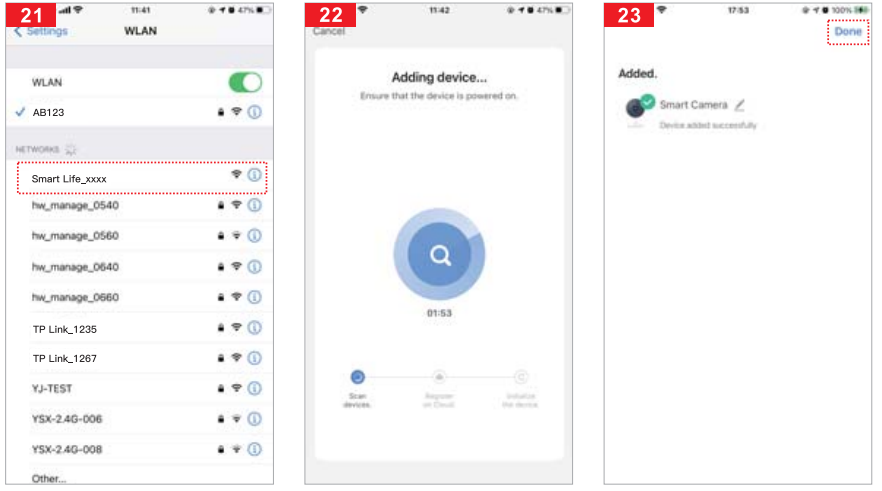
- The interface jumps to the WALN connection interface, finds the Wi-Fi at the beginning of "Smart Life_xxxx", and clicks on the connection (Figure 21 ).
- When the connection is completed, click back and return to the APP interface, at which time the APP display device is connected (Figure 22).
At this time, the device has been successfully connected; the interface jumps to "Device added successfully" (Figure 23).
- Then click"connected", it will jump to the Preview Interface of the Device (Figure 24).
Close the device preview interface and the interface returns to the APP home page, at which point the connected device will appear on the APP home page(Figure. 25), After entering the device interface to view, no need to readd, click directly into the device interface to view.
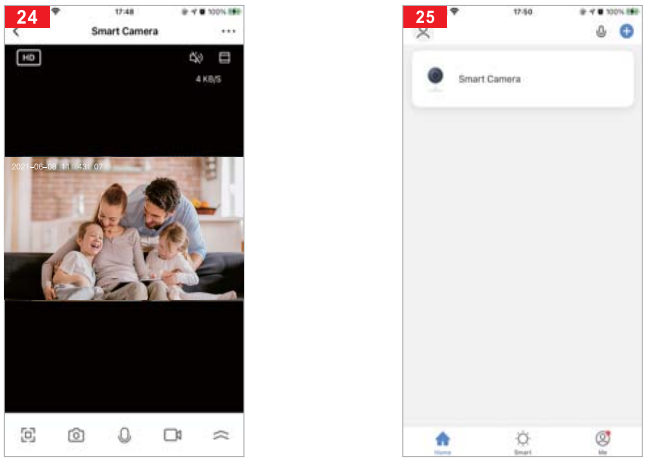
App Video Interface Information
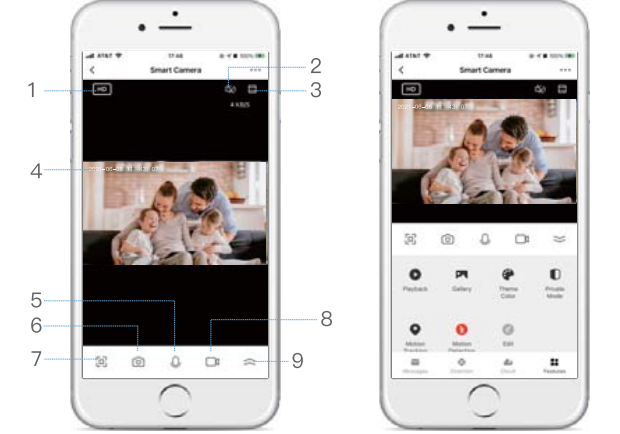
Preview Mode
Voice
Long Screen
Time
Microphone
Picture
Full Screen
Video
More
Matters Need Attention
- Try to keep away from the metal space.
- Avoid the furniture ,microwave oven blocked.
- Avoid the space where the audio, video and data lines are wound, and keep the space away from them as large as possible.
- Ensure that as close as possible to the coverage ofwireless Wi-Fi signals. Switching network environment.
- In the new network environment, please press the reset hole about 5 seconds, then connectto the network.
The Name and Content of Hazardous Substance in the Product
| Part Name | Hazardous Substance | |||||
| Pb | Hg | Cd | Cr(vl) | PBB | PBDE | |
| Shell | Ο | Ο | Ο | Ο | Ο | Ο |
| Board | Χ | Ο | Ο | Ο | Ο | Ο |
| Charger | Ο | Ο | Ο | Ο | Ο | Ο |
| Annex | Ο | Ο | Ο | Ο | Ο | Ο |
| This form is based on the provisions of SJfT 11364 。 | ||||||
Honnek Description
The Honnek Stein Indoor Security Camera QC21SE is a feature-rich home security solution that offers crystal-clear 1080p video recording, a wide-angle lens, and night vision up to 32 feet. With motion detection and adjustable sensitivity, you can ensure that you are alerted to any movement in your home or office. The two-way audio communication feature allows you to speak with anyone in the room, making it perfect for checking in on children or pets. The camera also features secure local storage with a microSD card slot, so you can rest assured that your footage is safe and secure.
Setup Guide
Setting up the Honnek Stein Indoor Security Camera QC21SE is easy and straightforward. Simply download the Honnek app, create an account, and follow the on-screen instructions to connect the camera to your Wi-Fi network. Once connected, you can adjust the camera's settings, including motion detection sensitivity and video quality, to suit your needs.
Honnek Stein Indoor Troubleshooting
If you encounter any issues with your Honnek Stein Indoor Security Camera QC21SE, consult the following troubleshooting steps:
- Make sure the camera is properly plugged in and connected to Wi-Fi.
- Check that the camera's lens is clean and unobstructed.
- Ensure that the camera's firmware is up to date.
- If the camera is not responding, try resetting it to its factory settings.
Pros & Cons
- Pros
- High-quality video recording
- Motion detection and adjustable sensitivity
- Two-way audio communication
- Secure local storage
- Compact and discreet design
- Cons
- No cloud storage option
- No zoom function
Customer Reviews about Security Camera QC21SE
"The Honnek Stein Indoor Security Camera QC21SE is a fantastic home security solution. The video quality is excellent, and the motion detection feature is very useful. I appreciate the local storage option, as it gives me peace of mind that my footage is secure. I highly recommend this camera to anyone looking for a reliable and affordable home security solution." - John D.
"I have been using the Honnek Stein Indoor Security Camera QC21SE for a few weeks now, and I am very impressed. The setup was easy, and the video quality is great. The two-way audio feature is a nice touch, and the motion detection sensitivity is adjustable, which is a great feature. I would definitely recommend this camera to others." - Sarah K.
Common complaints include the lack of cloud storage and the inability to zoom in on footage.
Faqs
How do I begin setting up my Honnek Stein Indoor Security Camera QC21SE?
What do I need to connect my Honnek Stein Indoor Security Camera QC21SE to my home WiFi?
Where is the optimal placement for the Honnek Stein Indoor Security Camera QC21SE?
How can I mount the Honnek Stein Indoor Security Camera QC21SE on the wall?
What steps should I take if my Honnek Stein Indoor Security Camera QC21SE is not sending notifications?
How can I share the Honnek Stein Indoor Security Camera QC21SE feed with my family members?
What should I do if the Honnek Stein Indoor Security Camera QC21SE live feed is blurry?
Can I integrate the Honnek Stein Indoor Security Camera QC21SE with smart home systems?
What do I do if the Honnek Stein Indoor Security Camera QC21SE is not recording events?
How do I access recorded footage on the Honnek Stein Indoor Security Camera QC21SE?
Leave a Comment