Setup Guide: Hoover FloorMate 500 Hard Floor Cleaner
Content
Introduction of Hoover FloorMate 500
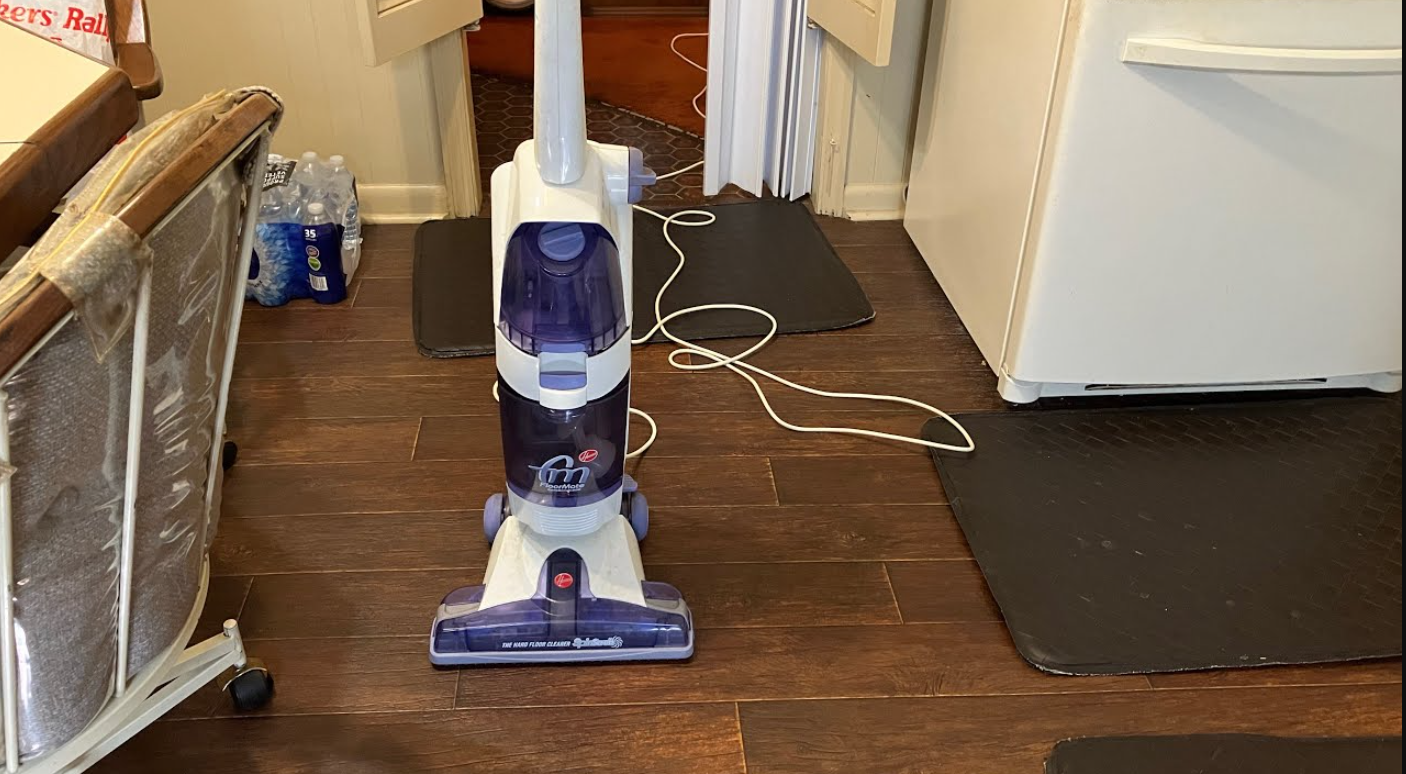
Say goodbye to back-breaking mopping and hello to the Hoover FloorMate 500 ! This versatile cleaning machine is designed to tackle all your hard floor surfaces, from tile and vinyl to hardwood and laminate. With its powerful spinning brushes and advanced water control system, the Hoover FloorMate Hard Floor Cleaner leaves your floors clean, dry, and streak-free. Priced around $149.99, this product is a game-changer for anyone looking to save time and effort on their floor cleaning routine. Launching in early 2023, the Hard Floor Cleaner is the perfect addition to your home cleaning arsenal.
Detailed Specifications of Hard Floor Cleaner
The Hoover FloorMate 500 Hard Floor Cleaner boasts several impressive features, including:
- SpinScrub Brushes: Three spinning brushes that loosen and lift dirt and grime from your floors, without damaging delicate surfaces.
- Advanced Water Control System: Allows you to easily switch between cleaning with water and detergent, and rinsing with clean water.
- Dual Tank System: Separates clean and dirty water, so you can always use clean water for cleaning.
- 20-Foot Cord: Provides ample reach for cleaning large areas without having to switch outlets.
- Lightweight Design: Weighing only 12.5 pounds, the FloorMate 500 is easy to maneuver and carry.
Description of FloorMate 500 Hard Floor Cleaner
The FloorMate 500 Hard Floor Cleaner is a revolutionary cleaning machine that makes mopping a thing of the past. Its spinning brushes and advanced water control system make it easy to clean all your hard floor surfaces, leaving them looking like new. Simply fill the clean water tank with water and detergent, select your cleaning mode, and let the FloorMate 500 do the rest. The dual tank system keeps clean and dirty water separate, so you can always use fresh water for cleaning. Plus, its lightweight design and 20-foot cord make it easy to move around your home.This cleaner is intended for household use. Operate cleaner only at voltage speci-fied on data plate on back of cleaner. Plug cleaner into a properly grounded outlet.
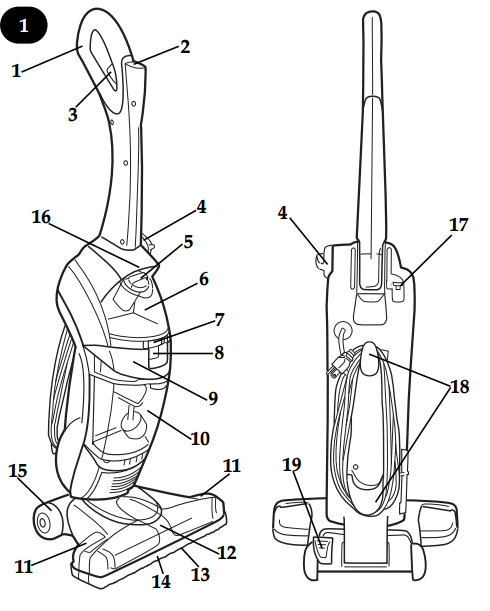
Features of FloorMate 500 Hard
- Soft hand grip
- ON/OFF switch
- Solution trigger: squeeze to release cleaning solution
- Mode selector dial: turns brushes ON for wet cleaning and OFF for wet pickup and dry vacuuming
- Clean solution tank cap/measuring cup
- Clean solution tank
- Clean solution tank release
- Recovery tank release
- Recovery tank lid and filter
- Recovery tank: collects dry debris as well as dirty cleaning solution
- Nozzle release buttons: release nozzle for easy clean-up (located behind nozzle)
- Nozzle
- Squeegee (underneath nozzle)
- Bumper
- Soft-tread wheels
- Carrying handle
- Upper handle release button
- Cord hooks: top hook rotates for quick cord release
- Handle release pedal
Assemble the handle Of Hoover FloorMate
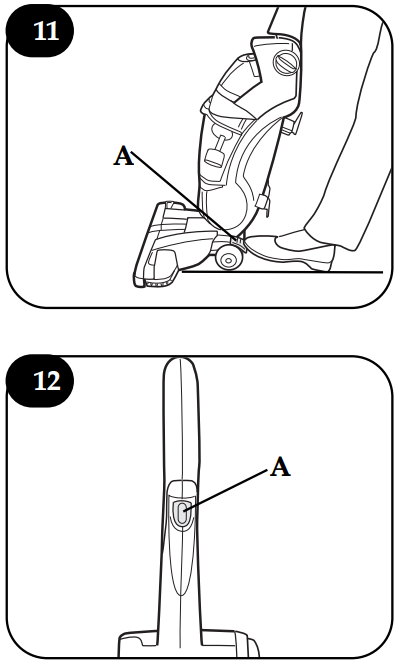
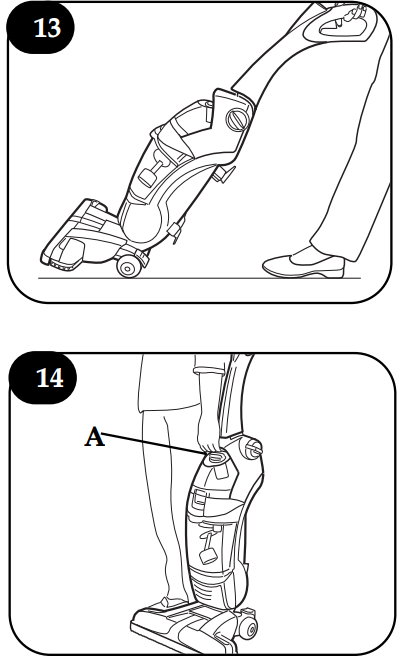
- Rotate bottom handle support (A) up to the upright position until asnap is felt.
Align control rod (B) on upper han-dle (C) with slot in bottom handle support (D).
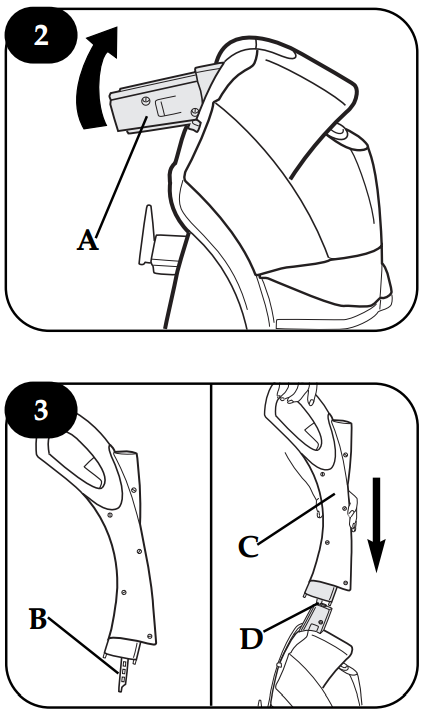
- Push upper handle (C) down until it is snapped in place.
Install brushes and nozzle
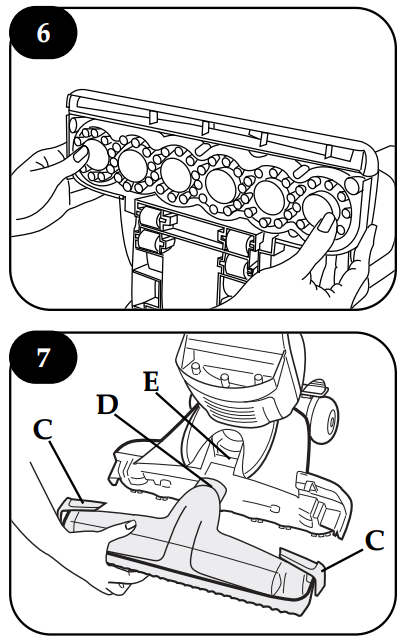
To install brushes, place handle in upright position. Tilt cleaner back so that it rests on the floor.Align post (A) on brush block with hole (B) on bottom of cleaner. Turn brushes slightly until post fits easily into hole.
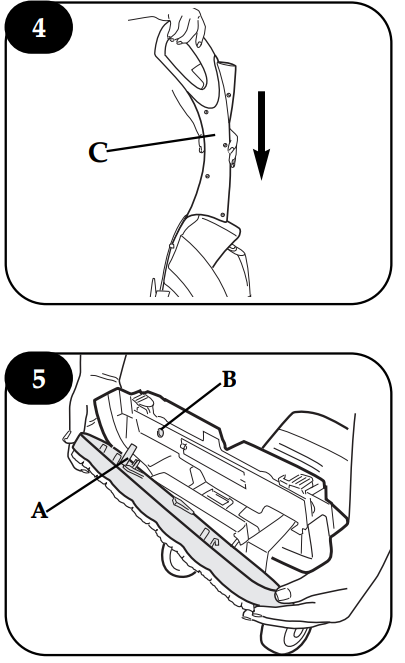
- Press brush assembly firmly to snap into place.
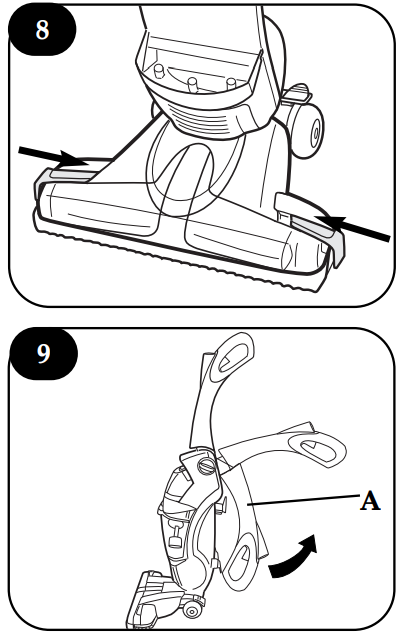
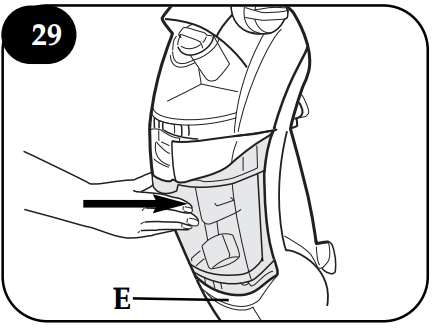
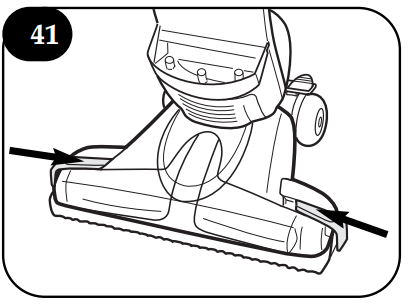
To install nozzle, make sure latches (C) are out. Align middle section (D) of nozzle with opening (E) on cleaner. Remove cardboard packing insert from squeegee area on underside of nozzle.
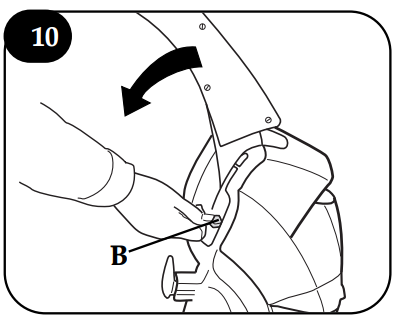
- While holding nozzle in place, slide latches inward to lock in place.
Unfold handle
Raise upper handle (A) to upright position until it locks in place.
How to fold the handle
Press upper handle release button (B) to fold handle to storage position.
Handle release pedal
Step on pedal (A) to lower handle to operating position. Handle does not lock into a single position, but “floats” to allow convenient operation.
ON/OFF switch
Push switch (A) once to turn cleaner ON. Push switch again to turn cleaner OFF.
Transporting
- To move your cleaner from room to room, put handle in upright position, tilt cleaner back on rear wheels and push forward.
- The cleaner may also be lifted using the carrying handle (A) on the front of the cleaner.
General operation of FloorMate 500 Hard Floor Cleaner
Your HOOVER FloorMate SpinScrub Cleaner can be used to both vacuum dry debris and wet clean non-carpeted floor surfaces such as vinyl, tile and sealed wood. It is not intended for use on carpet or rugs.
CAUTION: To prevent damage to wood floors, follow the flooring manufacturer’s cleaning recommendations.
If using cleaner on sealed wood floors, inspect floor surface for worn finish, bare wood or separated joints. Do not use FloorMate™ SpinScrub™ Cleaner to wet clean sealed wood floors if any of these conditions exist.
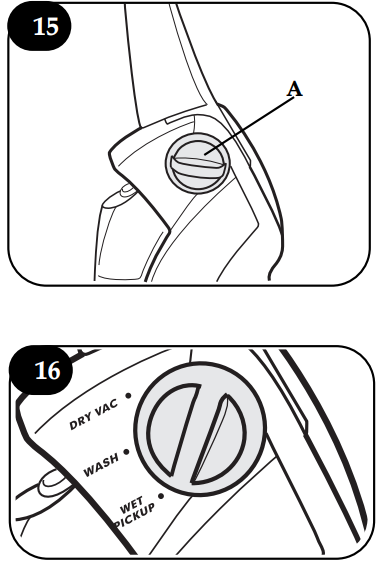
Mode selector dial
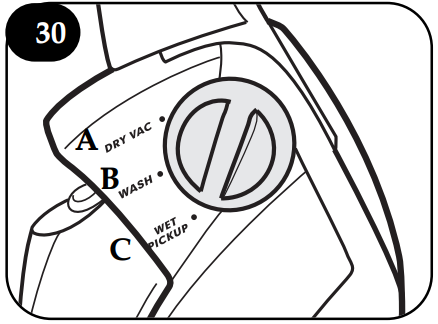
- The Mode selector dial (A) turns the brushes on and off.
For dry debris pickup, turn the dial to the DRY VAC position. In this position, the brushes will not rotate and are raised off the floor surface. To wet clean with brushes turned ON, turn the dial to the WASH position. For wet pickup, turn the dial to the WET PICK-UP position. Refer to “How to clean” section for complete cleaning instructions.
The tanks
Solution (upper) tank
The solution tank holds detergent and water that is to be dispersed onto the surface being cleaned.
How to fill
Disconnect cleaner from electrical outlet. Place cleaner handle in upright, locked position.
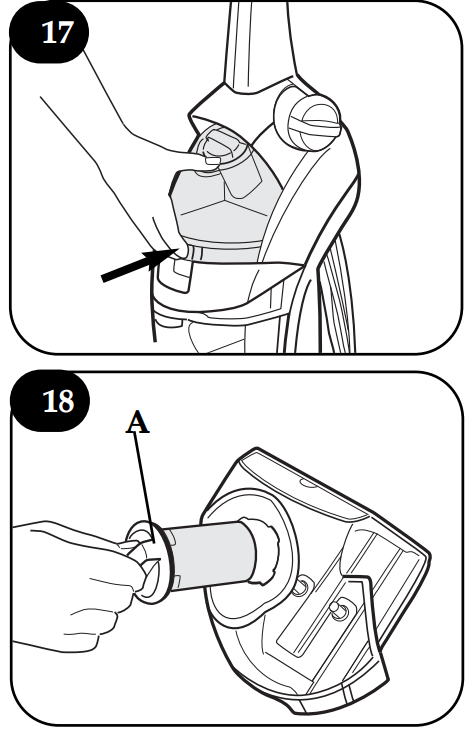
- To remove tank, squeeze release button and pull tank straight out.Carry tank to a sink.
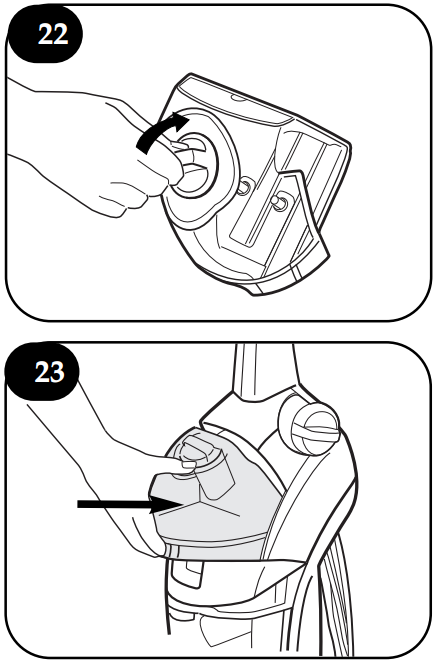
Rotate tank cap counter-clockwise and lift up to remove cap (A).
Turn cap (A) upside down to serve as a measuring cup.

For hard surface floors such as vinyl, linoleum, marble, laminate wood, polyurethane-sealed wood or other wood floors that can normally be cleaned using water, use one cup (2 oz.) HOOVER Floor to Floor Cleaner.
Check for worn spots or joint separations before using, as these conditions could lead to damaged flooring when using water to clean floor.
When cleaning ceramic and other tiles, use the set of grout brushes with gray bristles included with your FloorMate SpinScrub 500 Cleaner. Use these for tile floors where extra attention is needed for cleaning grout.(See “Cleaning the brushes” section for how to remove and replace the brush assemblies.)
Using cup, measure 1-1/2 cupfuls (3 oz.) of HOOVER Grout Cleaner. DO NOT use cleaning concentrates that contain solvent-based ingredients.
CAUTION: HOOVER Grout Cleaner cannot be used in Hoover SteamVac products. Doing so could damage your SteamVac Cleaner.
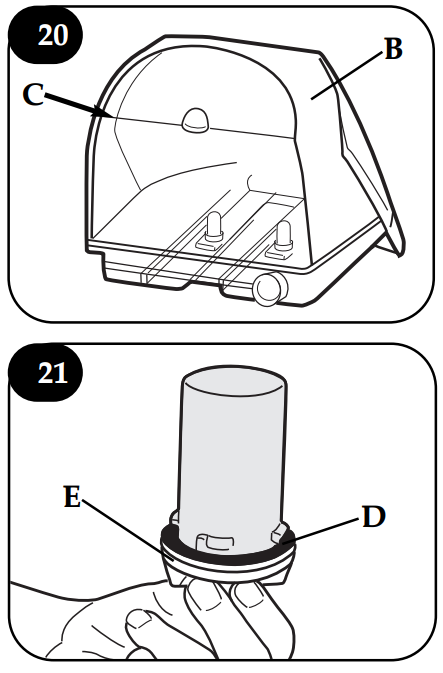
- Pour cleaning concentrate into tank (B). Fill tank to fill line (C) (1 quart) with warm water.
If rubber ring (D) on cap has become dislodged, reposition it with uneven side against ledge (E) as shown.
- Replace cap. Rotate cap clockwise until it locks in place. Cap must be locked in place for proper performance and to prevent leaking.
Slide tank straight into position until the latch snaps in place.
Recovery (lower) tank
Automatic shut-off
An automatic suction shut-off is built into the recovery tank to prevent the tank from overflowing.
When the shut-off activates, the cleaner will not pick up debris and the sound of the motor will change. The recovery tank is full and must be emptied.
How to empty
Turn cleaner off and disconnect from electrical outlet. Although not necessary for satisfactory performance, it is recommended that the recovery tank be emptied after dry vacuuming and before wet operation. Check the solution tank also. It may need to be refilled at this time.
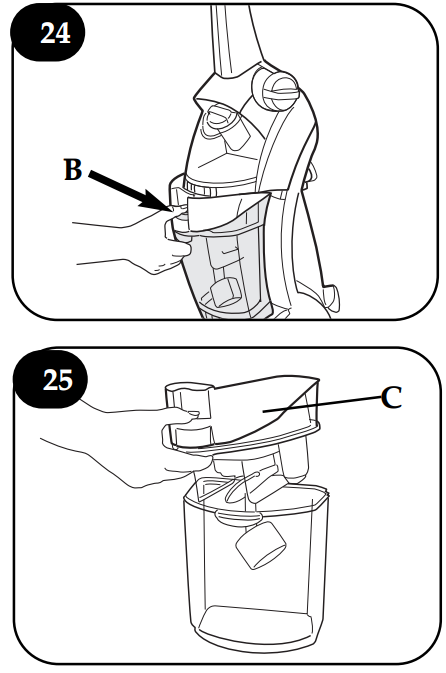
- To remove tank, press down on release button (B) and pull tank straight out.
Remove tank lid (C). Empty tank.
To clean filters
The tank lid contains a washable, reusable filter. Clean this filter when suction is low or reduced. Turn cleaner off and disconnect from electrical outlet.
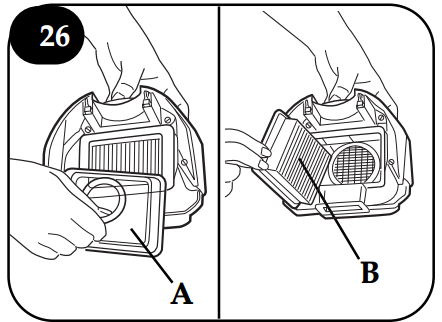
Remove recovery tank and lid (Figs. 24 & 25). Remove filter lid (A), then remove filter (B). Remove loose debris from filter by tapping the filter or gently brushing using your hand. The filter may also be rinsed for addition-al cleaning. Allow filter to air dry between uses. Reposition filter.
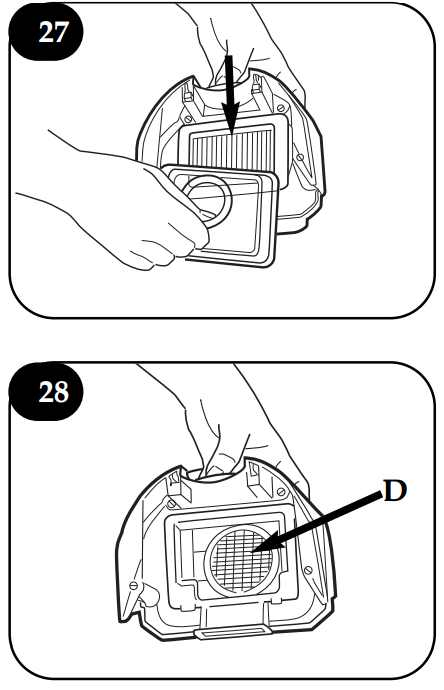
- Replace filter lid. Press down firmly until snapped in place. Dry or loose debris will also collect on the filter screen located in the tank lid.
To remove debris from screen, remove the pleated filter from the lid. Remove debris from screen (D).The filter screen may also be cleaned by rinsing it under running water. Reposition pleated filter in lid. Replace lid onto recovery tank, pressing down firmly until snapped in place.
To replace recovery tank, place bottom of tank behind ledge (E) and push tank straight into cleaner body until it is locked in place.
How to clean FloorMate 500 Hard Floor Cleaner
Recommended cleaning sequence
Use your HOOVER FloorMate SpinScrub 500 Cleaner to
- Dry Vacuum to remove loose dirt, hair and debris.
- Wet Clean the floor surface. The brushes will provide light agitation to help loosen dirt.
- Wet Pickup reduces drying time of the floor surface.
The Mode selector dial turns the brushes on and off.
For dry debris pickup, turn the dial to the DRY VAC position (A). In this position, the brushes will not rotate and are raised off the floor surface. To wet clean with brushes turned ON, turn the dial to the WASH position (B). For wet pickup, turn the dial to the WET PICKUP position (C).
Cleaning floors
NOTE: Your HOOVER FloorMate™ SpinScrub™ 500 cleaner may be used to clean wood floors that have been sealed with a polyurethane coating and can be cleaned with water.
CAUTION: To prevent damage to wood floors, follow the flooring manufacturer’s cleaning recommendations.
If using cleaner on sealed wood floors, inspect floor surface for the worn finish, bare wood or separated joints. Do not use FloorMate SpinScrub cleaner to wet clean sealed wood floors if any of these conditions exist.
- Set Mode selector dial to DRY VAC position and vacuum floor.
- Turn cleaner off and disconnect from electrical outlet. Empty recovery tank (see Figs. 24 & 25). Determine the type of brushes to be used (either gray for ceramic and other tiles or white for vinyl and sealed wood floors). See “Cleaning the brushes” for removing and replacing brushes.
- Fill solution tank with either Floor to Floor Cleaning Concentrate or Grout Cleaner, depend-ing upon the type of floor being cleaned, and water (see Figs. 17 through 23).
Do not use solvent based cleaning concentrates in your cleaner. Do not use any type of wax in your cleaner. - Turn Mode selector dial to WASH position.
- Dry hands and plug cleaner into a properly grounded outlet.
- Step on handle release pedal and lower handle to operating position. Turn cleaner ON.
To release solution, squeeze trigger (A) (Fig. 31). Slowly move cleaner forward and backward over area to be cleaned. Squeeze trigger to release solution as needed.
Overlap strokes by one inch to help prevent streaking. The cleaner’s suction will pick up the dirty solution throughout cleaning.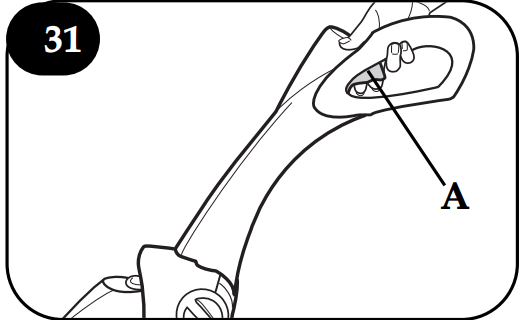
- To greatly enhance drying of the floor surface, release trigger
and turn Mode selector dial to the WET PICKUP position. Continue to move cleaner over the area to pick up the dirty solution. - To continue cleaning another area, turn Mode selector dial to WASH position. Repeat steps 7 through 9.
Note: When cleaning sealed wood floors, make sure all areas are completely dry. Ensure that no water remains on the floor.
Note: When switching between wet cleaning and wet pickup, it is not necessary to turn the cleaner off. Simply move the Mode selector dial between the two settings.
Empty recovery tank or clean the filter when the motor sound becomes higher in pitch and there is a loss of suction (see “Automatic shut-off” section).
Picking up spills
Your cleaner may also be used to pick up small liquid spills (1 quart or less, never to exceed 1/4 inch in depth) on non-carpeted floors. Turn Mode selector dial to the WET PICK-UP position and release the trigger. Continue to move cleaner over the area to pick up the spill.
Do not use the cleaner to pick up flammable or combustible liquids or chemicals. do not use the cleaner to pick up detergents that contain solvent based ingredients.
Storing the cleaner
Before storing cleaner
Turn cleaner OFF and disconnect from electrical outlet.
- Empty and rinse solution and recovery tanks. Allow to air dry.
- Press on upper handle release button to lower handle for storage.
- Make sure that nothing is pressing on the nozzle squeegee.
- Do not store cleaner on a wood surface unless cleaner is completely dry.
Maintenance of FloorMate 500 Hard Floor Cleaner
Cleaning the nozzle
Turn cleaner OFF and disconnect from electrical outlet. The cleaner’s nozzle can be removed for easy cleaning.
- Slide the two nozzle release latches (A) outward.
Remove nozzle (B) by pulling straight out.]
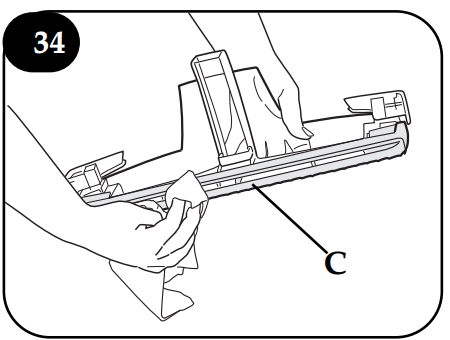
Rinse nozzle under running water. Remove debris from squeegee (C) and wipe with a damp cloth.
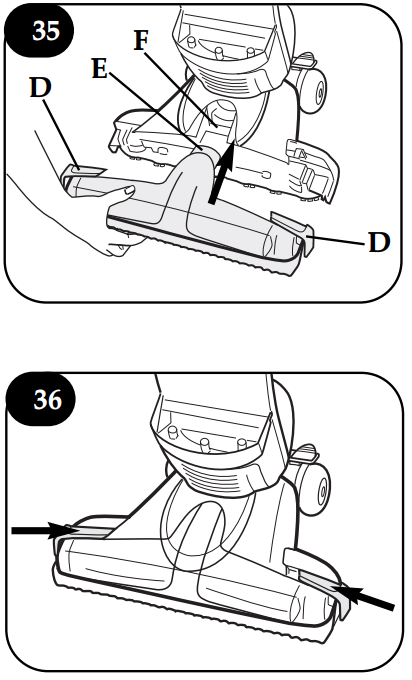
- To replace nozzle, make sure latches (D) are out.Cleaner should be in the upright position for easier assembly of the nozzle. Align middle section (E) of nozzle with opening (F) on cleaner.
While holding nozzle in place, slide latches inward to lock in place.
Cleaning the brushes
The brush assembly can be removed for easy cleaning. Turn cleaner OFF and disconnect from electrical outlet. Place handle in the upright position. Remove tanks to prevent leaking. Set aside.
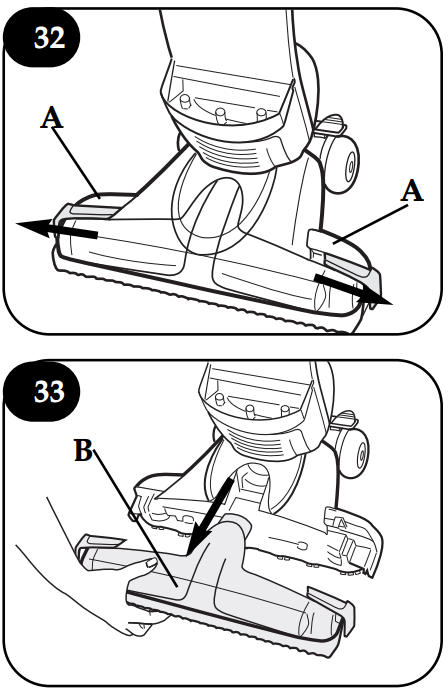
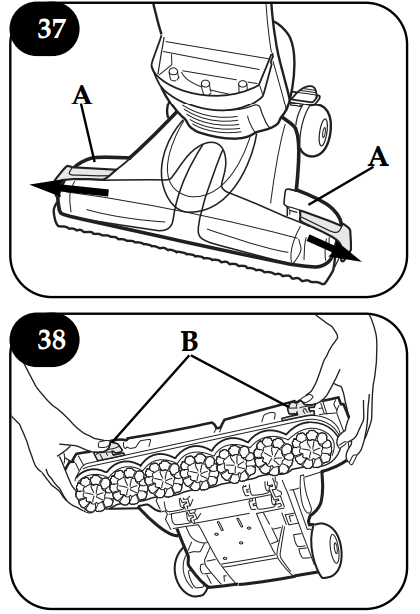
- Pull the two nozzle release buttons (A) out. Remove nozzle.Tilt the cleaner back so handle rests on floor.
Push two brush release buttons (B) and remove the brush assembly. The brushes can be washed with a mild detergent and rinsed. Do not use a solvent based detergent.
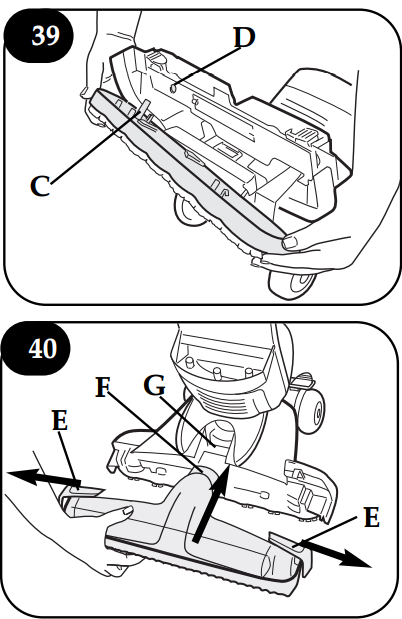
- To replace brushes, align post (C) on brush block with hole (D) on bottom of cleaner. Turn brushes slightly until postfits easily into hole. Press brush assembly firmly to snap into place.
Return cleaner to upright position. Replace nozzle, making sure latches (E) are out.Align middle section (F) of nozzle with opening (G) on cleaner.
While holding nozzle in place, slide the latches inward to lock in place. Replace tanks.
Troubleshooting of Hoover Hard Floor Cleaner
Use the list below to help solve minor problems.
| What’s the problem? | What to do |
|---|---|
| Cleaner won't run | ✓ Make sure the cleaner is plugged in firmly.<br>✓ Check the fuse or breaker. |
| Low suction | ✓ Empty the recovery tank; it may be full and the automatic shut-off engaged.<br>✓ Make sure filter and filter lid are properly positioned.<br>✓ Make sure tanks are locked in place.<br>✓ Check the filter and clean if dirty.<br>✓ Make sure nozzle is replaced properly and locked. |
| Water puddling behind cleaner | ✓ Use recommended detergents to reduce excess foaming.<br>✓ Make sure solution tank is installed properly.<br>✓ Empty recovery tank. |
| Won't pick up dirty solution | ✓ Check Mode selector dial to ensure it is set for WET PICKUP.<br>✓ Make sure recovery tank is installed properly.<br>✓ Empty recovery tank.<br>✓ Make sure filter and filter lid are properly positioned. |
| Cleaner pushes a line of dry debris in front of it | ✓ Check Model selector dial to ensure it is set for DRY VAC.<br>✓ Tip nozzle off floor by pushing down on handle to pick up debris that is too large to clear the squeegee. |
| Cleaning solution won't dispense | ✓ Make sure solution tank is locked in position.<br>✓ Refill the solution tank if it is empty. |
| Brushes won't rotate | ✓ Check Mode selector dial to ensure it is set for WASH.<br>✓ Reset circuit breaker:<br>1) Push ON/OFF switch to turn cleaner OFF.<br>2) Unplug the cleaner.<br>3) Wait one minute.<br>4) Plug the cleaner into electrical outlet.<br>5) Push the ON/OFF switch again to turn the cleaner ON.<br>If brushes continue to stall and the breaker trips again, clean the brushes to remove debris. |
Lubrication
The motor is equipped with bearings that contain sufficient lubrication for the life of the motor. The addition of lubricant could cause damage. Do not add lubricant to motor bearings.
Warranty of Hoover FloorMate 500
Your Hoover FloorMate 500 Hard Floor Cleaner appliance is warranted in normal household use, in accordance with the Owner’s Manual against original defects in material and workmanship for a period of one full year from the date of purchase. This warranty provides, at no cost to you, all labor and parts to place this appliance in the correct operating condition during the warranted period.
Pros & Cons of Hoover FloorMate 500 Hard Floor Cleaner
Pros
- Versatile: Cleans all hard floor surfaces, from tile and vinyl to hardwood and laminate.
- Powerful: SpinScrub brushes loosen and lift dirt and grime for a deep clean.
- Easy to Use: Advanced water control system and dual tank system make cleaning a breeze.
- Lightweight: Weigh only 12.5 pounds for easy maneuvering and carrying.
Cons
- May not be suitable for cleaning carpets or rugs.
- May require frequent emptying for larger cleaning jobs.
- Spinning brushes may not be as effective on heavily textured surfaces.
Customer Reviews about Hoover FloorMate 500 Hard Floor Cleaner
Customers love the Hoover FloorMate Hard Floor Cleaner for its versatility, ease of use, and powerful cleaning capabilities. However, some users have reported issues with the spinning brushes clogging with hair and debris, and the machine requiring frequent emptying for larger cleaning jobs. Overall, the Hoover FloorMate 500 Hard Floor Cleaner has received positive reviews and is a highly recommended product for anyone looking to simplify their floor cleaning routine.
Faqs
What is the hard floor cleaner Hoover FloorMate 500?
What is the initial protocol for utilizing the Hoover FloorMate 500?
Can I use any kind of hard floor with the Hoover FloorMate 500?
Which kinds of cleaning agents work well with the FloorMate 500?
How frequently should I clean my Hoover FloorMate 500's tanks and brushes?
What is causing the streaks on the floor left by my Hoover FloorMate 500?
How should I proceed if the FloorMate 500's suction is lessened?
How can I switch between the FloorMate 500's modes?
Can I use the Hoover FloorMate 500 to vacuum?
How long is the Hoover FloorMate 500 Hard Floor Cleaner warranty?
Leave a Comment