Set-up Details: Hp LaserJet Pro M402-M403 Usage Guide
Content
Introduction
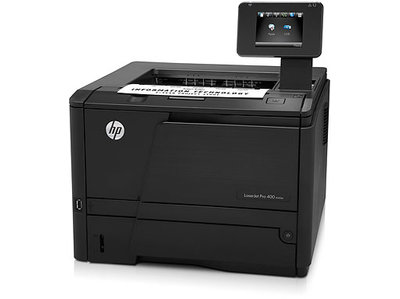
The hp LaserJet Pro M402-M403 is a high-performance monochrome laser printer designed for small to medium-sized businesses. With its fast printing speed and advanced features, it is ideal for improving productivity and efficiency in any office environment.
Specifications
- Print Technology: Laser
- Print Speed: Up to 40 ppm
- Print Resolution: 1200 x 1200 dpi
- First Page Out Time: As fast as 5.6 seconds
- Input Capacity: Up to 350 sheets
- Output Capacity: Up to 150 sheets
- Connectivity: USB 2.0, Ethernet
- Wireless: Optional
- Mobile Printing Capability: HP ePrint, Apple AirPrint, Mopria-certified
- Supported Operating Systems: Windows, Mac, Linux
Step 1: Checking
HP LaserJet Pro M402, M403 Getting Started Guide is about checking the package contents. It includes verifying that all the parts and accessories such as the printer itself, toner cartridge, power cord, USB cable, and getting started guide are included.
Step 2: Remove Packaging Material
Step 2 involves removing all packaging materials from the printer. This means taking off any tapes and packing materials from the outside and inside of the printer, including removing the protective film on the printer control panel. It is important to follow these steps carefully to ensure that all packaging materials are disposed of properly and the printer is ready for setup.
Step 3: Initial setup on the control panel
After turning on the printer, wait for it to initialize. Follow the prompts and use the arrow keys on the control panel to configure these settings:
• Language
• Location
• Default settings: Under Default Settings select one of these options:
• Self-managed: Optimized default settings for a guided experience on setups, configurations, and updates.
• IT-managed: optimized default settings for fleet manageability with enhanced security.
Step 4: Select a connection method and prepare for software installation
 USB connection directly between the printer and the computer
Use an A-to-B type USB cable.
Windows
- For Windows 7 or lower, do not connect the USB cable before installing the software. The installation process prompts to connect the cable at the appropriate time. If the cable is already connected, restart the printer when installation prompts to connect the cable.
- Continue with “5. Locate or download the software installation files.”
 NOTE: During software installation, select the option to Directly connect this computer using a USB cable.
Mac
- For Mac, connect the USB cable between the computer and the printer before installing the software.
- Continue with “5. Locate or download the software installation files.”
Wired (Ethernet) network connection  Use a standard network cable
- Connect the network cable to the printer and to the network. Wait a few minutes for the printer to acquire a network address.
- On the printer control panel, press the OK button. Open the Network Setup menu. The control panel will show the IP address by default. Note the IP address for use during software installation. Example IP address: 192.168.0.1
If the printer does not display the network address on the Home screen, manually configure the IP address on the control panel. To manually configure the IP address, see “Manually configure the IP address.” - Continue with “5. Locate or download the software installation files.” NOTE: During software installation, select the option to Connect through a network.
 Built-in wireless network connection (dw wireless model only)
1. To connect the printer to a wireless (Wi-Fi) network, make sure that the printer, access point, and computer are all turned on, and that the computer is connected to the wireless network.
2. A USB cable will be required.
3. Disconnect any USB or Ethernet cable that is connected to the printer.
4. To print from a computer, continue to “5. Locate or download the software installation files.”
 Manually configure the IP address
For information on how to manually configure the IP address, see the printer User Guide www.hp.com/support/ljM402 or www.hp.com/support/ljM403.
Step 5: Locate or download the software installation files
 Method 1: Download from HP Easy Start (Windows and OS X)
- Go to 123.hp.com/laserjet, and click Download.
- Follow the onscreen instructions and prompts to save the file to the computer.
- Launch the software file from the folder where the file was saved, and continue with “6. Install the software.”
Method 2: Download from printer support Web site (Windows and OS X)
- Go to www.hp.com/support/ljM402 or www.hp.com/support/ljM403.
- Select Software and drivers.
- Download the software for your printer model and operating system.
- Launch the installation file by clicking on the .exe or .zip file as necessary, and continue with “6. Install the software.”
 Method 3: Install from the printer CD (Windows only)
- Insert the printer CD into the computer.
- Continue with “6. Install the software.”
Step 6: Install the software
Windows solution
- Insert the printer CD into the computer, or launch the software installation file downloaded from the Web.
- The software installer detects the language of the operating system, and then it displays the main menu of the installation program in the same language. When installing from the CD, if the installer program does not start after 30 seconds, browse the CD drive on the computer and launch the file named SETUP.EXE.
- The Software Selection screen details the software to be installed.
- The recommended software installation includes the print driver and software for all available printer features.
- To customize the software installed, click the Customize software selections link. When finished, click the Next button.
- Follow the on-screen instructions to install the software.
- When prompted to select a connection type, select the appropriate option for the type of connection:
- Directly connect this computer using a USB cable
- Connect through a network
- Help me set up a first-time wireless connection
NOTE: When connecting through a network, the easiest way to detect the printer is to select Automatically find my printer on the network.NOTE: For wireless installation, select the option to Help me set up a first-time wireless connection, and then select Yes, retrieve the wireless settings on my computer.
OS X solution
- The software installer detects the language of the operating system, and then it displays the main menu of the installation program in the same language.
- Follow the on-screen instructions to install the software.
- At the end of the software installation process, use the HP Utility Setup Assistant to configure printer options.
Step 7:  Mobile and wireless printing (optional)
7.1 Connect the device to the wireless network
To print from a phone or tablet, connect the device to the same wireless network as the printer.
Apple iOS devices (AirPrint): Open the item to print, and select the Action icon. Select Print, select the printer, and then select Print.
Newer Android devices (4.4 or newer): Open the item to print, and select the Menu button. Select Print, select the printer, and select Print.
Some devices require downloading the HP Print Service plugin app from the Google Play store.
Older Android Devices (4.3 or older): Download the HP ePrint app from the Google Play store.
Windows Phone: Download the HP AiO Remote app from the Windows Store.
Learn more about mobile printing
To learn more about other mobile printing options, including additional ePrint solutions, scan the QR code, or see the “Mobile printing” section of the User Guide.,

7.2 Wi-Fi Direct (dw wireless model only)
Wi-Fi Direct enables close-proximity printing from a wireless mobile device directly to an Wi-Fi Direct-enable printer without requiring a connecting to a network or the Internet.NOTE: The printer might require a firmware update to use this feature.
Enable Wi-Fi Direct
- Print a Network Configuration Page to identify the printer IP address. On the control panel, press and hold the Cancel (X) button until the ready light starts to blink, and then release the button. The test page prints.
- Enter the printer IP address into the address line of your Web browser. The Embedded Web Server (EWS) screen displays. Example IP address: 192.168.0.0
- Click the Networking tab.
- Click Wi-Fi Direct Setup.
- Select the check box next to Wi-Fi Direct Printing Name (SSID), and then enter the network name SSID in the field.
- Click Apply. The IP address of the mobile device displays on the Networking tab.
NOTE: To find the network name (SSID), click the Wireless Configuration menu from the Networking tab. For more information on wireless printing and wireless setup, go to www.hp.com/go/wirelessprinting.
Step 8:  Set up HP ePrint via email (optional)
Use HP ePrint via email to print documents by sending them as an email attachment to the printer’s email address from any email enabled device, even from devices that are not on the same network.
To use HP ePrint via email, the printer must meet these requirements:
- The printer must be connected to a wired or wireless network and have Internet access.
- HP Web Services must be enabled on the printer, and the printer must be registered with HP Connected.
Enable HP Web Services (n and dw models only)
- On the printer control panel, press the OK button.
- Scroll to the HP Web Services menu, and press the OK button.
- Scroll to the Print Information Sheet option, and press the OK button.
The information page contains the printer code that you use to registger your HP printer at HP Connected. - Go to www.hpconnected.com to create an HP ePrint account and complete the setup process.
Instructions
- Unpack the printer and remove all packaging materials.
- Connect the power cord to the printer and plug it into a power outlet.
- Install the toner cartridge and load paper into the input tray.
- Connect the printer to your computer using the provided USB cable or set it up on your network.
- Install the printer driver and software on your computer.
- Follow the on-screen instructions to complete the setup process.
Settings are fully customizable after initial setup.
Description
The hp LaserJet Pro M402-M403 is a compact and reliable printer that delivers high-quality prints with sharp text and clear graphics. It features a user-friendly control panel and a 2-line LCD display for easy navigation and operation. With its fast printing speed and automatic duplex printing, it helps save time and paper. The printer also supports mobile printing, allowing you to print from your smartphone or tablet. With its durable construction and energy-efficient design, the hp LaserJet Pro M402-M403 is built to last and can handle heavy-duty printing tasks.
Faqs
How do I install the toner cartridge?
Can I print wirelessly from my mobile device?
What is the maximum paper size supported by this printer?
Does this printer support automatic duplex printing?
Is this printer compatible with Mac computers?
Can I print directly from a USB flash drive?
What is the monthly duty cycle of this printer?
Does this printer support color printing?
Is the printer compatible with Linux operating systems?
What is the warranty period for this printer?
Leave a Comment