
Settings & Usage: Hp Wireless Barcode Scanner User Manual
Content
HP Wireless Barcode Scanner
Introduction
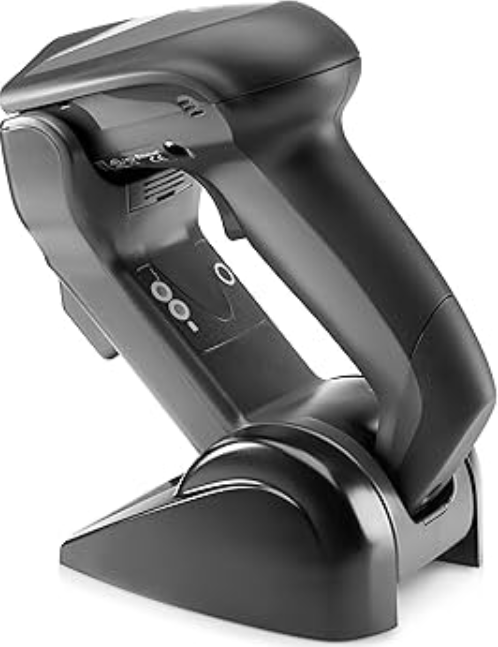
The HP Wireless Barcode Scanner is a versatile and efficient tool for businesses that require accurate and speedy barcode scanning. With its wireless connectivity, it offers flexibility and ease of use in various environments.
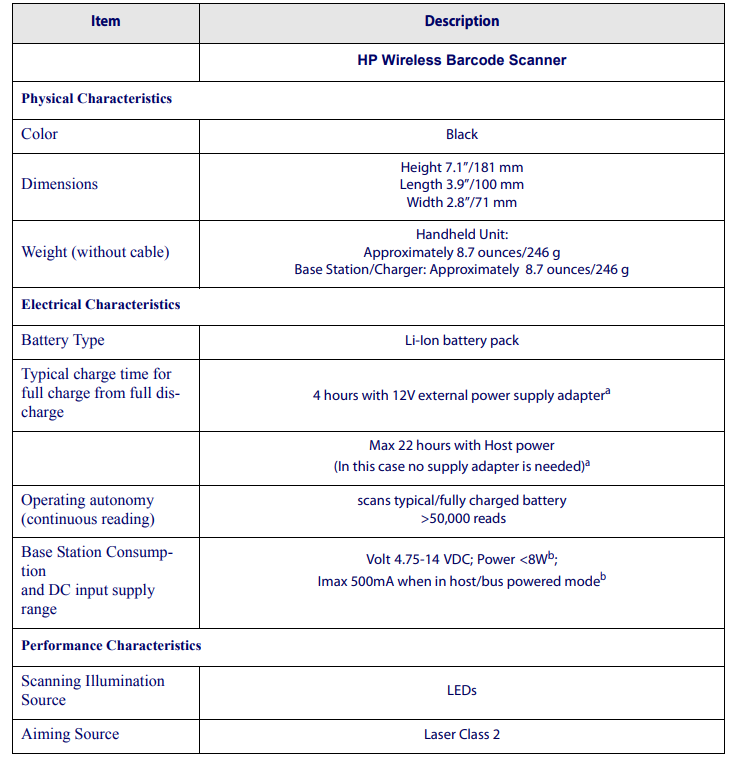
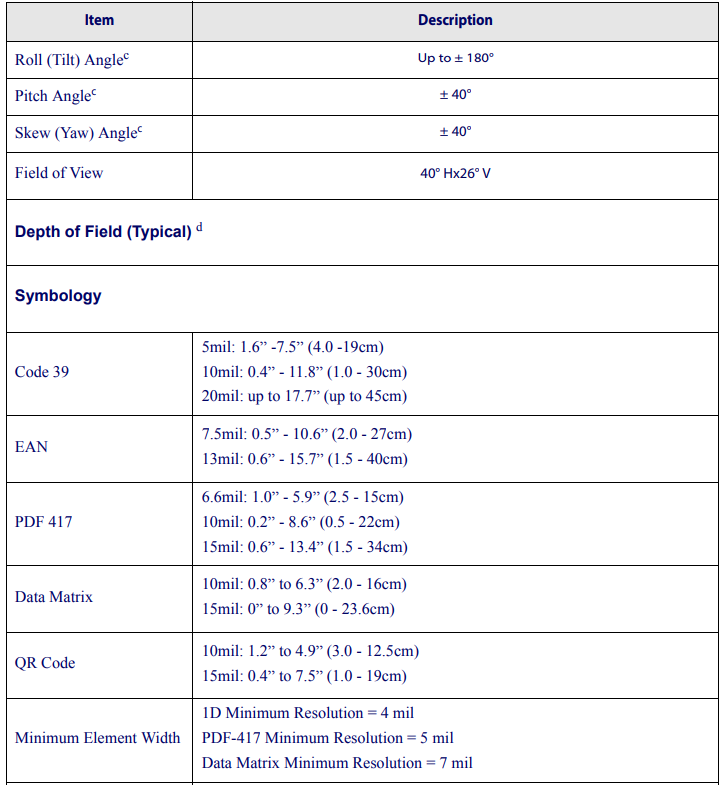
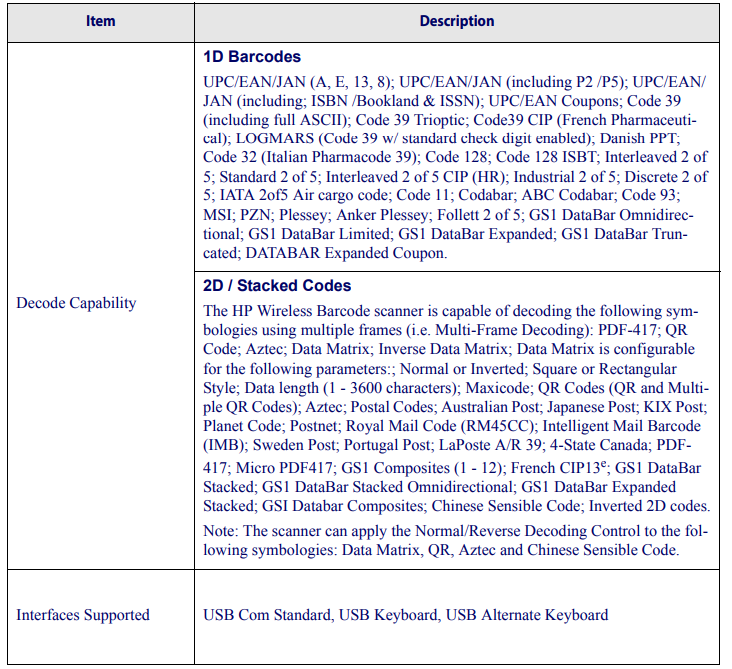
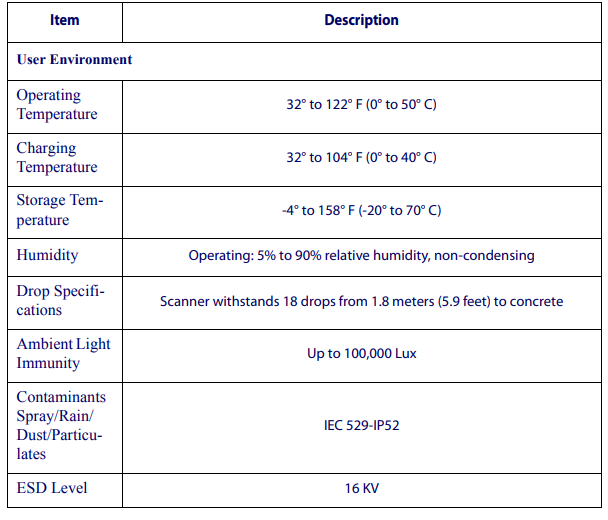
Specification
Instructions
- Charge the scanner fully before first use.
- Turn on the scanner by pressing the power button.
- Pair the scanner with your device via Bluetooth.
- Open the barcode scanning app on your device.
- Aim the scanner at the barcode and press the trigger button.
- The scanner will emit a beep to indicate a successful scan.
- Repeat the process for each barcode you need to scan.
- To turn off the scanner, press and hold the power button.
Unpacking
Check carefully to ensure the scanner and any accessories ordered are present and undamaged. If any damage occurred during shipment, contact HP Technical Support. Information is shown on page 2.
KEEP THE PACKAGING. Should the unit ever require service, it should be returned in its original shipping container.
Setting Up the Scanner
Follow the steps provided in this section to connect and get your scanner up and communicating with its host.
- Refer to the HP Wireless Barcode Scanner User Guide for instructions on connecting the base station.
- Go to Interface Selection and set the desired interface.
- Configure Interface Settings (only if not using factory settings for that interface).
- Go to Configuring Other Features (if modifications are needed from factory settings).
Connecting the Base when the Security Pin is Enabled
When connecting the Base to a system that has a custom Security Pin enabled, follow the steps below in the order shown:
- Power down the host system.
- Connect the appropriate interface cable to the Base.
- Place the scanner in the Base.
- Power up the host. The scanner will link to the Base
- When the host completely powers up, a new custom Security Pin Code may be sent to the scanner and Base, depending on host configuration. Contact HP Technical Support for more information.
Linking the Scanner to a Base Station
For the HP Wireless Barcode Scanner, before configuring the interface, it is necessary to link the handheld scanner with the base. To link the handheld and the base, press the trigger to wake it and place it on the base. If the scanner was previously linked to another base, you must first scan the Unlink action command before re-linking to the new base.
Important: The mandatory condition for establishing a new link between a BT handheld and a BT base is that the handheld is unlinked and they share the same security configuration. A successful link is indicated by three ascending tones from the scanner. A high-low-high-low tone indicates the link attempt was unsuccessful. A single green LED flash after this tone indicates no Base Station was discovered. Two green LED flashes after this tone indicate that more than one Base Station was discovered, and the scanner did not link. Three LED flashes after this tone indicate a security error.
Linking the BT Scanner to a PC
The scanner can optionally be linked to a Bluetooth-enabled PC with the serial port profile, in either server mode or client mode.
Linking to a PC in Server Mode (BT Slave Mode)
To link a BT scanner in server mode to a Bluetooth-enabled PC, follow these steps:
- Install any drivers provided with the Bluetooth adapter.
- Scan the barcode below to make the scanner visible to the host computer.
- Use the host computer’s Bluetooth manager to “Discover new devices” and select "HP Wireless Barcode Scanner." If you receive an error message, it may be necessary to disable security on the device.
- Select “connect” on the PC to link the scanner to the PC. Use a host terminal program to see incoming data on the port designated by the computer's Bluetooth manager.
Linking to a PC in Client Mode (BT Master Mode)
The scanner can optionally be linked in client mode to a Bluetooth-enabled PC with the serial port profile. To do this, follow these steps:
- Ensure the PC or terminal can network with Bluetooth devices and that it is powered on.
- Ensure that a COM port is assigned under Services within the Bluetooth setup menu.
- Create a Link label that contains the address of the PC Bluetooth adapter.
- The Bluetooth address can be found under "Properties" in the Bluetooth setup menu.
- NOTE
The link label is a Code 128 function 3 label with the following format: - <FN3 char>LnkB<12 character Bluetooth address>
- NOTE
- Scan the link label you created in step 3.
Power Off
Shuts off power to the BT handheld until the ext trigger pull.
Interface Selection
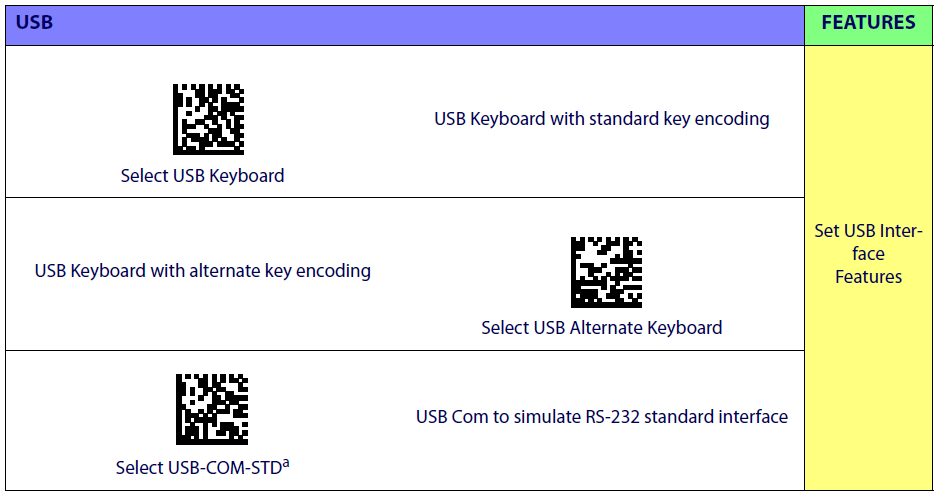
Upon completing the physical connection between the scanner and its host, proceed to Table 1 below to select the interface type (if needed to change for a specific application). Scan the appropriate barcode in that section to configure your system’s correct interface type.
The scanner supports a USB interface with types HID Keyboard and COM.
Setting the Interface
Scan the programming barcode from this section, which selects the appropriate interface type matching the system the scanner will be connected to. Next, proceed to the corresponding section in this manual (also listed in Table 1 below) to configure any desired settings and features associated with that interface.
- Unlike some programming features and options, interface selections require that you scan only one programming barcode label. DO NOT scan an ENTER/EXIT barcode before scanning an interface selection barcode.
- Some interfaces require the scanner to start in the disabled state when powered up. If additional scanner configuration is desired while in this state, pull the trigger and hold it for five seconds. The scanner will change to a state that allows programming with barcodes.
Table 1. USB Interfaces
Download the correct USB-C driver from the HP website.
Customizing Configuration Settings
Configure Interface Settings
- If, after scanning the interface barcode from the previous table, your installation requires you to select options to further customize your scanner, turn to "Configuration Parameters" starting on page 11.
Global Interface Features
See "Global Interface Features" on page 13 for settings configurable by all interface types.
Configuring Other Features
- If your installation requires different programming than the default settings, the following sections of this manual allow configuration of non-interface-specific settings you might require:
- Reading Parameters: Reading Parameters include programming for scanning, beep,r and LED indicators,r s, and other universal settings.
- 1D Symbologies: Includes options concerning the barcode label types (symbologies). These settings allow you to enable/disable symbologies, set label lengths, require a check digit, etc.
- WIRELESS-SPECIFIC FEATURES: Contains programming options pertaining specifically to wireless operation.
Software Version Transmission
The software version of the device can be transmitted through the host interface by scanning the following label.
Resetting the Product Configuration to Defaults
Restore Custom Defaults
If you aren’t sure what programming options are in your imager, or you’ve changed some options and want to restore the Custom Default Configuration that may have been saved in the scanner, scan the Restore Custom Default Configuration barcode below. This will restore the custom configuration for the currently active interface.
Custom defaults are based on the interface type. Configure the imager for the correct interface before scanning this label.
Faqs
How do I pair the scanner with my device?
Can I use the scanner with my smartphone?
What is the battery life of the scanner?
Is the scanner capable of scanning 2D barcodes?
How far can the scanner be from the connected device?
Can the scanner be used while charging?
Does the scanner come with a warranty?
Can the scanner be used in low-light environments?
Is the scanner compatible with Mac computers?
Does the scanner require any additional software to function?
More hp manuals
- Set-up Details: Hp LaserJet Pro M402-M403 Usage Guide
- Set-up: Hp Scanjet Professional 3000 EN Scanner User Guide | Specifications
- Operations & Features: Hp Chromebook 14a-na0150nr User Guide
- Settings & Connections: Hp x2 Detachable 10-p0XXHP PC User Guide
- Control Panels & Features: Hp DeskJet 4100e All-in-one Series User Guide
- Specifications & Connection: Hp DeskJet 1110 Series User Guide
Leave a Comment